ProGuard - Welding machine Cigweld - Free user manual and instructions
Find the device manual for free ProGuard Cigweld in PDF.

User questions about ProGuard Cigweld
0 question about this device. Answer the ones you know or ask your own.
Ask a new question about this device
Download the instructions for your Welding machine in PDF format for free! Find your manual ProGuard - Cigweld and take your electronic device back in hand. On this page are published all the documents necessary for the use of your device. ProGuard by Cigweld.
USER MANUAL ProGuard Cigweld
natural_image
Black PROGUARD welding helmet with visible purple screen and control buttons (no text or symbols on body)PROGUARD
ProGuard Welding Helmet
OPERATING MANUAL
CIGWELD
AN ESAB® BRAND
WE APPRECIATE YOUR BUSINESS!
Congratulations on your new Cigweld product. We are proud to have you as our customer and will strive to provide you with the best service and reliability in the industry. This product is backed by our extensive warranty and world-wide service network. To locate your nearest distributor or accredited service provider call +1300 654 674, or visit us on the web at www.cigweld.com.au
This Operating Manual has been designed to instruct you on the correct use and operation of your CIGWELD product. Your satisfaction with this product and its safe operation is our ultimate concern. Therefore please take the time to read the entire manual, especially the Safety Precautions. They will help you to avoid potential hazards that may exist when working with this product.
We have made every effort to provide you with accurate instructions, drawings, and photographs of the product(s) while writing this manual. However errors do occur and we apologize if there are any contained in this manual.
Due to our constant effort to bring you the best products, we may make an improvement that does not get reflected in the manual. If you are ever in doubt about what you see or read in this manual with the product you received, then check for a newer version of the manual on our website or contact our customer support for assistance.
YOU ARE IN GOOD COMPANY!
The Brand of Choice for Contractors and Fabricators Worldwide.
CIGWELD is the Market Leading Brand of Arc Welding Products for ESAB. We are a mainline supplier to major welding industry sectors in the Asia Pacific and emerging global markets including; Manufacturing, Construction, Mining, Automotive, Engineering, Rural and DIY.
We distinguish ourselves from our competition through market-leading, dependable products that have stood the test of time. We pride ourselves on technical innovation, competitive prices, excellent delivery, superior customer service and technical support, together with excellence in sales and marketing expertise.
Above all, we are committed to develop technologically advanced products to achieve a safer working environment for industry operators.

WARNINGS
Read and understand this entire Manual and your employer's safety practices before installing, operating, or servicing the equipment.
While the information contained in this Manual represents the Manufacturer's best judgement, the Manufacturer assumes no liability for its use.
Auto-Darkening Welding Helmet
Instruction Manual Number 0-5585 for:
ProGuard Auto Darkening Welding Helmet Part Number 454641
Published by:
CIGWELD Pty. Ltd
71 Gower Street
Preston, Victoria, Australia, 3072
www.cigweld.com.au
Copyright 2020 by
CIGWELD
All rights reserved.
A reproduction of this work, in whole or in part, without written permission of the publisher is prohibited.
The publisher does not assume and hereby disclaims any liability to any party for any loss or damage caused by any error or omission in this Manual, whether such error results from negligence, accident, or any other cause.
Publication Date: 10-20-2020
Revision Date:
Record the following information for Warranty purposes:
Where Purchased: ____
Purchase Date: ____
Table of Contents
SECTION 1: ARC WELDING SAFETY INSTRUCTIONS AND WARNINGS....5
1.01 Safety Instructions....5
1.02 Declaration of Conformity....7
1.03 Limited Warranty 8
SECTION 2: INTRODUCTION ...... 10
2.01 How to Use This Manual....10
2.02 Equipment Identification 10
2.03 Receipt of Equipment....10
SECTION 3: GENERAL INFORMATION .... 10
3.01 ProGuard Auto-Darkening Welding Helmet....10
3.02 User Responsibility....11
SECTION 4: PERSONAL PROTECTION .... 11
SECTION 5: SPECIFICATIONS.... 12
5.01 ProGuard Auto-Darkening Filter Lens 12
5.02 Range of Application....12
5.03 Contents 13
SECTION 6: OPERATION....13
6.01 Adjustment of headgear....13
6.02 Performance....13
6.03 How to Set Shade 13
6.04 Switching Grind Mode / Welding Mode 14
6.05 How to Replace Battery....14
6.06 Replacing the Outer Cover Lens....15
6.07 Before Using the Filter 15
6.08 Range of use for the ProGuard 15
6.09 Setting the delay 16
6.10 Filter Testing 16
SECTION 7: SERVICE AND MAINTENCE....17
SECTION 8: SPARE PARTS ...... 18
SECTION 9: BASIC TROUBLESHOOTING .... 19
SECTION 1: Arc Welding Safety Instructions and Warnings
WARNING
ARC WELDING can be hazardous.
Protect yourself and others from possible serious injury or death. Keep children away. Do not lose these instructions. Read operating / instruction manual before installing, operating or servicing this product.
Welding products and welding processes can cause serious injury or death, or damage to other equipment or property, if the operator does not strictly observe all safety rules and take precautionary actions.
Safe practices have developed from past experience in the use of welding and cutting. These practices must be learned through study and training before using this equipment. Anyone not having extensive training in welding and cutting practices should not attempt to weld. Certain practices apply to equipment connected to power lines; other practices apply to engine driven equipment.
Safe practices are outlined in the American National Standard Z49.1 entitled: SAFETY IN WELDING AND CUTTING. This publication and other guides to what you should learn before operating this equipment are listed at the end of these safety precautions.
HAVE ALL INSTALLATION, OPERATION, MAINTENANCE, AND REPAIR WORK PERFORMED ONLY BY QUALIFIED PEOPLE.
1.01 Safety Instructions
ELECTRIC SHOCK can kill.
Touching live electrical parts can cause fatal shocks or severe burns. The electrode and work circuit is electrically live whenever the output is on. The input power circuit and machine internal circuits are also live when power is on. In semiautomatic or automatic wire welding, the wire, wire reel, drive roll housing, and all metal parts touching the welding wire are electrically live. Incorrectly installed or improperly grounded equipment is a hazard.
- Do not touch live electrical parts.
- Wear dry, hole-free insulating gloves and body protection.
- Insulate yourself from work and ground using dry insulating mats or covers.
- Disconnect input power or stop engine before installing or servicing this equipment. Lock input power disconnect switch open, or remove line fuses so power cannot be turned on accidentally.

ARC RAYS can burn eyes and skin;
NOISE can damage hearing.
Arc rays from the welding process produce intense heat and strong ultraviolet rays that can burn eyes and skin. Noise from some processes can damage hearing.
- Properly install and ground this equipment according to its Owner's Manual and national, state, and local codes.
- Turn off all equipment when not in use. Disconnect power to equipment if it will be left unattended or out of service.
- Use fully insulated electrode holders. Never dip holder in water to cool it or lay it down on the ground or the work surface. Do not touch holders connected to two welding machines at the same time or touch other people with the holder or electrode.
- Do not use worn, damaged, undersized, or poorly spliced cables.
- Do not wrap cables around your body.
- Ground the workpiece to a good electrical (earth) ground.
- Do not touch electrode while in contact with the work (ground) circuit.
- Use only well-maintained equipment. Repair or replace damaged parts at once.
- In confined spaces or damp locations, do not use a welder with AC output unless it is equipped with a voltage reducer. Use equipment with DC output.
- Wear a safety harness to prevent falling if working above floor level.
-
Keep all panels and covers securely in place.
-
Use a Welding Helmet or Welding Faceshield fitted with a proper shade of filter (see ANSI Z49.1 and AS 1674 listed in Safety Standards) to protect your face and eyes when welding or watching.
- Wear approved safety glasses. Side shields recommended.
- Use protective screens or barriers to protect others from flash and glare; warn others not to watch the arc.
- Wear protective clothing made from durable, flame-resistant material (wool and leather) and foot protection.
- Use approved ear plugs or ear muffs if noise level is high.

WELDING can cause fire or explosion.
Sparks and spatter fly off from the welding arc. The flying sparks and hot metal, weld spatter, hot work piece, and hot equipment can cause fires and burns. Accidental contact of electrode or welding wire to metal objects can cause sparks, over heating, or fire.
- Protect yourself and others from flying sparks and hot metal.
- Do not weld where flying sparks can strike flammable material. Remove all flammables within 35ft (10.7 m) of the welding arc. If this is not possible, tightly cover them with approved covers.

Flying sparks and hot metal can cause Injury.
Chipping and grinding cause flying metal. As welds cool, they can throw off slag.
- Wear approved face shield or safety goggles. Side shields recommended.

CYLINDERS can explode if damaged.
Shielding gas cylinders contain gas under high pressure. If damaged, a cylinder can explode. Since gas cylinders are normally part of the welding process, be sure to treat them carefully.
- Protect compressed gas cylinders from excessive heat, mechanical shocks, and arcs.
- Install and secure cylinders in an upright position by chaining them to a stationary support or equipment cylinder rack to prevent falling or tipping.
KEEP BATTERIES OUT OF REACH OF
CHILDREN
- Swallowing may lead to serious injury in as little as 2 hours or death, due to chemical burns and potential perforation of the oesophagus.
- If you suspect your child has swallowed or inserted a button battery immediately call the 24-hour Poisons Information Centre in Australia on 13 11 26 for fast, expert advice.
- Examine devices and make sure the battery compartment is correctly secured, e.g. that the screw or other mechanical fastener is tightened. Do not use if compartment is not secure.
- Dispose of used button batteries immediately and safely. Flat batteries can still be dangerous.
-
Tell others about the risk associated with button batteries and how to keep their children safe.
-
Be alert that welding sparks and hot materials from welding can easily go through small cracks and openings to adjacent areas.
- Watch for fire, and keep a fire extinguisher nearby.
- Be aware that welding on a ceiling, floor, bulkhead, or partition can cause fire on the hidden side.
- Do not weld on closed containers such as tanks or drums.
- Connect work cable to the work as close to the welding area as practical to prevent welding current from travelling long, possibly unknown paths and causing electric shock and fire hazards.
- Do not use welder to thaw frozen pipes.
-
Remove stick electrode from holder or cut off welding wire at contact tip when not in use.
-
Wear proper body protection to protect skin.
-
Keep cylinders away from any welding or other electrical circuits.
- Never allow a welding electrode to touch any cylinder.
- Use only correct shielding gas cylinders, regulators, hoses and fittings designed for the specific application; maintain them and associated parts in good condition.
- Turn face away from valve outlet when opening cylinder valve.
- Keep protective cap in place over valve except when cylinder is in use or connected for use.
- Read and follow instructions on compressed gas cylinders, associated equipment, and CGA publication P-1 listed in Safety Standards.
1.02 Declaration of Conformity
Manufacturer: CIGWELD
Address: 71 Gower St, Preston
Victoria 3072
Australia
Description of equipment: Safety Equipment. CIGWELD ProGuard Auto-Darkening Welding Helmet.
National Standard and Technical Specifications
The product is designed and manufactured to a number of standards and technical requirements among them are:
a. AS/NZS 1337.1:2010 Section 4 - Eye Protectors for industrial applications.
b. AS/NZS 1338.1:2012 Filters for Eye Protectors.
* Extensive product design verification is conducted at the manufacturing facility as part of the routine design and manufacturing process, to ensure the product is safe and performs as specified. Rigorous testing is incorporated into the manufacturing process to ensure the manufactured product meets or exceeds all design specifications.
CIGWELD has been manufacturing and merchandising an extensive equipment range with superior performance, ultra safe operation and world class quality for more than 30 years and will continue to achieve excellence.
1.03 Limited Warranty
LIMITED WARRANTY: CIGWELD Pty Ltd, CIGWELD An ESAB Brand, hereafter, "CIGWELD and/or ESAB" warrants to customers of its authorized distributors hereafter "Purchaser" that its products will be free of defects in workmanship or material. Should any failure to conform to this warranty appear within the time period applicable to the CIGWELD/ESAB products as stated below, CIGWELD/ESAB shall, upon notification thereof and substantiation that the product has been stored, installed, operated, and maintained in accordance with CIGWELD/ESAB's specifications, instructions, recommendations and recognized standard industry practice, and not subject to misuse, repair, neglect, alteration, or accident, correct such defects by suitable repair or replacement, at CIGWELD/ESAB's sole option, of any components or parts of the product determined by CIGWELD/ESAB to be defective.
CIGWELD/ESAB MAKES NO OTHER WARRANTY, EXPRESS OR IMPLIED. THIS WARRANTY IS EXCLUSIVE AND IN LIEU OF ALL OTHERS, INCLUDING, BUT NOT LIMITED TO ANY WARRANTY OF MERCHANTABILITY OR FITNESS FOR ANY PARTICULAR PURPOSE.
LIMITATION OF LIABILITY: CIGWELD SHALL NOT UNDER ANY CIRCUMSTANCES BE LIABLE FOR SPECIAL, INDIRECT OR CONSEQUENTIAL DAMAGES, SUCH AS, BUT NOT LIMITED TO, LOST PROFITS AND BUSINESS INTERRUPTION.
The remedies of the Purchaser set forth herein are exclusive and the liability of CIGWELD/ESAB with respect to any contract, or anything done in connection therewith such as the performance or breach thereof, or from the manufacture, sale, delivery, resale, or use of any goods covered by or furnished by CIGWELD/ESAB whether arising out of contract, negligence, strict tort, or under any warranty, or otherwise, shall not, except as expressly provided herein, exceed the price of the goods upon which such liability is based. No employee, agent, or representative of CIGWELD/ESAB is authorized to change this warranty in any way or grant any other warranty.
PURCHASER'S RIGHTS UNDER THIS WARRANTY ARE VOID IF REPLACEMENT PARTS OR ACCESSORIES ARE USED WHICH IN CIGWELD'S or ESAB'S SOLE JUDGEMENT MAY IMPAIR THE SAFETY OR PERFORMANCE OF ANY CIGWELD PRODUCT. PURCHASER'S RIGHTS UNDER THIS WARRANTY ARE VOID IF THE PRODUCT IS SOLD TO PURCHASER BY NON-AUTHORIZED PERSONS.
The warranty is effective for the time stated below beginning on the date that the authorized distributor delivers the products to the Purchaser. Notwithstanding the foregoing, in no event shall the warranty period extend more than the time stated plus one year from the date CIGWELD delivered the product to the authorized distributor.
Any claim under this warranty must be made within the warranty period which commences on the date of purchase of the product. To make a claim under the warranty, take the product (with proof of purchase from a CIGWELD/ESAB Accredited Seller) to the store where you purchased the product or contact CIGWELD/ESAB Customer Care 1300 654 674 for advice on your nearest Service Provider. CIGWELD/ESAB reserves the right to request documented evidence of date of purchase. CIGWELD/ESAB or our Accredited Distributor must be notified in writing of its claim within seven (7) days of becoming aware of the basis thereof, and at its own expense returning the goods which are the subject of the claim to CIGWELD/ESAB or nominated Accredited Distributor/Accredited Service Provider.
This warranty is given.
CIGWELD Pty Ltd
CIGWELD An ESAB Brand
A.B.N. 56007226815
71 Gower Street, Preston Victoria, Australia, 3072
Phone: 1300 654 674 | Email: enquiries@cigweld.com.au | Website: www.cigweld.com.au | www.esabasia.com
This warranty is provided in addition to other rights and remedies you have under law: Our goods come with guarantees which cannot be excluded under the Australian Consumer Law. You are entitled to replacement or refund for a major failure and to compensation for other reasonably foreseeable loss or damage. You are also entitled to have the goods repaired or replaced if the goods fail to be of acceptable quality and the failure does not amount to a major failure.
Please note that the information detailed in this statement supersedes any prior published data produced by CIGWELD or ESAB.
WARRANTY SCHEDULE- PROGUARD AUTO-DARKENING WELDING HELMET
CIGWELD reserves the right to request documented evidence of date of purchase.
CIGWELD SAFETY EQUIPMENT WARRANTY PERIOD
ProGuard Auto-Darkening Welding Helmet ....3 years
ACCESSORIES
Cover Lenses....1 month
Sweat Band .... 1 month
CIGWELD Limited Warranty does not apply to;
- Obsolete goods sold at auction, second-hand goods and prototype goods.
- Consumable Parts for MIG, TIG, Plasma welding, Plasma cutting and Oxy fuel torches, O-rings, fuses, filters or other parts that fail due to normal wear.
Note:
- No employee, agent, or representative of CIGWELD or ESAB is authorized to change this warranty in any way or grant any other warranty, and CIGWELD/ESAB shall not be bound by any such attempt. Correction of nonconformities, in the manner and time provided herein, constitutes fulfilment of CIGWELD/ESAB's obligations to purchaser with respect to the product.
- This warranty is void, and seller bears no liability hereunder, if purchaser used replacement parts or accessories which, in CIGWELD/ESAB's sole judgment, impaired the safety or performance of any CIGWELD/ESAB product and if the unit is altered or serviced by an unauthorised CIGWELD/ESAB Service Provider. Purchaser's rights under this warranty are void if the product is sold to purchaser by unauthorized persons.
Please note that the information detailed in this statement supersedes any prior published data produced by CIGWELD.
WARNING
For the purpose of safety and performance and to protect your CIGWELD Equipment Warranty always use genuine CIGWELD replacement parts and accessories.
SECTION 2: Introduction
2.01 How to Use This Manual
This Owner's Manual usually applies to just the underlined specification or part numbers listed. If none are underlined, they are all covered by this manual.
To ensure safe operation, read the entire manual, including the chapter on safety instructions and warnings.
Throughout this manual, the word WARNING, CAUTION and NOTE may appear. Pay particular attention to the in formation provided under these headings. These special annotations are easily recognised as follows:

WARNING
Gives information regarding possible personal injury. Warnings will be enclosed in a box such as this.

CAUTION
Refers to possible equipment damage. Cautions will be shown in bold type.
NOTE
Offers helpful information concerning certain operating procedures. Notes will be shown in italics.
2.02 Equipment Identification
The product identification number is printed on the outer shipping carton. Record this number for future reference.
2.03 Receipt of Equipment
When you receive the equipment, check it against the invoice to make sure it is complete and inspect the equipment for possible damage due to shipping. If there is any damage, notify the carrier immediately to file a claim. Furnish complete information concerning damage claims or shipping errors to:
CIGWELD, Customer Care Department, 71 Gower St, Preston, Victoria, Australia, 3072.
Include all equipment identification numbers as described above along with a full description of the parts in error.
Additional copies of this manual may be purchased by contacting CIGWELD, Customer Care Department, at the address given above. Include the Owner's Manual number and equipment identification numbers.
SECTION 3: General Information
3.01 ProGuard Auto-Darkening Welding Helmet
The ProGuard welding helmets are high quality products that contribute to the comfort and safety of the welder. ProGuard welding helmets may be used only in connection with arc welding. The chart below shows how to choose the most suitable shade level:
| Welding processOr related techniques | Current internally in amperes | ||||||||||||||||||||
| 0.51 | 2.55 | 1015 | 2030 | 4060 | 80100 | 125150 | 175200 | 225250 | 275300 | 350400 | 450500 | ||||||||||
| E manualFlux core electrodesFlued stick electrodes | 9 | 10 1 | 12 | 13 | 14 | ||||||||||||||||
| MIG / Metal-Inert-Gas Argon (Ar/He)Steels, alloyed steels,Copper & its alloys etc. | 10 | 11 | 12 13 14 | ||||||||||||||||||
| MIG / Metal-Inert-Gas Argon (Ar/He)Aluminium, copper, nickelAnd other alloys. | 10 | 11 | 12 | 13 | 14 | 15 | |||||||||||||||
| TIG / Tungsten-Inert Gas Argon (Ar/H2) (Ar/He)All weldable metals such as steels, aluminium,Copper, nickel and their alloys. | 9 | 10 | 11 | 12 | 13 | ||||||||||||||||
| MAG / Metal-active Gas (Ar/Co2O2) (Ar/Co2/He/H2)Construction Steel, hardened & tempered steelsCr-Ni-steel, Cr-steel & other alloyed steels. | 10 | 11 | 12 | 13 14 | 15 | ||||||||||||||||
| Electric arc compressed air joining(Melt Joining) carbon electrodes (O2)Flame grooving compressed air (O2) | 10 | 11 | 12 | 13 | 14 | 15 | |||||||||||||||
| Plasma cutting (fusion cutting)All weldable metals see WIGCenter and outer gas: Argon (Ar/H2) (Ar/He) | 11 | 12 | 13 | ||||||||||||||||||
| Plasma cutting (Fusion cutting)Micro-plasma weldingCenter and outer gas: Agon (Ar/H2) (Ar/He) | 2.54 | 5 | 6 | 87 | 9 | 10 | 11 | 12 | 13 | 14 | 15 | ||||||||||
| 1 | 5 | 15 | 30 | 60 | 100 | 150 | 200 | 250 | 300 | 400 | 500 | ||||||||||
| 0.5 | 2.5 | 10 | 20 | 40 | 80 | 125 | 175 | 225 | 275 | 350 | 450 | ||||||||||
Depending upon the application conditions, the next highest or next lowest protection level can be used.
The darker fields correspond to those areas in which the corresponding welding process cannot be used.
ProGuard welding helmets afford reliable protection for the eyes whilst electric arc welding. They offer permanent protection against UV/IR rays, heat & sparks in any state from the clear to dark. The protection shades of the ProGuard welding helmets have been chosen to avoid eye damage caused by the welding arc.
Do not look directly at welding rays with unprotected eyes when the arc strikes. This can cause a painful inflammation of the cornea and irreparable damage to the lens of the eye leading to cataracts.
ProGuard welding helmets allow the welder to see the point of arc strike more precisely. This leads to a real time saving. The helmet does not have to be flipped up and down during welding, both hands are kept free and because of the helmet's light weight fatigue is reduced.
3.02 User Responsibility
This product will perform as per the information contained herein when installed, operated, maintained and repaired in accordance with the instructions provided. This equipment must be checked periodically. Defective equipment should not be used. Parts that are broken, missing, plainly worn, distorted or contaminated, should be replaced immediately. Should such repairs or replacements become necessary, it is recommended that such repairs be carried out by appropriately qualified persons approved by CIGWELD. Advice in this regard can be obtained by contacting an accredited CIGWELD Distributor.
This product or any of its parts should not be altered from standard specification without prior written approval of CIGWELD. The user of this product shall have the sole responsibility for any malfunction which results from improper use or unauthorised modification from standard specification, faulty maintenance, damage or improper repair by anyone other than appropriately qualified persons approved by CIGWELD.
SECTION 4: Personal Protection

WARNING
Prior to welding check operation of the filter lens, if the lens does not darken DO NOT COMMENCE WELDING. If during welding the filter does not darken IMMEDIATELY STOP WELDING.
The radiation from an electric arc during the welding process can seriously harm eyes and skin. It is essential that the following precautions be taken:
When electric arc welding, it is a requirement to use a welding helmet or welding handshield that complies to a relevant standard. Protective filter lenses are provided to reduce the intensity of radiation entering the eye thus filtering out harmful infra-red, ultraviolet radiation and a percentage of the visible light. Such filter lenses are incorporated into this Welding Helmet. To prevent damage to the filter lenses from molten or hard particles an additional hard clear glass or special plastic external cover lens is provided. This cover lens should always be kept in place and replaced before the damage impairs your vision while welding.

WARNING
For machine disc cutting, scaling, grinding and machining of metals and the like, additional eyeshields or faceshields with appropriate impact rating should be used. Refer to AS/NZS1336 for full details of the appropriate protection for industrial applications.

WARNING
The indicated filter lens shade numbers are minimum. If any discomfort is felt, higher shade numbers should be selected.
Recognised standards for recommended practices for occupational eye protection include AS/NZS 1336 and EN 175.
Gloves should be flameproof gauntlet type to protect hands and wrists from heat burns and harmful radiations. They should be kept dry and in good repair.
Protective clothing must protect the operator from burns, spatter and harmful radiation. Woollen clothing is preferable to cotton because of its greater flame resistance. Clothing should be free from oil or grease. Wear leggings and spats to protect the lower portion of the legs and to prevent slag and molten metal from falling into boots or shoes. SECTION 5: Specifications
SECTION 5: Specifications
5.01 ProGuard Auto-Darkening Filter Lens
| Description | |
| Filter Lens Auto-Darkening Filter Lens | |
| Filter Lens Dimensions 110mm x 90mm x 7.5mm | |
| Viewing Area Dimensions 100mm x 50mm | |
| Reaction Time 0.07ms | |
| Sensors 4 | |
| Power Supply 1 x CR2450 Lithium Batteries (replaceable) and Solar Assist | |
| Inactivated Shade Level 4 | |
| Variable Shade Level 9 - 13 | |
| Function Welding or Grinding | |
| Operating Temperature -10°C to +65 °C | |
| Storing Temperature -20 °C to +85 °C | |
| Sensitivity Range (Light to Dark) Low to High | |
| Delay (Dark to Light) Infinite stages (0.1s ~ 0.9s) | |
| On/Off Control Automatic | |
| Low Battery Indicator LED Indicator | |
| Helmet Material High Impact Resistant Nylon | |
| Weight | 500g |
Table 5-1 Specifications
NOTE
Due to variations that can occur in manufactured products, claimed performance, voltages, ratings, all capacities, measurements, dimensions and weights quoted are approximate only. Achievable capacities and ratings in use and operation will depend upon correct installation, use, applications, maintenance and service.
5.02 Range of Application
The ProGuard welding helmets can be used for the following applications:
- Electrode
• MIG
• Mag
• TIG (>=5A)
They are not suitable for use with laser systems and oxy-acetylene (gas welding) applications. The welding filter must not be used for any other purpose other than welding. They should never be used as sunglasses when driving as this could lead to incorrect identification of the color of traffic light.
The welding filters operate well under extreme low lighting and very strong sunlight.
5.03 Contents
| CONTENTS- PROGUARD AUTO-DARKENING WELDING HELMET | |
| Description Qty | |
| ProGuard Auto-Darkening Welding Helmet 1 | |
| Front Cover Lens 2 | |
| Inner Cover Lens 2 | |
| Sweatband 1 | |
| Operating Manual 1 | |
Table 5-2 Packing List
SECTION 6: Operation
6.01 Adjustment of headgear
ProGuard welding helmets are equipped with a comfortable headgear that can be adjusted in three different ways.

text_image
Push and Move 'Head Height' Longitudinal Adjustment Rake Adjustment Push and Turn 'Head Size'Figure 6-1 Headgear Adjustment
6.02 Performance
To allow the filter to switch both sensors on the front of the filter must not be covered, the filter then switches to the dark state when the arc strikes and to the clear state when it stops. The filter switches to the light state when the welding arc stops.
6.03 How to Set Shade
On the ProGuard set the shade by turning the knob on the outside of the helmet (pos. 1).
The most suitable setting can be found on the Chart in this brochure or chosen using your experience. This setting can also be made manually during the welding process.
6.04 Switching Grind Mode / Welding Mode
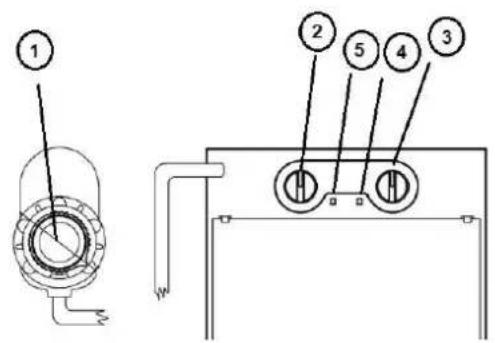
On the ProGuard exchange the Welding and Grind mode by pressing the knob on the shade knob outside of the helmet.
On Welding mode, by pressing the knob and hold for 2 seconds. The mode will be changed from Welding to Grind. The green Grind light will flash (pos.4)
On Grind mode, By Pressing the knob and hold for 2 seconds. The mode will be changed from Grind to Welding. The green Grind light will stop flashing (pos.4)
text_image
Technical diagram showing labeled components of a mechanical or electrical device with numbered partsFigure 6-2
Turning clockwise = darker
Turning anti clockwise = clearer
6.05 How to Replace Battery

WARNING
Swallowing batteries may lead to serious injury in as little as 2 hours or death, due to chemical burns and potential perforation of the oesophagus.
If you suspect your child has swallowed or inserted a button battery immediately call the 24-hour Poisons Information Centre in Australia on 13 11 26 for fast, expert advice.
Examine devices and make sure the battery compartment is correctly secured, e.g. that the screw or other mechanical fastener is tightened. Do not use if compartment is not secure.
Dispose of used button batteries immediately and safely. Flat batteries can still be dangerous.
Tell others about the risk associated with button batteries and how to keep their children safe.
When the LED (pos. 5) on ADF turns red, the battery needs replacement. Follow instructions below. Otherwise, ADF won't work correct and can cause harm to the operator.
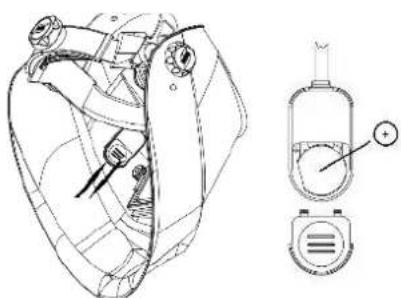
Remove battery cover from battery case (pos .1)
Take battery out and fit a new battery inside battery case. Note: “+” is on top. (pos. 2)
Assemble battery cover onto battery case.
natural_image
Technical line drawing of a mechanical device with internal components and a separate view showing a dial indicator (no text or symbols present)Figure 6-3
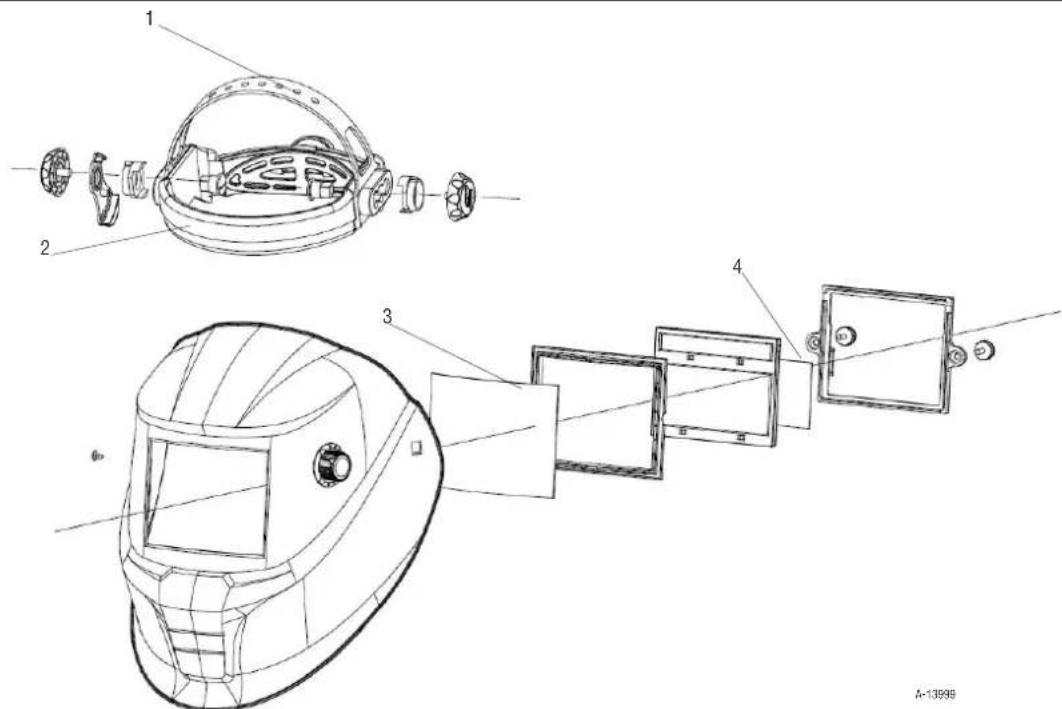
6.06 Replacing the Outer Cover Lens
Ensure that the helmet is always equipped with an Outside Lens (before the filter, on the outside of the helmet) and an Inner Cover Lens (behind the filter, inside the helmet). These protections lenses must be replaced if broken, damaged or covered with welding spatter to such an extent that vision is impaired.
Inner & Outer Lenses are consumables and must be replaced regularly with genuine certified CIGWELD spare parts.
Before using the ProGuard helmet for the first time the protective films must be removed from the Front Spatter Lens (Figure 6-4). The films cannot be removed from the Front Spatter Lens with the Lens in place. Please follow the instructions below to remove the Spatter Lens.

natural_image
Line drawing of two hands holding a card (no text or symbols)Figure 6-4

text_image
Technical diagram of a helmet assembly with numbered components and cross-sectional viewsFigure 6-5
Inserting and removing a new protection lens:
To insert the new front cover lens ② the filter must be removed by unscrewing the two retaining screws ⑦ from the inside of the helmet ①. The front cover lens ② can then be removed and the new lens inserted followed by the light seal cradle ③, ADF ④, inner cover lens ⑤ and then the ADF retaining frame ⑥ and finally replace the two retaining screws ⑦ (see Figure 6-5).
6.07 Before Using the Filter
We recommend the following adjustments to be made:
- Turn the sensitivity knob clockwise to the max. setting (pos. 2). Depending upon the surrounding light the filter will switch to the dark state or will flicker (if the surrounding light is very low, the filter may not switch to the dark state).
- Turn back the sensitivity knob (pos.2) until the filter switches to the clear state.
- The filter is now set to its optimum sensitivity (According to the surrounding light conditions).
6.08 Range of use for the ProGuard
All arc welding applications with the exception of TIG<5A.
Available shade - 9-13 (pos.1).
6.09 Setting the delay
The clearing delay can be adjusted manually by turning the delay knob (pos. 3) between a fast clear (0.1 sec) fully anti-clockwise and a slow clear (1.0 sec) fully clockwise.
Magnification lens ordering information (optional):
| Description Part Number | |
| 1.50 diopter 45 | 4012 |
| 2.00 diopter 45 | 4010 |
| 2.25 diopter 45 | 4014 |
| 2.50 diopter 45 | 4011 |
Table 6-1 Magnification Lens Ordering Information
6.10 Filter Testing
Before use of the welding helmet the auto darkening filter (ADF) and helmet needs to be checked according to the following procedure:
- Check outer protection lens is clean and can be seen through.
- Ensure the sensors are not covered in any way and are clean.
Once these checks have been carried out you can now test the ADF.
Turn the outside shade knob to the darkest setting (shade 13) and set the sensitivity to the highest setting (turning clockwise). Now point the sensor towards a light source such as an overhead light, lamp etc. The ADF should now switch to the dark state (please note if the ADF is stored in a dark area away from light it may need to be left out in strong light for 20 minutes to absorb power, after 20 minutes if the ADF does still not react then there is an issue with the sensor). Once the filter is in the dark state you can check the shade variation is functioning correctly, simply turn the shade knob anti-clockwise. By doing this, the shade should get lighter. If the shade does not appear to alter then you have an issue with the shade variation
To test the delay function, set the delay to the maximum setting. Now move the filter sensor away from the light source it should take 1 second to return to the light state, now after the delay setting to the minimum and repeat the process, the time taken to return to the clear state should be 0.1 second. If the ADF does not react in this way, then there is an issue with the delay function.
Testing the sensitivity. Set the sensitivity to minimum setting now point the ADF at the light source you used to test the other functions (if filter switches to dark state move away until the filter returns to clear state) slowly turn the sensitivity until the filter switches to dark state (if it does not then move closer to the light until it reacts) if the ADF does not react then there is an issue with the light sensors.
If any of the functions fail during test or in use, then do not use the ADF and contact your local distributor.
WARNING
The auto-darkening filters fitted in the ProGuard helmets are not waterproof and will not work properly if they have been in contact with water.
Welding helmets and filters only resist a certain amount of heat. Please do not place them near naked flames or hot work areas etc.
Operating temperature of electronic filter minus 10^ to plus 65^ C.
Materials that may get in contact with the wearers skin could cause Allergic reactions to susceptible individuals.
Section 7: Service and Maintenance
ProGuard welding helmets should not be dropped. Do not place heavy objects or tools (hammers etc.) on or inside the helmet so as not to damage the electro-optical filter.
Always make sure that the helmet is equipped with an outside and inner lens (in front of the filter on the outside and on the inside behind the filter). These protection lenses must be replaced if damaged in any way (see overleaf). They are consumables and should check and replaced regularly.
The filter should be cleaned when changing the protection lenses.
This can be done by any of the following ways:
- Wipe with a clean, dry piece of cloth.
- Clean with a piece of smooth cloth moistened with pure alcohol.
- Clean with a commercial disinfectant
- If used properly the welding filter requires no further maintenance during its lifetime.
If a filter should be replaced on a ProGuard welding helmet, use exclusively certified products (DIN-CE marks). We recommend the use of ESAB welding filters in all ProGuard helmets.
The filter itself contains no special or toxic products and can be disposed of in the same way as other electronic devices.
Section 8: Spare Parts

WARNING
CIGWELD cannot be held responsible for the continuing performance of this Welding Helmet if non-genuine spare parts are used.
text_image
Technical diagram of a welding helmet assembly with numbered components and cross-sectional viewsFigure 8-1 Exploded View of ProGuard Auto-Darkening Welding Helmet
Parts List
| SPARE PARTS – CIGWELD PROGUARD AUTO-DARKENING WELDING HELMET | ||
| Item No | Part Number Description | |
| 1 4546 | 43 Headgear Assembly including Sweat Band | |
| 2 4546 | 44 Sweat Band | |
| 3 4546 | 45 Front Cover Lens | |
| 4 4546 | 46 Inner Cover Lens | |
Table 8-1 Spare Parts
SECTION 9: Basic Troubleshooting
| FAULT CAUSE REMEDY | ||
| 1. Irregular darkening dimming. A. Headgear has been set unevenly and there is an uneven distance from the eyes to the filter lens. | A. Reset the headgear to reduce the difference to the filter | |
| 2. Auto-Darkening filter does not darken or flickers. | A. Front cover lens is soiled or damaged.B. Sensors are soiled.C. Welding current is too low. | A. Clean Cover Lens with a soft cloth. Replace if necessary.B. Clean the sensors surface.C. Adjust the sensitivity level to higher.D. Check battery and verify it is in good condition and installed properly. Also, check battery surfaces and contacts and clean if necessary. |
| 3. Poor vision. A. | Front/inner cover lens and/or the filter are soiled.B. There is insufficient ambient light.C. Shade number is incorrectly set. | A. Change lens.B. Reset the shade number. |
| 4. Welding helmet slips. A. Headgear is not properly adjusted. A. Readjust the headgear. | ||
Table 9-1 Basic Troubleshooting
WARNING
If the above troubleshooting recommendations do not resolve the problem, do not use the Auto-Darkening Welding Helmet. Contact CIGWELD for further information.
ESAB
CIGWELD Pty Ltd
CIGWELD An ESAB Brand
71 Gower Street, Preston VIC 3072 Australia
Customer Care:
Tel: 1300 654 674 | Fax: 03 9474 7391
Email: enquiries@cigweld.com.au
International Enquiries
Tel: +61 3 9474 7508 | Fax: +61 3 9474 7488
Singapore -
ESAB Asia Pacific
38 Joo Koon Circle
629063
Singapore
Tel: +65 6861 4322
Malaysia -
No 14 Jalan Teknologi 3/1
Selangor Science Park 1
Kota Damansara, 47810 Petaling Jaya
Selangor Darul Ehsan
Malaysia
Tel: 60 3 6145 0995
Fax: 60 3 6145 0585
Indonesia -
JI. Pulogadung No. 45
Kawasan Industri Pulogadung
Jakarta, 13930
Indonesia
Tel: +62 21 460 0188
Fax: +62 21 461 2929