Stealthbox SB-POL-RETX/10TW3 - Subwoofer JL Audio - Free user manual and instructions
Find the device manual for free Stealthbox SB-POL-RETX/10TW3 JL Audio in PDF.

User questions about Stealthbox SB-POL-RETX/10TW3 JL Audio
0 question about this device. Answer the ones you know or ask your own.
Ask a new question about this device
Download the instructions for your Subwoofer in PDF format for free! Find your manual Stealthbox SB-POL-RETX/10TW3 - JL Audio and take your electronic device back in hand. On this page are published all the documents necessary for the use of your device. Stealthbox SB-POL-RETX/10TW3 by JL Audio.
USER MANUAL Stealthbox SB-POL-RETX/10TW3 JL Audio
natural_image
Black plastic speaker device with a circular head and textured body, no visible text or symbolsStealthbox®
INSTALLATION GUIDE
for the
SB-POL-RETX/10TW3
SKU# 94621
2015 & Up Polaris Ranger ETX
Enclosure Type: Sealed
Driver Type: 10TW3-D4
Nominal Impedance: 2 ohms
Continuous Power Handling: 400 watts (RMS method)
SB-POL-RETX/10TW3 INSTR_SKU#011447
! IMPORTANT
If you choose to perform the installation yourself, it is absolutely vital that the Stealthbox® be properly mounted to the vehicle according to these instructions. Failure to mount the enclosure properly presents two problems:
1) The sub-bass performance will suffer due to the movement of the enclosure caused by the force exerted by the woofer(s).
2) A loose enclosure presents a serious safety hazard in the event of a collision or sudden deceleration.
INSTALLATION DIFFICULTY:

ESTIMATED TIME: 1 HOUR

text_image
JL AUDIO - Quality & Design - SBX STEALTHBOX®Thank you for choosing a JL Audio Stealthbox* for your automotive sound system. With proper installation, your new vehicle-specific enclosed subwoofer system will deliver years of listening pleasure.
We strongly recommend that you have your new Stealthbox® installed by your authorized JL Audio dealer. The installation professionals employed by your dealer have the necessary tools and experience to disassemble and reassemble your vehicle properly. If you prefer to perform your own installation, please read this installation guide completely before beginning the process.
Continued on Next Page
INCLUDED HARDWARE

text_image
Description 20 x 1" Stainless Steel Serrated Flange BoltBOM ID Qty SKU Description
| 1 6 153729 1/4 - 20 x 1" Stainless Steel Serrated Flange Bolt | ||
| 2 1 150868 | Front Bracket | |
| 3 2 153741 5/16 - 18 x 3/4" Stainless Steel Serrated Flange Bolt | ||
| 4 1 150870 Side Bracket | ||
| 5 2 153742 5/16" | Stainless Steel Flat Washer | |
| 6 2 153743 5/16" | Stainless Steel Serrated Spring Lock Washer | |
| 7 2 153744 5/16 - 18 Stainless Steel Hex Nut | ||
| 8 1 150869 Rear Bracket | ||
| - 1 150249 Foam Strips (not shown) | ||
Note: For optimum performance, JL Audio recommends applying the included Foam Strips (or sound damping material) to surrounding plastic panels to reduce unwanted vibrations.
POWER RECOMMENDATION
JL Audio recommends high quality amplifiers such as the JL Audio MX300/1. The diagram below shows the recommended crossover settings for the MX300/1. For a detailed description of the amplifier settings, consult the owner's manual for the amplifier. If another amplifier is being used, please reference this illustration and use similar settings on that amplifier.

text_image
Base Reset (USB) LP Filter Freq.(Hz) Output Polarity 0 512 60 130 LP Filter LP 60 Input Voltage 30 35 Input Sens. 40 Infrasonic Filter(Hz)CONNECTIONS
Using quality power, signal, and speaker wire is essential in ensuring the performance of your Stealthbox®. JL Audio recommends using an 8 AWG power kit such as the XD-PCS8-1B for your Stealthbox® amplifier. Other kits are available should you be using more than one amplifier. Signal wire such as the JL Audio Premium Audio Interconnect Cables should be used to provide signal for both channels of the amplifier. JL Audio recommends using 12AWG speaker wire for subwoofers such as the XC-BCS12-25.
natural_image
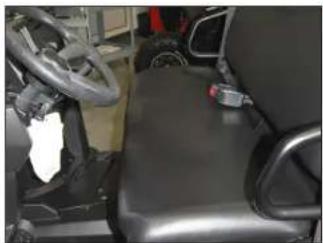
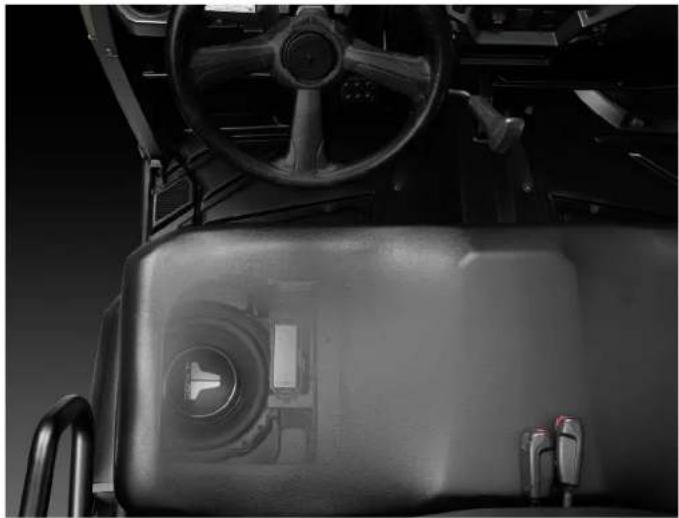
Interior view of a vehicle showing steering wheel, dashboard, and seat area (no visible text or symbols)STEP 1
Empty the vehicle.
natural_image
Close-up of a car's battery compartment with visible wiring and battery pack (no text or symbols)STEP 2
Fold the seat forward, pull up to release the cushion, and remove it from the vehicle.

natural_image
Close-up of mechanical components with no visible text or symbolsSTEP 3
Remove the indicated factory bolt in front of the fuse block, on the frame near the seat cushion latch. This bolt will be used to secure the Front Bracket in Step 7.

natural_image
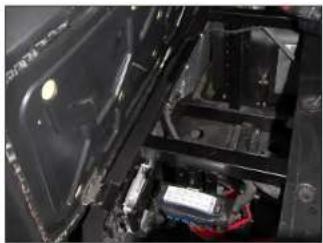
Close-up of a mechanical component with internal parts and a highlighted section (no visible text or symbols)STEP 4
Locate the indicated hole just above the fuse block. This hole will be used to secure the Side Bracket in Step 5.
Page 4 • JL Audio, Inc., 2016 Continued on Next Page
SB-POL-RETX/10TW3 INSTR_SKU#011447

natural_image
Close-up of a mechanical or electrical component with wires and a small labeled component (no readable text or symbols)STEP 5
Secure the Side Bracket to the hole indicated in Step 4 using a 5/16 - 18 x 3/4" Serrated Flange Bolt, 5/16" Flat Washer, 5/16" Serrated Spring Lock Washer, and 5/16 - 18 Hex Nut.
natural_image
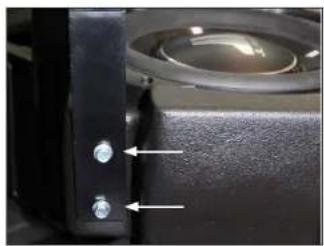
Close-up of a black speaker grille with two white buttons and a circular lens (no text or symbols visible)STEP 6
Secure the Front Bracket to the enclosure using a pair of 1/4 - 20 x 1" Serrated Flange Bolts as illustrated on Page 2.
Repeat the process for the Rear Bracket.
natural_image
Interior view of a car's front bumper showing speaker and rear-mounted components (no visible text or symbols)STEP 7
It is recommended to use two people for this step.
Connect speaker cable to the barrier strip on the enclosure. Install the Stealthbox® through the opening in front of the rear tire. Move it forward, then up until the Front Bracket lines up with the factory bolt hole indicated in Step 3. Secure the Front Bracket to the frame using the factory bolt, and hand tighten.

natural_image
Close-up of a mechanical component with an arrow indicating direction, no visible text or symbolsSTEP 8
Secure the Rear Bracket to to the vehicle as shown using a 5-16 - 18 x 3/4" Serrated Flange Bolt through the factory hole above the frame, and a 5/16" Flat Washer, 5/16" Serrated Spring Lock Washer, and 5/16 - 18 Hex Nut below the Rear Bracket under the frame.

natural_image
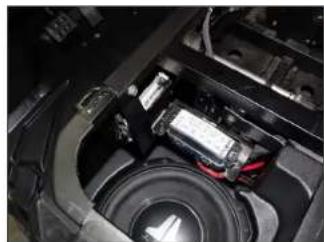
Close-up of a mechanical component with visible parts and wiring (no text or symbols)STEP 9
Secure the Side Bracket to the threaded inserts in the enclosure using a pair of 1/4 - 20 x 1" Serrated Flange Bolts. Fully tighten all hardware.
Note: For optimum performance, we recommend applying the included Foam Strips (or sound damping material) to surrounding plastic panels to reduce unwanted vibrations.
SB-POL-RETX/10TW3 INSTR_SKU#011447
CONGRATULATIONS!
You have completed the installation for this model! Enjoy your new Stealthbox®!
natural_image
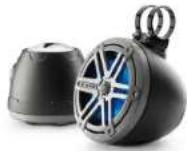
Interior view of a vehicle's driver cab showing steering wheel, dashboard, and front panel (no visible text or symbols)MID/HIGH FREQUENCY DRIVER FITMENT
VeX™ Enclosed Speaker Systems are ideal for powersports and off-road vehicle applications. Each weatherproof pod can be mounted to a roll cage precisely aimed for optimum sound. Mounting fixtures are available to fit a variety of roll cage diameters.
JLAUDIO. How we play:
(954) 443-1100
www.jlaudio.com
All open indicators are subject to change without notice. "A. Rock" and "B. A. Rock keeps, and "I. I. I. I. I. I. I. I. I. I. I. I. I. I. I. I. I. I. I. I. I. I. I. I. I. I. I. I. I. I. I. I. I. I. I. I. I. I. I. I. I. I. I. I. I. I.
JLA-SKU# 011447 • ver. 09.16.2016 • 10369 NORTH COMMERCE PARKWAY • MIRAMAR, FLORIDA • 33025 • USA