
GAP23G - Air purifier GEMINI - Free user manual and instructions
Find the device manual for free GAP23G GEMINI in PDF.

| Product Type | Air Purifier |
| Brand | Gemini |
| Model | GAP23G |
| Dimensions (Diameter x Height) | 195 mm x 388 mm |
| Weight | Not specified (approximately 2.5 kg) |
| Power Supply (Adapter Input) | 100-240 V AC, 50/60 Hz |
| Power Supply (Adapter Output) | 24 V DC, 1.2 A |
| Power Consumption (Main Unit) | 23 W |
| Filter Type | 3-in-1 HEPA filter |
| Filter Replacement Interval | Every 3-6 months for optimal performance |
| Control Type | Touch buttons |
| Wind Speed Modes | Auto, High, Sleep |
| Timer Settings | 2H, 4H, 8H |
| LED Light Ring | Indicates air quality (Blue=Good, Yellow=Normal, Red=Bad), brightness adjustable (Off/Soft/Bright) |
| Air Quality Sensor | Yes, detects particulate matter |
| Noise Level | Low (Sleep mode is quieter) |
| Safety Features | Automatic shut-off if tipped? (Not specified); child safety: not for children under 8 |
| Cleaning Instructions | Wipe exterior with soft cloth; do not wash filter, vacuum or clean with dry cloth |
| Warranty | Not specified in manual |
| Accessories Included | 3-in-1 HEPA filter, adapter |
Frequently Asked Questions - GAP23G GEMINI
User questions about GAP23G GEMINI
0 question about this device. Answer the ones you know or ask your own.
Ask a new question about this device
Download the instructions for your Air purifier in PDF format for free! Find your manual GAP23G - GEMINI and take your electronic device back in hand. On this page are published all the documents necessary for the use of your device. GAP23G by GEMINI.
USER MANUAL GAP23G GEMINI
Please read and retain for future reference.
SAFETY INSTRUCTION - GENERAL
- Use this appliance solely in accordance with these instructions.
- This appliance is for household personal use only, not for commercial purpose.
- Remove all packaging material from the appliance before use.
- This appliance shall not be used by children of 0 to 8-year old.
- This appliance can be used by children older than 8-year old and persons with reduced physical, sensory or mental capabilities or lack of experience and knowledge, but only if they have been given supervision or instruction concerning use of the appliance in safe way and understand the hazards involved.
- Children should be supervised to ensure that they do not play with the appliance.
- Cleaning and maintenance must not be done by children.
- Have any repairs carried out solely by a qualified electrician. Never try to repair the appliance yourself.
- Do not handle the plug or appliance with wet hands.
- Do not immerse the main body in water.
• Children shall not play with the appliance.
- Do not leave the appliance unattended when connected to the mains supply.
- Only use the attachments/accessories supplied with the product.
SAFETY INSTRUCTION - ELECTRICITY AND HEAT
- Ensure the appliance is in placed on a horizontal, even and stable surface.
- Verify that the mains voltage is the same as that indicated on the rating plate on the appliance before use.
- Make sure that you always use a grounded wall socket to connect the appliance.
- Always remove the plug from the wall socket when the appliance is not in use.
- Remove the plug from the wall socket by pulling the plug, not the power cord.
- Make sure that the appliance, the power cord and plug do not make contact with water.
- Make sure that the appliance, the power cord and plug do not make contact with hot surface, such as a hot hob or naked flame.
- Check the appliance's power cord regularly to make sure it is not damaged.
- Do not use the appliance if the power cord is damaged. If the power cord is damaged, it must be replaced by an electrical technician or a person with similar qualification, in order to avoid any hazards.
SAFETY INSTRUCTION - DURING OPERATION
- Leave at least 30cm of space on the back and sides of the product, and at least 50cm of space above the product when using.
- Please remove the packaging of the HEPA filter before using for the first time.
- Do not pick up the appliance if falls into water. Remove the plug from the socket immediately. Do not use the appliance again.
- Never immerse the appliance, the power cord or the plug in water or any liquid.
- Do not use the liquids, such as water or flammable solvents to clean the product, please use a soft cloth to clean when product not in running.
- Please keep air circulation and do not cover air inlet/outlet and detect air quality sensor when the product is running.
- Do not use other type power adapters, keep use the original accessories which accompany with the package.
- Please refer to "Cleaning and Storage" section to clean the appliance.
PRODUCT OVERVIEW
Main unit Control panel

Main Unit
- Control Panel
- LED Light Ring
- Air outlet
- Air inlet
- 3-IN-1 HEPA filter
- Base Cover
- Detect air quality sensor
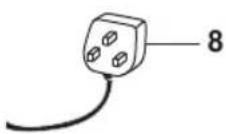
- Adaptor
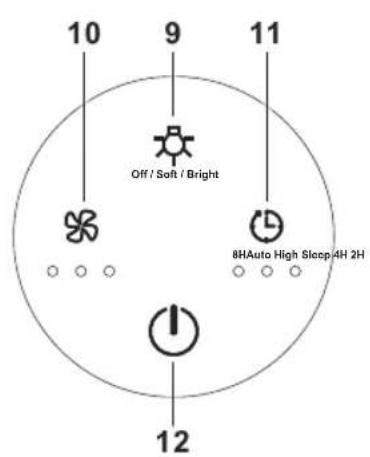
Control panel
- LED ring light touch button (Off/ Soft/Bright)
- Wind speed touch button (Auto/High/Sleep)
- Timer Off setting touch button (8H/4H/2H)
- Power On/ Off touch button
INSTALLATION FILTER


natural_image
Cross-sectional diagram of a cylindrical mechanical component with an upward arrow indicating force or direction (no text or symbols)

natural_image
Cross-sectional diagram of a cylindrical mechanical component with a textured base and a downward arrow indicating force or direction (no text or symbols)
- Invert the appliance, and rotate the base cover along the direction marked "OPEN". (Pic 1)
• Take out the 3-IN-1 HEPA filter from the appliance. (Pic 2) - Remove the packaging of the 3-IN-1 HEPA filter. (Pic 3)
• Install the 3-IN-1 HEPA filter into the appliance. (Pic 4) - Then install the base cover, rotate and tighten the base cover along the direction marked "CLOSE". (Pic 5)
WARNING
- Please remove the polybag packaging of the 3-IN-1 HEPA filter before using for the first time.
- Ensure the appliance is unplugged before removing or installing the 3-IN-1 HEPA filter.
FILTER REPLACEMENT
- When the LED light ring keeps flashing in red as filter replacement warning indicator, the filter should be replaced.
- When you replace a new 3-IN-1 HEPA filter, connect the power supply again, press and hold the ON/OFF touch button for 5 seconds to disengage the red warning indicator for replacing the filter
NOTE:
- User use the appliance at the first time, after remove the polybag of the filter and install it in place. No need to reset the filter.
- For best performance, suggest replacing a new 3-IN-1 filter around 3-6 months.
- Touch the power ON/OFF touch button to turn on the appliance, hear a "beep" sound. And the default setting is High wind mode, the corresponding wind speed indicator lights on.
- Touch the button again to turn off the appliance, the "beep" sound rings for once and the appliance will turn off with all lights turn off.
Wind Speed Touch Button ✿
- During the working, you will hear a “Beep” sound when you touch the wind speed touch button each time. Touch the wind speed touch button to set among the wind speeds of Sleep-High-Auto, and the corresponding white indicator lights on.
- Auto mode means the wind speed will automatically adjust according to air quality.
- Red LED light ring - Bad air quality (default High wind speed setting automatically)
- Yellow LED light ring - Normal air quality (default Mid wind speed setting automatically)
- Blue LED light ring - Good air quality (default Low wind speed setting automatically)
- High Wind Mode: connect the power supply, the light ring will turn among blue, cyan, green, yellow, red, purple. After around 30 seconds, the appliance will detect automatically based on detect air quality to display the air quality condition, the LED light ring (Blue/Yellow/Red), but the wind speed keeps at high wind mode.
- Sleep Mode: runs at low wind speed, the LED light ring will at the purple gradient for about 3 seconds, then the appliance will detect the air quality automatically by the detect air quality sensor to display the LED light ring (Blue/ Yellow/ Red), if no operation for about 5 seconds, all light ring will be off. Press any button can wake up the light.
LED Light Touch Button
- During the working, touch the LED ring light touch button, hear a “Beep” sound, and to set Soft light or Bright light mode of the LED light ring. Touch the button again, hear a “Beep” sound, the LED light ring turn off completely.
NOTE: The LED light button can not operate in the status of shutdown.
Timer Off Setting Touch Button
- During the working, touch the Timer off touch button to set among the circulation of 8H, 4H and 2H timer off with a “Beep” sound, and the corresponding white indicator lights on.
- Touch again, the timer indicator turns off and the appliance will work continuously without timer setting.
- In the status of timing the appliance begins to count down. When time is up, the fan will stop working and all lights and appliance will be off.
CLEANING AND STORAGE
- Ensure the appliance is power-off and unplugged before cleaning and storage.
- Use a soft cloth to clean away any dust or debris from the surface of the appliance and air inlet/outlet.
- Please use a dry cloth to wipe the dust on the 3-IN-1 HEPA the filter regularly, DO NOT wash the 3-IN-1 HEPA filter.
• DO NOT use a vacuum cleaner to clean the 3-IN-1 HEPA filter - After cleaning and make sure the appliance completely dry out, put on the bag and place it in a cool and well-ventilated place.
- DO NOT use abrasive, corrosive or flammable cleanser (such as bleach or alcohol) to clean any part of the appliance.
- Filter replacement alert: please refer to page 5 for details.
NOTE
- DO NOT drop or immense any water into the appliance when clean the air outlet.
TROUBLESHOOTING
| PROBLEM CAUSE SOLUTION | ||
| Not working The power con | connection is unreliable; | Make sure the adapter connect with power supply effectively |
| HEPA filter need to replace | Replace new HEPA filter, please refer to page 5- Installation Filter. | |
| Poor performance Too much | ch dust in the surface of filter; | Clean the filter or replace a new filter. Refer to page 5 Installation filter part or page 7 Cleaning and storage part. |
| Obstacle blocking the air inlet/ outlet | Remove the obstacles. Refer to page 7 Cleaning and storage part. | |
| Significant noise Stuck som | mething on the fan in the air outlet | Remove the obstacles. |
| Coming out nasty smell The | HEPA filter is dusty; Clean | the filter or replace a new filter. Refer to page 5 Installation filter part or page 7 Cleaning and storage part. |
| Burning smell emits form the appliance | Unplug the power socket and contact our after-sales customer service centre for assistance. | |
| The reminder of replacing filter is still flashing after user have replaced a new one | Have not reset the appliance | Press and hold the power On/ Off touch button to reset the appliance and the life counter of the filter will start. Refer to page 5-Installation filter |
| Other abnormal situation U | Unknown reasons Restart the | appliance. |
If the above investigation fails to solve the problem, please contact our after-sales service. Do not disassemble the machine by yourself.
PRODUCT SPECIFICATIONS
Product model no.: GAP23G
Adaptor input: 100-240V AC 50Hz/60Hz
Adaptor output: 24V DC 1.2A
Main unit power: 23W
Product dimensions: 195(Diameter) x 388(H) mm
* The final product specification may be varied according to a different lot of material and actual input voltage power of the usage area.
natural_image
Diagram of a cylindrical object with a textured base and an upward arrow, no text or symbols present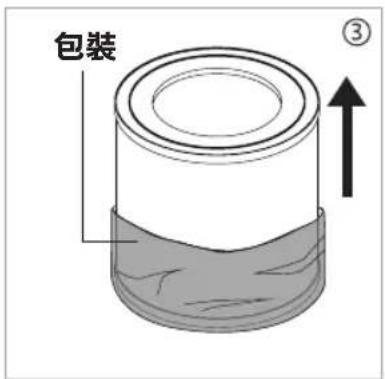

natural_image
Diagram of a cylindrical object with a textured base and arrow indicating downward motion (no text or symbols)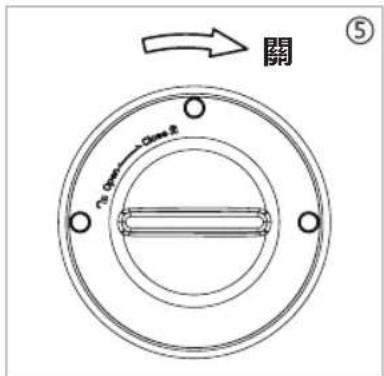
Proudly Serviced by:

Gilman
since 1841

a Gilman Group Company
太平家庭電器


- SAFETY INSTRUCTION - GENERAL
- SAFETY INSTRUCTION - ELECTRICITY AND HEAT
- SAFETY INSTRUCTION - DURING OPERATION
- PRODUCT OVERVIEW
- Main Unit
- Control panel
- INSTALLATION FILTER
- WARNING
- FILTER REPLACEMENT
- NOTE:
- Wind Speed Touch Button ✿
- LED Light Touch Button
- Timer Off Setting Touch Button
- CLEANING AND STORAGE
- NOTE
- PRODUCT SPECIFICATIONS
- 太平家庭電器
Brand : GEMINI
Model : GAP23G
Category : Air purifier