ACPLX-12Y - Smartphone CRUX - Free user manual and instructions
Find the device manual for free ACPLX-12Y CRUX in PDF.

User questions about ACPLX-12Y CRUX
0 question about this device. Answer the ones you know or ask your own.
Ask a new question about this device
Download the instructions for your Smartphone in PDF format for free! Find your manual ACPLX-12Y - CRUX and take your electronic device back in hand. On this page are published all the documents necessary for the use of your device. ACPLX-12Y by CRUX.
USER MANUAL ACPLX-12Y CRUX
- Smart-Play Integration system allows connection of Android and other phones to the Lexus infotainment system.
- Made for Android Auto and CarPlay.
- Adds front and rear aftermarket camera inputs.
- Retains functionality of the OEM backup camera if present.
- Front camera automatically shows on the screen after changing the gear from reverse to drive.
- Utilizes factory microphone for voice controls.
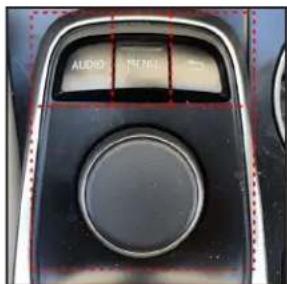
- Uses the factory Jog Wheel and steering wheel control buttons for Smart-Play controls.
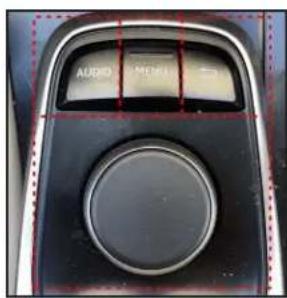
text_image
AUDIO MINIJog Wheel Controls
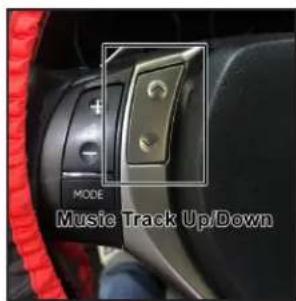
text_image
MODE Music Track Up/DownSteering Wheel Controls
PARTS INCLUDED:
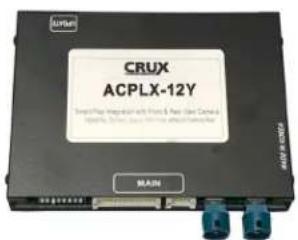
text_image
CRUX ACPLX-12Y Smart Plus Integrated with Fixed & Non-Linear Camera Hypnotics, 3000x, 500x, 800x, 900x and 1000x respectively MAIN
natural_image
Coiled black and white cables with connectors, no visible text or symbols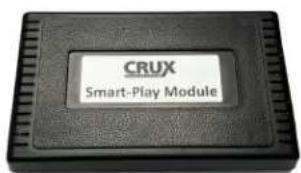
text_image
CRUX Smart-Play ModuleACPLX-12Y Module Main Harnesses Smart-Play Interface Module

OSD Controller
natural_image
Coiled black cable with two blue connectors and two black connectors (no text or symbols visible)GVIF Video Cables 4K HDMI Cable


natural_image
Coiled black cable with connectors, no visible text or symbolsUSB Extension Cable

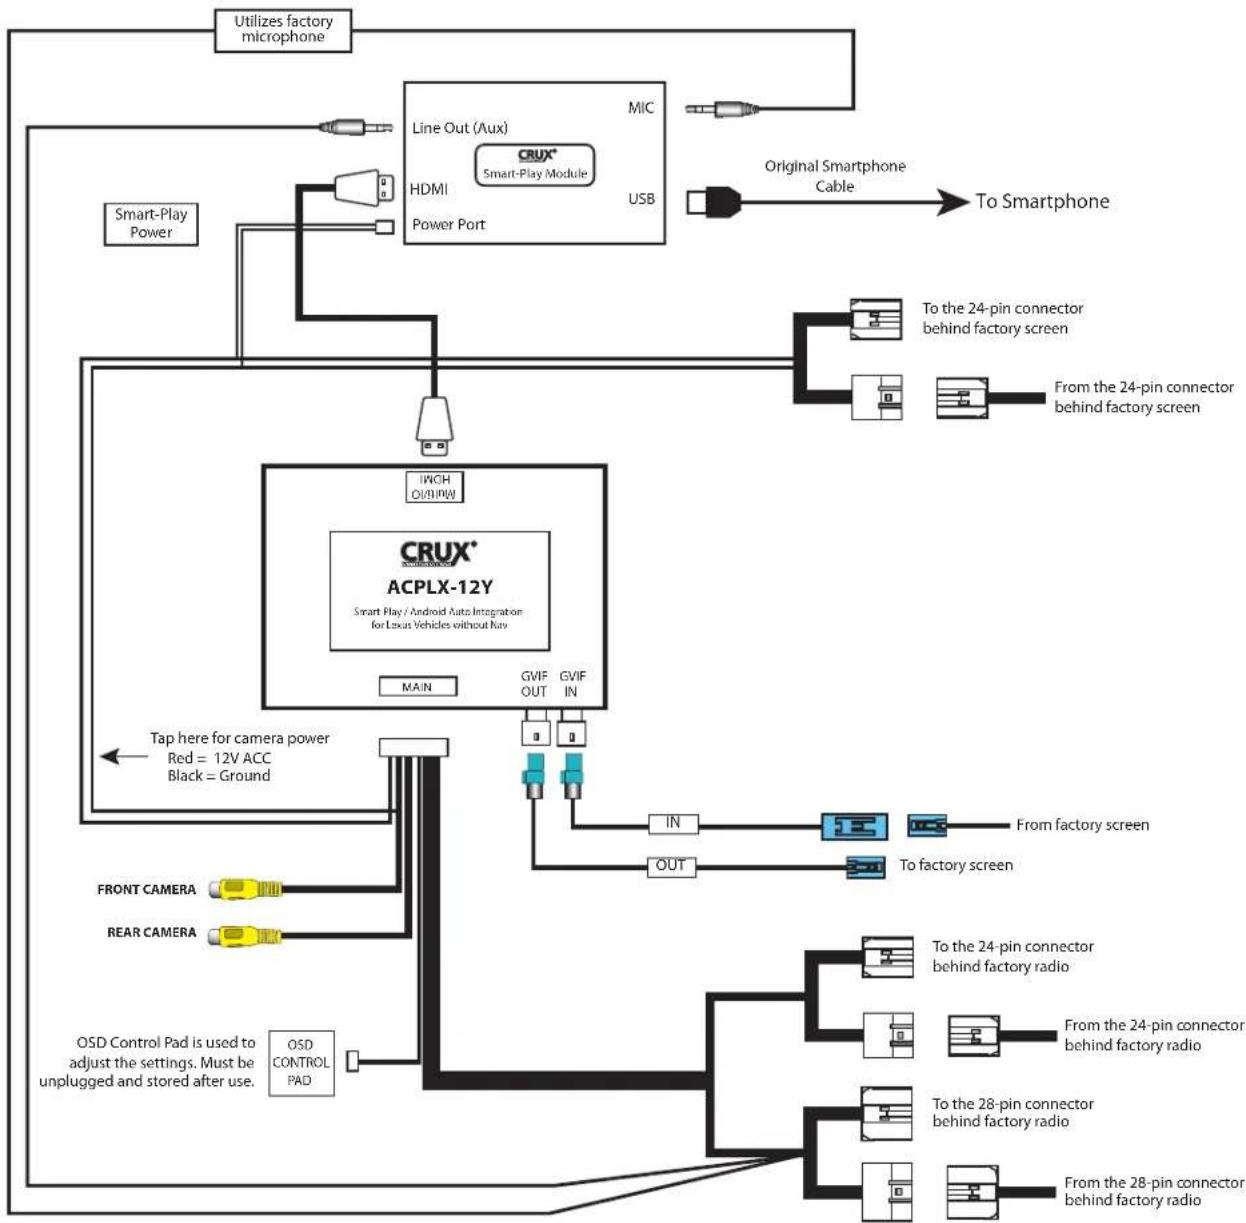
WIRING DIAGRAM:
flowchart
graph TD
    A["Utilizes factory microphone"] --> B["Line Out (Aux)"]
    B --> C["HDMI"]
    C --> D["Power Port"]
    D --> E["CRUX® Smart-Play Module"]
    E --> F["USB"]
    F --> G["Original Smartphone Cable"]
    G --> H["To Smartphone"]
    I["Smart-Play Power"] --> J["Tap here for camera power Red = 12V ACC Black = Ground"]
    J --> K["CrUX® ACPLX-12Y Smart Play / Android Auto Integration for Lexus Vehicles without Ray"]
    K --> L["Main"]
    L --> M["GVIF OUT"]
    L --> N["GVIF IN"]
    M --> O["IN"]
    N --> P["OUT"]
    O --> Q["From factory screen"]
    P --> R["From factory screen"]
    Q --> S["To factory radio"]
    R --> T["To factory radio"]
    S --> U["To the 24-pin connector behind factory radio"]
    T --> V["To the 28-pin connector behind factory radio"]
    U --> W["To the 24-pin connector behind factory screen"]
    V --> X["To the 28-pin connector behind factory radio"]
    W --> Y["To the 24-pin connector behind factory screen"]
    X --> Z["To the 24-pin connector behind factory screen"]
    Y --> AA["To the 24-pin connector behind factory screen"]
    Z --> AB["To the 24-pin connector behind factory radio"]
    AA --> AC["To the 28-pin connector behind factory radio"]
    AB --> AD["To the 24-pin connector behind factory radio"]
    AC --> AE["To the 28-pin connector behind factory radio"]
    AD --> AF["To the 24-pin connector behind factory radio"]
    AE --> AG["To the 28-pin connector behind factory radio"]
    AF --> AH["To the 24-pin connector behind factory radio"]
    AG --> AI["To the 28-pin connector behind factory radio"]
    AH --> AJ["To the 24-pin connector behind factory radio"]
    AI --> AK["To the 28-pin connector behind factory radio"]
DIP SWITCH SETTINGS:
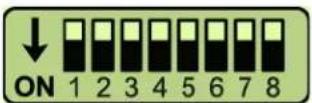
Note: ON is down and OFF is up
| DIP SETTING VEHICLE | ____ |
| 1 to 8 ALL OFF CT, GS, RX | |
| 4 ON (rest OFF) ES, IS, RC |
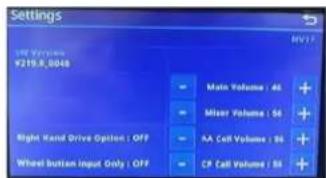
On vehicles with a 12.3" screen, you can change the screen resolution to show 5 horizontal App icons.
Press and hold for 3 seconds to go to screen settings mode.
text_image
Settings OFF Velocity: F215.8.0048 Main Volume : 46 Mixer Volume : 56 Right Hand Drive Option : OFF AA Cell Volume : 56 Wheel button Input Only : OFF CP Cell Volume : 56Set "CP" to 1024 x 600

text_image
Settings V328.0, 50Hz CP : 1024e650 @ 50fps AA: 0802e680 @ 60fps Right Hand Drive Options : OFF Mather Button Input Only : OFF - VR Volume : 56 + - Main Volume : 56 + - Mixer Volume : 56 + - AA Call Volume : 56 + - CP Call Volume : 56 +Set "Wheel button input Only:" to ON for Android Auto
INSTALLATION INSTRUCTIONS:
NOTE: Connections are made behind the radio and behind the screen.
natural_image
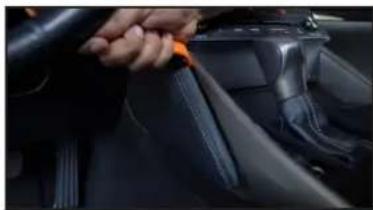
Close-up of a car interior showing a hand adjusting a belt switch (no text or symbols visible)
natural_image
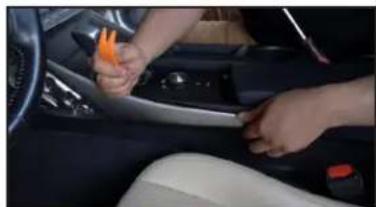
Close-up of a car interior showing dashboard and steering wheel (no visible text or symbols)- Remove the trims on both sides of the center console.
natural_image
Interior view of a car showing hands adjusting the seatbelt with orange tools (no visible text or symbols)
natural_image
Close-up of a person using a tool on a car engine compartment (no visible text or symbols)- Remove the right and left side trim along the center console.
natural_image
Close-up of a person's hands operating a car intake manifold (no visible text or symbols)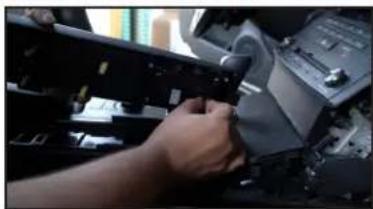
natural_image
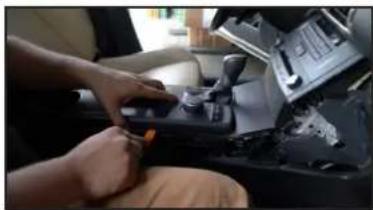
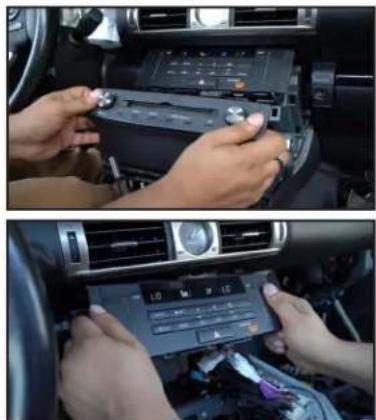
Close-up of hands using a tool to adjust or install electronic components (no visible text or symbols)- Remove the Jog Wheel console and uplug the harness.

natural_image
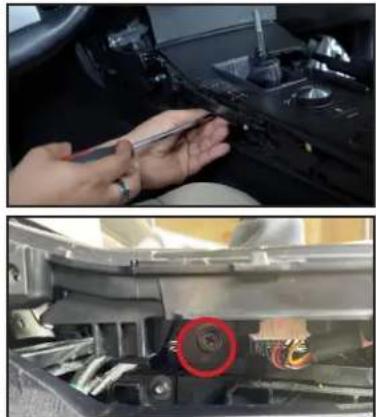
Two-panel photo showing hands using a car gear shaver to lift a black lever, no text or symbols visible- Remove the gear shift knob. 5. Remove
natural_image
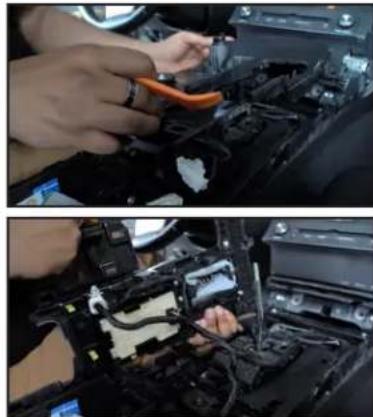
Two-panel image showing a hand holding a device in the top panel and a close-up of a car engine bay with a red circular component (no visible text or symbols)the screw under the gear shifter panel.
natural_image
Two-panel photo showing hands installing or adjusting components on a car engine, with no visible text or symbols.- Remove the gear shifter panel and set aside.
natural_image
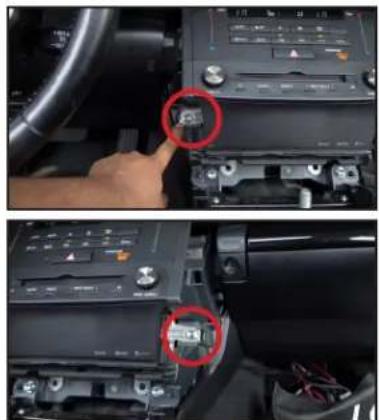
Interior view of a car dashboard showing the infotainment panel and control buttons, with no visible text or symbols.- Remove the screws holding the headunit.
natural_image
Two-panel photo showing hands installing or adjusting a car infotainment system on the dashboard (no visible text or symbols)- Remove the headunit and the climate control panel.

natural_image
Two-panel photo showing a hand adjusting a car's door panel and a wrench inserted into the engine compartment (no visible text or symbols)- Remove the glove box to gain access for mounting the ACPLX-12Y modules.
natural_image
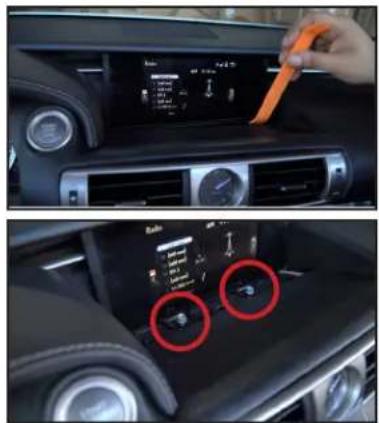
Interior view of a car dashboard and infotainment system (no visible text or symbols)- Use a pry tool to remove the trim in front of the screen. Remove the screws.

natural_image
Two-panel photo showing a person working on a car interior with visible wiring and components (no text or symbols)- Run the ACPLX-12Y harness from the glove box area to the screen.

natural_image
Two-panel photo showing hands installing or adjusting a component on a car's front, no visible text or symbols- Make the power and LVDS connections on the factory screen.

natural_image
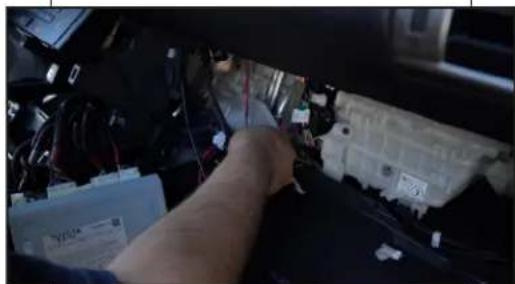
Two-panel photo showing hands installing or adjusting a car engine compartment with visible wiring and components (no text or symbols)- Make the connections behind the headunit.

natural_image
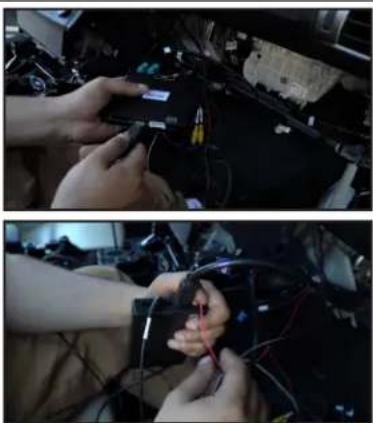
Two-panel photo showing hands installing a memory card into a circuit board (no visible text or symbols)- Plug in the power harness and LVDS connections to the ACPLX-12Y module.
natural_image
Two-panel photo showing hands installing or adjusting a cable device on a mechanical component (no visible text or symbols)- Plug in the power plug, HDMI, mic, aux-in, and USB extension to the Smart-Play module.
natural_image
Close-up of a person working on an automotive engine compartment with battery pack and wiring (no visible text or symbols)- Mount the ACPLX-12Y modules behind the dash and test before reinstalling the whole dash area.
ON SCREEN DISPLAY (OSD) SETTINGS:
The OSD Setting Screen automatically pops up when the OSD Control Pad is connected.
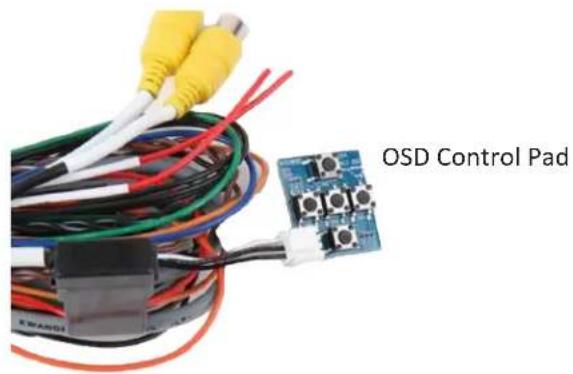
text_image
OSD Control Pad
text_image
UP LEFT RIGHT DOWN ENTERUse the OSD menu to make the necessary settings. Remember to Run Save&Reboot after the settings are made. Unplug the OSD Control Pad after setting the cameras and keep it in a secure location in case it is needed to change the settings.
SMART-PLAY SETTING
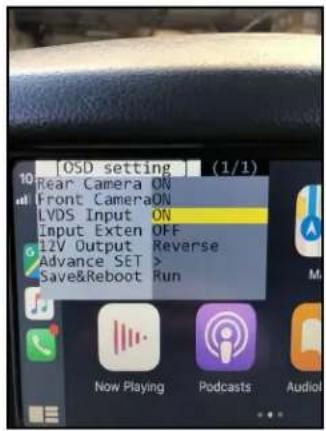
text_image
[OSD setting] (1/1) Rear Camera ON Front Camera ON LVDS Input ON Input Exten OFF 12V Output Reverse Advance SET > Save&Reboot Run Now Playing Podcasts AudioAfter plugging in the OSD controller, navigate down to LVDS Input and set to ON. Push RIGHT button to go to the next menu.
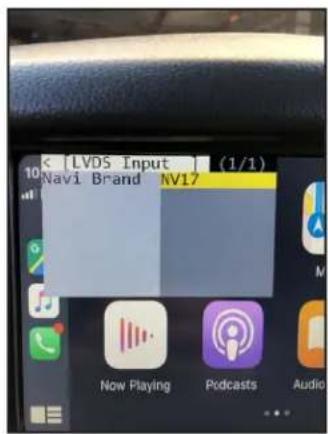
text_image
LVDS Input (1/1) Navi Brand NV17 Now Playing Podcasts AudioSet Navi Brand to NV17

text_image
[OSD setting] (1/1) Rear Camera ON Front Camera ON LVDS Input ON Input Exten OFF 12V Output Reverse Advance SET > Save&Reboot Run System ReadyNavigate the OSD back the main menu and go to Save&Reboot then Run.
REAR AND FRONT CAMERA SETTING

text_image
[OSD setting ] (1/1) Rear Camera ON Front Camera OFF LVDS Input ON Input Exten OFF 12V Output Constant Advance SET > Save&Reboot Run
text_image
[Rear Camera] (1/1) Rear Mode REAR →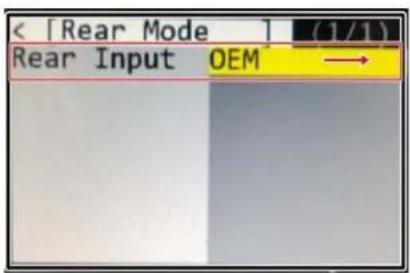
text_image
[Rear Mode] (1/1) Rear Input OEM →
text_image
Rear Input Aftermarket OEM When installing Aftermarket Rear View Camera When the cat is equipped with OEM Rear View Camera
text_image
[OSD setting ] (1/1) Rear Camera ON Front Camera OFF LVDS Input ON Input Exten OFF 12V Output Constant Advance SET > Save&Reboot Run To Save Changes, must press this button at the end.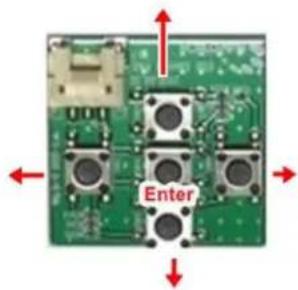
text_image
UDDI EnterDynamic Parking Guide Lines

text_image
< [Rear Set ] (1/1) Video FormatNTSC FPG (PAS) ON PDC ON Warning LANGON
text_image
< [Rear Set ] (1/1) Video FormatNTSC FPG (PAS) ON PDC ON Warning LANGONTo turn ON the Dynamic Parking Guide Lines, go the Rear Input > Rear Set and turn ON Warning LANG. Go back to the root menu and Run Save&Reboot. Remember to unplug the OSD Control Pad otherwise the unit will not function properly. Set the parking brake on, start the car, put the gear in reverse, turn the steering wheel all the way to the left and all the way to right then put it in the center. The ACPLX-12Y will calibrate automatically.
FRONT CAMERA SETTING

text_image
OSD setting | (1/1) Rear Camera ON Front CameraON LVDS Input ON Input Exten OFF 12V Output Constant Advance SET > Save&Reboot Run
text_image
[Front Camera] (1/1) Front Mode FRONT SIDE CAM
text_image
< |Front Camera| (1/1) Front Mode FRONT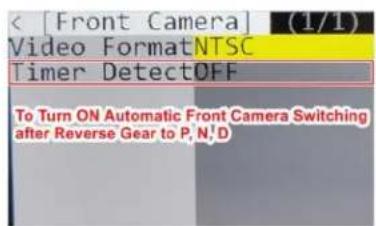
text_image
[Front Camera] (1/1) Video FormatNTSC Timer DetectOFF To Turn ON Automatic Front Camera Switching after Reverse Gear to P, N,D
text_image
< | Front Camera | (1/1) Video FormatNTSC Timer DetectON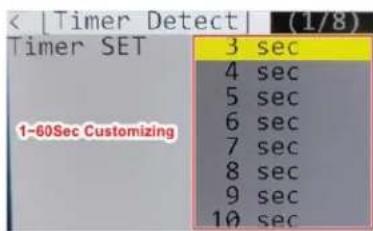
text_image
< |Timer Detect| (1/8) Timer SET 3 sec 4 sec 5 sec 6 sec 7 sec 8 sec 9 sec 10 sec 1-60Sec Customizing
text_image
[OSD setting] (1/1) Rear Camera ON Front Camera OFF LVDS Input ON Input Exten OFF 12V Output Constant Advance SET > Save&Reboot Run To Save Changes, must press this button at the end.The front Camera will automatically show on the screen when the gear is put to Drive from Reverse. Set the delay time on the OSD menu. Delay time can be set from 1 to 60 seconds after a putting the car to drive from reverse.
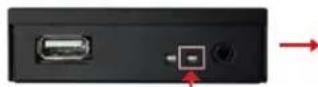
AUDIO INPUT TO VEHICLE:
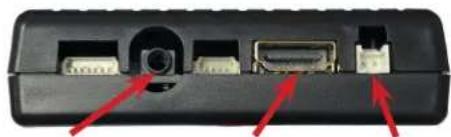
The Smart-Play audio will connect to the vehicle's audio system via the Aux-In of the radio. Plug in the 3.5mm stereo plug (labeled "Audio") on the ACPLX-12Y harness to the "Line Out" port on the Smart-Play module. Go to the radio's Aux-in function when using Smart-Play.
natural_image
Close-up of a black electronic device rear panel showing ports and connectors with red arrows pointing to specific components (no text or symbols visible)Line Out (Aux) HDMI Power Port
MICROPHONE CONNECTION:
The Smart-Play will utilize the vehicle's factory microphone. Plug in the 3.5mm microphone connector on the ACPLX-12Y harness to the Smart-Play module microphone port to use the factory microphone.

text_image
USB Mic InOPERATION:
text_image
AUDIO RADIO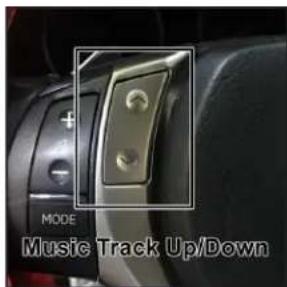
text_image
MODE Music Track Up/Down| JOG WHEEL CONTROLS | ||
| AUDIO | Activate Siri or Google voice command | |
| MENU | Long press = Activate CarPlay / Android Auto | Short press = back to OEM screen |
| RETURN | Back to OEM screen menu | |
| JOG WHEEL | Apple CarPlay and Android Auto controls | |
| STEERING WHEEL CONTROLS | ||
| Up /Down | Music Track Up/Down | |
VEHICLE APPLICATIONS:
Compatible with Lexus vehicles without OEM Navigation.
| Lexus | |||
| 2013-2018 | CT | 2013-2019 | IS |
| 2013-2018 | ES | 2013-2019 | RC-F |
| 2013-2019 | GS | 2013-2019 | RX |