V-CD281HTU - Vacuum Cleaner LG - Free user manual and instructions
Find the device manual for free V-CD281HTU LG in PDF.

User questions about V-CD281HTU LG
0 question about this device. Answer the ones you know or ask your own.
Ask a new question about this device
Download the instructions for your Vacuum Cleaner in PDF format for free! Find your manual V-CD281HTU - LG and take your electronic device back in hand. On this page are published all the documents necessary for the use of your device. V-CD281HTU by LG.
USER MANUAL V-CD281HTU LG
Bagless vacuum cleaner

natural_image
Abstract black and white circular logo with stylized geometric design (no text or symbols)LG
Table of contents
Information for Your Safety....3
How to Use....4
Assembling cleaner ....4
Using the cleaning head and Accessory Nozzles....6
Emptying the Dust Chamber 8
Cleaning the Filter 9
Operating the cleaner....10
Cleaning the Exhaust Filter ....11
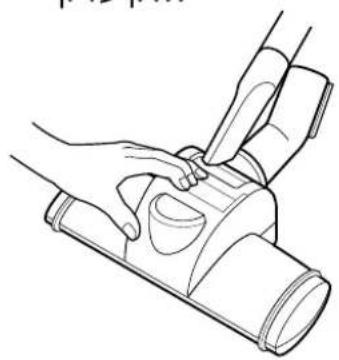
How to use elbow tube, turbine brush ....12
User's guide for sani punch vacuum nozzle 13
Features 13
Cleaning Vacuum Nozzle for Bedding....15
Information for Your Safety
Please read all the following information, which contains important instructions for the safety,
the use and the maintenance of the appliance.
This appliance complies with the following EC Directives: -73/23/EEC,
93/68/EEC-Low Voltage Directive-89/336EEC -EMC Directive.
□ Never allow children to use the appliance unsupervised.
☐ Do not use the appliance If the power cord is damaged or faulty.
☐ If the power cord is damaged, it must be replaced by an approved LG Electronics Service Agent to avoid a hazard.
□ Always switch the vacuum cleaner off before:
• Emptying the dust chamber.
• Cleaning or changing the filters.
☐ Do not vacuum flammable or explosive substances(liquids or gases).
☐ Do not vacuum hot ash, embers etc. nor sharp objects.
☐ Do not vacuum water or other liquids.
☐ Do not unplug by pulling on cord.
□ Use only LG's recommended filters.
□ When you vacuum with an attachment appliance that has a rotating brush roller:
• Do not reach into the running brush roller.
Thermal protector: This vacuum cleaner has a special thermostat that protects the cleaner in
case of motor overheating. If the cleaner suddenly shuts off, turn off the switch and unplug the
cleaner. Check the cleaner for a possible source of overheating such as a full dust chamber, a blocked
hose or clogged filter. If these conditions are found, clean the dust chamber and filters (refer to 8\~9 page) and wait at least 30
minutes before attempting to use the cleaner. After the 30 minutes period, plug the cleaner back in and
turn on the switch. If the cleaner still does not run, contact a qualified electrician.

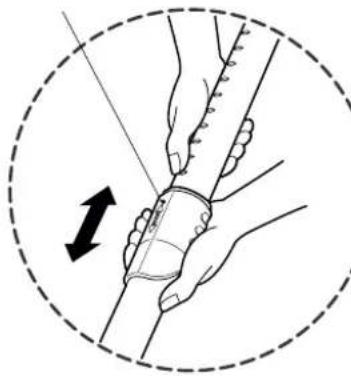
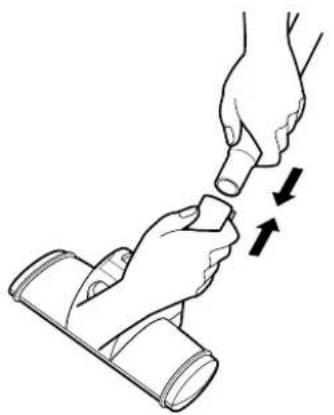
How to Use Assembling Cleaner
Fit the large cleaning head into the end of the tube.
Spring latch
natural_image
Illustration of hands performing a manual manipulation or dissection technique, enclosed in a dashed circle with an arrow indicating motion (no text or symbols present)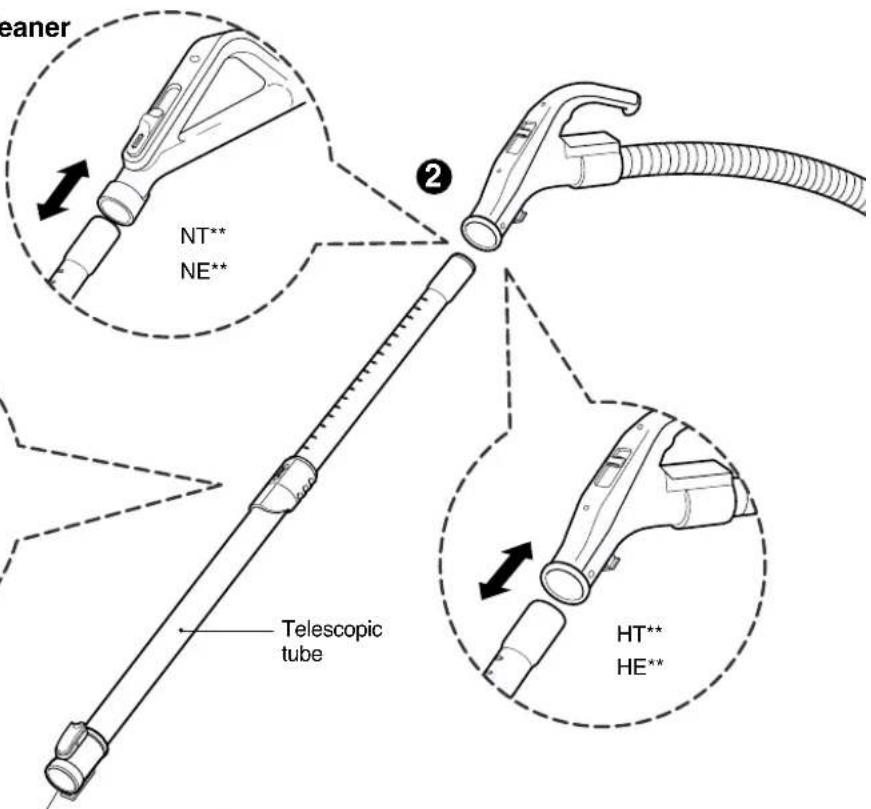
text_image
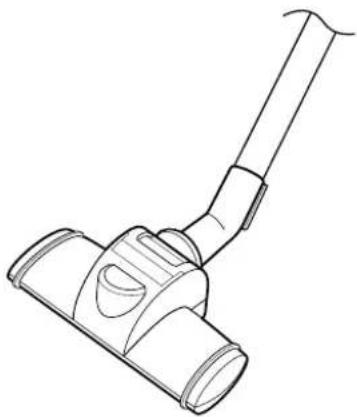
teener NT** NE** Telescopic tube HT** HE**1

natural_image
Line drawings of various vacuum cleaner components (no text or symbols)① The 2 position head
② Telescopic tube (depending on model)
Push telescopic tube into nozzle outlet.
- Press the spring latch to release.
- Pull out the tube to the desired length.
- Release spring latch to lock the tube in position.
- Push telescopic tube into hose handle firmly.
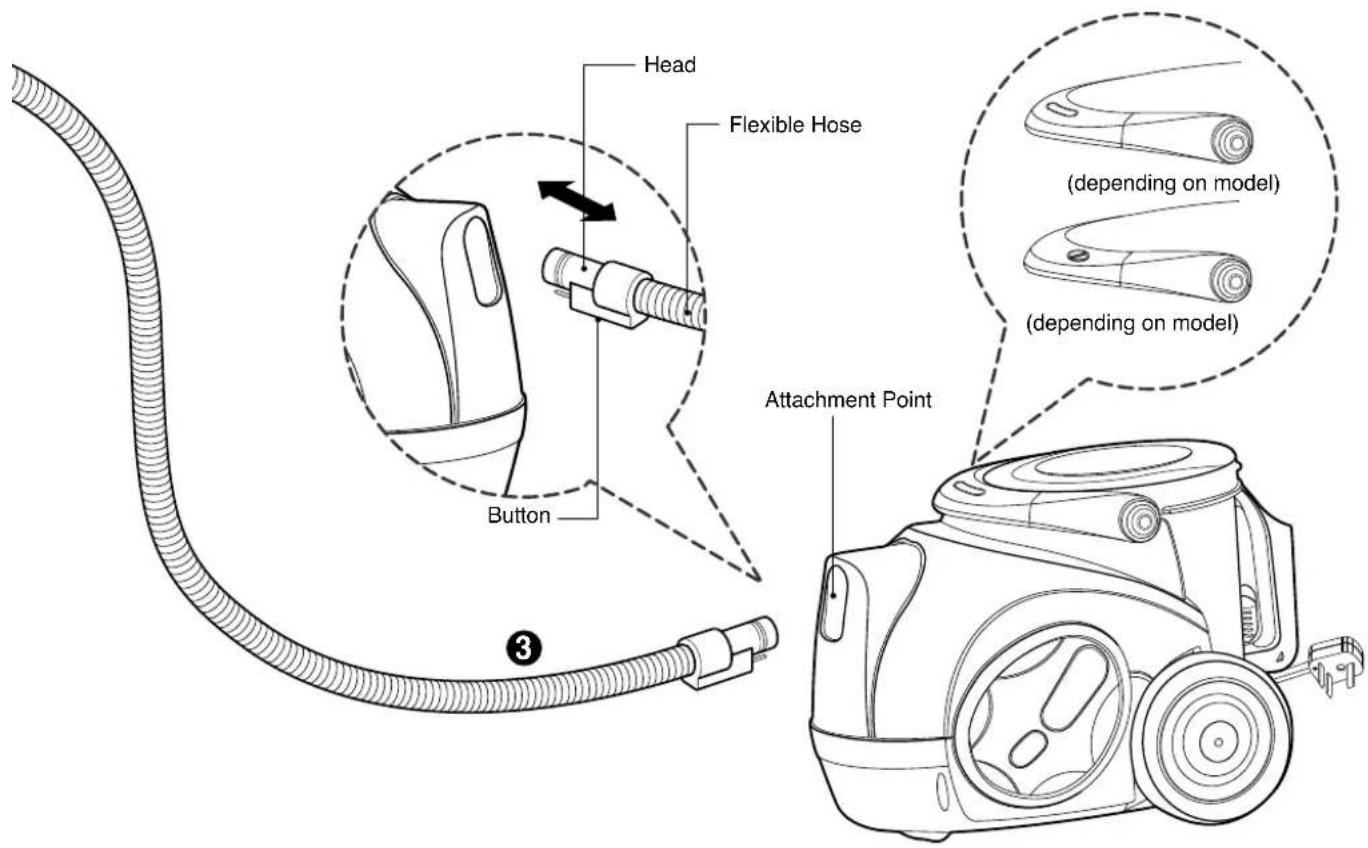
text_image
Head Flexible Hose Button Attachment Point (depending on model) (depending on model)
③ Connecting the flexible hose
- Push the end of the head on the flexible hose into the attachment point on the vacuum cleaner.
- To remove the flexible hose from the vacuum cleaner, press on the button situated on the head, then pull the head out of the vacuum cleaner.
CAUTION
- Suction power may be weakened when insignificant dusts are sucked. In this case, clean the filter.
- Make the dust box empty if dusts are filled to the maximum degree and then clean the filter when it becomes 5 times.
How to Use Using the cleaning head and Accessory Nozzles
Tear the vinyl bag and pull out accessories. Attach the accessory holder onto the telescopic tube. And then, fit the Dusting Brush, Crevice Tool and Upholstery Nozzle onto the accessory holder. Fit the accessory onto the hose.
natural_image
Illustration of hands holding a cup and a mug inside a dashed circle (no text or symbols)
natural_image
Illustration of a hand using a tool to clean or adjust a car seat (no text or symbols visible)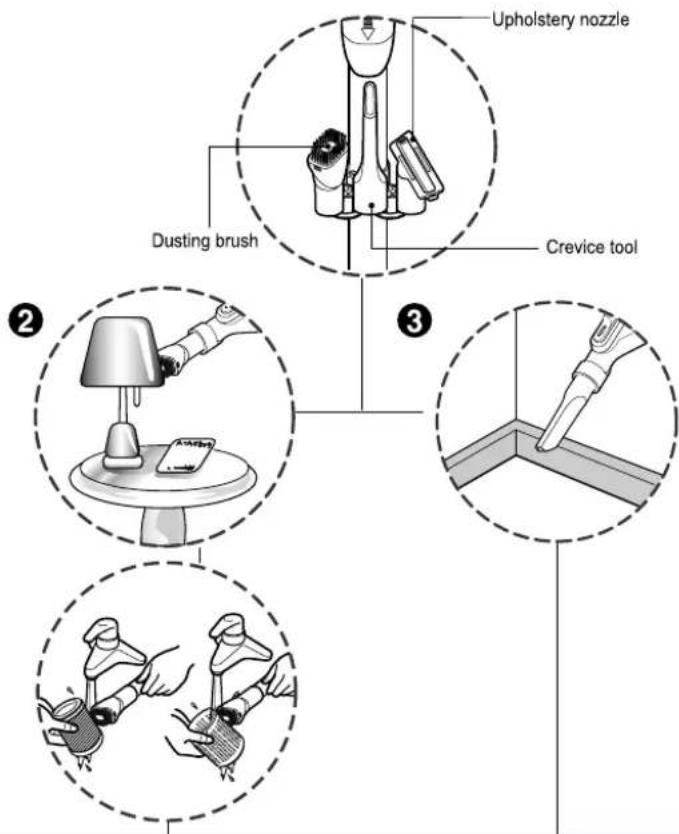
text_image
Upholstery nozzle Dusting brush Crevice tool ② ③② Dusting Brush
natural_image
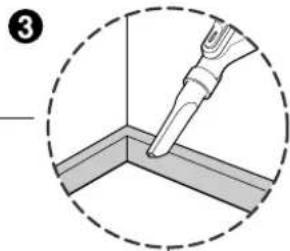
Diagram showing a tool interacting with a corner panel, enclosed in a dashed circle (no text or symbols)③ Crevice Tool
① Upholstery Nozzle
Upholstery Nozzle is for vacuuming upholstery, mattresses, etc. The thread collectors help to pick up the threads and fluff.
Dusting Brush is for vacuuming picture frames, furniture frames, books and other irregular surfaces. Dusting Brush is also used for cleaning Filters.
Crevice Tool is for vacuuming in those normally hard-to-reach places such as reaching cobwebs, or between the cushions of a sofa.

text_image
(depending on model) (depending on model) (depending on model) (depending on model)
natural_image
Simple line drawing of a mechanical component inside a dashed circle (no text or symbols)
text_image
5 Pedal
④ Sani punch nozzle (depending on model)
⑤ The 2 position head (depending on model)
Refer to Page 13\~16
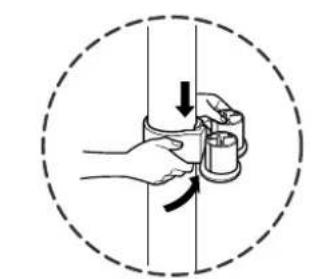
- The 2 position cleaning head equipped with a pedal which allows you to alter its position according to the type of floor to be cleaned.
- Hard floor position (tiles, parquets floor) Press the pedal to lower brush.
- Carpet or rug position Press the pedal to lift the brush up.
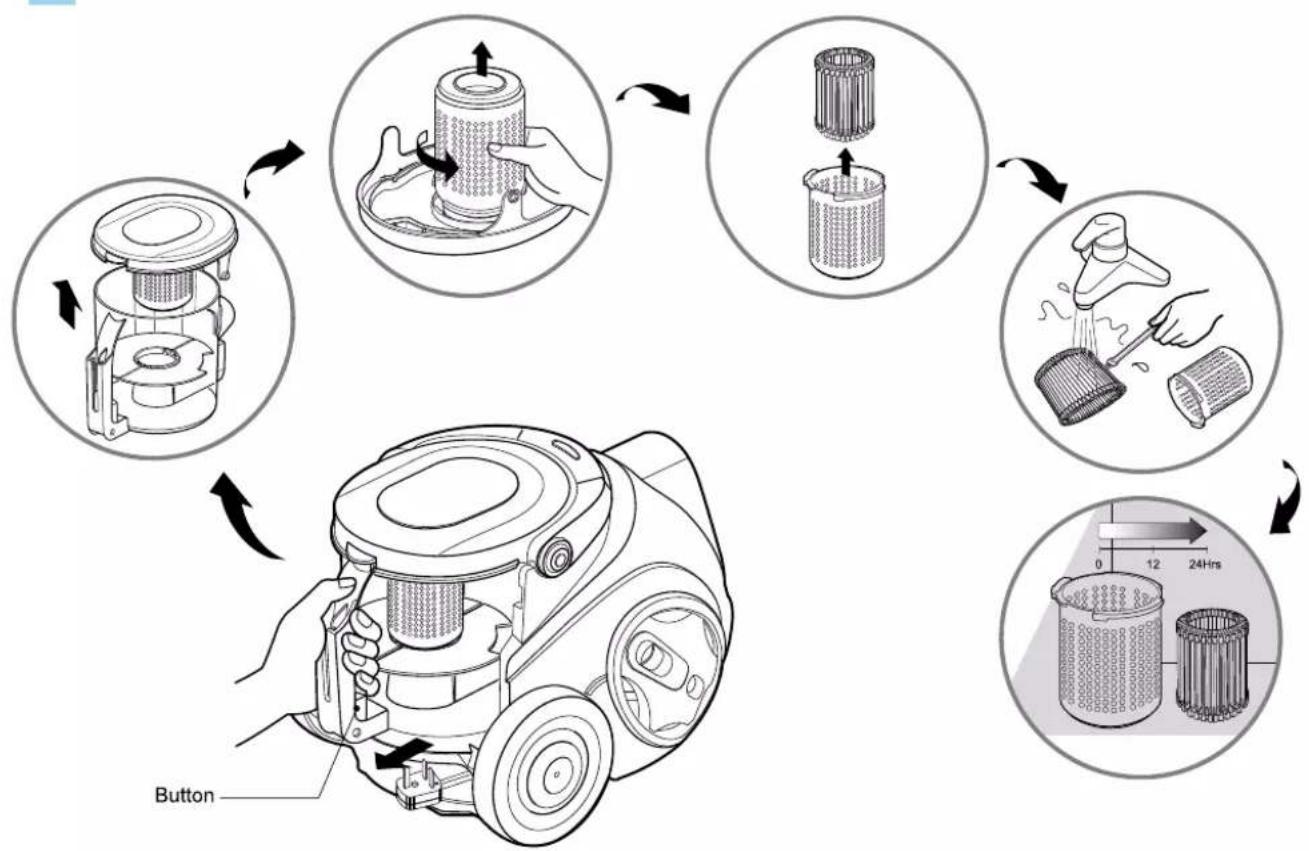
How to Use Emptying the dust chamber

text_image
Pleat-shaped internal filter Circle-shaped external filter Dust chamber cap Dust chamber Dust chamber cap Button Dust chamber PlateSuction power may be weakened when insignificant dusts are sucked. In this case, clean the filter.
- Turn off the vacuum cleaner and unplug it.
-
Your vacuum cleaner is equipped with both a dust chamber and a motor filters.
Press the button and pull the dust chamber forward. Remove the dust chamber cap.
Clean the pleat-shaped and the circle-shaped filters.
To reinstall the dust chamber, replace the dust chamber cap and push the dust chamber into the tank mount as far as it will go. -
Open the dust chamber cap.
- Remove two plates from the dust chamber.
- Wash both parts with softcloth. Gently rinse both parts under cold running water.
How to Use Cleaning the Filter
flowchart
graph TD
    A["Button"] --> B["Brushing"]
    B --> C["Close-up of brush cleaning device"]
    C --> D["Close-up of brush cleaning device"]
    D --> E["Close-up of brush cleaning device"]
    E --> F["Close-up of brush cleaning device"]
    F --> G["Close-up of brush cleaning device"]
    G --> H["Close-up of brush cleaning device"]
    H --> I["Close-up of brush cleaning device"]

The reusable filters are situated under the dust chamber cap and you can use it permanently.
- Press the button and pull the dust chamber forward.
- Open the dust chamber cap.
- Remove the filters by rotating it counter-clockwise.
- Clean the filters with the dusting brush under cold running water.
- Allow the filters to dry in a shaded location for a day.
- Make the dust chamber empty if dusts are filled to the maximum degree and then clean the filter.
Do not use the wet filter to avoid clogging.
WARNING!
Gently rinse both parts separately under a cold running water until the water runs clear. Do not use detergent or a washing machine or dishwasher. Shake off excess water from the filter.
Do not tumble/spindry, microwave or place in oven or on direct heat. Ensure the filter is completely dry.
Re-assemble and place it back in your machine, filter frame.
If the filter is damaged, do not place them in the machine.
Please call the Helpline.
Do not use the net-shaped filter separately.
How to Use Operating the cleaner.
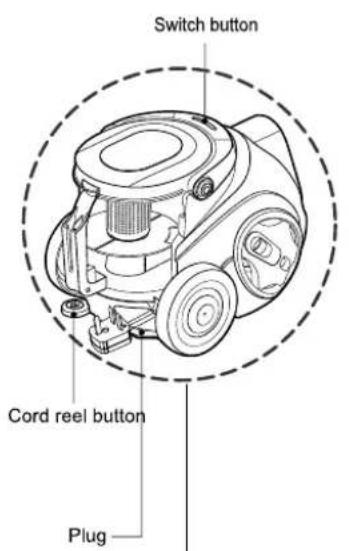
text_image
Switch button Cord reel button Plug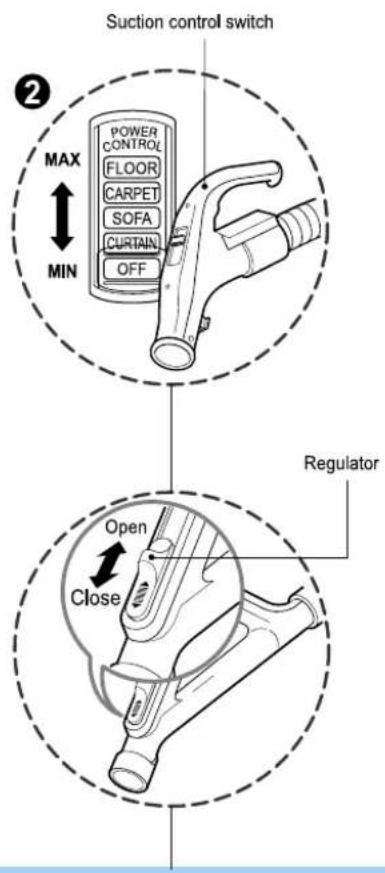
text_image
Suction control switch ② MAX MIN POWER CONTROL FLOOR CARPET SOFA CURTAIN OFF Regulator Open Close
natural_image
Mechanical assembly diagram showing a hand operating a lever mechanism within a dashed circular frame (no text or symbols)① How to Plug in and Use
- Pull out the power cord to the desired length and plug into the socket.
- Push the suction control switch of the hose handle in the direction of the position what you want. (depending on model)
- To stop it, push down the suction control switch in the direction of OFF. (depending on model)
- Press switch button to start the vacuum cleaner. (depending on model)
- To stop it, press the switch button again. (depending on model)
- Press the cord reel button to retract the power cord after use.
② Adjusting the Suction level (depending on model)
- Adjust suction with the suction control switch in the hose handle. (depending on model)
• The flexible hose handle has a manual air flow regulator which allows you to adjust the suction level briefly. (depending on model)
③ Park System
• To store after vacuuming and pause while vacuuming.
- For deposit after vacuuming, for example to move a small piece of furniture or a rug, use the Park system to support the flexible hose and cleaning head.
- Slide the hook on the large cleaning head into the slot on the rear of the dust chamber.
How to Use Cleaning the Exhaust Filter

flowchart
graph TD
    A["Component with Filter cover"] --> B["Initial inspection"]
    B --> C["Check for clean air"]
    C --> D["Check for full inspection"]
    D --> E["Final inspection with speed indicator"]
    E --> F["Recycl or Washing"]

• The exhaust filter is a washable and reusable HEPA filter.
• To change the exhaust filter, remove the filter cover on the body by release hook.
• Pull out the exhaust filter.
- Clean it with cold, running water.
Do Not use the brush
- Using the brush will cause permanent damage and allow dust to bypass the filter.
- Allow exhaust filter to dry in a shaded location for a dry.
• The exhaust filter should be cleaned at least once a year.
User's guide for sani punch vacuum nozzle (depending on model)
Features
This nozzle picks up even dust inside through beating.
The bottom part can be separated to be cleaned.
Since the bottom does not stick to the surface, vacuuming is easy.
How to use
Follow the directions below for proper use.
Assembly
Connect the nozzle to the telescopic tube.
natural_image
Illustration of two hands performing a manual task with arrows indicating motion (no text or symbols)
natural_image
Line drawing of a vacuum cleaner with handle and lever (no text or symbols)
Use
Set the suction power control switch to MAX POWER before vacuuming.
Depending on the type of bedding, handling may be awkward or it may cause a lot of noise.
If this is the case, adjust the suction power control switch to a lower setting.
If the punch bar does not move, lift the nozzle slightly off the surface.
If it does not move, even after doing this, check if the suction power is too low or if the nozzle base is clogged with a foreign object.

This Sani Punch nozzle is for effective cleaning of beds and blankets to remove mites and dust.
Effective cleaning

natural_image
Line drawing of a bed with an arrow indicating direction, no text or symbols presentBed & blanket
Bulky & heavy blanket Light blanket & sheet
natural_image
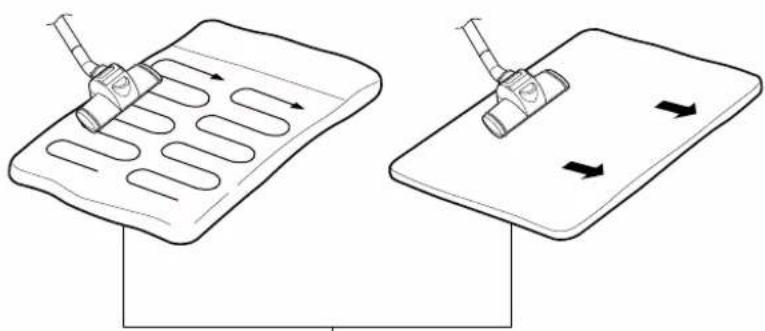
Diagram showing two mechanical components with directional arrows, one being inserted into a grid-like structure and the other holding a cylindrical component (no text or symbols)When using on the bed
When using on the floor
Lay out the blanket and vacuum it on the bed
It is easier to clean a light blanket or sheet by pushing the nozzle in the direction of the arrow. To increase cleaning efficiency for light blankets, lay on top of a bulky blanket and then clean.
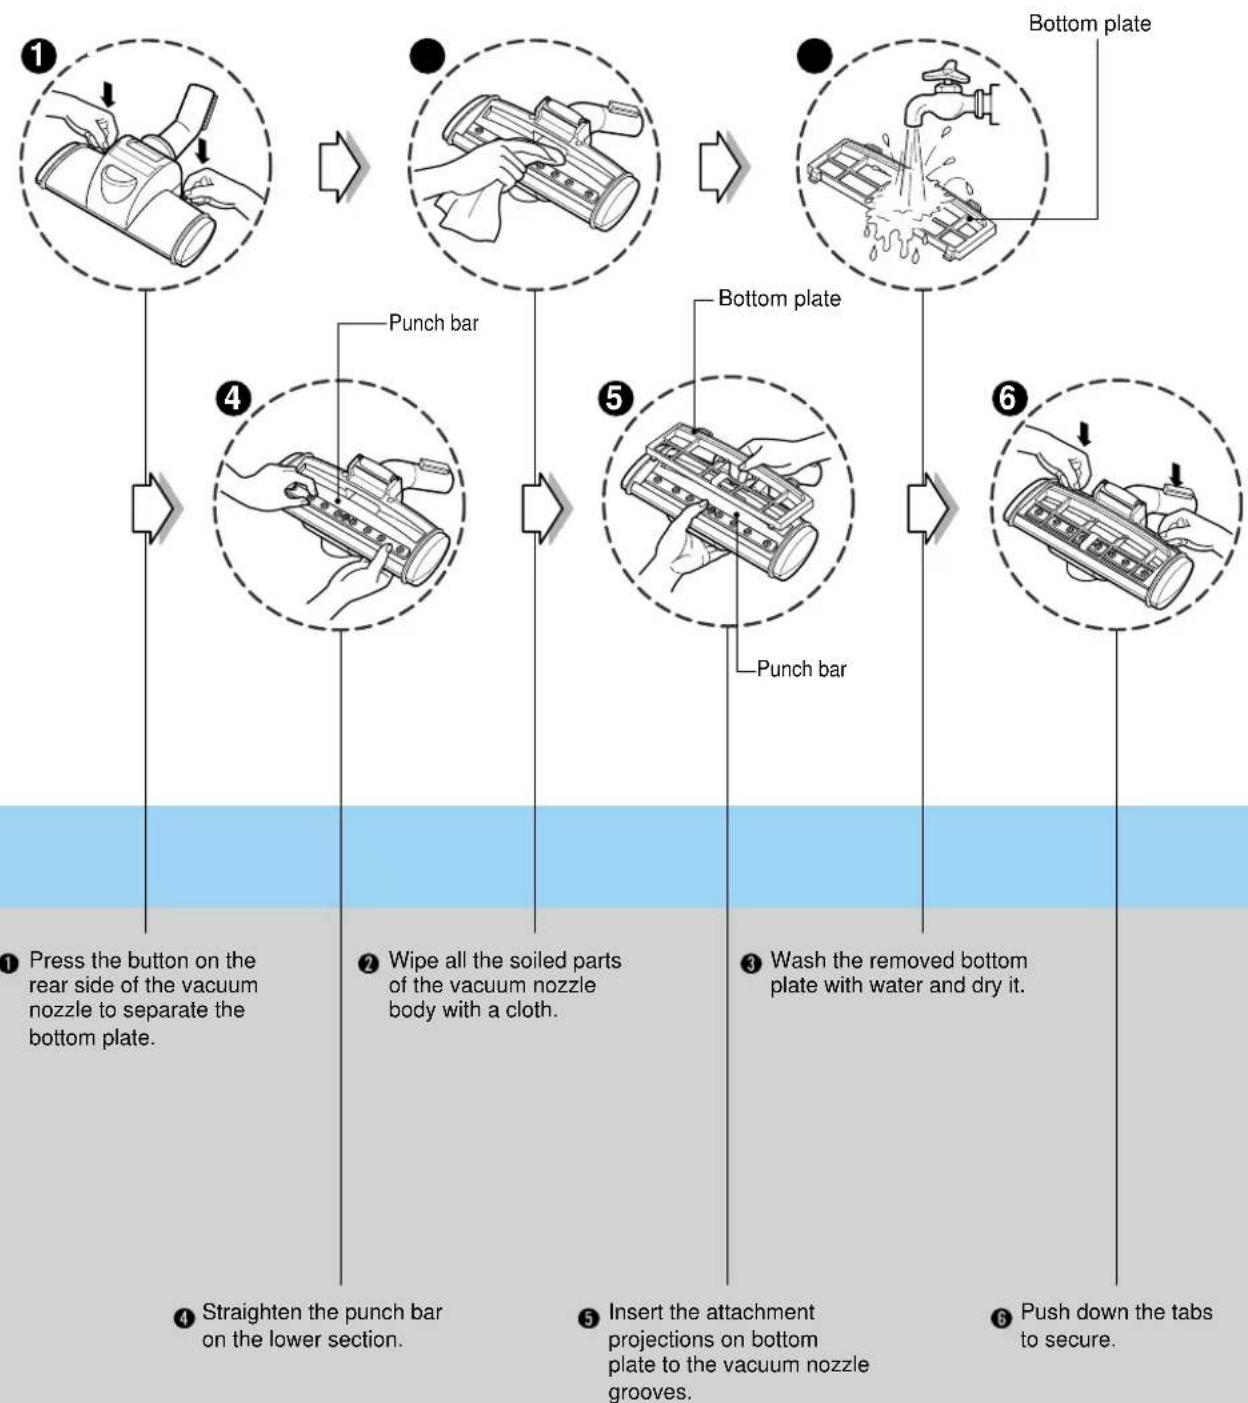
User's guide for sani punch vacuum nozzle Cleaning Vacuum Nozzle for Bedding (depending on model)
For simple cleaning of the vacuum nozzle, detach the Sani Punch nozzle from the telescopic tube and attach the crevice tool to vacuum dust.
Top Bottom
natural_image
Line drawing of a hand holding a device with a handle, no text or symbols present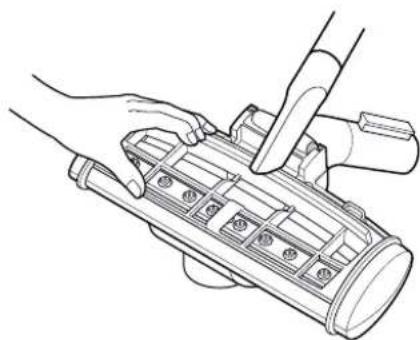
natural_image
Line drawing of hands using a tool to adjust or install a mechanical component (no text or symbols visible)
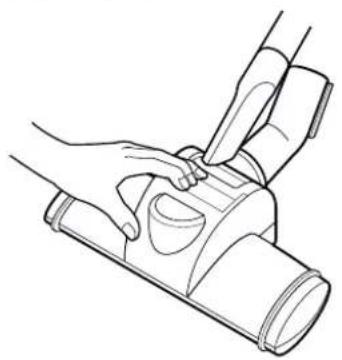
Since the vibrator inside is composed of precision parts, never disassemble the body. Be careful not to let foreign objects clog the air suction part on top of the vacuum nozzle. Since removal of the punch bar may cause performance problems, do not warp or remove it. Attach the bottom plate properly before using. Without this bottom plate, it may not function.
Since this vacuum nozzle has been made exclusively for cleaning beds, blankets and upholstery, use it only for these cleaning purposes. (Using it to clean the floor may result soiling it or a drop in performance, do not use it for such purposes.)
Follow the instruction below for through washing.
(Do not soak the entire body of the vacuum nozzle in water, it may cause the vibrator to malfunction)
flowchart
graph TD
    A["Press the button on the rear side of the vacuum nozzle to separate the bottom plate."] --> B["Punch bar"]
    B --> C["Wipe all the soiled parts of the vacuum nozzle body with a cloth."]
    C --> D["Punch bar"]
    D --> E["Wash the removed bottom plate with water and dry it."]
    E --> F["Push down the tabs to secure."]
What to Do if Your Vacuum Cleaner Does Not Work
Check that the vacuum cleaner is correctly plugged in correctly and that the electrical socket is working.
What to Do When Suction Performance Decreases
- Turn off the vacuum cleaner and unplug it.
- Check the telecsopic tube, flexible hose and cleaning tool for blockages or obstructions.
- Check that the dust chamber is not full. Empty if necessary.
- Check that the exhaust filter is not blocked. Clean the exhaust filter, if necessary.

Note

natural_image
Decorative border frame with leaf motifs and dotted lines, no text or symbols present

LG Electronics Inc.

LG Electronics Inc.

תָרִי

natural_image
Decorative border frame with leaf motifs and dotted lines, no text or symbols present
flowchart
graph TD
    A["Step 1: Initial water level control"] --> B["Step 2: Process with hands cleaning and handling"]
    B --> C["Step 3: Water level control with water level control, including water level adjustment"]
    C --> D["Step 4: Process with hands cleaning and handling"]
    D --> E["Step 5: Water level control with water level adjustment, including water level adjustment"]
    E --> F["Step 6: Water level control with water level adjustment, including water level adjustment"]
    F --> G["Step 7: Process with hands cleaning and handling"]
    G --> H["Step 8: Water level control with water level adjustment, including water level adjustment"]
natural_image
Line drawing of a hand using a tool to adjust or install a mechanical component (no text or symbols visible)הכלה
natural_image
Line drawing of hands operating a mechanical device with a cylindrical component (no text or symbols)natural_image
Illustration of a hand holding a vacuum cleaner in two different states: before and after a change (no text or symbols present)אַתְרָה
flowchart
graph TD
    A["Raw Material Inspection"] --> B["Initial Inspection"]
    B --> C["Assembly Steps"]
    C --> D["Time/Speed Indicator: 0-12, 12-24, 24+/-"]
    D --> E["Assembly Process"]
    E --> F["Final Assembly with Time/Speed Indicator: 0-12, 12-24, 24+/-"]
.הכלההוּרָהִיַעְבָרִיַעְבָרִיַעְבָרִיַעְבָרִיַעְבָרִיַעְבָרִיַעְבָרִיַעְבָרִיַעְבָרִי-הֶתֹאָהִיַעְבָרִי-הֶתֹאָהִיַעְבָרִי-הֶתֹאָהִי-הֶתֹאָהִי-הֶתֹאָהִי-הֶתֹאָהִי-הֶתֹאָהִי-הֶתֹאָה-הֶתֹאָה-הֶתֹאָה-הֶתֹאָה-הֶת:
flowchart
graph TD
    A["Raw Material"] --> B["Add into fan"]
    B --> C["Add into filter tank"]
    C --> D["Add into brush holder"]
    D --> E["Add to clean sample with brush"]
    E --> F["Final Product Output: 120 units, 24 hours"]
flowchart
graph TD
    A["Raw Material Input"] --> B["Add Fuel"]
    B --> C["Cutting into a filter"]
    C --> D["Cleaning with Gravel"]
    D --> E["Recycling into a bag with Gravel"]
    E --> F["Final Product Handling"]

    subgraph Initial State
        G["Raw Material Input"] --> H["Add Fuel"]
        H --> I["Cutting into a filter"]
        I --> J["Cleaning with Gravel"]
        J --> K["Recycling into a bag with Gravel"]
    end

    subgraph Final State
        L["Raw Material Input"] --> M["Add Fuel"]
        M --> N["Cutting into a filter"]
        N --> O["Cleaning with Gravel"]
        O --> P["Recycling into a bag with Gravel"]
    end

    style Initial State fill:#f9f,stroke:#333
    style Final State fill:#bbf,stroke:#333

natural_image
Simple line drawing of a mechanical component inside a dashed circle (no text or symbols)text_image
Diagram illustrating hand positioning and cleaning steps for a car seatbelt, showing step 1 with hand placement and cleaning instructions.הכלה ③
תָאַעְרִי
2
תְרַעָה בְּרַעָה ①
.Directive 89/336EEC-EMC - 93/
natural_image
Abstract black and white circular logo with stylized 'G' and dot (no text or symbols)LG