VTUA145NBU - Vacuum Cleaner LG - Free user manual and instructions
Find the device manual for free VTUA145NBU LG in PDF.

User questions about VTUA145NBU LG
0 question about this device. Answer the ones you know or ask your own.
Ask a new question about this device
Download the instructions for your Vacuum Cleaner in PDF format for free! Find your manual VTUA145NBU - LG and take your electronic device back in hand. On this page are published all the documents necessary for the use of your device. VTUA145NBU by LG.
USER MANUAL VTUA145NBU LG
natural_image
Abstract circular logo with stylized white letters inside a gray circle (no text or symbols)LG
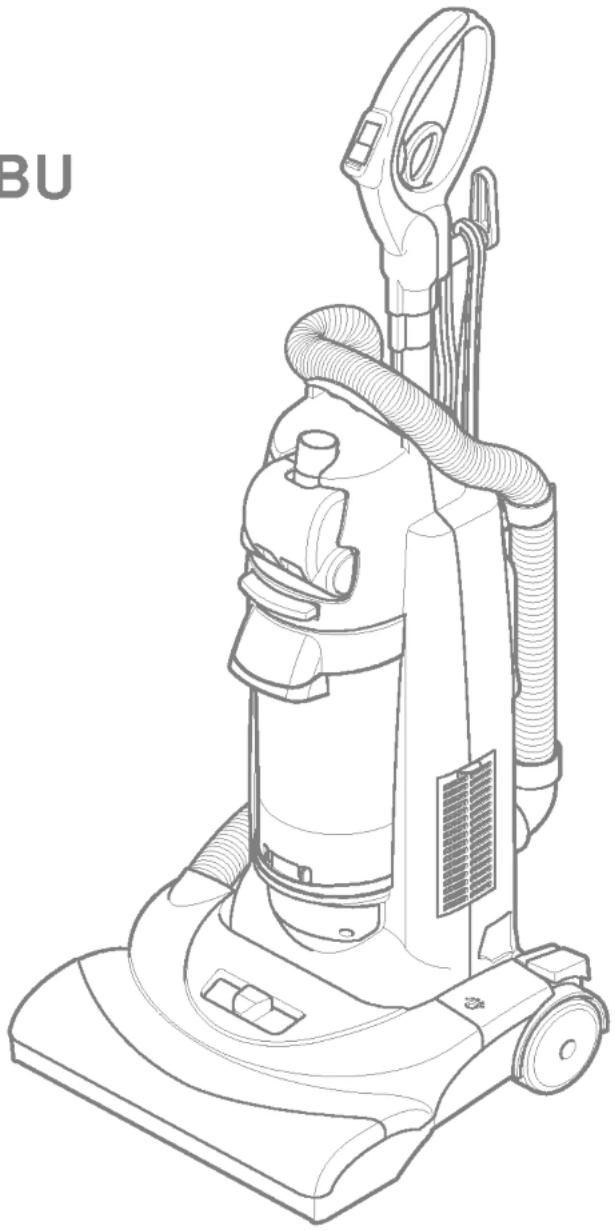
Upright Vacuum Cleaner Owner's Manual
MODEL : V-UA145NBU
natural_image
Line drawing of a vacuum cleaner with coiled tubing and handle (no text or symbols)PLEASE READ THIS MANUAL THOROUGHLY AND CAREFULLY BEFORE OPERATING THE VACUUM CLEANER
IMPORTANT SAFETY INSTRUCTIONS ...... 3
PARTS AND FEATURES ....4
TELESCOPIC HANDLE RELEASE ....5
CORD RELEASE ....5
SWITCH OPERATION 6
BODY RELEASE AND POSITIONS 6
Dust bin cleaning 11
Filters cleaning / changing 11
Belt Changing and Agitator Cleaning 13
Cleaning exterior 15
Removing clogs 15
TROUBLESHOOTING 16
IMPORTANT SAFETY INSTRUCTIONS

WARNING - To reduce the risk of fire, electric shock, or injury:
Your safety is important to us. To reduce the risk of fire, electric shock, injury to persons or damage when using your vacuum cleaner, follow basic safety precautions including the following:
Read this manual before assembling or using your vacuum cleaner.
Use your cleaner only as described in this manual. Use only with supplied attachments.
To reduce the risk of electric shock - Do not use outdoors or on wet surfaces.
Disconnect electrical supply before servicing or cleaning out brush area. Failure to do so could result in electric shock or brush suddenly starting.
Always turn cleaner off before connecting or disconnecting the hose.
Always turn cleaner off before unplugging.
Do not unplug by pulling on cord. To unplug, grasp the plug, not the cord.
Do not use with damaged cord or plug. If cleaner is not working as it should, has been dropped, damaged, left outdoors, or dropped into water, return it to an authorized LG Electronics Service Agency Do not pull or carry by cord, use cord as a handle, close door on cord, or pull cord around sharp edges or corners. Do not run cleaner over cord. Keep cord away from heated surfaces.
Do not leave cleaner when plugged in. Unplug from outlet when not in use and before servicing.
Do not allow to be used as a toy. Close attention is necessary when used by or near children.
Do not handle plug or cleaner with wet hands.
Do not put any object into openings.
Do not use with any opening blocked; keep free of dust, lint, hair and anything that may reduce air flow.
Keep hair, loose clothing, fingers, and all parts of body away from openings and moving parts.
Do not use cleaner without dust bin and/or filters in place.
Always clean dust bin after vacuuming carpet cleaners or freshener, powders and fine dust.
These products clog the filter, reduce airflow and can cause damage to the cleaner. Failure to clean the dust bin could cause permanent damage to the cleaner.
Do not use the cleaner to pick up sharp hard objects, small toys, pins, paper clips, etc. They may damage the cleaner or dust bin.
Do not pick up anything that is burning or smoking, such as cigarettes, matches, or hot ashes.
Do not use vacuum cleaner to pick up flammable or combustible liquids (gasoline, cleaning fluids, perfumes, etc.), or use in areas where they may be present. The fumes from these substances can create a fire hazard or explosion.
Use extra care when cleaning on stairs. Do not put on chairs, tables, etc. Keep on floor.
You are responsible for making sure that your vacuum cleaner is not used by anyone unable to operate it properly.
SAVE THESE INSTRUCTIONS
Proper assembly and safe use of your vacuum cleaner are your responsibilities. Your cleaner is intended only for household use. Read this Owner's Manual carefully for important use and safety information. This guide contains safety statements under warning and caution symbols.
Please pay special attention to these boxes and follow any instructions given. WARNING statements alert you to such hazards as fire, electric shock, burns and serious personal injury.
CAUTION statements alert you to such hazards as moderate personal injury and/or property damage.
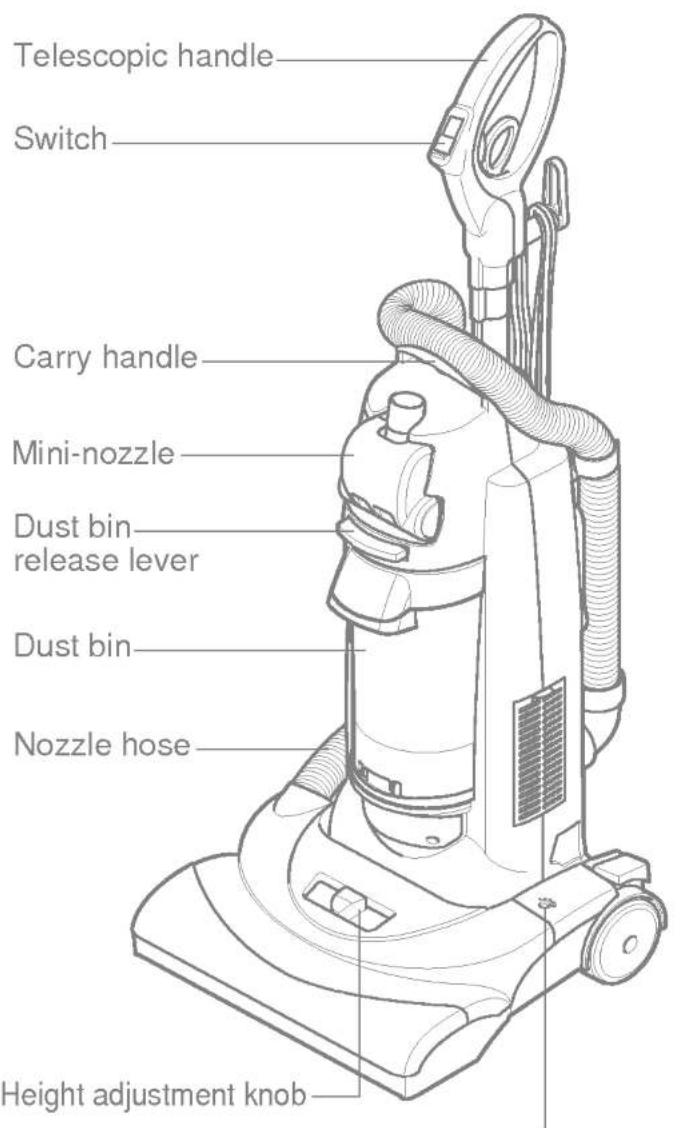
It is important to know your vacuum cleaner's parts and features to assure its proper and safe use. Review these before using your cleaner.
| Item | Part No. |
| Filter assembly | 5231FI2496A |
| Frame assembly | 3211FI1002A |
| Belt | 4400FI3352A |
text_image
Telescopic handle Switch Carry handle Mini-nozzle Dust bin release lever Dust bin Nozzle hose Height adjustment knob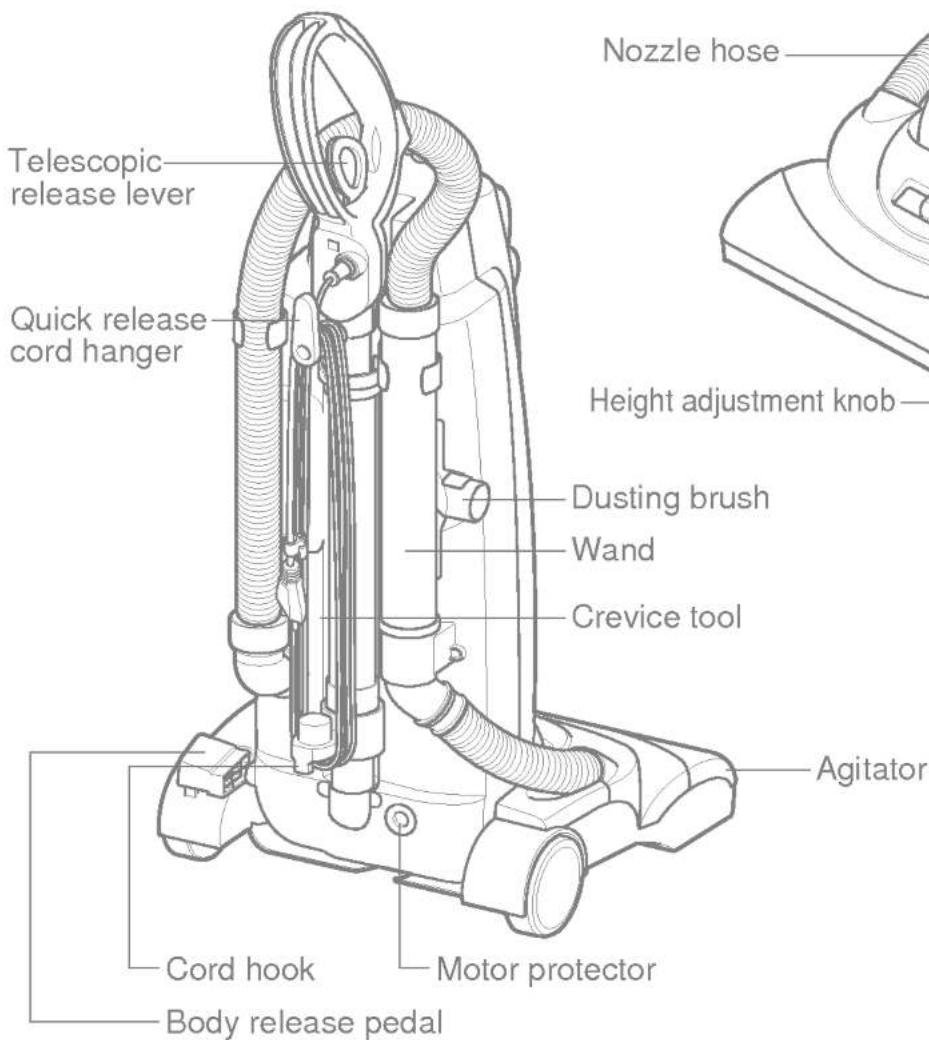
text_image
Telescopic release lever Quick release cord hanger Nozzle hose Height adjustment knob Dusting brush Wand Crevice tool Agitator Cord hook Motor protector Body release pedalReset button (Agitator motor)
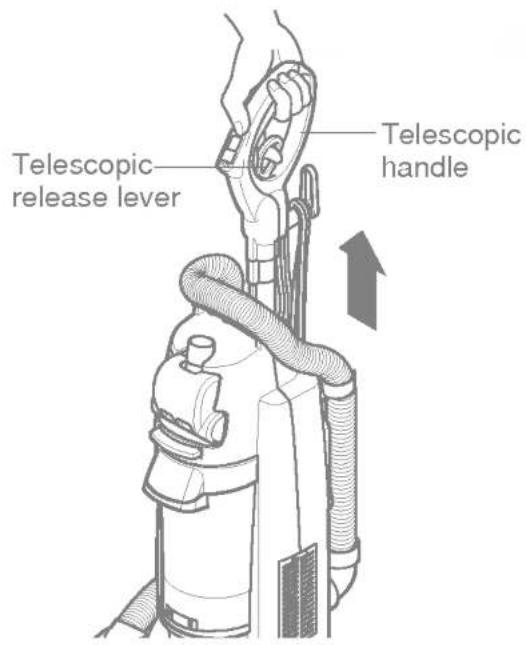
TELESCOPIC HANDLE RELEASE
Release the telescopic handle by pulling telescopic release lever up with fingers and pulling up the telescopic handle.
To lower the telescopic handle pull the telescopic release lever up with fingers and push down on the telescopic handle.
Note : For your convenience, adjust telescopic handle height properly to your height.
text_image
Telescopic release lever Telescopic handleTurn the quick release cord hanger to either side to release the power cord.
To store the power cord, wrap the power cord around the quick release cord hanger and hook, and clip the cord holder onto the power cord

text_image
Quick release cord hanger Cord Hook Cord holderSwitch operation
• Off
• Floor: Agitator off
- Carpet: Agitator on

WARNING
Personal injury hazard
To avoid personal injury, do not turn switch On/Off if the vacuum or your hand is wet.

text_image
Diagram showing a device with a lock and cable connector, annotated with an upward arrow indicating motion or adjustment.BODY RELEASE AND POSITIONS
Release the vacuum body by pressing down on the body release pedal with your foot and pulling back and down.

natural_image
Technical diagram of a vacuum cleaner's internal structure with no visible text or symbolsBody release pedal
Turn off cleaner first. Select a pile height setting by using height adjustment knob. Slide the adjustment knob to the correct setting position. Do not position the body when you are setting.
Suggested pile height settings :
You may need to raise the height to make some jobs easier, such as scatter rugs and longer pile carpets.
Suggested settings are :
High: shag carpet, long pile, plush, scatter rugs
Med: medium to long pile
Low: short to medium pile
Ex-low: very low pile, bare floor
Attention: Special care is required when vacuuming certain types of carpet or floor covering. Always check the carpet or floor covering manufacturer's recommended cleaning instructions before vacuuming.

text_image
100mm x 100 mm 50 mmHeight adjustment knob
| ATTACHMENT | CLEANING AREA | |||||
| Furniture* | Between Cushions* | Drapes* | Stairs | Walls | ||
| DUSTING BRUSH | 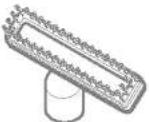 | X | X | X | X | X |
| CREVIC TOOL | 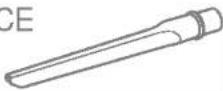 | X | X | X | ||
| Mini-nozzle |  | X | X | X | ||
* Always clean attachments before using on fabrics.
Carpet edges
Use attachments such as crevice tool, dusting brush, Mini-nozzle on carpet edges.
See page 7, 8

WARNING
Personal Injury Hazard
Use care if vacuum cleaner is placed on stairs. If it falls, personal injury or property damage could result.
To use attachments
1) Place the cleaner on a flat surface.
Remove the wand off the body by grasping and rotating while pulling up.
2) Set pile height to high
3) Place switch in "Floor" mode.
Dusting brush:
Functions as a dusting brush, also an upholstery nozzle which is useful for furniture, shelves etc. Attach as shown.

text_image
Diagram illustrating mechanical assembly steps with labeled components and directional arrows indicating movement or assembly.Crevice tool:
Crevice tool is attached as shown and used for corners, between cushions etc.

natural_image
Diagram showing a mechanical component being inserted into a cylindrical shaft, with an inset view of internal tubing (no text or symbols present)Note : For added reach the dusting brush can be used with crevice tool as shown.

text_image
Lock UnlockMini-nozzle
Mini-nozzle is attached as shown and used for stairs and other hard to reach places.

natural_image
Diagram showing a device being inserted into a cylindrical component, with an inset close-up of the mechanical assembly (no text or symbols)To remove Mini-nozzle cover:
Remove 2 screws on the bottom and take Mini-nozzle cover off as shown.
text_image
PressFrequently check and remove hair, string, and lint build-up the brush area. Failure to do so could cause damage to Mini-nozzle.
To extend wand:
Rotate the wand to unlock and pull.
text_image
Lock Unlock Pull
CAUTION
Do not pull the vacuum cleaner around the room by the hose. Property damage could result.
TO STORE ATTACHMENTS
Return the wand to its position on the body and the attachments to their holders.
PERFORMANCE FEATURES
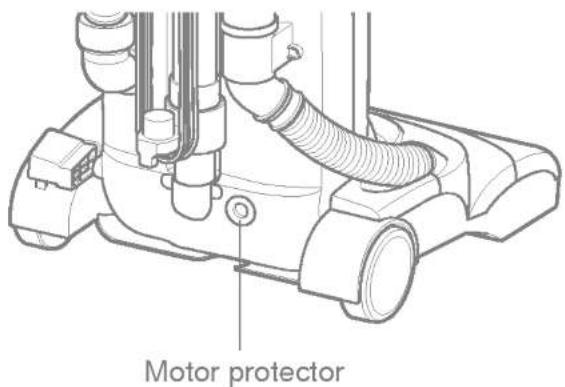
Motor protector
This vacuum has a motor protector bypass valve which automatically opens to provide cooling air to the motor when a clog prevents the normal flow of air to the motor. If the bypass valve opens to prevent motor overheating and possible damage to the vacuum, you will notice a change of sound as air rushes through the valve opening.
NOTE: Do not block motor protector.
To correct problem: Check for and remove clogs. See CLOG REMOVAL section.
NOTE: The motor protector may open when using attachments or when cleaning new carpet, due to reduced airflow caused by the attachments themselves or by new carpet fuzz filling the dust bin quickly.
text_image
Motor protectorThermal protector
This vacuum has a thermal protector which automatically trips to protect the vacuum from overheating. If a clog prevents the normal flow of air to the motor the thermal protector turns the motor off automatically to allow the motor to cool in order to prevent possible damage to the vacuum.
To correct problem: If this occurs, turn the vacuum off and unplug the power cord from the outlet to allow the vacuum to cool.
Check for and remove clogs, if necessary. Also check and clean/replace any clogged filters. Wait approximately thirty(30)minutes and plug the vacuum in and turn back on to see if the motor protector has reset. The thermal protector system will not reset until the vacuum has cooled down.
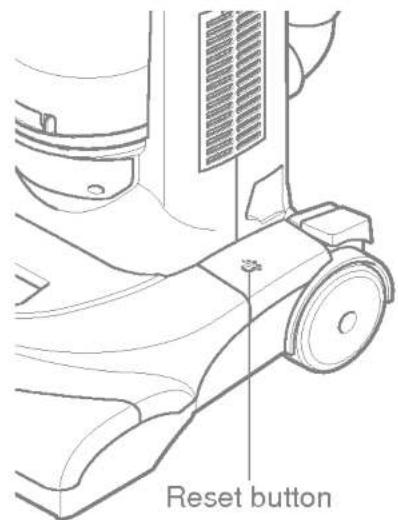
Motor overload protector
This vacuum cleaner has built-in protection against motor damage. If the motor is overloaded, the motor overload protector shuts off the motor. The suction motor will remain on at this time.
To correct problem: Turn off and unplug vacuum, remove obstruction and press reset button.
To reset, push reset button once.
text_image
Reset buttonVACUUM CLEANER CARE
Always follow all safety precautions when cleaning and servicing the vacuum cleaner.

WARNING
Electrical shock and personal injury hazard.
Disconnect electrical supply before servicing or cleaning the unit. Failure to do so could result in electrical shock or personal injury from cleaner suddenly starting.
To store the vacuum cleaner when it is not used, assemble its cord and return its telescopic handle to its lower space saving position.

WARNING
Electrical shock and personal injury hazard.
Wrapping the cord too tightly puts stress on the cord and can cause cord damage. A damaged cord is an electrical shock hazard and could cause personal injury or damage.

natural_image
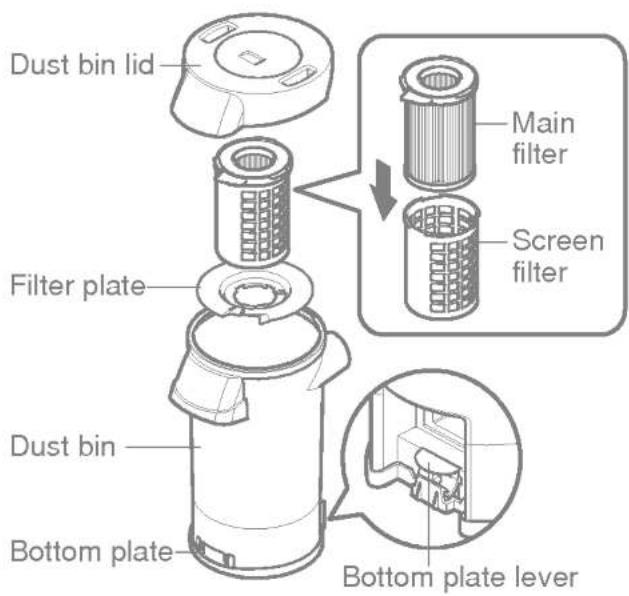
Line drawing of a vacuum cleaner with coiled tubing and mounting base (no text or symbols)Dust bin lid:
The dust bin lid covers up the dust bin.
Main filter:
Main filter traps dirt and debris that is picked up by the suction.
Screen filter:
Screen filter captures micro-particles.
Filter plate:
The filter plate separates the bin into two spaces for various types of dust and debris.
Bottom plate:
Used to throw dust out of the bin.
Bottom plate lever:
Used to open the bottom plate for dust and debris disposal.
Dust bin:
Where dirt is collected.
text_image
Dust bin lid Filter plate Main filter Screen filter Dust bin Bottom plate Bottom plate leverFor best performance always empty the dust bin when the dirt level reaches the "MAX" line.

WARNING
Electrical shock and personal injury hazard.
Always unplug power cord from electrical outlet before performing any service on vacuum.
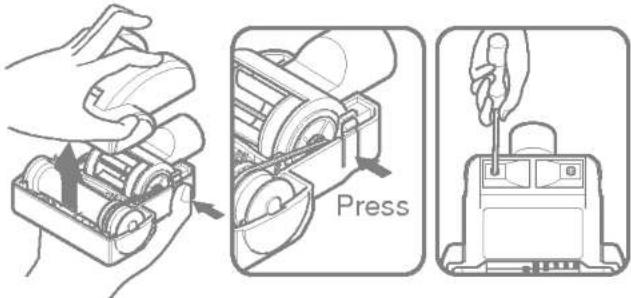
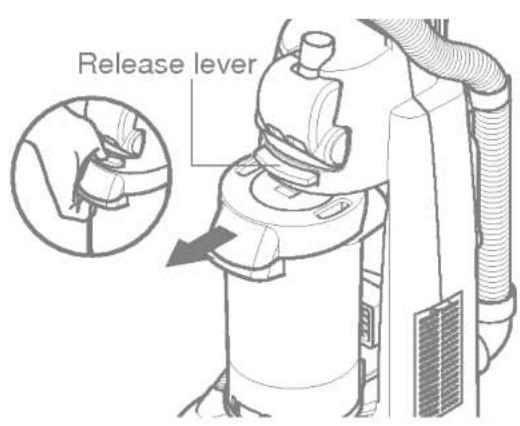
TO REMOVE DUST BIN, press the dust bin release lever until it snaps, and slide the bin out of cleaner.
text_image
Release leverTO EMPTY DUST BIN, press the bottom plate lever as shown.

text_image
Bottom plate leverNote : When replacing the dust bin in the vacuum you need to slide and snap it. Make sure that dust bin is fully engaged otherwise suction power could be low.

CAUTION
Carry the dust bin by the handle as shown.
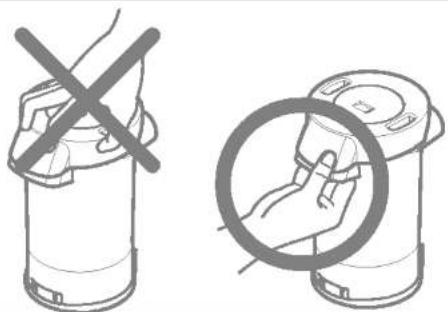
natural_image
Illustration showing a hand holding a device with a crossed-out 'X' symbol, alongside a magnified view of the device's handle (no text or symbols present)FILTERS CLEANING / CHANGING
TO CLEAN THE DUST BIN AND FILTERS, separate all components from the dust bin lid first, and clean the dust bin and filters with water.
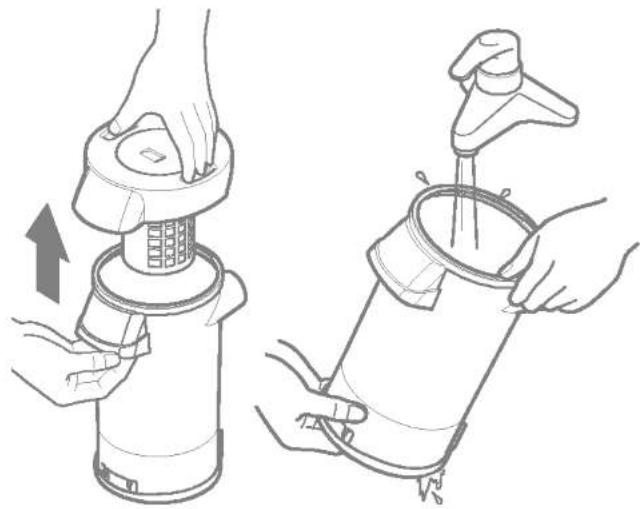
natural_image
Illustration of two hands using a portable device to lift water, showing the process with an upward arrow (no text or symbols)For optional performance check filters frequently and clean when dirty.
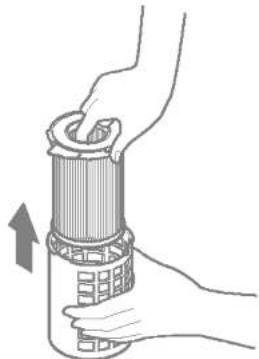
Grasp screen filter, rotate counter-clockwise and take them out.
Remove main filter from filter screen.
Rinse with clean water only, do not use detergent or soap.

natural_image
Illustration of a hand holding a device with a circular component, showing a press mechanism (no text or symbols present)Allow main and screen filter to dry 24 hours before putting them back. Make sure that the filters dry completely.
When cleaning the main filter no longer restores vacuum suction to full power, you need to replace the main filter.
natural_image
Illustration of hands holding a cylindrical device with a grid pattern, no text or symbols present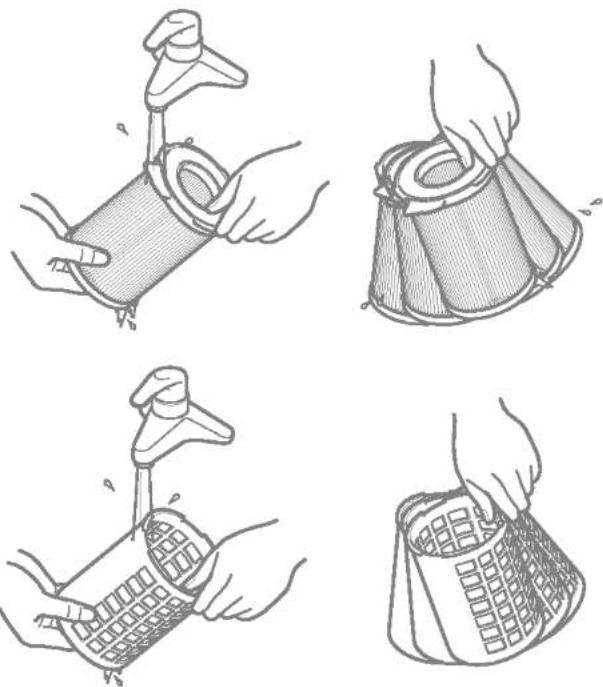
natural_image
Four-panel line drawing showing hands using different methods to handle a cylindrical object, with no text or symbols present.TO CHANGE THE EXHAUST FILTER, take it out of cleaner and replace it with new one. DO NOT CLEAN WITH WATER OR LIQUID. This filter can not be cleaned and must be replaced for proper performance.
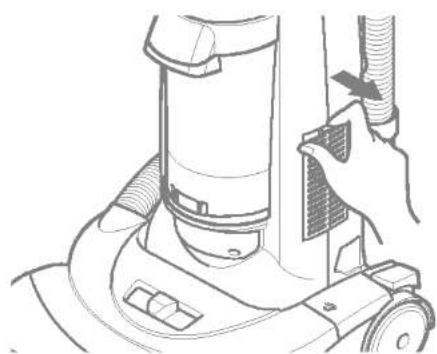
natural_image
Line drawing of a hand operating a vacuum cleaner on a wheeled base (no text or symbols)
natural_image
Line drawing of a vacuum cleaner with attached fan and wheels (no text or symbols)
CAUTION
Wet filter can cause permanent damage to cleaner. Ensure that all filters dry completely.
BELT CHANGING AND AGITATOR CLEANING

WARNING
Electrical shock and personal injury hazard.
Disconnect electrical supply before servicing or cleaning the unit. Failure to do so could result in electrical shock or personal injury from cleaner suddenly starting.
Frequently check and remove hair, string, and lint build-up in the agitator brush area. If build-up becomes excessive, follow the steps below. Should the belt become loose or should it break, follow the belt removal instructions.
NOZZLE COVER REMOVAL / INSTALLATION
Disconnect electrical supply, press body release pedal and rotate body down, so the cleaner is laying flat on the floor.
To protect the floor surface place paper under the nozzle and work area.
Remove 4 screws from the bottom as shown. Turn cleaner upside down to take the cover off.
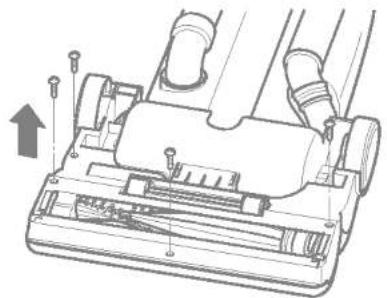
natural_image
Technical line drawing of a vacuum cleaner's internal structure with no visible text or symbols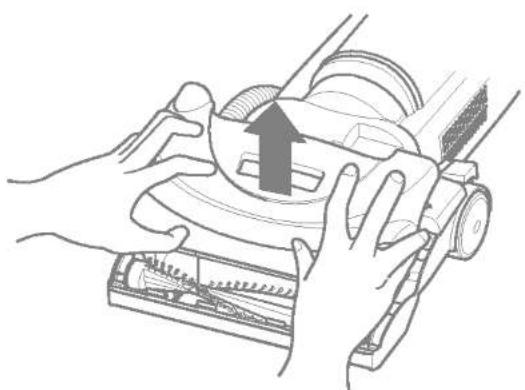
natural_image
Illustration of hands operating a mechanical device with an upward arrow indicating motion (no text or symbols present)To replace the nozzle cover, hook the front of the nozzle cover onto the nozzle base and turn the cleaner upside down. Replace the 4 screws on the bottom.
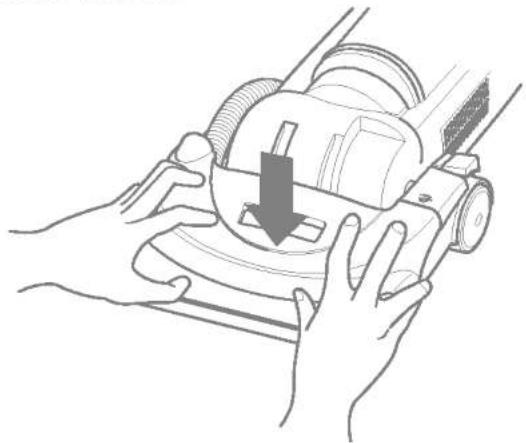
natural_image
Line drawing of hands operating a lawn mower with a downward arrow indicating the blade (no text or symbols present)
WARNING
Personal injury hazard
Always unplug the vacuum cleaner before cleaning the brush area as agitator may suddenly restart. Failure to do so can result in personal injury.
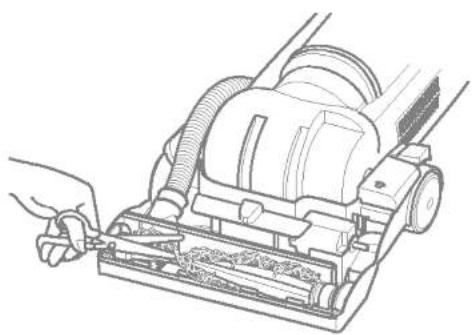
TO REMOVE BELT / CLEAN AGITATOR
Position hands on opposite ends of the agitator. If the belt is still attached to the agitator, there will be tension on it.
Carefully lift the right end of the agitator and then lift the other end.
Remove the worn or broken belt from the motor drive shaft and clean the agitator.

text_image
BeltRemove string or hair that may be wrapped around the agitator.
natural_image
Line drawing of a hand using a vacuum cleaner to clean or install the air (no text or symbols present)
WARNING
Be careful when removing the agitator as the belt tension is high. Failure to do so could result in personal injury from the agitator releasing quickly and snapping away.
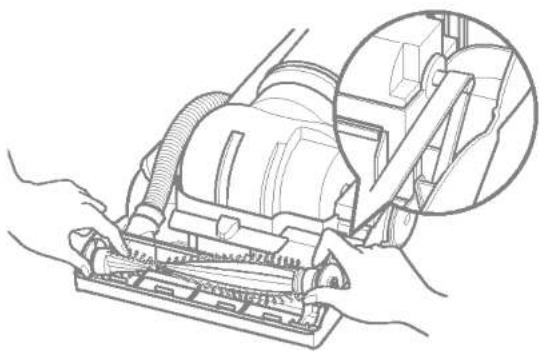
TO REPLACE BELT
Seat the left end of agitator into nozzle base.
natural_image
Line drawing of hands operating a vacuum cleaner with a magnified inset showing the component detail (no text or symbols present)Loop the new belt on the motor shaft.
Loop the other end of belt onto the belt pulley on the right end of agitator.

natural_image
Line drawing of hands operating a belt device with a circular dial and mechanical components (no text or symbols)Pull right end of agitator forward and seat it into nozzle base.

natural_image
Line drawing of hands operating a vacuum cleaner with a tool, no text or symbols presentTo seat agitator right end, put right end of agitator into slot in nozzle base as shown.

natural_image
Line drawing of hands operating a vacuum cleaner on a mechanical component (no text or symbols)Press firmly, checking to see that each end is completely inserted.

natural_image
Line drawing of hands operating a vacuum cleaner with hose and filter (no text or symbols)To replace the nozzle cover, follow the NOZZLE COVER REMOVAL / INSTALLATION section.
Unplug power cord from wall outlet. Clean exterior using a clean, soft cloth that has been dipped in a solution of mild liquid detergent and water and wrung dry.
DO NOT drip water in the cleaner.
DO NOT clean tools in dishwasher or clothes washer. Wash tools in warm soapy water, rinse and air dry.
DO NOT use tools if they are wet.
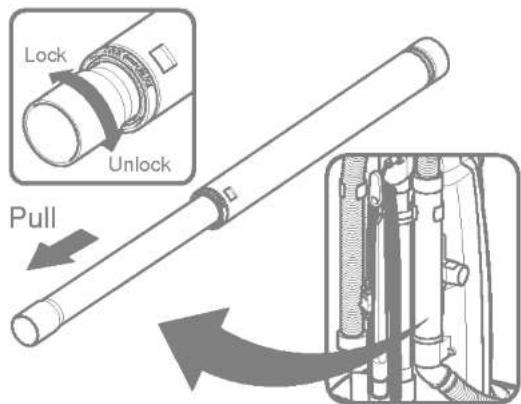
The hose located on the vacuum cleaner carries the dirt from the nozzle up to the dust bin. If the hose should become clogged :
Unplug vacuum. Remove the assembled wand, nozzle hose and check them.
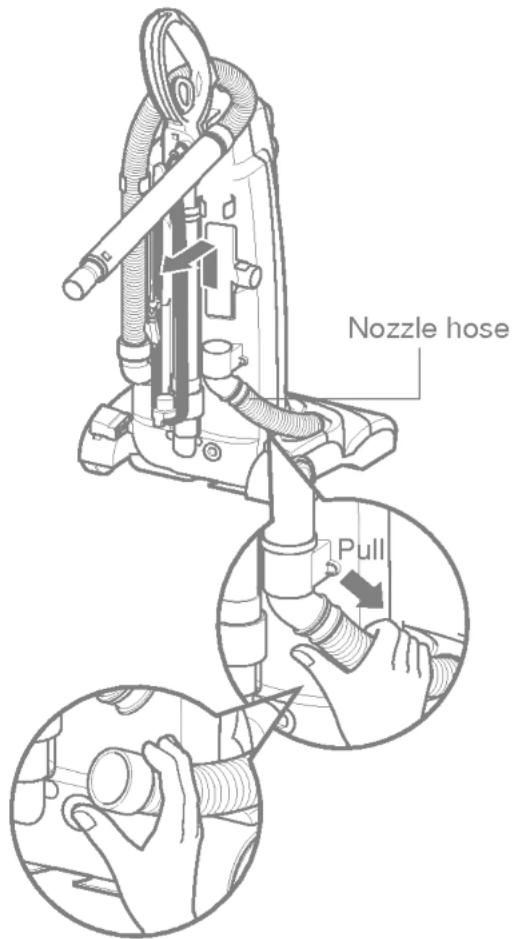
text_image
Nozzle hose PullCheck the base of the hose for clogging as shown.

text_image
Pull CheckCheck suction inlet and filters for clogs.
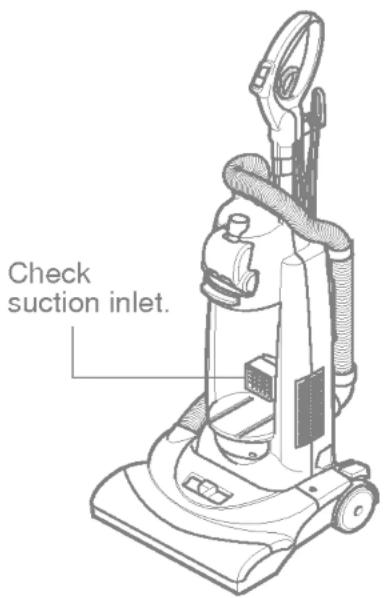
text_image
Check suction inlet.Note : Clogged filters can cause suction power to be low. To clean the filter, refer to FILTERS CLEANING / CHANGING section.
Review this chart to find do-it-yourself solutions for a minor performance problems. Additional service needed, other than those described in this owner's manual, should be performed at an authorized LG Electronics Service Agency

WARNING
Electrical shock and personal injury hazard.
Disconnect electrical supply before servicing or cleaning the unit. Failure to do so could result in electrical shock or personal injury.
| CLEANER WILL NOT RUN | 1. Unplugged at wall outlet.2. Switch in off position.3. Thermal protector activated | 1. Plug in firmly, check circuit breaker / fuse.2. Push switch to floor or carpet mode.3. See "To correct problem", page 9. |
| POOR JOB OF DIRT PICKUP | 1. Full or clogged dust bin.2. Broken agitator belt.3. Clogged hose or nozzle.4. Hose not inserted fully5. Worn agitator.6. Hole in hose7. Dust bin assembly improperly installed.8. Belt not installed on motor shaft.9. Motor protection system activated.10. Motor overload protector activated | 1. Empty dust bin and clean the filters2. Replace agitator belt.3. Clean hose or nozzle area.4. Insert hose5. Replace agitator.6. Replace hose.7. Properly install dust bin assembly8. Install belt on the motor shaft9. Check for clogs10. See "To correct problem", page 9. |
| DUST ESCAPES THE DUST BIN | 1. Dust bin assembly improperly installed. | 1. Properly install dust bin |
natural_image
Line drawing of a vacuum cleaner with coiled tubing and control panel (no text or symbols)text_image
Diagram showing a device with a lock and cable, highlighting the 'Open' button with an arrow indicating rotation.natural_image
Technical diagram of a vacuum cleaner's internal structure with no visible text or symbolstext_image
500mm 100mm 150mmtext_image
Technical diagram illustrating mechanical assembly steps with labeled components and directional arrows indicating movement or assembly.Щелевая насадка:
natural_image
Illustration of a hand using a mechanical device to press or install a component (no text or symbols visible)
text_image
Нажмите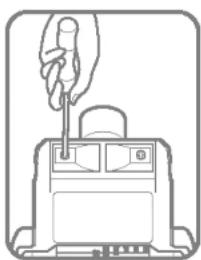
natural_image
Simple line drawing of a hand using a tool to press or install a device (no text or symbols)natural_image
Technical illustration of a mechanical assembly with pipes and a lever (no text or symbols)
ПРЕДОСТЕРЕЖЕНИЕ
natural_image
Technical line drawing of a vacuum cleaner's internal components (no text or symbols)natural_image
Line drawing of a vacuum cleaner with coiled tubing and mounting base (no text or symbols)КОМПЛЕКТ БУНКЕРА ДЛЯ СБОРА ПЫЛИ
text_image
What is the high level of vacuum buntingtext_image
Diagram showing a hand holding a device with a crossed-out X symbol, alongside a magnified view of the device's circular outline.ОЧИСТКА / ЗАМЕНА ФИЛЬТРОВ
natural_image
Illustration of two hands using a portable blender to lift water, showing the process with a handle and arrow (no text or symbols)natural_image
Diagram of a mechanical device with internal components and directional arrow (no text or symbols)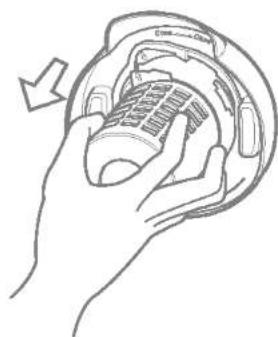
natural_image
Illustration of hands holding a device with a curved arrow indicating rotation (no text or symbols)natural_image
Illustration of hands holding a cylindrical device with a lid, showing internal structure and an upward arrow (no text or symbols)
natural_image
Illustration of hands using a tool to lift a cylindrical object (no text or symbols present)
natural_image
Hand holding a coiled net or filter component (no text or symbols visible)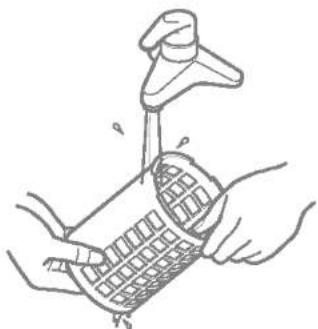
natural_image
Line drawing of hands using a tool to lift or spread material into a grid-patterned container (no text or symbols)
natural_image
Line drawing of a hand holding a grid-patterned object (no text or symbols)natural_image
Line drawing of a hand operating a vacuum cleaner on a mechanical device (no text or symbols)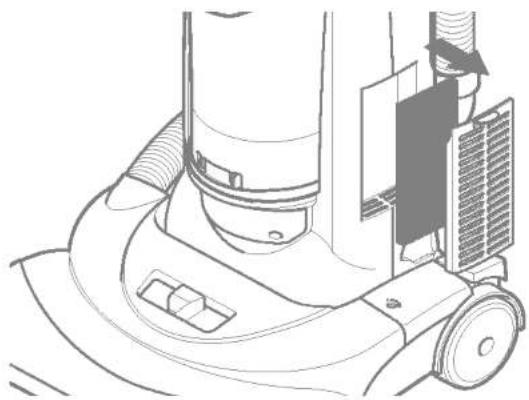
natural_image
Technical line drawing of a vacuum cleaner's wheel assembly (no text or symbols)
ПРЕДОСТЕРЕЖЕНИЕ
natural_image
Illustration of two hand positions showing a vacuum cleaner's internal components being processed, with no text or symbols present.natural_image
Illustration of hands operating a vacuum cleaner with a downward arrow indicating motion (no text or symbols present)
ПРЕДУПРЕЖДЕНИЕ
natural_image
Line drawing of a hand using a vacuum cleaner to clean or install the air gap (no text or symbols present)
ПРЕДУПРЕЖДЕНИЕ
natural_image
Line drawing of a vacuum cleaner with hands operating it, showing mechanical components and a magnified inset (no text or symbols)natural_image
Illustration of hands operating a vacuum cleaner with a handle, no text or symbols presentnatural_image
Line drawing of hands operating a vacuum cleaner (no text or symbols present)natural_image
Line drawing of hands operating a vacuum cleaner with a downward arrow indicating motion (no text or symbols present)natural_image
Line drawing of hands operating a vacuum cleaner on a mechanical component (no text or symbols)natural_image
Line drawing of hands operating a vacuum cleaner on a machine (no text or symbols)natural_image
Line drawing of a hand using a vacuum cleaner to clean or store contents (no text or symbols)תָרְשָׁ

natural_image
Line drawing of a vacuum cleaner with hands operating it, showing mechanical components and a magnified inset (no text or symbols)natural_image
Illustration of hands operating a mechanical device with a circular component and tool (no text or symbols visible)natural_image
Line drawing of hands operating a vacuum cleaner with a downward arrow indicating motion (no text or symbols)תָרִי
בְרָאִי אַלְה

natural_image
Illustration of hands operating a mechanical device with a scroll, showing internal components and a directional arrow (no text or symbols)תָרְשָׁ
natural_image
Technical line drawing of a mechanical device with no visible text or symbols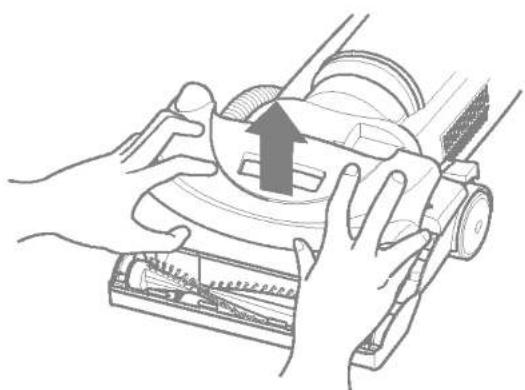
natural_image
Illustration of hands operating a vacuum cleaner with a rising arrow (no text or symbols)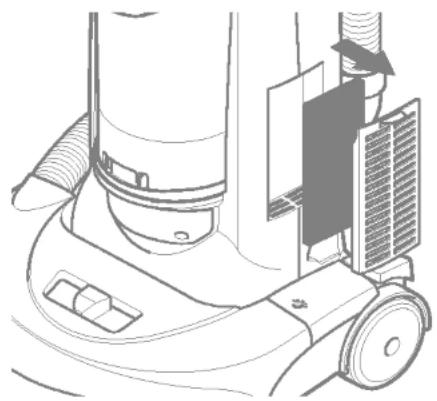
natural_image
Line drawing of a vacuum cleaner's side view showing mechanical components and airflow path (no text or symbols)תָרְשָׁ

natural_image
Illustration of hands holding a cylindrical device with a handle, showing internal structure and an upward arrow (no text or symbols)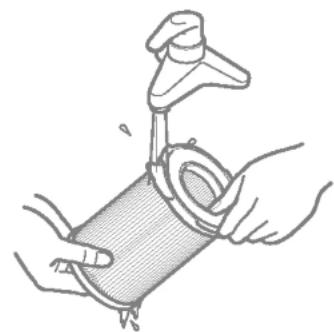
natural_image
Illustration of hands using a tool to lift a cylindrical object, no text or symbols present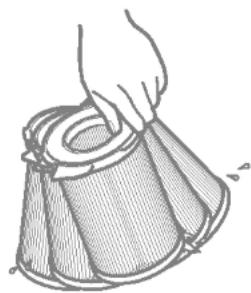
natural_image
Hand holding a coiled cable or mesh device, no text or symbols visible
natural_image
Illustration of hands using a pipette to clean or handle a woven basket (no text or symbols)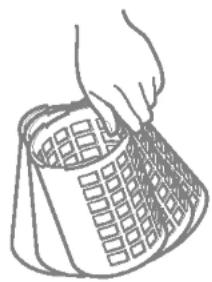
natural_image
Simple line drawing of a hand holding a grid-patterned object (no text or symbols)natural_image
Line drawing of a hand operating a vacuum cleaner on a wheeled base (no text or symbols)natural_image
Simple line drawing of a hand holding a cylindrical device with a crossed-out X symbol (no text or labels)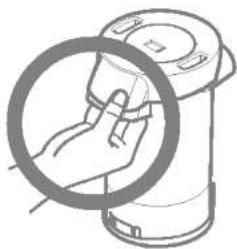
natural_image
Illustration of a hand holding a circular device with a magnified inset (no text or symbols)"MAX"
תָרְתָא
natural_image
Line drawing of a hand holding a device inside a circular container with a grid pattern (no text or symbols)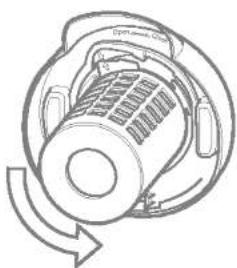
natural_image
Diagram of a mechanical device with internal components and directional arrows indicating rotation (no text or symbols)natural_image
Illustration of two hands using a portable device to lift water, showing the process from pouring into a filter (no text or symbols present)בַרְשָׁה בַרְשָׁה
natural_image
Line drawing of a vacuum cleaner with coiled tubing and control panel (no text or symbols)text_image
cut cycleתְבָרִי
natural_image
Diagram showing a mechanical device being inserted into a cylindrical component, with an inset close-up of hands adjusting the part (no text or symbols present)natural_image
Line drawing of a hand using a screwdriver to press or install a device (no text or symbols present)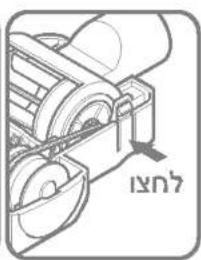
natural_image
Mechanical assembly diagram showing gears and shafts without any text or symbols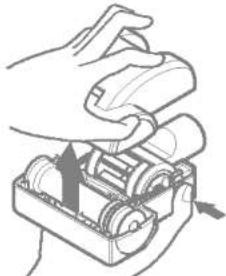
natural_image
Illustration of a hand using a mechanical device to press or adjust a component (no text or symbols visible)text_image
Diagram illustrating mechanical assembly steps with labeled components and directional arrows indicating movementתְרָה בִּרַעֹת אַב
natural_image
Diagram showing a mechanical component being inserted into a cylindrical shaft, with an inset close-up of its internal structure (no text or symbols present)text_image
Technical diagram illustrating a tool manipulation process with Hebrew text labels and directional arrows indicating movement.text_image
Diagram showing a device with a lock and cable, highlighting a directional arrow labeled 'NO' and 'NO NO'.natural_image
Technical diagram of a vacuum cleaner's internal structure with no visible text or symbolsתַעְרָה בְּרָה
text_image
Technical diagram showing hand operating a vacuum cleaner with labeled parts and directional arrows indicating motion or movement.תְבָרִי לַלְעֹם