EV193V - Media player LG - Free user manual and instructions
Find the device manual for free EV193V LG in PDF.

User questions about EV193V LG
0 question about this device. Answer the ones you know or ask your own.
Ask a new question about this device
Download the instructions for your Media player in PDF format for free! Find your manual EV193V - LG and take your electronic device back in hand. On this page are published all the documents necessary for the use of your device. EV193V by LG.
USER MANUAL EV193V LG
Video Cassette Player
with Line Recording
OWNER'S MANUAL
MODEL : EV193V
VHS
PAL SECAM
Before connecting, operating, or adjusting this product, please read this instruction booklet carefully and completely.
cautions, contents & Features

Position your VCP so that no bright light or sunlight falls directly onto it.
Care should be taken not to expose your VCP to any unnecessary vibration, moisture, dust or heat.
During electrical storms it is advisable to unplug both the aerial cable and mains plug to prevent accidental damage to your VCP and TV.
Do not operate your VCP if it is damaged. Your VCP should not be repaired by anyone except qualified service personnel.
Never remove the back cover of your VCP as this can expose you to very high voltage and other hazards. If your VCP does not operate properly, please check the Troubleshooting Guide on page 16. If your VCP still does not operate properly, unplug it and call your dealer.
If the unit is suddenly moved from a cold place to a warm place, do not operate it for two or three hours. Moisture condensation on the head drum, one of the most crucial parts of the unit, will cause damage to the tape. If you experience the above condition, plug the mains lead into an AC outlet, set the POWER switch to ON, and leave at room temperature until moisture condensation disappears.
Thank you for buying this video cassette player.

Warning
Precautions, Contents & Features
Controls & Sockets
Connecting to a TV
Tuning in a Video Channel
Remote Control Functions
On Screen Display
Playing a tape
Other Playback Features
Video Doctor
Automatic Memory Power Shut-Off
DC Power Source
Recording
Dubbing Tapes
Troubleshooting & Specifications
• Super Multi System
- PAL - B/G D/K, SECAM
- MESECAM, NTSC 3.58/4.43
- NTSC Playback on PAL TV
• Long Playback & Recording (LP/EP)
• ICON OSD (On Screen Display)
• OPR(Optimum Picture Response) (see page 9.)
• Video Doctor (Self-Diagnosis)
• Line Recording thru AV jack
• AC/DC Compatible
• Automatic Memory Power Shut-Off (see page 11.)

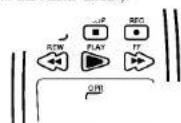
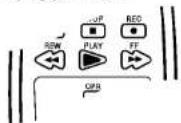
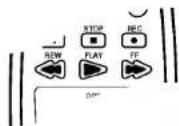
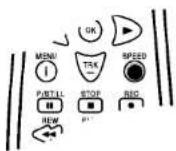
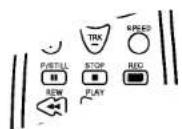
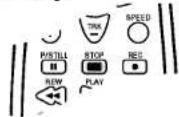
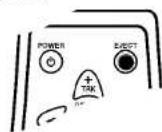
Each button on your VCP has the same function as its corresponding button on the remote control. (see page 6.)

text_image
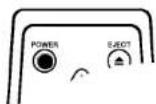
1 2 3 4 5 6 12 11 10 9 8 7- Power (ON/OFF)
- Stop & Tape Eject
- Cassette Compartment
- Rewind
- Play
-
Fast Forward
-
Pause/Still
- Record
- Remote Control Sensor
- Function Indicators
- System Select (see page 7.)
- OPR (see page 9.)
Connecting To a TV
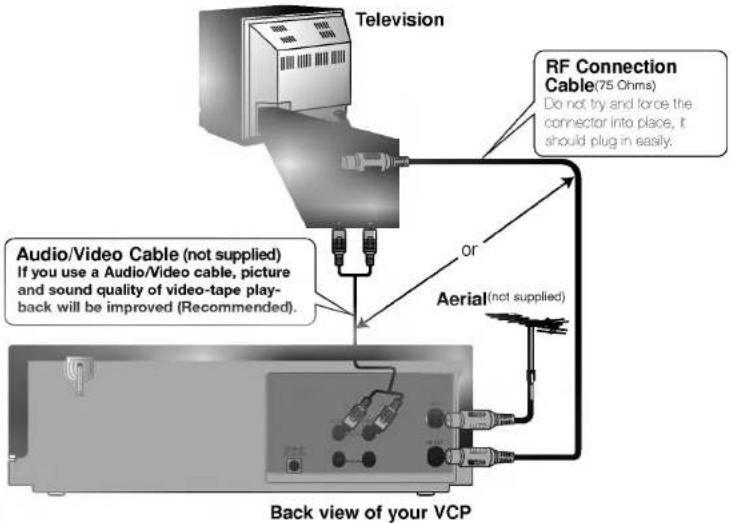
If you connect your VCP using the supplied RF Connection Cable (75 Ohms) you will have to tune in a video channel on your TV in order to view video tapes. Further on in the book you will be given guidance on how to tune in your TV.
Make sure all appliances are unplugged from the mains before connecting.
The guidance given on this page is the most common form of connection. However please check with your manufacturer's instruction books for specific information. Make sure all connections are made with both your VCP and additional appliance unplugged from the mains to avoid damaging your equipment. Connecting a VCP using Audio/Video cable is one of the best ways to achieve optimum sound and picture quality from video-tape playback (Recommended). If you own a TV with AV input sockets you will be able to enjoy it; you will be unable to enjoy this facility if you connected just using a normal RF cable.
text_image
Television RF Connection Cable(75 Ohms) Do not try and force the connector into place, it should plug in easily. Audio/Video Cable (not supplied) If you use a Audio/Video cable, picture and sound quality of video-tape play-back will be improved (Recommended). or Aerial(not supplied) Back view of your VCP
Your TV receives signals from the video player (VCP) like another TV station.
You have to select a channel number on your TV and tune it in so that you may watch video tapes.
If you connect a monitor or a TV set equipped with AUDIO and VIDEO sockets this adjustment
will not be necessary, simply select the AV mode on your TV.

Make sure that you have correctly installed your VCP as described earlier this book.
Press POWER to turn on your VCP.
Turn on your TV.

Insert a pre-recorded video tape into your VCP and press PLAY.
Select channel 36 on your TV.
And then you will see the picture being played in your VCP.

Store the selected TV channel on your TV. (You will need to look at the TV instruction book if you do not know how to do this.)

Changing the transmitter channel
If channel 36 is already occupied at your TV set, or if the picture is distorted, or if you want to change the channel for audio output (B/G or D/K), please consult your nearest service center.
On your TV
Video channel
Tuning in a

To watch TV programs, turn off your VCP. When your VCP
is on, broadcast reception through the AERIAL socket is not possible.
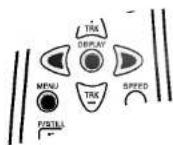
Remote Control Location & Function
If you do not intend to use the REMOTE CONTROL
HANDSET for a long period of time, remove the batteries, store them in a cool, dry place and out of the reach of children.
Do not use batteries of differing age or type. Always discard batteries safety.

text_image
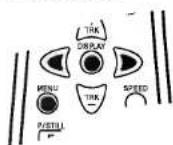
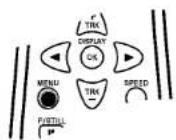
Your video player (VCP) is designed so that almost all of its features can be controlled from the REMOTE CONTROL HANDSET. Some features can also be controlled from the FRONT PANEL of the video player. The maximum operating distance that you may control your video player is about 7.5 meters (25 feet). It must also be within an angle of 30 degrees either side of the REMOTE SENSOR on the front of your video player. POWER switches the VCP on from standby or on to standby. MANUAL TRACKING To manually adjust the tracking. SELECT Select the desired items on the MENU screen. MENU/i To display MENU screen. P/STILL Switches to a still picture. REWIND Rewinds the tape. Reverse high speed picture play. PLAY To play the tape. EJECT Eject a tape. DISPLAY/OK To display Function OSD. Switches the selected item on the MENU screen. SPEED To select the recording speed of the tape. STOP To stop the tape. RECORD Starts recording. FF Winds the tape forwards. Forward high speed picture play. OPR (see page. 9) Battery Installation Your REMOTE CONTROL HANDSET is powered by two AAA type batteries. To insert them, push the tab backwards and lift off the cover of the handset. Put the two batteries into the compartment making sure the + and - are correctly positioned. Replace the cover.Battery Installation Your REMOTE CONTROL HANDSET is powered by two AAA type batteries.

text_image
to insert them, push the tab backwards and lift off the cover of the handset. Put the two batteries into the compartment making sure the + and - are correctly positioned.Replace the cover.

On Screen Display gives you information about the tape counter and operational mode of your VCP. Some functions of this video player can be set and altered on the TV screen using the remote control with On Screen Display.
MENU OSD
Press MENU / i to display the main menu.
Press ◀ or ▶ to select the desired menu.
Press DISPLAY / OK and press ◀ or ▶ to select the sub menu.
Press MENU / i to remove the menu screen.
FUNCTION OSD
Switches the function OSD ON or OFF. OPR
To improve the playback picture (see page 9). REPEAT
If you want to play back a tape repeatedly, set REPEAT to ON (see page 10).
Dr. To check a problem with your VCP (see page 11). ABC OSD
To change the language setting for OSD (ENGLISH, FRANCAIS, DEUTSCH, ITALIANO, ESPAÑOL, DUTCH, POLSKI, РУССКИЙ). SYSTEM
Select the colour system used for playback and recording. You can also set the system by pressing SYSTEM on the front of your VCP. The system is changed as shown below.
| Source | Mode | System Change |
| PAL/SECAM | Recording | AUTO→PAL→SECAM→MESECAM |
| MESECAM | Playback | AUTO→PAL→SECAM→MESECAM |
| NTSC | Recording | NTSC3.58→NTSC4.43 |
| Playback | NTSC-PB→NTSC3.58→NTSC4.43 |
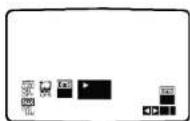
FUNCTION OSD
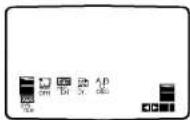
Press DISPLAY/OK to display the function OSD.

text_image
TISK DISPLAY MENU ① ② ③ ④① Operating mode
② Colour system
③ OPR mode (see page 9.)
④ Tape counter
(hours:minutes:seconds)
Display
On Screen
The tape counter changes to 0:00:00 when the tape is ejected. The tape counter does not work when the tape is not inserted. After 3 seconds, the function OSD will automatically disappear. Press DISPLAY/OK again to remove all displays from the TV screen.


his VCP is designed to play back and record cassettes using PAL, SECAM, MESECAM, and NTSC (3.58 or 4.43) colour systems. You will only be able to load and eject video cassettes when your VCP is plugged into the mains.
Getting a better picture
When a cassette is inserted and playback started, the automatic tracking function works to get the best
possible picture automatically. "AUTO TRACKING" will appear on the TV screen while it is doing this. If the
quality of the recording is poor, repeatedly press TRK (- or +) on the remote control to manually adjust the tracking until any distortions have been removed.

Make sure that you have correctly installed your VCP as described earlier in this book.
Press POWER to turn on your VCP.
Turn on your TV.

Insert the video cassette into your VCP. The video cassette should have the window side facing up and the arrow facing away from you.
Do not attempt to force a cassette into your VCP. There may already be a video cassette in your VCP. You may have the cassette upside down or back to front!

Check your tape programme system before playing back a tape.
Press PLAY to start playing your tape.
If you load a video cassette which has had its record protection tab removed (e.g rental movies from video hire shops) playback of the cassette will start automatically.

If you set SYSTEM to AUTO, your VCP detects the colour system automatically.

If there are colour problems with very weak signals, you should select the
colour system manually.
Or ; If your tape programme is NTSC3.58 or NTSC4.43, set the system to NTSC3.58 or NTSC4.43 on a multi-system TV, or NTSC-PB on a PAL TV by pressing SYSTEM repeatedly on the front of your VCP.
You can also set the system from the On Screen Display. (see page 7.)

Video Head Cleaning
Dirt accumulating on the head after a long period of time can cause the playback picture to become blurred or broken up. High quality video cassette tapes will not normally deposit dirt onto the video head, but old or damaged tapes might. Clean the video heads with a commercially available video heads cleaning tape.

STILL
Press P/STILL to still a picture.

Tapes can be paused for up to 5 minutes. After 5 minutes your VCP will stop playing the tape to prevent damaging the tape or your VCP.
A still picture will be unstable or will have noise, this is quite normal and doesn't mean that there is anything wrong with your VCP1
Press PLAY to continue playing your tape.
Visual search
Press either FF or REW during playing back. This will enable you to rapidly wind the tape and see where you are on the tape.
Press PLAY to resume normal playback speed.
During visual search PLAY indicator flashes in the display window on the front of your VCP.
Visual search will only continue for about 3 minutes, after which your VCP will return to normal playback. During visual search the sound is muted and there will be some noise streaks on the TV screen.
Press STOP to end playback.

Press EJECT.
The cassette compartment will open and the video cassette will be partially ejected.

If the end of the tape is reached, your VOP will stop playback automatically, rewind, stop, eject the tape, and place itself into STANDBY.

OPR (Optimum Picture Response) :
This feature automatically improves playback picture quality by adjusting your VCP to the condition of the tape.
Press MENU / i.
Press ◀ or ▶ to select OPR.
Press OK.
Press ◀ or ▶ to select : OFF, SOFT or SHARP.

Press MENU / i to remove the menus.
Please note you may only set OPR to on when playing a tape.
You can also set the OPR by pressing OPR on the remote control or on the front of your VCP.
Repeat playback
If you want to play back a tape repeatedly, set REPEAT to ON.
Press MENU / i.

Press ◀ or ▶ to select REPEAT.
Press DISPLAY / OK.
Press ◀ or ▶ to switch ON or OFF.
Press MENU / i to remove menus from TV screen.
When the end of the tape is reached, VCP automatically rewinds tape to the beginning and repeats playback continuously.
If you want to release this function, set REPEAT to OFF.

Ejecting a tape automatically switches REPEAT to OFF.
Logic search
Hold down FF or REW to watch a picture of tape during fast forward or rewind.
Your VCP switches forward or reverse search. Release the button to return to the fast forward or rewind.


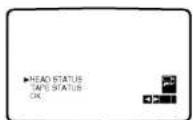
VIDEO DOCTOR (Self-Diagnosis)
This feature informs you that there is a problem with your VCP. These error messages will appear on the TV screen.

Press MENU / i.
Press ◀ or ▶ to select Dr.
Press DISPLAY / OK.


Press ◀ or ▶ to check a problem.
HEAD STATUS
OK
- PLEASE CLEAN : Clean your video heads.
TAPE STATUS
●RECORDABLE
● NOT RECORDABLE : Insert a tape with its protection tab in place.
Press MENU / i to remove menus from TV screen.

Automatic Memory Power Shut-Off
This feature of your VCP enables you to switch off your VCP automatically after tape rewind has been completed.

Press POWER during tape rewind.


POWER indicator flashes in the display window on the front of your VCP.
The tape will rewind to the beginning and your VCP will automatically switch itself off.
Off
Automatic Memory Power Shut-
Video Doctor(Self - Diagnosis)

Your VCP is designed for in-home or portable use. You can power it from the cigarette lighter socket in your vehicle or a 12V (1.2A) DC power source.

text_image
TV set TO AUDIO/VIDEO IN TO AUDIO/VIDEO OUT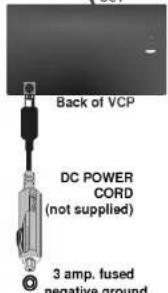
text_image
Back of VCP DC POWER CORD (not supplied) 3 amp. fused negative groundDC Input Socket
Plug DC power cord into either the 12-volt DC outlet or cigarette lighter socket. Plug the other end into the DC input socket on your VCP.
Do not leave your VCP in a place where the temperature exceeds 70°C (158°F), or the pick-up device may be damaged.
Examples include :
• Inside a car with the windows closed and in direct sunshine.
• Near a heating appliance.

Warning
When your VCP is not in use,
always disconnect it from the cigarette lighter socket to avoid battery drain.

Your VCP and its DC power cord are designed for use in vehicles that have 12-volt, negative ground electrical systems. (This is standard for most vehicles.) If your vehicle has a different
type of electrical system, the DC power system cannot be used.
To prevent electrical shock and possible damage to your VCP or vehicle, always unplug DC power cord from the cigarette lighter socket before you remove the plug from your VCP.
A 3 amp. 125 or 250V fuse for protection is installed in the DC power cord.
While the engine is being started, disconnect the DC power cord from the car's cigarette lighter socket.
Do not operate your VCP when the car battery is discharged. Peak current from the car generator may cause the DC fuse to blow.
If the vehicle's supply voltage drops below approximately 10 volts, your VCP may not work properly.
Your VCP allows you to make recordings connecting to a TV equipped with AUDIO and VIDEO sockets.


Connect your VCP to a TV as shown below.
Your external aerial must be plugged in your TV.

text_image
TV set Aerial TO AUDIO/VIDEO OUT YOUR VCP TO AUDIO/VIDEO IN
Press POWER to turn on your VCP.
Turn on your TV and select the channel you wish to record with the TV's channel selector.

Insert a video cassette with the record protection tab into your VCP.
The video cassette should have the window side facing up and the arrow facing away from you.
Do not attempt to force a cassette into your VCP. There may already be a video cassette in your VCP. You may have the cassette upside down or back to front!

Set the desired recording speed by pressing SPEED.

NTSC colour system : SP or EP.
PAL colour system : SP or LP.
record
How to
If you do not wish to record on a tape (this can happen
quite easily by accident!) remove the safety tab on the back edge of the video cassette.
It is possible to record on a video cassette with the
record protection tab removed by covering the hole with self adhesive tape.

Press REC to start recording.

During recording of TV programme you do not change the TV channel number on
your TV.

Press P/ STILL to avoid recording unwanted scenes. REC indicator flashes in the display window.
Press P/STILL again to continue recording.
Tapes can be paused for up to 5 minutes; ■ will be displayed when a tape is paused. After 5 minutes your VCP will stop recording to prevent damaging the tape or your VCP.


Press STOP to end recording.
Press EJECT. The cassette compartment will open and the video cassette will be partially ejected.
If the end of the tape is reached, your VCP will stop recording automatically, rewind, stop, eject the tape, and place itself into STANDEY.

Make sure all connections are made with both your VCP's and Television unplugged from the mains to avoid damaging your equipment.

Connect your VCP to another VCP as shown below.

flowchart
graph TD
    A["TV set"] --> B["RECORDING VCP (YOUR VCP)"]
    B --> C["Aerial"]
    C --> D["TO AUDIO/VIDEO IN OUT"]
    D --> E["PLAYING VCP"]

Press POWER to turn on your VCP.
Insert a pre-recorded source tape into another (playing) VCP.

Insert a blank video tape with the record protection tab into your (recording) VCP.
Simultaneously begin playback on another VCP and record on your VCP.

Press STOP / EJECT to stop recording.
Dubbing Tapes
Unauthorized recording of copyrighted TV programmes, films, video cassettes and other materials may infringe the rights of copyright owners and be contrary to copyright laws.

Check the following before calling for service.
No picture & no sound
• Is the mains plug plugged in and switched on?
• Is the TV switched on?
• Have you tuned in a video channel on your TV to watch video tapes on ? (see page 5.)
- If you have used a Audio/Video cable to connect your VCP and TV have you selected the AV mode on your TV?
TV programmes cannot be recorded
Has the external aerial been plugged in your TV? (see page 13 step 1.)
Video cassette cannot be inserted
Is the cassette compartment empty?
Remote control does not work
• Is the mains plug plugged in and switched on?
• Is the VCP switched on?
• Check the batteries in remote control.
The top of the playback picture is unstable
• Is the video cassette damaged, have you tried using another one?
• Make sure that you are using a video channel on your TV?
Auto Play does not work
Has the safety tab been removed from the video cassette?
General
Power ......AC 110-240V, 50/60Hz DC 12*V, 1.2A
Power consumption.....Approx. 10 Watts
Tape format ....Tape Width 12.7 mm (0.5 inch)
Dimensions (W x H x D) .....360 x 97.5 x 270 mm
Weight.....Approx. 3.0 Kg.
Operating temperature .....5 - 35°C
Operating humidity ....Less than 80%.
Video
Television system....CCIR standard (625 lines, 50 fields), PAL/SECAM colour signal
Recording format....PAL/SECAM/MESECAM/ NTSC3.58/ NTSC4.43
RF OUT....PAL/SECAM (G or K)
Input level....1.0 Vp-p, 75 Ohm, unbalanced
Output level 1.0 Vp-p, 75 Ohm, unbalanced
RF modulator ....UHF channels 32-40 (adjustable)
Audio
Input level....-6 dBm, more than 47 kOhms
Output level....-6 dBm, less than 1.5 kOhms
Audio track....Mono track
Audio frequency response ..100 Hz-10 kHz (-6/+3 dBm)
- Design and specifications are subject to change without notice.

LG Electronics Inc.
P/N: 3834RP0073Z