ITUT-5000 - Turntable Victrola - Free user manual and instructions
Find the device manual for free ITUT-5000 Victrola in PDF.

User questions about ITUT-5000 Victrola
0 question about this device. Answer the ones you know or ask your own.
Ask a new question about this device
Download the instructions for your Turntable in PDF format for free! Find your manual ITUT-5000 - Victrola and take your electronic device back in hand. On this page are published all the documents necessary for the use of your device. ITUT-5000 by Victrola.
USER MANUAL ITUT-5000 Victrola
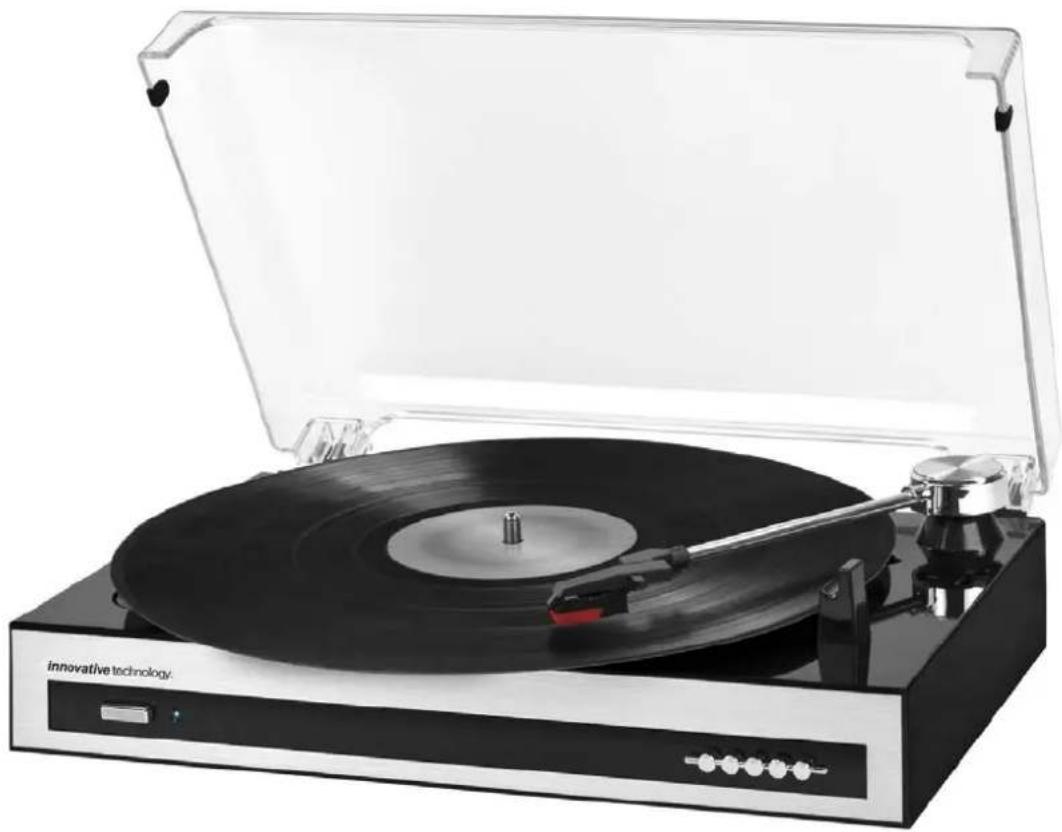
innovative technology.™
USB Turntable
Model: ITUT-5000
ITUT-5000 is a part of ITCDS-6000.
natural_image
Vintage typewriter with open lid and black finisher, labeled 'innovative technology' (no other text or symbols visible)Instruction Manual
PLEASE READ THIS INSTRUCTION MANUAL CAREFULLY BEFORE USE AND KEEP IT FOR FUTURE REFERENCE.
IMPORTANT SAFETY INSTRUCTIONS
-
Read these instructions – All the safety and operating instructions should be read before this product is operated.
-
Keep these instructions – The safety and operating instructions should be retained for future reference.
-
Heed all warnings – All warnings on the appliance and in the operating instructions should be adhered to.
-
Follow all instructions – All operating and use instructions should be followed.
-
Do not use this apparatus near water – The appliance should not be used near water or moisture – for example, in a wet basement or near a swimming pool, and the like.
-
Clean only with dry cloth.
-
Do not block any ventilation openings. Install in accordance with the manufacturer's instructions.
-
Do not install near any heat sources such as radiations, heat registers, stoves, or other apparatus (including amplifiers) that produce heat.
-
Do not defeat the safety purpose of the polarized or grounding plug. A polarized plug has two blades with one wider than the other. A grounding plug has two blades and a third grounding prong. The wide blade or the third prong is provided for your safety. If the provided plug does not fit into your outlet, consult an electrician for replacement of the obsolete outlet.
-
Protect the power cord from being walked on or pinched particularly at the plugs, convenience receptacles, and at the point where they exit from the apparatus.
-
Only use attachments/accessories specified by the manufacturer.
-
Use only with the cart, stand, tripod, bracket, or table specified by the manufacturer, or sold with the apparatus. When a cart or rack is used, use caution when moving the cart/apparatus combination to avoid injury from tip-over.

-
Unplug the apparatus during lighting storms or when unused for long periods of time.
-
Refer all servicing to qualified personnel. Servicing is required when the apparatus has been damaged in any way, such as power supply cord or plug is damaged, liquid has been spilled or objects have fallen into the apparatus has been exposed to rain or moisture, does not operate normally, or has been dropped.
15.

text_image
CAUTION RISK OF ELECTRIC SHOCK DO NOT OPEN AVERTISSEMENT: RISQUE DE CHOC ÉLECTRIQUE—NE PAS OUVRIR.-This lightning flash with arrowhead symbol within an equilateral triangle is intended to alert the user to the presence of non-insulated “dangerous voltage” within the product’s enclosure that may be of sufficient magnitude to constitute a risk of electric shock.
-Warning: To reduce the risk of electric shock, do not remove cover (or back) as there are no
user-serviceable parts inside. Refer servicing to qualified personnel.
-The exclamation point within and equilateral triangle is intended to alert the user to the presence of important operating and maintenance instructions in the literature accompanying the appliance.
16.

This equipment is a Class II or double insulated electrical appliance. It has been designed in such a way that it does not require a safety connection to electrical earth.
This equipment is a Class II or double insulated electrical appliance. It has been designed in such a way that it does not require a safety connection to electrical earth.
- The mains plug is used as disconnect device, the disconnect device shall remain readily operable.
- WARNING
To reduce the risk of fire or electric shock, do not expose this apparatus to rain or moisture. The apparatus shall not be exposed to dripping or splashing and that no objects filled with liquids, such as vases, shall not be placed on apparatus.
- The use of the equipment in moderate climate.
- The ventilation should not be impeded by covering the ventilation openings with items, such as newspapers, table-cloths, curtains, etc.
- No naked flame sources, such as lighted candles, should be placed on the apparatus.
- The symbol with Indication AC voltage
Precautions
Safety Information-caution:
- In order to shut off power to this product completely, unplug the power cord from the wall outlet. Be sure to unplug the unit if you do not intend to use it for an extended period of time, such as during a vacation.
- Use of controls, adjustments and performance of procedures other than those specified herein may result in hazardous radiation exposure.
- To prevent electric shock, match wide blade of plug to wide slot, fully insert.
- If this product is experience problems during operation, contact qualified service centers, and do not use the product in defective states.
Safety Precautions
WARNING:
To reduce the risk of fire or electric shock, do not expose this appliance to rain or moisture.
CAUTION:
Use of controls or adjustments or performance of procedures other than those specified may result in hazardous radiation exposures.
CAUTION
RISK OF ELECTRIC SHOCKS - DO NOT OPEN!
To reduce the risk of electric shock, do not remove cover or back.
No user serviceable parts inside. Refer servicing to qualified service personnel.

The light flash with arrowhead symbol, within an equilateral triangle, is intended to alert user to the presence of non-insulated “dangerous voltage” within the product’s enclosure that may be of sufficient magnitude to constitute risk of electric shock to persons.

The exclamation point within an equilateral triangle is intended to alert user to the presence of important operating and maintenance (servicing) instructions in the literature accompanying the appliance.
(See markings on the back of the unit.)
Before Use
- Choose unit installation location carefully. Avoid placing it in direct sunlight or close to a source of heat. Also avoid locations subject to vibrations and excessive dust, cold or moisture.
Keep away from sources that hum, such as transformers or motors. - Do not open the cabinet as this may result in damage to the circuitry or electrical shock. If a foreign object should get into the set, contact your dealer.
- Be sure not to handle record with dirty fingers. Never play a record that has a crack on the surface.
- When removing the power plug from the wall outlet, always pull directly on the plug, never pull the cord.
- To protect the stylus, don't forget to put on the white protective needle cover after use.
- Do not attempt to clean the unit with chemical solvents as this might damage the finish.
Use a clean, dry cloth.
- In order to shut off the power to this product completely, unplug the power cord from the wall outlet. Be sure to unplug the unit if you do not intend to use it for an extended period of time, such as a vacation.
- Keep this manual in a safe place for future reference.
How to Replace the Turntable Stylus (Needle)
Removing old stylus
- Set a screwdriver at the tip of the stylus and push down in the direction "A".
- Remove the stylus by pulling it forward and down.
Installing a new stylus
- Hold the tip of the stylus and insert the other edge by pressing in the direction "B".
- Push up in the direction "C" until it locks at the tip.

natural_image
Close-up of a black electronic device with a downward arrow and labeled point A (no text or symbols on the device itself)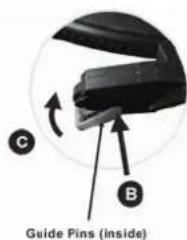
text_image
C B Guide Pins (inside)Layouts
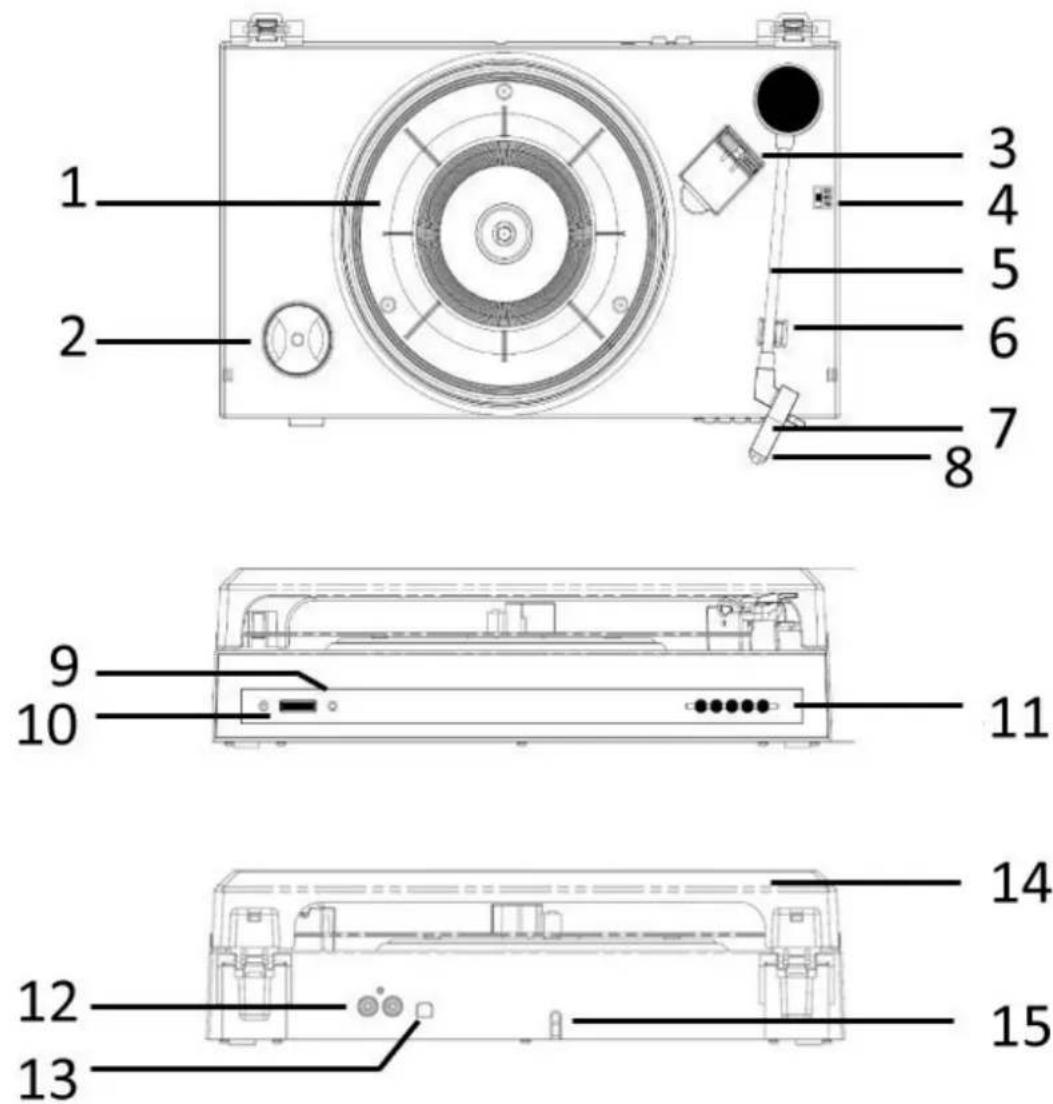
- TURNTABLE
2.45 RPM ADAPTOR - TONE ARM REST 1
- SPEED SELECTOR
- TONE ARM
- TONE ARM REST 2
- STYLUS
-
NEEDLE COVER
-
POWER INDICATOR
- POWER BUTTON
- DECORATION
- RCA LIINE-OUT SOCKET
- USB SOCKET
- DUST COVER
- AC POWER CORD
PART I: Main Function
Line Out
- Disconnect the AC power cord from the household outlet to turn the unit OFF.
- Connect the RCA line out jacks to the auxiliary input sockets of your home amplifier device.
Make sure to match the socket colors with the jack colors. - Connect the unit's power cord to the household outlet. Also, power on your amplifier device and adjust its volume level.
Phonograph
- Connect the AC plug to the household outlet.
- Press the power button to turn on the unit.
- Put a record on the turntable. Remember to use the 45 RPM adaptor located on the bottom left corner when playing a 45 RPM record.
- Remove the white plastic needle cover. Keep the needle cover in a safe and accessible place for future use.
- Select the speed according to the record you are playing.
- Lift and move the tone arm over the turntable. Record will start spinning and place the tone arm in desired position to start playing music.
NOTE:
It is strongly recommended to play records with the transparent dust cover closed. Also please do not place anything on top of the dust cover especially while playing a record.
- To pause or stop playing, you need to lift and move the tone arm back to the tone arm rest manually.
- When the end of the record is reached, the tone arm and rotation stop. Lift the tone arm and place it on the tone arm rest manually.
- Remember to use the white plastic needle guard to protect the stylus and unplug the unit.
AUX-IN 2 Function (Turntable Setup)
Before use, make sure both the ITCDS-5000a and ITUT-5000 are plugged into a power source.
- To connect the turntable unit (ITUT-5000) to the main speaker system (ITCDS-5000a), plug the included RCA Cable into the Line Out jacks (Aux-In 2) into the back of the main speaker system. Make sure that the red RCA Cable is inserted into the red jack and the white RCA Cable is inserted into the white jack.
- Use the other end of the RCA Cable to connect to the back of the turntable unit, again being sure that the RCA Cable is plugged into the correct color coded jack.
- Turn on both the ITCDS-5000a and the ITUT-5000 using their respective power buttons.
- Press the Function button on main speaker system to select the AUX-IN 2 function.
- Follow turntable operation steps for audio playback.
PART II: Audacity Software

text_image
AudacityThe provided CD disc contains the following software:
(1)Audacity_for_mac----For Mac (see page 22)
(2)Audacity_for_win ----For Windows
The software is compatible with Window XP, VISTA, 7 and 8, 10 requires appropriate drives and Mac.
NOTE:
- Read about Audacity on Windows 8, 7 and Vista. Windows 2000, NT, and 95 are not supported.
-Windows 10 is supported, but subject to all enabled devices having Windows 10-compatible drivers designed for the device. This should be the case for the built-in sound device of a new computer that came with Windows 10. Please see our Windows 10 page for solutions if you encounter problems. We hope to improve our Windows 10 compatibility with older devices in a future release.
-A CPU that supports SSE2 is required (any CPU made after 2003 should support this). Please use the legacy Audacity 2.0.6 version if your machine lacks SSE2 support.
- Audacity for Mac is a Universal Binary for OS X 10.6 and later. Audacity runs best with at least 1 GB RAM and a 1 GHz processor (2 GB RAM/2 GHz on OS X 10.7 and later).
- For lengthy multi-track projects, we recommend a minimum of 2 GB RAM and 2 GHz processor (4 GB RAM on OS X 10.7 and later).
- The 2.1.1 release was the final release for PPC Macs.
Because of the variation of different operation systems, some of the interface may not be the same as below.
Audacity Installation and USB Connection
Connect one end of USB cable to the turntable and the other end into your computer. Then connect the AC power cord of the turntable.
Audacity for Windows
Installing the Audacity Software
- Please insert the Audacity software disk that comes with your unit. Go to My Computer and double click the CD ROM Drive.

text_image
Organize System properties Uninstall or change a program Map network drive Open Control Panel Favorites Desktop Downloads Recent Places Autodesk 360 Libraries Documents Music Pictures Hardware Hard Disk Drives (3) Local Disk (C:) 11.6 GB free of 48.8 GB 新加卷 (E:) 123 GB free of 221 GB 新加卷 (D:) 133 GB free of 195 GB Devices with Removable Storage (1) DVD Drive (F:) AUDACITY 0 bytes free of 130 MB CDFS- Select Audacity-for-win for window system.

- Double click the audacity-win-2.1.2 to install the audacity software.

audacity-wi n-2.1.2
- Select the setup language first and click on OK to continue.
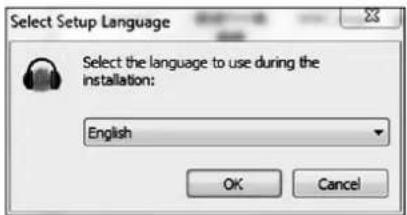
text_image
Select Setup Language Select the language to use during the installation: English OK CancelNote: The language choice in the Windows EXE Audacity installer only selects the language for the installer.
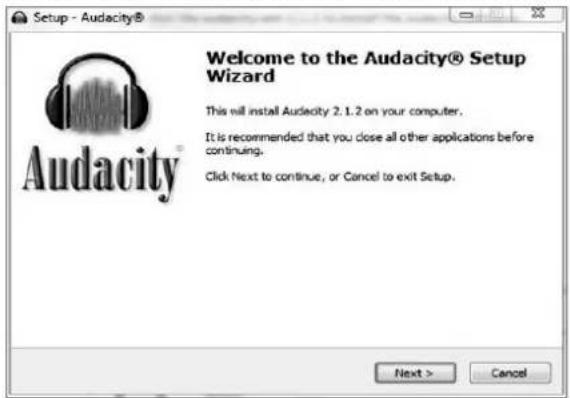
- The Audacity Setup Wizard will appear. Click on Next to install the software.
text_image
Setup - Audacity® Welcome to the Audacity® Setup Wizard This will install Audacity 2.1.2 on your computer. It is recommended that you close all other applications before continuing. Click Next to continue, or Cancel to exit Setup. Next > Cancel- Continue to click on the Next buttons.
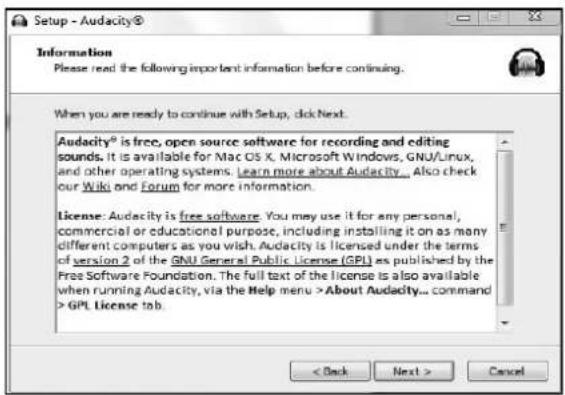
text_image
Setup - Audacity® Information Please read the following important information before continuing. When you are ready to continue with Setup, click Next. Audacity® is free, open source software for recording and editing sounds. It is available for Mac OS X, Microsoft Windows, GNU/Linux, and other operating systems. Learn more about Audacity... Also check our Wiki and Forum for more information. License: Audacity is free software. You may use it for any personal, commercial or educational purpose, including installing it on as many different computers as you wish. Audacity is licensed under the terms of version 2 of the GNU General Public License (GPL) as published by the Free Software Foundation. The full text of the license is also available when running Audacity, via the Help menu >About Audacity... command >GPL License tab.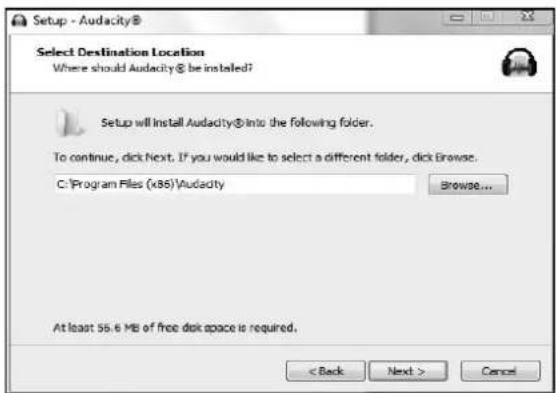
text_image
Setup - Audacity® Select Destination Location Where should Audacity® be installed? Setup will install Audacity® into the following folder. To continue, click Next. If you would like to select a different folder, click Browse. C:\Program Files (x85)\Audacity Browse... At least 55.6 MB of free disk space is required. < Back Next > Cancel
text_image
Setup - Audacity® Select Additional Tasks Which additional tasks should be performed? Select the additional tasks you would like Setup to perform while instelling Audacity®, then click Next. Additional icons: ✓ Create a desktop icon ✓ Reset Preferences < Back Next > Cancel- Click on the Install button to start installation.

text_image
Setup - Audacity® Ready to Install Setup is now ready to begin installing Audacity® on your computer. Click Install to continue with the installation, or click Back if you want to review or change any settings. Destination location: C:\Program Files (x86)\Audacity Additional tasks: Additional icons: Create a desktop icon Reset Preferences < Back Install Cancel
text_image
Setup - Audacity® Installing Please wait while Setup installs Audacity® on your computer. Extracting files... C:\Program Files (x85) Audacity\help\manual\mImages\0/0\labelsbeforedetcch.png Cancel- Click on Next to continue.

text_image
Setup - Audacity® Information Please read the following important information before continuing. When you are ready to continue with Setup, click Next. Audacity(30): A Free, Cross-Platform Digital Audio Editor WWW: http://audacityteam.org/ We welcome feedback on Audacity, suggestions for new or improved features, bug reports and patches at: feedback@audacityteam.org . Personal support with Audacity is not provided by e-mail, but on our Forum: http://forum.audacityteam.org/. Audacity is copyright (c) 1999-2015 by Audacity Team. This copyright notice applies to all documents in the Audacity source code archive, except as otherwise noted (mostly in the lib-arc subdirectories). Next >- Click on Finish to complete installation.

text_image
Setup - Audacity® Audacity® Completing the Audacity® Setup Wizard Setup has finished installing Audacity® on your computer. The application may be launched by selecting the installed icons. Click Finish to exit Setup. ✓ Launch Audacity < Back Finish- You can now open the Audacity software and start recording your files.
Note:
- Once you set up Audacity, you do not need to re-set it with each use.
- The "Audacity-win-2.1.2.exe" (helpfile included) is available for Windows 8/ Windows 7/ Windows 10 requires appropriate drivers / Windows Vista/ Windows XP.
- If you cannot run the exe document, please go to the website below and download the file from it directly.
http://www.audacityteam.org/download/windows
- Users upgrading to this release from Audacity 2.0.5 or earlier who had FFmpeg installed will see a notice that FFmpeg needs to be reconfigured. Please visit http://manual.audacityteam.org/o/man/faq_installation_and_plug_ins.html#ffdown for a link to the recommended 2.2.2 version of FFmpeg for Windows and Mac OS X, and for information for Linux.
- The Windows installer for 2.0.x versions will replace legacy 1.2.x or any previous 2.0.x installation, but install alongside legacy 1.3.x Beta versions. It is strongly recommended to uninstall previous Beta versions before installing current Audacity.
- Audacity 2.1.2 requires the CPU to support the SSE2 instruction set which should be available on any Intel hardware produced after 2001 and any AMD hardware produced after 2003. To check what SSE levels your CPU supports, you can install CPU-Z. If your hardware only supports SSE, you may download Audacity 2.0.6 from http://www.oldfoss.com/Audacity.html.
- Users on Windows XP: You may see "Entry Point Not Found" when first launching Audacity after installation. This error occurs if you are running less than the latest "Service Pack" of updates for your Windows XP system. Please see http://manual.audacityteam.org/o/man/faq_installation_and_plug_ins.html#entry_point for how to install the latest Service Pack and for advice about the potential security risks of running XP now that Microsoft no longer supports it.
- On first use of Audacity you need to confirm or cancel the Register Effects dialog for detected effects before you can launch Audacity. (For additional information, please visit the website at http://manual.audacityteam.org/o/man/effects_preferences.html#register)
Configuring Audacity for Microsoft Windows
Audacity Interface

text_image
Audio Player File Edit View Transport Tools Generate Effect Analysis Help 100 VREF 3-USB PDF Audio Device 2 (Stereo Freq) 40 Tolerance High Definition -1.0 1.0 2.0 3.0 4.0 5.0 6.0 7.0 8.0 9.0 10.0 11.0 12.0 13.0 14.0 Project Rate (%): Drop to Selection Start End Length Audio Project +100 -Upper Toolbar dock area
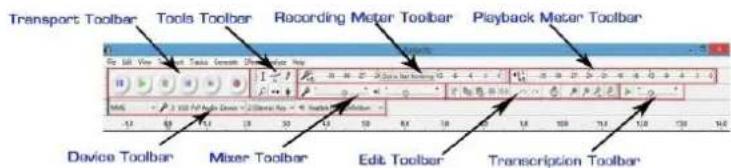
text_image
Transport Toolbar Tools Toolbar Recording Meter Toolbar Playback Mixer Toolbar Device Toolbar Mixer Toolbar Edit Toolbar Transcription ToolbarAudacity Control Buttons
Use the attribute controls button at the top of the screen to go to beginning, Pause, Play, Stop, Record etc. Use the File, Edit, View, Transport, Tracks, Generate, Effect and Analyze menus to Save, Export, and edit the music.
- Click the ( ) button to pause the recording;
- Click the ( ) button to play;
- Click the (☐) button to stop the recording;
- Click the ( ) button to skip to start;
- Click the ( ) button to skip to end;
- Click the ( ) button to record;
- Adjust the input volume;
- Adjust the output volume;

text_image
1 2 3 4 5 6 File Edit View Transport Tracks Generate Effect Analyze Help Audiocity 7 8Audacity Preferences
- Click the "Edit" on the Audacity interface, select "Preferences".

text_image
File Edit View Transport Tracks Generate Effect An Undo Ctrl+Z Redo Ctrl+Y Cut Ctrl+X Delete Ctrl+K Copy Ctrl+C Paste Ctrl+V Duplicate Ctrl+D Remove Special > Paste Text to New Label Ctrl+Alt+V Clip Boundaries > Labeled Audio > Select > Find Zero Crossings Z Move Cursor > Region Save Region Restore Play Region > Preferences... Ctrl+PIn the pop-up window of the Audacity Preferences, tabs of Devices, Playback, Recording, Quality, Interface, Tracks, Spectrograms, Import / Export, Extended Import, Projects, Libraries, Directories, Warnings, Effects, Keyboard, Mouse and Modules are listed on the left side of the window as shown in the picture below.
text_image
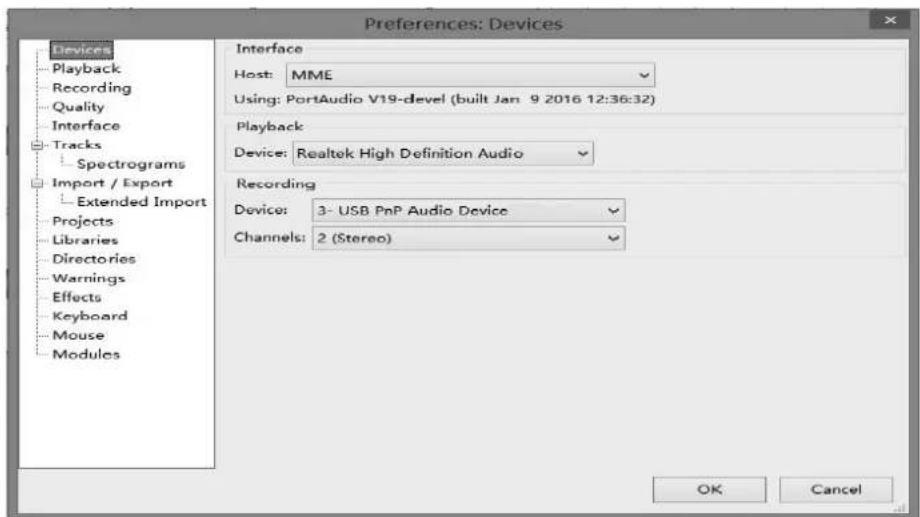
Preferences: Devices Devices Playback Recording Quality Interface Tracks Spectrograms Import / Export Extended Import Projects Libraries Directories Warnings Effects Keyboard Mouse Modules Interface Host: MME Using: PortAudio V19-devel (built Jan 9 2016 12:36:32) Playback Device: Realtek High Definition Audio Recording Device: 3- USB PnP Audio Device Channels: 2 (Stereo) OK Cancel- Click 'Devices' on the left side and detailed contents of the Devices will appear on the right hand side of the interface.
Click the ▼ arrow on "Device" below Playback and choose "Realtek High Definition Audio" or "Microphone Sound Mapper- Output".
Click the ▼ arrow on 'Device' below 'Recording' and choose "USB PnP Audio Device".
Click the ▼ arrow on 'Channels' to select '2(Stereo)'. Do not click OK until you finish all of the settings.
Note: If you cannot find the "USB PnP Audio Device" in the Device list, close the Audacity Software and re-open and try again.
Windows Vista and later call most USB external devices "microphones" but Windows XP and earlier do not. Some higher-end USB recording interfaces may appear as their explicit manufacturer's name.

text_image
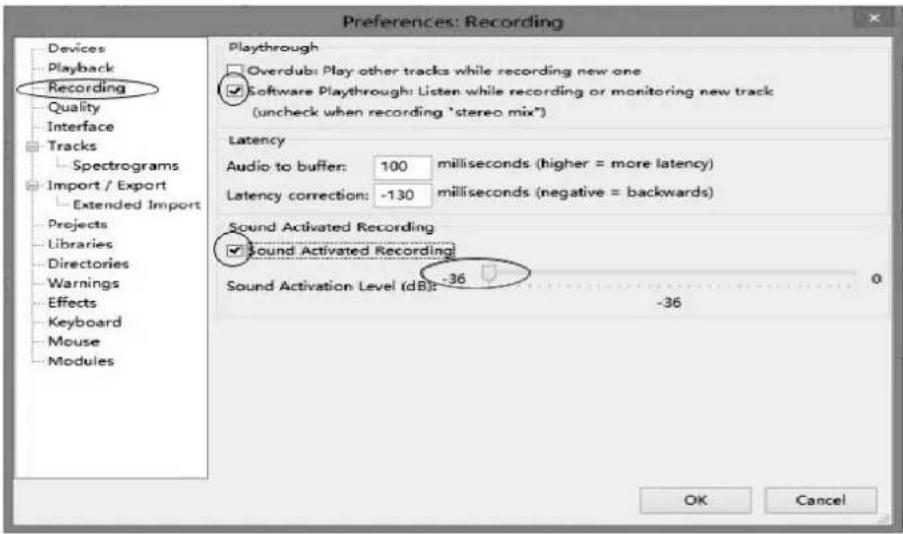
Preferences: Devices Devices Playback Recording Quality Interface Tracks Spectrograms Import / Export Extended Import Projects Libraries Directories Warnings Effects Keyboard Mouse Modules Interface Host: MME Using: PortAudio V19-devel (built Jan 9 2016 12:36:32) Playback Device: Realtek High Definition Audio Recording Device: 3- USB PnP Audio Device Channels: 2 (Stereo) OK Cancel- Click 'Recording' on the left side and the detailed contents will display on the right side.
Click the checkbox beside 'Software Play through: Listen while recording or monitoring new track'.
Click the checkbox beside 'Sound Activated Recording' and adjust the Sound Activation Level (dB) to -36.
NOTE: Once the 'Sound Activated Recording' is selected, the Pause button will not work during recording. You can Click "Interface" on the left side to select Sound Activation Level.
text_image
Preferences: Recording Devices Playback Recording Quality Interface Tracks Spectrograms Import / Export Extended Import Projects Libraries Directories Warnings Effects Keyboard Mouse Modules Playthrough Overdub: Play other tracks while recording new one Software Playthrough: Listen while recording or monitoring new track (uncheck when recording "stereo mix") Latency Audio to buffer: 100 milliseconds (higher = more latency) Latency correction: -130 milliseconds (negative = backwards) Sound Activated Recording Sound Activated Recording Sound Activation Level (dB): -36 OK Cancel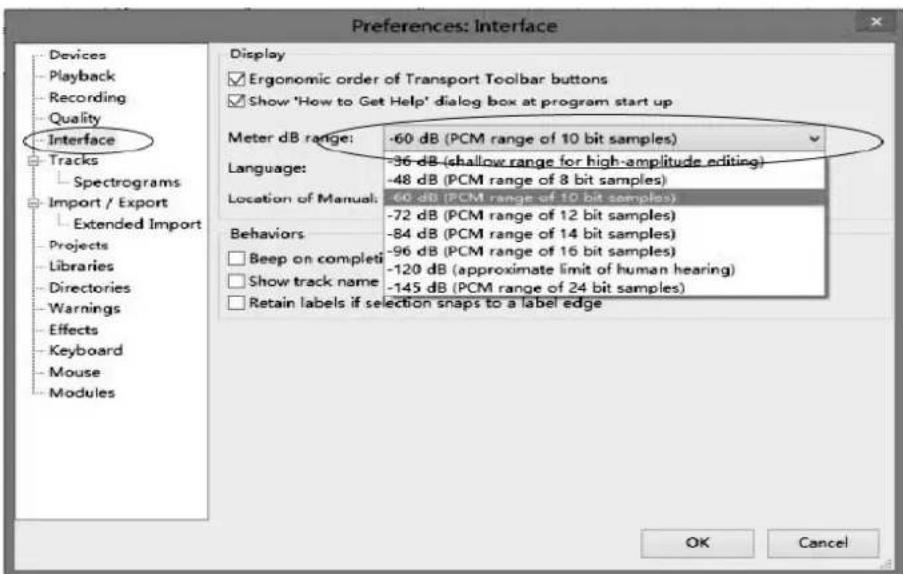
text_image
Preferences: Interface Devices Playback recording Quality Interface Tracks Spectrograms Import / Export Extended Import Projects Libraries Directories Warnings Effects Keyboard Mouse Modules Display ✓ Ergonomic order of Transport Toolbar buttons ✓ Show 'How to Get Help' dialog box at program start up Meter dB range: -60 dB (PCM range of 10 bit samples) Language: -36 dB (shallow range for high-amplitude editing) -48 dB (PCM range of 8 bit samples) Location of Manual: -60 dB (PCM range of 10 bit samples) -72 dB (PCM range of 12 bit samples) -84 dB (PCM range of 14 bit samples) Behaviors -96 dB (PCM range of 16 bit samples) Beep on complete -120 dB (approximate limit of human hearing) Show track name -145 dB (PCM range of 24 bit samples) Retain labels if selection snaps to a label edge OK Cancel- Before exporting a MP3 file, you need to find 'lame' first. If the program does not show the MP3 Library, make sure the Audacity driver disc is inside your computer.
Click 'Libraries' on the left side, then in 'MP3 Export Library' interface, click 'Locate...' button to find 'lame_enc.dll'.

text_image
Preferences: Libraries Devices Playback recording Quality Interface Tracks Spectrograms Import / Export Extended Import Projects Libraries Directories Warnings Effects Keyboard Mouse Modules MP3 Export Library MP3 Library Version: MP3 export library not found MP3 Library: Locate... LAME MP3 Library: Download FFmpeg Import/Export Library FFmpeg Library Version: FFmpeg library not found FFmpeg Library: Locate... FFmpeg Library: Download OK Cancel- You can download the 'lame' software from the website. Click 'Download' and a website will be opened automatically.
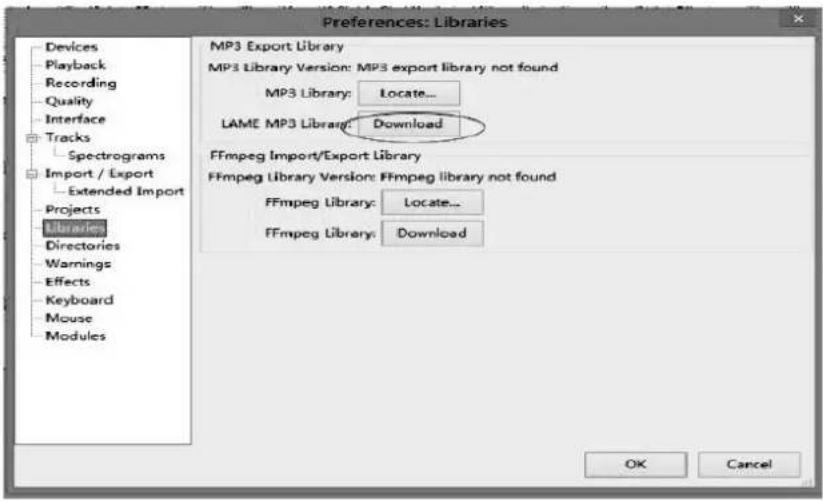
text_image
Preferences: Libraries Devices Playback Recording Quality Interface Tracks Spectrograms Import / Export Extended Import Projects Libraries Directories Warnings Effects Keyboard Mouse Modules MP3 Export Library MP3 Library Version: MP3 export library not found MP3 Library: Locate... LAME MP3 Library: Download FFmpeg Import/Export Library FFmpeg Library Version: FFmpeg library not found FFmpeg Library: Locate... FFmpeg Library: Download OK CancelOpen the website to download 'lame_enc.dll': click on LAME download page.
Windows
- Go to the external LAME download page Left-click this link, do not right-click.
- Directly underneath "For FFmpeg/LAME on Windows click below", left-click the link Lame v3.99.3 for Windows.exe and save the file anywhere on your computer.
- Double-click "Lame v3.99.3 for Windows.exe" to launch it (you can safely ignore any warnings that the "publisher could not be verified")
- Follow the Setup instructions to install LAME for Audacity, making sure not to change the offered installation location of "C:\Program Files\Lame for Audacity" (or "C:\Program Files (x85)\Lame for Audacity" on a 64-bit version of Windows).
You should now be able to export MP3s without any further configuration, choosing File > Export Audio... then selecting "MP3 Files" in the Export Audio Dialog. Troubleshooting
Occasionally, there may be a conflict where Audacity still tries to detect the path to an older lame_enc.dll file. To correct this:
- Ensure there are no older versions of lame_enc.dll in any locations where Audacity detects it, namely:
- C:\Program Files\Lame for Audacity or C:\Program Files (x86)\Lame for Audacity (this is where the installer puts the new _dl)
- the Audacity installation folder (usually C:\Program Files\Audacity or C:\Program Files (x86|\Audacity), or in the "Plug-Ins" folder inside that.
- Exit Audacity and navigate to the audacity.cfg preferences file at:
- Windows XP: Documents and Settings|
|Application Data|Audacity|audacity.cfg - Windows Vista/Windows 7/Windows 8: Users!
| AppData/Roaming/Audacity/audacity.cfg
In order to see audacity cfg, you may need to set the operating system to show hidden files and folders. See instructions for Windows 7 and Windows versions before 7.
Jump straight to Windows download' in the top line. Left click 'Windows download' and it will jump to the download chapter for Windows.

text_image
Click Here, Windows User ---- Jump straight to Windows downloads Click Here, MAC OSX User ---- Jump straight to MAC OSX downloadsAudacity LAME is free, so you can click 'libmp3lame-win-3.99.3.zip' under ZIP OPTION to download. Click Save, select the Folder you want to save it in, then click Save again to save it.
TO DOWNLOAD Lame and FFmpeg for Windows, click links BELOW:
If Audacity does not detect LAME, download the ZIP option, extract the files inside to a well known folder, then open Audacity, go to Library Preferences and configure it to search on the well known folder you extracted the files to.
NOTICE: As of 2014-June-27 Clam Antivirus is showing a false positive for Lame_v3.99.3_for_Windows.exe

Close the webpage, then click OK to close the Audacity preference. Minimize Audacity interface, then open the Folder where you saved the libmp3lame-win-3.99.3.Double click on it, then double click on it again to open. Now left click on lame_enc.dll. Hold and drag it to your Desktop.
NOTES:
■ Once you move it to the Desktop you do not need to do this again.
■ After opening lame_enc.dll the first time it may not be necessary to open lame_enc.dll the next time you record.
Go back to Audacity and click on Edit, then Preferences. Click on Libraries in MP3 library. Click on Locate, then click on 'Browse'. Click on Desktop, then click on Lame_enc.dll to highlight it. Then click Open.
Click on OK on locate Lame box. Click OK on Audacity Preferences to close and to complete your settings. Now you can Record, Export and save your favorite music.
- For detailed information about how to run this program, please click 'Help' and click 'Manual (in web browser)'.

text_image
Help Quick Help Manual Screenshot Tools... Check for Updates... Audio Device Info... Show Log... Generate Support Data... About Audacity...- Adjust the output and input volume to 20% (or 0.2 level).

NOTE: Because of the variation of different operation systems, the input volume control may not work on some individual Windows versions. Windows Vista is recommended to ensure the input volume control works properly.
For any queries in regard to 'Mixer Toolbar' please visit:
http://wiki.audacityteam.org/index.php?title=Mixer_Toolbar_Issues
RECORDING OPERATION
To download music and save into computer:
- Place the record on the turntable.
- Move the tone-arm over to the record to start playing.
- Click the Record () button to start recording.
The waves (left and right tracks) will show on the interface.
text_image
Audio File Edit View Transport Tracks Generate Effect Analyse Help 10 11 12 13 14 15 16 17 18 19 20 21 22 23 24 25 26 27 28 29 30 31 32 33 34 35 36 37 38 39 40 41 42 43 44 45 46 47 48 49 50 51 52 53 54 55 56 57 58 59 60 61 62 63 64 65 66 67 68 69 70 71 72 73 74 75 76 77 78 79 80 81 82 83 84 85 86 87 88 89 90 91 92 93 94 95 96 97 98 99 100 101 102 103 104 105 106 107 108 109 110 111 112 113 114- At end of a song, click the "pause" ( ) button on the computer and press the Stop button on the turntable, move the cursor to the wave area and left click at the end of the song.
For the next song, replace the album or move tone-arm to another desired song. Press the Play button on the turntable to start playing the next song. Immediately press the "pause" (☐) button on the computer and downloading will continue and another R/L track will appear on the interface.
NOTE: Pause button will not work during the recording process if the 'Sound Activated Recording' in Preferences Recording is selected. Clear the checkbox next to 'Sound Activated Recording' if you want to manually pause recording.
- Repeat steps 3 and 4 until you have finished downloading.
NOTE: Do not click stop button on the computer when continuously downloading songs. Remember to click pause button in between your desired songs. Press stop button on the computer only when all your desired songs have been downloaded.
After your have finished downloading, you may play back the songs through your computer. In stop mode, simply click ( ) SKIP TO START button and then the ( ) PLAY button.
TIP: If you press the "stop" button by accident, you can click "Transport" and click "Append Record" and you can continue to record in the same track.

text_image
Transport Tracks Generate Effect Analyze Help Play/Stop Space Play/Stop and Set Cursor Shift+A Loop Play Shift+Space Pause P Skip to Start Home Skip to End End Record R Timer Record... Shift+T Append Record Shift+R Overdub (on/off) Software Pleythrough (on/off) Sound Activated Recording (on/off) Sound Activation Level... Rescan Audio DevicesFor example, if the "stop" button has been pressed by accident at the end of the first song, do not click anything in Audacity. Prepare another song, click "Transport" tab and select "Append Record". The second song will continue to record on the same track at the end of the first song.
You now have a music download on your computer but the music needs to be saved and converted to WAV, OGG, or MP3 formats before exporting.
GENERAL PROBLEMS FOR WINDOWS VERSION
- If you do not have the fluctuating wave on the interface during recording, or the recording sounds unsatisfactory, adjust the recording volume as follows:
- Click Start in the left corner of the computer, select Settings, Control Panel.

text_image
Set Program Access and Defaults Windows Catalog Windows Update Programs Documents Settings Search Help and Support Run... Log Off abc... Turn Off Computer... Control Panel Network Connections Printers and Faxes Taskbar and Start Menu start- In Control Panel interface Find Sounds and Audio Devices. Double click the icon to enter Sounds and Audio Devices Properties interface.

text_image
Control Panel File Edit View Favorites Tools Help Back Search Folders Control Panel Switch to Category View See Also Accessibility Options Add Hardware Add or Rerov... Administrative Tools Automatic Updates Date and Time Display Folder Options Fonts Game Controllers Internet Options Keyboard Mouse Network Connections Network Setup Wizard Phone and Modem ... Power Options Printers and Foxes QuickTime Regional and Language ... Scanners and Cameras Scheduled Tasks Security Center Speech System Taskbar and Start Menu User Accounts VMware Tools Windows Firewall Wireless Network Set...- In Sounds and Audio Devices Properties interface Volume window will display, select the Audio tab to reveal the settings. In Sound recording, select USB PnP Audio Device and click the Volume button to set the recording input level. The WAVE IN window will appear.
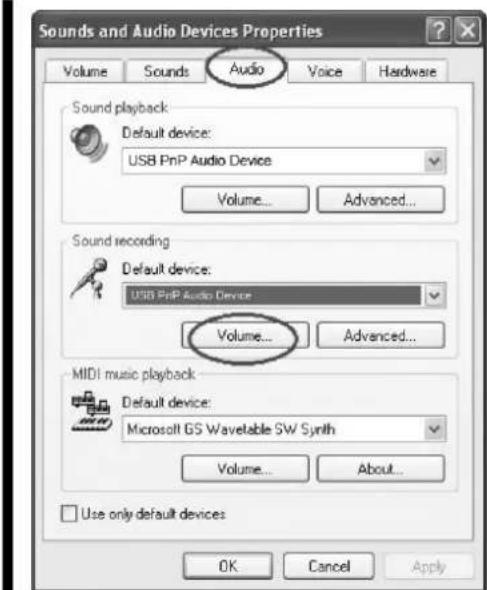
text_image
Sounds and Audio Devices Properties Volume Sounds Audio Voice Hardware Sound playback Default device: USB PnP Audio Device Volume... Advanced... Sound recording Default device: USB PnP Audio Device Volume... Advanced... MIDI music playback Default device: Microsoft GS Wavelable SW Synth Volume... About... Use only default devices OK Cancel Apply- In WAVE IN interface Adjust the recording volume to about 50% as per illustrated below. The fluctuating wave will show on the interface when recording.

text_image
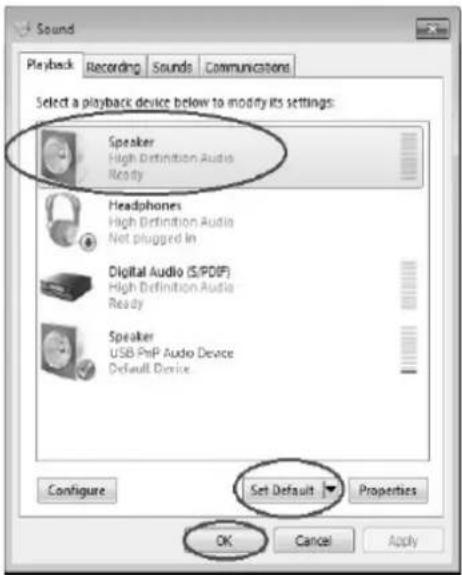
Options Help Microphone Balance: Volume: Mute USB Audio Controller- If you do not hear any sound when the turntable is connected and you wish to listen to the music and/or video, it is possible that the default playback device has been changed to USB PnP Audio Device when the turntable connects to the PC.
Recommended: Remove the USB cable from the PC.
Alternative: This solution requires you to change the setting manually every time you connect the USB cable to the PC. Change the setting as follows:
•For Vista and Windows 7 users:
Click "Start" and go to the Control Panel. Find and click "Sound" icon. Sound window will be opened and the "Playback" window will be seen. You will see that the Speaker USB PnP Audio Device is set as default. To ensure the sound, click a playbac device (e.g., Speaker High Definition Audio), then click "Set Default" and click OK. The sound should now work.
text_image
Sound Playback Recording Sounds Communications Select a playback device below to modify its settings: Speaker High Definition Audio Ready Headphones High Definition Audio Not plugged in Digital Audio (S/PDIF) High Definition Audio Ready Speaker USB PrP Audio Device Default Device Configure Set Default Properties OK Cancel Apply•For Other Windows versions users (e.g.: Windows XP):
Click "Start" and find "Settings", "Control Panel". In the Control Panel window, find and double click into "Sounds and Audio Devices". In the Sounds and Audio Devices Properties window, Volume window will be seen. Click the "Audio" tab to reveal the settings. In the Sound playback section, you will see that the USB PnP Audio Device is selected. To enable the sound, click the pull-down arrow and select your inbuilt sound device or sound card b name as the playback device (e.g., Realtek) and click OK and the sound should be enabled.

text_image
Sounds and Audio Devices Properties Volume Sounds Audio Voice Hardware Sound playback. Default device: USB PnP Audio Device Volume Advanced Sound recording Default device: USB PnP Audio Device Volume Advanced MIDI music playback Default device: Microsoft GS Wavelength SW Synth Volume... About... Use only default devices OK Cancel ApplyDIVIDING TRACKS
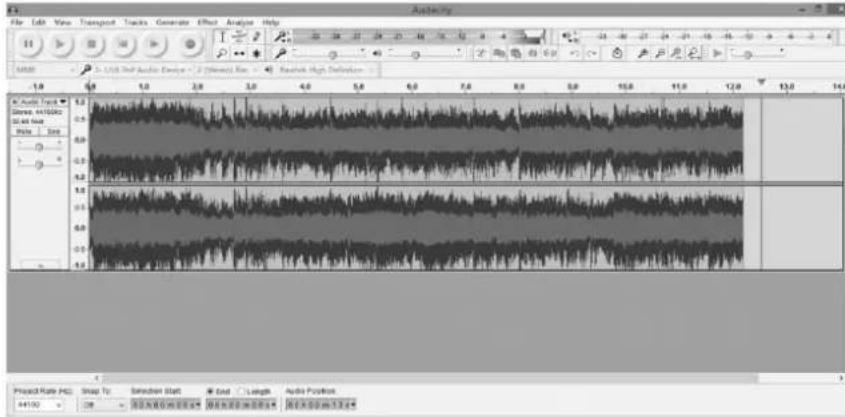
After you have finished downloading, you may play back the songs through your computer before exporting. In stop mode, simply click ( ) SKIP TO START button and click then the ( ) PLAY button.
- Press ( ) button to return to the beginning of the first song.
- Move cursor to the wave graphic area, left click mouse and hold then drag from left to right. Release the mouse when the highlight reaches the end of the first song.
Highlighted
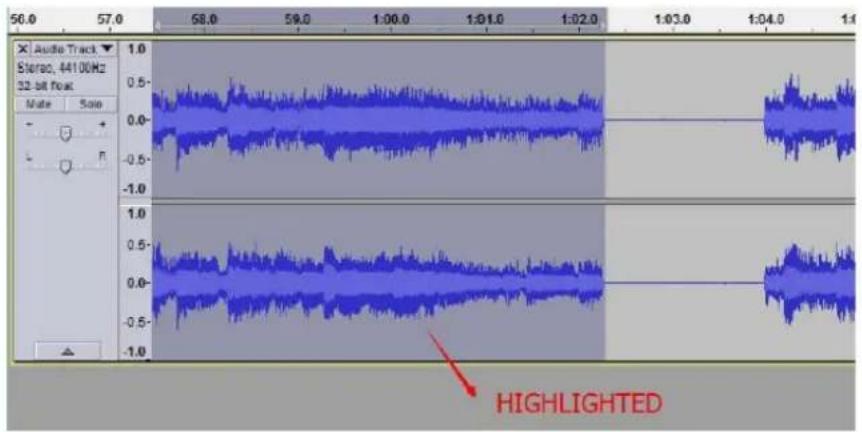
text_image
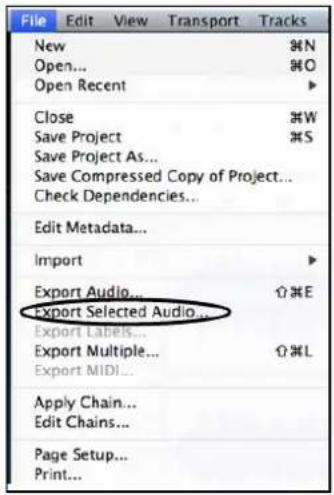
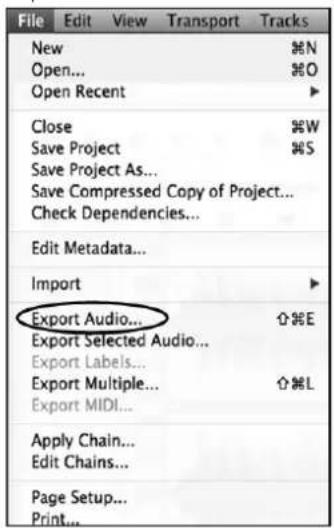
Audio Track Stereo, 44100Hz 32-bit freq Mate Size 1.0 0.5- 0.0- -0.5- -1.0 1.0 0.5- 0.0- -0.5- -1.0 1:03.0 1:04.0 1.1 HIGHLIGHTED- Click "File" tab then select "Export Selected Audio..."

text_image
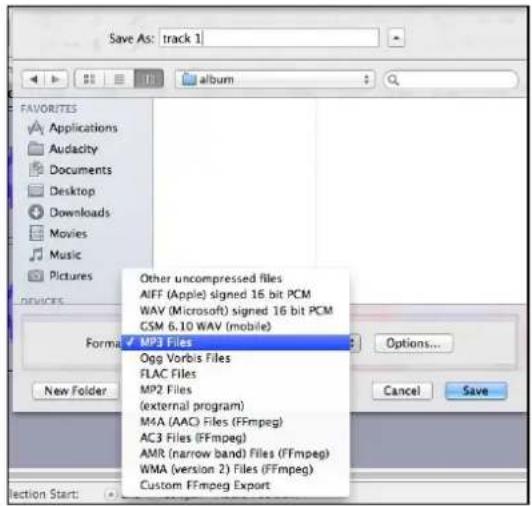
File Edit View Transport Tracks Generate Effect An New Ctrl+N Open... Ctrl+O Recent Files > Close Ctrl+W Save Project Ctrl+S Save Project As... Save Compressed Copy of Project... Check Dependencies... Edit Metadata... Import > Export Audio... Ctrl+Shift+E Export Selected Audio... Export Labels... Export Multiple... Ctrl+Shift+L Export MIDI... Apply Chain... Edit Chains... Page Setup... Print... Exit Ctrl+Q- In the next window, select a location as well as the format (most people prefer to save audios in MP3 format (MP3 format is most common)) in My Music and put the title in the file name. Click "Save".
NOTE: The most common formats are: MP3, WAV (WAV uses a lot of space), and MYA/AAC (most iPod devices can play audios with this format).
You can also choose alternative formats such as AIFF, WAV, OGG or FLAC if these formats are supported on both your computer and the exported devices. Note that according to your selection, the Edit Metadata window may not appear.

text_image
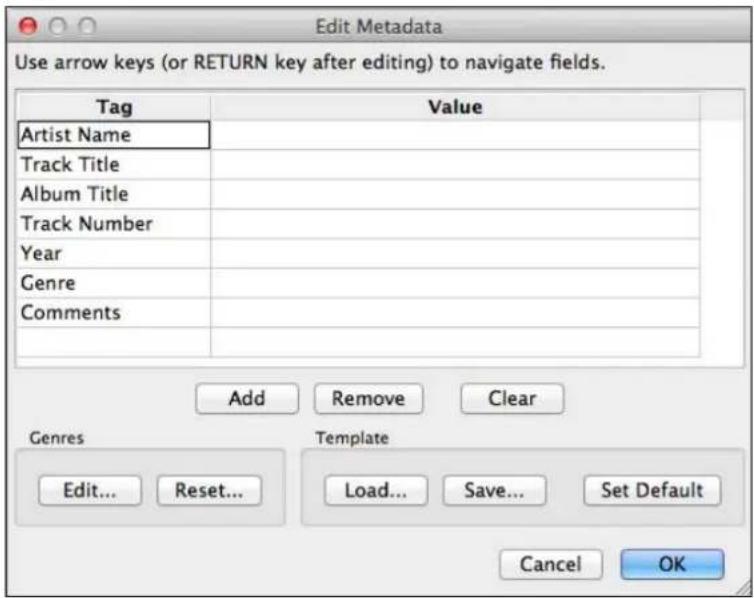
Export Selected Audio Save in: My Music No items match your search. Recent Places Desktop Libraries Computer Network File name: track 01.mp3 Save as type: MP3 Files Save Cancel Options...- In the next window, fill in the information in the window entitled "Edit Metadata". Then click "OK".
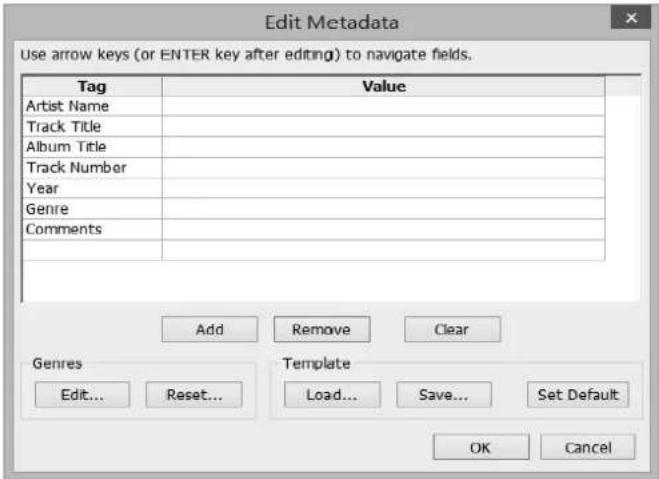
text_image
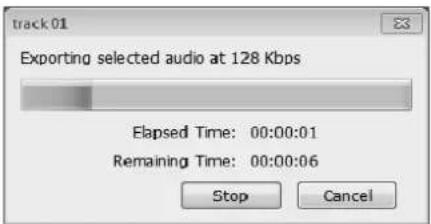
Edit Metadata Use arrow keys (or ENTER key after editing) to navigate fields. Tag Value Artist Name Track Title Album Title Track Number Year Genre Comments Add Remove Clear Genres Update Reset...TemplateLoad... Save... Set Default OK CancelWait a few seconds before exporting the selected audio.
text_image
track01 Exporting selected audio at 128 Kbps Elapsed Time: 00:00:01 Remaining Time: 00:00:06 Stop CancelSecond song to be divided and saved:
- Move cursor to the wave graphic at the beginning of the second song. Left click mouse and hold then drag from left to right until you reach and highlight the end of the second song.
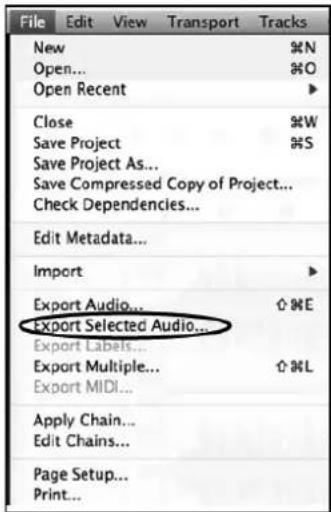
- Click "file" tab then select "Export Selected Audio...".
- Follow above steps to divide songs, export and save, one-by-one.
MP3, WAV AND OGG FORMAT
THESE ARE DIGITAL FILE FORMATS FOR AUDIO (MUSIC) AND MOST CURRENT COMPUTERS ARE COMPATIBLE. HOWEVER, IF YOU COPY THE FILE ONTO A CD DISC (CD-R OR CD-RW) AND PLAY WITH ANOTHER CD PLAYER, YOU HAVE TO MAKE SURE THE CD PLAYER SUPPORTS THOSE FORMATS; OTHERWISE, THE COPIED CD DISC WILL NOT PLAY. THE SAME THING IS TRUE WITH A COPIED FILE TO BE PLAYED ON ANOTHER MP3 PLAYER.
EXPORT AND SAVE FOR WAV
AND OGG FORMATS
(AFTER RECORDING IS COMPLETE)
When the song is finished, click ( ) on the screen to stop playing.
You can export and save tracks individually, or export and save into one file.
To export and save individually:
- Highlight the song that you want to save then click the file tab on the audacity interface.

text_image
File Edit View Transport Tracks Generate Effect An New Ctrl+N Open... Ctrl+O Recent Files Close Ctrl+W Save Project Ctrl+S Save Project As... Save Compressed Copy of Project... Check Dependencies... Edit Metadata... Import Export Audio... Ctrl+Shift+E Export Selected Audio... Export Labels... Export Multiple... Ctrl+Shift+L Export MIDI... Apply Chain... Edit Chains... Page Setup... Print... Exit Ctrl+Q- Select "Export Selected Audio...", a window will appear as below:

text_image
Export Selected Audio Save in: My Music Recent Places Desktop Libraries Computer Network No items match your search. File name: Save as type: MP3 Files Save Cancel Options...Select the folder, put title in the file name and click the pull-down arrow to select a save type, such as WAV or OGG format.
- Choose the file format of the recording that should be exported and put in the title in the file name and the folder of the location where it will be saved, i.e. desktop. Then click "Save".
- Edit Metadata window may appear, complete the information then press the OK button.

text_image
Edit Metadata Use arrow keys (or ENTER key after editing) to navigate fields. Tag Value Artist Name Track Title Album Title Track Number Year Genre Comments Add Remove Clear Genres Edit... Reset... Template Load... Save... Set Default OK Cancel- Wait for a few seconds until the export & saving is completed.
Setting the language
- Click Edit and select Preferences.
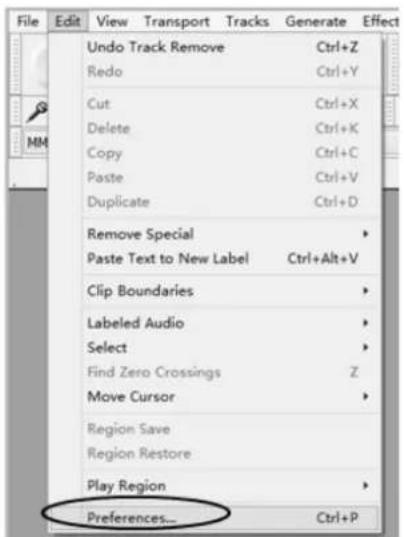
text_image
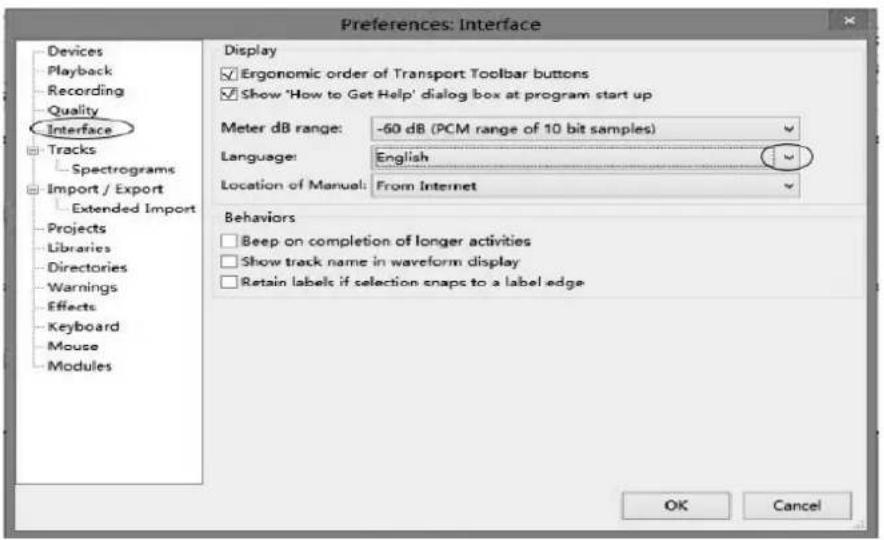
File Edit View Transport Tracks Generate Effect Undo Track Remove Ctrl+Z Redo Ctrl+Y Cut Ctrl+X Delete Ctrl+K Copy Ctrl+C Paste Ctrl+V Duplicate Ctrl+D Remove Special > Paste Text to New Label Ctrl+Alt+V Clip Boundaries > Labeled Audio > Select > Find Zero Crossings Z Move Cursor > Region Save Region Restore Play Region > Preferences... Ctrl+P- Another window titled with Audacity Preferences will appear. Click the Interface tab and click the pull down arrow to select the language you wanted.
text_image
Preferences: Interface Devices Playback Recording Quality Interface Tracks Spectrograms Import / Export Extended Import Projects Libraries Directories Warnings Effects Keyboard Mouse Modules Display ✓ Ergonomic order of Transport Toolbar buttons ✓ Show 'How to Get Help' dialog box at program start up Meter dB range: -60 dB (PCM range of 10 bit samples) Language: English Location of Manual: From Internet Behaviors □ Beep on completion of longer activities □ Show track name in waveform display □ Retain labels if selection snaps to a label edge OK Cancel
text_image
Preferences: Interface Devices Playback recording quality interface Tracks Spectrograms Import / Export Extended Import Projects Libraries Directories Warnings Effects Keyboard Mouse Modules Display ✓ Ergonomic order of Transport Toolbar buttons ✓ Show 'How to Get Help' dialog box at program start up Meter dB range: -60 dB (PCM range of 10 bit samples) Language: English Location of Manual: English Behaviors Beep on complet Show track name Retain labels if se Espanol Euskara Farsi Francais Gaeilge Galician Georgian Hebrew Hindi Italiano Khmer Korean Lietuviu Magyar Makedonski Nederlands Nihongo Norsk Occitan Polski Portugues Portugues (Brasil) Romanian Russky Serbian (Cyrillic) Serbian (Latin) Slovak Slovenscina Suomi- Then click OK to close the window. The new setting will only be active in the next start - that means you need to close the Audacity and re-open the software again.
AUDACITY FOR MAC USERS
System Requirements
Audacity for Mac is a Universal Binary for OS X 10.6 and later. Audacity runs best with at least
1 GB RAM and a 1 GHz processor (2 GB RAM/2 GHz on OS X 10.7 and later).
For lengthy multi-track projects, we recommend a minimum of 2 GB RAM and 2 GHz processor (4 GB RAM on OS X 10.7 and later).
-
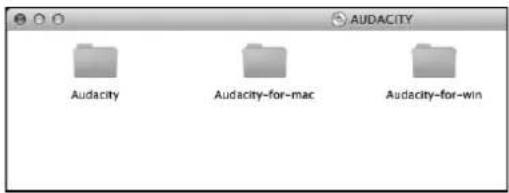
Please insert the Audacity software disk that comes with your unit. Click the Audacity disk on the desktop.
-
Select Audacity_for_mac for Macintosh system.
text_image
AUDACITY Audacity Audacity-for-mac Audacity-for-winTIPS: To check your computer OS version, you can click the Apple icon then select "About This Mac".

Finder File Edit View Go Window Help
The next window will display and the processor type and the OS version will display as below.

text_image
About This Mac Mac OS X Version 10.7.3 Software Update... Processor 2 GHz Intel Core 2 Duo Memory 2 GB 667 MHz DDR2 SDRAM Startup Disk Macintosh HD More Info... TM and © 1983-2012 Apple Inc. All Rights Reserved. License Agreement- Double click on the Audacity_for_mac folder.

- Then double click "audacity-macosx-ub-2.1.2.dmg".

Wait a few minutes until this window disappears.

text_image
Opening "audacity-macosx-ub-2.1.2.dmg" Verifying... Cancel SkipThen another window will appear.

text_image
Audacity 2.1.2 INSTALLATION Drag the Audacity folder to the Applications shortcut Audacity ApplicationsDrag the "Audacity" folder in to "Applications" as the instruction show on the window.
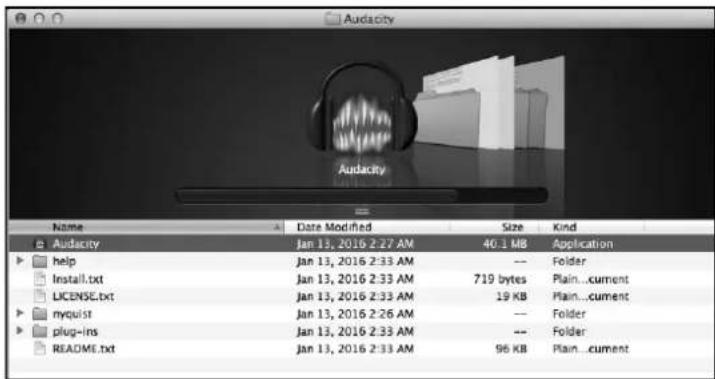
- Double click the Audacity folder and in the Audacity window, files will be displayed in the folder.
text_image
Audacity Name Date Modified Size Kind Audacity Jan 13, 2016 2:27 AM 40.1 MB Application help Jan 13, 2016 2:33 AM -- Folder Install.txt Jan 13, 2016 2:33 AM 719 bytes Plain...current LICENSE.txt Jan 13, 2016 2:33 AM 19 KB Plain...current myquist Jan 13, 2016 2:26 AM -- Folder plug-ins Jan 13, 2016 2:33 AM -- Folder README.txt Jan 13, 2016 2:33 AM 96 KB Plain...current- Double click the Audacity icon to start the software running, alternatively, drag the "orange ball wearing headphones" icon down onto the desktop toolbar. Click on this icon to run Audacity.
CONFIGURING AUDACITY FOR MAC
Audacity Interface for Mac

text_image
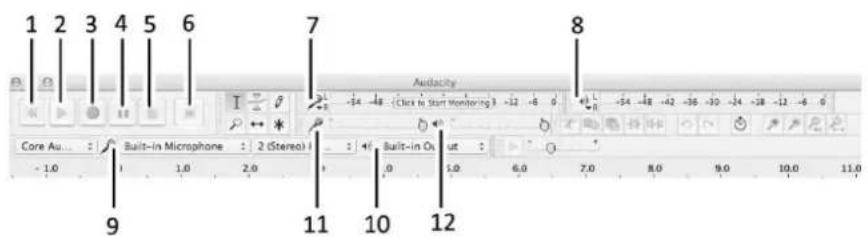
Audio Core Audio 2 USB PrP Audio Device 2 (Stered) 4 Built-in Output -1.0 0.0 1.0 2.0 3.0 4.0 5.0 6.0 7.0 8.0 9.0 10.0 11.0 12.0 13.0 Project Rate (Hz) Drop To Selection Run End Length Audio Response in USD Meters: 00 h/00 m/00 s* 00 h/00 m/00 s* 00 h/00 m/00 s*Audacity Interface---Settings and controls
At the top of the main Audacity window, to the right of the play control buttons, you will see the input and output level meters (labeled L and R). Under the output level meter, is an icon that looks like a microphone. Next to the microphone is a black arrow that points down. Click this arrow and select Start Monitor. (If you do not see the input and output level meters, open your Preferences again as described above.)
AUDACITY CONTROLS AND BUTTONS
Use the attribute control button at the top of the screen to go to Beginning, Play, Record, Pause, Stop and End. Use the File, Edit, View, Transport, Tracks, Generate, Effect and Analyze menus to Save, Export, and Edit the music.
- Click the ( ) button to skip to start;
- Click the ( ) button to play;
- Click the ( ) button to record;
- Click the ( ) button to pause the recording;
- Click the ( ) button to stop the recording;
- Click the ( ) button to skip to end;
- Input level monitor
- Output level monitor
- Input device
- Output device
- Adjust the input volume.
- Adjust the output volume.
text_image
1 2 3 4 5 6 7 8 Core Au... Built-in Microphone : 2 (Stereo) -1.0 1.0 2.0 11 10 12 Audiacy -14 -18 -Click to Start Monitoring 3 -12 -6 0 Built-in Os ut 1.0 6.0 7.0 8.0 9.0 10.0 11.0AUDACITY PREFERENCES SETTINGS
A few settings will be required before you download the music.
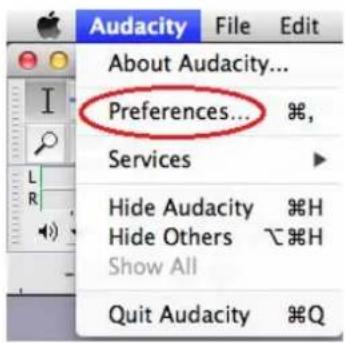
- Click "Audacity" on the Audacity interface, select "Preferences" and another window will appear on the screen.
text_image
Audacity File Edit About Audacity... Preferences... Services Hide Audacity H Hide Others C H Show All Quit Audacity Q
text_image
Preferences: Devices Devices Playback Recording Quality Interface Tracks Spectrograms Import / Export Extended Import Projects Libraries Directories Warnings Effects Keyboard Mouse Modules Interface Host: Core Audio Using: PortAudio V19-devel (built Jan 12 2016 13:27:02) Playback Device: Built-in Output Recording Device: Built-in Microphone Channels: 2 (Stereo) Cancel OK- In the window of Audacity Preferences click "Devices" on the left hand side.
Then on the right side within the Recording Device column, set Device to "USB PnP Audio Device", Channels to "2 (Stereo)".
NOTE: If you cannot find the "USB PnP Audio Device" in the Device list, close the Audacity Software and re-open and try again. Ensure that the turntable is connected to the computer.

text_image
Preferences: Devices Devices Playback Recording Quality Interface Tracks Spectrograms Import / Export Extended Import Projects Libraries Directories Warnings Effects Keyboard Mouse Modules Interface Host: Core Audio Using: PortAudio V19-devel (built Jan 12 2016 13:27:02) Playback Device: Built-in Output Recording Device: USB PnP Audio Device Channels: 2 (Stereo) Cancel OK- Click "Recording" on the left. Then on the right side in Playthrough column, click the checkbox beside "Software Playthrough: Listen while recording or monitoring new track".
In the Sound Activated Recording column, click the checkbox beside "Sound Activated Recording", then slide the meter to -36 db. NOTE: Once the 'Sound Activated Recording' is selected, the Pause button will not work during recording.

text_image
Preferences: Recording Devices Playback Recording Quality Interface Tracks Spectrograms Import / Export Extended Import Projects Libraries Directories Warnings Effects Keyboard Mouse Modules Playthrough Overdub: Play other tracks while recording new one Hardware Playthrough: Listen while recording or monitoring new track Software Playthrough: Listen while recording or monitoring new track Latency Audio to buffer: 2 milliseconds (higher = more latency) Latency correction: -150 milliseconds (negative = backwards) Sound Activated Recording Sound Activated Recording Sound Activation Level (dB): -36 -36 0 Cancel OK- Click "Quality" on the left then on the right side in the Sampling column, select "44100 Hz" in Default Sample Rate and select "16-bit" in Default Sample Format.
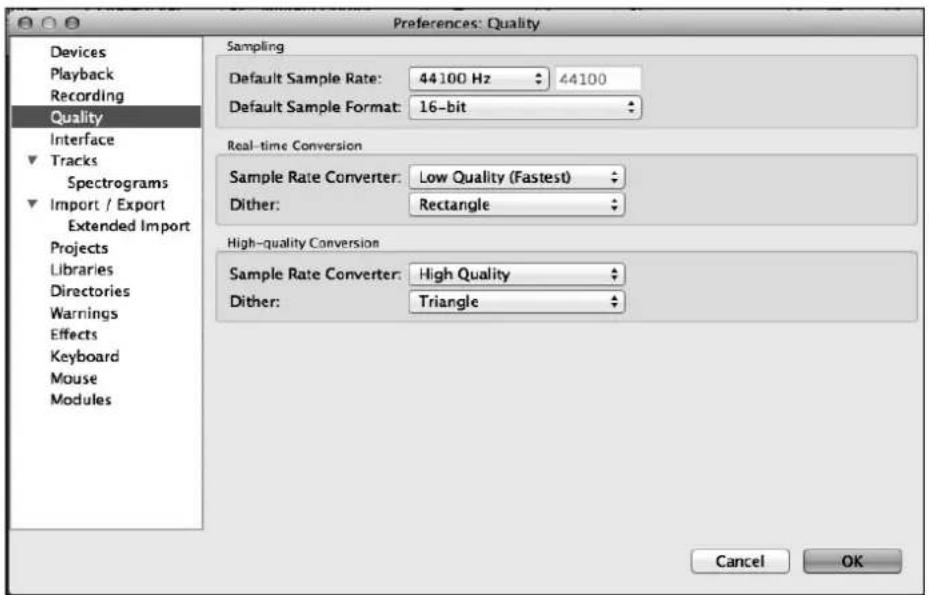
text_image
Preferences: Quality Devices Playback Recording Quality Interface Tracks Spectrograms Import / Export Extended Import Projects Libraries Directories Warnings Effects Keyboard Mouse Modules Sampling Default Sample Rate: 44100 Hz 44100 Default Sample Format: 16-bit Real-time Conversion Sample Rate Converter: Low Quality (Fastest) Dither: Rectangle High-quality Conversion Sample Rate Converter: High Quality Dither: Triangle Cancel OK- Click "Libraries" on the left then on the right side in MP3 Export Library column, check if the program has detected and shown the MP3 Library Version there. If shown, skip and forward to step 6.

text_image
Preferences: Libraries Devices Playback Recording Quality Interface Tracks Spectrograms Import / Export Extended Import Projects Libraries Directories Warnings Effects Keyboard Mouse Modules MP3 Export Library MP3 Library Version: LAME 3.98.2 MP3 Library: Locate... LAME MP3 Library: Download FFmpeg Import/Export Library FFmpeg Library Version: FFmpeg library not found FFmpeg Library: Locate... FFmpeg Library: Download Cancel OKIf "MP3 export library not found" is displayed, you must find the "LAME". Click "Locate..." button then a window named "Locate Lame" appears to find where the "LAME" is. Click the "Browse..." button to find it.
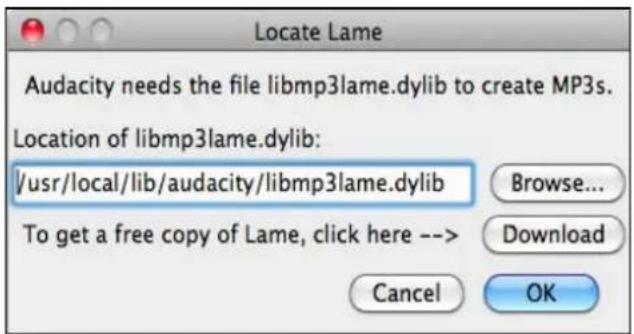
text_image
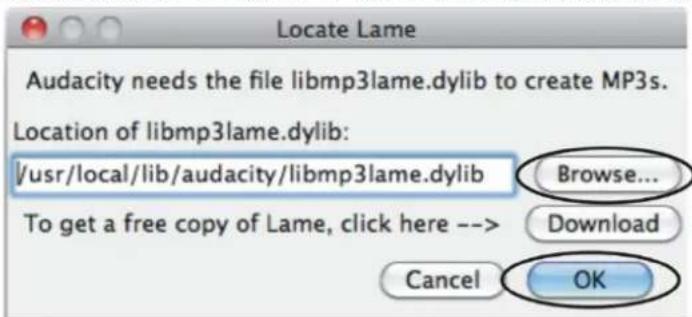
Locate Lame Audacity needs the file libmp3lame.dylib to create MP3s. Location of libmp3lame.dylib: /usr/local/lib/audacity/libmp3lame.dylib Browse... To get a free copy of Lame, click here --> Download Cancel OKIf you cannot find it or the LAME file you found is not compatible, click the "Download" button and a website will show automatically. Scroll down the webpage to find a title named "Mac OS X". Click the "LAME download page" and another website will show automatically.
Mac OS X
On OS X 10.6 or later, Administrative (and occasionally, root) permissions may be needed on some machines to read the LAME library the installer places in /usr/local/lib/audacity.
In case of difficulty, please download the zip version "Lame_Library_v3.98.2_for_Audacity_on_OSX.zip" from "Alternative zip download for Lame 3.98.2" below and follow the instructions.
• Installer
- Go to the external LAME download page.
- Download Lame Library v3.98.2 for Audacity on OSX.dmg.
- When you have finished downloading, double-click the .dmg to mount it, then go to the Finder (in Safari, the "Lame Library v3.90.2 for Audacity" virtual disk image will be extracted and mounted automatically after downloading).
- Double-click "Lame Library v3.98 2 for Audacity pkg", the standard OS X Installer will start
- Click through the steps in the installer, accepting the defaults in all cases; this will install the LAME binary "libmp3lame dylib" in /usr/local/lib/audacity.
-
Audacity should detect LAME automatically when you export as MP3. If Audacity cannot find LAME:
-
Click Audacity > Preferences then choose "Libraries" on the left
- Click "Locate..." under "MP3 Export Library", then "Browse..." in the "Locate Lame" dialog
- The "Where is libmp3lame.dylib?" window will open at /usr/local/lib/audacity; select "libmp3lame.dylib", click "Open" then "OK" and "OK".
Find and Click the "MAC OSX downloads"
Click Here, Windows User ----> Jump straight to Windows downloads
Click Here, MAC OSX User ----> Jump straight to MAC OSX downloads
Scroll down the webpage.
For FFmpeg and LAME on Mac OSX click below:
If Audacity does not detect FFmpeg, download the ZIP option, extract the files inside to a well known folder, then open Audacity, go to Library Preferences and configure it to search on the well known folder you extracted the files to.
For Audacity 1.3.3 or later on Mac OS X 10.4 and greater (Intel or PPC), and Audacity 1.2.5 on OS X 10.4 and later (Intel)
Lame Library v3.98.2 for Audacity on OSX.dmg (ZIP version here)
FFmpeg 2.2.2 ZIP for Audacity 2.0.6 or later on OS X 10.4 and later (Intel or PPC) (THIS IS NOT LAME!):
ffmpeg-mac-2.2.2.zip - DMG version here
FFmpeg Binary for Audacity 1.3.13 to 2.0.5 ONLY (see previous link for 2.0.6) OS X 10.4 and later (Intel or PPC):
FFmpeg (0.6.2 OSX 10.4+ DMG) (zip version here or if problems with the installer, try this new one)
You will notice a form showing the LAME for all version systems. Find a title named "For Audacity 1.3.3 or later on Mac OS X 10.4 and greater (Intel or PPC), and audacity 1.2.5 on OS X 10.4 and later (Intel)" and then click "Lame Library v3.98.2 for Audacity on OSX.dmg" or "here" to download the file. Then locate LAME and click OK.
text_image
Locate Lame Audacity needs the file libmp3lame.dylib to create MP3s. Location of libmp3lame.dylib: /usr/local/lib/audacity/libmp3lame.dylib Browse... To get a free copy of Lame, click here --> Download Cancel OK- Click OK to close the Preferences interface.
SETTING THE RECORDING INPUT LEVEL
It is recommended that the recording input level is adjusted prior to starting to record.
Slide the output level to about 0.5, slide the input level to 0.3, then get your record ready.

RECORDING OPERATION
To download music and save into computer:
- Place the record on the turntable.
- Move the tone-arm over to the record to start playing.
- Click the Record () button to start recording.
The waves (left and right tracks) will show on the interface.
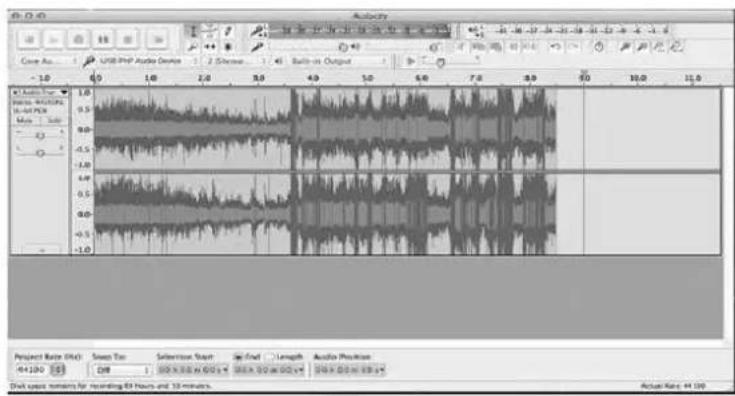
text_image
Audio Core As: USB PDF Audio Device 2 Charges 1.45 Bats-on Output 61 Audio Time 1.0 1.0 2.0 3.0 4.0 5.0 6.0 7.0 8.0 9.0 10.0 11.0 Source: AC/2024 16-47 PCE Audio Position Project Rate (Shk): Smooth Tan Selection Scan End Length Audio Position +4/120 128 100 x 30 x 60 x 90 x 120 x 150 x 180 x Duct space parameters for recording 65 Hours and 55 minutes. Actual Rate: 44.00- At end of the song, click "pause" (☐) button on computer and press Stop button on turntable, move cursor to the wave area and left click at the end of the song.
For the next song, replace the album or move tone-arm to another desired song. Press Play button on the turntable to start playing the next song. Immediately press "pause" (☐) button on computer and downloading will continue and another R/L track will appear on the interface.
NOTE: Pause button will not work during recording process if the 'Sound Activated Recording' in the Preferences Recording is selected. Clear the checkbox next to the 'Sound Activated Recording' if you want to pause recording manually.
- Repeat steps 3 and 4 until you have finished downloading.
NOTE: Do not click stop button on computer while continuously downloading songs. Remember to click pause button in between your desired songs. Press stop button on the computer only when all your desired songs have been downloaded.
After your have finished downloading, you may play back the songs through your computer. In stop mode, simply click ( ) SKIP TO START button then the ( ) PLAY button.
DIVIDING TRACKS
- Press ( ) button to return to the beginning of the first song.
- Move cursor to the wave graphic area, left click the mouse and hold then drag from left to right. Release the mouse when the highlighter has reached the end of the first song.
- Click "File" tab then select "Export Selected Audio...".
- The window will pop up a dialog box for you to complete the Metadata. Click OK button when completed.
text_image
File Edit View Transport Tracks New ⌘N Open... ⌘O Open Recent ▶ Close ⌘W Save Project ⌘S Save Project As... Save Compressed Copy of Project... Check Dependencies... Edit Metadata... Import ▶ Export Audio... ⌘E Export Selected Audio... Export Labels... Export Multiple... ⌘L Export MIDI... Apply Chain... Edit Chains... Page Setup... Print...- Then a window appears, select your music file location and format and type in your file name. Click "Save" and the song is saved on the computer.
text_image
Save As: track 1 FAVORITES Applications Audacity Documents Desktop Downloads Movies Music Pictures New Folder Other uncompressed files AIFF (Apple) signed 16 bit PCM WAV (Microsoft) signed 16 bit PCM CSM 6.10 WAV (mobile) MP3 Files Ogg Vorbis Files FLAC Files MP2 Files (external program) MA (AAC) Files (FFmpeg) AC3 Files (FFmpeg) AMR (narrow band) Files (FFmpeg) WMA (version 2) Files (FFmpeg) Custom FFmpeg Export Options... Cancel Save Section Start:- Edit Metadata window will appear. Complete the information then click OK. Wait for a few minutes until the saving is complete.
text_image
Edit Metadata Use arrow keys (or RETURN key after editing) to navigate fields. Tag Value Artist Name Track Title Album Title Track Number Year Genre Comments Add Remove Clear Genres Template Edit... Reset... Load... Save... Set Default Cancel OKEXPORT AND SAVE FILES (AFTER RECORDING IS COMPLETED)
■ When the recording is finished, click the ( ) on the screen and stop the cassette playback.
■ You have a music download on your computer now.
■ You may play back the song through your computer.
■ Simply click the ( ) to play.
- To export and save individually, click the "File" tab on the Audacity window then select "Export Selected Audio...".
text_image
File Edit View Transport Tracks New %N Open... %O Open Recent ▶ Close %W Save Project %S Save Project As... Save Compressed Copy of Project... Check Dependencies... Edit Metadata... Import ▶ Export Audio... ⬆ %E Export Selected Audio... Export Labels... Export Multiple... ⬆ %L Export MIDI... Apply Chain... Edit Chains... Page Setup... Print...To export and save into one file, click the "File" tab on the Audacity window then select "Export Audio".
text_image
File Edit View Transport Tracks New ⌘N Open... ⌘O Open Recent ▶ Close ⌘W Save Project ⌘S Save Project As... Save Compressed Copy of Project... Check Dependencies... Edit Metadata... Import ▶ Export Audio... ⌘E Export Selected Audio... Export Labels... Export Multiple... ⌘L Export MIDI... Apply Chain... Edit Chains... Page Setup... Print...- A window will pop up after clicking Export. It will default to the MP3 format, but you also can select other formats by clicking the arrow located at the right of the MP3 Files.

text_image
Audacity Save As: track 1 album FAVORITES DEVICES Name Date Modified Other uncompressed files AIFF (Apple) signed 16 bit PCM WAV (Microsoft) signed 16 bit PCM GSM 6.10 WAV (mobile) Format MP3 Files Ogg Vorbis Files FLAC Files MP2 Files (external program) M4A (AAC) Files (FFmpeg) AC3 Files (FFmpeg) AMR (narrow band) Files (FFmpeg) WMA (version 2) Files (FFmpeg) Custom FFmpeg Export New Folder Options... Cancel Save- Complete the "Save As" and Save-in location, click the Save button and the Edit Metadata window will display. Complete the information if necessary then click OK and wait a few minutes until it is finished saving.

text_image
Edit Metadata Use arrow keys (or RETURN key after editing) to navigate fields. Tag Value Artist Name Track Title Album Title Track Number Year Genre Comments Add Remove Clear Genres Template Edit... Reset... Load... Save... Set Default Cancel OK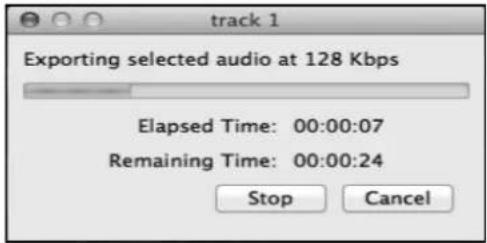
text_image
Exporting selected audio at 128 Kbps Elapsed Time: 00:00:07 Remaining Time: 00:00:24 Stop CancelTROUBLESHOOTING GUIDE
If you experience any problems with your unit, kindly consult the following guide prior to calling your dealer.
NO SOUND:
- If you are not getting any sound into the software application, go back to the preferences as shown above and make sure that you have selected the USB PnP Audio Device for the recording device in the devices.
- Power Cycle: Close Audacity, turn off the turntable, unplug the USB Cable. then plug in the USB Cable, turn on the turntable and reopen Audacity.
- If you are not able to hear any audio as you play the record, please click on the microphone drop-down arrow and select Start Monitoring. This will enable you to hear the audio from the turntable, even if you have not record-enabled the Audacity application.
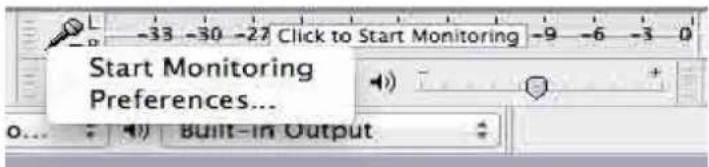
text_image
Start Monitoring Preferences...Check the microphone slider to make sure that it is at full volume, all the way to the right as shown below. If you find the recording sounds low or distorted, adjust the microphone slider.

text_image
Scanned interface toolbar with icons and text labels, including a pen and a shield icon- If you still do not have the fluctuating wave on the interface during recording, or the recording sounds unsatisfactory, adjust the recording volume as follows:
Click the launchpad icon

Then find "System Preference" and double click it.

In the new interface, find the "Sound" icon and double click it.

Adjust the Output volume under "Sound Effects"

text_image
Sound Show All Sound Effects Output Input Select an alert sound: Name Type Basso Built-in Blow Built-in Bottle Built-in Frog Built-in Play sound effects through: Internal Speakers Alert volume: Play user interface sound effects Play feedback when volume is changed Output volume: Mute Show volume in menu barUnder "Input", select "USB PnP Audio Device" and adjust the "Input volume"
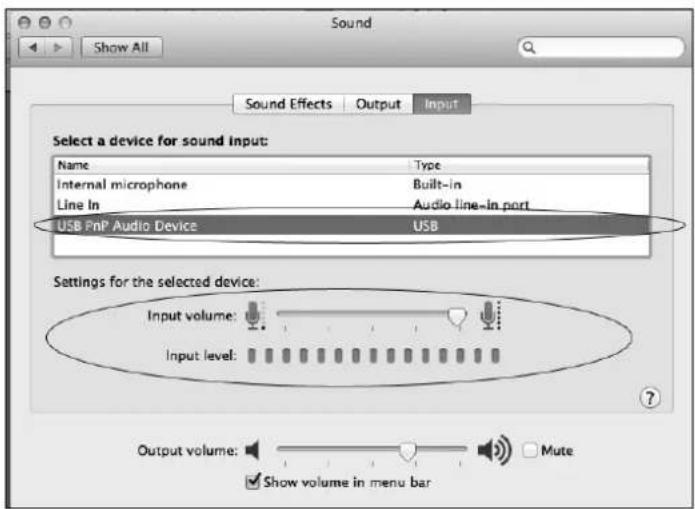
text_image
Sound Show All Sound Effects Output.Input Select a device for sound input: Name Way Internal microphone Built-in Line In Audio line-in port USB FnP Audio Device USB Settings for the selected device: Input volume: Input level: Output volume: Mute Show volume in menu barPOOR SOUND QUALITY:
- Check your stylus to make sure it is secured to the tone arm. The stylus must be connected to the tone arm whenever using the turntable.
- Make sure that your RCA plugs are plugged into a source or not touching bare metal. If you are experiencing noise through the USB, you may have interference from the RCA plugs. Ensure the USB cable is not touching or near any other cables.
- If you experience any odd sounds coming from the recording, try closing all applications and restarting the computer. Only run Audacity while recording.
| Problem | Cause | Solution | |
| THE WHOLE UNIT | Power does not come on when the unit is switched on. | Unit is unplugged. | Connect the unit to the AC power supply. |
| No sound comes out of the speakers. | The volume is tur down (to MIN). | Adjust the volume. | |
| The input selector does not match the playback source. | Re-select the desired input source. | ||
| The sound is noisy. | The unit is too close to a TV set or another similar appliance. | Turn off the TV or other appliance, and relocate the unit. | |
| The unit has no response. | External factors such as ESD (Electro-static discharge) affect the unit. | Remove the power cord and all power supply to the device, then re-plug in the unit after one minute. | |
| PHONO PLAYER | The sound is noisy when playing the record. | The stylus is not placed in the middle center. | Place the stylus in the middle center. |
| The sound is noisy when used for a period of time. | The stylus is damaged. | Please change to a new stylus. | |
| USB-PC | No sound. | “USB PnP Audio Device” may not be selected when choosing a Recording Device during the Device Audacity Preference Settings. Make sure the Microphone slider it is not at full volume | Go back to the preferences as shown above and make sure that you have selected the “USB PnP Audio Device” for the Recording Device in the Device Audacity Preference Settings. Close Audacity, turn off the turntable and unplug the USB Cable. Plug the USB Cable in after a moment, turn on the turntable and reopen Audacity. Click on the microphone drop-down menu and select Start Monitoring. Adjust the microphone slider. |
| Poor sound quality | The stylus does not have a great connection to the tone arm. The RCA Plugs and/or USB Cable may be touching other interfering wires or may be unplugged. | Check your stylus to make sure it is secured to the tone arm. Make sure that your RCA plugs are plugged into a source or not touching bare metal. If you are experiencing noise through the USB, you may have interference from the RCA plugs. Ensure the USB cable is not touching or near any other cables. | |
Specification
USB
Type....
Recording....
Full-Speed....
PHONOGRAPH section
Motor....
Drive system....
Speeds....
Wow & Flutter......
S/N ratio......
Cartridge type....
Stylus....
Output level......
GENERAL
Power requirements......
Power consumption......
Dimensions (LxDxH) ....
Weight......
Standard accessories....
USB series B connector
USB to PC record for vinyl record
USB 2.0 full speed
DC servo motor
Belt drive
33 1/3 rpm, 45 rpm and 78 rpm
Less than 0.25% (WTD)
More than 35 dB
Ceramic stereo cartridge
ITRRS-300
160-380 mV (5 cm/sec at 1 KHz)
AC 120 V \~ 60 Hz
5 W
360mm(L)×221.6mm(D)×105mm(H)
1.76 kg (approx.)
Instruction Manual
45 RPM Adaptor
A Disc for Audacity Software Driver
USB Cable
RCA Line-out Cable
Made in China.
*As a result of continual improvements, design, specifications, and manual are subject to change without prior notice.
FCC Statement
This device complies with Part 15 of the FCC Rules. Operation is subject to the following two conditions: (1) This device may not cause harmful interference, and (2) this device must accept any interference received, including interference that may cause undesired operation.
NOTE: This equipment has been tested and found to comply with the limits for a Class B digital device, pursuant to Part 15 of the FCC Rules. These limits are designed to provide reasonable protection against harmful interference in a residential installation. This equipment generates uses and can radiate radio frequency energy and, if not installed and used in accordance with the instructions, may cause harmful interference to radio communications. However, there is no guarantee that interference will not occur in a particular installation. If this equipment does cause harmful interference to radio or television reception, which can be determined by turning the equipment off and on, the user is encouraged to try to correct the interference by one of the following measures:
- Reorient or relocate the receiving antenna.
- Increase the separation between the equipment and receiver.
- Connect the equipment into an outlet on a circuit different from that to which the receiver is connected.
- Consult the dealer or an experienced radio/TV technician for help.
WARNING: Any changes or modifications not expressly approved by the party responsible for compliance could void the user's authority to operate this equipment.
The device must not be co-located or operating in conjunction with any other antenna or transmitter.
This device complies with FCC and IC radiation exposure limits set forth for an uncontrolled environment.
The device should be installed and operated with a minimum distance of 20cm between the radiator and your body.
INDUSTRY CANADA
This device complies with RSS247 of Industry Canada. Cet appareil se conforme à RSS247 de Canada d'Industrie.
This device complies with Industry Canada license-exempt RSS standard(s). Operation is subject to the following two conditions: (1) this device may not cause interference, and (2) this device must accept any interference, including interference that may cause undesired operation of the device. appareils radio exempts de licence. Son fonctionnement est sujet aux deux conditions suivantes: (1) le dispositif ne doit pas produire de brouillage prejudiciable, et (2) ce dispositif doit accepter tout brouillage recu, y compris un brouillage susceptible de provoquer un fonctionnement indesirable.
Radiation Exposure Statement: The product comply with the Canada portable RF exposure limit set forth for an uncontrolled environment and are safe for intended operation as described in this manual.
The further RF exposure reduction can be achieved if the product can be kept as far as possible from the user body or set the device to lower output power if such function is available.
"WARNING" This product contains chemicals known to the State of California to cause birth defects or other reproductive harm. For more information on these regulations and a list of chemicals, log on the following website address:
http://www.oehha.ca.gov/prop65.html
Innovative Technology Electronics LLC.
Limited Warranty: 90 Days Labor, One Year Parts
Innovative Technology Electronics LLC. (IT) warrants the product to be free from "Defects" in materials under normal use for a period of "One Year" from the date of the original purchase. The Warranty is "Not" transferable. IT agrees, within the initial "90 Day" period, to repair or replace the product if it is determined to be defective at "No Charge". It is further agreed that IT will cover the cost to repair or replace damaged "Parts" only for a total period of "One Year" from the date of the original purchase.
The warranty does not cover cosmetic damage, antennas, AC cords, cabinets, headbands, ear-pads
or damage due to line power surges, connection to improper voltage supply or settings, misuse, mishandling, accident, acts of God or attempted repair by an unauthorized service agent.
To obtain service, the purchaser MUST present an original sales receipt / proof of purchase. Please contact us at www.ithomeproducts.com to request an RMA (Return Material Authorization) number to return products for service or replacement. Returns
without an RMA number on the package will be refused and returned to sender. Upon receipt of the returning item and our full inspection (IT) may issue a replacement to customer for the same item or of one that has equivalent value and features. To return an item, supply full name, return address, phone number,
item purchased, receipt of purchase and reason for return to obtain RMA number.
All returns must be in the original packaging or reasonable substitute to prevent damage.
Customer "Must" include full name, shipping address and telephone number inside of package. No return will be shipped back to a PO Box or APO address.
Please include your check or money order in the amount of:
- USD \5.00 for items \10.00 to \$39.99 (Price Paid Per Unit)
- USD \10.00 for items \40.00 to \$99.99. (Price Paid Per Unit)
- USD \16.00, for items \100.00 and up. (Price Paid Per Unit)
• Shipping fees are non-refundable
to be payable to Innovative Technology Electronics LLC. (for handling and return shipping charges) (IT) will not be responsible for delays or unprocessed claims resulting from a purchaser's failure to provide any / all of the necessary information. Send all inquiries or RMA request via our website www.ithomeproducts.com/support.
Innovative Technology Electronics LLC.
1 Channel Drive
Port Washington, NY 11050
Toll free: 1-877-483-2497
Website for support: www.ithomeproducts.com/support
There are no express warranties except as listed above.
REPAIR OR REPLACEMENT AS PROVIDED UNDER THIS WARRANTY IS THE EXCLUSIVE REMEDY OF THE CUSTOMER, (IT) SHALL NOT BE LIABLE FOR ANY INCIDENTAL OR CONSEQUENTIAL DAMAGES FOR BREACH OF ANY EXPRESS OR IMPLIED WARRANTY ON THIS PRODUCT EXCEPT TO THE EXTENT PROHIBITED BY APPLICABLE LAW. ANY IMPLIED WARRANTY OF MERCHANTABILITY OR FITNESS FOR A PARTICULAR PURPOSE ON THIS PRODUCT IS LIMITED IN DURATION TO THE DURATION OF THIS WARRANTY.
Some states do not allow the exclusion or limitation of incidental or consequential damages, or limitations on how long an implied warranty lasts, so the above exclusions or limitations may not apply to you. This warranty gives you specific legal rights and you may also have other rights, which vary from state to state.