V-KC681HT - Vacuum Cleaner LG - Free user manual and instructions
Find the device manual for free V-KC681HT LG in PDF.

User questions about V-KC681HT LG
0 question about this device. Answer the ones you know or ask your own.
Ask a new question about this device
Download the instructions for your Vacuum Cleaner in PDF format for free! Find your manual V-KC681HT - LG and take your electronic device back in hand. On this page are published all the documents necessary for the use of your device. V-KC681HT by LG.
USER MANUAL V-KC681HT LG
New Type Cyclone vacuum cleaner
Please read all of the information on page 3 carefully.
This information contains important instructions for the safe use and the maintenance of the appliance.
P/No.: 3828FI2866V

natural_image
Abstract black and white circular logo with stylized 'G' and dot (no text or symbols)LG
Table of contents
Information for Your Safety....3
How to Use....4
Assembling Cleaner....4
Vacuum Cleaner Operation....6
Using the Carpet and floor nozzle ....7
Using the Accessory Nozzles 8
Emptying the Dust Tank 9
Cleaning the Dust Tank....10
Cleaning the Air Filter and the Motor safety filter....11
Cleaning the Exhaust Filter....12
What to do if your Vacuum Cleaner does not work....13
What to do when suction performance decreases....13
Information for Your Safety
Please read all the following information, which contains important instructions for the safety, the use and the maintenance of the appliance. This appliance complies with the following EC Directives: -73/23/EEC, 93/68/EEC-Low Voltage Directive-89/336EEC -EMC Directive.
☐ The appliance is not intended for use by young children or infirm persons without supervision.
☐ Young Children should be supervised to ensure that they do not play with appliance.
☐ If the appliance is supplied from a cord extension set or an electrical portable outlet device, the cord extension set on electrical portable outlet device must be positioned so that it is not subject to aplashing or ingress of moisture.
☐ Do not use the vacuum as a toy, injury could result.
☐ Do not continue to vacuum if any defect appears, missing or damaged. In these cases, contact an approved LG Electronics Service Agent.
☐ Repairs, when necessary, must be performed at an approved LG Electronics Service Agent.
☐ Only use parts produced or recommended by LG doing otherwise could invalidate your guarantee.
☐ Do not use without the dust tank or air filter.
☐ Do not use the vacuum cleaner If the power cord is damaged or faulty.
☐ If the power cord is damaged, it must be replaced by an approved LG Electronics Service Agent to avoid a hazard.
☐ Do not unplug by pulling on cord.
☐ Do not pull on the supply cord, run over it, pull it around sharp edges or near/over hot surfaces.
□ Always turn the vacuum cleaner off before:
- Emptying the dust tank.
- Cleaning or changing the filter.
- Romoving from the mains outlet.
☐ Do not leave vacuum cleaner with the plug connected to a mains outlet-unplug when not in use.
☐ Do not use the vacuum with any of the openings blocked with any object that may restrict the airflow.
☐ Do not put any part of the body, colthes or any object (e.g. stick) into the opening or moving parts of the cleaner.
☐ Do not use outdoors.
☐ Do not vacuum hot ash, embers etc. or sharp objects.
☐ Do not vacuum flammable or explosive substances(liquids or gases).
☐ Do not vacuum water or other liquids.
☐ Do not handle the cleaner or plug with wet hands.
☐ Do not immerse the whole cleaner in water.
☐ Do not use vacuum cleaner without repaired if it was under water.
☐ When you vacuum with an attachment appliance that has a rotating brush roller:
- Do not reach into the running brush roller.
☐ Do not vacuum fine dust.
☐ Do not expose vacuum cleaner to heat.

Thermal protector: This vacuum cleaner has a special thermostat that protects the cleaner in case of motor overheating.
If the cleaner suddenly shuts off, turn off the switch and unplug the cleaner.
Check the cleaner for a possible source of overheating such as a full dust tank, a blocked hose or clogged filter.
If these conditions are found, fix them and wait at least 30 minutes before attempting to use the cleaner.
After the 30 minutes period, plug the cleaner back in and turn on the switch. If the cleaner still does not run, contact a qualified electrician.
How to Use Assembling Cleaner
Fit the nozzle onto the end of the pipe.

text_image
to onto the end of the pipe. Spring latch Telescopic pipe Hose Handle Click! Carpet and floor nozzle
Nozzle
Push the nozzle onto the telescopic pipe.

Telescopic pipe
- Press the spring latch to release.
- Pull out the pipe to the desired length.
- Release spring latch to lock the pipe in position.
- Push telescopic pipe into hose handle firmly.
4

text_image
Click! Fitting pipe Flexible Hose Button Attachment Point
③ Connecting the hose to the cleaner
Push the fitting pipe on the flexible hose into the attachment point on the vacuum cleaner. To remove the flexible hose from the vacuum cleaner, press on the button situated on the fitting pipe, then pull the pipe out of the vacuum cleaner.
How to Use Vacuum Cleaner Operation

text_image
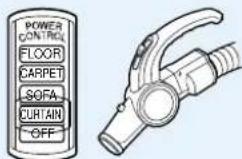
Suction control Slide knob MAX MIN Cord reel button Plug① How to Plug in and Use
② Adjusting the Suction power
③ Park System
4 Storage
- Pull out the power cord to the desired length and plug into the socket.
- Push the suction control switch of the handle in the direction of the position what you want.
• To stop it, push down the suction control switch in the direction of OFF. -
Press the cord reel button to retract the power cord after use.
-
Adjust suction power with the suction control slide knob in the hose handle.
- The indicator is lighted on when the Dust Tank is closely filled with or Air filter is clogged. Empty the Dust Tank and clean the Air filter.
• The indicator could be lighted when sucking fine dust. At this time clean the Air filter.
• To store after vacuuming and pause while vacuuming.
- For deposit after vacuuming, for example to move a small piece of furniture or a rug, use the Park system to support the flexible hose and cleaning head.
- Slide the hook on the nozzle into the slot on the side of the dust tank.
- When you have switched off and unplugged the appliance, press the cord reel button to automatically rewind the cord.
- You can store your appliance in a vertical position by sliding the hook on the nozzle head into the clip on the underside of the appliance.
How to use Using the Carpet and floor nozzle

text_image
1 Carpet Pedal Carpet Floor Floor- Cleaning carpet and floor nozzle
flowchart
graph TD
    A["Hand holding device"] --> B["Assembly"]
    B --> C["Toolpath"]

① Carpet and floor nozzle
• The 2 position cleaning head equipped with a pedal which allows you to alter its position according to the type of floor to be cleaned.
- Carpet or rug position Press the pedal to lower brush.
- Hard floor position (tiles, parquets floor) Both types are available.
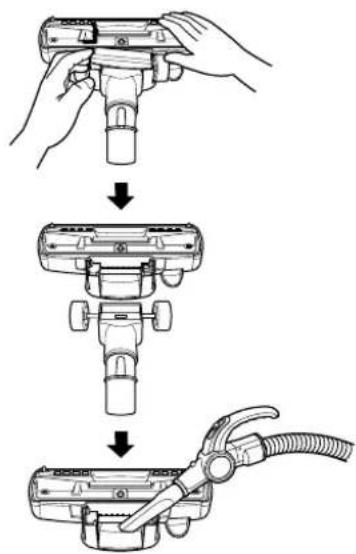
- Open the cover by pulling the hook.
- Divide the nozzle into two parts
- Clean the hole of the nozzle.
How to use Using the Accessory Nozzles
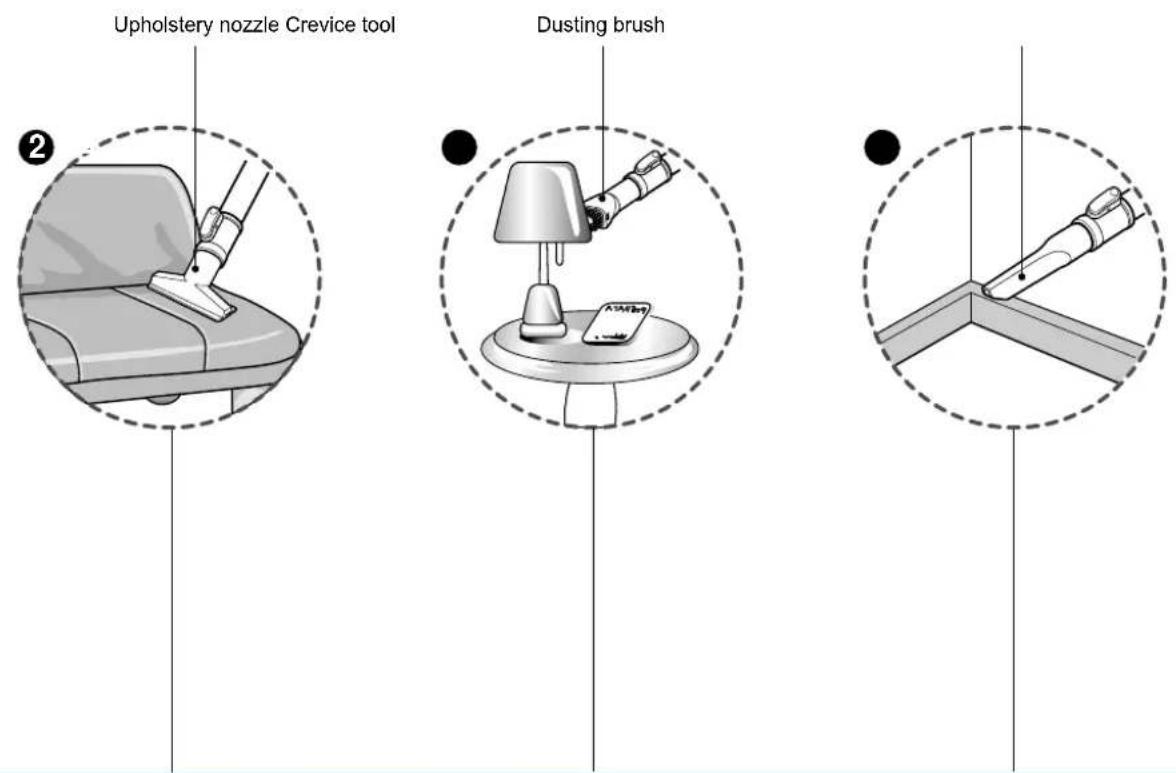
② Upholstery Nozzle
Upholstery Nozzle is for vacuuming upholstery, mattresses, etc.
The thread collectors help to pick up the threads and fluff.
③ Dusting Brush
Dusting Brush is for vacuuming picture frames, furniture frames, books and other irregular surfaces.
4 Crevice Tool
Crevice Tool is for vacuuming in those normally hard-to-reach places such as reaching cobwebs, or between the cushions of a sofa.

natural_image
Illustration of an open box being processed with a tablet showing internal components (no text or symbols)- BOX -
- Accessory nozzles include in the "PE BAG" with owner's manual.

text_image
HolderWARNING!
You must use accessory nozzles in curtain mode.
How to use Emptying the Dust Tank
text_image
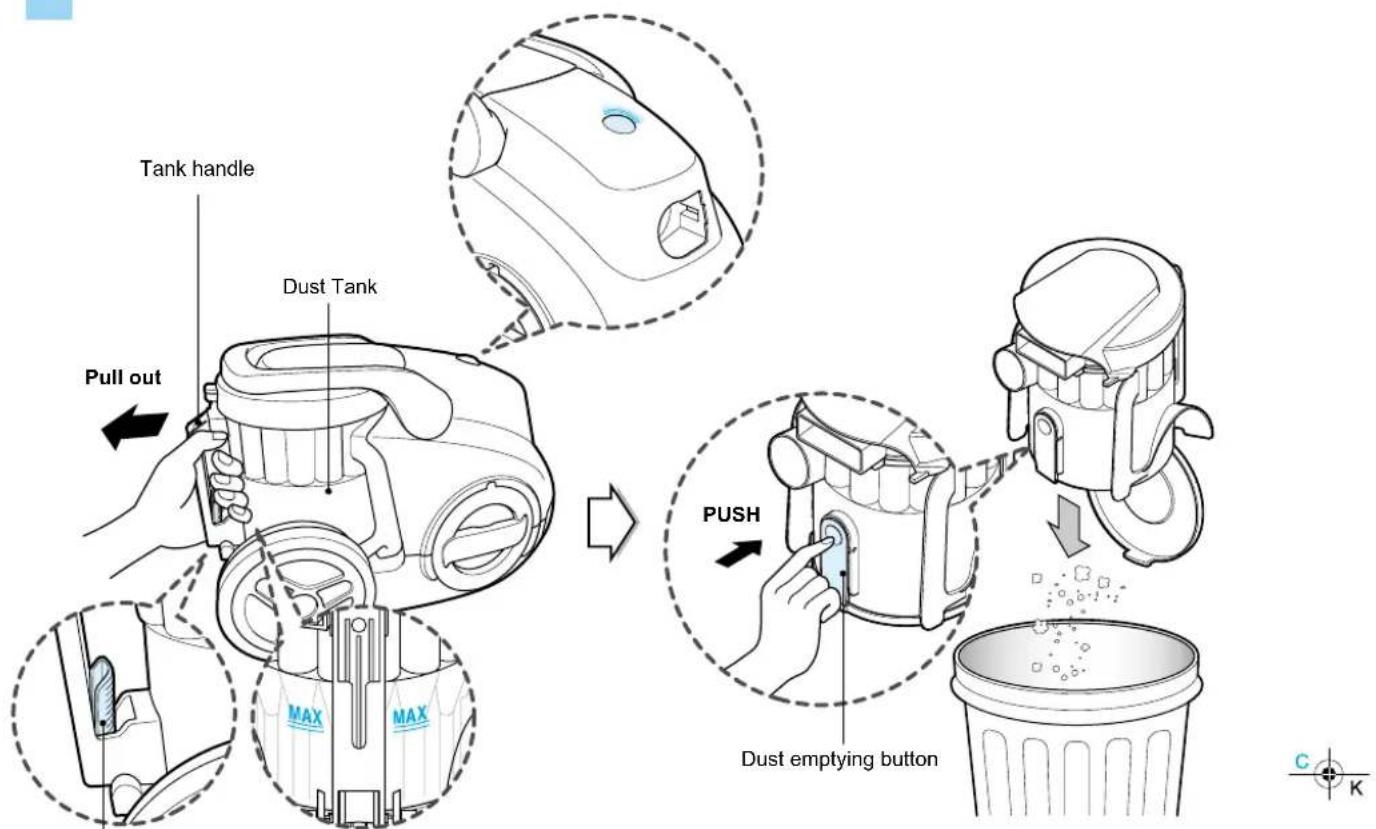
Tank handle Dust Tank Pull out PUSH Dust emptying button C KTank Separation Lever

The dust tank needs emptying when dust reaches the "MAX" position on the dust tank or indicator is lighted on.
- Turn off the vacuum cleaner and unplug it.
- Grasp the handle of the tank and then push the tank separation lever.
- Pull out the tank.
- Empty the tank and then push the tank into the cleaner.
- Push the dust tank into the tank mount as far as it will go.
text_image
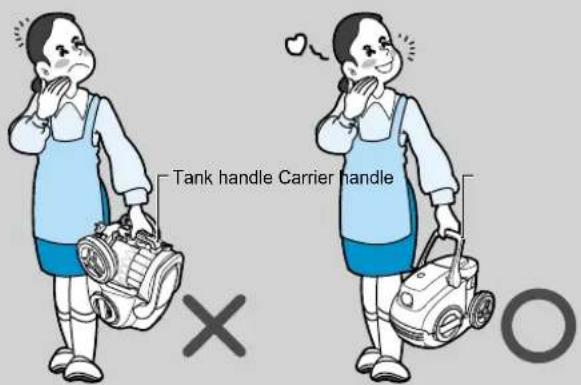
Tank handle Carrier handle × OCAUTION
- Suction power may be weakened when insignificant dusts are sucked. In this case, clean the air filter and the motor safety filter. Page11
- After emptying the dust tank the indicator is on(Red light)or twinkles, clean the air guide and the dust tank.
→ Next page - When the indicator continues to twinkle for 90 seconds, the suction will become low to protect the motor (from overheating).
Moving the cleaner
- Don't grasp the tank handle when you are moving the Cleaner. The cleaner's body may be fell down with separating tank and body. You should grasp the carrier handle when you are moving the cleaner.
How to use Cleaning the Dust Tank
flowchart
graph TD
    A["Pull out"] --> B["Tank Separation Lever"]
    B --> C["Air guide"]
    C --> D["Dust emptying button"]
    D --> E["Dust tank cap"]
    E --> F["Push"]
    F --> G["Dust separating button"]
    G --> H["End"]
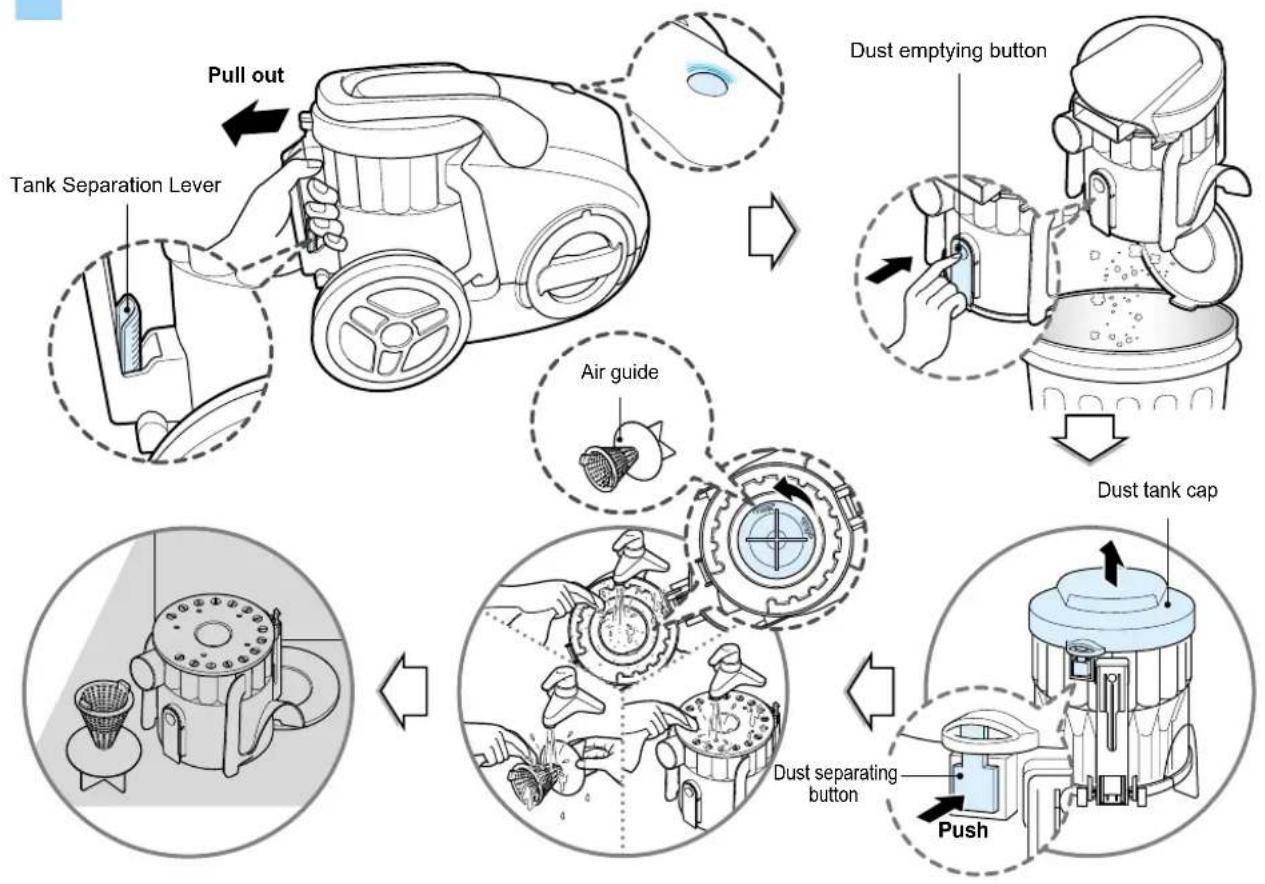
Check the indicator is lighted on after emptying the dust tank. If the indicator is lighted on when dust tank is not filled, firstly clean the dust tank and air guide as follows.
- Press the lever of tank handle and pull the dust tank out.
- Empty dust tank by pressing the dust emptying button as figure.
- Open the dust tank cap by pushing the cap separating button.
- Rotate the air guide by counter clock wise and pull it out of the dust tank. The air guide is located in the center of dust tank.
- Wash tank and air guide with water.
- Dry those fully in shade so that moisture is entirely removed.
Dust tank cap assembling
• The hook of the dust tank cap fits the groove of dust tank.
- Push the dust tank cap until the button of the dust tank assemble the dust tank cap.

CAUTION
After emptying the dust tank the indicator is lighted on(Red light)or twinkles,clean the dust tank.
Air guide assembling
- Adjust the arrow on air guide to the rib of the dust tank.
- Join the air guide to the dust tank by rotating it clock wise.

text_image
Rib EN
text_image
Hook GrooveHow to use Cleaning the Air filter and the Motor safety filter
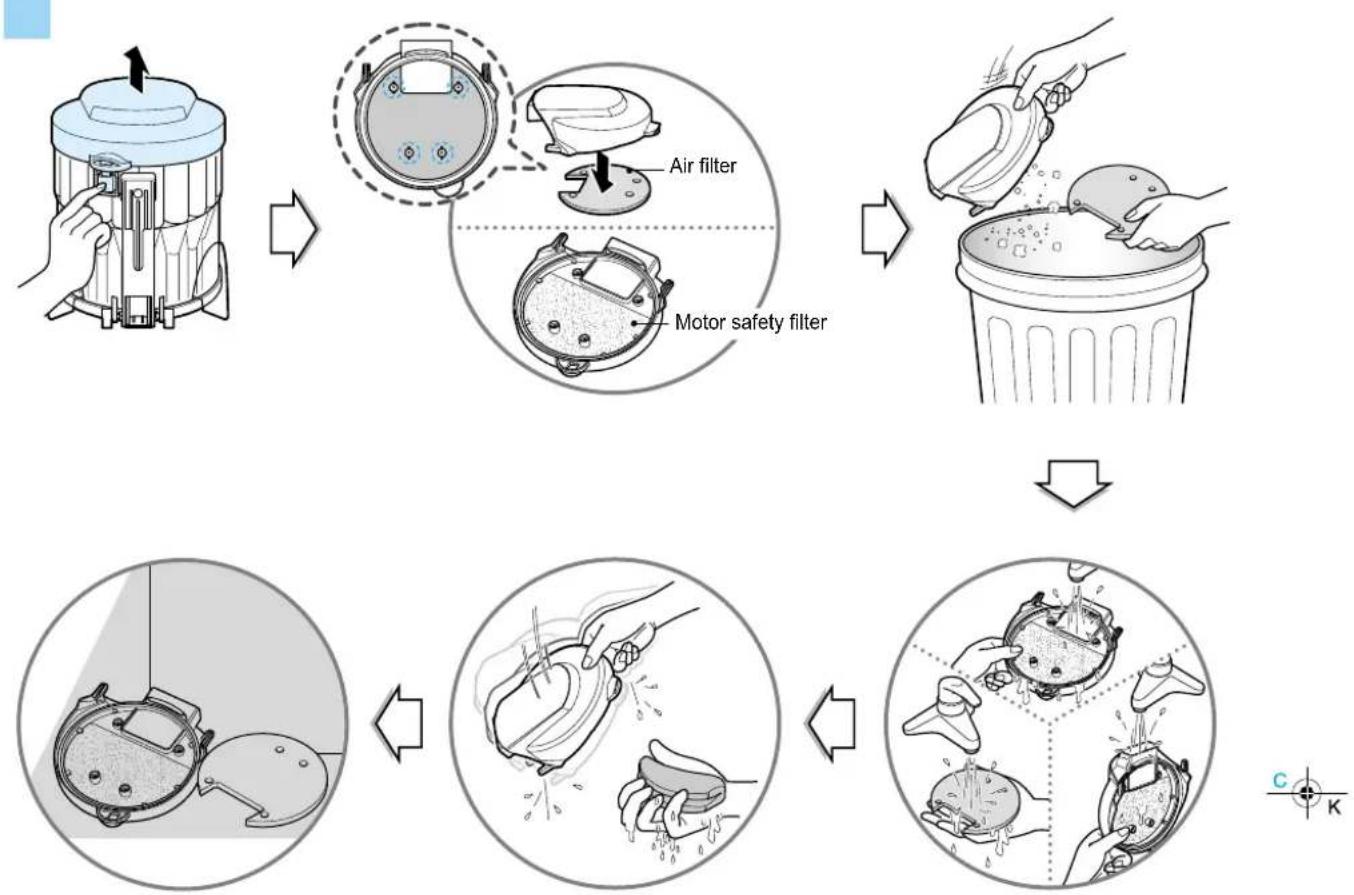
If the indicator is lighted on after cleaning the dust tank, clean the air filter and motor safety filter. The air filter and motor safety filter are located at the bottom of dust tank cap in above figure.
- Push the cap separating button of the tank and separate the dust tank cap.
- Separate the air filter
- Motor safety filter is assembled in the bottom of the cap
- Wash those with water
- Dry those fully in shade so that moisture is entirely removed.
- The air filter and motor safety filter should be cleaned with above case, but standard cycle of cleaning those parts are every 6 months at least.
WARNING!
Gently rinse both parts separately under a cold running water until the water runs clear. Hand wash only with damp cloth. Shake off excess water from the filter. Do not tumble/spindry, microwave or place in oven or on direct heat. Ensure the filter is completely dry. Re-assemble and place it back in your machine, filter frame. If the filter is damaged, do not place them in the machine. Please call the Helpline. The standard cycle of cleaning the air filter and motor safety filter - Every 6 months
How to use Cleaning the Exhaust Filter

flowchart
graph TD
    A["Exhaust filter cover"] --> B["Person applying filter cover"]
    B --> C["Person cleaning a circular component with water spray"]
    C --> D["Final cleaning with water spray"]
White side White side White side
• The exhaust filter is a washable and reusable HEPA filter.
- To clean the exhaust filter, remove the Exhaust filter cover on the body by rotating it counter clockwise.
- Separate the filter assembled with the filter cover.
- Wash the filter in flow water cleanly.
- When you wash the filter, make sure you should not wash the blue side.
- Remove moisture.
- Dry it fully in shade so that moisture is entirely removed.
• The exhaust filter should be cleaned at least once a year.
Exhaust filter cover assembling
• The exhaust filter cover fits the grooves.
- Join it to the body by rotating it clockwise.
- The exhaust filter cover fits the grooves. - Join it to the body by rotating it clockwise.

WARNING!
The exhaust filter should be cleand at least once a year.
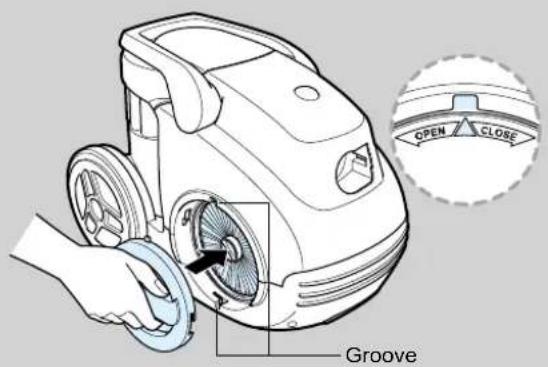
text_image
OPEN CLOSE GrooveWhat to do if your vacuum cleaner does not work
Check that the vacuum cleaner is plugged in correctly and that the electrical socket is working.
What to do when suction performance decreases
- Turn off the vacuum cleaner and unplug it.
- Check the telescopic pipe, flexible hose and cleaning tool for blockages or obstructions.
- Check that the dust tank is not full. Empty if necessary.
- Check that the exhaust filter is not blocked. Clean the exhaust filter, if necessary.
- Check that the pre-filter(air-filter)is not full.Clean the pre-filter,if necessary.
Thermal protector:
This vacuum cleaner has a special thermostat that protects the cleaner in case of motor overheating. If the cleaner suddenly shuts off, turn off the switch and unplug the cleaner. Check the cleaner for a possible source of overheating such as a full dust tank, a blocked hose or clogged filter. If these conditions are found, fix them and wait at least 30 minutes before attempting to use the cleaner. After the 30 minutes period, plug the cleaner back in and turn on the switch. If the cleaner still does not run, contact a qualified electrician.


WARNING!
Should it become necessary to replace the moulded plug then the detective plug should be replaced by a qualified electrician.
Note