VK7320NHAYB - Vacuum Cleaner LG - Free user manual and instructions
Find the device manual for free VK7320NHAYB LG in PDF.

| Product Type | Canister Vacuum Cleaner |
| Model | VK7320NHAYB |
| Brand | LG |
| Dimensions (W x D x H) | 300 x 400 x 250 mm |
| Weight | 5.2 kg |
| Power Supply | 220-240 V, 50/60 Hz |
| Power Consumption | 1800 W |
| Dust Capacity | 1.5 L |
| Bag Type | Bagless |
| Filtration System | HEPA 14 |
| Cord Length | 6.0 m |
| Operating Radius | 8.0 m |
| Noise Level | 78 dB(A) |
| Suction Power | 350 AW |
| Main Brush Type | Motorized turbo brush |
| Accessories Included | Crevice tool, dusting brush, upholstery tool |
| Dust Indicator | Yes |
| Automatic Cord Rewind | Yes |
| Hose Length | 1.5 m |
| Washable Filter | Yes (pre-motor and post-motor) |
| Repairability Index | 7.5 / 10 |
Frequently Asked Questions - VK7320NHAYB LG
User questions about VK7320NHAYB LG
0 question about this device. Answer the ones you know or ask your own.
Ask a new question about this device
Download the instructions for your Vacuum Cleaner in PDF format for free! Find your manual VK7320NHAYB - LG and take your electronic device back in hand. On this page are published all the documents necessary for the use of your device. VK7320NHAYB by LG.
USER MANUAL VK7320NHAYB LG
This information contains important instructions for the safe use and maintenance of the vacuum cleaner. Especially, please read all of the information on page 3, 4, 5 for your safety. Please keep this manual in an easily accessible place and refer to it anytime.
VK73*****
Table of contents
Important safety instructions 3\~5
How to use 6\~19
Assembling vacuum cleaner 6\~7
Operating vacuum cleaner 8
Using carpet and floor nozzle 9
Using accessory nozzles 10
Using sani punch nozzle 11\~15
Emptying dust tank 16
Cleaning dust tank 17
Cleaning dust separator 18
Cleaning exhaust filter 19
What to do if your vacuum cleaner does not work 20
What to do when suction power decreases 20
Read and follow all instructions before using your vacuum cleaner to prevent the risk of fire, electric shock, personal injury, or damage when using the vacuum cleaner. This guide do not cover all possible conditions that may occur. Always contact your service agent or manufacturer about problems that you do not understand.
This is the safety alert symbol.
This symbol alerts you to potential hazards that can kill or hurt you and others.
All safety messages will follow the safety alert symbol and either the word "WARNING" or "CAUTION."
These words mean:
This symbol will alert you to hazards or unsafe practices which could cause serious bodily harm or death.
This symbol will alert you to hazards or unsafe practices which could cause bodily injury or property damage.
- This appliance is not intended for use by persons (including children) with reduced physical, sensory or mental capabilities, or lack of experience and knowledge, unless they have been given supervision or instruction concerning use of the appliance by a person responsible for their safety.
- Children should be supervised to ensure that they do not play with the appliance.
- If the supply cord is damaged, it must be replaced by LG Electronics Service Agent in order to avoid a hazard
- This appliance can be used by children aged from 8 years and above and persons with reduced physical, sensory or mental capabilities or lack of experience and knowledge if they have been given supervision or instruction concerning use of the appliance in a safe way and understand the hazards involved. Children shall not play with the appliance. Cleaning and user maintenance shall not be made by children without supervision.
IMPORTANT SAFETY INSTRUCTIONS

WARNING
- Do not plug in if control knob is not in OFF position.
Personal injury or product damage could result. - Keep children away and beware of obstructions when rewinding the cord to prevent personal injury.
The cord moves rapidly when rewinding. - Disconnect electrical supply before servicing or cleaning the unit or when cleaner is not in use.
Failure to do so could result in electrical shock or personal injury. - Do not use vacuum cleaner to pick up anything that is burning or smoking such as cigarettes, or hot ashes.
Doing so could result in death, fire or electrical shock. - Do not vacuum flammable or explosive substances such as gasoline, benzene, thinners, propane (liquids or gases).
The fumes from these substances can create a fire hazard or explosion. Doing so could result in death or personal injury. - Do not handle plug or vacuum cleaner with wet hands.
Doing so could result in death or electrical shock. - Do not unplug by pulling on cord.
Doing so could result in product damage or electrical shock. To unplug, grasp the plug, not the cord. - Keep hair, loose clothing, fingers, and all parts of the body away from openings and moving parts.
Failure to do so could result in electrical shock or personal injury. - Do not pull or carry by cord, use cord as a handle, close a door on cord, or pull cord around sharp edges or corners. Do not run vacuum cleaner over cord. Keep cord away from heated surfaces.
Failure to do so could result in electrical shock or personal injury or fire or product damage. - The hose contains electrical wires. Do not use it if it is damaged, cut punctured.
Failure to do so could result in death, or electrical shock. -
Do not allow to be used as toy. Close attention is necessary when used by or near children.
Personal injury or product damage could result. -
Do not use the vacuum cleaner if the power cord or plug is damaged or faulty.
Personal injury or product damage could result. In these cases, contact LG Electronics Service Agent to avoid hazard. - Do not use vacuum cleaner if it has been under water.
Personal injury or product damage could result. In these cases, contact LG Electronics Service Agent to avoid hazard. - Do not continue to vacuum if any parts appear missing or damaged.
Personal injury or product damage could result. In these cases, contact LG Electronics Service Agent to avoid hazard. - Do not use an extension cord with this vacuum cleaner.
Fire hazard or product damage could result.
• Using proper voltage.
Using improper voltage may result in damage to the motor and possible injury to the user. Proper voltage is listed on the bottom of vacuum cleaner. - Turn off all controls before unplugging.
Failure to do so could result in electrical shock or personal injury. - Do not change the plug in any way.
Failure to do so could result in electrical shock or personal injury or product damage. Doing so result in death. If plug does not fit, contact a qualified electrician to install the proper outlet.
If the supply cord is damaged, it must be replaced by the manufacturer, its service agent or similarly qualified persons in order to avoid a hazard.
• Repairs to electrical appliances may only be performed by qualified service engineers.
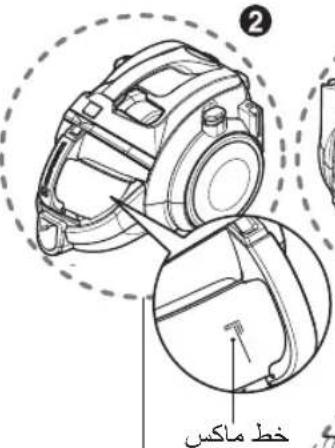
Improper repairs may lead to serious hazards for the user. - Do not put fingers near the gear.
Failure to do so could result in personal injury.
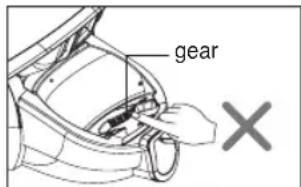
text_image
gear XIMPORTANT SAFETY INSTRUCTIONS
CAUTION
- Do not put any objects into openings.
Failure to do so could result in product damage. - Do not use with any opening blocked: keep free of dust, lint, hair, and anything that may reduce air flow.
Failure to do so could result in product damage. - Do not use vacuum cleaner without the dust tank and/or filters in place.
Failure to do so could result in product damage.
• Always clean the dust bin after vacuuming carpet cleaners or fresheners, powders and fine dust.
These products clog the filters, reduce airflow and can cause damage to the cleaner. Failure to clean the dust bin could cause permanent damage to the cleaner. - Do not use vacuum cleaner to pick up sharp hard objects, small toys, pins, paper clips, etc.
They may damage the cleaner or dust bin. - Store the vacuum cleaner indoors.
Put the vacuum cleaner away after use to prevent tripping over it. - The vacuum cleaner is not intended to use by young children or infirm people without supervision.
Failure to do so could result in personal injury or product damage. - Only use parts produced or recommended by LG Electronics Service Agents.
Failure to do so could result in product damage. - Use only as described in this manual. Use only with LG recommended or approved attachments and accessories.
Failure to do so could result in personal injury or product damage. -
To avoid personal injury and to prevent the machine from falling when cleaning stairs, always place it at the bottom of stairs.
Failure to do so could result in personal injury or product damage. -
Use accessory nozzles in sofa mode.
Failure to do so could result in product damage. - Don't grasp the tank handle when you are moving the vacuum cleaner.
The vacuum cleaner's body may fall when separating tank and body. Personal injury or product damage could result. You should grasp the carrier handle when you are moving the vacuum cleaner. (Page 16) - Make sure the filters (exhaust filter and motor safety filter) are completely dry before replacing in the machine.
Failure to do so could result in product damage. - Do not dry the filter in an oven or microwave.
Failure to do so could result in fire hazard. - Do not dry the filter in a clothes dryer.
Failure to do so could result in fire hazard. - Do not dry near an open flame.
Failure to do so could result in fire hazard. - Do not use filters that is not dried.
- If the power cord is damaged, it must be replaced by an approved LG Electronics Service Agent to avoid a hazard.
- This appliance is not intended for use by persons (including children) with reduced physical, sensory or mental capabilities, or lack of experience and knowledge, unless they have been given supervision or instruction concerning use of the appliance by a person responsible for their safety.
Children should be supervised to ensure that they do not play with the appliance.
Thermal protector:
This vacuum cleaner has a special thermostat that protects the vacuum cleaner in case of (motor) overheating.
If the vacuum cleaner suddenly shuts off, turn off the power switch and unplug the vacuum cleaner.
Check the vacuum cleaner for possible sources of overheating such as a full dust tank, a blocked hose or clogged filter.
If these conditions are found, fix them and wait at least 30 minutes before attempting to use the vacuum cleaner.
After the 30 minute period, plug the vacuum cleaner back in and turn on the power switch.
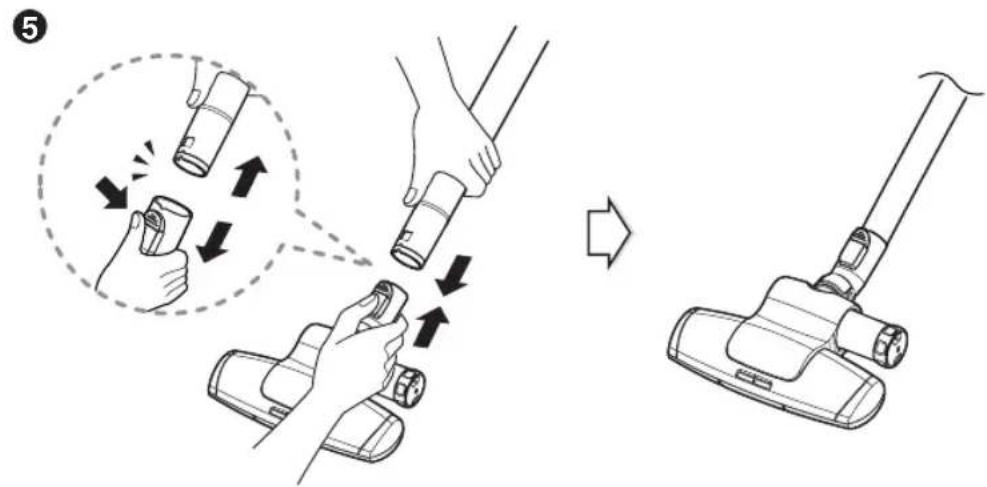
How to use Assembling vacuum cleaner
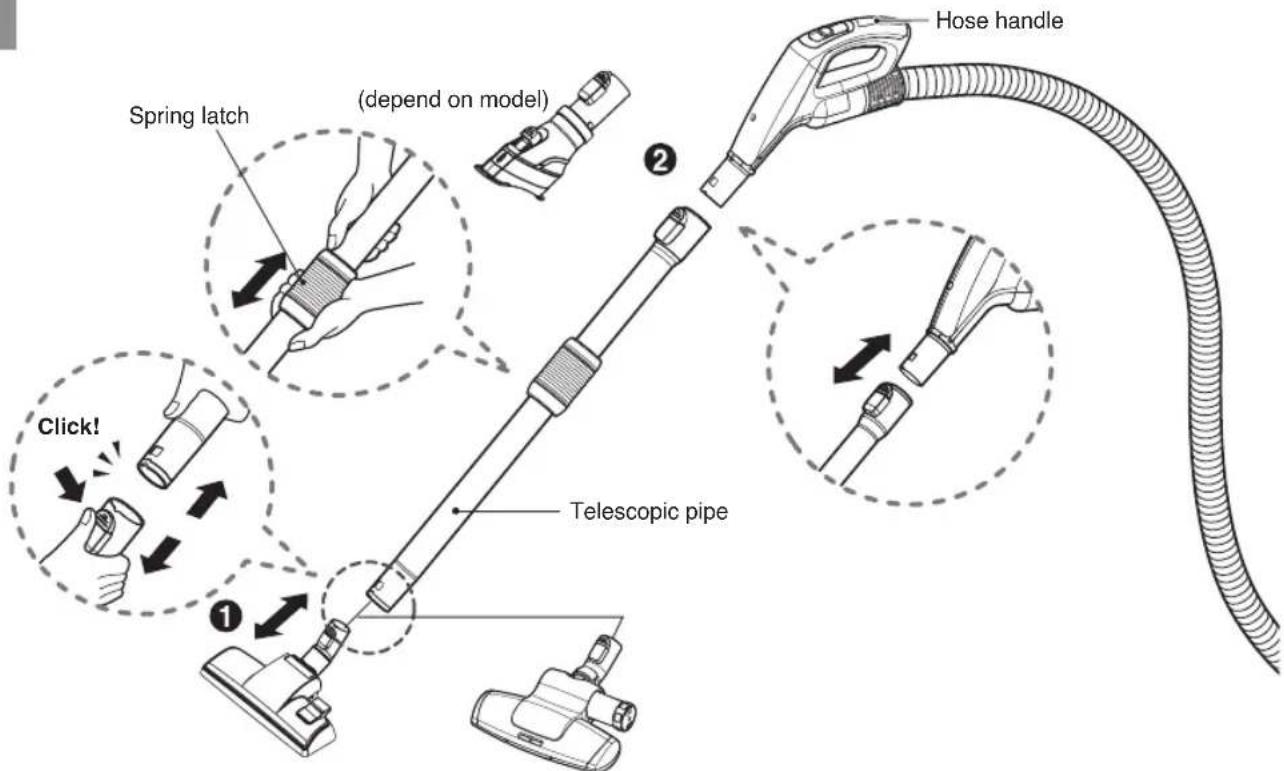
text_image
Spring latch (depend on model) Click! Telescopic pipe Hose handle(depend on model) (depend on model)
① Carpet and floor nozzle (depend on model)
Push the telescopic pipe into the nozzle.
② Telescopic pipe
- Push the hose handle firmly into the telescopic pipe.
- Grasp the spring latch to expand.
- Pull out the pipe to desired length.
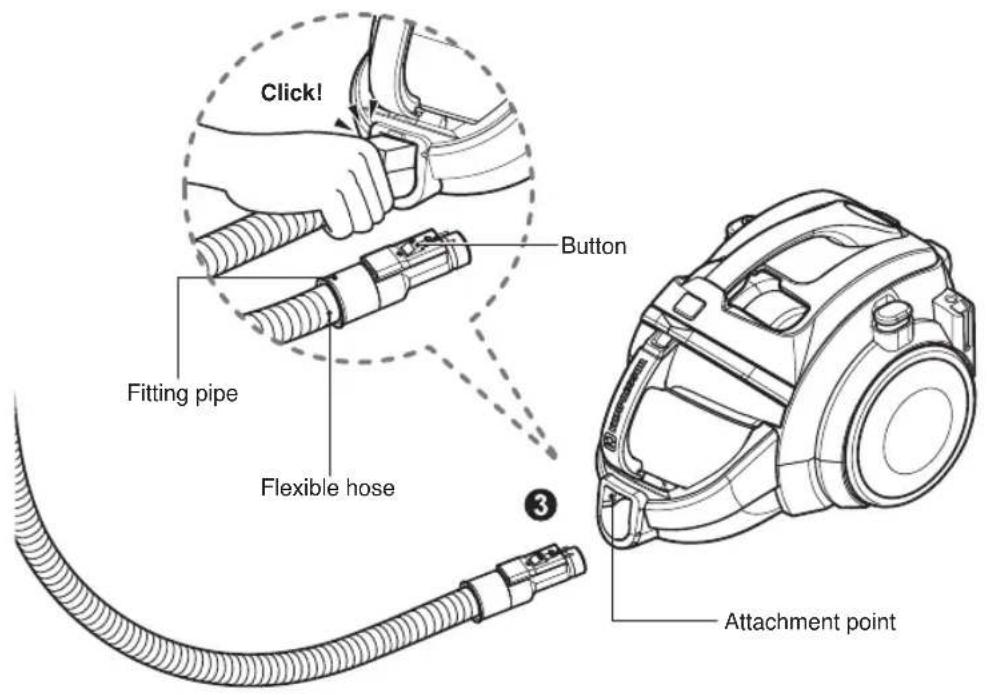
text_image
Click! Button Fitting pipe Flexible hose Attachment point③ Connecting the hose to the vacuum cleaner
Push the fitting pipe on the flexible hose into the attachment point on the vacuum cleaner.
To remove the flexible hose from the vacuum cleaner, press the button situated on the fitting pipe, then pull the fitting pipe out of the vacuum cleaner.
How to use Operating vacuum cleaner

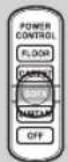
① How to operate
- Pull out the power cord to the desired length and plug into the socket.
- Place the control knob of the hose handle to the required position.
• To turn off, slide control knob to OFF position. - Press the cord reel button to rewind the power cord after use.
② Emptying the dust tank
• Always empty the dust tank when the dust tank level reaches the MAX line.
③ Park mode
• To store during vacuuming, for example to move a small piece of furniture or a rug, use park mode to support the flexible hose and nozzle.
- Slide the hook on the nozzle into the slot on the side of vacuum cleaner.
④ Storage
- When you have switched off and unplugged the vacuum cleaner, press the cord reel button to automatically rewind the cord.
- You can store your vacuum cleaner in a vertical position by sliding the hook on the nozzle into the slot on the underside of the vacuum cleaner.

WARNING
No liquid suction. Liquid suction can cause defects.
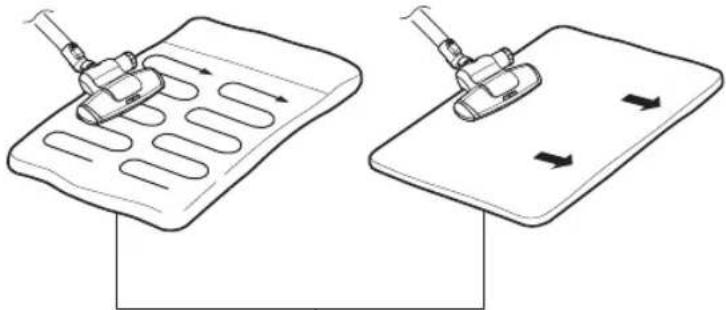
How to use Using carpet and floor nozzle

text_image
1 Carpet Pedal Floor① Carpet and floor nozzle(depend on model)
• The 2 position nozzle
This is equipped with a pedal which allows you to alter its position according to the type of floor to be cleaned.
- Carpet or rug position
Press the pedal (☐) to lower brush.
- Hard floor position (tiles, parquets floor)
Press the pedal ( ) to lift the brush up.
• Cleaning carpet and floor nozzle

natural_image
Technical line drawing of a mechanical assembly with two tools (no text or symbols)- Clean the hole and the brush of the nozzle.
How to use Using accessory nozzles
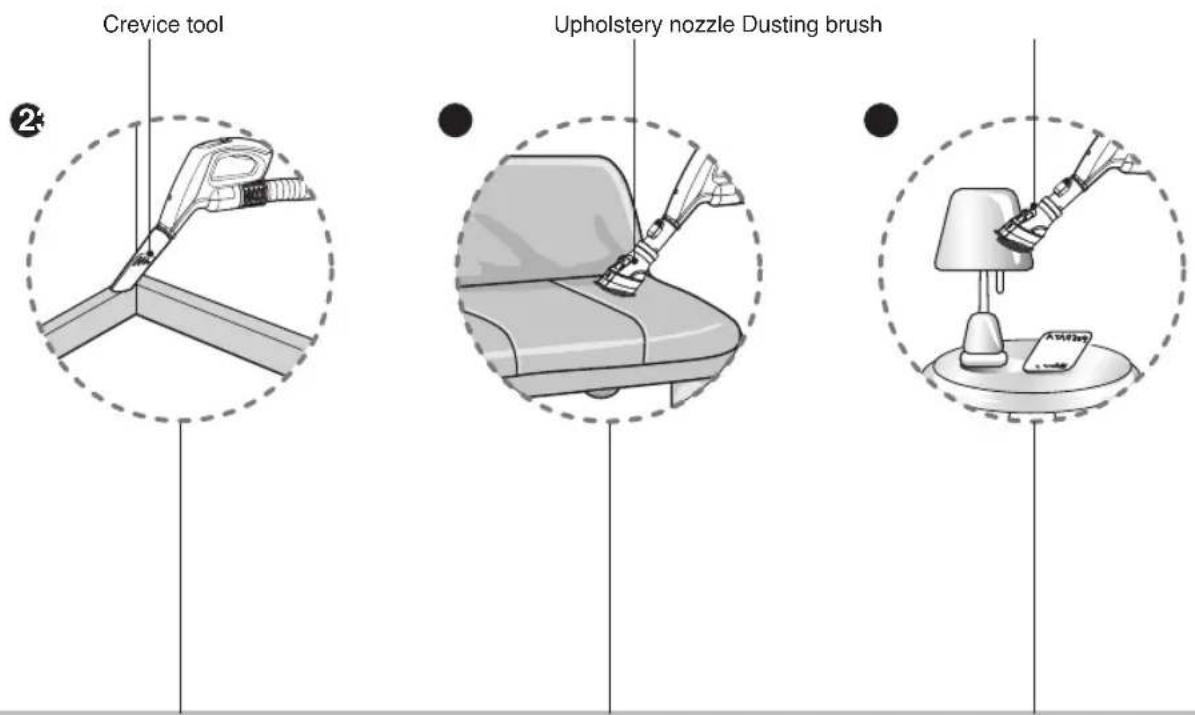
② Crevice tool(depend on model)
③ Upholstery nozzle(depend on model)
④ Dusting brush(depend on model)
Crevice tool is for vacuuming in those nomally hard-to-reach place such as reaching cobwebs or between the cushions of sofa.
Upholstery nozzle is for vacuuming upholstery, mattresses etc.
Dusting brush is for vacuuming picture frames, furniture frames, books and other irregular surfaces.
Push the button

natural_image
Illustration of hands using a handheld electric vehicle plug to lift a cable (no text or symbols visible)Pull the cover

text_image
All the coverNOTICE
Use accessory in the sofa mode.

text_image
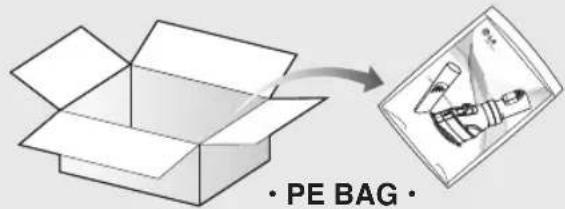
PE BAG- Accessory nozzles included in the "PE BAG" with owner's manual (depend on model)
How to use Using sani punch nozzle
Features
This nozzle picks up even dust inside through beating. The bottom part can be separated to be cleaned. Since the bottom does not stick to the surface, vacuuming is easy.
How to use
Follow the directions below for properuse.
Assembly
Connect the nozzle to the telescopic pipe.
text_image
Diagram illustrating the step-by-step installation of a vacuum cleaner, showing hand positioning and tool path changes.⑤ Sani punch nozzle (depend on model)
Set the suction power control switch to MAX POWER before vacuuming. Depending on the type of bedding, handling may be awkward or it may cause a lot of noise. If this is the case, adjust the suction power control switch to a lower setting.
This Sani Punch nozzle is for effective cleaning of beds and blankets to remove mites and dust.
Effective cleaning

natural_image
Diagram of a carpet cleaning device with circular background pattern and labeled 'Carpet' (no other text or symbols)Bulky & heavy blanket
natural_image
Diagram showing two mechanical assembly steps with arrows indicating motion, no text or symbols presentWhen using on the carpet
Sani-punch is used for carpet.
When using on the floor
It is easier to clean a light blanket or sheetby pushing the nozzle in the direction of the arrow. To increase cleaning efficiency for light blankets, lay on top of a bulky blanket and then clean.
For simple cleaning of the vacuum nozzle, detach the Sani Punch nozzle from the telescopic pipe and attach the crevice tool to vacuum dust.
Top Bottom Inside

natural_image
Line drawing of a hand holding a cylindrical device with two tubes (no text or symbols)
natural_image
Line drawing of a hand using a tool to adjust or install a device with no visible text or symbols
natural_image
Technical line drawing of a mechanical assembly with two views: top shows internal components, bottom shows exploded view (no text or symbols)You can remove dust by hand, if you can't remove dust which is inside of nozzle by crevice tool.
Since the vibrator inside is composed of precision parts, never disassemble the body.
Be careful not to let foreign objects clog the air suction part on top of the vacuum nozzle.
Since removal of the punch bar may cause performance problems, do not warp or remove it.
Attach the bottom plate properly before using. Without this bottom plate, it may not function.
Since this vacuum nozzle has been made exclusively for cleaning beds, blankets and upholstery, use it only for these cleaning purposes. (Using it to clean the floor may result soiling it or a drop in performance, do not use it for such purposes.)
Follow the instruction below for through washing.
(Do not soak the entire body of the vacuum nozzle in water, it may cause the vibrator to malfunction)

flowchart
graph TD
    A["Press the button on the rear side of the vacuum nozzle to separate the bottom plate."] --> B["Punch bar Bottom plate"]
    B --> C["Wipe all the soiled parts of the vacuum nozzle body with a cloth."]
    C --> D["Punch bar"]
    D --> E["Wash the removed bottom plate with water and dry it."]
④ Straighten the punch bar on the lower section.
⑤ Insert the attachment projections on bottom plate to the vacuum nozzle grooves.
⑥ Push down the tabs to secure.
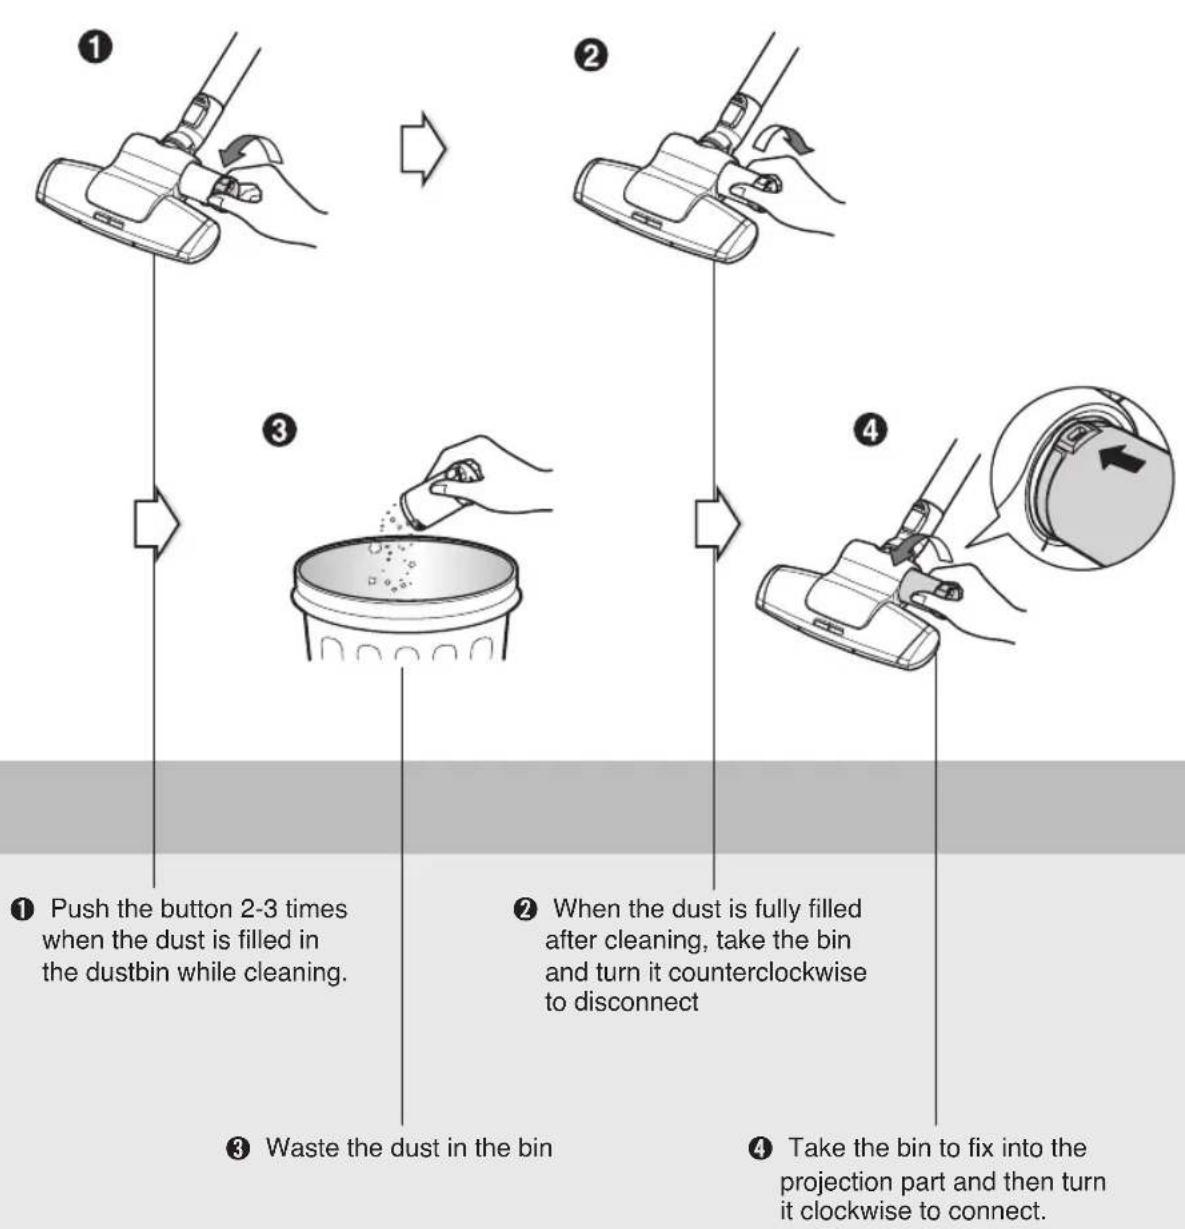
① Push the button 2-3 times when the dust is filled in the dustbin while cleaning.
② When the dust is fully filled after cleaning, take the bin and turn it counterclockwise to disconnect
③ Waste the dust in the bin
④ Take the bin to fix into the projection part and then turn it clockwise to connect.
How to use Emptying dust tank

text_image
MAX line ① Push the button ② Pull out Tank separation button Tank handle Dust tank capThe dust tank needs emptying when the dust tank level reaches the MAX line.
- Turn off the vacuum cleaner and unplug it.
- Grasp the handle of the tank and then press the tank separation button.
- Pull out the dust tank.
• Empty the tank and then assemble the dust tank as shown.
NOTICE
- If suction power decreases after emptying the dust tank, clean the dust tank ➞ next page
Moving the vacuum cleaner
- Don't grasp the tank handle when you are moving the vacuum cleaner.
The vacuum cleaner's body may fall when separating tank and body.
You should grasp the carrier handle when you are moving the vacuum cleaner.
Assembling the dust tank

text_image
Diagram illustrating two steps of a handwashing a cup and a vacuum cleaner, labeled with numbered instructions.
text_image
Tank handle Carrier handleHow to use Cleaning dust tank

flowchart
graph TD
    A["Push the button"] --> B["Pull out"]
    B --> C["Tank handle"]
    C --> D["Tank separation button"]
    D --> E["Recycling with waste bag"]
    E --> F["Receiving wash bottle"]
- Press tank separation button and pull out the dust tank.
- Raise the dust tank cap.
- Wash the dust tank.
• Dry fully in shade so that moisture is entirely removed.
NOTICE
If suction power decreases after cleaning the dust tank, clean the air filter and the motor safety filter. ➡ Next page
How to use
Cleaning dust separator
- Inside of dust separator, air filter, motor safety filter

flowchart
graph TD
    A["Dust separator"] --> B["Guide cover lever"]
    B --> C["Air filter cover"]
    C --> D["Motor safety filter"]
    D --> E["Air filter"]
    E --> F["Guide cover"]
    F --> G["Air filter cover"]
    G --> H["Air filter cover"]
The air filter and the motor safety filter are located on the top of the vacuum cleaner as above the figure.
- Open the vacuum cleaner cover by pushing the button.
- Grasp the handle of the dust separator and take out it.
- Open the guide cover by pulling the guide cover lever and remove the dust.
- Open the air filter cover by pushing the air filter cover lever and take out the air filter.
- Separate the motor safety filter from the dust separator.
- Wash the air filter and the motor safety filter.
- Do not wash filters with hot water.
- Dry fully in shade so that moisture is entirely removed.
- The air filter and the motor safety filter should be cleaned as above the figure.

WARNING
Dry fully for more than 24 hours in shade.
NOTICE
If filters are damaged, do not use them.
In this cases, contact LG Electronics Service
Agent. Wash filters at least Once a month.
How to use Cleaning exhaust filter
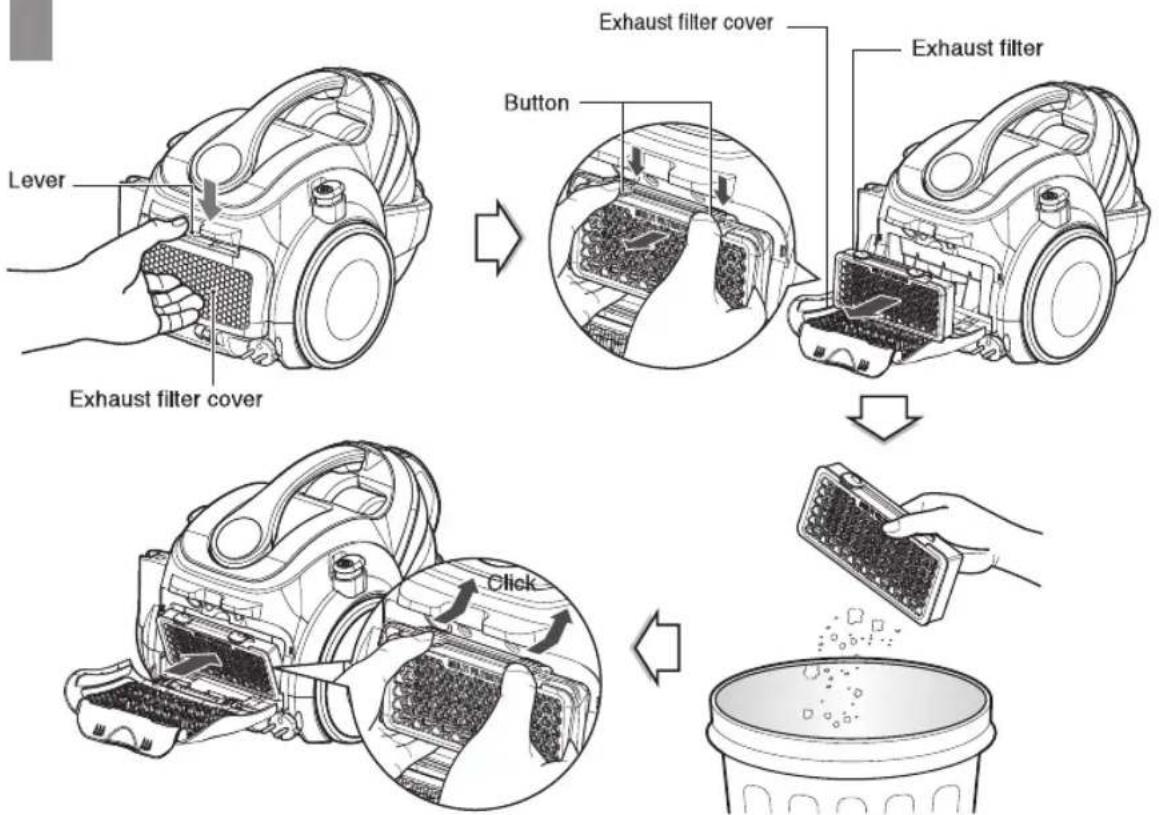
text_image
Lever Exhaust filter cover Button Exhaust filter cover Exhaust filter Click• The exhaust filter is a reusable filter.
- To clean the exhaust filter, open the exhaust filter cover by pushing the button.
- Separate the exhaust filter by pushing the lever.
- Dust off the exhaust filter.(Do not wash the exhaust filter with water)
- Insert the projection of exhaust filter into the grooves on the body and push up the exhaust filter button certainly until you hear sound "click".
• The exhaust filter should be cleaned at least a year.
What to do if your vacuum cleaner does not work
Check that the vacuum cleaner is plugged in correctly and that the electrical socket is working.
What to do when suction power decreases
- Turn off the vacuum cleaner and unplug it.
- Check the telescopic pipe, flexible hose and cleaning tool for blockages or obstructions.
- Check that the dust tank is not full. Empty if necessary.
- Check that the exhaust filter is not clogged. Clean the exhaust filter if necessary.
- Check that the air filter and the motor safety filter are not clogged. Clean the them if necessary.
- Check the inside of the dust separator. Clean the inside of the dust separator if necessary.
natural_image
Symbol of a trash bin crossed with a horizontal line and a black rectangle below (no text or labels)Disposal of your old appliance
- All electrical and electronic products should be disposed of separately from the municipal waste stream via designated collection facilities appointed by the government or the local authorities.
- The correct disposal of your old appliance will help prevent potential negative consequences for the environment and human health.
- For more detailed information about disposal of your old appliance, please contact your city office, waste disposal service or the shop where you purchased the product.
NOTICE
In dry environments with low humidity, vacuuming dust or sand may cause low levels of static (electricity) to be felt from the vacuum, particularly from the extension pipe. Though static (electricity) does not affect the functionality and longevity of the product, it can be minimized through the following methods:
- Keep indoor humidity higher than 60%
- Have parts of the vacuum susceptible to static (like the extension pipe) come in contact with nearby metallic materials (such as a metallic leg of a chair) to conduct and remove the static electricity out of the vacuum.
flowchart
graph TD
    A[" dust removal in air purifier"] --> B[" dust cleaner with dust particles"]
    B --> C[" dust filter with dust particles"]
    C --> D[" dust inspection with dust particles"]
    D --> E[" final inspection with dust particles"]

    subgraph A
        F[" dust removal in air purifier "]
        G[" dust filter with dust particles "]
        H[" dust inspection with dust particles "]
    end

    subgraph B
        I[" dust removal in air purifier "]
        J[" dust filter with dust particles "]
        K[" dust inspection with dust particles "]
    end

    subgraph C
        L[" dust removal in air purifier "]
        M[" dust filter with dust particles "]
        N[" dust inspection with dust particles "]
    end

    subgraph D
        O[" dust removal in air purifier "]
        P[" dust filter with dust particles "]
        Q[" dust inspection with dust particles "]
    end

    subgraph E
        R[" dust removal in air purifier "]
        S[" dust filter with dust particles "]
        T[" dust inspection with dust particles "]
    end

    subgraph F
        U[" dust removal in air purifier "]
        V[" dust filter with dust particles "]
        W[" dust inspection with dust particles "]
    end

    subgraph G
        X[" dust removal in air purifier "]
        Y[" dust filter with dust particles "]
        Z[" dust inspection with dust particles "]
    end

    subgraph H
        AA[" dust removal in air purifier "]
        AB[" dust filter with dust particles "]
        AC[" dust inspection with dust particles "]
    end

    subgraph I
        AD[" dust removal in air purifier "]
        AE[" dust filter with dust particles "]
        AF[" dust inspection with dust particles "]
    end

    subgraph J
        AG[" dust removal in air purifier "]
        AH[" dust filter with dust particles "]
        AI[" dust inspection with dust particles "]
    end

    subgraph K
        AJ[" dust removal in air purifier "]
        AK[" dust filter with dust particles "]
        AL[" dust inspection with dust particles "]
    end

    subgraph L
        AM[" dust removal in air purifier "]
        AN[" dust filter with dust particles "]
        AO[" dust inspection with dust particles "]
    end

    subgraph M
        AP[" dust removal in air purifier "]
        AQ[" dust filter with dust particles "]
        AR[" dust inspection with dust particles "]
    end

    subgraph N
        AS[" dust removal in air purifier "]
        AT[" dust filter with dust particles "]
        AU[" dust inspection with dust particles "]
    end

    subgraph O
        AV[" dust removal in air purifier "]
        AW[" dust filter with dust particles "]
        AX[" dust inspection with dust particles "]
    end

    subgraph P
        AY[" dust removal in air purifier "]
        AZ[" dust filter with dust particles "]
        BA[" dust inspection with dust particles "]
    end

    subgraph Q
        BB[" dust removal in air purifier "]
        BC[" dust filter with dust particles "]
        BD[" dust inspection with dust particles "]
    end

    subgraph R
        BE[" dust removal in air purifier "]
        BF[" dust filter with dust particles "]
        BG[" dust inspection with dust particles "]
    end

    subgraph S
        BH[" dust removal in air purifier "]
        BI[" dust filter with dust particles "]
        BJ[" dust inspection with dust particles "]
    end

    subgraph T
        BK[" dust removal in air purifier "]
        BL[" dust filter with dust particles "]
        BM[" dust inspection with dust particles "]
    end

    subgraph U
        BN[" dust removal in air purifier "]
        BO[" dust filter with dust particles "]
        BP[" dust inspection with dust particles "]
    end

    subgraph V
        BOA[" dust removal in air purifier "]
        BHA[" dust filter with dust particles "]
        BIH[" dust inspection with dust particles "]
    end

    subgraph W
        BW[" dust removal in air purifier "]
        BX[" dust filter with dust particles "]
        BYD[" dust inspection with dust particles "]
    end

    subgraph X
        BWA[" dust removal in air purifier "]
        BXA[" dust filter with dust particles "]
        BYD --> BXB[" dust inspection with dust particles "]
    end

    subgraph Y
        BWB[" dust removal in air purifier "]
        BXB --> BXC[" dust inspection with dust particles "]
    end

    subgraph Z
        BWD[" dust removal in air purifier "]
        BXD --> BXE[" dust inspection with dust particles "]
    end
flowchart
graph TD
    A["Start: Bagging with bagging and bagging details"] --> B{Gaging details: what can be satisfied?}
    B -->|Yes| C["Check for bagging details"]
    B -->|No| D["Check for bagging details"]
    C --> E["Ordering details: what can be satisfied?"]
    D --> F["Ordering details: what can be satisfied?"]
    E --> G["Close-up of bagging device"]
    F --> H["Close-up of bagging device"]
    G --> I["Final cleaning process: clear hand washing, clean hands washing"]
    H --> J["Final cleaning process: clear hand washing, clean hands washing"]
flowchart
graph TD
    A[" Dust removal in a bin"] --> B[" Dust removal of dust"]
    B --> C[" Airbag with dust removed"]
    C --> D[" Airbag with dust removed"]
    D --> E[" Airbag with dust removed"]
    E --> F[" Airbag with dust removed"]
    F --> G[" Airbag with dust removed"]
    G --> H[" Airbag with dust removed"]
    H --> I[" Airbag with dust removed"]
    I --> J[" Airbag with dust removed"]
    J --> K[" Airbag with dust removed"]
    K --> L[" Airbag with dust removed"]
    L --> M[" Airbag with dust removed"]
    M --> N[" Airbag with dust removed"]
    N --> O[" Airbag with dust removed"]
    O --> P[" Airbag with dust removed"]
    P --> Q[" Airbag with dust removed"]
    Q --> R[" Airbag with dust removed"]
    R --> S[" Airbag with dust removed"]
    S --> T[" Airbag with dust removed"]
    T --> U[" Airbag with dust removed"]
    U --> V[" Airbag with dust removed"]
    V --> W[" Airbag with dust removed"]
    W --> X[" Airbag with dust removed"]
    X --> Y[" Airbag with dust removed"]
    Y --> Z[" Airbag with dust removed"]
    Z --> AA[" Airbag with dust removed"]
    AA --> AB[" Airbag with dust removed"]
    AB --> AC[" Airbag with dust removed"]
    AC --> AD[" Airbag with dust removed"]
    AD --> AE[" Airbag with dust removed"]
    AE --> AF[" Airbag with dust removed"]
    AF --> AG[" Airbag with dust removed"]
    AG --> AH[" Airbag with dust removed"]
    AH --> AI[" Airbag with dust removed"]
    AI --> AJ[" Airbag with dust removed"]
    AJ --> AK[" Airbag with dust removed"]
    AK --> AL[" Airbag with dust removed"]
    AL --> AM[" Airbag with dust removed"]
    AM --> AN[" Airbag with dust removed"]
    AN --> AO[" Airbag with dust removed"]
    AO --> AP[" Airbag with dust removed"]
    AP --> AQ[" Airbag with dust removed"]
    AQ --> AR[" Airbag with dust removed"]
    AR --> AS[" Airbag with dust removed"]
    AS --> AT[" Airbag with dust removed"]
    AT --> AU[" Airbag with dust removed"]
    AU --> AV[" Airbag with dust removed"]
    AV --> AW[" Airbag with dust removed"]
    AW --> AX[" Airbag with dust removed"]
    AX --> AY[" Airbag with dust removed"]
flowchart
graph TD
    A["Step 1: Airplane in clean air"] --> B["Step 2: Airplane in clean air"]
    B --> C["Step 3: Airplane in clean air"]
    C --> D["Step 4: Bag being cleaned with a bag and a bucket containing granular material"]
    D --> E["Step 5: Bag being cleaned with a container and a bucket containing granular material"]
    E --> F["Step 6: Bag being cleaned with a container and a bucket containing granular material"]
    F --> G["Step 7: Bag being cleaned with a container and a bucket containing granular material"]
    G --> H["Step 8: Bag being cleaned with a container and a bucket containing granular material"]
    H --> I["Step 9: Bag being cleaned with a container and a bucket containing granular material"]
    I --> J["Step 10: Bag being cleaned with a container and a bucket containing granular material"]
    J --> K["Step 11: Bag being cleaned with a container and a bucket containing granular material"]
    K --> L["Step 12: Bag being cleaned with a container and a bucket containing granular material"]
    L --> M["Step 13: Bag being cleaned with a container and a bucket containing granular material"]
    M --> N["Step 14: Bag being cleaned with a container and a bucket containing granular material"]
    N --> O["Step 15: Bag being cleaned with a container and a bucket containing granular material"]
    O --> P["Step 16: Bag being cleaned with a container and a bucket containing granular material"]
    P --> Q["Step 17: Bag being cleaned with a container and a bucket containing granular material"]
    Q --> R["Step 18: Bag being cleaned with a container and a bucket containing granular material"]
    R --> S["Step 19: Bag being cleaned with a container and a bucket containing granular material"]
    S --> T["Step 20: Bag being cleaned with a container and a bucket containing granular material"]
flowchart
graph TD
    A["1: Water bottle being cleaned"] --> B["2: Hand washing bottle is open"]
    B --> C["3: Water tap is open with faucet and water bottle"]
    C --> D["4: Water bottle is open with hand holding bottle"]
    D --> E["5: Water bottle is open with hand holding bottle"]
    E --> F["6: Water bottle is open with hand holding bottle"]

    subgraph Step 1
        G["1: Water bottle is closed"]
        H["2: Hand washing bottle is open"]
        I["3: Water tap is open with faucet and water bottle"]
    end

    subgraph Step 2
        J["1: Hand washing bottle is open"]
        K["2: Hand washing bottle is open"]
        L["3: Water bottle is open with hand holding bottle"]
    end

    subgraph Step 3
        M["1: Water tap is closed"]
        N["2: Hand washing bottle is open"]
        O["3: Water tube is open with hand holding bottle"]
    end

    subgraph Step 4
        P["1: Hand washing bottle is open"]
        Q["2: Hand washing bottle is open"]
        R["3: Water tube is open with hand holding bottle"]
    end

    subgraph Step 5
        S["1: Water tube is closed"]
        T["2: Hand washing bottle is open"]
        U["3: Water tube is open with hand holding bottle"]
    end

    subgraph Step 6
        V["1: Water tube is closed"]
        W["2: Hand washing bottle is open"]
        X["3: Water tube is open with hand holding bottle"]
    end

    subgraph Step 7
        Y["1: Water tube is closed"]
        Z["2: Hand washing bottle is open"]
        AA["3: Water tube is open with hand holding bottle"]
    end

    subgraph Step 8
        AB["1: Water tube is closed"]
        AC["2: Hand washing bottle is open"]
        AD["3: Water tube is open with hand holding bottle"]
    end

    subgraph Step 9
        AE["1: Water tube is closed"]
        AF["2: Hand washing bottle is open"]
        AG["3: Water tube is open with hand holding bottle"]
    end

    subgraph Step 10
        AH["1: Water tube is closed"]
        AI["2: Hand washing bottle is open"]
        AJ["3: Water tube is open with hand holding bottle"]
    end

    subgraph Step 11
        AK["1: Water tube is closed"]
        AL["2: Hand washing bottle is open"]
        AM["3: Water tube is open with hand holding bottle"]
    end

    subgraph Step 12
        AN["1: Water tube is closed"]
        AO["2: Hand washing bottle is open"]
        AP["3: Water tube is open with hand holding bottle"]
    end

    subgraph Step 13
        AQ["1: Water tube is closed"]
        AR["2: Hand washing bottle is open"]
        AS["3: Water tube is open with hand holding bottle"]
    end

    subgraph Step 14
        AT["1: Water tube is closed"]
        AU["2: Hand washing bottle is open"]
        AV["3: Water tube is open with hand holding bottle"]
    end

    subgraph Step 15
        AW["1: Water tube is closed"]
        AX["2: Hand washing bottle is open"]
        AY["3: Water tube is open with hand holding bottle"]
    end

    subgraph Step 16
        AZ["1: Water tube is closed"]
        BA["2: Hand washing bottle is open"]
        BB["3: Water tube is open with hand holding bottle"]
    end

    subgraph Step 17
        BC["1: Water tube is closed"]
        BD["2: Hand washing bottle is open"]
        BE["3: Water tube is open with hand holding bottle"]
    end

    subgraph Step 18
        BF["1: Water tube is closed"]
        BG["2: Hand washing bottle is open"]
        BH["3: Water tube is open with hand holding bottle"]
    end

    subgraph Step 19
        BI["1: Water tube is closed"]
        BJ["2: Hand washing bottle is open"]
        BK["3: Water tube is open with hand holding bottle"]
    end

    subgraph Step 20
        BL["1: Water tube is closed"]
        BM["2: Hand washing bottle is open"]
        BN["3: Water tube is open with hand holding bottle"]
    end

    subgraph Step 21
        BO["1: Water tube is closed"]
        BP["2: Hand washing bottle is open"]
        BQ["3: Water tube is open with hand holding bottle"]
    end

    subgraph Step 22
        BR["1: Water tube is closed"]
        BS["2: Hand washing bottle is open"]
        BT["3: Water tube is open with hand holding bottle"]
    end

    subgraph Step 23
        BU["1: Water tube is closed"]
        BV["2: Hand washing bottle is open"]
        BW["3: Water tube is open with hand holding bottle"]
    end

    subgraph Step 24
        BX["1: Water tube is closed"]
        BY["2: Hand washing bottle is open"]
        BZ["3: Water tube is open with hand holding bottle"]
    end

    subgraph Step 25
        BZ["1: Water tube is closed"]
        CA["2: Hand washing bottle is open"]
        CB["3: Water tube is open with hand holding bottle"]
    end

    subgraph Step 26
        CC["1: Water tube is closed"]
        CD["2: Hand washing bottle is open"]
        DD["3: Water tube is open with hand holding bottle"]
    end

    subgraph Step 27
        DE["1: Water tube is closed"]
        DF["2: Hand washing bottle is open"]
        DG["3: Water tube is open with hand holding bottle"]
    end

    subgraph Step 28
        DH["1: Water tube is closed"]
        DI["2: Hand washing bottle is open"]
        DJ["3: Water tube is open with hand holding bottle"]
    end

    subgraph Step 29
        DK["1: Water tube is closed"]
        DL["2: Hand washing bottle is open"]
        DJ["3: Water tube is open with hand holding bottle"]
    end

    subgraph Step 30
        DM["1: Water tube is closed"]
        DN["2: Hand washing bottle is open"]
        DO["3: Water tube is open with hand holding bottle"]
    end

    subgraph Step 31
        DOA["1: Water tube is closed"]
        DB["2: Hand washing bottle is open"]
        DC["3: Water tube is open with hand holding bottle"]
    end

    subgraph Step 32
        DBA["1: Water tube is closed"]
        DBB["2: Hand washing bottle is open"]
        DCB["3: Water tube is open with hand holding bottle"]
    end

    subgraph Step 33
        DBC["1: Water tube is closed"]
        DBD["2: Hand washing bottle is open"]
        DBE["3: Water tube is open with hand holding bottle"]
    end

    subgraph Step 34
        DBF["1: Water tube is closed"]
        DBG["2: Hand washing bottle is open"]
        DBH["3: Water tube is open with hand holding bottle"]
    end

    subgraph Step 35
        DBI["1: Water tube is closed"]
        DBJ["2: Hand washing bottle is open"]
        DBK["3: Water tube is open with hand holding bottle"]
    end

    subgraph Step 36
        DBK["1: Water tube is closed"]
        DBL["2: Hand washing bottle is open"]
        DBM["3: Water tube is open with hand holding bottle"]
    end

    subgraph Step 37
        DBN["1: Water tube is closed"]
        DBO["2: Hand washing bottle is open"]
        DBP["3: Water tube is open with hand holding bottle"]
    end

    subgraph Step 38
        DBQ["1: Water tube is closed"]
        DBR["2: Hand washing bottle is open"]
        DBS["3: Water tube is open with hand holding bottle"]
    end

    subgraph Step 39
        DBQA["1: Water tube is closed"]
        DBQB["2: Hand washing bottle is open"]
        DBQC["3: Water tube is open with hand holding bottle"]
    end

    subgraph Step 40
        DBQCQ["AfCAD"] --> DQCQ
    end

    subgraph Step 41
        DQCQ --> DQCQ
text_image
ال timestamp
text_image
أعلىtext_image
Diagram illustrating the step-by-step installation of a vacuum cleaner, showing how to press or adjust the device via hand gestures.natural_image
Technical line drawing of a mechanical clamp or bracket assembly (no text or symbols)natural_image
Line drawing of a vacuum cleaner inside a dashed circular frame (no text or symbols)
natural_image
Mechanical assembly diagram showing a valve inserted into a housing, enclosed in a dashed circular border (no text or symbols)