Ultimate CC1605 - Vacuum Cleaner Oreck - Free user manual and instructions
Find the device manual for free Ultimate CC1605 Oreck in PDF.

User questions about Ultimate CC1605 Oreck
0 question about this device. Answer the ones you know or ask your own.
Ask a new question about this device
Download the instructions for your Vacuum Cleaner in PDF format for free! Find your manual Ultimate CC1605 - Oreck and take your electronic device back in hand. On this page are published all the documents necessary for the use of your device. Ultimate CC1605 by Oreck.
USER MANUAL Ultimate CC1605 Oreck
natural_image
Cross-sectional diagram of a vacuum cleaner with internal components (no text or labels)ORECK
Important: Read carefully before assembly and use.
U414300#961A00007ID111867
THANK YOU
for purchasing an Oreck® product
please register your product:
online at oreck.com or call 1.800.989.3535
to register by phone
TABLE of CONTENTS
1 IMPORTANT SAFETY INSTRUCTIONS .... 4
2 FEATURES....6
3 OPERATION....8
Attach the Tool Caddy 8
Attach the Adjustable Shoulder Strap....10
Using the Vacuum.... 11
4 MAINTENANCE....12
Replacing Inner Bag.... 12
Replacing the Micro Filter.... 14
Replacing the HEPA Filter 16
5 TROUBLESHOOTING GUIDE ...... 17
6 WARRANTY....18
IMPORTANT SAFETY INSTRUCTIONS
SAVE THESE INSTRUCTIONS
When using an electrical appliance, basic precautions should always be followed, including the following: READ ALL INSTRUCTIONS BEFORE USING THIS APPLIANCE.
WARNING: TO REDUCE THE RISK OF FIRE, ELECTRIC SHOCK OR INJURY:
This canister vacuum is intended for household use only. If used commercially, warranty is VOID.
• Fully assemble before operating.
- Operate cleaner only at voltage specified on data plate on the bottom of the cleaner.
- Do not leave appliance unattended when plugged in. Unplug from outlet when not in use and before servicing.
- Do not use outdoors or on wet surfaces.
- Do not allow to be used as a toy. Close attention is necessary when used by or near children.
- Use only as described in this manual. Use only manufacturer's recommended attachments.
- Do not use with damaged cord or plug. If appliance is not working as it should, has been dropped, damaged, left outdoors, or dropped into water, return it to a service center or call customer service at 0845 603 0153
- Do not pull or carry by cord, use cord as a handle, close door on cord, or pull cord around sharp edges or corners. Do not place product on cord. Do not run appliance over cord. Keep cord away from heated surfaces.
- Do not unplug by pulling on cord. To unplug, grasp the plug, not the cord.
- This appliance can be used by children aged from 8 years and above and persons with reduced physical sensory or mental capabilities or lack of experience and knowledge if they have been given supervision or instruction concerning use of the appliance in a safe way and understand the hazards involved. Children shall not play with the appliance. Cleaning and user maintenance shall not be made by children without supervision.
- Do not handle plug or appliance with wet hands.
- Do not put any object into openings. Do not use with any opening blocked; keep free of dust, lint, hair and anything that may reduce air flow.
- Do not use to pick up flammable or combustible liquids, such as gasoline or lighter fluid, or use in areas where they may be present.
- Keep hair, loose clothing, fingers and all parts of body away from openings and moving parts.
- Do not use to pick up anything that is burning or smoking, such as cigarettes, matches, or hot ashes.
- Do not use without dust bag and filter in place.
- Turn off all controls before unplugging.
- Use extra care when cleaning on stairs.
- Do not use sharp objects to clean out hose as they can cause damage.
PLEASE KEEP INSTRUCTIONS FOR FURTHER USE.
Plug:
As the colours of the wires in the mains lead of this appliance may not correspond with the coloured markings identifying the terminals in your plug, proceed as follows;
The wire which is coloured Blue must be connected to the terminal which is marked with the letter N or coloured Black. The wire which is coloured Brown must be connected to the terminal which is marked with the letter L or coloured Red. Neither wire is to be connected to the earth pin of the 3 pin plug.
Replace fuse with same size fuse.

text_image
FUSE 11 AMP N BLUE BROWN CORD CLAMPThe wires in this mains lead are coloured in accordance with the following code:
Blue: Neutral
Brown: Live
! WARNING!!
THIS PRODUCT CONTAINS CHEMICALS KNOWN TO THE STATE OF CALIFORNIA TO CAUSE CANCER AND BIRTH DEFECTS OR OTHER REPRODUCTIVE HARM. WASH HANDS AFTER HANDLING.
! CAUTION!!
TO REDUCE THE RISK OF DAMAGE: AVOID PICKING UP HARD, SHARP OBJECTS WITH THIS PRODUCT, AS THEY MAY CAUSE DAMAGE.
! CAUTION!!
TO REDUCE THE RISK OF DAMAGE: STORE APPROPRIATELY INDOORS IN A DRY PLACE. DO NOT EXPOSE MACHINE TO FREEZING TEMPERATURES.
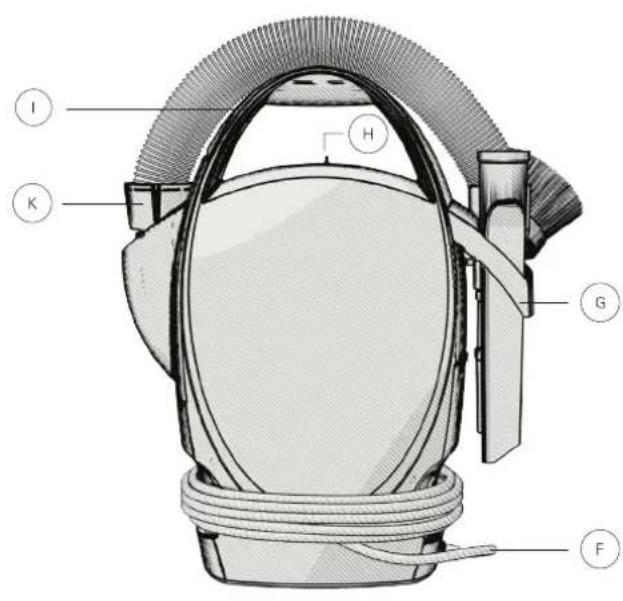
2. FEATURES
CARTON CONTENTS
Adjustable shoulder strap
B Upholstery tool
Large floor tool
D Dusting brush
E Crevice tool
F Power cord
G Tool caddy
H On/Off Switch
Carry handle with strap hooks
Slinky hose
K Hose inlet
L Extension wand
The Ultimate Handheld Canister weighs about 2.3 kg/5 lbs.
text_image
I K H G F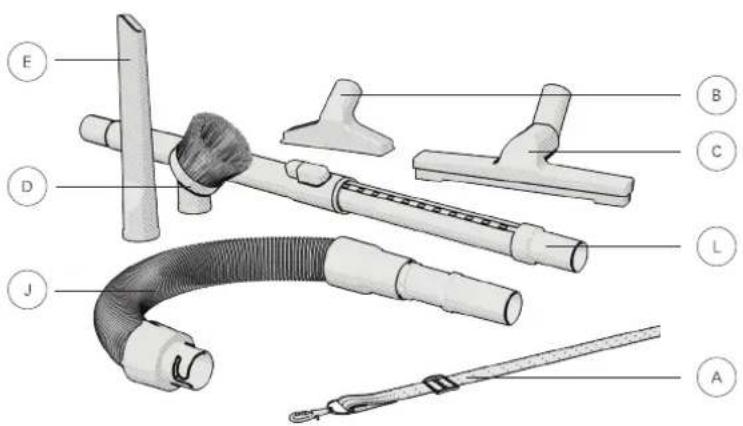
text_image
Labeled diagram of a medical or laboratory device with numbered parts for identification3. OPERATION
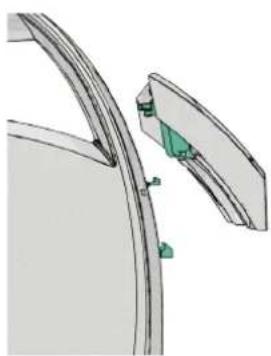
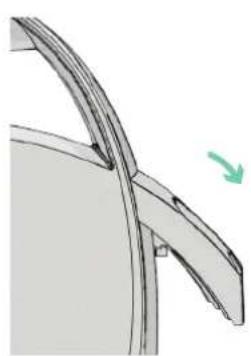
ATTACH THE TOOL CADDY
natural_image
Technical illustration of a mechanical component with green clamps and a curved base (no text or symbols)Align the middle slot and two pronged tabs with the vacuum tab and slots.
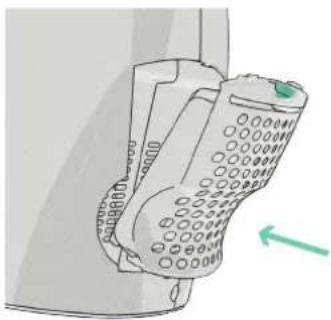
natural_image
Technical line drawing of a curved mechanical component with a green arrow indicating direction (no text or symbols)Snap the tool caddy down into place. Load the tools onto the tool caddy.

natural_image
Technical line drawing of a mechanical component with a brush and bracket (no text or symbols)
natural_image
Mechanical assembly diagram showing a threaded component with a green arrow indicating motion (no text or symbols)Align the J-shaped slot at the end of the hose with the tab inside the hose inlet. Turn clockwise to lock into place.

Attach the tool you would like to use. Twist and push to lock in. Twist and pull to remove.
3. OPERATION
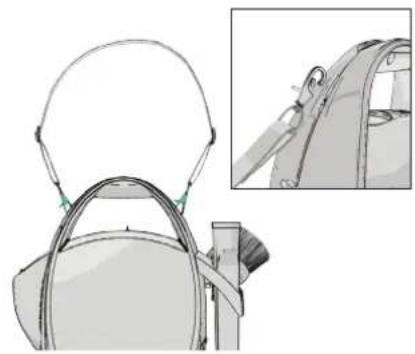
The shoulder strap can be attached in a horizontal or vertical position.

natural_image
Simple line drawing of a ribbon or cable with a looped end (no text or symbols)Loosen the straps, and slide the clip up or down to adjust.
natural_image
Illustration of a handbag with a helmet and side profile view (no text or symbols)To carry in a vertical position: clip each end of the shoulder strap into the two carry handle side slots.

natural_image
Line drawing of a mechanical component with a curved handle and circular opening (no text or symbols)To carry in a horizontal position: clip one end of the shoulder strap into carry handle slot. Clip the opposite end into the bottom of the vacuum slot.
USING THE VACUUM
natural_image
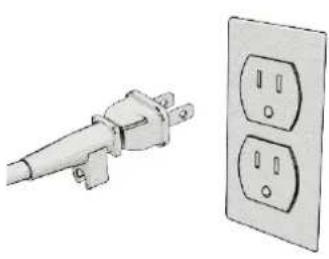
Illustration of a power plug and two electrical outlets (no text or symbols)Unwrap the cord and plug into an electrical outlet.

Attach the tool you need to the end of the extension wand.
Note: Press the button on the extension wand for more length if needed.

natural_image
Diagram of a capsule-shaped object with a vertical slot, shown with a green arrow indicating direction (no text or symbols)Slide the power switch to the ON position.
4. MAINTENANCE
REPLACING INNER BAG
natural_image
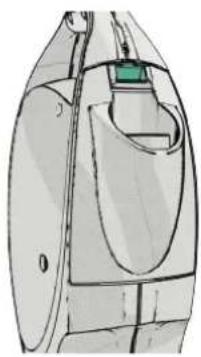
Technical line drawing of a mechanical component with no visible text or symbolsPush down on the inner bag door release button located above the hose inlet.
natural_image
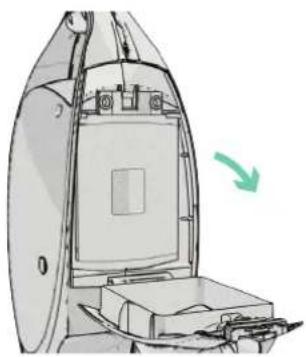
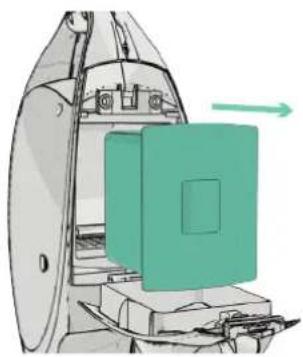
Diagram of a device with a green arrow indicating direction, showing internal components and a rectangular chamber (no text or symbols)Rotate the inner bag door down. Pull the inner bag out.
natural_image
Diagram of a mechanical device with a green component and directional arrow (no text or symbols)! WARNING!!
TO REDUCE THE RISK OF PERSONAL INJURY—UNPLUG BEFORE CLEANING OR SERVICING.
IF APPLIANCE IS NOT WORKING AS IT SHOULD, HAS BEEN DROPPED, DAMAGED, LEFT OUTDOORS, OR DROPPED INTO WATER, TAKE IT TO A SERVICE CENTER PRIOR TO CONTINUING USE.
ANY OTHER SERVICING SHOULD BE DONE BY AN AUTHORIZED SERVICE REPRESENTATIVE.

natural_image
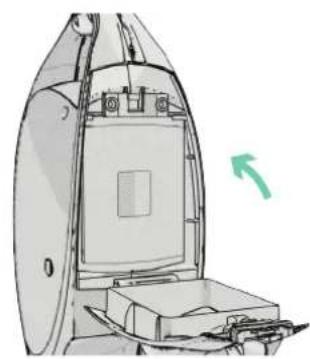
Diagram of a mechanical device with a green panel and directional arrow (no text or symbols)Insert a new inner bag by fitting the cardboard rim between the tabs inside the bag holder.
natural_image
Technical line drawing of a mechanical device with a green arrow indicating direction (no text or symbols)Close the inner bag door.
4. MAINTENANCE
REPLACING THE MICRO FILTER
Important: Never remove the white gasket surrounding the inner bag opening. The vacuum will leak air and not run properly.
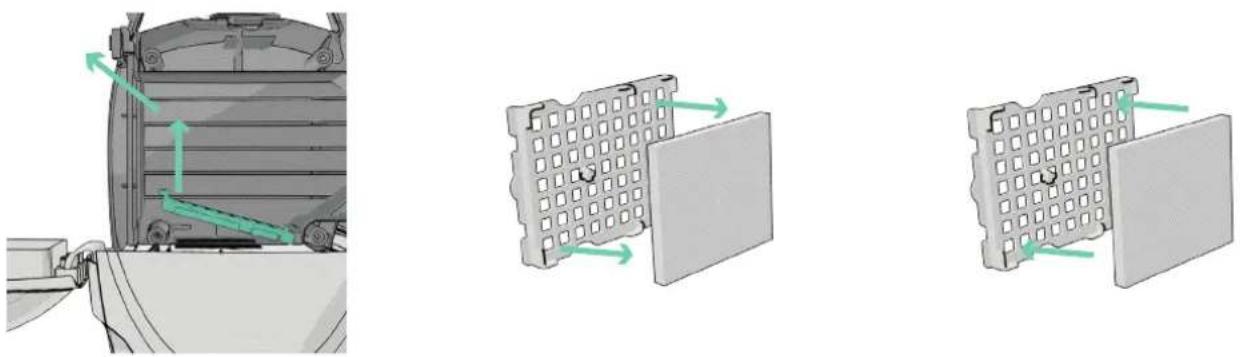
Lift up on the finger tab and pull out. Remove the Micro Filter from the frame. Replace by pressing a new Micro
Filter onto the tab located on the underside of the frame.
! WARNING!!
TO REDUCE THE RISK OF PERSONAL INJURY—UNPLUG BEFORE CLEANING OR SERVICING.
IF APPLIANCE IS NOT WORKING AS IT SHOULD, HAS BEEN DROPPED, DAMAGED, LEFT OUTDOORS, OR DROPPED INTO WATER, TAKE IT TO A SERVICE CENTER PRIOR TO CONTINUING USE.
ANY OTHER SERVICING SHOULD BE DONE BY AN AUTHORIZED SERVICE REPRESENTATIVE.

natural_image
Mechanical assembly diagram showing a cylindrical component with internal channels and a green arrow indicating motion direction (no text or symbols)Insert the frame back in. Then insert the inner bag back into place, and close the door.
4. MAINTENANCE
REPLACING THE HEPA FILTER
natural_image
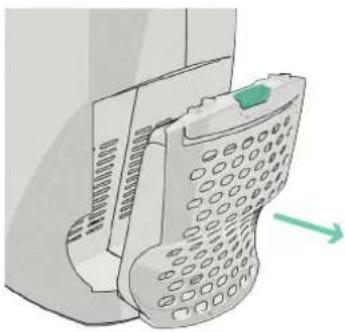
Illustration of a mobile phone receiver with a green scroll wheel (no text or symbols)Push down the HEPA filter door tab to pull out

natural_image
Diagram showing a device with a rectangular panel and a grid-patterned cylindrical object, both with a green arrow indicating direction (no text or symbols present)Slide the HEPA filter up and out. Insert a new filter by aligning the slots on the side of the filter with the tabs on the filter door.
natural_image
Illustration of a mobile phone with a green arrow pointing to the right side (no text or symbols present)Place the HEPA filter door back in until it snaps into place.
LUBRICATION
The motor is equipped with bearings which contain sufficient lubrication for their lifetime. The addition of lubricant could cause damage. Do not add lubricant to motor.
! WARNING!!
TO REDUCE THE RISK OF PERSONAL INJURY—UNPLUG BEFORE CLEANING OR SERVICING.
IF APPLIANCE IS NOT WORKING AS IT SHOULD, HAS BEEN DROPPED, DAMAGED, LEFT OUTDOORS, OR DROPPED INTO WATER, TAKE IT TO A SERVICE CENTER PRIOR TO CONTINUING USE.
ANY OTHER SERVICING SHOULD BE DONE BY AN AUTHORIZED SERVICE REPRESENTATIVE.
5. TROUBLESHOOTING
Service problems can often be solved easily. This guide can help you troubleshoot.
| Problem | Check What to do | |
| Cleaner will not run | Not plugged in properlyNo electricity in wall outletBlown fuse or tripped breakerMotor Protector tripped | Be sure cleaner is firmly plugged into wall outletCheck electrical source — fuse or circuit breaker in homeReplace Fuse or reset breaker in homeSee thermal protection box. |
| Cleaner does not pick up or has low suction | Inner Bag is fullHose/wand tool is cloggedAir leak due to missing or damaged gasket | Replace inner bag. See “Replacing the Inner Bag”Clear obstructionReplace the white bag gasketReturn to Service Center for repair |
| Extension wand and tools will not stay together | Proper friction fit is not being obtained | Push and twist the tools together to properly attach |
THERMAL PROTECTION
A thermal protector has been designed into your cleaner to protect it from over heating. When the thermal protector activates the cleaner will stop running. If this happens proceed as follows: 1. Turn cleaner OFF and unplug it from the electrical outlet. 2. Check fullness of bag, change if needed. 3. Inspect the hose or accessory for any obstructions. Clear obstructions if present. 4. When cleaner is unplugged and motor cools for 30 minutes, the thermal protector will deactivate and cleaning may continue. If the thermal protector continues to activate after following the above steps, your cleaner needs servicing.
! WARNING!!
TO REDUCE THE RISK OF PERSONAL INJURY—UNPLUG BEFORE CLEANING OR SERVICING.
IF APPLIANCE IS NOT WORKING AS IT SHOULD, HAS BEEN DROPPED, DAMAGED, LEFT OUTDOORS, OR DROPPED INTO WATER, TAKE IT TO A SERVICE CENTER PRIOR TO CONTINUING USE.
ANY OTHER SERVICING SHOULD BE DONE BY AN AUTHORIZED SERVICE REPRESENTATIVE.
5. WARRANTY
Techtronic Floor Care Technology gives you the following limited warranty for this product only if it was originally purchased for residential use, not for resale, from Oreck ^® or an Oreck ^® Authorized Retailer.
Oreck ^® will repair or replace, free of charge, to the original purchaser, any part that is found to be defective in material or workmanship within three (3) years following the date of purchase for all residential models. NOTE: If the unit is used commercially, warranty is void. This limited warranty does not cover the replacement of expendable or consumable parts such as filters, cartridges, and other parts subject to normal wear unless they are defective in material or workmanship.
This limited warranty does not apply to any part subjected to accident, abuse, commercial use, alteration, misuse, damage caused by an act of God, the use of voltages other than on the data plate of this product or service of this product by other than Oreck ^® or a participating Factory Authorized Service Center.
Oreck ^6 does not authorize any person or representative to assume or grant any other warranty obligation with the sale of this product.
Oreck ^® 's limited warranty is valid only if you retain proof of purchase from Oreck ^® or an Oreck ^® Authorized Retail Dealer for this product. If you purchase this product from any other source, your purchase is "AS IS," which means Oreck ^® grants you no warranty, and that you, not Oreck ^® , assume the entire risk of the quality and performance of this product, including the entire cost of any necessary servicing or repairs of any defects.
Oreck ^® 's liability for damages to you for any costs whatsoever arising out of this statement of limited warranty shall be limited to the amount paid for this product at the time of original purchase, and Oreck ^® shall not be liable for any direct, indirect, consequential or incidental damages arising out of the use or inability to use this product. Some states do not allow the exclusion or limitation of incidental or consequential damages, so the above limitation or exclusion may not apply to you.
ALL EXPRESS AND IMPLIED WARRANTIES OTHER THAN THE LIMITED WARRANTY SET FORTH ABOVE, FOR THIS PRODUCT, INCLUDING IMPLIED WARRANTIES OF MERCHANTABILITY AND FITNESS FOR A PARTICULAR PURPOSE ARE EXPRESSLY DENIED.
This warranty gives you specific legal rights, and you may also have other rights which vary from state to state.
ORECK®
Techtronic Floor Care Technology Limited Distributed by Royal Appliance Mfg. Co. Glenwillow, Oh 44139 U414 300