
HDTV-17 T2 - Digital decoder Grunkel - Free user manual and instructions
Find the device manual for free HDTV-17 T2 Grunkel in PDF.

| Product Type | Digital Terrestrial Receiver (DVB-T2 FTA) |
| Model | HDTV-17 T2 |
| Brand | Grunkel |
| Input Frequency Range | VHF & UHF, 177.5 – 866 MHz |
| Demodulation | QPSK, 16QAM, 64QAM, 256QAM |
| Video Decoding | MPEG-2 SD/HD, MPEG-4 H.264/AVC SD/HD, JPEG, BMP, PNG, AVI, VOB, MOV, MKV |
| Audio Decoding | MPEG-1, MPEG-2 Layer I & II, Dolby Digital, HE-AAC |
| Aspect Ratio | 4:3, 16:9 |
| HDMI Output Resolutions | 576i, 576p, 720p, 1080i, 1080p |
| Power Supply | AC 100-240V ~ 50/60Hz |
| Power Consumption (Operating) | < 6 W |
| Power Consumption (Standby) | < 0.5 W |
| PVR Functions | Instant recording, timer recording, time shift, playback |
| Electronic Program Guide | 7-day EPG |
| Subtitles | DVB Subtitle |
| Teletext | EBU Teletext |
| Remote Control | Included (2xAAA batteries) |
| USB Port | For multimedia playback and recording (external HDD with own power required) |
| Safety Features | Double insulation, hazardous voltage warning |
| Default Password | 000000 |
Frequently Asked Questions - HDTV-17 T2 Grunkel
User questions about HDTV-17 T2 Grunkel
0 question about this device. Answer the ones you know or ask your own.
Ask a new question about this device
Download the instructions for your Digital decoder in PDF format for free! Find your manual HDTV-17 T2 - Grunkel and take your electronic device back in hand. On this page are published all the documents necessary for the use of your device. HDTV-17 T2 by Grunkel.
USER MANUAL HDTV-17 T2 Grunkel
natural_image
Exterior view of a Grunkel USB device with ports and indicator lights (no readable text beyond branding)grunkel

natural_image
Simple line drawing of a rectangular object with a curved arrow indicating rotation, no text or symbols present.- Colocar las pilas
natural_image
Diagram of a car interior with arrows indicating movement or force (no text or symbols)- Cerrar la tapa

natural_image
Simple line drawing of a rectangular object with a curved arrow indicating rotation, no text or symbols present.Instalación

-
USB port
-
CH+
-
CH-
-
Power
Guía de instalación
COINTER ELECTRONICA S.L
TLF. ATT. AL CLIENTE 902 110 909 // 954 18 51 83 // 954 18 53 20


grunkel
grunkel
NORMAS DE GARANTIA OFICIAL GRUNKEL
natural_image
Exterior view of a Grunkel USB device with control buttons (no readable text beyond branding)grunkel

This symbol indicates that dangerous voltages constituting a risk of electric shock are present within this

This symbol indicates that there are important operating and maintenance instructions in the literature buying this unit.

This symbol indicates that this product incorporates double insulation between hazardous mains voltage accessible parts. When servicing use only identical replacement parts.
Package contents:
IMPORTANT SAFETY INSTRUCTIONS

TO REDUCE THE RISK OF ELECTRIC SHOCK. DO NOT REMOVE COVER. NO USER-SERVICEABLE PARTS INSIDE. REFER SERVICING TO QUALIFIED SERVICE PERSONNEL.


This symbol indicates important instructions accompanying the product.
! As a switching equipment, power adaptor should be convenient for operating the device should be far away from water dropping and splashing, as well as vase full of liquid
INTRODUCTION
This user manual is intended to guide you through the operation for the DVB-T2 FTA High Definition Digital Terrestrial Receiver.
The password might require while you try to modify some advance option. Default password is "000000".
MAIN FUNCATIONS AND FEATURE
This product is a high performance HDTV Terrestrial receiver. It fully complies with DVB-T2 FTA receiver requirement specifications. It provides users with all digital terrestrial TV and radio signals being broadcast in Standa
rd Definition or High Definition.
THE REMOTE CONTROL
grunkel
Photograph Key Function
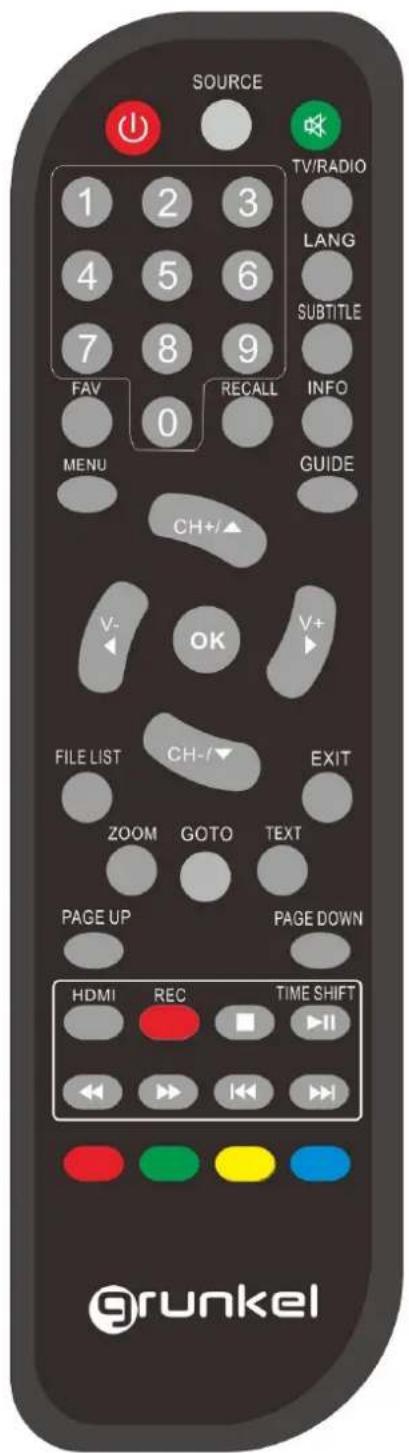
| MUTE Disable Audio output | |
| POWER Power on/off the STB | |
| 0......9 | 0-9 numeral buttons, for input of numbers or for selecting a TV channel |
| SOURCE .Enter the multimedia play menu. | |
| GOTO GOTO select the track/time for multimedia playing | |
| HDMI Change the definition for HDMI output | |
| RECALL | Recall last channel while watching digital TV or listening to radio. |
| TV/RADIO | Press TV/R key to switch between TV program and Radio program. |
| VOL+/VOL- Increase or decrease the audio output volume | |
| CH+/CH- Select next/previous channel | |
| RED Function key in different page. | |
| GREEN Function key in different page. | |
| YELLOW Function key in different page. | |
| BLUE Function key in different page. | |
| MENU | Display menu, press again to exit current menu |
| EXIT | Back to previous menu without saving |
| INFO. | Press INFO. Key to display the information bar during watch program. |
| GUIDE | Go to TV PROGRAM GUIDE |
| Navigation keys: ▲▼◀▶&OK | Navigation keys to move up, down, left & right & press OK key to confirm one setting |
| OK | Call up a program list for the current channel while watching digital/TV or listening to the radio. In a menu, this button serves to confirm a selection. |
| PREV/NEXT | Page up/down in lists, and Previous/Next track |
| FAV | Display favorites channel |
| ZOOM | (1) enable/disable zoom;(2) Switch to Daily Mode (GUIDE page)(3) set/unset program locked in channel manager menu |
| REC | Press REC key to record the current program during watch TV program |
| STOP | Press STOP key to stop recording program or stop program during watch PVR program. |
| TEXT | Teletext |
| FILELIST Go to the Recorded File List | |
| F.R./F.F | Press these keys to go faster backward and forward with different speed |
| SUBTITLE | Switch between different subtitles. |
| LANG | Press LANG key to set the audio track and audio mode. |
| PageUP/Page Down | Turn to previous/next page of all TV list |
grunkel
 | Into the timeshift state, press ▶key to enter the timeshift suspended state;Press ▶button to enter timeshift playback state;Press □button to exit the timeshift state; press info to see detailed information; | |
Remark: When connecting outside hard-disk, the hard-disk must have its own power source.
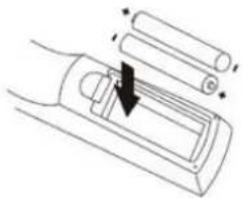
Installing the batteries
Remove the battery cover from the read of the Remote Control and place 2xAAA size batteries inside the compartment.
Please make sure the battery polarities match the polarity markings inside the compartment.
1.Open the cover
- Install batteries

natural_image
Diagram of a car interior with battery plates and a directional arrow indicating movement (no text or symbols)- Close the cover

natural_image
Simple line drawing of a rectangular object with a curved top and base, no text or symbols present.Using the Remote Control
grunkel
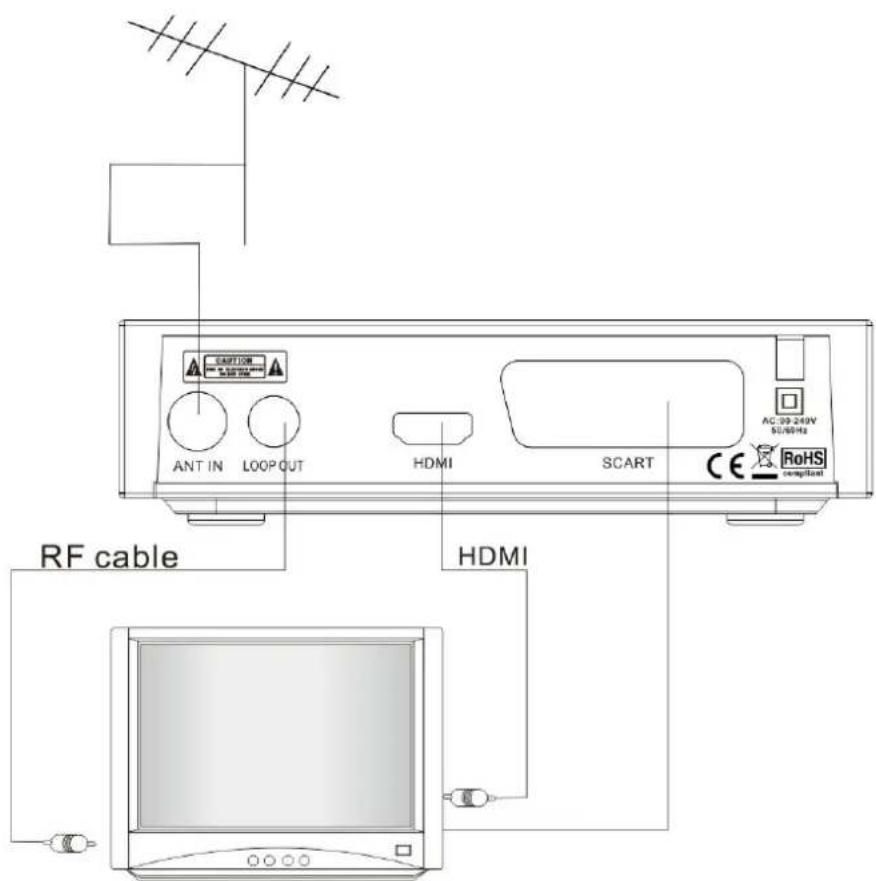
INSTALLATION

-
USB port
-
CH+
-
CH-
-
Power

grunkel
Installation Guide
Follow the installation guide to enjoy your high definition digital TV world. Follow the help information that at the bottom of the window to select preference menu language and suitable country (Region) and start channel search.
If no channel is found during the channel searching process, the user may adjust the antenna position to obtain optimal TV signal. After the scanning process finished, it would save and turn back to play the first program automatically.
Sub key
The programs might have multilingual subtitle information. All available subtitle languages would display on the subtitle information window while you press SUBTITLE key. The screenshot is illustrated below. Follow the help information on the subtitle windows to select preference subtitle.
HDMI
Change the type of HDMI output – following options are available : 576i / 576p / 720p / 1080i / 1080p
GUIDE
Press GUIDE key to display the weekly electronic program guide. You could find when your enjoy program start and the summary of your enjoy program.
TV Channel and radio Channel list
Press ENTER key to display all TV channel or all Radio channel. Follow the help information at the bottom of the window to select preference channel.
Favourite Channel
You can add preference channels to favourite's channel list on the channel edit window. Press FAV key to launch your favourite's channel list.
PVR Function
Base on FILELIST function you could record the preference program and playback. Instant recording, GUIDE recording and timer recording were available.
Instant recording
Press REC. key to start instant recording during watch TV and the recording symbol would be display on the left top of the screen. Press INFO. key to get further more information of instant recording. Press STOP key to stop instant recording.
Time Shift
1) Press key to enter the TIMESHIFT mode. In Timeshift mode, you can watch the program meanwhile record the program.
2) The "TIMESHIFT" state will be shown on top right corner of the screen, and record program play will begin at recording start time
3) In Timeshift mode, when press "STOP" will exit Timeshift mode and other functions will be continued
Timer recording
You could record preference program freely with timer recording feature. Go to Program Guide and press INFO key to enter to the schedule window. You could add, edit and delete timer recording event on schedule window.
Playback recorded program
Press FILELIST key to display the recorded program. Follow the help information to preview, playback the recorded program and edit the recorded program.


SPECIFICATION
| Tuner | |
| Input Connector | IEC 16902. Female |
| Input Frequency Range | VHF&UHF |
| Num of RF Inputs | 1 |
| Input impedance | 75 ohm |
| RF output Connector | (bypass)IEC 169-2 Male |
| Loop through | 177.5-866MHz |
| Demodulation | |
| Standard | ETSI EN300 744 |
| Guard interval | 1/4,19/256,1/8,19/128,1/16,1/32,1/128 |
| Modes | |
| FEC Modes Rate | 1/2,3/5,2/3,3/4,4/5,5/6 Automatic |
| Mode | 1K,2K,4k,8k,16k,32k |
| Demodulation | QPSK, 16QAM, 64QAM,256QAM, |
| Channel bandwidth | 7 and 8 MHz |
| Video Decoder | |
| Standard | ISO/IEC 13818-2 and ISO/IEC 14496-10 |
| Transport stream | ISO/IEC 13818-1 |
| Video decoding | MPEG-2 SD/HD (MP@ML and MP@HL), MPEG-4 H.264/AVC SD/HD JPEG,BMP,PNG, AVI, VOB, MOV, MKV |
| Aspect ratio | 4:3, 16:9 |
| Audio Decoder | |
| Standard | ISO/IEC13818-3 TR1011154 |
| Audio decoding | MPEG-1 and MPEG-2 Layer I & II, Dolby Digital Audio, and HE -AAC Digital Audio |
| Dolby Digital (AC-3) | Stereo down-mixing to analog and digital audio outputs (including HDMI) For digital outputs, L-PCM stereo encoding is provided |
| Subtitles & Teletext | |
| Subtitle | DVB Subtitle |
| Teletext | EBU TELETEXT |
| Accessories | |
| Remote control unit | 1 pcs |
| Batteries | 2 x AAA, typ R03 |
| User Manuel | 1 pcs |
| Power | |
| Power supply | AC 100-240V~ 50/60Hz |
| Power consumption | < 6W |
| Standby consumption | < 0.5W |
- grunkel
- Instalación
- Guía de instalación
- NORMAS DE GARANTIA OFICIAL GRUNKEL
- IMPORTANT SAFETY INSTRUCTIONS
- INTRODUCTION
- MAIN FUNCATIONS AND FEATURE
- Installing the batteries
- INSTALLATION
- Installation Guide
- Sub key
- HDMI
- GUIDE
- TV Channel and radio Channel list
- Favourite Channel
- PVR Function
- Instant recording
- Time Shift
- Timer recording
- Playback recorded program
Brand : Grunkel
Model : HDTV-17 T2
Category : Digital decoder