EWS202DX-DWM - Water heater ELECTROLUX - Free user manual and instructions
Find the device manual for free EWS202DX-DWM ELECTROLUX in PDF.

User questions about EWS202DX-DWM ELECTROLUX
0 question about this device. Answer the ones you know or ask your own.
Ask a new question about this device
Download the instructions for your Water heater in PDF format for free! Find your manual EWS202DX-DWM - ELECTROLUX and take your electronic device back in hand. On this page are published all the documents necessary for the use of your device. EWS202DX-DWM by ELECTROLUX.
USER MANUAL EWS202DX-DWM ELECTROLUX
natural_image
Two identical white-framed air conditioner unit designs with no visible text or symbols on the surfacesGeneral Remark
- The installation and maintenance has to be carried out by qualified professionals or authorized technicians.
- The manufacturer shall not be held responsible for any damage or malfunction caused by wrong installation or failing to comply with following instructions included in this pamphlet.
- For more detailed installation and maintenance guidelines, please refer to below chapters.
TABLE OF CONTENTS
TITLE PAGE
- Cautions ......(2)
2.Product introduction ....(3) - Unit installation....(6)
4.Methods of using....(8) - Maintenance....(12)
- Troubleshooting....(13)
1. CAUTIONS
Before installing this water heater, check and confirm that the earthing on the supply socket is reliably grounded. Otherwise, the electrical water heater can not be installed and used. Do not use extension boards. Incorrect installation and use of this electrical water heater may result in serious injuries and loss of property.
Special Cautions
- The supply socket must be earthed reliably. The rated current of the socket shall not be lower than 16A. The socket and plug shall be kept dry to prevent electrical leakage.
- The installation height of the supply socket shall not be lower than 1.8m.
- The wall in which the electrical water heater is installed shall be able to bear the load more than two times of the heater filled fully with water without distortion and cracks. Otherwise, other strengthening measures shall be adopted.
- The pressure relief valve attached with the heater must be installed at the cold water inlet of this heater(see Fig.1), and make sure it is not exposed in the foggy. The water may be outflowed from pressure relief valve, so the outflow pipe must open wide in the air; The pressure relief valve need to be checked and cleaned regularly, so as to make sure it will not be blocked.

text_image
Hot water Cold water Pressure relief valve Thread screw Drain handle Pressure release hole (Fig- When using the heater for the first time (or the first use after maintenance), the heater can not be switched on until it has been filled fully with water. When filling the water, at least one of the outlet valves at the outlet of the heater must be opened to exhaust the air. This valve can be closed after the heater has been filled fully with water.
- The water heater is not intended for use by persons(including children)with reduced physical, sensory or mental capabilities, or lack of experience and knowledge, unless they have been given supervision or instructions concerning use of the appliance by a person responsible for their safety. Children should be supervised to ensure that they do not play with the heater.
- During heating, there may be drops of water dripping from the pressure release hole of the pressure relief valve. This is a normal phenomenon. If there is a large amount of water leak, please contact customer care center for repair. This pressure release hole shall, under no circumstances, be blocked; otherwise, the heater may be damaged, even resulting in accidents.
- The drainage pipe connected to the pressure release hole must be kept sloping downwards.
- Since the water temperature inside the heater can reach up to 75^ C, the hot water must not be exposed to human bodies when it is initially used. Adjust the water temperature to a suitable temperature to avoid scalding.
- If the flexible power supply cord is damaged, the special supply cord provided by the manufacturer must be selected, and replaced by the professional maintenance personnel.
- If any parts and components of this electrical water heater are damaged please contact customer care center for repair.
- This appliance is not intended for use by persons (including children) with reduced physical, sensory or mental capabilities, or lack of experience and knowledge, unless they have been given supervision or instruction concerning use of the appliance by a person responsible for their safety.
• Children should be supervised to ensure that they do not play with the appliance.
- The maximum inlet water pressure is 0.5MPa; the minimum inlet water pressure is 0.1MPa, if this is necessary for the correct operation of the appliance.
- The water may drip from the discharge pipe of the pressure-relief device and that this pipe must be left open to the atmosphere; The pressure-relief device is to be operated regularly to remove lime deposits and to verify that it is not blocked;
- In order to drain away the water inside the inner container, it can be drained away from the pressure release valve. Twist the thread screw of the pressure release valve off, and lift the drain handle upwards.(See Fig.1) A discharge pipe connected to the pressure-relief device is to be installed in a continuously downward direction and in a frost-free environment.
2. PRODUCT INTRODUCTION
2.1 Technical Performance Parameters
| Model | Volume (L) | Rated Power (W) | Rated Voltage (ACV) | Rated Pressure (MPa) | Max Of Water Temperature (°C) | Protection Class | Waterproof Grade |
| EWS202DX-DWM | 20 | 2500 | 220 | 0.8 | 75 | I | IPX4 |
| EWS202DX-DWE | 20 | 2500 | 220 | 0.8 | 75 | I | IPX4 |
2.2 Brief introduction of product structure
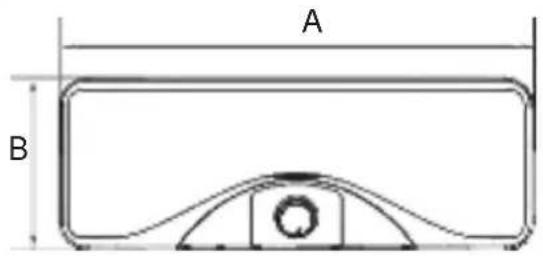
text_image
A B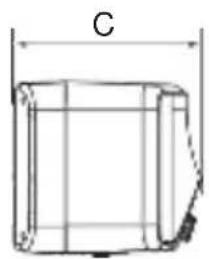
text_image
C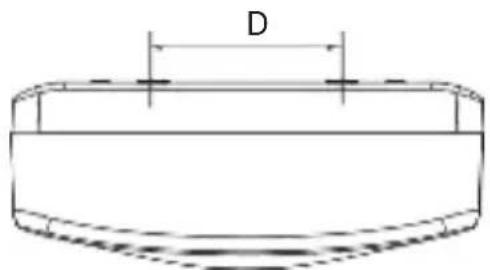
text_image
DPRODUCT STRUCTURE FOR EWS202DX-DWM
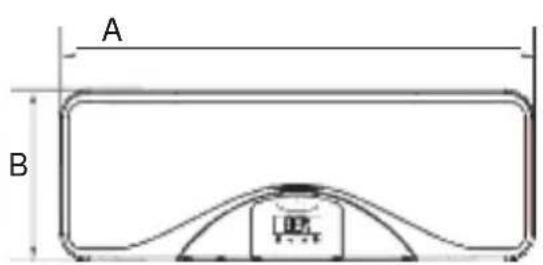
text_image
A B
natural_image
Technical line drawing of a cylindrical mechanical part with a labeled dimension 'C' (no text or symbols beyond the label)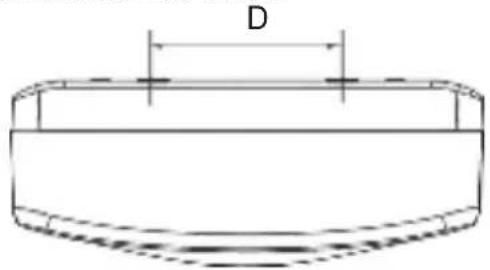
text_image
DPRODUCT STRUCTURE FOR EWS202DX-DWE
| EWS202DX-DWM | EWS202DX-DWE | |
| A | 750 | 750 |
| B | 271 | 271 |
| C | 293 | 293 |
| D | 300 | 300 |
(Note: All dimensions are in mm)
2.4 Internal Wire Diagram

flowchart
graph TD
    A["Thermal Cut Out"] --> B["Q"]
    C["Thermostat"] --> D["Q"]
    E["Power Indicator"] --> F["Yellow/Green"]
    G["Heating Element"] --> H["Light"]
    I["Green Light"] --> J["Light"]
    K["L Brown"] --> L["Blue"]
    M["N Blue"] --> N["Yellow/Green"]
    O["E Grey"] --> P["Ground"]
WIRING DIAGRAM FOR EWS202DX-DWM

flowchart
graph TD
    A["LED Display"] --> B["Indicator light"]
    B --> C["Thermal Cut Out"]
    C --> D["PCB"]
    D --> E["Heating Element"]
    E --> F["Transformer"]
    F --> G["Temperature Sensor"]
    G --> H["Indicators light"]
    H --> I["Blue/Green"]
    I --> J["L"]
    style A fill:#f9f,stroke:#333
    style F fill:#ccf,stroke:#333
    style G fill:#cfc,stroke:#333
WIRING DIAGRAM FOR EWS202DX-DWE
3. UNIT INSTALLATION
3.1 Installation Instruction
① This electrical water heater shall be installed on a solid wall. If the strength of the wall cannot bear the load equal to two times of the total weight of the heater filled fully with water, it is then necessary to install a special support.
In case of hollow bricks wall, ensure to fill it with cement concrete completely.
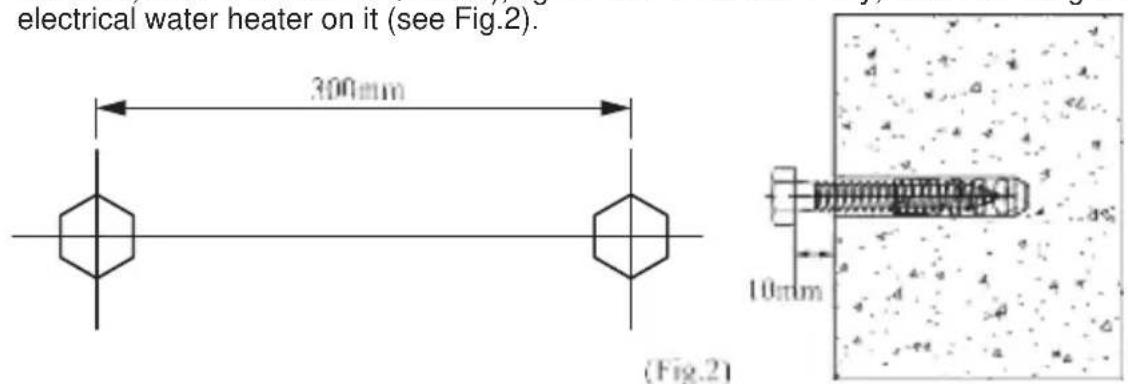
② After selecting a proper location, determine the positons of the two install holes used for expansion bolts with hook (300mm), Make two holes in the wall with the corresponding depth by using a chopping bit with the size matching the expansion bolts attached with the machine, insert the screws (M8*80), tighten the nuts to fix firmly, and then hang the electrical water heater on it (see Fig.2).
text_image
electrical water heater on it (see Fig.2). 300mm 10mm (Fig.2)③ Install the supply socket in the wall. The supply socket be 220V. It is recommended to placed the socket on the right above the heater. The height of the socket to the ground shall not be less than 1.8m (see Fig.4). If there is fault on power cable, it should be replaced by the manufacturers, agencies or qualified person who is able to do this so as to ensure the safety.

text_image
L (Brown) E (Yellow/Green) N (Blue) ≥1.8m Ground (Fig.4)④ If the bathroom is too small, the heater can be installed at another place. However, in order to reduce the pipeline heat losses, the installation position of the heater shall be closed to the location shall be as near as possible to the heater.
3.2 Pipelines Connection
①The dimension of each pipe part is G1/2"; The massive pressure of inlet should use Pa as the unit; The minimum pressure of inlet should use Pa as the unit.
② Connection of pressure relief valve with the heater on the inlet of the water heater.
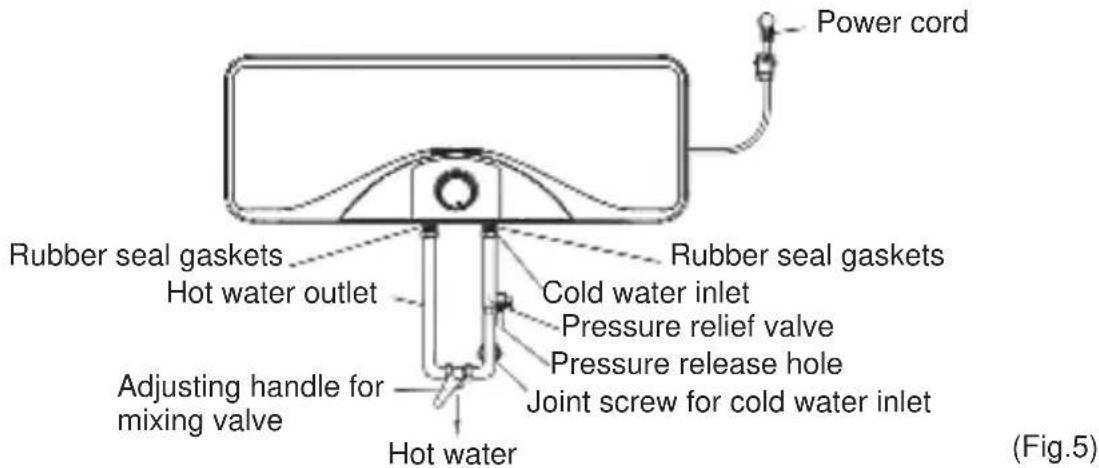
③ In order to avoid leakage when connecting the pipelines, the rubber seal gaskets provided with the heater must be added at the end of the threads to ensure leak proof joints (see Fig.5).
text_image
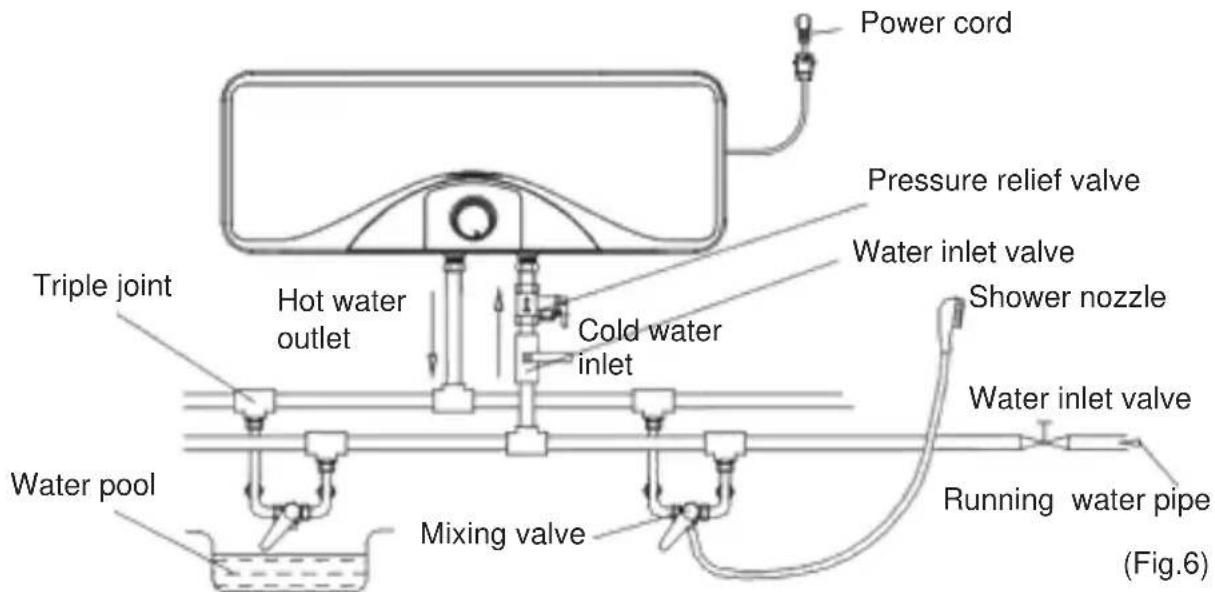
Power cord Rubber seal gaskets Hot water outlet Rubber seal gaskets Cold water inlet Pressure relief valve Pressure release hole Adjusting handle for mixing valve Joint screw for cold water inlet Hot water (Fig.5)④ If the users want to realize a multi-way supply system, refer to the method shown in fig.6 for connection of the pipelines.
text_image
Power cord Pressure relief valve Water inlet valve Shower nozzle Hot water outlet Cold water inlet Water inlet valve Running water pipe Water pool Mixing valve Triple joint
NOTE
Please be sure to use the accessories provided by our company to install this electric water heater. This electric water heater can not be hung on the support until it has been confirmed to be firm and reliable. Otherwise, the electric water heater may drop off from the wall, resulting in damage of the heater, even serious accidents of injury. When determining the locations of the bolt holes, it shall be ensured that there is a clearance not less than 0.2m on the right side of the electric heater, to convenient the maintenance of the heater, if necessary.
4. METHODS OF USING
- First, open any one of the outlet valves at the outlet of the water heater, then, open the inlet valve. The water heater gets filled with water. When water flows out of the outlet pipe it implies that the heater has been filled fully with water, and the outlet valve can be closed.

NOTE
During normal operation, the inlet valve shall be always kept open.
- Insert the supply plug into the socket.
- If the indicator lights up, the thermostat will automatically control the temperature. When the water temperature inside the heater has reached the set temperature, it will switch off automatically, when the water temperature falls below the set point the heater will be turned on automatically to restore the heating.
- Easy Clean System
Dirty water can be drained out through a separate pipe underneath the tank
① Turn off the power and close inlet valve.
② Use the spanner to twist off the nut.
③ Remove the nut to drain away the water.

text_image
-18 Anticlockwise to loosen4.1 Operating Of The Unit
↓ PRODUCT FOR EWS202DX-DWM

text_image
2 1 40 50 60 70 LOW OFF HIGH
NOTE
The temperature displayed on the scale refers to water temperature of the central part in the tank. The outlet water temperature may be higher than the displayed temperature. The hot water from the water heater may cause scald, please test the temperature of the hot water before using.
① Rotate the knob according to the marking on the knob to increase or decrease the setting temperature.
② The LED turns to blue while there is power to the system and the water temperature reaches the user setting, at the end of the heating phase.
The LED turns to pink (red and blue mix color) when the heating is working.

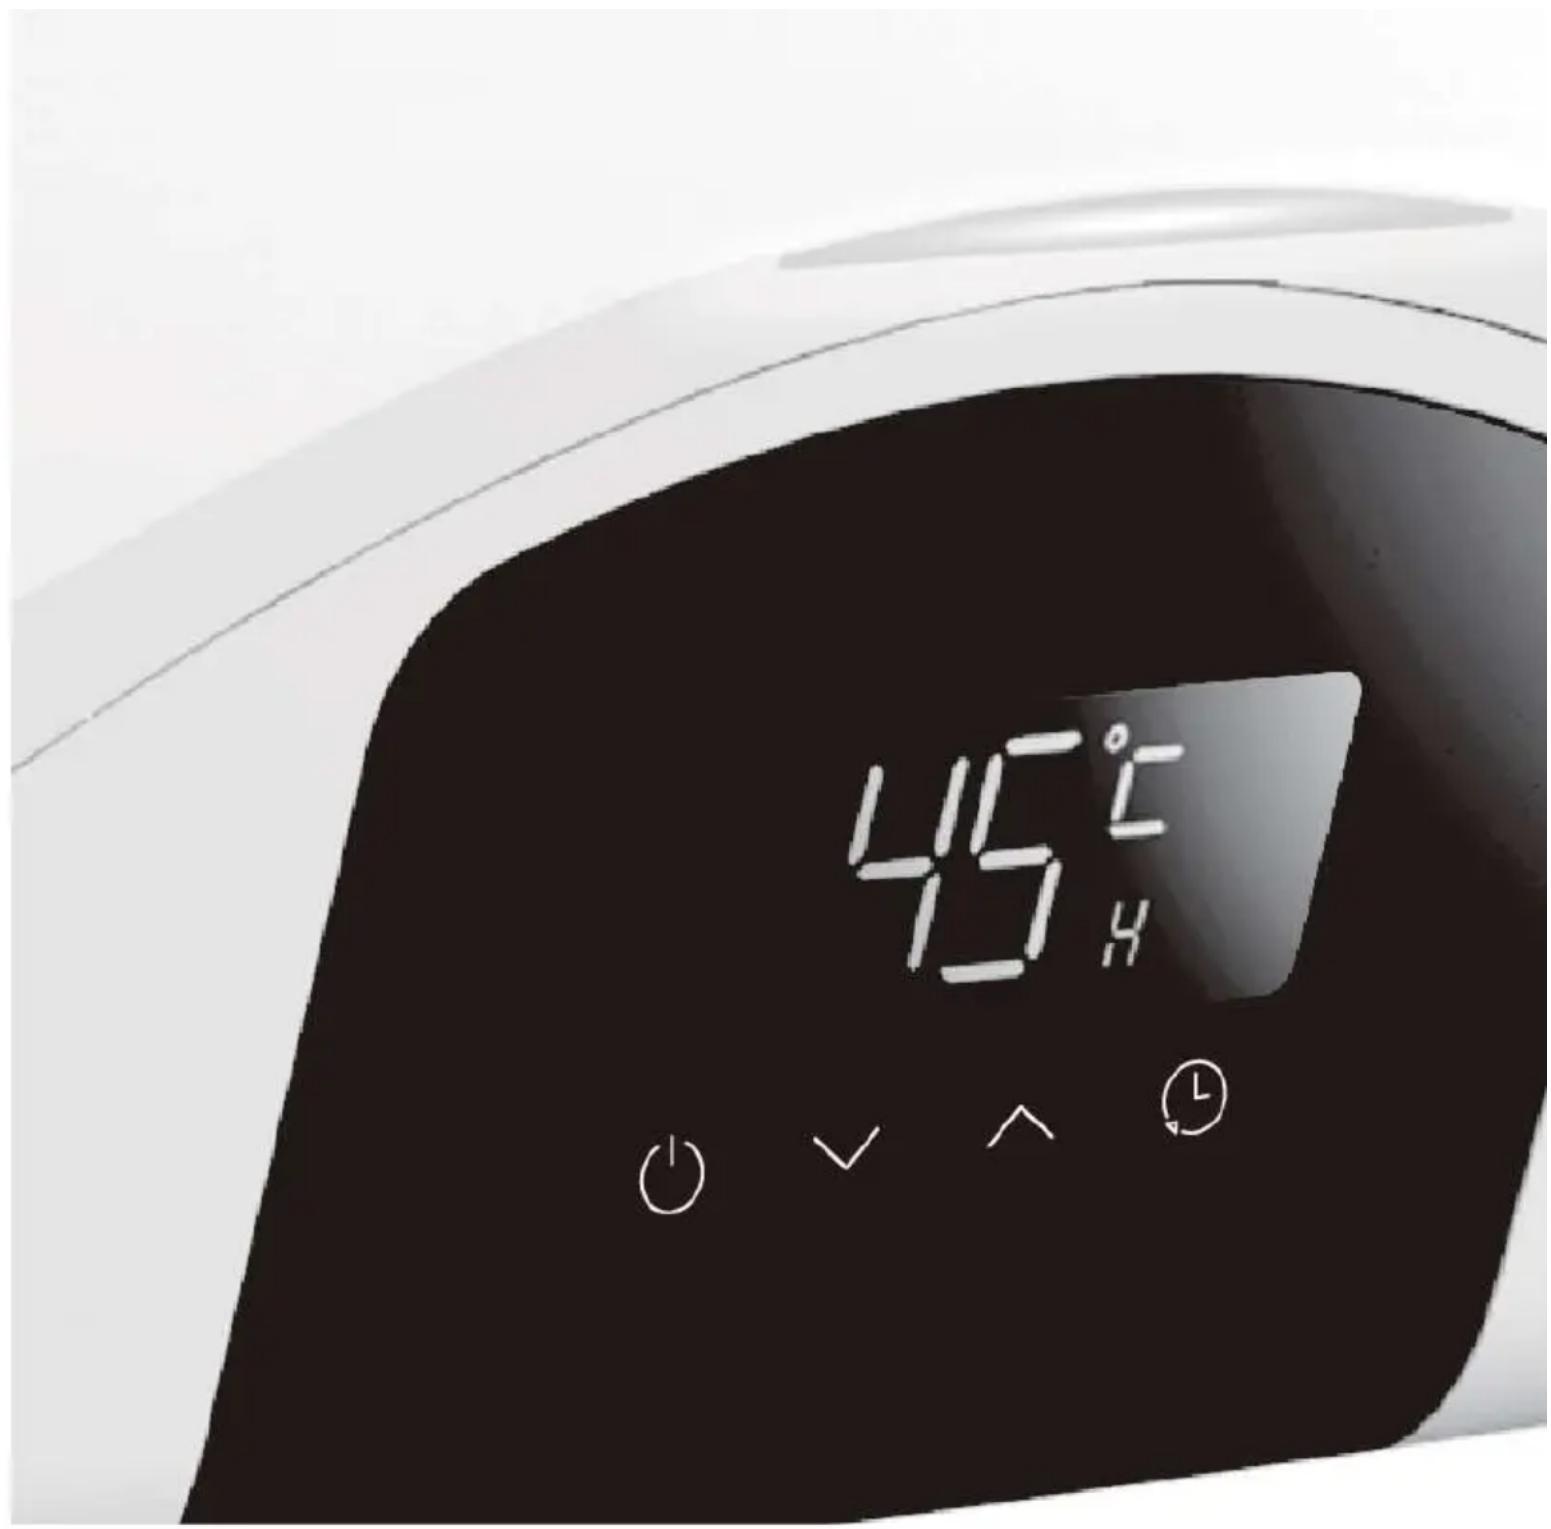
PRODUCT FOR EWS202DX-DWE
5

text_image
82°C H


1

text_image
I ✓ ↑ L ③ ④


NOTE
The temperature displayed on the LED refers to water temperature of the central part in the tank. The outlet water temperature may be higher than the displayed temperature. The hot water from the water heater may cause scald, please test the temperature of the hot water before using.
①“①”key
This key acts as an ON/OFF operating key. When power is connected, display screen is fully bright for 2s. If there is power failure memory function, return to the working condition before power failure. Otherwise, system will enter into power off state.
When in power-on state, press “①” key to shut down the system.
When in power-off state, press “ ” key to turn on the system. In this case, power failure memory data will be restored and the system will enter into the corresponding working condition.
Notes: "key is the highest priority key among all keys in system. That is, if you press it under all failure-free working conditions, the system will enter into the power-off state; no content is displayed in power-off state. Software version number will be displayed after full screen display for 2s. (Double "8" digital tube show 01)
② “× key
(1) Cooperate with "BOOK" key to adjust the booked time. The specific operations are shown in booking adjustment function.
(2) Setting temperature: temperature is adjusted in the range of (T_)(-T_+1)-(T_+1)75-(T_) . The setting temperature will rise by 1^ after “” key is clicked for once. Long pressing “” key will render the setting temperature to increase at the rate of 5^/s . If no key is pressed within 5s, the system will store the setting temperature parameters and exit the temperature setting status.
③ “ ”key
(1) Cooperate with "BOOK" key to adjust the booked time. The specific operations are shown in booking adjustment function.
(2) Setting temperature: temperature is adjusted in the range of 75-74-73-...-(Tmin+1)-(Tmin)-35.
The setting temperature will reduce by 1^ C after “√” key is clicked for once. Long pressing “√” key will render the setting temperature to decrease at the rate of 5^ C/s. If no key is pressed within 5 s, the system will store the setting temperature parameters and exit the temperature setting status.
④ "BOOK" key
Power on state: press this key to enter into booked time setting mod. At this moment, booked time can be set through pressing “^” or “▼” key. The specific operations are shown in booking function introduction. Power off state: this key is invalid.
⑤The LED turns to blue while there is power to the system and the water temperature reaches the user setting, at the end of the heating phase.
The LED turns to pink (red and blue mix color) when the heating is working.
• Heating/Heat preservation function
The system could judge heating/heat preservation state and light up the corresponding indicator based on the difference between actual temperature and setting temperature. If the water heater is in heating state, the LED indicator lights pink; the LE D indicator lights blue when in heat preservation state.
The water heater could be directly heated to the setting temperature after just starting or readjusting the setting temperature. When the setting temperature is reached, it will stop heating and enter into the heat preservation state. If the difference between actual temperature and setting temperature is greater than the temperature return difference, water will be heated again.
- Booking bath function
When in power-on state, press the "Book" key, then the booking indicator "H" will light up. The system will enter into booked time adjustment state and the digital tube flickers. At this moment, the user could adjust the booked time through pressing "✗" or "✗" key.
Notes:
1) The delay booking can't set the minutes of the booked time;
2) In the setting process of booked time, booked time shall flicker. In the flickering period:
▲No key is pressed within 5s, then confirm the booking state;
▲Press the "Book" key to confirm the booking mode immediately;
3) The reservation will be canceled when you press the "Book" key during the reservation waiting process;
4) Upon the completion of booking set, system will preheat one hour. For instance, if the user books water usage 6 h later, system will start heating immediately after 5 h from the current time. If the user books water usage 1 h later, system will start heating immediately.
5) The system enters into the heat preservation state when the booking heating reaches the setting temperature, if the temperature decreases by 5^ C, it will reenter into the heating state;
• Power failure memory function
The system has the function of power off memory, can remember the working state, the set temperature and other related informations which are before the power off. After the power is re energized, the system will automatically return to the state of work which is before the power off.
Note:
- this power down memory function does not contain clock memory function.
- The booked status can not be remembered, that is, after the power off, the booked status will be cleared automatically.
• Anti-freezing protection function
When in non-heating state, if the water temperature in water heater is less than or equal to 6^ C, connect to the corresponding heating tube to conduct heating; The water heater could stop heating when the temperature reaches 10^ C (heating is not displayed, i.e., hidden heating).
- Restore factory settings
When in power off state, if Ⓤ” key and ⚙” key are pressed for 3s simultaneously, the display screen will be fully bright and system will enter into the factory setting mode (buzzer will ring, if any). Then the system will enter into “heating/heat preservation” state after 2s. The factory setting parameters are shown in the following table.
| setting temperature | 70°C |
| timer reservation | 08 |
| reservation mode | Unlock by default |
- Alarming function and fault self-detection
When dry heating fault, over-temperature fault and sensor turnoff or short circuit appears, nixie tubes on display screen respectively show E2, E3 and E4 with blinking display. All other nixie tubes and indicator lights do not show signs. For instance, if there is a buzzer, it will give six short alarms. At this moment, all relays are switched off and all keys do not work. After failures are removed and electricity is conducted again, water heater will recover to the power-off state. When in power-up state, system automatically conducts self-inspection. If there is fault, corresponding fault code will be displayed accordingly and system cannot work (i.e. water heater is unable to start.)
Identification of dry heating fault: when system detects that rising slope of inner container temperature is 15^ C/min or 8^ C/30S and temperature is greater than 50^ C, fault code E2 is showed on display screen with blinking display.
Identification of over-temperature fault: when the temperature of temperature sensor of inner container is greater 90^ C, over-temperature is identified and fault code E3 is showed on display screen with blinking display.
Identification of sensor fault: in case of sensor turnoff or short circuit, an alarm will be given and fault code E4 is showed on display screen with blinking display.
E2: Dry Ashing---Top up with water and re-heat.
E3: Overheating---Check the heating system or replace it.
E4: Sensor Fault---Check the sensor or replace it.
Do cut off power supply before maintenance, to avoid danger like electric shock.
- Check the power plug and outlet as often as possible. Secure electrical contact and also proper grounding must be provided. The plug and outlet must not heat excessively.
- If the heater is not used for a long time, especially in regions with low air temperature (below 0 °C), it is necessary to drain water from the heater to prevent damage of the water heater, due to water freezing in the internal tank. (Refer Cautions in this manual for the method to drain away the water from the inner container).
- To ensure long reliable water heater operation, it is recommended to regularly clean the internal tank and remove deposits on the electric heating element of the water heater, as well as check condition (fully decomposed or not) of the magnesium anode and, if necessary, replace it with a new one in case of full decomposition. Tank cleaning frequency depends on hardness of water located in this territory. Cleaning must be performed by special maintenance services. You can ask the seller for address of the nearest service center.
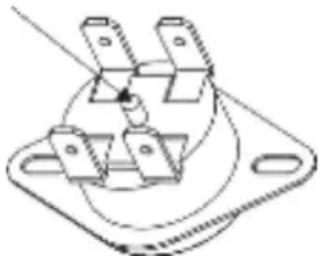
- The water heater is equipped with a thermal switch, which cuts off power supply of the heating element upon water overheating or its absence in the water heater. If the water heater is connected to the mains, but water is not heated and the indicator doesn't light up, then the thermal switch was switched off or not switched on. To reset the water heater to the operating condition, it is necessary to:
-
De-energize the water heater, remove the plate of the side/lower cover.
-
Press the button, located at the center of the thermal switch, see Fig.7:
-
If the button is not pressed and there is no clicking, then you should wait until the thermal switch cools down to the initial temperature.
Manual reset button
natural_image
Pure technical line drawing of a mechanical component with mounting flange (no text or symbols)(Fig.7)

WARNING
Non-professionals are not allowed to disassemble the thermal switch to reset. Please contact professionals to maintain. Otherwise our company will not take responsibility if any quality accident happens because of this.
6. TROUBLESHOOTING
| Failures | Reasons | Treatment |
| The heating indicator light is off. | Failures of the temperature controller. | Contact with the professional personnel for repair. |
| No water coming out of the hot water outlet. | 1. The running water supply is cut off.2. The hydraulic pressure is too low.3. The inlet valve of running water is not open. | 1. Wait for restoration of running water supply.2. Use the heater again when the hydraulic pressure is increased.3. Open the inlet valve of running water. |
| The water temperature is too high. | Failures of the temperature control system. | Contact with the professional personnel for repair. |
| Water leak. | Seal problem of the joint of each pipe. | Seal up the joints. |

Parts illustrated in this use and care manual are indicative only, parts provided with the product may differ with illustrations. This product is intended for household use only. Specifications are subject to change without notice.
NOTE
Những lưu ý chung
natural_image
Technical line drawing of a cylindrical object with a labeled dimension 'C' (no text or symbols beyond the label)
text_image
DCÁU TẠO SẢN PHẨM MÃU MÁY EWS202DX-DWM

text_image
A B
natural_image
Technical line drawing of a cylindrical mechanical part with a labeled dimension 'C' (no text or symbols beyond the label)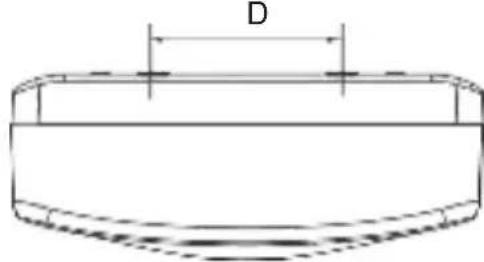
text_image
DCÂU TẠO SẢN PHẨM MÃU MÁY EWS202DX-DWE
| EWS202DX-DWM | EWS202DX-DWE | |
| A | 750 | 750 |
| B | 271 | 271 |
| C | 293 | 293 |
| D | 300 | 300 |
SO ĐỒ MẠCH ĐIỆN MÃU MÁY EWS202DX-DWM

flowchart
graph TD
    A["Layout L"] --> B["Dây nâu"]
    C["Layout E"] --> D["Dây sêgouth q"]
    E["Layout N"] --> F["Dây sêgouth dông"]
    B --> G["PCB"]
    D --> G
    F --> G
    G --> H["Mãy biến áp"]
    G --> I["Bộ phận cảm biến nhiệt độ"]
    J["Đèn chỉ báo"] --> K["Màn hình LED"]
    K --> G
    style A fill:#f9f,stroke:#333
    style C fill:#f9f,stroke:#333
    style E fill:#f9f,stroke:#333
    style J fill:#ccf,stroke:#333
    style K fill:#cfc,stroke:#333
    style G fill:#fcc,stroke:#333
    style H fill:#ffc,stroke:#333
    style I fill:#ffc,stroke:#333
SƠ ĐỒ MẠCH ĐIỆN MÃU MÁY EWS202DX-DWE
3. LÂP ĐẠT THIẾT BỊ
text_image
300mm 10mm Hinh 2text_image
MÃU MÁY EWS202DX-DWM ② 50 60 70 40 THÁP LOW HIGH Cao OFF
CHÚ Ý
natural_image
Pure technical line drawing of a mechanical component with mounting flanges and a central pin (no text or symbols)(Hình.7)

CẢNH BÁO
Menara Utara 2nd Floor,
Suite 201, I. HR Rasuna Said
kav C 11-14, Karet Setiabudi
Corporate Office Address: Unit T2-7,7th Floor, Tower2,
aya33 Hyperoffice, No.3, alan Semangat, Seksyen 13,
46100 Petaling aya, Selangor
Office Tell: (+60 3) 7843 5999
Office Fax: (+60 3) 79555511
Consumer Care Center Address: Lot C6, No. 28,
alan 15/22, Taman Perindustrain Tiong Nam,
40200 Shah Alam, Selangor
Consumer Care Center Fax: (+60 3) 5524 2521
Philippines
Consumer Care Center Toll Free: 1-900-10-845-CARE 2273
Consumer Care Hotline: (+63 2) 845 CARE 2273
10th Floor, W5th Avenue Building
5th Avenue Corner 32nd Street
Bonifacio Global City,
Taguig Philippines 1634
Trunkline: +63 2 737-4757
Vietnam
Consumer Care Toll Free: 1800-58-88-99
Tel: (+84 8) 3910 5465
Floore 9th, A&B Tower
76 Le Lai street – Ben Thanh Ward –
District 1
Ho Chi Minh City, Vietnam
Office Tel: (+84 8) 3910 5465
Office Fax: (+84 8) 3910 5470
Hongkong
Tel: (+85 2) 8203 0298
Dah Chong Hong, Ltd – Service Centre
8/F., Yee Lim Godown Block C
2-28 Kwai Lok Street, Kwai Chung, N,T.
text_image
45°C 45° Hzwww.home-comfort.ru
www.electrolux.ru
www.home-comfort.in.ua
www.electrolux.ua
www.home-comfort.vn
www.electrolux.vn