NERO VOX - Speaker OSD Audio - Free user manual and instructions
Find the device manual for free NERO VOX OSD Audio in PDF.

User questions about NERO VOX OSD Audio
0 question about this device. Answer the ones you know or ask your own.
Ask a new question about this device
Download the instructions for your Speaker in PDF format for free! Find your manual NERO VOX - OSD Audio and take your electronic device back in hand. On this page are published all the documents necessary for the use of your device. NERO VOX by OSD Audio.
USER MANUAL NERO VOX OSD Audio
natural_image
Circular device with four buttons and a plus/minus symbol, no visible text or labelsUSERS GUIDE
OVERVIEW FEATURES
The NERO VOX was designed for the Amazon Echo Dot 3rd Generation. CAT-5 cable and a 16-2 AWG power cable are used to connect the NERO VOX to the Wall Plate. Extend these common wire standards to mount the NERO VOX and Wall Plate in opposite sides of the room if desired, up to 300ft, or a remote location like an equipment rack.
The NERO VOX wall plate is designed to match the look of standard electrical outlets. Ideal placement of the Wall Plate is next to an electrical outlet for easy access for the power plug. The wall plate has a audio input, subwoofer/pre output, and power plug. The audio input provides a second audio source to the NERO VOX. The subwoofer output provides a convenient location to connect any powered subwoofer to add more bass.
Note: Any second audio source must have a variable audio output.
4-OHM – Connect any pair of 4 Ohm speakers OR any two pairs of 8 Ohm speakers.
8-OHM – Connect any pair of 8 Ohm speakers.
Note: NERO VOX will automatically go into Overload Protection if the incorrect impedance is used or too many speakers are connected to the unit. Maxing out the Gain Control may also trip protection mode. If overload protection occurs check the gain and/or impedance to resume normal amp function.
• Voice Command Built-In
• Multi-Room Capable
• Hi Efficient Digital Amplifier 20 Watts
- 4 ohm stable
• Overload Protection
- Provides Power for ECHO DOT Gen3
- Sub Output Dual RCA (Right/Left)
• 3.5mm Aux Input (TV, Smartphone)
• Power Connection for Ext Power Supply
• Wall Plate Connects fits standard J box
• NERO VOX to Wall Plate extendable 300'
- Includes 1,5m Cat5 2-way Audio Cable
- Includes 1.5m Power Connecting Cable
• 18V DC External Power Supply
- Paintable Snap-On Square Trim Cover
SPECS & DIMENSIONS
• AC Input Multi-Voltage 100-240VAC
- DC Input: 18V/2A
• Signal Voltage: 500mV
• Power Output: 40W peak 20 Watts RMS
- DC Output 12V/2A
- Dimensions:
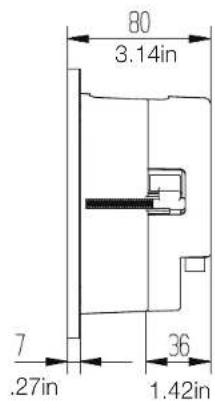
Trim Plate: 5.9" x 5.9" x .27"
Trim Plate hole: 3.6"
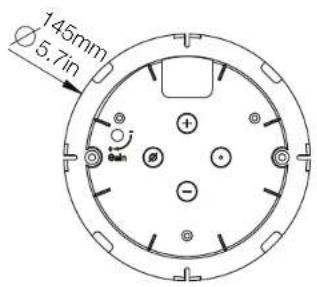
VOX Flange Diameter: 5.9"
VOX Cutout Hole: 4.84"
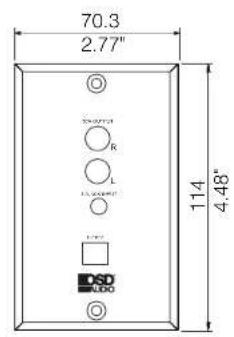
Wall Plate: 2.77" x 4.48"
WP Connector Depth: 2.05"

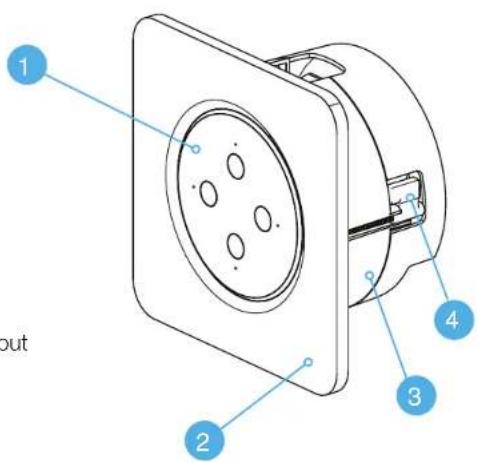
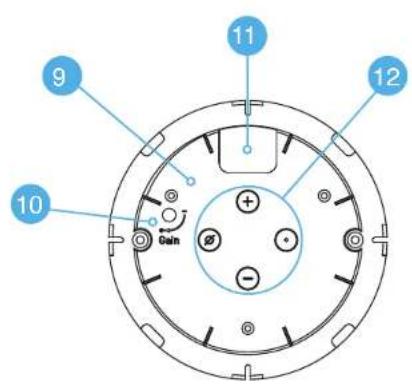
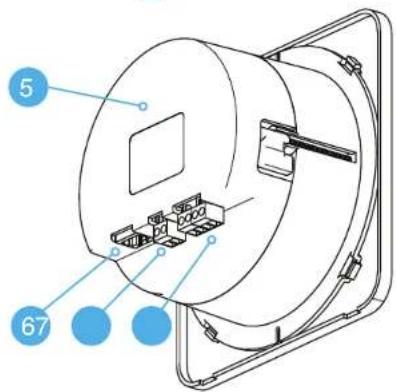
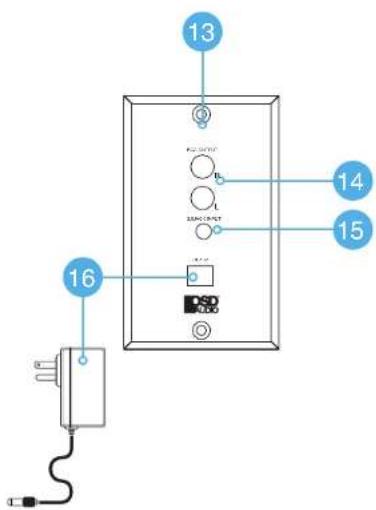
NERO VOX CALL OUTS
- ECHO Dot 3rd Gen/ sold separately
- Wall Plate Cover (white)
- Docking Station Enclosure
- Mounting Brackets; Dog Ears
- In-Wall Amplifier Enclosure
- 1.5M CAT5 RJ45 Input Plug Audio Input/Sub Output
- Power Connector & 1.5M Power Cable (+/-)
- Speaker Output Connectors
- ECHO DOT 3rd Gen Docking Holder
- Internal AMP Gain Control Knob, set and forget
- Power and Audio Connector Cable opening
- Unit docks in one way, match the buttons
- Audio Input/Output and Power Wall Plate
- Subwoofer Audio Output (R/L Female RCA)
- Aux 3.5mm Audio Input connector
- Power Input Connector and External 18V/2A Power Supply
SYSTEM DIAGRAM
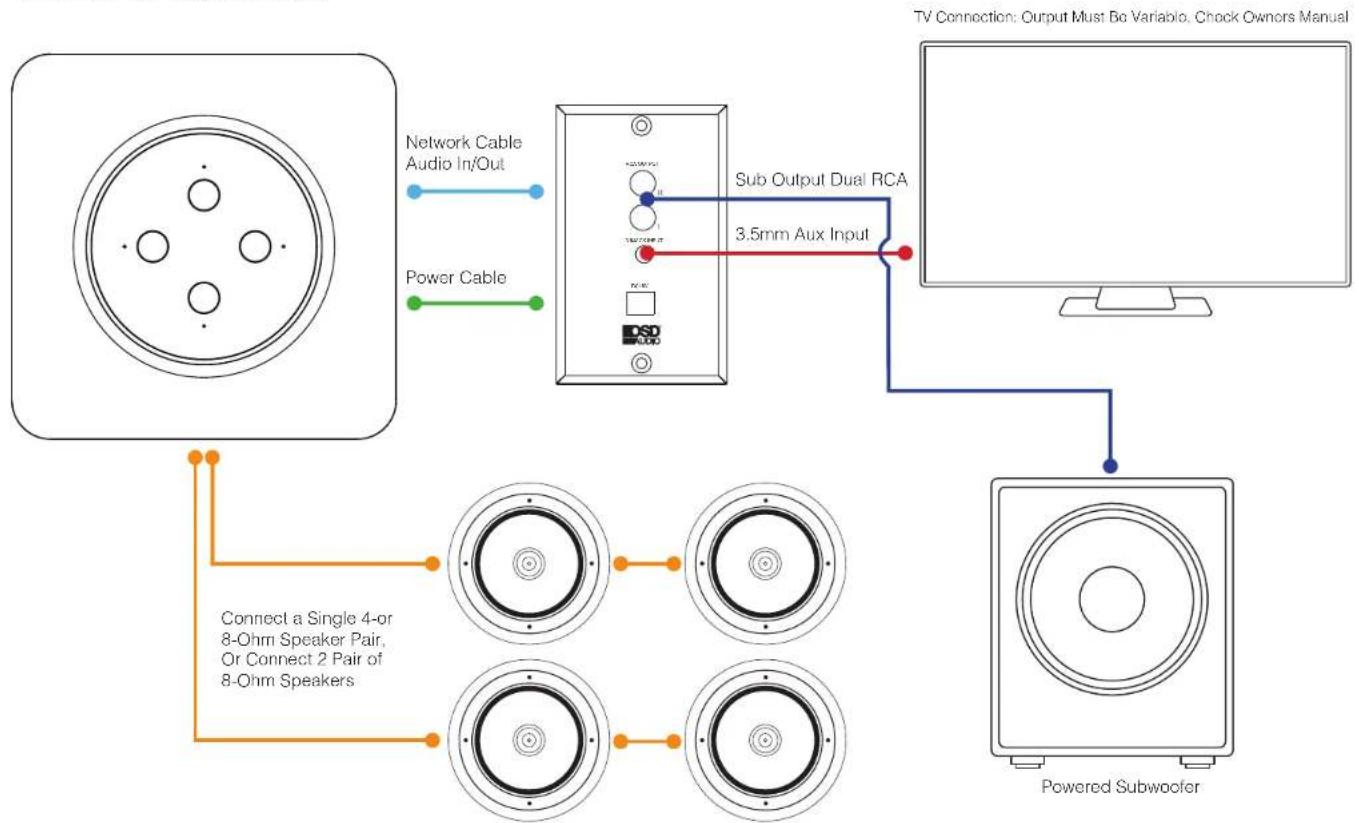
flowchart
graph TD
    A["TV Connection"] --> B["Sub Output Dual RCA"]
    B --> C["3.5mm Aux Input"]
    C --> D["Powered Subwoofer"]
    A --> E["Network Cable Audio In/Out"]
    A --> F["Power Cable"]
    G["Connect a Single 4-or 8-Ohm Speaker Pair, Or Connect 2 Pair of 8-Ohm Speakers"] --> H["Concentric circles"]
    G --> I["Concentric circles"]
    G --> J["Concentric circles"]
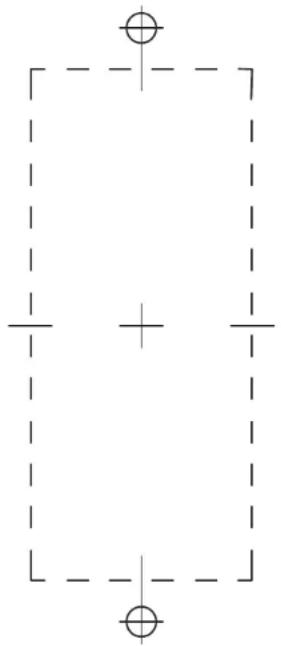
WALL PLATE INSTALLATION WALL PLATE TEMPLATE
- Choose a location for the wall plate, preferably near an electrical outlet.
- Use the provided cut-out template to align and cut opening. If you are not sure of potential obstruction behind the mounting area, start by cutting a smaller hole first, this will make drywall repair much easier if necessary.
- If there is no obstruction behind the mounting area, finish cutting the hole to the correct size.
- Feed CAT-5 cable and 16 AWG power cable through hole and connect to the back of the wall plate.
- Secure wall plate to surface or low voltage single gang box or bracket using the provided screws.
- Connect any local audio source with an RCA cable.
- Connect any powered subwoofer using a subwoofer cable.
- Connect provided 18v power supply to electrical outlet.
natural_image
Pure geometric diagram with dashed lines and cross marks, no text or symbols presentAMP INSTALLATION
- Prior to installation of the NERO VOX Amp, it is necessary to run speaker cable to the amplifier location.
- Use the provided cut-out template to align and cut opening. If you are not sure of potential obstruction behind the mounting area, start by cutting a smaller hole first, this will make drywall repair much easier if necessary.
- If there is no obstruction behind the mounting area, finish cutting the hole to the correct size.
- Connect the speaker cables to the removable speaker output phoenix connector with correct polarity to the speakers, + to + and - to -.
- Connect the CAT-5 cable and 16 AWG power cable to the back of NERO VOX and feed through the wall opening to Wall Plate location.
- Insert NERO VOX into wall opening with power plug and 3.5mm plugs for Echo Dot on the top of the amplifier and tighten the mounting screws on the front of the amplifier.
OPTION: Power Supply – When replacing in-wall volume controls with the NERO VOX, we recommend converting the speaker cable from the amplifier into power cables for the VOX power supply.
ECHO DOT INSTALLATION
- Connect the Power Plug to the back of the Amazon Echo Dot 3 ^RD Generation.
- Connect the 3.5mm audio plug to the audio output on the back of the Amazon Echo Dot.
Note: Do not forcibly pull on the power plug or 3.5mm cables, this can damage the NERO VOX - Insert Echo Dot at a slight angle with connectors on top in first, then gently push on the bottom to fully mount Echo Dot.
- Make sure Echo Dot buttons are level to the wall or surface.
- You may need to adjust the two NERO VOX mounting screws to ensure that the NERO VOX is also level.
- Clip on the trim plate with the four clip points located on the top, bottom, left, and right side of the NERO VOX.
Note: Do not use unnecessary force or pressure at the clip points. This may damage the amplifier, wall surface, or both.
WARRANTY
All OSD AUDIO electronics have (2) year Limited Warranty against defects in materials and workmanship. Proof of purchase must accompany all claims. During the warranty period OSD AUDIO will replace any defective part and correct any defect in workmanship without charge for either parts or labor.
OSD AUDIO may replace returned electronics with a product of equal value and performance. In such cases, some modifications to the mounting may be necessary and are not OSD AUDIO's responsibility.
Damage to or destruction of components due to application of excessive power voids the warranty on those parts. In these cases, repairs will be made on the basis of the retail value of the parts and labor. To return for repairs, you must email customer service at RMA@audiogeargroup.com for a Returned Merchandise Authorization (RMA) number then the unit must be shipped to OSD AUDIO at the owner's expense, along with a note explaining the nature of service required. Be sure to pack the product(s) in a corrugated container with at least 3 inches of resilient material to protect the unit from damage in transit.
This Warranty Does Not Cover: Damage caused by abuse, accident, misuse, negligence, or improper operation (installation). Any products that have been altered or modified. Any product whose identifying number of decal, serial #, etc. has been altered, defaced or removed. Normal wear and maintenance.