MW6337DT - Mp3 player GPX - Free user manual and instructions
Find the device manual for free MW6337DT GPX in PDF.

User questions about MW6337DT GPX
0 question about this device. Answer the ones you know or ask your own.
Ask a new question about this device
Download the instructions for your Mp3 player in PDF format for free! Find your manual MW6337DT - GPX and take your electronic device back in hand. On this page are published all the documents necessary for the use of your device. MW6337DT by GPX.
USER MANUAL MW6337DT GPX
MP3 Player MW6337DT INSTRUCTION MANUAL
text_image
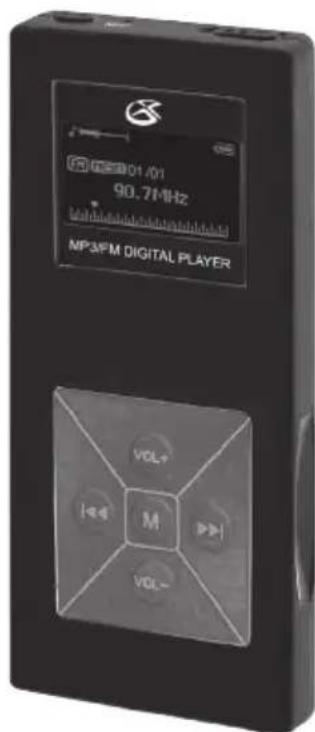
01/01 90.7MHz MP3FM DIGITAL PLAYER VCL+ M VCL-TO PREVENT FIRE OR SHOCK HAZARDS, DO NOT EXPOSE THIS UNIT TO RAIN OR MOISTURE.

This symbol, located on back or bottom of the unit, is intended to alert the user to the presence of uninsulated “dangerous voltage” within the product’s enclosure that may be of sufficient magnitude to constitute a risk of electric shock to persons.

This symbol, located on back or bottom of the unit, is intended to alert the user to the presence of important operating and maintenance (servicing) instructions in the literature accompanying the appliance.
CAUTION: TO PREVENT ELECTRIC SHOCK, MATCH WIDE BLADE OF PLUG TO WIDE SLOT, FULLY INSERT.
To reduce the risk of electric shock, do not remove cover (or back). There are no user-service-able parts inside. Please refer any servicing to qualified service personnel.
WARNING: Changes or modifications to this unit not expressly approved by the party responsible for compliance could void the user's authority to operate the equipment.
NOTE: This equipment has been tested and found to comply with the limits for a Class B digital device, pursuant to Part 15 of the FCC Rules. These limits are designed to provide reasonable protection against harmful interference in a residential installation. This equipment generates, uses, and can radiate radio frequency energy and, if not installed and used in accordance with the instructions, may cause harmful interference to radio communications. However, there is no guarantee that interference will not occur in a particular installation. If this equipment does cause harmful interference to radio or television reception, which can be determined by turning the equipment off and on, the user is encouraged to try to correct the interference by one or more of the following measures:
- Reorient or relocate the receiving antenna.
- Increase the separation between the equipment and receiver.
- Connect the equipment into an outlet on a circuit different from that to which the receiver is connected.
- Consult the dealer or an experienced radio/TV technician for help.
Features
text_image
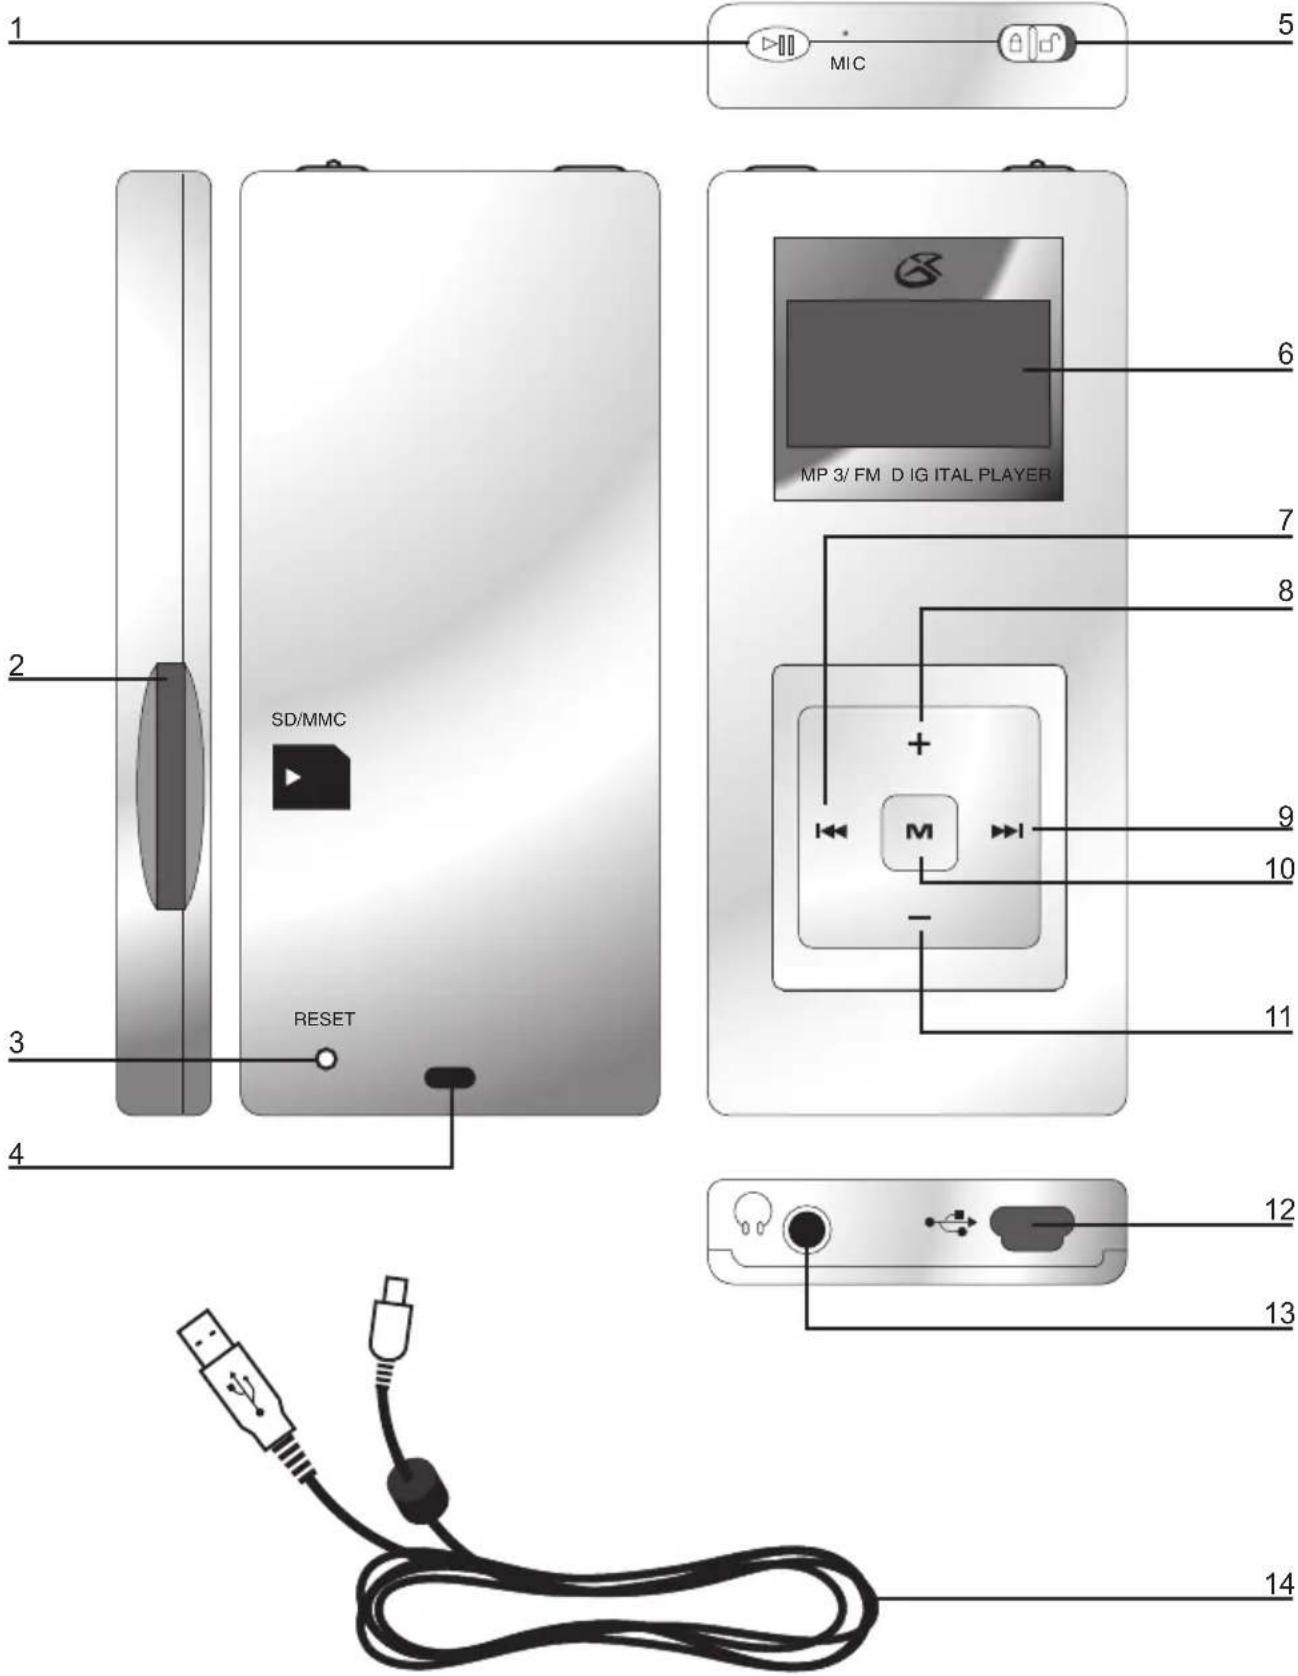
1 MIC 5 2 SD/MMC 6 MP 3/ FM D I G ITAL PLAYER 7 8 + - M 9 10 - 11 3 4 RESET 12 13 14Features Defined
| 1 | PLAY/PAUSE Press the PLAY/PAUSE button to play or pause the MP3 Player, or hold the PLAY/ PAUSE button to turn the MP3 Player off and on. |
| 2 | SD/MMC Expansion Slot Use this slot to connect SD/MMC expansion cards to add additional memory. |
| 3 | Reset Press the Reset button to re-configure the MP3 player to the default factory settings. Use a paperclip to push the recessed reset button. This will not erase the data you have stored on the MP3 player. |
| 4 | Laniard Connection Connect a laniard to the Laniard Connection to wear the MP3 Player around your neck. (laniard not included) |
| 5 | Lock/UnLock Use the Lock/UnLock toggle switch to lock or unlock the buttons on the MP3 Player. |
| 6 | OLED Display View the track, track time, and song information on the 2 color Organic Light Emitting Diode (OLED). |
| 7 | PREV/SEARCH Press the PREV/SEARCH button to skip to the previous track. Press and hold the PREV/SEARCH button to search backwards through a song |
| 8 | Volume (+) Press the (+) button to increase the volume. |
| 9 | NEXT/SEARCH Press the NEXT/SEARCH button to skip to the next track. Press and hold the NEXT/SEARCH button to search forward through a song. |
| 10 | M (Menu/Mode) Press the M button to select songs and menu options, and to switch between USB and MTP mode. |
| 11 | Volume (-) Press the (-) button to decrease the volume. |
| 12 | Mini-USB Port Use the Mini-USB Port to connect the MP3 Player to a computer via the included USB Cord. |
| 13 | Headphone Jack Use the Headphone Jacks to plug in a set of headphones. |
| 14 | USB Cord Use the USB Cord to connect the MP3 Player to a computer. |
The Main Menu
1 Play Music Click on Play Music to access your MP3 and WMA music.
2 FM Tuner Click on FM Tuner to access the built-in FM radio. From here you can press the NEXT/SEARCH and PREV/SEARCH buttons to scan through radio stations. Press the PLAY/PAUSE button to access your station presets.
3 Voice Click on Voice to access your recorded audio files.
4 Setting Click on Setting to adjust the Play Mode, Contrast, Backlight, Powerset, and Language.
5 Folder Click on Folder to view your saved or imported files in folder organization.
6 Record Click on Record to record audio from the microphone. After recording you can access your saved audio files from the Voice or Folder sections.
7 Storage Click on Storage to select between internal storage and SD/MMC storage.
8 About Click on About to see the date, total MB (megabytes) of memory, total MB of free space, and the firmware's version number.
9 Exit Click on exit to go back to the Play Music section.
The FM Menu
1 Play Music Click on Play Music to access your MP3 and WMA music.
2 Voice Click on Voice to access your saved audio files.
3 Save Station When on a station you want to save click on Save Station, select the preset number you want that station set to, and press the "M" button.
4 Delete Station Click on Delete Station to cycle through the saved radio station and delete them.
5 Record Click on Record to record audio from the FM station currently playing. After recording you can access your saved audio files from the Voice or Folder sections.
6 Auto Scan Click on the Auto Scan feature to start a scan through all the FM frequencies.
7 Exit Click on exit to go back to the FM Tuner section.
System Requirements
- Microsoft® Windows® 98SE, ME, 2000 Professional, XP Home/Professional Edition
- USB Driver compatible with Microsoft® Windows® ME, 2000 Professional, and XP. Multi-CPU or Multi-Boot environments are not supported.
Customers with Windows 98/98SE computer need to go to our website, www.gpx.com, to download the appropriate drivers for the MP3 Player.
Connecting to a Computer
- Turn on the MP3 Player by holding the PLAY/PAUSE button.
- Take the USB Cord and plug the corresponding ends of the USB Cord into the MP3 Player and a Computer.
- When connected the OLED Display will either say "USB" or "MTP".
- Press the "M" button to switch between "USB" and "MTP" mode.
“MTP” mode allows you to sync up with Windows® Media Player. “MTP” mode will only work, when your player is connected to Microsoft® Windows® XP and Windows® Media Player 10.
“USB” mode will allow you to use your MP3 Player as a removable storage device.
Using Windows® Media Player 9
- Start Windows Media Player 9 and connect the MP3 Player to your computer.
- Click "Copy to CD or Device".
- In the drop-down list, on the “Items to Copy” pane, click the play list, category, or other item that you want to copy.
- Clear the check boxes next to any files you do not want to copy.
- In the drop-down list, on the “Items to Copy” pane, click the device that you want to copy files to.
- Click the 'Copy' button.
- Repeat steps 2-5 for any other items that you want to copy to your unit.
Using Windows® Media Player 10
- Start Windows Media Player 10 and connect the unit to your computer. On your player's display it should say 'MTP'. If not, then while the unit is connected press the 'M' button to change from 'USB' to 'MTP' mode.
- If you have not set up synchronization between your computer and this device, the Device Setup Wizard starts. In the Device Setup Wizard, select Manual.
- Click Finish.
- Select Library option. On the right pane select Sync List.
- From the left pane you can select the Play list or Library and you will see the content songs in the center pane.
- Select the songs from the center pane, drag and add them to the Sync List.
- Click the 'Start Sync' button in the Sync List pane.
- Repeat steps 4-7 for any other items that you want to copy to your unit.

natural_image
Abstract geometric logo design with stylized 'S' and arrow-like elements (no text or symbols)Service Information
Address 2116 Carr Street, St. Louis MO, 63106
Phone 1-314-621-2881
Fax 1-314-588-1805
Email prodinfo@gpx.com
Website www.gpx.com
To download this Instruction Manual in English, Spanish, or French visit the Support section at www.gpx.com.