Kickall - Synthesizer Befaco - Free user manual and instructions
Find the device manual for free Kickall Befaco in PDF.

User questions about Kickall Befaco
0 question about this device. Answer the ones you know or ask your own.
Ask a new question about this device
Download the instructions for your Synthesizer in PDF format for free! Find your manual Kickall - Befaco and take your electronic device back in hand. On this page are published all the documents necessary for the use of your device. Kickall by Befaco.
USER MANUAL Kickall Befaco
-
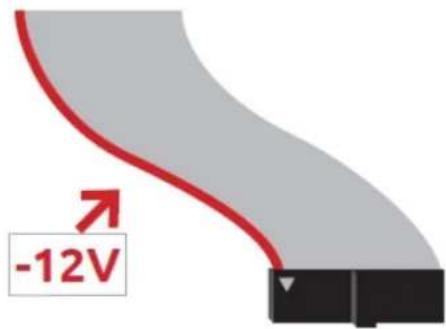
Disconnect your cabinet from the mains.
-
Triple check the power cord polarity. The coloured line on the cable (pin number one) is the -12V rail.
-
If you plug the module backwards you might burn it out and unfortunately this is not covered by the warranty.
-
If you have any questions about this product please send them to: befacosynth@gmail.com
text_image
-12VINTRODUCTION
KICKALL
Kickall is an analog bassdrum module capable of generate a vast palette of kick sounds as well as others like percussions or basslines. The module can also track with precise V/Oct scalling via its Tune input allowing you to fit your kicks in the mix perfectly.
MODULE REFERENCE
PANEL OVERVIEW

text_image
KICKALL ① ② ③ ④ TURG OUT ⑤ ⑥ ⑦ TIME ⑧ BEND ⑨ ⑪ ⑫ TUNE SHAPE DECAY 03FACO- Volume Input
Voltage Control Input of the internal VCA. Range: +/-10V.
- Trigg Input
This input trigs the internal VCA Envelope. Input threshold: 3,5V
- Out
Main Output of the module.
- Tune
This knob controls the tune of the sound around the first two octaves.
- Trigg Button
Manual trigger for the internal VCA envelope.
- Shape
This control morphs the signal waveform from sine to square
- Time
Manual control for the Pitch Envelope decay time
- Bend
This knob acts as attenuator for the Pitch Envelope.
- Decay
Manual control for the VCA Envelope decay time.
- Tune Input
Voltage Control Input for Oscillator tune. It tracks on V/Oct standard up to ten octaves.
- Shape Input
Voltage Control Input of Shape parameter. Range: +/- 10V.
- Decay Input
Voltage Control Input of Decay parameter. Range: +/- 10V.
MODULE REFERENCE | KICKALL SIGNAL PATH EXPLANATION

flowchart
graph LR
    A["OSCILLATOR"] --> B["WAVE SHAPER"]
    B --> C["VOLUME CONTROL 1"]
    C --> D["VOLUME CONTROL 2"]
    D --> E["OUT"]
    F["PITCH ENVELOPE"] --> G["TRIGGER"]
    G --> H["VOL ENVELOPE"]
    H --> I["DECAY"]
    I --> J["TIME"]
    J --> K["BEND"]
    K --> L["PITCH ENVELOPE"]
SIGNAL PATH
Kickall's signal path is based on the classical bass drum patch that we've been using for years.
On signal path, this patch starts with a sinewave oscillator that pass across a Sine to Square VC Waveshaper and two VCA's. In control path we have two envelope circuits to modulate oscillator's pitch and first VCA.
Both envelopes are fired by a trigger circuit that can be activated manually or via the dedicated trigger input.
Kickall implements a high precision Tune section formed by a dedicated pot and CV input. With the Tune pot, you can adjust precisely the tuning of the sound around aprox. two octaves, being the first note, with the pot counterclockwise A0 and the last note, with the pot fully clockwise B2.
Through its Tune input, Kickall is capable to track eight octaves with high accuracy. This input works under V/Oct standard so you just need to plug your favourite sequencer or CV source to create sequences and patterns out of the Kick range.
The Pitch dedicated envelope has two parameters: Time and Bend. Time controls the decay of the envelope, allowing you to adjust the amount of time that the envelope will be open. On the other hand, Bend sets the amplitude of this envelope, limiting the range of pitch that will be modulated by the envelope. Both controls are exclusively manual.
Just playing with those two parameters we can drastically change the character of our sound from deep sub-basses to even snappy percusions.
The Volume envelope adjusts the opening of the first VCA. Unlike Pitch envelope, it only have control over the Decay but it's both manual and CV controlled.
At the end of the path we have a second VCA with dedicated CV input. Feeding this input with different CV signals (or even audio) we can make a basic AM operation expanding the sonic range of the module.
This input is normalled so when no CV is present we will have full volume of the signal.
MODULE REFERENCE CALIBRATION PROCEDURE
A factory assembled module is shipped tuned to 1V/oct. However, sometimes you may want to make your own calibration.
The tuning procedure is an iteration of successive approximations. We will try in each iteration to get closer to a perfect tune. Just follow the next steps and your Kickall will be ready to go in a few minutes.
1 - Turn the knobs to the following position: TUNE: Center
BEND and TIME: Minimum (counterclockwise)
DECAY: Maximum (slider upper position)
SHAPE: Maximum (fully clockwise)
2 - Feed the TRIG input with a very fast trigger signal (a square signal from an oscillator can work too)
3 - Plug a V/Oct signal from a well calibrated CV source like a sequencer or a keyboard into the TUNE input and connect the OUT of the module to a tuner.
Note: if you don't have a hardware tuner you can connect the module to your audio interface and use a software tuner as well.
4 - Send a voltage of OV from your CV source and check the tuner, adjusts the TUNE knob till your tuner shows C1 note. Be patience on this step, on the low frequency range is a bit harder to be precise.
5 - Send a voltage of 4V from your CV source and check the tuner, adjusts the ZZZ trimmer located on the upper part of the module (the little blue one) with a small flat screw driver till your tuner shows you a C5 note.
6 - Now send again a OV voltage and check the tuner. You will notice that it is not showing you the C1 note that we adjust before but we are closer than the first time. Let's repeat steps 4 and 5 till we get C1 and C5 in both.
Once this is done, send other notes from the CV source and check the tuner, to make sure the whole range is tracking. If not, repeat steps 4 and 5 again till you get it.
MISCELANEA | SPECS & CREDITS
* Size: 6HP
* Depth: 20mm
* +12v: 30mA
* -12v: 30mA
* Design: Jaume Olivé & Befaco