
AHDC-1.0 - Camera BLAUPUNKT - Free user manual and instructions
Find the device manual for free AHDC-1.0 BLAUPUNKT in PDF.


| Product Type | Front and Reverse AHD Camera |
| Brand | Blaupunkt |
| Model | AHDC-1.0 |
| Imaging Sensor | CMOS |
| TV System | PAL |
| Effective Pixels | 1280 (H) x 720 (V) |
| Image Resolution | 750TVL |
| Frame Rate | 25 fps |
| Electronic Shutter | 1/60 ~ 1/100000 sec |
| Exposure & Gain Control | Yes |
| Auto White Balance | Yes |
| Min. Illumination | 0.1 Lux/F |
| Horizontal View Angle | 120° |
| Vertical View Angle | 100° |
| Diagonal View Angle | 150° |
| Voltage | DC12V |
| Current | 160mA - 180mA |
| Operating Voltage Range | DC9 - 16V |
| Operating Temperature | -20 ~ +70 °C |
| Storage Temperature | -30 ~ +75 °C |
| Protection Grade | IP68 |
| Lens | 4 glasses |
| Connection | RCA / 4 PIN DIN |
| Safety Notes | Read manual before use; avoid high-pressure water; do not disassemble |
| Maintenance | Remove protective film before use; clean lens gently |
| Spare Parts Availability | Contact authorized Blaupunkt dealer |
Frequently Asked Questions - AHDC-1.0 BLAUPUNKT
User questions about AHDC-1.0 BLAUPUNKT
0 question about this device. Answer the ones you know or ask your own.
Ask a new question about this device
Download the instructions for your Camera in PDF format for free! Find your manual AHDC-1.0 - BLAUPUNKT and take your electronic device back in hand. On this page are published all the documents necessary for the use of your device. AHDC-1.0 by BLAUPUNKT.
USER MANUAL AHDC-1.0 BLAUPUNKT
natural_image
Close-up of a black camera lens with a white lens and coiled cable, shown against a plain white background (no text or symbols visible)Enjoy it.
CAUTIONS
Safety Notes
This vehicle security system has been manufactured according to established safety guidelines. However, dangers may still occur if the safety notes in this manual is not observed. This manual is intended to familiarize the user with the reverse camera important functions. Read this carefully, prior to using the reverse camera. Keep this manual in an easily accessible location. In addition, do observe the instructions of the devices used in conjunction with this reverse camera.
Attentions
- Assign a mounting location that will not obstruct driver in any circumstances. Or cause injuries to drives and passengers in case of emergency brake or accidents.
- Ensure all wires are connected properly, and that the unit is functioning well before fitting the unit into the mount.
- Any unauthorized installation, disassembly or modification may cause malfunction to the unit and void warranty of the unit.
• Always use only the parts that are included with the units only. - Do not damage vehicle components when drilling holes for the mount.
- Vehicle may differ from the description provided here. Consult an authorized Blaupunkt dealer or vehicle's manufacturer if the information provided here does not fit your specific installation requirement.
-
This unit is applicable for front and reverse AHD camera use. Consult an authorized Blaupunkt dealer during installation.
-
Unit does not record video.
- Avoid automatic car wash or high-pressure water to prevent water and pressure from damaging the camera or causing it to fall off.
- Do not install this unit near heater outlet.
This manual may be updated from time to time without any notice.
Disclaimer
In no event shall Blaupunkt be liable for any direct, indirect, punitive, incidental, special consequential damages to property or life and whatsoever arising out of or connected with the use or misuse of our products. USA & CANADA: This product is not intended for sale in the United States and Canada. If purchased in the U.S. or Canada, this product is purchased on as-is basis. No warranty, whether expressed or implied is provided in the U.S. or Canada.
SPECIFICATIONS
| Features | AHDC-1.0 |
| CMOS Image Sensor | √ |
| PAL TV System | √ |
| Effective Pixels | 1280 (H) x 720 (V) |
| 750TVL Image Resolution | √ |
| 25 Frame Per Second | √ |
| Exposure & Gain Control | √ |
| 1/60~1/100000sec Electronic Shutter | √ |
| Auto White Balance | √ |
| Illumination Min. | 0.1 Lux/F |
| Horizontal View | 120°H |
| Vertical View | 100°V |
| Diagonal View | 150°D |
| DC12V Voltage | √ |
| Current | 160mA-180mA |
| DC9-16V Operating Voltage Range | √ |
| Operating Temperature | -20~+70 °C |
| Storage Temperature | -30~+75°C |
| Protection Grade | IP68 |
| RCA/4 PIN DIN | √ |
| Lens | 4 glasses |
INSTALLATION DIAGRAM
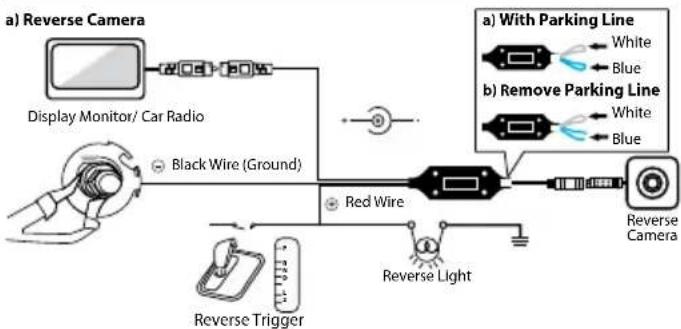
flowchart
graph LR
    A["Display Monitor/ Car Radio"] --> B["Black Wire (Ground)"]
    B --> C["Red Wire"]
    C --> D["Reverse Light"]
    D --> E["Reverse Trigger"]
    F["a) White Parking Line"] --> G["Blue"]
    H["b) Remove Parking Line"] --> I["White"]
    J["Reverse Camera"] --> K["Blue"]
Ground the wire through the exterior body of the vehicle and keep connection intact.
b) Front Camera
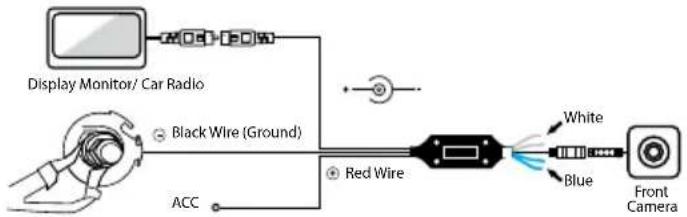
flowchart
graph LR
    A["Display Monitor/ Car Radio"] --> B["Black Wire (Ground)"]
    B --> C["Red Wire"]
    C --> D["Front Camera"]
    D --> E["White"]
    D --> F["Blue"]
    C --> G["ACC"]
Ground the wire through the exterior body of the vehicle and keep connection intact.
INSTALLATION LOCATION

Attention
- Remove protective film from camera lens before use.
• Take extra precautions when setting up the connection near petrol tank and wires. - Connect Red Wire ⊕ with reverse light.
INSTALLATION LOCATION

flowchart
graph TD
    A["E3TYPE 1"] --> B["Tail Light"]
    B --> C["1 Remove one side of the reverse light socket from its housing then remove the bulb from its socket."]
    C --> D["2 Connect the reverse light power cable to the camera, screwn the housing & camera back into position with a screwdriver."]
    E["TYPE 2TY"] --> F["Hatch Handle"]
    F --> G["1 Use a screwdriver to remove the original hatch handle"]
    G --> H["2 Mount the camera where the original hatch handle used to be."]
    I["After Installation"] --> J["Car Plate"]
    J --> K["1 Remove the rotating mount before installation. Drill an access hole for the camera cables."]
    K --> L["2 Mount the camera onto the access hole & secure it in position with 3M tape/ screws."]
    M["Adjust Viewing Angle"] --> N["Image: car with camera icon"]
Remarks :
- Pictures are for illustration purpose only, see actual vehicle for accurate installation location.
- Ensure diameter of hole size is correct before drilling.
- Ensure drilling process does not harm the component of the vehicle.
- Assign mounting location that will not obstruct camera view.
FRONT / REVERSE CAMERA INSTALLATION
FRONT/ REAR VIEW DISPLAY & PARKING LINE
Reverse Camera Wiring (Remove Parking Line)

natural_image
Two identical video frames showing a snowy road with directional arrows, one pointing to the road (no text or symbols visible)
Reverse Camera
Do not cut the wires when using as reverse camera.

Reverse Camera
Cut blue wire when using as reverse camera to remove parking line.
Front Camera Wiring (Flip Viewing Display & Remove Parking Line)
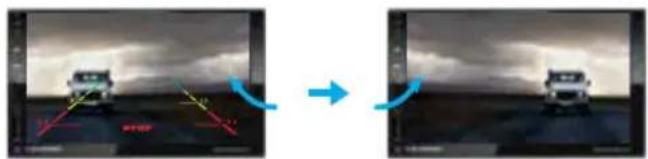
natural_image
Two identical video frames showing a truck on a cloudy sky, with red and green arrows indicating motion direction (no text or symbols)
Reverse Camera
Do not cut the wire when using as reverse camera.

Front Camera
Cut white & blue wires when using as front camera to flip viewing display & remove parking line.
TROUBLESHOOTING
If any of the following problem occur, please resort to Troubleshooting for the possible solutions. Consult Blaupunkt authorized dealer if problem persist.
| Problem | Solution |
| Display monitor / car radio does not show reverse view when reversing. |  Restart the display monitor / car radio. Restart the display monitor / car radio. |
| Reverse view does not show even after restarting the display monitor/ car radio. | Examine if the power supplies of the reverse light or the rear car plate light is properly connected. |
| Reverse view does not show even though power supplies of the reverse light or the rear car plate light is properly connected. | Examine if the power supply cables of the reverse light or the rear car plate light is damaged. Repair/replace if the cables are damaged. |
Restart the display monitor / car radio.
Examine if the power supplies of the reverse light or the rear car plate light is properly connected.
Examine if the power supply cables of the reverse light or the rear car plate light is damaged. Repair/replace if the cables are damaged.




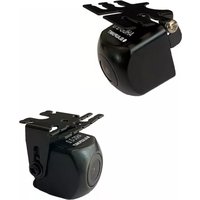

Brand : BLAUPUNKT
Model : AHDC-1.0
Category : Camera