AMP-BT2SIC61SVC - Loudspeaker OWI - Free user manual and instructions
Find the device manual for free AMP-BT2SIC61SVC OWI in PDF.

| Product Type | In-ceiling self-powered speaker/amplifier with Bluetooth |
| Model | AMP-BT2SIC61SVC |
| Speaker Diameter | 6.5 inches |
| Impedance | 8 ohms (non-amplified speaker) |
| Frequency Response | 50 Hz to 15 kHz (amplifier); 65 Hz to 20 kHz (non-amplified speaker) |
| Power Output | 2 x 20 watts (40 watts total) into 8 ohms |
| Bluetooth Version | Certified SIG Bluetooth 3.0, supports A2DP, AVRCP, HFP/HSP, SPP |
| Audio Inputs | Line In (balanced Phoenix), Jack Line In (3.5mm stereo), Priority Input (25V/70V/100V/1V) |
| Audio Output | Balanced Line Out (0 dB) |
| Power Supply | 15 VDC, 3.5 A, UL Listed, Level 5 (Energy Star); input 100-240 VAC, 50-60 Hz |
| Standby Power Consumption | 1.5 watts DC |
| Sleep Mode Power (Energy Star) | Less than 1 watt |
| Weight (Amplified Speaker Assembly) | 3.15 lbs |
| Height (Amplified Speaker Assembly) | 4.5 inches |
| Non-Amplified Speaker Weight (IC6) | 2.5 lbs |
| Non-Amplified Speaker Dimensions (IC6) | 8.93 inches (diameter) x 3.45 inches (height) |
| Cutout Size (IC6) | 7.68 inches diameter |
| Warranty | 1 year limited |
Frequently Asked Questions - AMP-BT2SIC61SVC OWI
User questions about AMP-BT2SIC61SVC OWI
0 question about this device. Answer the ones you know or ask your own.
Ask a new question about this device
Download the instructions for your Loudspeaker in PDF format for free! Find your manual AMP-BT2SIC61SVC - OWI and take your electronic device back in hand. On this page are published all the documents necessary for the use of your device. AMP-BT2SIC61SVC by OWI.
USER MANUAL AMP-BT2SIC61SVC OWI
Speaker Combination Models
AMP-BT2SIC51 / AMP-BT2SIC52 / AMP-BT2SIC54
AMP-BT2SIC51SVC / AMP-BT2SIC52SVC / AMP-BT2SIC54SVC
AMP-BT2SIC61 / AMP-BT2SIC62 / AMP-BT2SIC64
AMP-BT2SIC61SVC / AMP-BT2SIC62SVC / AMP-BT2SIC64SVC
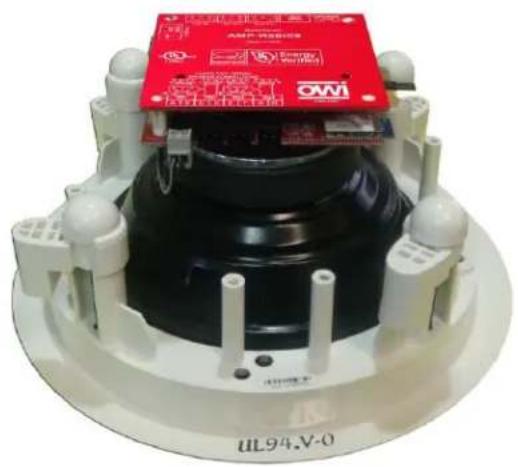
natural_image
Close-up of a white electronic device with black components and a red top labeled 'AMP PROGRESS' (no readable text beyond branding)
OWI Incorporated
Established 1978
OWI Incorporated
17141 Kingsview Ave. Carson CA 90746-1207 USA
Tel. 310-515-1900 Fax 310-515-1606
info@owi-inc.com
www.owi-inc.com
Technical Support 310-515-1900
OWI User Manual: Model AMP-BT2SIC5 / AMP-BT2SIC6 Speaker Amplifier Model AMP-BT2SIC5 / AMP-BT2SIC6 Speaker Amplifier
PROPRIETARY NOTICE
The OWI Inc. product information and design disclosed herein were originated by and are the property of OWI Inc. OWI Inc. reserves all patent, proprietary design, manufacturing, reproduction, use and sales rights thereto, and to any article disclosed therein, except to the extent right(s) are expressly granted to others.
COPYRIGHT NOTICE
This manual is Copyright 2014 by OWI Inc. All rights reserved. Reproduction in whole or in part without written prior permission from OWI, Inc. is prohibited.
UNPACKING AND INSPECTION NOTICE
Immediately upon receipt of the equipment, inspect the shipping container and the contents carefully for any discrepancies or damage. Should there be any, notify the freight company and OWI, Inc. or the dealer where purchased at once.
LIMITED WARRANTY
- This product has been thoroughly tested and inspected at the factory. It is warranted for one year from the date of purchase. IT IS THE OWNERS' RESPONSIBILITY TO ESTABLISH THE DATE OF PURCHASE BY ACCEPTABLE EVIDENCE AT TIME SERVICE IS SOUGHT.
- Any unit, which in the judgment of OWI INC, is defective or develops defects under normal use will be replaced or repaired without cost within the warranty period.
- This warranty will be considered void if the unit is dropped, misused, abused and altered in any manner, overdriven with excess amplification exceeding manufacturer's specification, improperly serviced or accidentally damaged.
- OWI Inc. shall have no liability whatsoever for consequential damages. The sole responsibility at the discretion of OWI Inc. under this warranty shall be limited to the repair of the product or replacement thereof. Any and all implied warranties including the implied warranty of merchantability are limited to the duration of this express limited warranty.
OWI, Inc. is NOT liable for incidental or consequential damages of any kind.
- IMPORTANT: This warranty is void unless the attached card is completed and mailed to OWI Inc. within 10 days following the date of purchase. Units must be sent to OWI Inc. or to the dealer where purchased.
RETURN SHIPPING INSTRUCTIONS, Obtain a RETURN AUTHORIZATION from:
OWI Inc., 17141 Kingsview Ave, Carson, CA 90746.
Phone (310) 515-1900, Fax (310) 515-1606
FCC Notice: This equipment has been tested and found to comply with the limits for a Class A digital device, pursuant to part 15 of the FCC Rules. These limits are designed to provide reasonable protection against harmful interference when the equipment is operated in a commercial environment. This equipment generates, uses, and can radiate radio frequency energy and, if not installed and used in accordance with the instruction manual, may cause harmful interference to radio communications. Operation of this equipment in a residential area is likely to cause harmful interference in which case the user will be required to correct the interference at his or own expense.
Modifications not expressly approved by the manufacturer could void the user's authority to be operated under FCC rules.
Table of Contents
| Description | Page |
| Proprietary, Copyright Notices | 2 |
| Unpacking and Inspection | 2 |
| Warranty Information | 2 |
| Return Shipping Instructions | 2 |
| Table of Contents | 3 |
| Important Safety Instructions | 4 - 5 |
| Introduction | 6 |
| Specifications | 7 - 8 |
| Illustration: Connection and Control | 9 |
| Chained Self Amplified Speakers Wiring | 10 |
| Bluetooth Operation | 11 |
| One, Two, Four Speaker Combination Wiring | 12 |
| Input Connectors Wiring | 13 |
| Volume Control Wiring Diagram | 14 |
| Installation | 15 - 18 |
| Warranty | 19 |
| Back Cover | 20 |
IMPORTANT SAFETY INSTRUCTIONS
CAUTION

RISK OF ELECTRIC SHOCK - DO NOT OPEN

NOTE: Installation is to be completed by a qualified electrical technician according to NEC/CEC code and applicable local codes.
CAUTION: The power supply is not to be used in air handling spaces.
CAUTION: To reduce the risk of electric shock: Do not remove the cover or back: No user-serviceable parts inside: refer servicing to qualified personnel.
The lighting flash with arrowhead within an equilateral triangle is intended to alert the user to the presence of uninsulated “dangerous voltage” within the product’s enclosure that may be of sufficient magnitude to constitute a risk of electric shock to persons.
The exclamation point within an equilateral triangle is intended to alert the user of the presence of important operating and maintenance (servicing) instructions in the literature accompanying the appliance.
The apparatus shall not be exposed to dripping or splashing and that no objects filled with liquids, such as vases, shall be placed on the apparatus.
IMPORTANT SAFETY INSTRUCTIONS
- Read these instructions. All the safety and operation instructions should be read before this OWI product is operated.
- Keep these instructions - The safety and operating instructions should be kept for future reference.
- Heed all warnings - All warnings on this product and in these operating instructions should be followed.
- Follow all instructions - All operating and other instructions should be followed.
- Do not use this apparatus near water - for example, near a bathtub, washbowl, kitchen sink, laundry tub, in a wet basement, near a swimming pool, or a swamp.
- Clean only with dry cloth.
- Do not block any ventilation openings. Install in accordance with the manufacturer's instructions. - This OWI product should be situated so that its location or position does not interfere with its proper ventilation. For example, the component should not be situated on a bed, sofa, rug, or similar surface that may block any ventilation openings, or placed in a built-in installation such as a bookcase or cabinet that may impede the flow of air through ventilation openings.
- Do not install the unit near any heat sources such as radiators, heat registers, stoves or other apparatus (including amplifiers) that produce heat.
OWI User Manual: Model AMP-BT2SIC5 / AMP-BT2SIC6 Speaker Amplifier
Model AMP-BT2SIC5 / AMP-BT2SIC6 Speaker Amplifier
-
Do not defeat the safety purpose of the polarized or grounding-type plug. A polarized plug has two blades with one wider than the other. A grounding type plug has two blades and a third grounding prong. The wider blade or the third prong is provided for your safety. If the provided plug does not fit into your outlet, consult an electrician for replacement of the obsolete outlet.
-
Protect the power cord from being walked on or pinched particularly at plugs, convenience receptacles, and the point where they exit the apparatus.
-
Only use attachment/accessories specified by the manufacturers.

Portable Cart Warning
-
Use only with the cart, stand, tripod, bracket or table specified by the manufacturer, or sold with the apparatus. When a cart is used, use caution when moving the cart/apparatus combination to avoid injury from tip-over.
-
Unplug this apparatus during lightning storms or when unused for long periods of time.
-
Refer all servicing to qualified service personnel. Servicing is required when the apparatus has been damaged in any way, such as power-supply cord or plug is damaged, liquid has been spilled or objects have fallen into the apparatus, the apparatus has been exposed to rain or moisture, does not operate normally, or has been dropped. The user should not attempt to service this OWI product beyond those means described in this operating manual. All other servicing should be referred to the OWI Service Department.
-
WARNING: To reduce the risk of fire or electric shock, do not expose this apparatus to rain or moisture.
-
To prevent electric shock, do not use this polarized plug with an extension cord, receptacle or other outlet unless the blades can fully be inserted to prevent blade exposure.
-
Exposure to extremely high noise levels may cause permanent hearing loss. Individuals vary considerably in susceptibility to noise-induced hearing loss, but nearly everyone will lose some hearing if exposed to sufficiently intense noise for a period of time. The U.S. Government's Occupational Safety and Health Administration (OSHA) has specified the permissible noise level exposures shown in the following chart. According to OSHA, any exposure in excess of these permissible limits could result in some hearing loss. To ensure against potentially dangerous exposure to high sound pressure levels, it is recommended that all persons exposed to equipment capable of producing high sound pressure levels use hearing protectors while the equipment is in operation. Ear plugs or protectors in the ear canals or over the ears must be worn when operating the equipment in order to prevent a permanent hearing loss if exposure is in excess of the limits set forth here.
-
OWI recommends that this apparatus be placed on a switched power outlet, one that switches both sides and has contact separation of at least 3 millimeters.
End of IMPORTANT SAFETY INSTRUCTIONS
OWI User Manual: Model AMP-BT2SIC5 / AMP-BT2SIC6 Speaker Amplifier Model AMP-BT2SIC5 / AMP-BT2SIC6 Speaker Amplifier
Introduction
The OWI AMP-BT2SIC5 / AMP-BT2SIC6 is a self powered speaker/amplifier. This unit can drive up to four speakers connected series parallel to have a net impedance of 8 ohms. With an included UL Listed, Level 5 (Energy Star), 15 volt, 3.5 ampere power supply, the amplifier can output 40 watts, or 10 watts per speaker in a four speaker hook-up.
Special features of the OWI Model AMP-BT2SIC5 / AMP-BT2SIC6 include:
Bluetooth Feature
Certified SIG Bluetooth Version 3.0, Frequency Range 2.40 – 2.48 MHz, Supports A2DP, AVRCP, HFP/HSP and SPP, Password Protected.
Energy Star Mode
If no audio is present on any input, the power consumption of the speaker amplifier is less than one (1) watt.
Two (2) audio inputs: Line In and Jack Line In
The LINE IN inputs accepts a balanced input via a Phoenix style screw terminal plug. The JACK LINE IN accepts unbalanced input via 3.5 mini jack. The mini jack accept stereo inputs. The stereo channels are summed together. This input is muted during Priority Override.
Priority Override Feature
The Priority input accepts balanced input levels of resistor selected 100 volts audio, 70 volts audio, 25 volts audio and 1 volt (approximately line level) audio. Audio on the Priority input suspends audio on the Line In and Jack Line In inputs and switches the speaker amplifier to pass the Priority audio. After the Priority audio stops, the unit waits before returning to the Line In and Jack Line In audio input.
Balanced Line Level Output
A nominal 0dB level, balanced output is available at LINE OUT. The source of this output is both balanced and Jack Line In sources.
Power Amplifier Features
The power amplifier outputs 2 times 20 watts or 40 watts total into 8 ohms and 15VDC power. The class D power amplifier has reduced radiated electromagnetic interference (EMI) due to a special feature of the power amplifier, operating in a patented spread spectrum. The power amplifier protects itself from over-temperature, over-current, over-voltage conditions. The power amplifier will shut itself down during these conditions.
IMPORTANT NOTE! This amplifier is intended for audio use only! Continuous sine wave drive into a load will cause the amplifier to shut itself down when it heats up.
OWI User Manual: Model AMP-BT2SIC5 / AMP-BT2SIC6 Speaker Amplifier
Model AMP-BT2SIC5 / AMP-BT2SIC6 Speaker Amplifier
SPECIFICATIONS (MODEL AMP-BT2SIC5 / AMP-BT2SIC6)
| BLUETOOTH SPECIFICATIONS |
| AMP-BT2SIC5 / AMP-BT2SIC6 |
| Certified SIG Bluetooth Version 3.0 |
| Frequency Range 2.40 – 2.48 MHz |
| Supports A2DP, AVRCP, HFP/HSP and SPP |
| Password Protected |
| ELECTRICAL AMPLIFIER | SPECIFICATIONS | |
| AMP-BT2SIC5 | AMP-BT2SIC6 | |
| Input voltage, nominal | (25 watts) 15 volts DC | (25 watts) 15 volts DC |
| Input current, operating (15VDC) | 1.667 amperes peak | 1.667 amperes peak |
| Input volt-amperes, peak (15VDC) | 25 volt-amperes | 25 volt-amperes |
| Input voltage, maximum | 16.5 volts, DC | 16.5 volts, DC |
| Frequency Response, | ||
| EQ set to flat | 50Hz to 15 kHz | 50Hz to 15 kHz |
| Bass | ±10dB@50Hz | ±10dB@50Hz |
| Treble | ±10dB@10kHz | ±10dB@10kHz |
| THD + Noise | <1% at 15 watts, “A” weighted | <1% at 15 watts, “A” weighted |
| S/N | >90 dB | >90 dB |
| Max Power Output (28V in) | 2 times 20 watts or a total of 40 watts | 2 times 20 watts or a total of 40 watts |
| DC Power, Standby | 1.5 watts | 1.5 watts |
| AC Power, Sleep Mode (Energy Star) | less than 1 watt | less than 1 watt |
| DC Power, | ||
| Short Circuit protected | Yes | Yes |
| Over current protected | Yes | Yes |
| Over voltage protected | Yes | Yes |
| Over temperature protected | Yes | Yes |
| Minimum Load Impedance | 4.0 Ω (Two 8 Ω Speakers in parallel) | 4.0 Ω (Two 8 Ω Speakers in parallel) |
| Minimum Input impedance, Priority in | 20,000 Ω | 20,000 Ω |
| Minimum Input impedance, Bal. Line in | 820 Ω | 820 Ω |
| Minimum Input impedance, mini-jack | 2300 Ω | 2300 Ω |
| Dynamic Mic input impedance | 300 Ω | 300 Ω |
| Warranty | 1 year | 1 year |
OWI User Manual: Model AMP-BT2SIC5 / AMP-BT2SIC6 Speaker Amplifier
Model AMP-BT2SIC5 / AMP-BT2SIC6 Speaker Amplifier
Mechanical "UL rating is dependent upon use of the Backcan and Tile Bridge"
| SPECIFICATIONS | ||
| AMP-BT2SIC5 | AMP-BT2SIC6 | |
| Speaker Diameter | 5.25 inches | 6.5 inches |
| Weight of Amplifier/Speaker Assembly | 2.55 pounds | 3.15 pounds |
| Height of Amplifier/Speaker Assembly | 4 inches | 4.5 inches |
| Backcan “Suitable for use in air handling spaces” | UL Listed Enclosure | UL Listed Enclosure |
| Tile Bridge “Suitable for use in air handling spaces” | UL Listed Support Truss | UL Listed Support Truss |
POWER SUPPLY
| PS15VDC35AL5 | SPECIFICATIONS |
| Input | 100 to 240 VAC, 50-60 Hz, 1.4ANote: Be sure to use the correct polarity on the power input. |
| Output | 15 VDC, 3.5 amperes |
| Wire gauge and length | Minimum 18 gauge up to 40 feet maximum length |
| Electrical, Power Supply | UL Listed,Level 5 (Energy Star) |
| Weight | 0.45 pounds |
| Size | 4.7”H x 2”W x 1.2”D |
CAUTION: The Power Supply is not to be used in air handling spaces.
*Note: Maximum power requires the replacement of the 15 volt supply with a 22 volt supply and Energy Star and UL approvals no longer apply.
Power Supply Wire Gauge and Length - Minimum 18 gauge up to 40 feet maximum length
| NON-AMPLIFIED SPEAKER | SPECIFICATIONS | |
| IC5 | IC6 | |
| DESCRIPTION: | 5.25", 2-way, coaxial | 6.5", 2-way, coaxial |
| IMPEDANCE: | 8 ohms | 8 ohms |
| SENSITIVITY (1W/1M): | 85dB | 86dB |
| DISPERSION: | 120 degrees | 120 degrees |
| MAX POWER (8 Ohms) | 40 watts | 50 watts |
| NOMINAL POWER (8 Ohms) | 20 watts | 25 watts |
| FREQUENCY RESPONSE: | 80Hz ~ 20 kHz | 65Hz ~ 20 kHz |
| WOOFER SIZE: | 5.25" | 6.5" |
| WOOFER MATERIAL: | Paper, PP coated | Paper, PP coated |
| TWEETER SIZE: | 0.5" | 0.5" |
| TWEETER MATERIAL: | PEI | PEI |
| GRILL MATERIAL: | Aluminum | Aluminum |
| OVERALL DIMENSIONS (Diameter X Height): Inches | 7.95*3.15 | 8.93*3.45 |
| CUT OUT SIZE (Diameter): Inches | 6.61 | 7.68 |
| WEIGHT: lbs. | 2.26 | 2.5 |
| MOUNTING HARDWARE: | Mounting Clamps | Mounting Clamps |
End of Specifications
OWI User Manual: Model AMP-BT2SIC5 / AMP-BT2SIC6 Speaker Amplifier Model AMP-BT2SIC5 / AMP-BT2SIC6 Speaker Amplifier
Illustration: Connection and Control

OWI User Manual: Model AMP-BT2SIC5 / AMP-BT2SIC6 Speaker Amplifier
Model AMP-BT2SIC5 / AMP-BT2SIC6 Speaker Amplifier
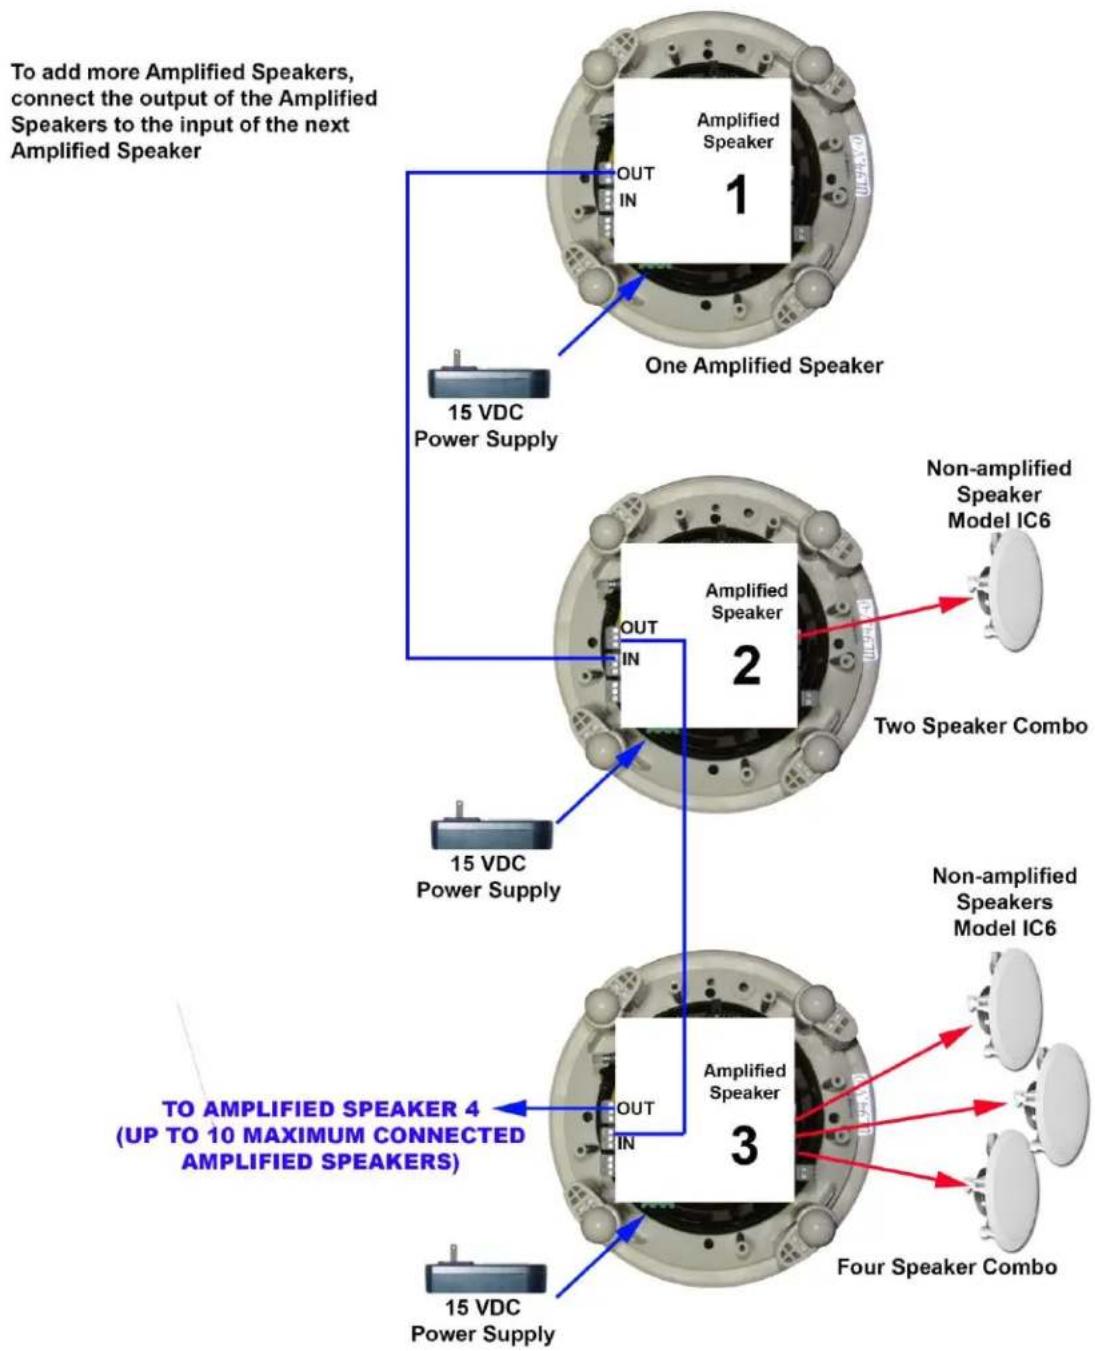
AMP-BT2SIC5 / AMP-BT2SIC6 TO ANOTHER AMP-BT2SIC5 / AMP-BT2SIC6 SPEAKER WIRING SINGLE LINE DIAGRAM
Chained Self Amplified Speakers Wiring
flowchart
graph TD
    A["To add more Amplified Speakers, connect the output of the Amplified Speakers to the input of the next Amplified Speaker"] --> B["One Amplified Speaker"]
    B --> C["15 VDC Power Supply"]
    B --> D["2"]
    D --> E["Two Speaker Combo"]
    D --> F["Non-amplified Speaker Model IC6"]
    D --> G["Four Speaker Combo"]
    D --> H["Amplified Speaker 3"]
    H --> I["TO AMPLIFIED SPEAKER 4 (UP TO 10 MAXIMUM CONNECTED AMPLIFIED SPEAKERS)"]
    H --> J["15 VDC Power Supply"]
OWI User Manual: Model AMP-BT2SIC5 / AMP-BT2SIC6 Speaker Amplifier
Model AMP-BT2SIC5 / AMP-BT2SIC6 Speaker Amplifier
BLUETOOTH OPERATION
Discovery
- When the speaker amp is first turned ON, the Red LED light will turn ON and the speaker amp should be discoverable by a Bluetooth enabled device such as a PC, tablet, iPhone or other smartphone.
- Open the device Bluetooth manager and review its list of discoverable Bluetooth devices. The speaker amp will appear as OWI-XXXX where XXXX is the last 4 digits of the speaker amp MAC address. Note: The speaker amp MAC address is identified on a label located on the speaker amp board.
Pairing
- Select the OWI-XXXX Bluetooth device from the list and the device will pair with the speaker amp. Note: If the speaker amp is password protected, you will be required to enter the correct PIN before the pairing process will begin. If the PIN has not been changed on the speaker amp, entering 1234 will begin the pairing process.
Operation
Once the speaker amp is paired with the device, audio from the device should pass through and be heard from the speaker(s) connected to the speaker amp.
Reset Bluetooth settings
It is possible to reset all Bluetooth settings including the Bluetooth PIN to the factory default values.
- Turn the power OFF to the speaker amp.
- Locate the 5pin header on the speaker amp board.
- Plug in the reset receptacle onto the header.
- Turn the power ON to the speaker amp.
- Wait 10secs
- View the newly generated PIN listed on your device 'PIN XXXX' where XXXX is the new PIN. Note: every time the reset receptacle is installed onto the 5pin header, a new PIN will be generated.
- Write down the PIN and keep in a safe place.
- Turn the power OFF to the speaker amp.
- Remove the reset receptacle from the 5pin header.
- All Bluetooth settings including the PIN have been reset to the factory settings.
OWI User Manual: Model AMP-BT2SIC5 / AMP-BT2SIC6 Speaker Amplifier
Model AMP-BT2SIC5 / AMP-BT2SIC6 Speaker Amplifier
One, Two, Four Speaker Combination Wiring
AMPLIFIED SPEAKER TO NON-AMPLIFIED SPEAKER HOOK UPS

ONE (1) SPEAKER HOOK UP
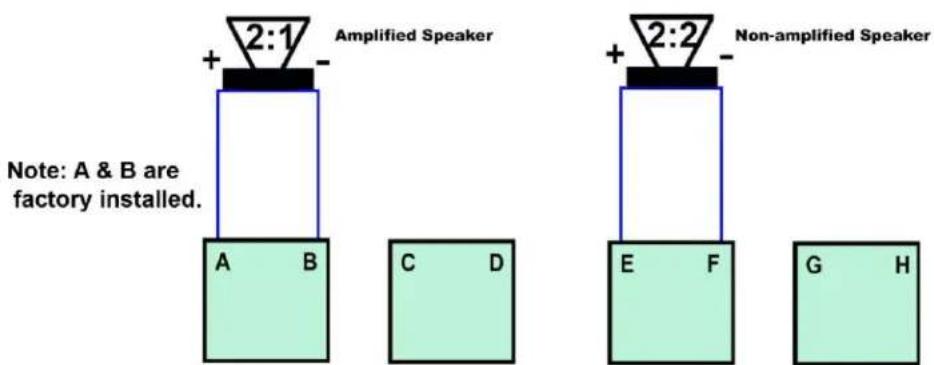
TWO (2) SPEAKER HOOK UP

flowchart
graph TD
    subgraph "Amplified Speaker"
        A["+ 4:1"] --> B["A"]
        C["-"] --> D["B"]
        E["4:2"] --> F["C"]
        G["4:3"] --> H["F"]
        I["4:4"] --> J["G"]
    end
    subgraph "Three Non-amplified Speakers"
        K["+ 4:3"] --> L["E"]
        M["-"] --> N["F"]
        O["4:4"] --> P["H"]
        Q["4:3"] --> R["G"]
    end
    style A fill:#d4edda,stroke:#333
    style C fill:#d4edda,stroke:#333
    style E fill:#d4edda,stroke:#333
    style G fill:#d4edda,stroke:#333
    style I fill:#d4edda,stroke:#333
    style M fill:#d4edda,stroke:#333
    style O fill:#d4edda,stroke:#333
    style Q fill:#d4edda,stroke:#333
FOUR (4) SPEAKER HOOK UP
OWI User Manual: Model AMP-BT2SIC5 / AMP-BT2SIC6 Speaker Amplifier
Model AMP-BT2SIC5 / AMP-BT2SIC6 Speaker Amplifier
INPUT CONNECTORS WIRING
Note: Jack Line In is the same as STEREO LINE IN, immediately below.

OWI User Manual: Model AMP-BT2SIC5 / AMP-BT2SIC6 Speaker Amplifier
Model AMP-BT2SIC5 / AMP-BT2SIC6 Speaker Amplifier
VOLUME CONTROL WIRING DIAGRAM

AMPSTVC
Two Channel
Two Stereo Combiners
Takes Stereo Converts to Mono
Transformer Balanced
Note: To avoid ground loops, use only plastic single gang boxes.
STEREO/MONO VOLUME CONTROL WIRING DIAGRAM
09/17/15
OWI User Manual: Model AMP-BT2SIC5 / AMP-BT2SIC6 Speaker Amplifier
Model AMP-BT2SIC5 / AMP-BT2SIC6 Speaker Amplifier
INSTALLATION
NOTE: Installation is to be completed by a qualified electrical technician according to NEC/CEC code and applicable local codes.
Installation Instructions for Speaker Combination Model AMP-BT2SIC5 / AMP-BT2SIC6
The AMP-BT2SIC5 / AMP-BT2SIC6 carton includes:
- One (1) each AMP-BT2SIC5 / AMP-BT2SIC6 (In-ceiling 2 Source Amplified Speaker)
- One (1) each UL Listed, Level 5 (Energy Star) Power Supply (electrical wire not included)
- Four (4) each Mounting screws
- One (1) each cardboard mounting template
- One (1) each User Manual
The AMP-BT2SIC5 / AMP-BT2SIC6 Combination carton includes items 1 to 5 above plus the following:
- UL Listed 8 ohms in-ceiling speaker model IC5 / IC6
- UL Listed Backcan Enclosure (See Pages 15 & 16)
- UL Listed Tile Bridge (See Pages 15 & 16)
*Note: Quantity of Ceiling speakers, tile bridge and backcan depends on the SKU of the AMP-BT2SIC5 / AMP-BT2SIC6 Combination Program.
Speaker Placement
Before installing your OWI speakers, consider the placement carefully, taking into effect the location of electrical, plumbing and other fixtures.
Placement in Ceiling
OWI speakers should be located above the primary listening area.
Mounting your OWI speakers
Determine the best area to mount your OWI speakers. It will be necessary to run your speaker wires to that location. This location must be free of obstructions, such as electrical conduits, HVAC ducts, or water lines.
Be sure the mounting surface is between 3/8 and 1 14 inches thick and that there is at least a 3 inch clearance behind the mounting surface (5 inch if using an OWI backcan). Make sure that no objects block the back of the speaker.
Remove the round cardboard disc from the template supplied and keep it for later use as a paint mask, if you decide to paint your speakers.
Use the template to mark the position for the mounting hole at the selected location. If you are not certain that no obstruction exists (electrical wiring, plumbing, etc.), you should start by cutting a small hole in the center of your penciled mounting hole with a drywall or keyhole saw, cutting at a 45 degree angle towards the inside of the hole. Cutting a small hole at this angle will make drywall repair much easier. Once you have determined there are no obstructions in your desired mounting location, start cutting the finished hole at a 90 degree angle to the ceiling surface.
Route the speaker wires from your amplifier to your opening. Avoid routing the speaker wire near electrical wires. If you have to run them parallel, make certain to space the speaker wires at least 2 feet from the AC line. Do not nail or staple the speaker wire.
Prepare Your OWI Speakers for Mounting
Insert a paper clip into one of the grille openings, then pull upwards to remove the grille.
Turn the mounting tab 90° and push toward the grill. The grill will safely pop off.
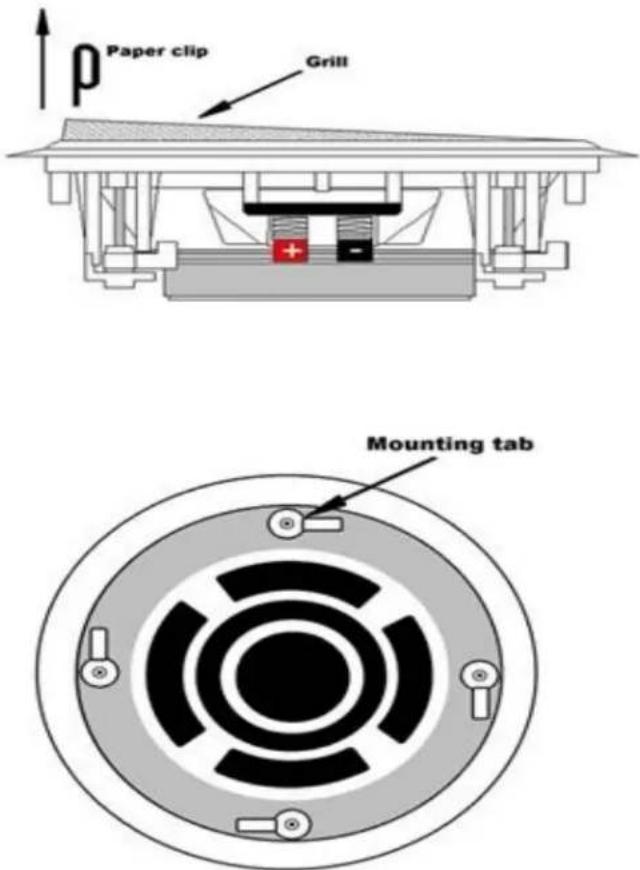
Be sure to position the four Mounting Tabs on your OWI speaker inward then insert the four (4) screws (supplied) from the front of the speaker into the screw opening.
OWI User Manual: Model AMP-BT2SIC5 / AMP-BT2SIC6 Speaker Amplifier
Model AMP-BT2SIC5 / AMP-BT2SIC6 Speaker Amplifier
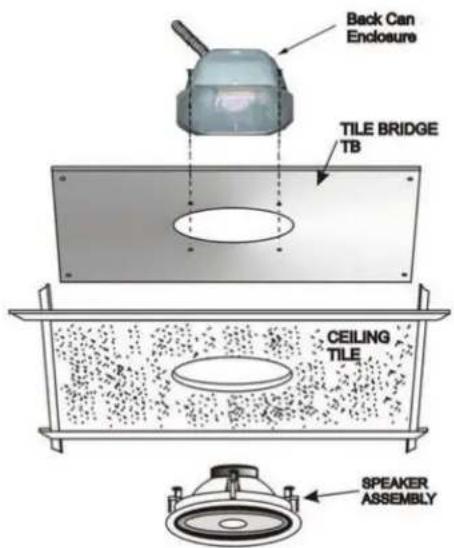
The Quick and Easy Way to Install the OWI TB (Tile Bridge) and the
Backcan Enclosure with a 6-1/2" or 5-1/4" OWI In-Ceiling Speaker.
- Position the enclosure over the speaker hole and align it with the screw holes in the tile bridge. Insert and tighten
4 screws through the enclosure into the holes on top of the tile bridge.

- Insert and tighten four screws to attach the tile bridge to the beam.

natural_image
Simple line drawing of a metallic enclosure or enclosure with a circular opening on the base (no text or symbols)- After hole is cut in the ceiling, connect the wires and install the speaker by tightening the screws of the four clamps.

natural_image
Illustration of a hand holding a circular object near a wall, with no visible text or symbols

OWI INCORPORATED 17141 Kingsview Avenue, Carson, CA 90746-1207 USA Tel: 310.515.1900 Fax: 310.515.1606 Email: info@owi-inc.com Website: www.owi-inc.com

The Quick and Easy Way to Install the OWI TB (Tile Bridge) and the Backcan Enclosure with a 6-1/2" or 5-1/4" OWI In-Ceiling Speaker.
The TB will work on a 2' X 4', 2' X 2' lay-in type ceilings.
| 1. Use one tile bridge (TB) as a template to make cut outs for all the ceiling tiles. |  | 5. Remove the template saw out the circle (hole). Set ceiling tile aside. |  |
| 2. To save time, cut 2 ceiling tiles at the same time.Lay the ceiling tile face to face. |  | 6. Place one ceiling tile face down on the floor or on top of a table. Position the TB tile bridge across the tile with the speaker holes coinciding with each other. |  |
| 3. After finding the center of the ceiling tile, position the tile bridge template across the tile. |  | 7. Position the enclosure over hole and align it with the screen in the tile bridge. Insert and tighten 4 screws through the enclosure into the holes on top of the tile bridge through the ceiling tile. |  |
| 4. Draw a circle using the speaker hole of the template (tile bridge). |  | 8. After connecting the speaker assembly through the hole and tighten the screws of the 4 clamps. The 4 clamps will hold the and the ceiling tile together | 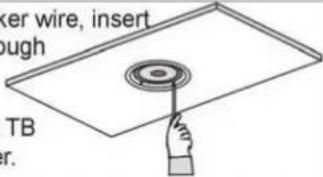 |
TEE BAR CEILING ASSEMBLY
OWI User Manual: Model AMP-BT2SIC5 / AMP-BT2SIC6 Speaker Amplifier
Model AMP-BT2SIC5 / AMP-BT2SIC6 Speaker Amplifier OWI SPEAKER SYSTEM LIMITED WARRANTY REGISTRATION
(Save this portion for your records)
- Your OWI Speaker System has been thoroughly tested and inspected at the factory.
It is warranted for 1 year from date of purchase.
IT IS THE OWNERS' RESPONSIBILITY TO ESTABLISH THE DATE OF PURCHASE BY ACCEPTABLE EVIDENCE AT TIME SERVICE IS SOUGHT.
- WHAT WE WILL PAY FOR AND WHAT YOU MUST PAY FOR:
OWI INC. will repair or replace unit(s) covered by this warranty, without charge to the consumer for labor or materials. YOU ARE RESPONSIBLE FOR ANY INSTALLATION OR REMOVAL CHARGES AND FOR ANY INITIAL SHIPPING CHARGES if the unit(s) must be shipped for warranty service. However, we will pay the return shipping charges to any destination within the U.S.A. if the repairs are covered by the warranty.
-
Any unit which in the judgment of OWI Inc. is defective or develops defects under normal use will be replaced or repaired without cost within the warranty period.
-
This warranty will be considered void if unit has been dropped, misused, abused, altered in any manner, overdriven with excessive amplification exceeding manufacturer's specification, improperly serviced or accidental damage.
-
OWI Inc. shall have no liability whatsoever for consequential damage. The sole responsibility and discretion of OWI Inc. under this warranty shall be limited to the repair of the product or replacement thereof.
-
IMPORTANT: This warranty is void unless the attached card is completed and mailed to OWI Inc. within 10 days following the date of purchase. Units must be sent to OWI Inc. or to the dealer where purchased.
OWI INCORPORATED
17141 Kingsview Ave
Carson, CA 90746-1207 USA
Date Purchased:
Model Number:
Serial Number:
The Ground Truth image displays a single, solid horizontal line. According to Rule 2 (UNDERSCORE & LINE RULES), if the GT contains lines used for stylistic emphasis or as background elements (like ruled paper), the OCR result must ignore them. The line in the GT is clearly a stylistic or background line, not a placeholder for text. Therefore, the OCR should not have output any underscores. Outputting `____` constitutes an error under Rule 2, as it hallucinates placeholder symbols where none are semantically intended. Hence, the OCR result is inconsistent with the Ground Truth.
The Ground Truth image displays a single, solid horizontal line. According to Rule 2 (UNDERSCORE & LINE RULES), if the GT contains lines used for stylistic emphasis or as background (like ruled paper), the OCR result must ignore them. The provided OCR content is "____", which consists of four underscores. This is incorrect because underscores are not equivalent to a solid line and are not permitted under the “Stylistic/Background Lines (Ignore)” rule. Outputting underscores for a stylistic line violates the rule and constitutes an error. Therefore, the OCR result is inconsistent with the Ground Truth.
(Keep this part for your record)
----CUT AND MAIL----

OWI INCORPORATED
17141 Kingsview Ave
Carson, CA 90746-1207 USA
LIMITED WARRANTY
Model Number:
Model Name:
Serial No.
Date of Purchase: Month: ____ Day ____ Year ____
Owner's Name:
Address:
City: ____ State ____ Zip
Dealer's Name: ____ City ____ State ____
Purchased from (please check one):
Video ____, Electronic ____, Mailorder ____, Mass Merchandiser ____, Installer ____
Others (please specify)
Remarks:
OWI User Manual: Model AMP-BT2SIC5 / AMP-BT2SIC6 Speaker Amplifier
Model AMP-BT2SIC5 / AMP-BT2SIC6 Speaker Amplifier

OWI Incorporated
Established 1978
OWI Incorporated
17141Kingsview Ave. Carson CA 90746-1207 USA
Tel. 310-515-1900 Fax 310-515-1606
www.owi-inc.com

- OWI User Manual: Model AMP-BT2SIC5 / AMP-BT2SIC6 Speaker Amplifier Model AMP-BT2SIC5 / AMP-BT2SIC6 Speaker Amplifier
- PROPRIETARY NOTICE
- COPYRIGHT NOTICE
- UNPACKING AND INSPECTION NOTICE
- LIMITED WARRANTY
- IMPORTANT SAFETY INSTRUCTIONS
- CAUTION
- RISK OF ELECTRIC SHOCK - DO NOT OPEN
- OWI User Manual: Model AMP-BT2SIC5 / AMP-BT2SIC6 Speaker Amplifier
- Model AMP-BT2SIC5 / AMP-BT2SIC6 Speaker Amplifier
- End of IMPORTANT SAFETY INSTRUCTIONS
- Introduction
- Bluetooth Feature
- Energy Star Mode
- Two (2) audio inputs: Line In and Jack Line In
- Priority Override Feature
- Balanced Line Level Output
- Power Amplifier Features
- SPECIFICATIONS (MODEL AMP-BT2SIC5 / AMP-BT2SIC6)
- CAUTION: The Power Supply is not to be used in air handling spaces.
- AMP-BT2SIC5 / AMP-BT2SIC6 TO ANOTHER AMP-BT2SIC5 / AMP-BT2SIC6 SPEAKER WIRING SINGLE LINE DIAGRAM
- BLUETOOTH OPERATION
- Discovery
- Pairing
- Operation
- Reset Bluetooth settings
- INPUT CONNECTORS WIRING
- VOLUME CONTROL WIRING DIAGRAM
- STEREO/MONO VOLUME CONTROL WIRING DIAGRAM
- INSTALLATION
- NOTE: Installation is to be completed by a qualified electrical technician according to NEC/CEC code and applicable local codes.
- Speaker Placement
- Placement in Ceiling
- Mounting your OWI speakers
- Prepare Your OWI Speakers for Mounting
- The Quick and Easy Way to Install the OWI TB (Tile Bridge) and the Backcan Enclosure with a 6-1/2" or 5-1/4" OWI In-Ceiling Speaker.
- Model AMP-BT2SIC5 / AMP-BT2SIC6 Speaker Amplifier OWI SPEAKER SYSTEM LIMITED WARRANTY REGISTRATION
- OWI INCORPORATED
- Kingsview Ave
- Carson, CA 90746-1207 USA
- Date Purchased:
- Model Number:
- Serial Number:
Brand : OWI
Model : AMP-BT2SIC61SVC
Category : Loudspeaker