E1-LED-Pico - Video projector FAVI - Free user manual and instructions
Find the device manual for free E1-LED-Pico FAVI in PDF.

User questions about E1-LED-Pico FAVI
0 question about this device. Answer the ones you know or ask your own.
Ask a new question about this device
Download the instructions for your Video projector in PDF format for free! Find your manual E1-LED-Pico - FAVI and take your electronic device back in hand. On this page are published all the documents necessary for the use of your device. E1-LED-Pico by FAVI.
USER MANUAL E1-LED-Pico FAVI
natural_image
Hand holding a black-and-white photo of a MFAV mobile phone with control buttons and speaker grille (no visible text or symbols on device body)E1-LED-Pico User Guide
Safety Precautions
Please avoid looking directly into the projector's lens while the unit is operating. Doing so could cause damage to your eyes.
Do not use this projector under direct sunlight.
Do not use this projector near sources of heat such as space heaters or fireplaces. This projector will automatically shut down if the internal temperature reaches 140^ F Lengthly exposure to high temperatures may damage your projector.
Do not allow liquids to come in contact with this projector. if the projector is exposed to liquids, the internal electronics may be damaged.
Please avoid dropping, hitting, or throwing this projector.
Please make sure the projector's batteries are installed properly. Improperly installed batteries may explode or leak.
To prevent possible damage to your projector from leaking batteries, please remove the batteries if you do not plan on using your projector for an extended period of time.
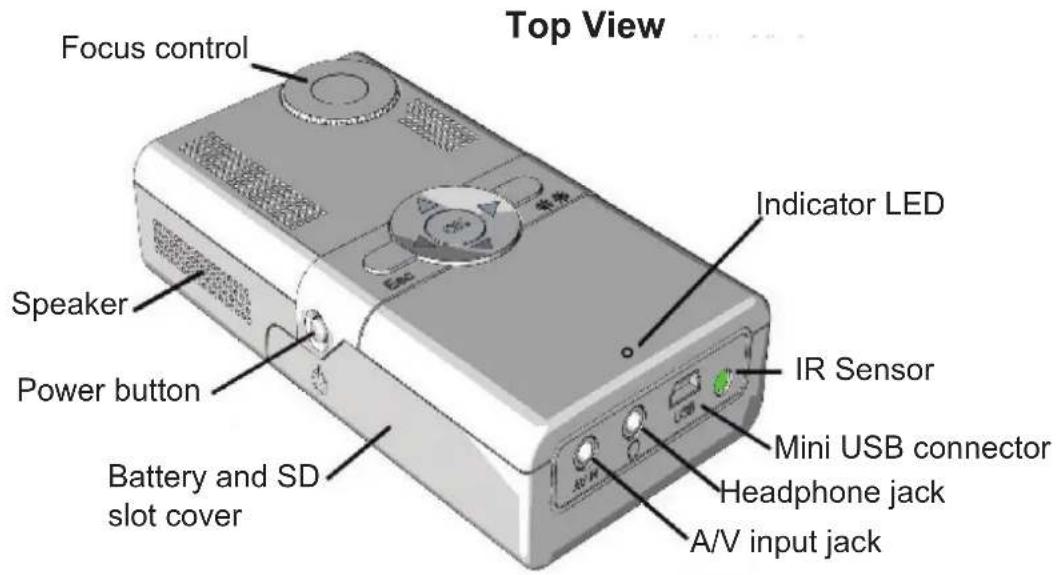
The Indicator LED
Your projector's indicator LED is designed to inform you of the status of your projector. When the Indicator LED is Green, the projector is operating normally. If the projector shuts down and the indicator LED starts flashing Green, the projector has automatically shut down due to overheating. If the LED begins to flash Red while the projector is operating, this means that the batteries are running low and need to be replaced.
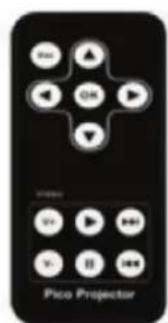
Remote control Overview
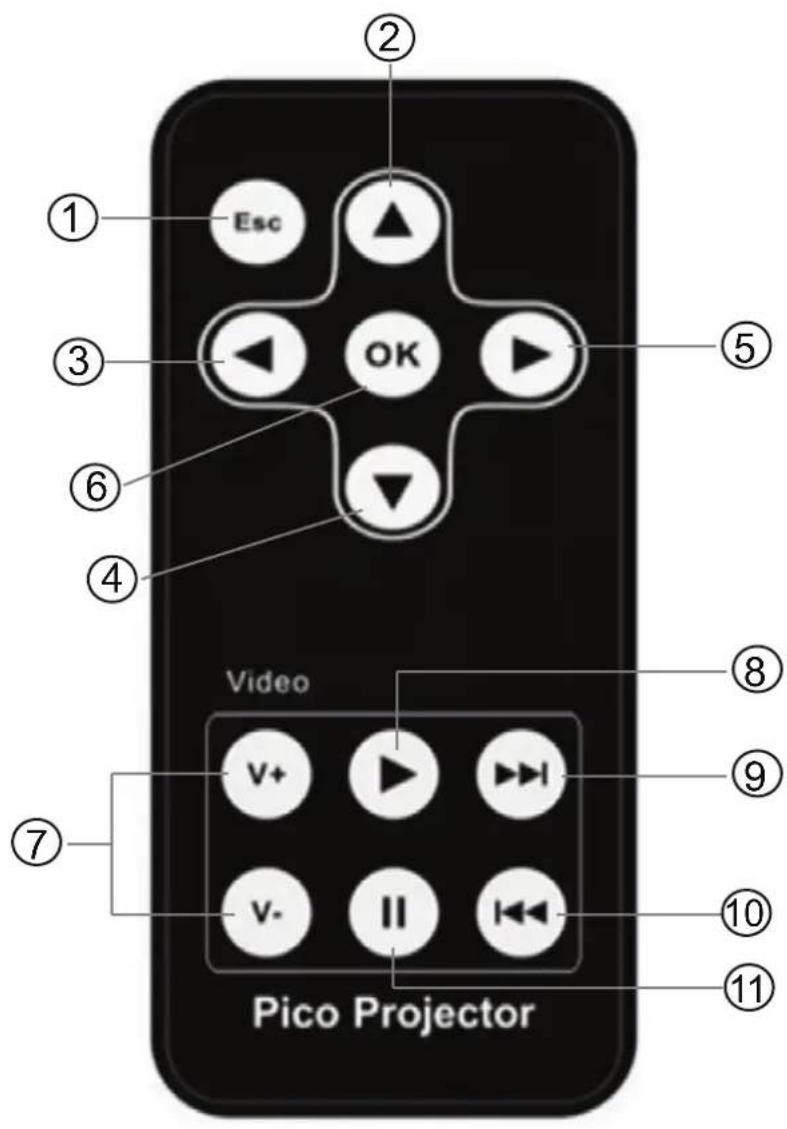
1: Escape button.
2: Up arrow button.
3: Left arrow button
4: Down arrow button
5: Right arrow button
6: OK button
7: Volume control buttons
8: Play button
9: Skip forward button
10: Skip backward button
11: Pause button
Buttons 7 through 11 are for playing videos only.
Your projector's remote control uses one 3 volt CR2025 button cell battery. To replace the battery, slide out the battery retainer located on the bottom of the remote control. Note the polarity of the old battery, and gently pull it out of the retainer. Insert a fresh battery, then replace the retainer.
Projector Overview

Getting Started
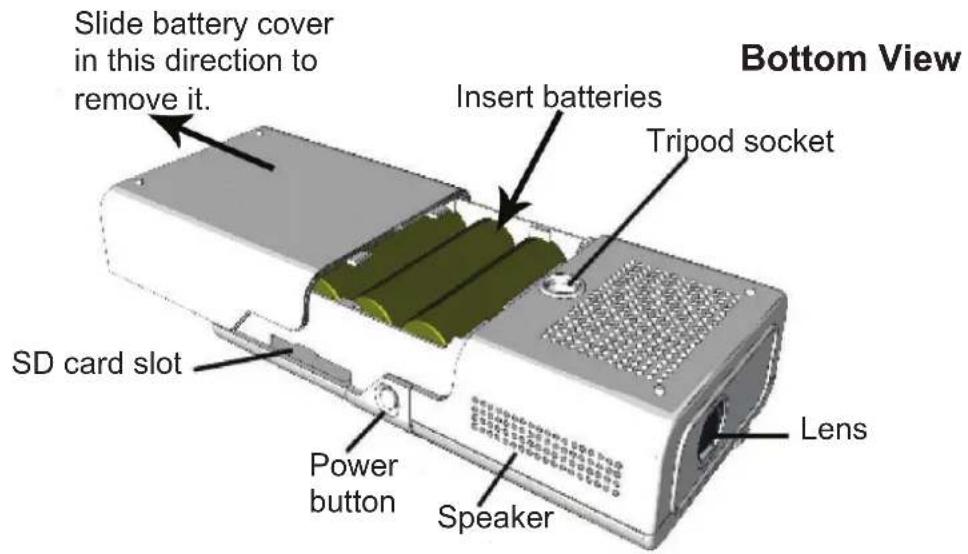
Installing the batteries
Grasp the sides of the battery cover and pull backwards to slide it off. Insert 4 AA batteries using the diagrams in the battery compartment to ensure correct polarity. Your projector can run for up to 6 hours on 4 standard AA alkaline batteries.
Your projector will also operate with rechargeable batteries. However it is not designed to recharge them.
Installing and removing an SD card.
The SD card slot is located behind the battery cover next to the power button. With the battery cover removed, you can insert or remove an SD card. With the projector right side up, insert the SD card label side down into the SD slot. Gently push it in until you hear it click into place.
To remove an SD card from your projector, press on it until you hear another click. The SD card should then eject, allowing you to remove it.
Setting up your Projector
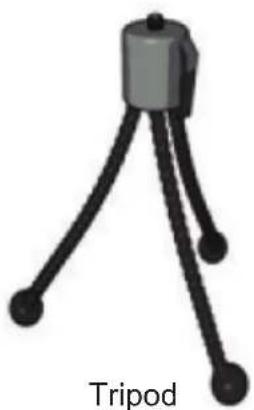
Attaching the tripod (optional)
Your projector comes with a tripod which can allow the projector to be set up and used on any stable surface. Attach the tripod by gently screwing it into the tripod socket located on the bottom of the projector. Gently bend the tripod's legs outward.
Powering on
Press and hold the power button on the projector for up to 5 seconds. After powering up, the projector will display a menu screen allowing you to select its internal memory, or an SD card if inserted.
Adjusting the focus
Rotate the focus wheel in either direction to adjust the focus. If you are unable to obtain perfect focus, you may need to relocate the projector.
Brightness level button
Press the Brightness level button to switch from normal brightness to high brightness. This will increase the projector's light output to maximum. It will also decrease battery life. If the projector is operating off of batteries, the normal brightness setting will be the default.
When the projector's batteries start to run low, the high brightness setting will no longer be available.
Projector Startup
When your projector powers up, you will see a source selection screen that will allow you to select between the internal memory, or an SD card (if inserted). If an SD card has not been inserted, only the internal memory will be selectable.
After selecting either the projector's internal memory or an SD card, you will be presented with the main menu screen where you can select between Photo, Video, and Setting. Use the navigation arrow buttons on either the remote control or the projector to select an option, or press the Esc key on either the remote or the projector to return to the source selection screen.
Viewing Photos
If supported image files are available on the source you have selected, you can view them by selecting the Photo option on the main menu screen. By default they will be shown as a slideshow. Press the Esc button on either the remote or the projector to exit the slideshow and enter Thumbnail mode. Pressing the Esc key again will move up one level in the directory tree if available. Continuing to press the Esc key will return you to the main menu. You can change how photos are displayed in the Settings menu.
Playing Videos
If supported video files are available on the source you have selected, you can view them by selecting the Video option on the main menu screen. Use the navigation arrow buttons on either the remote control or the projector to select the video that you want to play. Press the OK button to begin playing the video.
While the video is playing, you can pause it by pressing the Pause button on the remote control, or the OK button. Press the Play or OK button to resume playing the video. To reverse a video, press the left arrow button. To skip forward, press the right arrow button. To skip to the next video, press the Skip forward button on the remote control. To select the previous video, press the Skip backward button.
Your projector has been tested with video resolutions up to 720x480. Higher video resolutions are not supported and may not play on your projector.
Changing the Settings
From the main menu screen, select the Setting option. In the Settings menu you can change how your projector will operate.
Photo Setup
Here you can change how your projector will display photos.
Display Mode: You can choose between Slideshow mode, Thumbnail mode, or Browse mode. The default setting is Slideshow mode.
Display Ratio: You can choose between Fit to Screen, which will display photos in their correct aspect ratio, Full Screen, which will display all photos in the 4:3 aspect ratio, or Crop to Fill mode, which will crop the edges of a photo to fill the screen.
Slideshow duration: You can choose between 5 seconds, 10 seconds, 15 seconds, 30 seconds, 1 minute, 5 minutes, or 15 minutes. The default is 5 seconds.
Slideshow effect: Choices are Random, Snake, Partition, Erase, Blinds, Random lines, Grid, Cross, Spiral, Rect, Close, Paging, 3D flip, 3D exchange, Black In Out, Disappear, Push, Roll, 3D Rotate, Mosaic, Fade In Out, Sliding, and 3D Split.
Video Setup
This sub menu allows you to change how your projector will play videos.
Display mode: You can choose between original size and full screen. If you are playing videos with a resolution of 640x480 or higher, they will be shown in full screen regardless of this setting.
Play Mode: You can choose between Once, Repeat, and Random.
System Setup
This sub menu allows you to change the language settings, or reset all settings back to their defaults.
Language: Use the arrow keys to select between English, Chinese, Simplified Chinese, French, German, Italian, Spanish, and Hebrew.
Default Setting: Press the OK button. A confirmation menu will appear. Press the OK button again to change all settings back to their defaults.
Note that changing any of these settings affects how the projector will play files in both its internal memory and on an SD card.
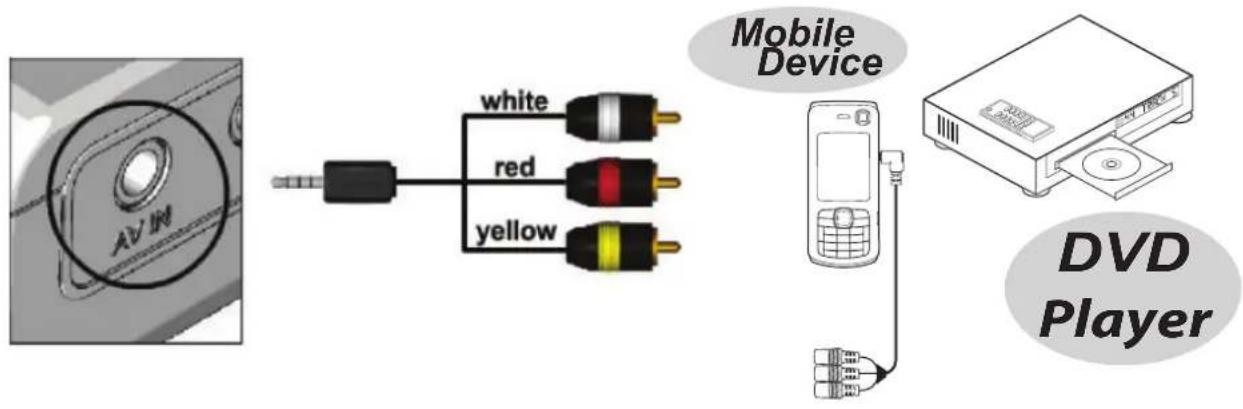
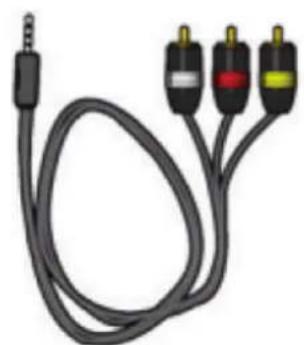
Using your Projector with Composite video devices
Your projector comes with an A/V cable that can allow it to be connected to any device that outputs Composite video, such as a mobile device, DVD player, video game console, or PC with TV out capability. First connect the color coded plugs on the A/V cable to the Composite video device, then plug the other end of the A/V cable into the A/V IN jack on the back of the projector. The projector will then automatically switch to Composite video mode.
Using the Headphone jack
Next to the A/V IN jack is a standard 3.5mm headphone jack, which you can connect a pair of headphones to, or a pair of amplified speakers. When you plug in a pair of headphones or external speakers, the projector's internal speakers are automatically disabled.
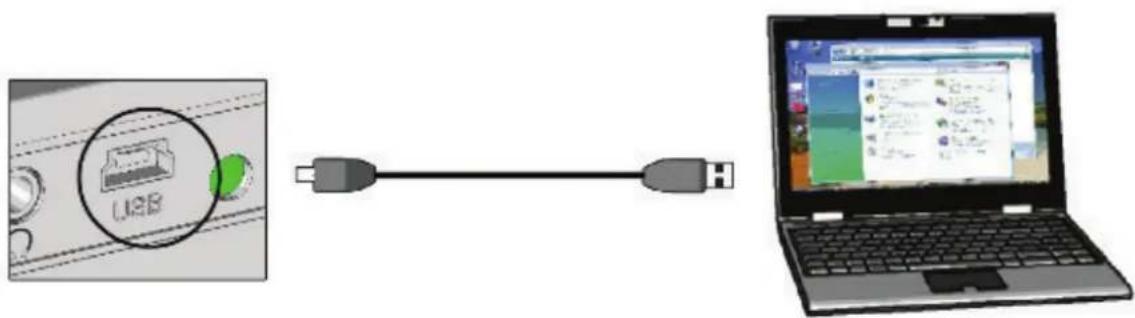
Accessing your Projector's internal memory
You can access the projector's internal memory or an SD card (if inserted) by connecting the included USB cable and plugging it into a computer that supoports the USB 2.0 standard. You do not need to have the projector plugged in or have batteries inserted in order to access the projector's internal memory.
If you have an SD card inserted into your projector, it will be accessed instead of the internal memory. Remove the SD card to gain access to the projector's internal memory.
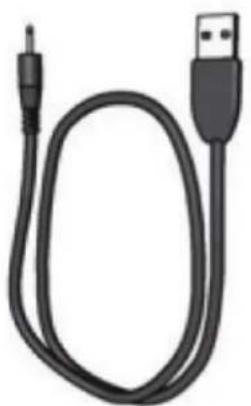
Accessories
Your projector comes with the following accessories:
natural_image
Coiled black USB cable with a metallic connector (no text or symbols visible)USB cable
natural_image
Coiled audio audio cable with three connected ports (no text or symbols visible)Composite video cable
natural_image
Simple 3D diagram of a tripod with labeled 'Tripod' at the base (no other text or symbols)Tripod

natural_image
Simple line drawing of a black electrical plug with a coiled cable (no text or symbols)Power adapter

natural_image
Dark rectangular object with indistinct internal patterns and a small triangular shape on the right side (no visible text or symbols)Carrying pouch
Remote control

This user guide

natural_image
Circular dark object with glossy surface and central hole (no text or symbols)North American plug adapter

natural_image
Circular black object with two small circular features on top, resembling a stylized face or button (no text or symbols visible)European plug adapter

natural_image
Close-up of a black plastic door or vent with a circular opening and two side brackets (no text or symbols visible)U.K. plug adapter

natural_image
Circular black object with a glossy surface and central hole, resembling a button or knob (no text or symbols visible)Australian plug adapter
| E1-LED-Pico Specifications | |
| Optical Engine 3M Color | Sequential engine (MM200) |
| Resolution 640 x 480 | |
| Aspect ratio 4:3 | |
| Internal memory | 1 GB |
| LED output 12 Lumens | |
| Contrast Ratio | 200:1 |
| Focus Manual | |
| Audio Built in 0.5 watt stereo speakers | |
| Supported photo and video formats | Photo: JPEG, and BitmapVideo file extensions: AVI, MP4Video codecs: Xvid, Divx, 3gpAudio codecs: PCM ADPCM, MP3, AAC |
| A/V input | Composite video with stereo line audio jacks |
| Audio output jack | Standard 3.5 mm stereo headphone jack |
| USB port | Standard Mini USB port with USB adapter cable |
| Power source | 4 AA batteries, or DC 5V 2.0 Amp power adapter. 5 volt USB for transferring data. |
| Battery life | Up to 6 hours |
| Certifications CE,, FCC, ROHS | |
| Operating temperature | 40°F to 104°F |
| Storage temperature | -30°F to 180°F |
| Item Dimensions | 4.5 x 2.3 x 1.1 inches |
| Item Weight | 117g (without batteries) |
Specifications are subject to change without notice.
Troubleshooting
Before contacting us regarding an issue with your projector, please refer to the following troubleshooting section.
| My projector won't power up. | Make sure you are holding the power button down for up to 5 seconds.Make sure the projector is either plugged in, or has fresh batteries installed.Make sure the batteries are installed correctly. |
| I can't switch the projector to high brightness mode. | The projector will disable the high brightness mode if it detects that the batteries are low. Replace the batteries or plug in the projector's power adapter. |
| My projector will not play my videos. | Please make sure your videos are in a supported format with a supported file extension. Supported file extensions are .avi and .mp4. Supported video codecs are Divx, Xvid, and 3gp.Please make sure your video is in a supported resolution.Your projector has been tested with video resolutions up to 720x480. |
| Video playback stutters or has a low framerate. | Your video codec may not be fully supported. Try another codec.The video bitrate or resolution may be too high. |
| My projector will not view my photos. | Please make sure your photos are in either the Bitmap or JPEG file format.Please make sure your image resolution is 2592x1944 or lower. |
| My projector will not detect my SD card. | Please make sure your SD card is formatted.Try another SD card. |
| My remote control does not work. | Please make sure you are aiming the remote control at the IR sensor located on the back of the projector.Try changing the battery in the projector's remote control. |