
FCR45DCAPA-GL - Refrigerator Furrion - Free user manual and instructions
Find the device manual for free FCR45DCAPA-GL Furrion in PDF.

| Product Type | Portable Electric Cooler (Refrigerator/Freezer) |
| Brand | Furrion |
| Model | FCR45DCAPA-GL |
| Cooling Volume | 1.67 cu. ft. (50 Quart / 47.3 L) |
| Dry Storage Volume | 0.2 cu. ft. (6 Quart / 5.7 L) |
| Temperature Range | -8°F to 50°F (-22°C to +10°C) in Manual mode; Presets: ECO 46°F (8°C), Beverage 43°F (6°C), Freezer 7°F (-14°C) |
| Refrigerant | R134a (34 g / 1.2 oz) |
| Power Input Options | AC/DC adapter (14.5V/6A), 12V DC cigarette lighter plug (13.2V, 10-16V), solar panel (16-24.5V, sold separately), ePod battery (14.4V, sold separately) |
| Noise Level | 45 dB(A) |
| USB Outputs | 2x USB-A (5V/2.4A), 1x USB-A (5V/3.1A, 15W quick charge) |
| Wireless Charging | 10W |
| Dimensions (L x W x H) | 35 5/8" x 20 1/8" x 19 15/16" (906 mm x 512 mm x 507 mm) |
| Net Weight | 61.5 lbs (27.9 kg) |
| Operating Ambient Temperature | 50°F to 109°F (10°C to 43°C) |
| Cooling Modes | ECO, Beverage, Freezer, Manual, USB (cooling off) |
| Control Interface | Touch panel with temperature adjustment (+/-), mode selection, °F/°C toggle |
| Included Accessories | DC cigarette lighter cable, AC/DC adapter, serving tray, dual cup holder, umbrella holder, basket, bottle opener, screw plugs, quick start guide, warranty manual |
| Optional Accessories | Wheel kit (C-FCR00DCAPA-01), solar panel (FSPK10MWT-BL), ePod battery (FBN12C33A1) |
| Safety Features | Overcurrent protection, short circuit protection, low voltage protection, thermal cut-out, lid latch (child safety) |
| Maintenance | Clean interior with baking soda solution, exterior with mild detergent; defrost via drain cap; air dry after cleaning |
| Warranty | 24 months (parts and labor, accessories excluded) |
Frequently Asked Questions - FCR45DCAPA-GL Furrion
User questions about FCR45DCAPA-GL Furrion
0 question about this device. Answer the ones you know or ask your own.
Ask a new question about this device
Download the instructions for your Refrigerator in PDF format for free! Find your manual FCR45DCAPA-GL - Furrion and take your electronic device back in hand. On this page are published all the documents necessary for the use of your device. FCR45DCAPA-GL by Furrion.
USER MANUAL FCR45DCAPA-GL Furrion
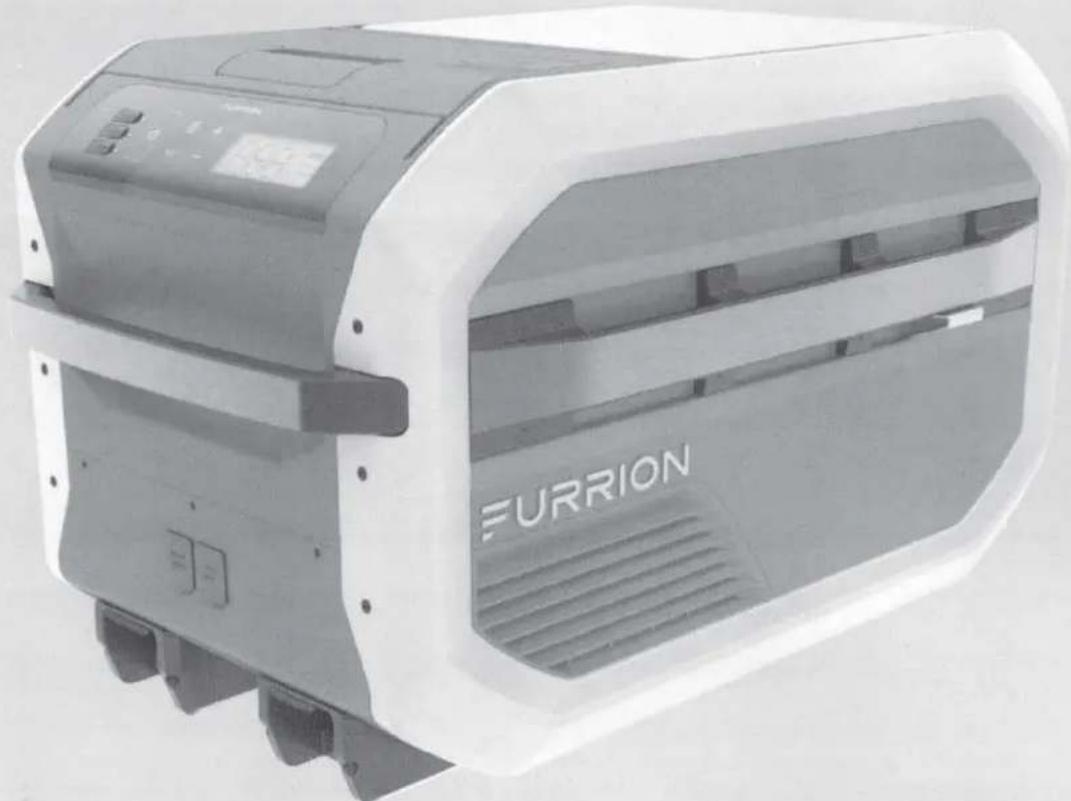
natural_image
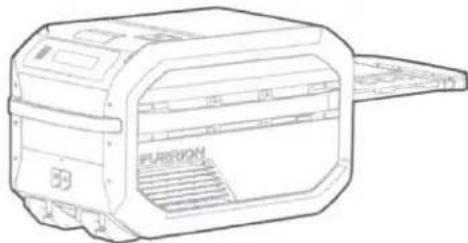
Exterior view of a Furrion printer device with a close-up inset showing its internal components (no text or symbols on the device itself)* Product picture is for reference only.
* This full manual is full online use only.
Thank you for purchasing this Furrion® product. Before operating your new appliance, please read these instructions carefully. This user manual contains information for safe use, installation and maintenance of the appliance.
Please keep this user manual in a safe place for future reference. This will ensure safe use and reduce the risk of injury. Be sure to pass on this manual to new owners of this appliance.
The manufacturer does not accept responsibility for any damages due to not observing these instructions.
Table of Contents
Table of Contents....2
Explanation of Symbols 3
Important Safety Instructions....3
Before Use....4
Introduction....4
What's in the Box....4
Parts and Features....4
Accessories Sold Separately 5
Shared ECO System Components 5
Installation 5
Location 5
Wiring 5
Storing & Transporting 5
Operation....8
Getting Started 8
Expanded Function *ePod™ Battery Only* 9
Navigating Your Cooler 10
ePod™ Battery & Dry Storage Compartment....10
Care & Maintenance ....12
Troubleshooting ....13
Error Code....13
Specification 14
Explanation of Symbols
This manual has safety information and instructions to help you eliminate or reduce the risk of accidents and injuries. Always respect all safety warnings identified with these symbols. A signal word will identify safety messages and property damage messages, and will indicate the degree or level of hazard seriousness.

DANGER
Indicates an imminently hazardous situation which, if not avoided, will result in death or serious injury.

WARNING
Indicates a potentially hazardous situation which, if not avoided, could result in death or serious injury.

CAUTION
Indicates a potentially hazardous situation which, if not avoided, may result in minor or moderate personal injury, or property damage.
Important Safety Instructions

DANGER
- DO NOT use or modify the appliance for anything other than it's intended purpose.
- DO NOT use damaged electrical components, or touch exposed areas of wiring.
- DO NOT store explosive substances, such as aerosol cans, in the appliance.
- NEVER Immerse the cooler or electrical adaptors in water, shield from rain fall.
- DO NOT let children or incapable persons to play with or use the appliance, supervise usage or store out of reach.
- NEVER attempt to service the product without contacting Furrion.
- DO NOT lift beyond your capabilities, use additional help if necessary.
• ONLY use Furrion approved accessories. - NEVER disconnect power, or handle the battery with wet hands.
- DO NOT use your cooler if it is damaged or malfunctions in any manner.
- This appliance is not intended for use by persons (including children) with reduced physical, sensory or mental capabilities, or lack of experience and knowledge, unless they have been given supervision or instruction concerning use of the appliance by a person responsible for their safety.
Failure to follow instruction will result in serious injury, property damage or death.

WARNING
- If the SUPPLY CORD is damaged, it must be replaced by the manufacturer, its service agent or similarly qualified persons in order to avoid a hazard.
- The repair and maintenance of the cooler should be conducted by the manufacturer, local dealer or qualified personnel. Do not attempt to repair your cooler by yourself, this will void the warranty.
- Do not let the cord hang over the edge of a table or counter or touch hot surfaces.
- Do not unplug by pulling the cord, always grasp the plug head.

WARNING
- Do not attempt to move your cooler while it is still plugged. To move your cooler safely, it should be unplugged from power supply.
- Do not use mechanical devices or other means to accelerate the defrosting process, other than those recommended by the manufacturer.
- Do not damage the refrigerant circuit.
- Do not use electrical appliances inside the food storage compartments of the appliance, unless they are of the type recommended by the manufacturer.
HEALTH HAZARD
- Food may only be stored in its original packaging or in suitable containers.
- Opening the lid for long periods can cause significant increase of the temperature in the compartments of the device.
- Clean regularly surfaces that can come in contact with food and accessible drainage systems.
- Store raw meat and fish in suitable containers in the device, so that it is not in contact with or can drip onto other food.
- If the device is left empty for long periods:
– Switch off the device. - Defrost the device.
– Clean and dry the device.
– Leave the lid open to prevent mould developing within the device.

CAUTION
- Unplug your cooler when not in use or before cleaning.
• Always keep lids closed before use. - It is recommended to operate the unit on a flat surface. Maximum operation angle is 30^ . During transportation, its slope should be less than 30^ and should be handled carefully.
- When not in use, unplug the adapter or solar panel, take out the ePod™ Battery and empty the compartment. Then allow the cooler to air dry.
• The cooler should not be placed inverted.
- Do not use abrasive powders or scouring pads since they may scratch the exterior and interior surfaces of your cooler. Use only mild soap and water and allow to air dry.
Refrigerant
The refrigerant of the cooler is R134a, a natural gas with a high level of environmental compatibility and inflammable in the air.
- During transportation and installation of the cooler, be certain that none of the components of the refrigerant circuit become damaged.
- If the refrigerant circuit should become damaged:
- Avoid open flames and sources of ignition;
– Thoroughly ventilate the room in which the appliance is situated.
Save these instructions for future reference!
Before Use
Introduction
This appliance is designed and manufactured for beverage and food preservation. Common uses may include:
• RV Indoor refrigerator/freezer
- Portable Camping Cooler
• Emergency Cold Storage
• Cold Grocery Preservation
- Cooler mounted in the vehicle to keep food & beverages cold
What's in the Box
Make sure the unit and the accessories are in the box. If anything is damaged or missing, contact your dealer.
• Furrion eRove™ Electric Cooler x 1
• DC (Cigarette Lighter) Cable x 1
- AC/DC Adapter x 1
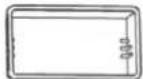
- Serving Tray x 1
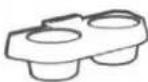
• Dual Cup Holder x 1
- Umbrella Holder x 1
- Basket x 1 (in the cooling compartment)
- Bottle Opener x 1 (installed)
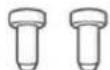
- Screw Plug x 2
- Quick Start Guide x 1
- Warranty Manual x 1
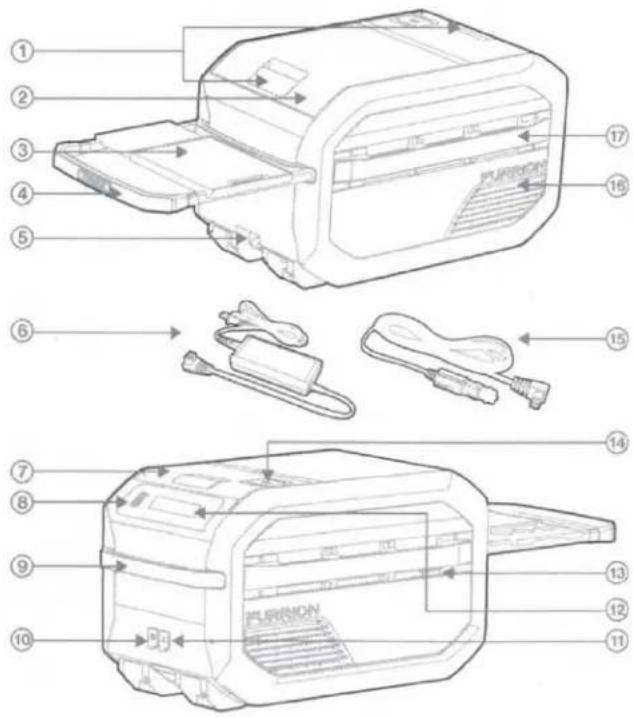
Parts and Features

Item Part Name
| 1 | Lid Latch |
| 2 | Cooling Compartment |
| 3 | Serving Tray |
| 4 | Retractable Handle |
| 5 | Drainage Cap |
| 6 | AC/DC Adapter |
| 7 | Dry Storage & ePodTM Compartment |
| 8 | USB Ports |
| 9 | Handle |
| 10 | Solar Panel Input |
| 11 | DC Input |
| 12 | Control Panel |
| 13 | Bottle Opener |
| 14 | Wireless Charging Pad |
| 15 | DC (Cigarette Lighter) Cable |
| 16 | Vent |
| 17 | Accessory Rail |
Accessories Sold Separately
Wheel Kit
(C-FCR00DCAPA-01)

Solar Panel
(FSPK10MWN-BL)

Furrion ePod™ Battery
(FBN12C33A1)
NOTE: For the wheel kit, Furrion ePod™ battery and solar panel, please refer to their own manuals separately for instructions.
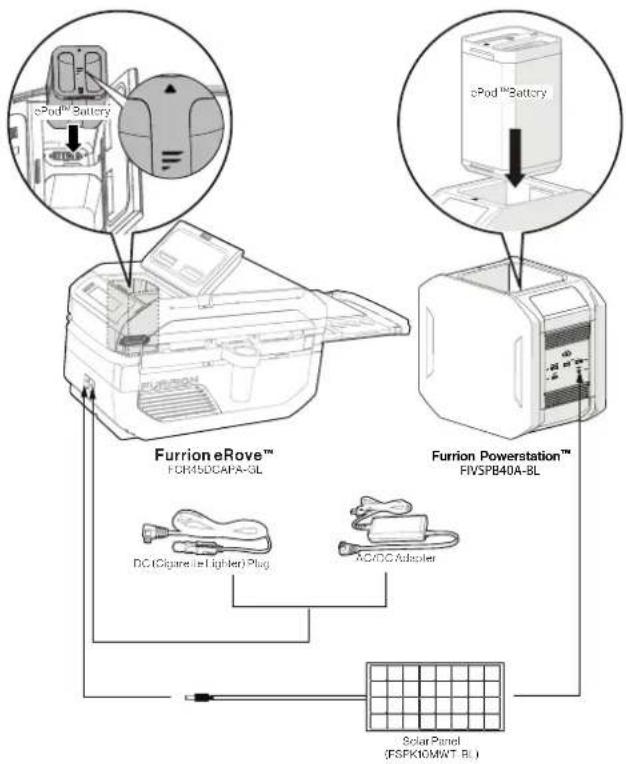
Shared ECO System Components
ePod™ Battery
Provided with the ePod ^TM , sold separately with the eRove ^TM cooler.
Solar Panel
Sold separately for both the eRove ^TM cooler and the ePod ^TM , but can be shared.
DC (Cigarette Lighter) Plug & AC/DC Adapter
Shared between both the eRove ^TM cooler and the ePod ^TM , and provided with each.
flowchart
graph TD
    A["Furrion eRove™ FCM50CAPA-3L"] --> B["DC (Cigarette & Lighter) Plug"]
    A --> C["AC/DC Automaker"]
    D["Furrion Powerstation™ FIVSPB40A-BL"] --> E["Solar Panel (FSPK10MWT_BL)"]
    F["ePod™ Battery"] --> G["Top 2 Battery"]
    G --> H["Top 3 Battery"]
Installation
Location
- This appliance is designed to be free standing only, and should not be recessed or built in a cabinet.
- NEVER block the air vents during operation and make certain at least 1" (25.4mm) clearance exists to the air vents for good circulation.
- Ensure 20" (508mm) of clearance is above the cooler to open the lids for accessing the compartments if needed.
- It is recommended to operate the unit on a flat surface, or the surface with slope of no more than 30^ .
- The unit must be placed in a dry and ventilated place far away from heat sources (such as stove, flue), place the unit in a well shaded area. (Prevent exposure to direct sunlight.)
- When the cooler is attached on the prep kit, make sure there is 20" (508mm) of clearance on top of the cooler so that its lids can be opened without blocking.
Wiring
The cooler can be powered from the following auxiliary sources:
-
Via power adaptor, plugged into a standard fused NEMA 5-15R AC outlet (GFCI not required, as the cooler only uses a NEMA 1-15P plug, which has no protective ground terminal). Ensure the outlet can provide at least 3A of current. The power adaptor is only to be used indoors.
-
Via by-packed cigarette lighter harness, plugged into a standard 12V cigarette outlet. Ensure the outlet can provide a continuous current of 10A, with short peaks up to 15A. The outlet shall be fused as per applicable local legislation.
NOTE: 12V Wiring Installation
- Provide a dedicated circuit to prevent light flicker and other 12V appliance interference.
- Ensure proper wire gauges are used per the following:
| AWG Gauge | Max Length* 12V DC(ft.) (m) | |
| 14 0 - 6 0 - 1.8 | ||
| 12 6 - 10 1.8 - 3 | ||
| 10 10 -20 3 - 6 | ||
| 8 20 - 30 6 - 9.1 | ||
- Protect circuit with a 15A delayed or slow blow fuse.
Storing & Transporting
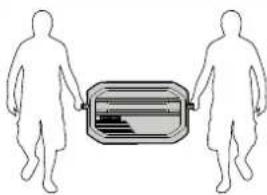
WARNING
natural_image
Two human silhouettes facing each other with a rectangular object between them (no text or symbols)EXCESSIVE WEIGHT HAZARD
In case of back or other injuries to be caused while moving the cooler, two or more persons should be utilized to move and install the cooler.
- Store the Cooler at the temperature range of -27^ 122^ (-33°C \~ 50°C).
CAUTION
Leaving loose objects inside the cooler compartments while inside a vehicle on the move can damage the cooler unit. Always make sure the stored objects are secured.
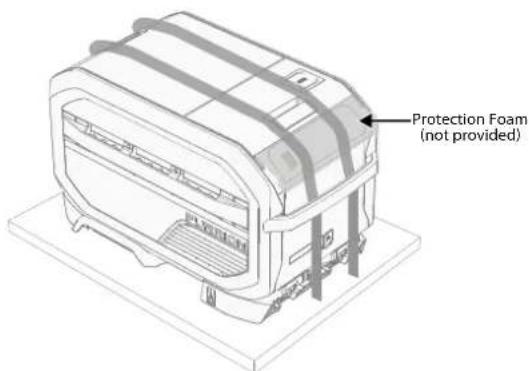
Tie Downs
Restrain the cooler over the top with tie down straps (not provided) when transporting to prevent tipping over, sliding, or other hazards. (Fig. 1)

NOTE: Do not use the handle or accessory rail as a restraining point. Always include a protection foam over the control panel in case of scratching while strapping the cooler.
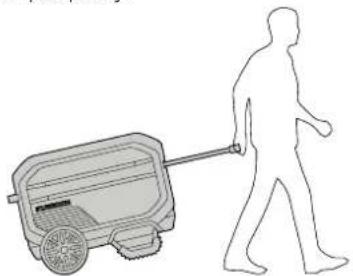
Wheel Kit
A wheel kit base is available that can be attached securely to the cooler and used for easy mobility. The wheel kit can remain secured to the cooler when transported in your vehicle if tied down properly.
natural_image
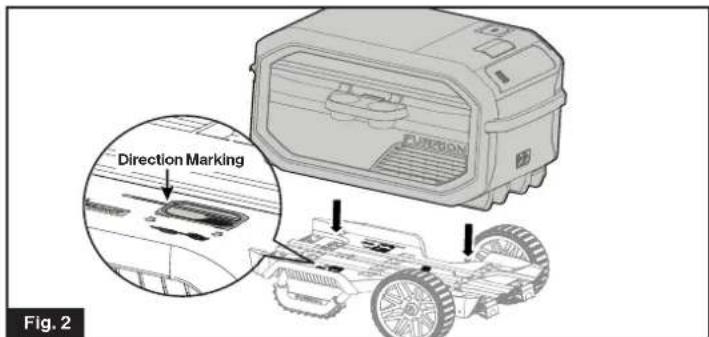
Silhouette of a person pushing a small cart with a long handle, no text or symbols present- See the separate quick start guide of the wheel kit to assemble it.
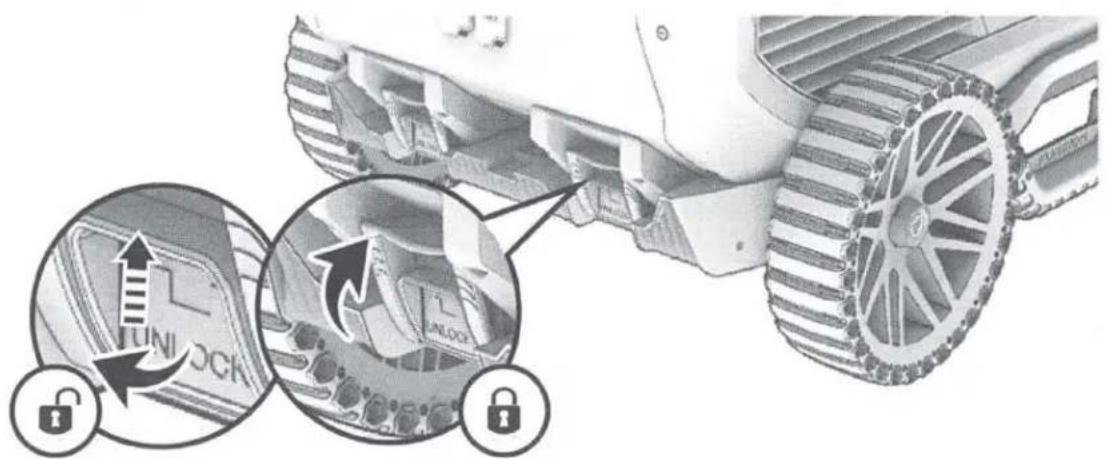
- Place the Furrion eRove™ Cooler on the wheel kit following the instruction of direction markings on the wheel kit. (Fig. 2)
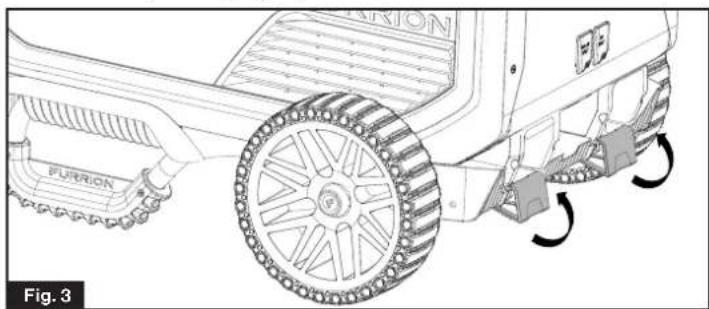
- To lock the eRove™ Cooler, flip up the latches until they click into place. (Fig. 3)
natural_image
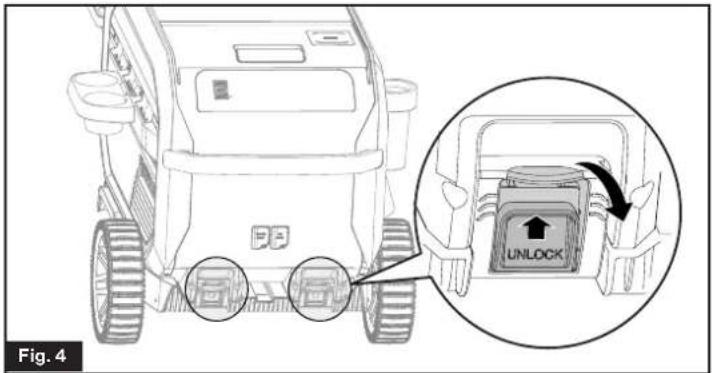
Technical line drawing of a mechanical vehicle with labeled components and motion arrows (no readable text or symbols)- To unlock the eRove™ Cooler, flip up the latches and pull outwards at the same time until they are unlocked. (Fig. 4)
- When the cooler with wheel kit is located in a moving vehicle, tie down the cooler securely to prevent it from tipping over, sliding or other hazards. (Fig. 5)
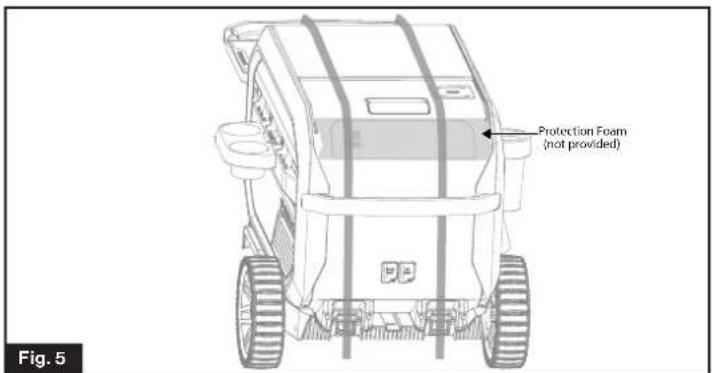
NOTE: Do not use the handle or accessory rail as a restraining point.
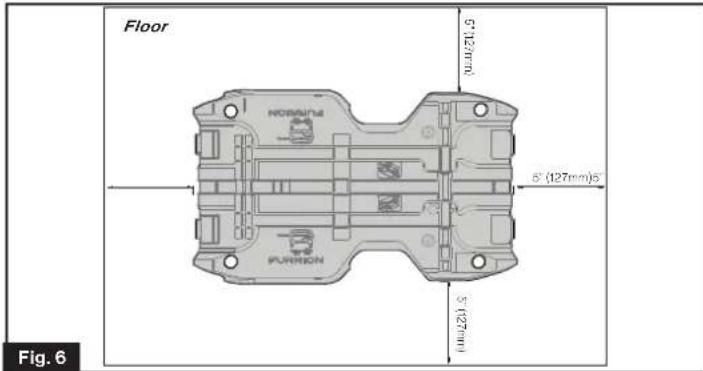
Mounting Base
- The cooler is designed to be fixed to a structure with the prep kit.
-
Before mounting the base, have the prep kit separated from the wheel kit by removing the wheels (if assembled) and feet.
-
Choose a desired location to fix the prep kit. (Fig. 6)
NOTE: Keep min. 5" (127mm) clearance around the prep kit for easy hand locking and releasing the cooler.
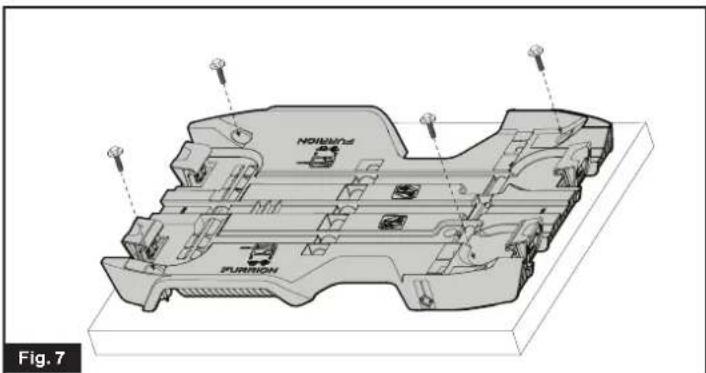
- Set the prep kit on the desired location and use 4 screws (with washers) that are appropriate for the weight of cooler and its load to fix through the prep kit holes to the floor. (Fig. 7)
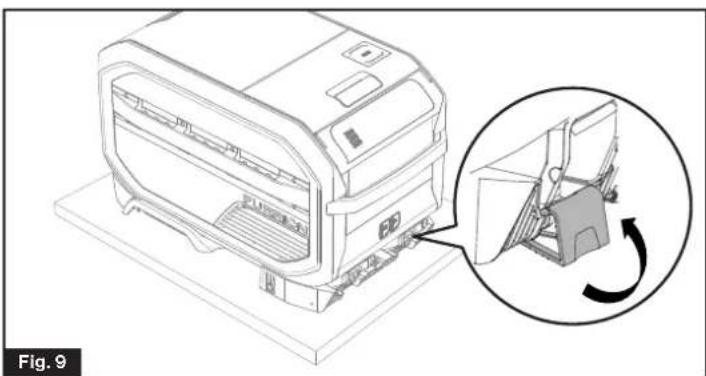
- Place the Furrion eRove™ Cooler on the prep kit following the markings on the prep kit. (Fig. 8)
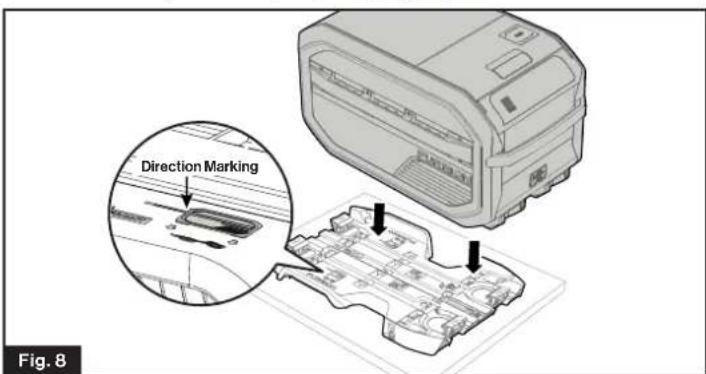
- To lock the eRove™ Cooler, flip up the latches until they click into place. (Fig. 9)
natural_image
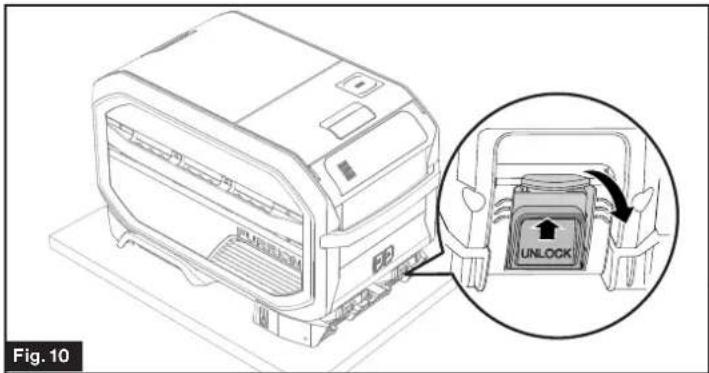
Technical line drawing of a printer with an inset showing the internal mechanism (no text or symbols)- To unlock the eRove™ Cooler, pull up the latches and flip outwards until they are unlocked. (Fig. 10)
- When the vehicle is in motion, tie down the cooler securely with band on the RV floor for additional restraint. (Fig. 11)
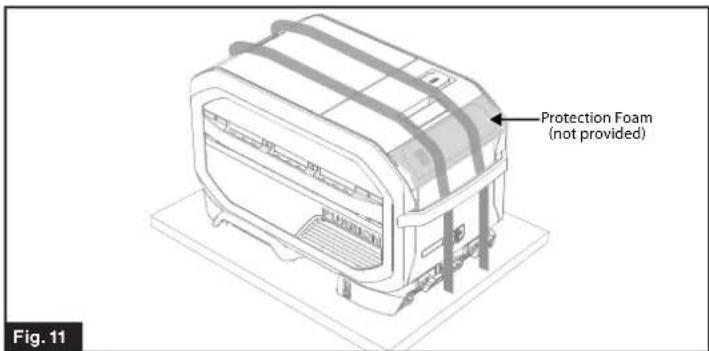
NOTE: Do not use the handle or accessory rail as a restraining point.
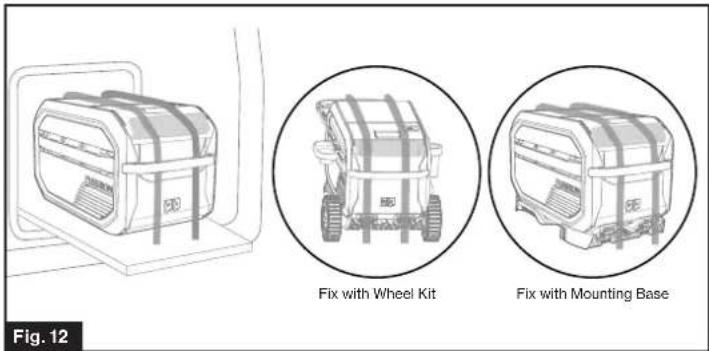
Mounting the Cooler on Sliding Platform
A sliding platform can be fabricated to support the cooler for easy storage and usage. Plan for a minimum 200lb (90kg) cooler weight when considering loading scenario's for the platform.
-
Use bolts, washers and nuts (not provided) for securing the prep kit to the tray. Ensure the mounting location on the prep kit aligns with a supporting member of the sliding platform.
-
Extend sliding platform out entirely and check the following:
– Proper load support.
– Clearance for opening and closing cold and dry storage lids.
– Wiring lengths and connection strains.
- Access to locking latches.
- Fix the cooler in RV sliding platform. (Fig. 12)
Operation
It is recommended to clean the cooler before first use. For detail cleaning instructions, please refer to section Cleaning Instruction.
Getting Started
Power Input
Select the appropriate power source:
NOTE:
The 400Wh ePod™ battery is purchased separately and can be used as a standalone power source. The solar panel is also purchased separately but can not be used as a standalone power source, it must be used in combination with the 400Wh portable ePod™ battery.
| 1 | AC/DC Adaptor | 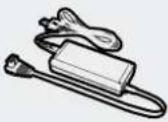 | Converts 120VAC from the wall to DC to power the cooler. |
| 2 | Cigarette Lighter Plug | 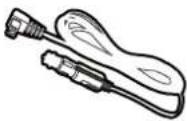 | Connect directly to DC power from the Car or RV to power the cooler.. |
| 3 | 400WH Portable ePodTM Battery | 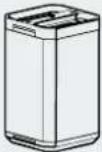 | Power the cooler.Can be charged by AC/DC Adaptor,Cigarette Lighter Plug or Solar Panel. |
| 4 | Solar Panel |  | Using the 100W solar panel to charge the ePodTM battery. |
NOTE:
The AC/DC adapter is for indoor use only. Do not use it outdoors.
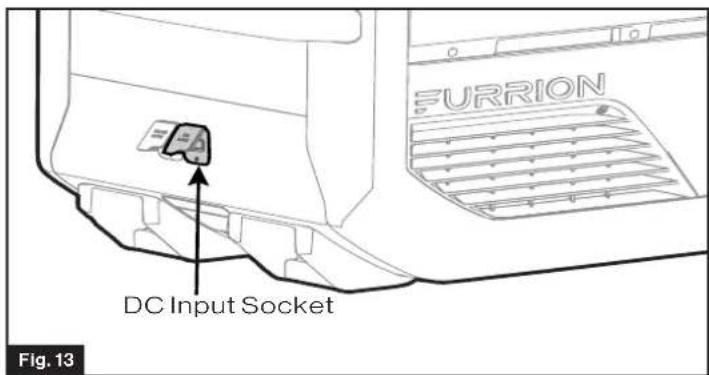
Power Input Connection
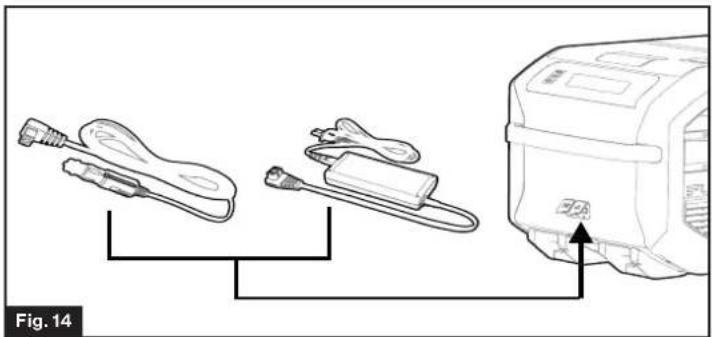
AC/DC Adapter, DC (Cigarette Lighter) Plug
- Open the DC input socket cover. (Fig. 13)
- Insert the plug of the appropriate adapter into the DC input socket for power supply. (Fig. 14)
natural_image
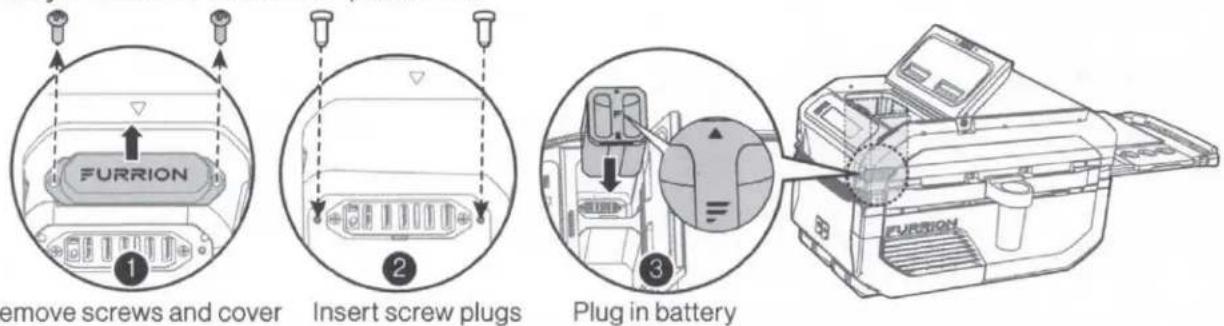
Diagram showing three connected components: a cable, a battery pack, and a motor (no text or symbols present)ePod™ Battery
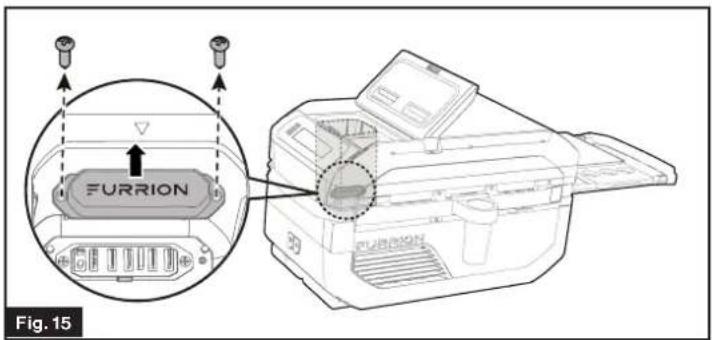
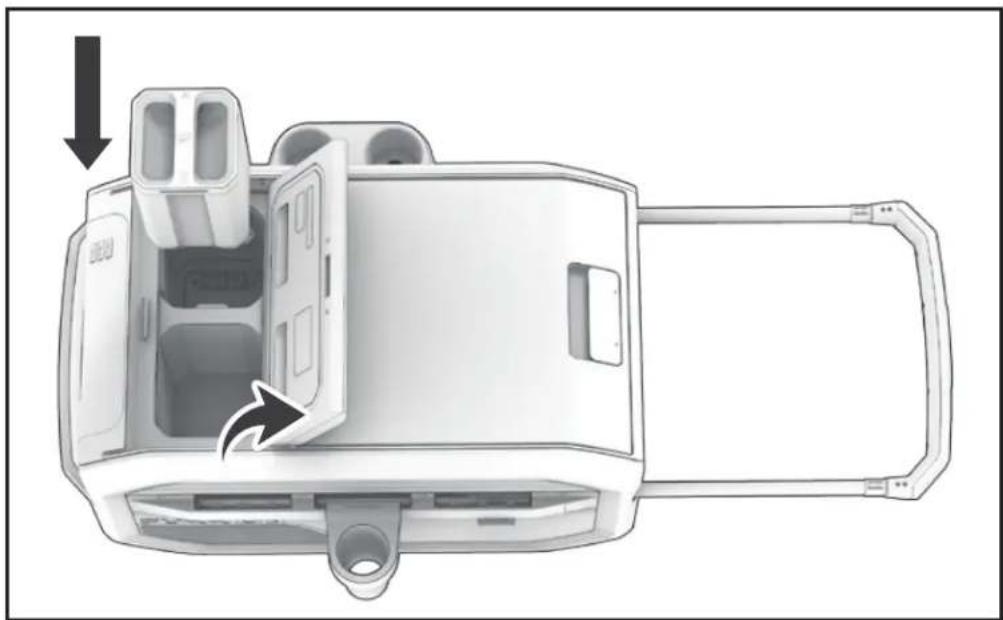
- Open the battery compartment lid by pulling the latch upwards.
- Remove the terminal cap at the bottom of the battery compartment by unscrewing the 2 fastening screws. (Fig. 15)
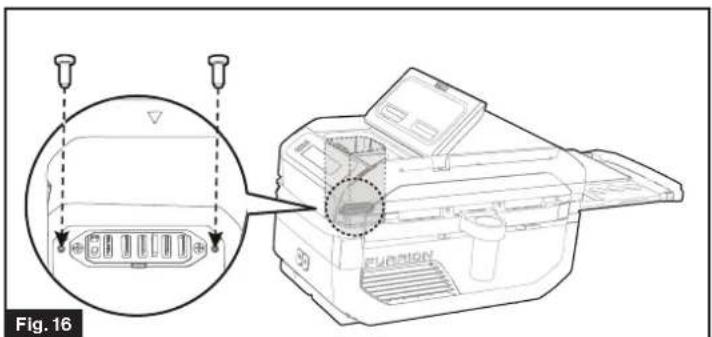
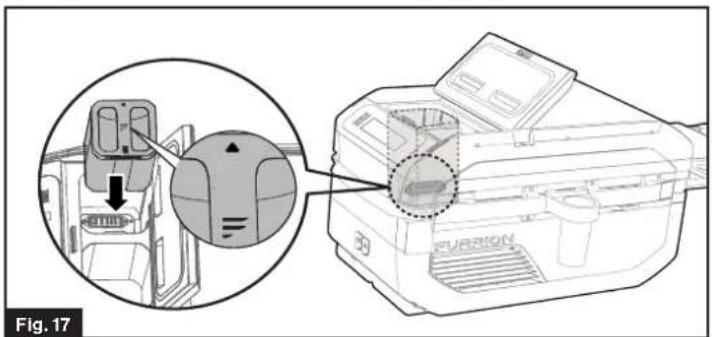
- Block the screw holes with 2 screw plugs (provided). (Fig. 16)
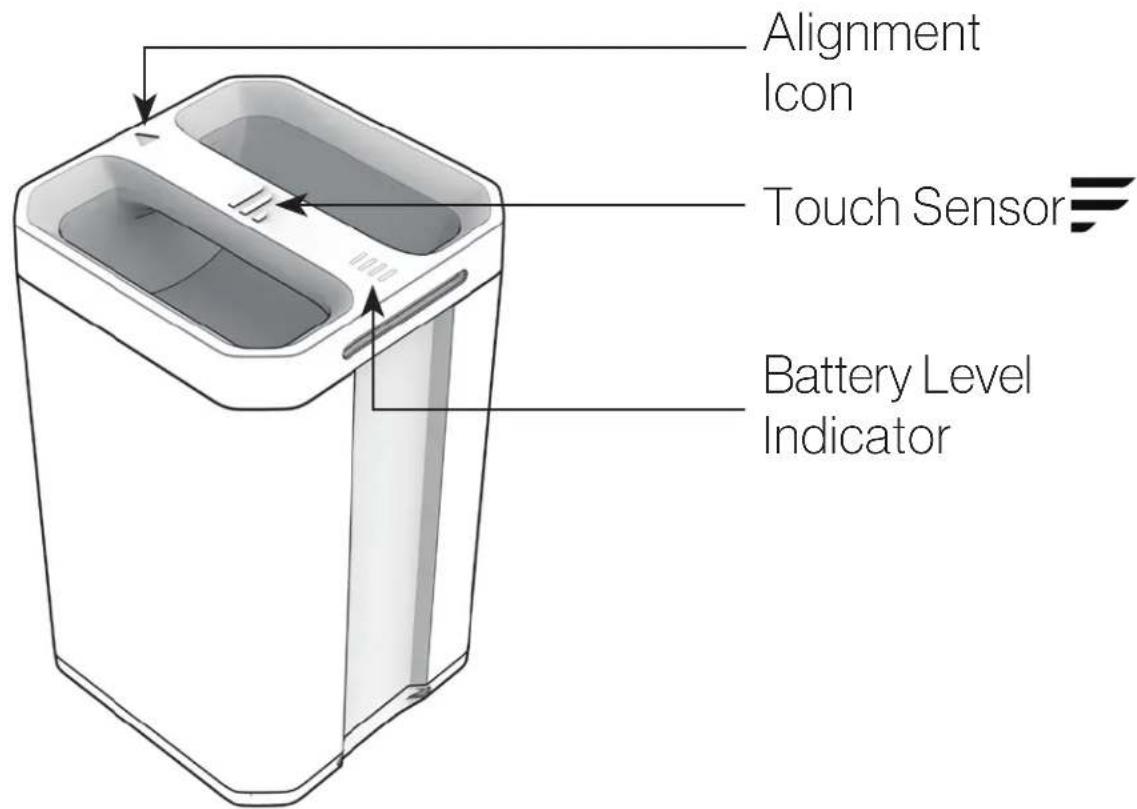
- Insert fully the ePod ^TM battery into the battery compartment with the ▲cons on the battery and cooler aligned. Close the lid afterwards. (Fig. 17)
natural_image
Technical diagram showing a mechanical assembly with a magnified inset view of internal components (no text or symbols)NOTE:
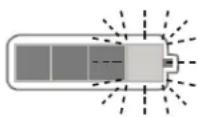
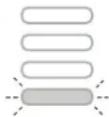
- Once the ePod™ Battery is plugged in, the LCD display on it shows white light for 10s. If the ePod™ battery is charging, the battery icon will flash for a few seconds.
- The dry storage & ePod battery compartment should be closed when not in use.
- If the cooler is not used for a long time, install the terminal cover back with screws.
Solar Panel
NOTE: Only operate with ePod™ Battery.
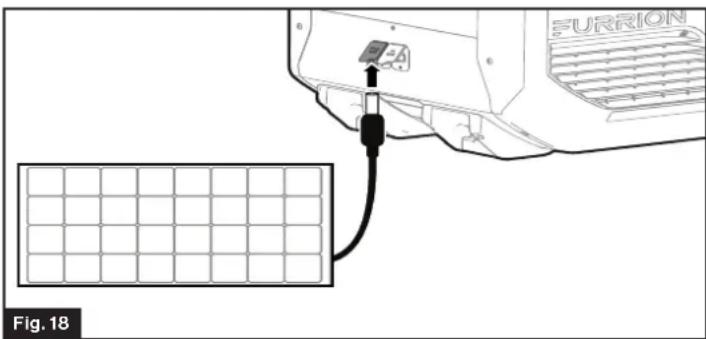
- Open the solar input socket cover.
- Insert the plug from solar panel into the solar input socket. (Fig. 18)
Control Panel Function
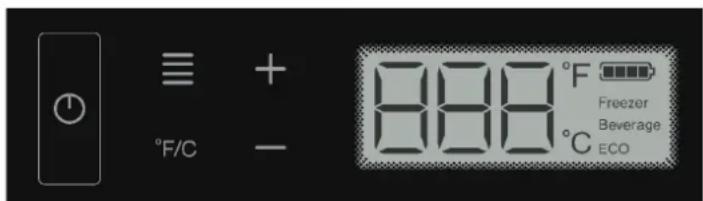
Power On/Off ⏻
To turn on the cooler, touch and hold "Power" key for 1 second, the buzzer will sound, the control panel will display the mode and previous temperature setting. USB ports 1,2,3 and wireless charger are activated for charging your device.
NOTE: The LCD screen shows "ECO" for the initial start up of the cooler.
To turn off the cooler, touch and hold "Power" key again for 1 second, the buzzer will sound, and the cooler turns off. The compressor, LCD display, USB and wireless charger will shut down. However, if ePod™ battery is still inserted and the cooler still connected to power supply or solar panel, the device will still charge.
Mode Selection
- Press Mode key to select cooling mode following the sequence: ECO > Beverage > Freezer > USB.
- Select the ECO, Beverage or Freezer modes, the temperature settings are automatically set to their default values.
- Use "+/—" to increase/decrease temperature, the cooler enters in Manual mode and does not turn back to the ECO, Beverage or Freezer modes even if the temperature is adjusted to their default values.
- To turn back to the cooling mode (ECO, Beverage or Freezer), press Mode key to reselect.
- Temperature setting will flash for 2 seconds before displaying the actual temperature.
| Mode Displayed Default | Temperature Range | Function | ||
| ECO | ECO | 46°F (8°C) | / | Saving Power: Freezer or Beverage |
| Beverage | Beverage | 43°F (6°C) | /Cooling | Beverages |
| Freezer | Freezer | 7°F (-14°C) | /Freezing Items | |
| USB | USB | USB ports and Wireless charging function only, ePodTM battery quick charging activated, Cooling disabled. | ||
| Manual | "Not Displayed" | / | -8°F ~ 50°F -22°C ~ 10°C | Full Range Setting |
+/-
Touch "+/—" to cycle through the available temperature range for the Manual mode. Stop cycling on desired setting to select temperature. Temperature setting will flash for 2 seconds before displaying the actual temperature.
°F/C
Touch "F6" toggle between Fahrenheit and Celsius. Stop at the desired setting to select the temperature unit.
Loss of Power Memory Function
If there is a loss of power, the system will resume with the same settings prior to the interruption as soon as power is restored.
Expanded Function \*ePod™ Battery Only\*
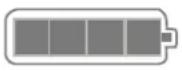
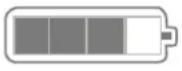
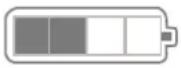
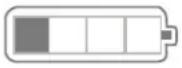
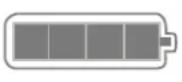
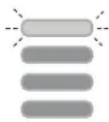
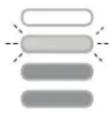
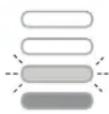
Power Level Display
When the ePod ^TM battery is plugged in the cooler, the battery icon will indicate the actual battery level.
The battery icon is divided into 4 sections, each of them indicates 25% of the ePod ^TM battery capacity.
When there is no ePod ^TM Battery plugged in or the ePod ^TM battery plugged in has no power, the battery icon will not display.
Deep ECO Mode
A Deep ECO Mode is available to extend the battery run time when using the ePod ^TM battery power source.
Deep ECO can be activated only when the device is powered by the Furrion ePod™ battery. To activate Press "F" and "°F/C" together for 3 seconds.
The LCD screen displays "d" + "ECO" symbol and lights off in 5 seconds. The temperature setting range of this mode is 30^ F \~ 46^ F (-1°C to +8°C) and the default temperature is 46^ F (8°C).
When the cooler is in Deep ECO Mode, only the compressor is in operation and the “+”, “—” and “°F/C” keys are active.
The USB or wireless charging function will not be available and the Mode and Power On/Off keys will be disabled.
To exit this mode, there are two options to choose:
- Remove the ePod™battery and DC/Solar power input;
- Press “+” and “°F/C” keys at the same time for 3 seconds.
Seamless Power Interruption
If there is a loss of power, the Furrion ePod™ battery will automatically maintain the cooler's function seamlessly until power is restored. No additional setting needs to be selected to activate the battery.
ePod™ Battery Charging
The ePod™ Battery plugged in the unit can be charged through an adaptor, cigarette plug or solar panel.
NOTE:
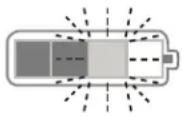
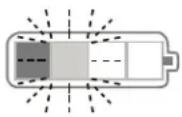
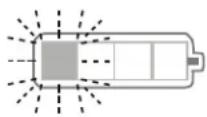
- When ePod battery plugged in, connect the AC/DC adapter, cigarette plug or solar panel to the cooler for charging the ePod™ battery. The LCD backlight will dim or turn off if no further operation. Upon touching any key, the LCD screen will light on again.
- When the cooler is only connected with solar panel and without the ePod™ battery plugged in, the LCD shows "SOL" on screen, all functions are disabled.
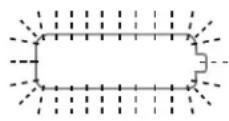
- When the cooler is with solar panel and with the ePod battery plugged in but the battery voltage is too low, the battery icon outline will flash, the LCD shows “- -” on screen, all functions are disabled until the ePod™ battery is recharged to certain level. And it automatically starts working when it is recharged.
Navigating Your Cooler
Lid Latch
Pull the lid latch outwards to unlock the lid. Then pull the lid upward to open the compartments. Close the lid until a "click" is heard. The lid latch will automatically engage the lock.
Cooling Compartment (Fig. 19)
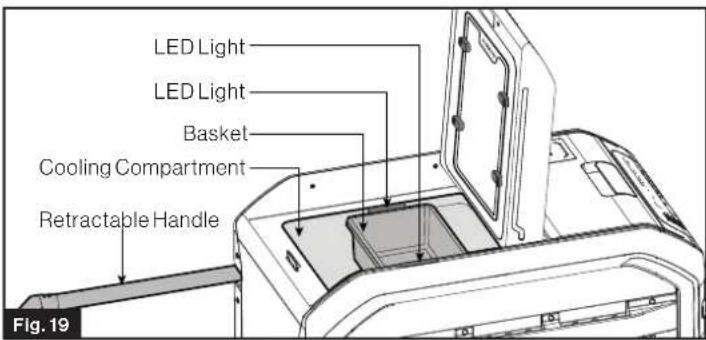
- Open the Cooling compartment lid, and the two LED lights will illuminate the compartment automatically.
- The translucent basket can be used to store content at the top and can be removed as necessary.
- Place contents in the cooling compartment that best fits, avoid exceeding a height of the bottom of the translucent basket, so that the basket can slide appropriately and the lid can fully close with a tight seal.
ePod™ Battery & Dry Storage Compartment
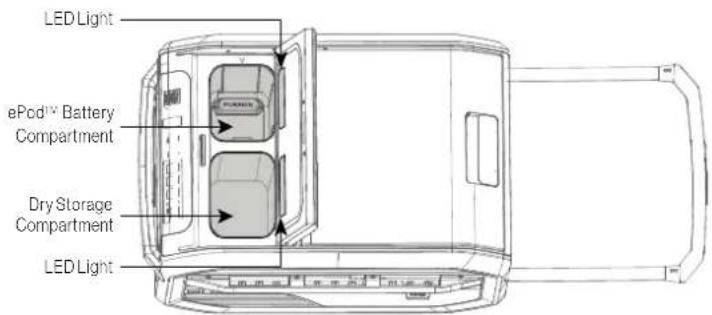
- Open the small lid, and the two LED lights will illuminate the compartments automatically.
- This section is divided into two smaller compartments, one is the ePod™ battery compartment, the other is the dry storage compartment.
- Place any content that doesn't require cold storage in the dry storage compartment. The space is large enough to store an extra battery if needed.
- If using the battery compartment as additional "dry storage" make sure the Furrion terminal cap is in place. Never store metallic/conductive objects in this compartment.
Retractable Handle
WARNING
• Always use the handles to lift or move the cooler.
- The net weight of the cooler is 61.5lbs(27.9kg). Use TWO persons to lift the cooler if necessary.
- To lift the cooler, the retractable handle must be in its retracted position to prevent being broken when the cooler is heavily loaded.
- To extend the handle, press the Furrion button in on the handle and pull the handle outward.
- When not in use, press the Furrion button in and push the handle inward.
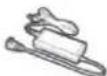
Serving Tray
- Use the tray to cut food on or place on it, and to hold condiments on the three recessed slots.
- The tray is located under the cooling compartment lid for storage.
-
It can be removed from the lid, unfolded and rest on the retractable handle.
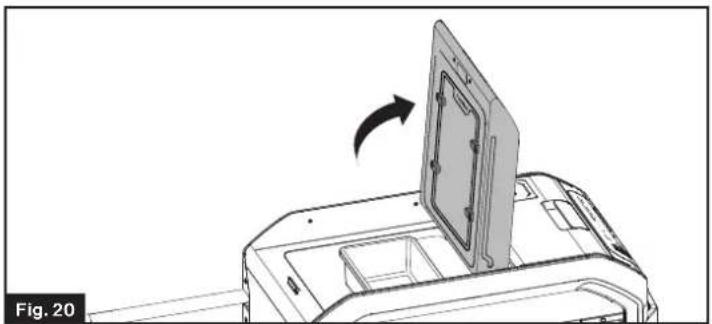
-
Pull out the retractable handle and open the cooling compartment lid. (Fig. 20)
natural_image
Diagram of a printer with a door lid and arrow indicating rotation (no text or symbols)- Rotate the 4 serving tray locks 90^ to release and take out the Serving Tray. (Fig. 21)
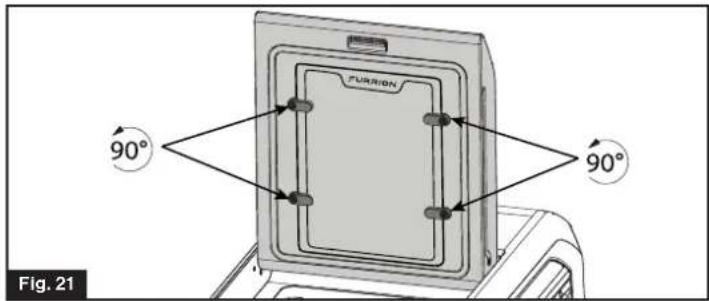
NOTE: When placing the serving tray back, make sure the "FURRION" side faces outward. Otherwise the serving tray will not seat properly.
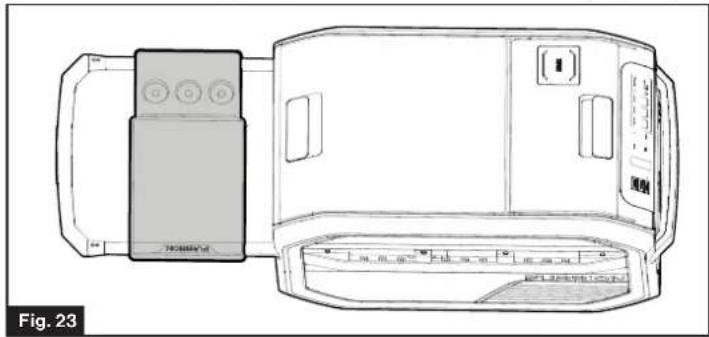
- Unfold the Serving Tray to its fully extended position. (Fig. 22)
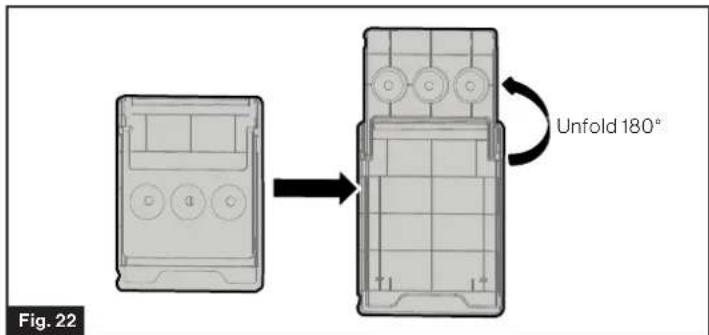
- Place the Serving Tray on the extended handle. (Fig. 23)
natural_image
Technical line drawing of a device with control panel and display unit (no text or symbols)NOTE: Do not place more than 5lbs (2.27kg) weight onto the serving tray.
Drain Cap (Fig. 24)
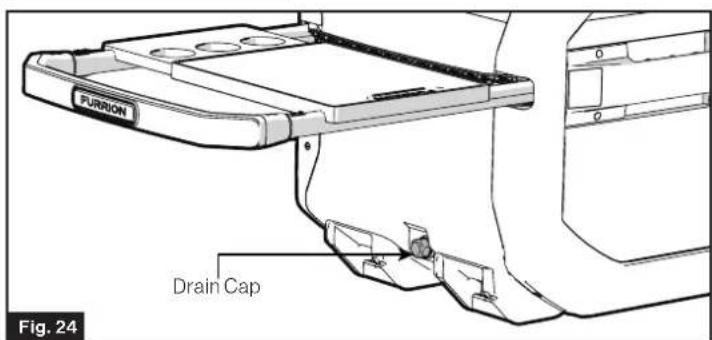
- Located at the bottom of the cooling compartment side.
- Rotate the cap to take it off, the water in the cooling compartment can be drained.
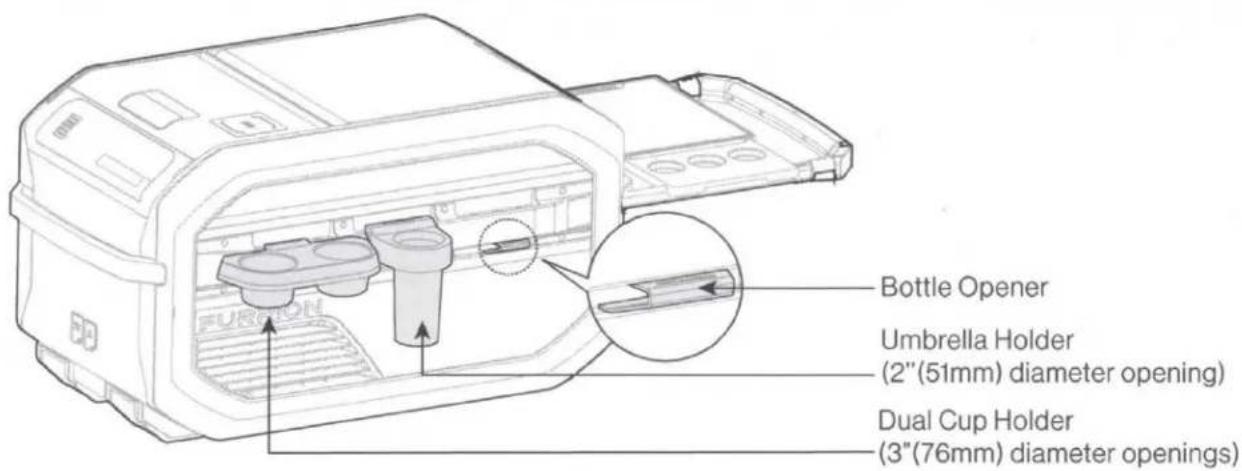
Accessory Rail (Fig. 25)

• Installed on both sides of the cooler.
- Dual cup holder, umbrella holder and other accessories can be quickly and conveniently attached and detached from the accessory rail.
Bottle Opener
• The Bottle Opener is installed on the accessory rail.
• Heavy duty construction for durability.
Dual Cup Holder
- Able to be quickly attached to & detached from the accessory rail.
- Two 3" (76mm) wide openings to fit several beverage sizes (tumblers, cans, water bottles, 12 oz beer bottles).
Umbrella Holder
- Able to be quickly attached to & detached from cooler accessory rail.
- Can accept beach umbrella of which handle up to 2" diameter. The pole should insert into the sand ground for at least 5" (127 mm).
- Additional use for fishing poles, flag poles up to 2" diameter.
Care & Maintenance
CAUTION
Failure to unplug the unit could result in electric shock or personal injury.
ePod™ Battery Care
Care for the battery as described by the instructions provided with the battery.
Solar Panel Care
Care for the solar panel as described by the instructions provided with the solar panel.
Power Failure
Most power failures are recovered within a few hours and should not affect the temperature of your unit if you minimize the number of times the lid is opened.
Vacation Time
- Short vacations: Leave the unit operating during vacations of less than three weeks.
- Long vacations: If the appliance will not be used for several months, remove all food and unplug the power cord and ePod Battery. Clean and dry the interior thoroughly. To prevent odor and mold growth, leave the lid open slightly.
Energy Saving Tips
- The cooler should be located at the coolest area as much as possible, away from heat producing appliances and out of the direct sunlight.
- Let hot foods cool down to room temperature before placing in the unit. Overloading the unit forces the compressor to run longer.
- Be sure to wrap foods properly, and wipe containers dry before placing them in the unit. This cuts down on frost build-up inside the unit.
- Organize and label food to quickly and conveniently locate items and reduce duration and frequency of lid openings.
Defrosting the Cooler
CAUTION
- Never use hard or pointed tools to remove ice or to loosen frozen objects, because which can damage the inner surfaces of the compartment.
- Do not empty the frost or water in the compartment by turning the cooler over.
Frost can form on the interior of the cooling compartment when operating in Freezer mode. It is important to defrost as necessary and often to prevent a decrease in storage capacity and efficiency of the appliance. Follow the below steps for defrosting.
- Turn off the cooler and open the cooling compartment lid.
- Empty the cooling compartment. If necessary, move the items to another freezer.
- Remove the frost by wiping it off or naturally melting through the bottom drain port.
Cleaning Instructions
WARNING
- Electrical parts should be wiped by dry cloth only!
-
Disconnect any power supply before clean the cooler!
-
Turn off the cooler, unplug the power cord and remove ePod Battery. Empty the cold and dry storage compartments.
- Wash the inside surfaces with a warm water and baking soda solution. The solution should be about 2 tablespoons of baking soda to a quart of water.
- Wash the outside surfaces with warm water and mild liquid detergent. Rinse well and wipe dry with a clean soft cloth.
- Rotate the drain cap off to drain water out of the compartments. And allow the cooler to air dry.
NOTE:
- Do not use steel wool or steel brush on the stainless steel. These will contaminate the stainless steel with steel particles and rusting may occur.
- Do not use cleansers containing corrosive and deliquescent material (such as scouring powder, bleach, soap powder, alkaline cleansers, benzene, gasoline, acid, water, etc.) to clean the appearance panels, lid gaskets and plastic parts.
Correct Disposal of This Product
To prevent possible harm to the environment or human health from uncontrolled waste disposal, recycle it responsibly to promote the sustainable reuse of material resources. To return your used device, please use the return and collection systems or contact the retailer where the product was purchased. They can take this product for environmental safe recycling.
! DANGER
RISK OF CHILD ENTRAPMENT
Before you throw away your old refrigerator or freezer:
• Take off the lids.
- Leave the shelves in place so that children may not easily climb inside.
Troubleshooting
Before contacting the Furrion Customer Service:
- Try to solve the problem yourself following the points described in the table below.
- Turn off the appliance and restart it to see if the fault persists.
| Trouble Possible Cause | |
| Cooler does not work | The Cooler is not powered on. Refer Power On/Off section in Page 9 for instructions).The circuit breaker tripped or fuse blown. |
| Compressor turns on and off frequently | The lid is open or is frequently opened, or gasket is torn, ripped or removed. |
| The temperature is not set correctly. | |
| Cooling compartments are too warm | Temperature control is not set correctly (see page 9 for setting compartment temperature). |
| The lid gasket does not seal properly. | |
| The lid is open or is frequently opened. | |
| The cooler has recently been disconnected for a period of time. | |
| Vibrating or rattling (slight vibration is normal) | The cooler is placed on uneven or weak surface. |
| Moisture collects inside the cooler | The lid is open or is frequently opened. |
| Moisture forms on the outside of the cooler | This is normal in hot and humid weather. |
| Bubbling or gurgling sounds (like boiling water) | This is the normal sound of refrigerant (used to cool cooler) circulating throughout the system. |
| Popping or cracking sounds when compressor comes on | This is normal for metal parts to undergo expansion and contraction, like hot water pipes. |
| The lid can't be closed properly. | The gasket is dirty or bent. |
| The basket is not seated properly.Storage compartment is too full and items are interfering with the lid.Lid latch is damaged or obstructed by sand, screes or something else. |
Error Code
Codes Possible Causes
| E0 | Battery is not recognized by the appliance. |
| Lo | Compressor low voltage protection. |
| E2 | Fan over-current cut-out. |
| Hot | Thermal cut-out of electronic unit. |
| E6 | Controller hardware of the compressor failure (controller detects abnormal parameters) |
| E7 | Cold storage NTC short circuit |
| E8 | Cold storage NTC open |
| -- | Gyroscope malfunction does not work or ePodTM Battery is not discovered. |
Specification
| Cooling Storage Volume | 1.67 cu. ft. (50 Quart) / 47.3 L | |
| Dry Storage Volume | 0.2 cu. ft. (6 Quart)/5.7L | |
| Refrigerant Type | R134a | |
| Refrigerant Amount | 34g/1.2oz | |
| Cooling Setting | ECO Mode Default: 46°F (8°C) | |
| Beverage Mode Default: 43°F (6°C) | ||
| Freezer Mode Default: 7°F (-14°C) | ||
| Manual Mode -8°F to 50°F (-22°C to +10°C) | ||
| Ambient Temperature* | 50°F to 109°F (+10°C to +43°C) | |
| Power Supply/Voltage (DC) | AC/DC adaptor 14.5V /6A --- | |
| Cigarette Plug 13.2V (10V to 16V) --- | ||
| Solar Panel 16V to 24.5V (open circuit) (sold separately) | ||
| ePodTM Battery 14.4V (12.8V to 16.8V) (sold separately) | ||
| Noise Level | 45 dB (A) | |
| USB Port (output) | USB1 port: 5V 724A | |
| USB2 port: 5V 724A | ||
| USB3 port: 5V 731A. 15W quick charge | ||
| Wireless Charger | 10W | |
| Wheel | Detachable Wheel Kit (Sold Separately) | |
| Product Dimension (L x W x H) | 35 58 " x 20 18 " x 19 ^15/_16 "906mm x 512mm x 507mm | |
| eRoveTM Net Weight (lbs/kg) | 61.5 / 27.9 | |
NOTE: The ambient temperature of the ePod battery is 32^ F to 104^ F ( 0^ C to 40^ C).

natural_image
Abstract black geometric shape on white background (no text or symbols)Furrion Innovation Center & Institute of Technology
- 52567 Independence Ct., Elkhart, IN 46514, USA - Toll free:1-800-789-3341
- Email: support@furrion.com
©2007-2020 Furrion Ltd. Furrion® and the Furrion logo are trademarks licensed for use by Furrion Ltd. and registered in the U.S. and other countries.
AU201913718, EU005949815-0001, AU201914110 and other patents pending
www.furrion.com
FURRIONeROVE™
50Q Electric Cooler
natural_image
Exterior view of a Furrion air purifier device (no visible text or symbols beyond branding)* Picture shown here is for reference only.
Model: FCR45DCAPA-GL
Quick Start Guide
WHAT'S IN THE BOX
DC (Cigarette lighter) Cable
Dual Cup Holder
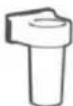
Dry Storage Container
Screw Plug x 2
natural_image
Line drawing of a paper printer with label 'PUSION' on the cover (no other text or symbols)Furrion eRove™ Cooler
AC/DC Adapter
Umbrella Holder
Serving Tray

Quick Start Guide
Warranty Manual
(Warning labels attached on the product)
KNOW YOUR COOLER
WARNING
• Always use the handles to lift or move the cooler.
- The net weight of the cooler is 61.5lbs (27.9kg). You may need two people to lift the cooler.
- To lift the cooler, the retractable handle must be in its retracted position.
| Item | Part Name |
| 1 | Lid Latch |
| 2 | Cooling Compartment |
| 3 | Serving Tray |
| 4 | Retractable Handle |
| 5 | Drainage Cap |
| 6 | AC/DC Adapter |
| 7 | Dry Storage & ePod Compartment |
| 8 | USB Ports |
| 9 | Handle |
| 10 | Solar Panel Input |
| 11 | DC Input |
| 12 | Control Panel |
| 13 | Bottle Opener |
| 14 | Wireless Charging Pad |
| 15 | DC (Cigarette lighter) Cable |
| 16 | Vent |
| 17 | Accessory Rail |
Accessories Sold Separately

natural_image
Line drawing of a wheel and gear assembly (no text or symbols)Wheel Kit (C-FCR00DCAPA-01)
Furrion ePod™ Battery (FBN12C33A1)

natural_image
Grid pattern with uniform squares and no text or symbolsSolar Panel (FSPK10MWT-BL)
NOTE: For the wheel kit, Furrion ePod™ battery and solar panel, please refer to each manual separately for instructions.
BEFORE FIRST USE
- Remove all packaging materials.
- Check the completeness of the delivery.
- Check the appliance for transport damages.
- Before starting your new cooler for the first time, clean it with a damp cloth. Do not use soap or detergent.
APPLIANCE PLACEMENT
- Make certain at least 1"(25.4mm) clearance exists to the air vents, and never block vents.
- Operate the unit on a flat surface (slope of no more than 30^ ).
- Place the unit in a dry and ventilated place far away from heat sources (such as stove, open fire), and place the unit in a well shaded area (prevent exposure to direct sunlight).
- Do not immerse the unit in water or expose it to rain.
POWER THE COOLER
Power with 120V AC / 12V DC Power Source

NOTE: The AC/DC adapter is for indoor use only. Do not use it outdoors.
Power with Furrion ePod™ Battery (Sold Separately)
You can purchase a Furrion ePod™ battery to power your cooler in off-grid situations.
Plug in the Furrion ePod™ battery
The cooler display will indicate the actual battery level when the Furrion ePod™ battery is correctly inserted into the compartment.
NOTE: Keep the dry storage and Furrion ePod™ battery compartment closed when camping.
Charge the ePod™ battery
NOTE: The solar panel cannot power the Cooler without a Furrion ePod™ battery inserted (Unit shows "SOL").

OPERATION
Switch On/Off
Press and hold the ⏻ button on the control panel for 1 second to turn on/off the Cooler.
Select Operation Mode
- Touch ≡ (Mode key) to select operating mode: ECO > Beverage > Freezer > USB.
- Stop cycling on desired setting to select mode.
- Use "+ / —" to increase/decrease temperature away from the preset mode Beverage, Freezer, ECO.
- Beverage mode has a fixed preset temperature setting to 43°F (6°C) and Freezer mode to 7°F (-14°C). Select ECO mode for keeping items cold with lower power consumption (to prolong battery lifetime).
- Select USB mode if you just want to power connected devices via USB and keep the compressor turned off.

Touch “+ / —” to cycle through the available temperature range for the Manual mode. Stop cycling on desired setting to select temperature. Temperature setting will flash for 2 seconds before displaying the actual temperature.
°F/C
Touch "°F/C" to cycle between Fahrenheit and Celsius.
Use Your Serving Tray

NOTE: Do not place more than 5lbs (2.27kg) weight onto the serving tray.
Accessories on the Rail
IMPORTANT SAFETY INSTRUCTIONS
This appliance is designed and manufactured for beverage and food preservation. Common uses may include:
• RV Indoor refrigerator/freezer
- Portable Camping Cooler
• Emergency Cold Storage
• Cold Grocery Preservation
• Cooler mounted in the vehicle to keep food & beverages cold

DANGER
• DO NOT store explosive substances, such as aerosol cans, in the appliance.
- This appliance is not intended for use by persons (including children) with reduced physical, sensory or mental capabilities, or lack of experience and knowledge, unless they have been given supervision or instruction concerning use of the appliance by a person responsible for their safety.
• RISK OF CHILD ENTRAPMENT.
Before you throw away your old cooler:
- Take off the doors.
- Leave the dry storage container in place so that children may not easily climb inside.
Failure to follow instruction could result in serious injury, property damage or death.

WARNING
- If the SUPPLY CORD is damaged, it must be replaced by the manufacturer, its service agent or similarly qualified persons in order to avoid a hazard.
- The repair and maintenance of the cooler should be conducted by the manufacturer, local dealer or qualified personnel. Do not attempt to repair your cooler by yourself, this will void the warranty.
- Do not let the cord hang over the edge of a table or counter or touch hot surfaces.
- Do not unplug by pulling the cord, always grasp the plug head.
- Do not attempt to move your cooler while it is still plugged into the power outlet - always unplug cables first.
- Keep ventilation openings, in the appliance enclosure or in the built-in structure, clear of obstruction.
- Do not use mechanical devices or other means to accelerate the defrosting process, other than those recommended by the manufacturer.
• Do not damage the refrigerant circuit. - Do not use electrical appliances inside the food storage compartments of the appliance, unless they are of the type recommended by the manufacturer.
HEALTH HAZARD
- Food may only be stored in its original packaging or in suitable containers.
- Opening the lid for long periods can cause significant increase of the temperature in the compartments of the device.
- Clean regularly surfaces that can come in contact with food and accessible drainage systems.
- Store raw meat and fish in suitable containers in the device, so that it is not in contact with or can drip onto other food.
• If the device is left empty for long periods:
– Switch off the device. - Defrost the device.
– Clean and dry the device.
– Leave the lid open to prevent mould developing within the device.
Correct Disposal of This Product
To prevent possible harm to the environment or human health from uncontrolled waste disposal, recycle it responsibly to promote the sustainable reuse of material resources. To return your used device, please use the return and collection systems or contact the retailer where the product was purchased. They can take this product for environmental safe recycling.
Save these instructions for future reference!

natural_image
Abstract black geometric shape on white background (no text or symbols)
natural_image
Simple question mark inside a speech bubble (no text or symbols)
www.furrion.com/support
1-800-789-3341

support@furrion.com
FURRION
Furrion Innovation Center & Institute of Technology
• 52567 Independence Ct., Elkhart, IN 46514, USA
©2007-2020 Furrion Ltd. Furrion® and the Furrion logo are trademarks licensed for use by Furrion Ltd. and registered in the U.S. and other countries.
www.furrion.com
IG-FHA00019 V1.0
FURRION
WARRANTY MANUAL...... ENGLISH (EN)
LIVRET DE GARANTIE...... FRANÇAIS (FR)
MANUAL DE GARANTÍA..... ESPAÑOL (ES)

Congratulations on purchasing your new Furrion product. All Furrion products are made to strict quality standards. The details of this warranty are set out in the terms and conditions (see reverse) which supplement the authorized reseller or dealer's
Terms and Conditions of Sale. Please visit www.furrion.com
LIMITED WARRANTY TERMS AND CONDITIONS
- Furrion warrants that this product will be free from defects in workmanship and materials for a period of 24 months (accessories and general wear and tear damage are excluded) with parts and labor, from date of retail purchase, by the original end-use purchaser ("you") when delivered to you in new condition, in original packaging, from a Furrion authorized reseller or dealer and used in normal conditions. If a valid claim is made under warranty, then you will only be entitled to claim in accordance with paragraph 6 below.
- The warranty only applies to Furrion products: with a valid serial number; used for consumer, private use and not for commercial or industrial use; and where you have validated the warranty in accordance with paragraph 4 below.
-
The warranty does not cover damage or loss: caused by poor, faulty or incorrect use, installation or maintenance; caused by accident (including force majeure or natural forces), misuse, negligence, abrasion, improper storage following delivery, rot and/or infestation following delivery, leaks (or similar incidents); occurring during shipment (even when Furrion arranged or paid for shipping); caused by failure to follow instructions in the owner's guide, damaged; caused by normal wear and tear; caused by maintenance, repairs or modifications other than those carried out by an authorized dealer; caused to the decorative surface of the product; caused to any data, software or information. This warranty also excludes claims based on any misrepresentations by the seller; or if this product's serial number has been altered, defaced, removed or rendered unidentifiable. This warranty is only valid in the country of purchase. Please see section 14 for specific product details.
-
To validate the warranty, you must: (a) complete the registration via www.furrion.com, or by call center; and (b) register the warranty covering this product within 6 months of the date of the bill of sale; and (c) have the original bill of sale to validate warranty of this product.
-
If you require warranty service on this product, please cease using the product when a fault arises and contact us directly. You will have to present your original bill of sale to establish warranty coverage. Furrion's customer service can be reached at:
(i) For USA/Canada customers:
www.furrion.com
Email: support@furrion.com
Toll-free Number: +1 800 789 3341
- Following the filing of a claim, Furrion will investigate the claim. If we believe there is a defect covered by the warranty, we will at our option either repair or replace the defective product (or part). It is Furrion's right to replace with new or refurbished product. If the product is part of an advanced exchange program, you may be required to provide a credit authorization during the claiming process.
- Please note in the event that no defect can be found, it is your responsibility to pay for the re-delivery of the replacement items. If a defect is found, Furrion will pay for the re-delivery of the replacement items.
- Installation of any repaired or replaced product will not be Furrion's responsibility.
- If you do not allow the authorized dealer to inspect the product which is the subject of the warranty claim, you will invalidate the warranty in respect of that claim.
- Any repaired Furrion product parts shall be guaranteed on the terms of this warranty for the unexpired portion of the warranty period only.
- This warranty is subject to the jurisdiction of the courts of the State where you purchased this product, and any dispute or claim arising out of, or in connection with it or its subject matter, shall be governed by, and construed in accordance with the laws of that State.
- In the event of any difference between this warranty and the provisions in any owner's manuals, warranty manuals, or packaging cartons, the terms of this warranty shall prevail to the fullest extent allowed by law.
- THIS WARRANTY AND REMEDIES SET FORTH ABOVE ARE EXCLUSIVE AND IN LIEU OF ALL OTHER WARRANTIES, REMEDIES AND CONDITIONS, WHETHER ORAL OR WRITTEN, EXPRESS OR IMPLIED. FURRION SPECIFICALLY DISCLAIMS ANY AND ALL IMPLIED WARRANTIES, INCLUDING, WITHOUT LIMITATION, WARRANTIES OF MERCHANTABILITY AND FITNESS FOR A PARTICULAR PURPOSE. IF FURRION CANNOT LAWFULLY DISCLAIM IMPLIED WARRANTIES UNDER THIS LIMITED WARRANTY, ALL SUCH WARRANTIES, INCLUDING WARRANTIES OF MERCHANTABILITY AND FITNESS FOR A PARTICULAR PURPOSE ARE LIMITED IN DURATION TO THE DURATION OF THIS WARRANTY. NO FURRION RESELLER, AGENT, OR EMPLOYEE IS AUTHORIZED TO MAKE ANY MODIFICATION, EXTENSION, OR ADDITION TO THIS WARRANTY. FURRION IS NOT RESPONSIBLE FOR DIRECT, INDIRECT, SPECIAL, INCIDENTAL OR CONSEQUENTIAL DAMAGES RESULTING FROM ANY BREACH OF WARRANTY OR CONDITION, OR UNDER ANY OTHER LEGAL THEORY, INCLUDING BUT NOT LIMITED TO LOST PROFITS, DOWNTIME, GOODWILL, DAMAGE TO OR REPLACEMENT OF ANY EQUIPMENT OR PROPERTY, ANY COSTS OF RECOVERING, REPROGRAMMING, OR REPRODUCING ANY PROGRAM OR DATA STORED IN OR USED WITH FURRION PRODUCTS. FURRION'S TOTAL LIABILITY IS LIMITED TO
THE REPAIR OR REPLACEMENT OF THIS PRODUCT PURSUANT TO THE TERMS OF THIS WARRANTY. SOME STATES DO NOT ALLOW THE EXCLUSION OR LIMITATION OF INCIDENTAL OR CONSEQUENTIAL DAMAGES OR EXCLUSIONS OR LIMITATIONS ON THE DURATION OF IMPLIED WARRANTIES OR CONDITIONS, SO THE ABOVE LIMITATIONS OR EXCLUSIONS MAY NOT APPLY TO YOU. THIS WARRANTY GIVES YOU SPECIFIC LEGAL RIGHTS, AND YOU MAY ALSO HAVE OTHER RIGHTS THAT VARY BY STATE OR (WHERE APPLICABLE IN THE COUNTRIES WHERE FURRION HAS NON-US/CANADIAN AUTHORIZED DEALERS) COUNTRY. NO ACTION OR CLAIM TO ENFORCE THIS WARRANTY SHALL BE COMMENCED AFTER THE EXPIRATION OF THE WARRANTY PERIOD.

natural_image
Abstract geometric pattern with three parallel dark gray shapes on white background (no text or symbols)FURRIONeROVE™
Wheel Kit
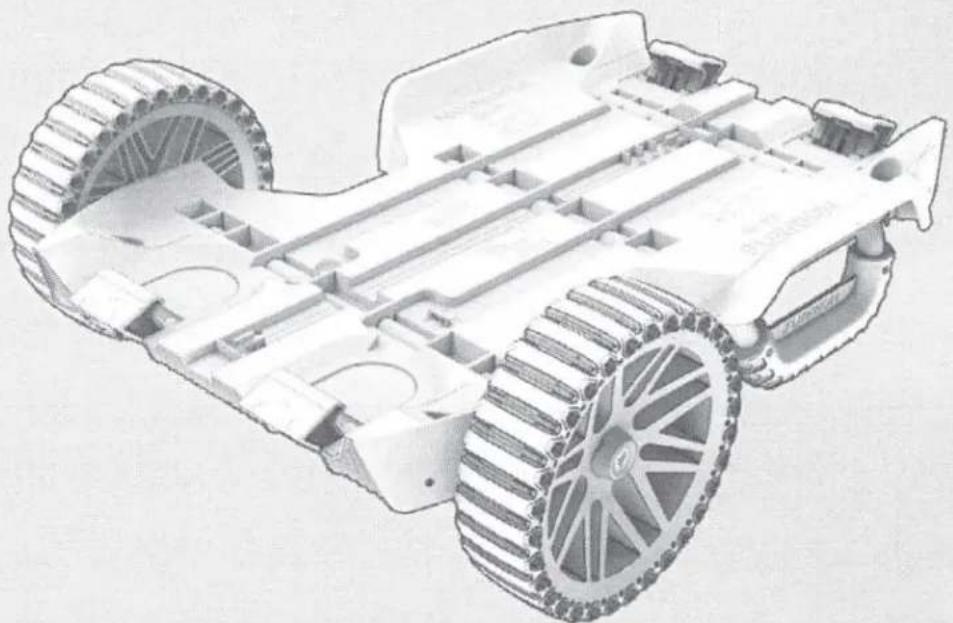
natural_image
Technical illustration of a tracked robotic vehicle with visible wheels and structural components (no text or symbols)* Picture shown here is for reference only.
Model: C-FCR00DCAPA-01
Quick Start Guide
WHAT'S IN THE BOX
Make sure you have all the following items included in the packaging. If any item is damaged or missing, contact your dealer or the Furrion customer service.
- Wheel Kit Body x1
- Wheel x 2
- Washer (on Wheels) x 4
- Wheel Cap (on Wheels) x 2
- Axle (in Wheel Kit Body) x 1
- Stopper (in Wheel Kit Body) x 2
- Hex Wrench x 1
BEFORE ASSEMBLY
- Remove all packaging materials.
- Check the completeness of the delivery.
- Check the product for transport damages.
ASSEMBLY

- Remove axle, stoppers, wheel caps and washers.
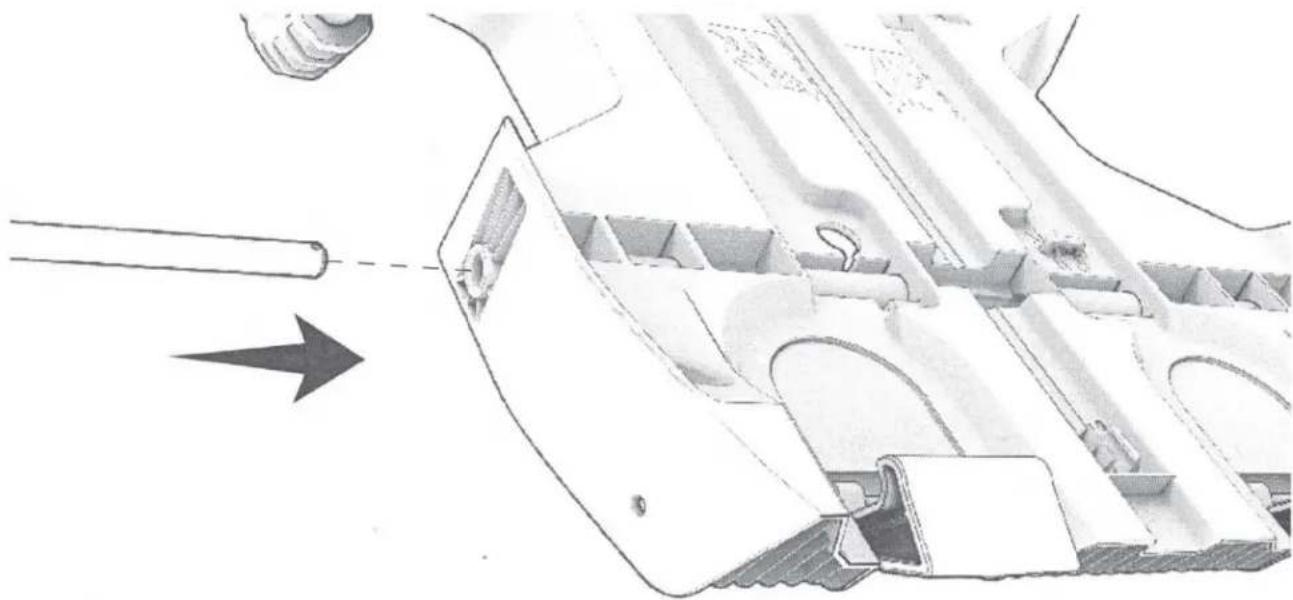
natural_image
Technical illustration of a mechanical assembly with internal components and an arrow indicating direction (no text or symbols)- Push the axle through the guide rail of the wheel kit body.
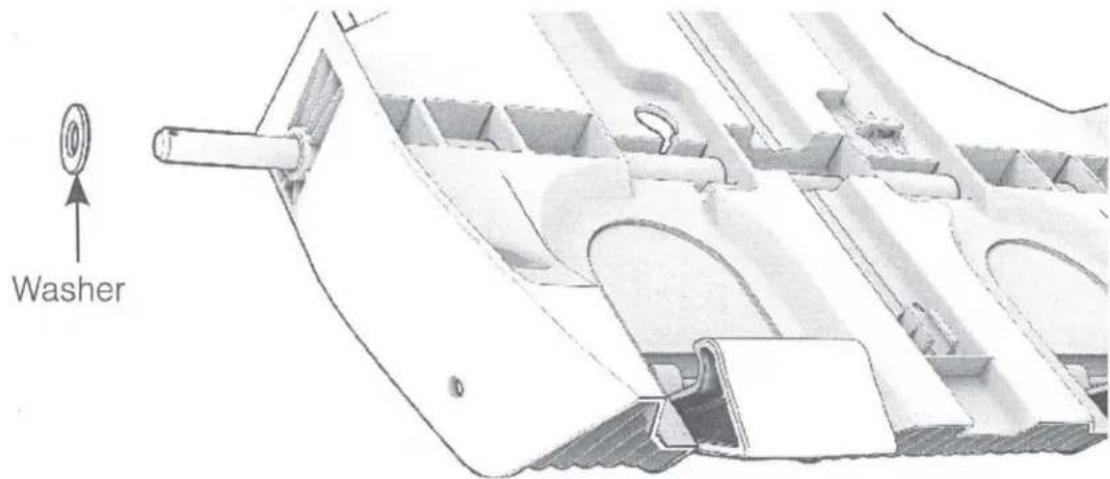
- Place a washer on the axle. Push the washer fully in, until it reaches the wheel kit body.
natural_image
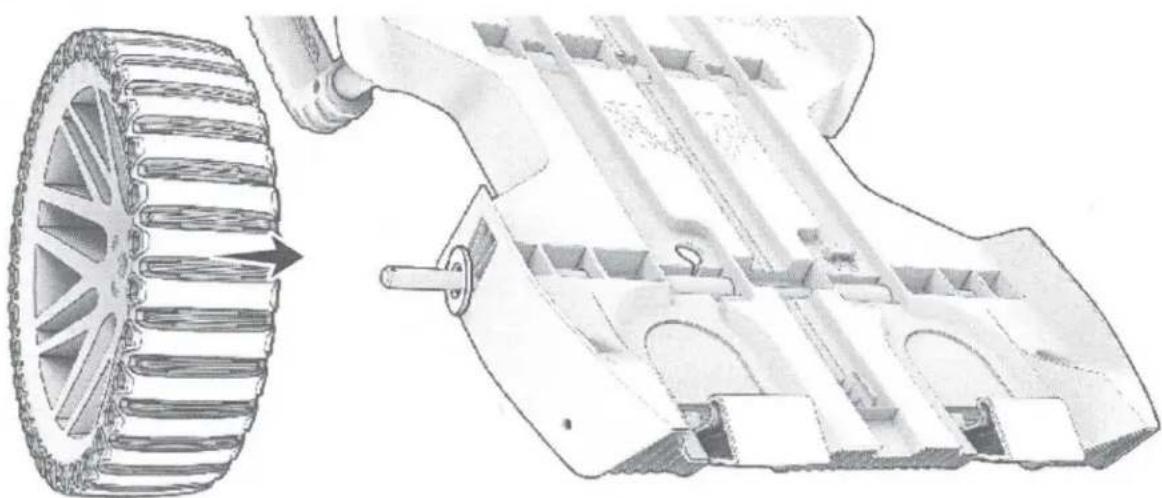
Technical illustration of a mechanical assembly with gear and housing components (no text or symbols)- Slide a wheel to the axle.
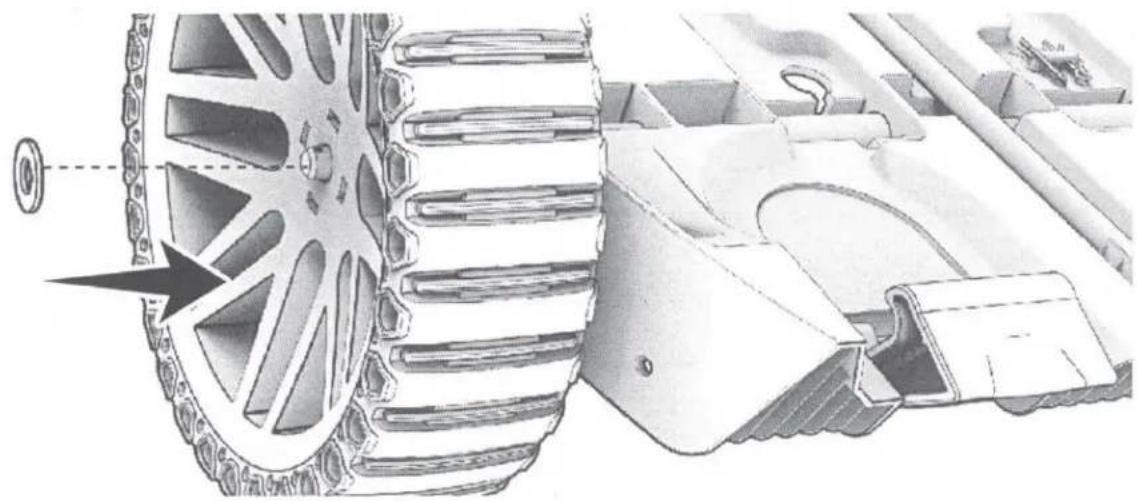
natural_image
Technical illustration of a tank's internal components, showing wheel rim and chassis (no text or symbols)- Place a washer on the axle. Push the washer onto the wheel.
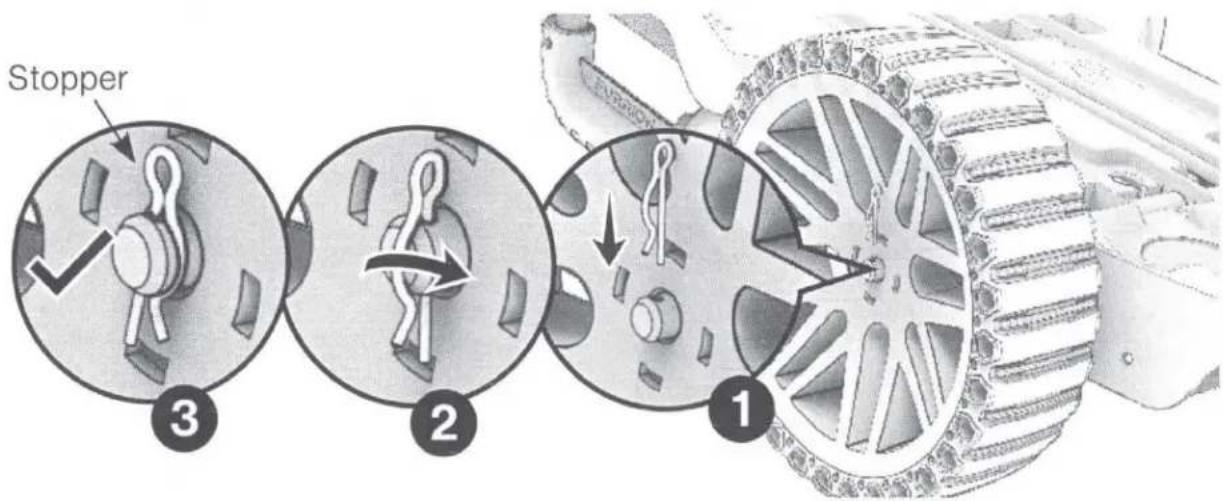
- Push the straight end of the retention pin through the axlels hole.
natural_image
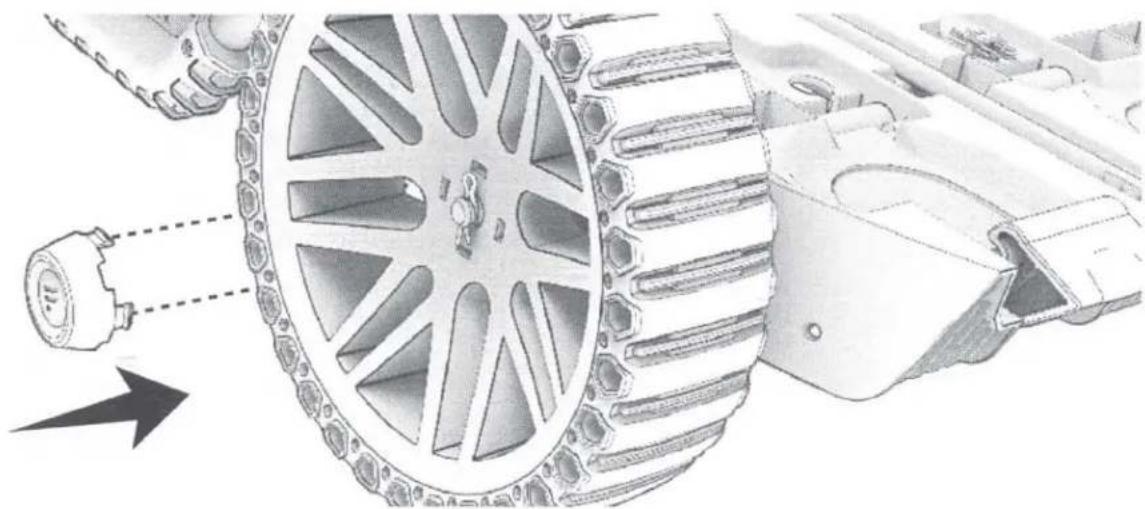
Technical illustration of a mechanical assembly with gears and a sensor, showing no text or symbols.- Assemble the wheel cap onto the wheel: Align the catches with the holes on the wheel and push the wheel cap in.
- Repeat the above steps to assemble the second wheel on the other side.
- The assembly of the wheel kit is completed.
ATTACHING/DETACHING THE WHEE KIT
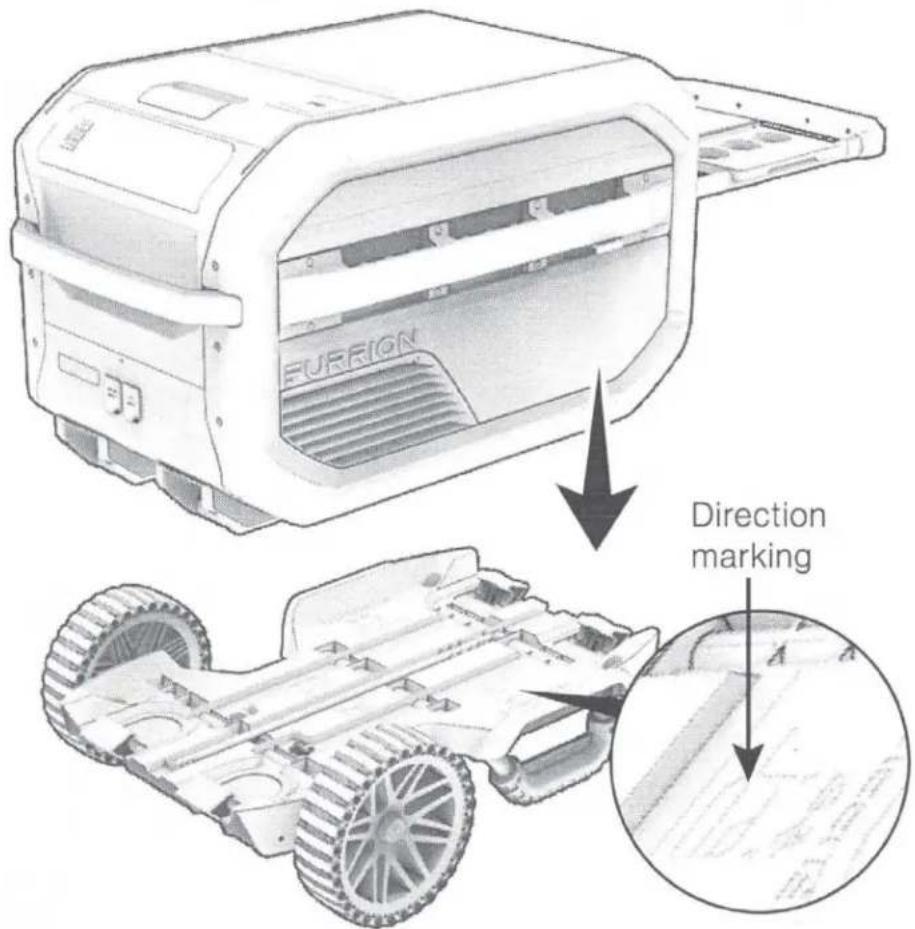
- Place the Furrion eRove™ Cooler on the wheel kit following the instruction of direction markings on the wheel kit.
- To lock the eRove™ Cooler, flip up the latches until they click into place.
- To unlock the eRove™ Cooler, flip up the latches and pull outwards at the same time until they are unlocked.

natural_image
Simple question mark inside a speech bubble outline (no text or symbols)
natural_image
Abstract geometric pattern with three horizontal gray bars and a curved bottom bar (no text or symbols)
www.furrion.com/support
1-800-789-3341

support@furrion.com
FURRION
Furrion Innovation Center & Institute of Technology
• 52567 Independence Ct., Elkhart, IN 46514, USA
©2007-2020 Furrion Ltd. Furrion® and the Furrion logo are trademarks licensed for use by Furrion Ltd. and registered in the U.S. and other countries.
www.furrion.com
IG-FHA00030 V1.0
FURRION
WARRANTY MANUAL...... ENGLISH (EN)
LIVRET DE GARANTIE...... FRANÇAIS (FR)
MANUAL DE GARANTÍA..... ESPAÑOL (ES)
LIMITED WARRANTY TERMS AND CONDITIONS
- Furrion warrants that this product will be free from defects in workmanship and materials for a period of 12 months with parts and labor, except the products in the following table, from date of retail purchase, by the original end-use purchaser ("you") when delivered to you in new condition, in original packaging, from a Furrion authorized reseller or dealer and used in normal conditions. If a valid claim is made under warranty, then you will only be entitled to claim in accordance with paragraph 6 below.
| Product Type | Warranty Period |
| Air Conditioner | 24 months |
| Gas Water Heater | 24 months |
| Solar | 24 months |
| AC/DC Power Centers | 24 months |
| Cordsets & Adapters, Power Inlets (RV, and Marine) | 60 months |
- The warranty only applies to Furrion products: with a valid serial number; used for consumer, private use and not for commercial or industrial use; and where you have validated the warranty in accordance with paragraph 4 below.
- The warranty does not cover damage or loss: caused by poor, faulty or incorrect use, installation or maintenance; caused by accident (including force majeure or natural forces), misuse, negligence, abrasion, improper storage following delivery, rot and/or infestation following delivery, leaks (or similar incidents); occurring during shipment (even when Furrion arranged or paid for shipping); caused by failure to follow instructions in the owner's guide, damaged; caused by normal wear and tear; caused by maintenance, repairs or modifications other than those carried out by an authorized dealer; caused to the decorative surface of the product; caused to any data, software or information. This warranty also excludes claims based on any misrepresentations by the seller; or if this product's serial number has been altered, defaced, removed or rendered unidentifiable. This warranty is only valid in the country of purchase. Please see section 14 for specific product details.
- To validate the warranty, you must: (a) complete the registration via www.furrion.com, or by call center; and (b) register the warranty covering this product within 6 months of the date of the bill of sale; and (c) have the original bill
of sale to validate warranty of this product.
- If you require warranty service on this product, please cease using the product when a fault arises and contact us directly. You will have to present your original bill of sale to establish warranty coverage. Furrion's customer service can be reached at:
(i) For USA/Canada customers:
www.furrion.com
Email: support@furrion.com
Toll-free Number: +1 800 789 3341
-
Following the filing of a claim, Furrion will investigate the claim. If we believe there is a defect covered by the warranty, we will at our option either repair or replace the defective product (or part). It is Furrion's right to replace with new or refurbished product. If the product is part of an advanced exchange program, you may be required to provide a credit authorization during the claiming process.
-
Please note in the event that no defect can be found, it is your responsibility to pay for the re-delivery of the replacement items. If a defect is found, Furrion will pay for the re-delivery of the replacement items.
-
Installation of any repaired or replaced product will not be Furrion's responsibility.
-
If you do not allow the authorized dealer to inspect the product which is the subject of the warranty claim, you will invalidate the warranty in respect of that claim.
-
Any repaired Furrion product parts shall be guaranteed on the terms of this warranty for the unexpired portion of the warranty period only.
-
This warranty is subject to the jurisdiction of the courts of the State where you purchased this product, and any dispute or claim arising out of, or in connection with it or its subject matter, shall be governed by, and construed in accordance with the laws of that State.
-
In the event of any difference between this warranty and the provisions in any owner's manuals, warranty manuals, or packaging cartons, the terms of this warranty shall prevail to the fullest extent allowed by law.
-
THIS WARRANTY AND REMEDIES SET FORTH ABOVE ARE EXCLUSIVE AND IN LIEU OF ALL OTHER WARRANTIES, REMEDIES AND CONDITIONS, WHETHER ORAL OR WRITTEN, EXPRESS OR IMPLIED. FURRION SPECIFICALLY DISCLAIMS ANY AND ALL IMPLIED WARRANTIES, INCLUDING, WITHOUT LIMITATION, WARRANTIES OF MERCHANTABILITY AND FITNESS FOR A PARTICULAR PURPOSE. IF FURRION CANNOT LAWFULLY DISCLAIM IMPLIED WARRANTIES UNDER THIS LIMITED WARRANTY, ALL SUCH WARRANTIES, INCLUDING WARRANTIES OF MERCHANTABILITY AND FITNESS FOR A PARTICULAR PURPOSE ARE LIMITED IN DURATION TO THE DURATION OF THIS WARRANTY. NO FURRION RESELLER, AGENT, OR EMPLOYEE IS AUTHORIZED TO MAKE ANY MODIFICATION, EXTENSION, OR ADDITION TO THIS WARRANTY. FURRION IS NOT RESPONSIBLE FOR DIRECT, INDIRECT, SPECIAL, INCIDENTAL OR CONSEQUENTIAL DAMAGES RESULTING FROM ANY BREACH OF WARRANTY OR CONDITION, OR UNDER ANY OTHER LEGAL THEORY, INCLUDING BUT
NOT LIMITED TO LOST PROFITS, DOWNTIME, GOODWILL, DAMAGE TO OR REPLACEMENT OF ANY EQUIPMENT OR PROPERTY, ANY COSTS OF RECOVERING, REPROGRAMMING, OR REPRODUCING ANY PROGRAM OR DATA STORED IN OR USED WITH FURRION PRODUCTS. FURRION'S TOTAL LIABILITY IS LIMITED TO THE REPAIR OR REPLACEMENT OF THIS PRODUCT PURSUANT TO THE TERMS OF THIS WARRANTY. SOME STATES DO NOT ALLOW THE EXCLUSION OR LIMITATION OF INCIDENTAL OR CONSEQUENTIAL DAMAGES OR EXCLUSIONS OR LIMITATIONS ON THE DURATION OF IMPLIED WARRANTIES OR CONDITIONS, SO THE ABOVE LIMITATIONS OR EXCLUSIONS MAY NOT APPLY TO YOU. THIS WARRANTY GIVES YOU SPECIFIC LEGAL RIGHTS, AND YOU MAY ALSO HAVE OTHER RIGHTS THAT VARY BY STATE OR (WHERE APPLICABLE IN THE COUNTRIES WHERE FURRION HAS NON-US/CANADIAN AUTHORIZED DEALERS) COUNTRY. NO ACTION OR CLAIM TO ENFORCE THIS WARRANTY SHALL BE COMMENCED AFTER THE EXPIRATION OF THE WARRANTY PERIOD.

natural_image
Abstract geometric pattern with three parallel dark gray shapes on white background (no text or symbols)FURRION ePOD™
Furrion ePod™ Battery
Model: FBN12C33A1
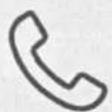
natural_image
Illustration of a white rectangular washing machine with two compartments and a handle (no text or symbols)* Picture shown for reference only
Quick Start Guide
GENERAL SAFETY INSTRUCTIONS

WARNING
Indicates a hazardous situation which, if not avoided, could result in death or serious injury.

WARNING
RISK OF FIRE, ELECTRIC SHOCK, OR PERSONAL INJURY.
WARNING: When using this product, basic precautions should always be followed, including the following:
- Read all instructions and safety precautions before using the product.
- Keep out of reach of children. To reduce the risk of injury, close supervision is necessary when the product is used near children.
- Failing to operate the battery or power station in accordance to this manual may damage internal components and will void the warranty.
- Damage to internal components may result in electrical shock, chemical burn, outgassing, fire, or explosion causing personal injury or damage to other devices.
- Do not allow internal battery materials to come in contact with skin or eyes. If exposed to internal battery materials seek medical attention immediately and flush area with clean lukewarm water without interruption or as instructed by medical professionals.
- Do not modify or disassemble the battery or the power station; there are no userserviceable parts inside.
-
Do not use power sources or attachments that are not approved by Furrion®.
-
To reduce risk of damage to the adapter cables and charging ports, pull cables by the plug end when disconnecting the power station. Do not operate the power station with damaged adapter cables.
- Do not drop or subject the product to strong mechanical shock.
- Do not expose the product to moisture, water, rain, snow, or spray.
- Keep the product clean and dry. Unplug the product before cleaning. Use a clean dry cloth to clean battery or power station terminals if they become dirty.
- Do not allow foreign objects or conductive materials such as keys or fingers to come in contact with the positive and negative terminals on the battery or power station. Doing so may cause a short circuit.
- Always unplug charging cables from power station prior to removing battery.
- Ensure that battery is fully inserted in power station and charging cords are connected properly before attempting to charge or discharge.
- Do not expose the product to excessive heat or fire above 158^ F ( 70^ C) and avoid storage in direct sunlight.
- The product may become warm, up to 104^ F ( 40^ C), during extended high-power operation. During operation, keep the product away from materials that may be affected by these temperatures.
- Disconnect the ePod from power source after more than 48 hours when not in use.
- Do not allow the ePod or any other connected devices exceed the rated current, voltage, or power indicated in this manual and at the AC/DC ports.
- Dispose of battery in accordance with local regulation. Contact your local waste management office for information on proper battery recycling or disposal.
- The product must be stored indoors and protected from the elements.
- Do not block the air vents of the product. Keep a clearance of at least 1" (2.5cm) on the left and right side.
CORRECT DISPOSAL OF THIS PRODUCT
To prevent possible harm to the environment or human health from uncontrolled waste disposal, recycle the battery responsibly to promote the sustainable reuse of material resources. To return your used product, please use the return and collection systems or contact the retailer where the product was purchased. They will help inform the best way to deal with the product in an environmentally safe way.
Do not dispose of used batteries with your household waste. Take them to an appropriate disposal/collection site.
STORAGE
- Store the ePod in a cool dry location, not accessible to children and pets.
- Store the ePod indoors at temperature of -4 to 140°F (-20 to +60°C) with low humidity and non-corrosive atmosphere.
- Ensure that no heavy objects are placed on top of the ePod or could otherwise fall on the ePod.
- After extended periods of storage, up to 6 months, it is recommended to fully discharge and charge the ePod several times to optimize performance.
BEFORE USE
- Remove all packaging materials.
- Please keep this instruction manual in a safe place for future reference. Make sure to pass the instruction manual on to any new owners of the product.
- The manufacturer does not accept responsibility for any damages that may occur due to not observing these instructions.
- If you have any further questions regarding our products, please contact us at support@furrion.com.
- Check the battery for transport damages.
PRODUCT OVERVIEW
Make sure you have all the following items included in the packaging. If any item is damaged or missing, contact your dealer or Furrion® customer service.
• Furrion ePod™ Battery (FBN12C33A1) x 1
• Quick Start Guide x 1
• Warranty Manual x 1
The battery is compatible with the following components:
- Furrion ePod™ Power Station (FIVSP40A-BL, sold separately)
- Furrion eRove™ (FCR45DCAPA-GL, sold separately)
CHECKING THE BATTERY LEVEL WHILE DISCHARGING
Touch the ➕ logo on the handle to check the battery level. The battery percentage and corresponding LED indicators are shown below:
| Indicator on Display Indicator on Battery Battery Level | ||
 |  | 76 – 100% |
 |  | 51 – 75% |
 |  | 26 – 50% |
 |  | 11 – 25% |
 |  Red blink Red blink | 0 – 10% |
NOTE: Indication is shown for 10 seconds.
CHECKING THE BATTERY LEVEL WHILE CHARGING
During the charging process, the battery percentage and corresponding LED indicators are shown below:
| Indicator on Display Indicator on Battery Battery Level | ||
 |  | 91 – 100% |
 |  | 76 – 90% |
 |  | 51 – 75% |
 |  | 26 – 50% |
 |  | ≤ 25% |
INSERTING AND CHARGING THE ePod™ BATTERY
NOTE: Before installing/removing the battery, switch off the appliance and disconnect it from any power supply.
NOTE: During the charging process, the battery indicator on the handle flashes slowly.
Charge with Furrion ePod™ Power Station
- Fully insert the battery into the power station until the PRESS AND RELEASE button is latched into position.
- To remove, press the PRESS AND RELEASE button and pull upwards.
NOTE: For detailed instructions, refer to the Furrion ePod™ Power Station user manual.

Charge with Furrion eRove™
Insert the battery into the eRove battery compartment.
NOTE: For detailed instructions, refer to the Furrion eRove™ user manual.
natural_image
Diagram of a device interior showing internal components and a directional arrow (no text or symbols)SPECIFICATION
| Weight 8.8lb (4kg) | |
| Dimensions | 59/16" x 59/16" x 91⁄2"(141.5 x 141.5 x 241mm) |
| Operating Temperature 32 to 104°F (0 to +40°C) | |
| Storage Temperature -4 to 140°F (-20 to +60°C) | |
| Cell Chemistry Lithium-ion | |
| Pack Capacity 412Wh | |
| Battery Voltage 14.4Vdc | |
| Life Cycles* | 500 @RT 77°F (25°C), charge & discharge with 0.2C |
| * Maintaining over 70 % of original capacity. | |

natural_image
Abstract geometric pattern with three black curved shapes on a light gray background (no text or symbols)FURRION
Furrion Innovation Center & Institute of Technology
• 52567 Independence Ct., Elkhart, IN 46514, USA
• Toll free: 1-800-789-3341
- Email: support@furrion.com
©2007-2020 Furrion Ltd. Furrion® and the Furrion logo
are trademarks licensed for use by Furrion Ltd. and registered in the U.S.
and other countries.
FURRION.COM
IG-FEN00007V1.0
Furrion ePod™ Battery
natural_image
Exterior view of a modern Furrion battery unit (no signage or text beyond branding)Main Features

EXPANDABLE SWAPPABLE DESIGN, INCREASE USABILITY

UP TO 500 CHARGING CYCLE

LITHIUM ION HIGH CAPACITY BATTERY

OVERCURRENT AND OVERLOARD PROTECTION

LONG LASTING SHELF LIFE STORAGE

OVER DISCHARGE PROTECTION INCREASE LIFESPAM
![5%×[141mm] 5%×[141mm]](/content/2026/06/1204164/images/c070a07fddd05a503cb9226c5c08f03a675a051472202f399a6e0d2e97de0102.jpg)
natural_image
Pure technical line drawing of a rectangular frame with internal components (no text or symbols)
natural_image
Pure technical line drawing of a rectangular frame with vertical supports (no text or symbols)
natural_image
Pure technical line drawing of a rectangular enclosure or enclosure frame (no text or symbols)![24% [74.8mm]](/content/2026/06/1204164/images/6f9224cdf9a4dbcede32fa97012c5e87b7222402d06740a82b83cf0a68197fbe.jpg)
Part Number
Product
FPP04A40-BL

Specifications
| Battery Type | 18650 Lithium Ion Cells, 44 total cells |
| Output Voltage | 14.4V |
| Current | 35A |
| Battery Cycles | 500 minimum |
| Built-in Charger Input | 10.5V - 24V |
| Built-in Charger Input Power | <100W |
| Battery Capacity | 412Wh (114,400mAh @3.6V) |
| Over Charge Voltage Protection | √ |
| Short Circuit Protection | √ |
| Automatic Power Cut Off | √ |
| Over Discharge | √ |
| Over Current Protection | √ |
| Material | ABS + Aluminium |
| Operating Temperature | 32-104°F / 0-40°C |
| Weight (lbs/kg) | 9.5lbs / 4.3kg |
| Product Size (WxHxD) | 5.6 x 9.5 x 5.6" |
| (141 x 241 x 141mm) |
FURRION
WARRANTY MANUAL...... ENGLISH (EN)
LIVRET DE GARANTIE...... FRANÇAIS (FR)
MANUAL DE GARANTÍA..... ESPAÑOL (ES)

Congratulations on purchasing your new Furrion product. All Furrion products are made to strict quality standards. The details of this warranty are set out in the terms and conditions (see reverse) which supplement the authorized reseller or dealer's Terms and Conditions of
Sale. Please visit www.furrion.com
LIMITED WARRANTY TERMS AND CONDITIONS
- Furrion warrants that this product will be free from defects in workmanship and materials for a period of 12 months with parts and labor, except the products in the following table, from date of retail purchase, by the original end-use purchaser ("you") when delivered to you in new condition, in original packaging, from a Furrion authorized reseller or dealer and used in normal conditions. If a valid claim is made under warranty, then you will only be entitled to claim in accordance with paragraph 6 below.
| Product Type | Warranty Period |
| Air Conditioner | 24 months |
| Gas Water Heater | 24 months |
| Solar | 24 months |
| AC/DC Power Centers | 24 months |
| Cordsets & Adapters, Power Inlets (RV, and Marine) | 60 months |
-
The warranty only applies to Furrion products: with a valid serial number; used for consumer, private use and not for commercial or industrial use; and where you have validated the warranty in accordance with paragraph 4 below.
-
The warranty does not cover damage or loss: caused by poor, faulty or incorrect use, installation or maintenance; caused by accident (including force majeure or natural forces), misuse, negligence, abrasion, improper storage following delivery, rot and/or infestation following delivery, leaks (or similar incidents); occurring during shipment (even when Furrion arranged or paid for shipping); caused by failure to follow instructions in the owner's guide, damaged; caused by normal wear and tear; caused by maintenance, repairs or modifications other than those carried out by an authorized dealer; caused to the decorative surface of the product; caused to any data, software or information. This warranty also excludes claims based on any misrepresentations by the seller; or if this product's serial number has been altered, defaced, removed or rendered unidentifiable. This warranty is only valid in the country of purchase. Please see section 14 for specific product details.
-
To validate the warranty, you must: (a) complete the registration via www.furrion.com, or by call center; and (b) register the warranty covering this product within 6 months of the date of the bill of sale; and (c) have the original bill
of sale to validate warranty of this product.
- If you require warranty service on this product, please cease using the product when a fault arises and contact us directly. You will have to present your original bill of sale to establish warranty coverage. Furrion's customer service can be reached at:
(i) For USA/Canada customers:
www.furrion.com
Email: support@furrion.com
Toll-free Number: +1 800 789 3341
-
Following the filing of a claim, Furrion will investigate the claim. If we believe there is a defect covered by the warranty, we will at our option either repair or replace the defective product (or part). It is Furrion's right to replace with new or refurbished product. If the product is part of an advanced exchange program, you may be required to provide a credit authorization during the claiming process.
-
Please note in the event that no defect can be found, it is your responsibility to pay for the re-delivery of the replacement items. If a defect is found, Furrion will pay for the re-delivery of the replacement items.
-
Installation of any repaired or replaced product will not be Furrion's responsibility.
-
If you do not allow the authorized dealer to inspect the product which is the subject of the warranty claim, you will invalidate the warranty in respect of that claim.
-
Any repaired Furrion product parts shall be guaranteed on the terms of this warranty for the unexpired portion of the warranty period only.
-
This warranty is subject to the jurisdiction of the courts of the State where you purchased this product, and any dispute or claim arising out of, or in connection with it or its subject matter, shall be governed by, and construed in accordance with the laws of that State.
-
In the event of any difference between this warranty and the provisions in any owner's manuals, warranty manuals, or packaging cartons, the terms of this warranty shall prevail to the fullest extent allowed by law.
-
THIS WARRANTY AND REMEDIES SET FORTH ABOVE ARE EXCLUSIVE AND IN LIEU OF ALL OTHER WARRANTIES, REMEDIES AND CONDITIONS, WHETHER ORAL OR WRITTEN, EXPRESS OR IMPLIED. FURRION SPECIFICALLY DISCLAIMS ANY AND ALL IMPLIED WARRANTIES, INCLUDING, WITHOUT LIMITATION, WARRANTIES OF MERCHANTABILITY AND FITNESS FOR A PARTICULAR PURPOSE. IF FURRION CANNOT LAWFULLY DISCLAIM IMPLIED WARRANTIES UNDER THIS LIMITED WARRANTY, ALL SUCH WARRANTIES, INCLUDING WARRANTIES OF MERCHANTABILITY AND FITNESS FOR A PARTICULAR PURPOSE ARE LIMITED IN DURATION TO THE DURATION OF THIS WARRANTY. NO FURRION RESELLER, AGENT, OR EMPLOYEE IS AUTHORIZED TO MAKE ANY MODIFICATION, EXTENSION, OR ADDITION TO THIS WARRANTY. FURRION IS NOT RESPONSIBLE FOR DIRECT, INDIRECT, SPECIAL, INCIDENTAL OR CONSEQUENTIAL DAMAGES RESULTING FROM ANY BREACH OF WARRANTY OR CONDITION, OR UNDER ANY OTHER LEGAL THEORY, INCLUDING BUT
NOT LIMITED TO LOST PROFITS, DOWNTIME, GOODWILL, DAMAGE TO OR REPLACEMENT OF ANY EQUIPMENT OR PROPERTY, ANY COSTS OF RECOVERING, REPROGRAMMING, OR REPRODUCING ANY PROGRAM OR DATA STORED IN OR USED WITH FURRION PRODUCTS. FURRION'S TOTAL LIABILITY IS LIMITED TO THE REPAIR OR REPLACEMENT OF THIS PRODUCT PURSUANT TO THE TERMS OF THIS WARRANTY. SOME STATES DO NOT ALLOW THE EXCLUSION OR LIMITATION OF INCIDENTAL OR CONSEQUENTIAL DAMAGES OR EXCLUSIONS OR LIMITATIONS ON THE DURATION OF IMPLIED WARRANTIES OR CONDITIONS, SO THE ABOVE LIMITATIONS OR EXCLUSIONS MAY NOT APPLY TO YOU. THIS WARRANTY GIVES YOU SPECIFIC LEGAL RIGHTS, AND YOU MAY ALSO HAVE OTHER RIGHTS THAT VARY BY STATE OR (WHERE APPLICABLE IN THE COUNTRIES WHERE FURRION HAS NON-US/CANADIAN AUTHORIZED DEALERS) COUNTRY. NO ACTION OR CLAIM TO ENFORCE THIS WARRANTY SHALL BE COMMENCED AFTER THE EXPIRATION OF THE WARRANTY PERIOD.

natural_image
Abstract black geometric shapes on white background (no text or symbols)

- Table of Contents
- Table of Contents....2
- Explanation of Symbols 3
- Important Safety Instructions....3
- Before Use....4
- Installation 5
- Operation....8
- Care & Maintenance ....12
- Troubleshooting ....13
- Specification 14
- Explanation of Symbols
- DANGER
- WARNING
- CAUTION
- Important Safety Instructions
- HEALTH HAZARD
- Refrigerant
- Save these instructions for future reference!
- Before Use
- Introduction
- What's in the Box
- Parts and Features
- Accessories Sold Separately
- Shared ECO System Components
- ePod™ Battery
- Solar Panel
- DC (Cigarette Lighter) Plug & AC/DC Adapter
- Installation
- Location
- Wiring
- NOTE: 12V Wiring Installation
- Storing & Transporting
- Tie Downs
- Wheel Kit
- Mounting Base
- Mounting the Cooler on Sliding Platform
- Operation
- Getting Started
- Power Input
- NOTE:
- Power Input Connection
- AC/DC Adapter, DC (Cigarette Lighter) Plug
- NOTE: Only operate with ePod™ Battery.
- Control Panel Function
- Power On/Off ⏻
- Mode Selection
- +/-
- °F/C
- Loss of Power Memory Function
- Expanded Function \*ePod™ Battery Only\*
- Power Level Display
- Deep ECO Mode
- Seamless Power Interruption
- ePod™ Battery Charging
- Navigating Your Cooler
- Lid Latch
- ePod™ Battery & Dry Storage Compartment
- Retractable Handle
- Serving Tray
- Bottle Opener
- Dual Cup Holder
- Umbrella Holder
- Care & Maintenance
- ePod™ Battery Care
- Solar Panel Care
- Power Failure
- Vacation Time
- Energy Saving Tips
- Defrosting the Cooler
- Cleaning Instructions
- Correct Disposal of This Product
- ! DANGER
- RISK OF CHILD ENTRAPMENT
- Troubleshooting
- Error Code
- Furrion Innovation Center & Institute of Technology
- FURRIONeROVE™
- 50Q Electric Cooler
- Quick Start Guide
- KNOW YOUR COOLER
- BEFORE FIRST USE
- APPLIANCE PLACEMENT
- POWER THE COOLER
- Power with 120V AC / 12V DC Power Source
- Power with Furrion ePod™ Battery (Sold Separately)
- Plug in the Furrion ePod™ battery
- Charge the ePod™ battery
- Switch On/Off
- Select Operation Mode
- Use Your Serving Tray
- Accessories on the Rail
- FURRION
- LIMITED WARRANTY TERMS AND CONDITIONS
- BEFORE ASSEMBLY
- ASSEMBLY
- ATTACHING/DETACHING THE WHEE KIT
- For USA/Canada customers:
- FURRION ePOD™
- Furrion ePod™ Battery
- GENERAL SAFETY INSTRUCTIONS
- WARNING: When using this product, basic precautions should always be followed, including the following:
- STORAGE
- PRODUCT OVERVIEW
- CHECKING THE BATTERY LEVEL WHILE DISCHARGING
- CHECKING THE BATTERY LEVEL WHILE CHARGING
- INSERTING AND CHARGING THE ePod™ BATTERY
- Charge with Furrion ePod™ Power Station
- Charge with Furrion eRove™
- SPECIFICATION
- Main Features
Brand : Furrion
Model : FCR45DCAPA-GL
Category : Refrigerator