iSAPPOS 9A - Cash register POS-X - Free user manual and instructions
Find the device manual for free iSAPPOS 9A POS-X in PDF.

| Product Type | Tablet Stand / Kiosk for Cash Register |
| Brand | POS-X |
| Model | iSAPPOS 9A |
| Compatibility | iPad (not included; 9.7"/10.5"/12.9" iPad Pro models) |
| Materials | Aluminum base plate and stand body; plastic jacket |
| Package Contents | Aluminum base plate, stand body, jacket for iPad, micro-USB cable, 2 screws for jacket, 2 thumb screws for base plate, 2 coin screws for rear cover, quick user guide |
| Ports | Micro-USB (charging and data syncing) |
| Power Source | Use included micro-USB cable with iPad's 10W (12W for 12.9" iPad Pro) adapter; power adapter not included |
| Certifications | CE, FCC (Part 15), WEEE compliant |
| Lock Mechanism | Lock-unlock switch; manual override with paperclip |
| Assembly Required | Yes; tools needed: Phillips #0 screwdriver |
| Cleaning | Unplug power; use dry cloth or compressed air; no liquid or aerosol cleaners |
| Safety Precautions | Do not disassemble; avoid water/humidity; use only approved power cables; do not overload outlets |
| Warranty Registration | Online via customer portal with serial number |
| Weight | Not specified in manual |
| Dimensions | Not specified in manual |
| Color | Silver/white (typical) |
| Compliance | IEC60950-1 (limited power sources), EEC directives 2004/108/EC and 2006/95/EC |
| ESD Protection | Discharge static before handling; use antistatic materials |
| Operating Environment | Away from water, high humidity, radiators; do not block vents |
Frequently Asked Questions - iSAPPOS 9A POS-X
User questions about iSAPPOS 9A POS-X
0 question about this device. Answer the ones you know or ask your own.
Ask a new question about this device
Download the instructions for your Cash register in PDF format for free! Find your manual iSAPPOS 9A - POS-X and take your electronic device back in hand. On this page are published all the documents necessary for the use of your device. iSAPPOS 9A by POS-X.
USER MANUAL iSAPPOS 9A POS-X
User's Manual (Model A)
iSAPPOS 9/12 Stand
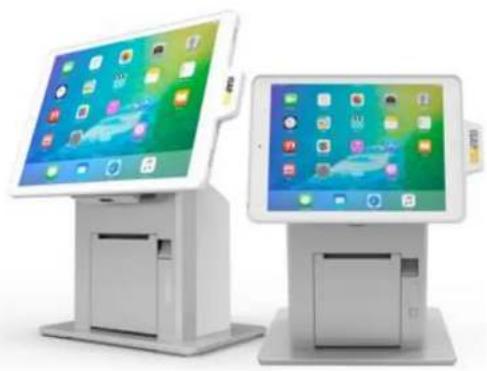
natural_image
Two modern tablet kiosks displayed side by side, one with a colorful app interface and the other with a green screen (no visible text or symbols)iSAPPOS
Section 1
Overview
Package Contents
- Aluminum base plate
• Aluminum Stand body - Jacket for iPad ^1
- 1 x Micro-USB cable (For charging and data syncing) ^2
- 2 x Screws for the Stand jacket
- 2 x thumb screws for the Stand base plate
- 2 x coin screws for the rear cover
- Quick user guide
- iPad not included.
- Power adapter not included for model A. Use included micro-USB cable with iPad's 10W (12W for 12.9" iPad Pro) adapter for charging.
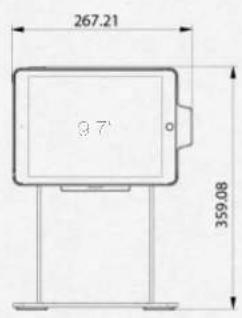
The Jacket
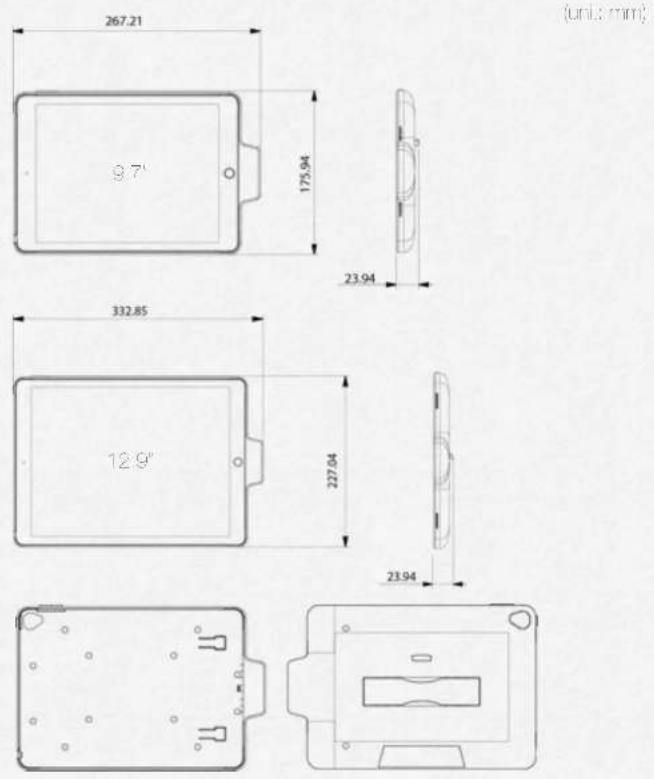
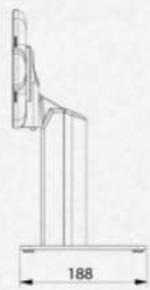
The Stand I/O Ports
(und miss)
natural_image
Technical line drawing of a mechanical bracket with dimension label (188) at base, no readable text or symbols present.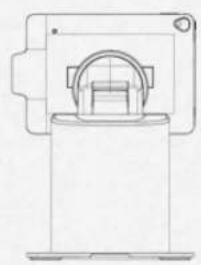
natural_image
Technical line drawing of a mechanical component or housing (no text or symbols)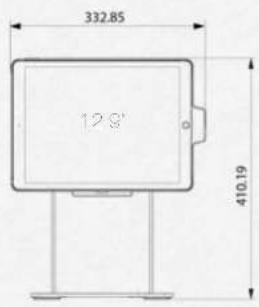

natural_image
Technical line drawing of a mechanical component or housing (no text or symbols)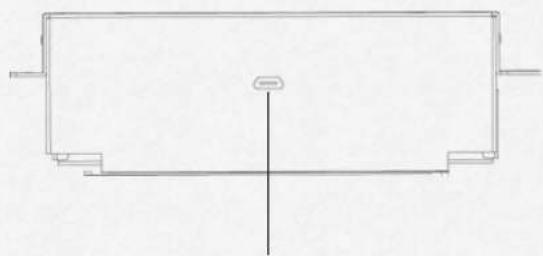
natural_image
Pure technical line drawing of a rectangular component with internal lines and a central vertical axis (no text or symbols)Micro-USB (for charging and data syncing)
Section 2
Getting started
Getting started
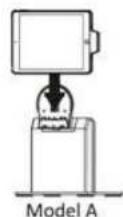
Assemble iPad and the Stand
• Tools needed - Phillips(+) #0 Screwdriver
- Assombo hoslano
- Secure the base plate and Stand body with M4 thumo screws (x4) found in the accessory box.
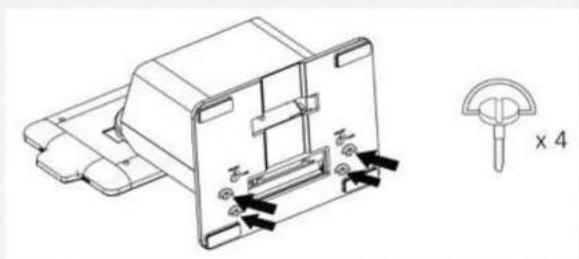
natural_image
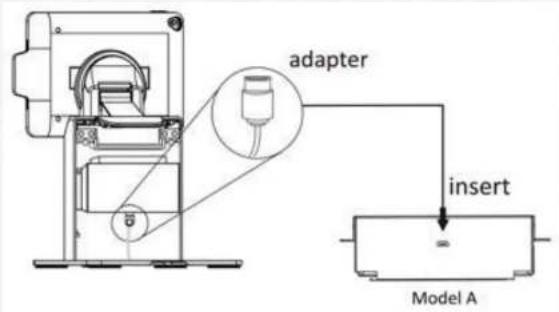
Technical line drawing of a mechanical component with mounting holes and a cross-sectional view labeled 'x 4' (no text or symbols on the diagram itself)- Connect the power adapter for charging.
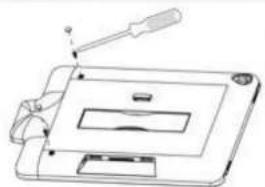
- Place the back cover to the back of the stand. Secure the back cover the base plate using the coin screws (X2) found in the accessory box. Tighten Ithorn with a
(1)
- Insert the iPad to the acket
→ S do open the jscxel
natural_image
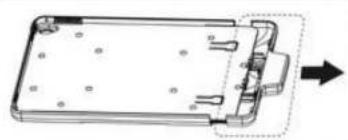
Technical line drawing of a rectangular electronic component with mounting holes and a dashed arrow indicating direction (no text or symbols)→ Insort and align Pac with the jacket (It's normal to see the side with the home bottom is higher than the other side)

natural_image
Line drawing of a foldable electronic device with a clip and connector (no text or symbols)- Slide close the jacket gently and slowly. While sliding close the jacket press down both comers of the iPad like indicated in the picture and meko sure it's aligned with the jacket
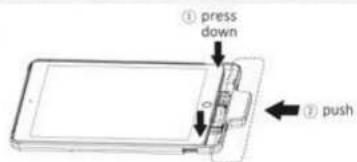
→ Remove the paddlings of the indicated screw holes. Secure Inc (Fed and the jackel with Phillips), 40 Scrowdriver and MP screws (X2) found in the accessory box. Pace the paddlings to cover the indicated screw holes
natural_image
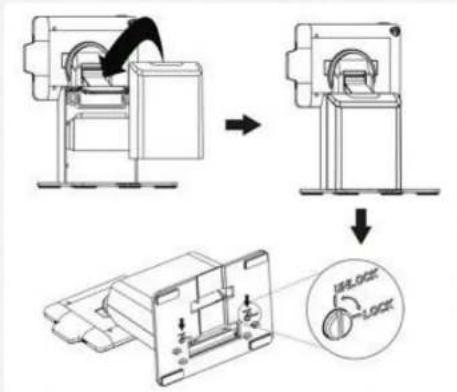
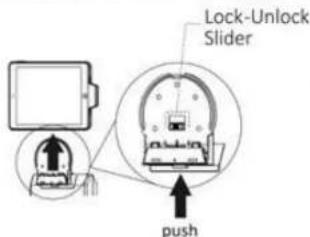
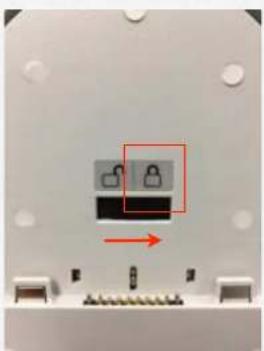
Line drawing of a handheld electronic device with a screwdriver and screen (no text or symbols)5 Place the jacket onto the Stand's dock, (make sure the lock-unlock switch is in the unlock position)
Dock
Undock
Unlock Jacket from the Stand Manually
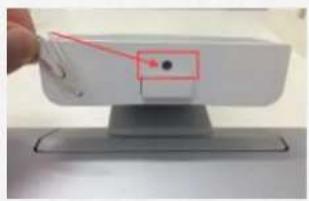
If the jacket is pleased on the Stand while the lock. Unlock a floor on the carpet is in "Lock" position, you can manually override the switch and unlock the jacket from the Stand by using a paperclip and push up the button hidden at the bottom of the carpet. If it up the jacket while the button is pushed up to detach it from the Stand.
natural_image
Close-up of a mechanical component with two small circular features and a red arrow indicating direction (no text or symbols)When locked
natural_image
Close-up of a white electronic device with a red arrow pointing to a black dot on its side, mounted on a stand (no visible text or symbols)Override mechanism to unlock
Product Warranty Registration
Register your Stand for warranty by visiting our customer portal. Simply sign up for an account and color your Stand's social number to complete the warranty registration process.

Regulatory Information
Regulatory Information
Caution: Do not remove the plug and connect it to a power outlet by itself; always attach the plug to the power adapter first before connecting it to a power outlet.

CE MARK
This device complies with the requirements of the EEC directive 2004/108/EC with regard to "Electromagnetic compatibility" and 2006/95/EC "Low Voltage Directive".

FCC
This device complies with part 15 of the FCC rules. Operation is subject to the following two conditions:
(1) This device may not cause harmful interference.
Safety Caution
Note: To comply with IEC60950-1 Clause 2.5 (limited power sources, L.P.S) related legislation, peripherals shall be 4.7.3.2 "Materials for re enclosure" compliant.
4.7.3.2 Materials for re enclosures
For MOVABLE EQUIPMENT having a total mass not exceeding 18kg.the material of a FIRE ENCLOSURE, in the thinnest significant wall thickness used, shall be of V-1 CLASS MATERIAL or shall pass the test of Clause A.2.
For MOVABLE EQUIPMENT having a total mass exceeding 18kg and for all STATIONARY EQUIPMENT, the material of a FIRE ENCLOSURE, in the thinnest significant wall thickness used, shall be of 5VB CLASS MATERIAL or shall pass the test of Clause A.1
LEGISLATION AND WEEE SYMBOL
2012/19/EU Waste Electrical and Electronic Equipment Directive on the treatment, collection, recycling and disposal of electric and electronic devices and their components.
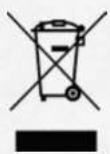
The crossed dust bin symbol on the device means that it should not be disposed of with other household wastes at the end of its working life. Instead, the device should be taken to the waste collection centers for activation of the treatment, collection, recycling and disposal procedure.
To prevent possible harm to the environment or human health from uncontrolled waste disposal, please separate this from other types of wastes and recycle it responsibly to promote the sustainable reuse of material resources.
Household users should contact either the retailer where they purchased this product, or their local government of CE, for details of where and how they can take this item for environmentally safe recycling.
Business users should contact their supplier and check the terms and conditions of the purchase contract.
This product should not be mixed with other commercial wastes for disposal.
Safety Instructions
Please adhere to the following safety guidelines to help ensure your own personal safety and protect your system from potential damage. Any acts taken that are inconsistent with ordinary use of the product, including improper testing, etc., and those not expressly approved by iSAPPOS may result in the loss of product warranty.
Unless expressly approved by an authorized representative of iSAPPOS in writing, you may not and may not permit others to:
- Disassemble or reverse engineer the device or attempt to derive source code (underlying ideas, algorithms, or structure) from the device or from any other information provided by iSAPPOS, except to the extent that this restriction is expressly prohibited by local law.
- Modify or alter the device.
- Remove from the device any product identification or other notices, including copyright notices and patent markings, if any. To reduce the risk of bodily injury, electrical shock, fire, and damage to the device and other equipment, observe the following precautions:
Power Sources
- Observe and follow service markings.
- Do not push any objects into the openings of your device unless consistent with the authorized operation of the device. Doing so can cause a re or an electrical shock by shorting out interior components.
• The powering of this device must adhere to the power specifications indicated for this product.
- Do not overload wall outlets and/or extension cords as this will increase the risk of re or electrical shock.
- Do not rest anything on the power cord or on the device (unless the device is made and expressly approved as suitable for stacking).
- Position system cables and power cables carefully; route cables so that they cannot be stepped on or tripped over. Be sure that nothing rests on any cables.
- Operate the device only from the type of external power source indicated on the electrical ratings label.
• To help avoid damaging your device, be sure the voltage selection switch (if provided) on the power supply is set to match the power available at your location.
•Also be sure that attached devices are electrically rated to operate with the power available in your location.
- Use only approved power cable(s). If you have not been provided a power cable for your device or for any AC -powered option intended for your device, purchase a power cable that is approved for use in your country and is suitable for use with your device. The power cable must be rated for the device and for the voltage and current marked on the device's electrical ratings label. The voltage and current rating of the cable should be greater than the ratings marked on the device.
• To help prevent an electrical shock, plug the device and peripheral power cables into properly grounded electrical outlets. These cables are equipped with three-prong plugs to help ensure proper grounding. Do not use adapter plugs or remove the grounding prong from a cable. If you must use an extension cable, use a 3-
wire cable with properly grounded plugs.
- Observe extension cable and power strip ratings. Ensure that the total ampere rating of all products plugged into the extension cable or power strip does not exceed 80 percent of the ampere ratings limit for the extension cable or power strip.
• To help protect your device from sudden, transient increases and decreases in electrical power, use a surge suppressor, line conditioner, or uninterruptible power supply (UPS).
- Do not modify power cables or plugs. Consult a licensed electrician or your power company for site modi cations. Always follow your local/national wiring rules.
- When connecting or disconnecting power to hot-pluggable power supplies, if offered with your device, observe the following guidelines.
• Install the power supply before connecting the power cable to the power supply.
- Unplug the power cable before removing the power supply.
• If the system has multiple sources of power, disconnect power from the device by unplugging all power cables from the power supplies.
Servicing/Disassembling
- Do not service any product except as expressly set forth in your system documentation.
- Opening or removing covers that are marked with the triangular symbol with a lightning bolt may expose you to an electrical shock. Only a trained service technician should service components inside these compartments.
• To reduce the risk of electrical shock, never disassemble this device. None of its internal parts are user-replaceable; therefore, there is no reason to access the interior.
- Do not spill food or liquids on your system components, and never operate the device in a wet environment. If the device gets wet, see the appropriate section in your troubleshooting guide or contact your trained service provider.
- Use the device only with approved equipment.
- Move products with care; ensure that all casters and/or stabilizers are firmly connected to the system. Avoid sudden stops and uneven surfaces.
Environment
- Do not use this device near water (e.g. near a bathtub, sink, laundry tub, in a wet basement or near a swimming pool).
- Do not use this device in areas with high humidity.
- This device must not be subjected to water or condensation.
- Keep your device away from radiators and heat sources. Also, do not block cooling vents.
Cleaning
•Always unplug the power before cleaning this device.
- Do not use liquid or aerosol cleaners of any kind. Use only compressed air that is recommended for electronic devices.
- Use a dry cloth for cleaning.
Protecting Against Electrostatic Discharge
Static electricity can harm delicate components inside your system. To prevent static damage, discharge static electricity from your body before you touch any of the electronic components, such as the microprocessor. You can do so by periodically touching an unpainted metal surface on the chassis.
You can also take the following steps to help prevent damage from electrostatic discharge (ESD):
- When unpacking a static-sensitive component from its shipping carton, do not remove the component from the antistatic packing material until you are ready to install the component in your system. Just before unwrapping the antistatic packaging, be sure to discharge static electricity from your body.
- When transporting a sensitive component, first place it in an antistatic container or packaging.
- Handle all sensitive components in a static-safe area. If possible, use antistatic floor pads, workbench pads, and an antistatic grounding strap.
ISAPPOS © COPYRIGHT 2017. ALL RIGHTS RESERVED.
Apple iPhone and iPad are registered trademarks of Apple, Inc. and are not included. They serve as a reference only and does not imply any affiliation with or endorsement by Apple.
UM000A0EN0802171
- User's Manual (Model A)
- iSAPPOS 9/12 Stand
- Section 1
- Overview
- Package Contents
- Section 2
- Getting started
- Assemble iPad and the Stand
- Unlock Jacket from the Stand Manually
- Product Warranty Registration
- Regulatory Information
- CE MARK
- FCC
- Safety Caution
- Materials for re enclosures
- LEGISLATION AND WEEE SYMBOL
- Safety Instructions
- Power Sources
- Servicing/Disassembling
- Environment
- Cleaning
- Protecting Against Electrostatic Discharge
Brand : POS-X
Model : iSAPPOS 9A
Category : Cash register