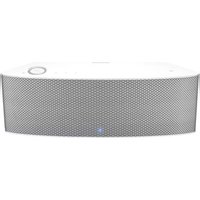
Shape M7 - Loudspeaker Hanwha - Free user manual and instructions
Find the device manual for free Shape M7 Hanwha in PDF.


| Product Type | Wireless Speaker |
| Model | Shape M7 |
| Brand | Hanwha |
| Dimensions (W x H x D) | 25 x 10 x 10 cm |
| Weight | 1.2 kg |
| Power Supply | Built-in rechargeable battery (7.4V, 2600 mAh) |
| Battery Life | Up to 12 hours |
| Charging Time | 3 hours |
| Connectivity | Bluetooth 5.0, AUX input, USB-C charging |
| Audio Output | 20W (2 x 10W) |
| Water Resistance | IPX5 |
| Speaker Drivers | 2 full-range drivers, 1 passive radiator |
| Frequency Response | 80 Hz - 20 kHz |
| Microphone | Built-in for hands-free calls |
| Smart Features | Voice assistant compatible (Siri, Google Assistant) |
| Pairing | Multi-device pairing (up to 2 devices) |
| Distinctive Features | 360° sound, LED indicator, fabric grille |
| Cleaning and Maintenance | Wipe with dry cloth; avoid water jets |
| Safety | Overcharge protection, short-circuit protection |
| Spare Parts and Repairability | Battery and USB port replaceable by service center |
| Box Contents | Speaker, USB-C cable, AUX cable, user manual |
Frequently Asked Questions - Shape M7 Hanwha
User questions about Shape M7 Hanwha
0 question about this device. Answer the ones you know or ask your own.
Ask a new question about this device
Download the instructions for your Loudspeaker in PDF format for free! Find your manual Shape M7 - Hanwha and take your electronic device back in hand. On this page are published all the documents necessary for the use of your device. Shape M7 by Hanwha.
USER MANUAL Shape M7 Hanwha
Thank you for purchasing this Samsung product.
To receive more complete service,
please register your product at
www.samsung.com/register
Safety Information
Regulatory Compliance Statements
 | CAUTIONRISK OF ELECTRIC SHOCKDO NOT OPEN |  |
| The lighting flash and arrowhead within the triangle is a warning sign alerting you to dangerous voltage inside the product. | CAUTION: TO REDUCE THE RISK OF ELECTRIC SHOCK, DO NOT REMOVE THE COVER (OR BACK). NO USER SERVICEABLE PARTS INSIDE. REFER SERVICING TO QUALIFIED SERVICE PERSONNEL. | The explanation point within the triangle is a warning sign alerting you to important instructions accompanying the product. |
Warning
reproductive toxicity.
Do not put objects filled with liquids, such as vases on the apparatus.
Consequently, the power plug must be easily and readily accessible at all times.
FCC Statement: (for U.S.A)
Federal Communication Commission Interference Statement
This equipment has been tested and found to comply with the limits for a Class B digital device, pursuant to Part 15 of the FCC Rules. These limits are designed to provide reasonable protection against harmful interference in a residential installation. This equipment generates, uses and can radiate radio frequency energy and, if not installed and used in accordance with the instructions, may cause harmful interference to radio communications. However, there is no guarantee that interference will not occur in a particular installation. If this equipment does cause harmful interference to radio or television reception, which can be determined by turning the equipment off and on, the user is encouraged to try to correct the interference by one of the following measures:
connected to.
FCC Caution: Any changes or modifications not expressly approved by the party responsible for compliance could void the user's authority to operate this equipment.
This device complies with Part 15 of the FCC Rules. Operation is subject to the following two conditions: (1) This device may not cause harmful interference, and (2) this device must accept any interference received, including interference that may cause undesired operation.
For products available in the US and Canadian markets, only channels 1\~11 are available. You cannot select other channels.
This device and it's antennas must not be co-located or operated in conjunction with any other antenna or transmitter except in accordance with FCC multi-transmitter product procedures.
This device operates in the 5.15\~5.25GHz frequency range. It is restricted to indoor environments only.
IMPORTANT NOTE
FCC Radiation Exposure Statement
This equipment complies with FCC radiation exposure limits set forth for an uncontrolled environment. This equipment should be installed and operated so there is at least 8 inches (20cm) between the radiator and your body.
IC Statement: (for Canada)
CAN ICES-3 (B)/NMB-3(B)
This device complies with Industry Canada license-exempt RSS standard(s). Operation is subject to the following two conditions: (1) this device may not cause interference, and (2) this device must accept any interference, including interference that may cause undesired operation of the device.
For products available in the US and Canadian markets, only channels 1\~11 are available. You cannot select other channels.
This device and it's antennas must not be co-located or operated in conjunction with any other antenna or transmitter except in accordance with IC multi-transmitter product procedures.
This device may automatically discontinue transmission if there is no information to transmit, or an operational failure. Note that this is not intended to prohibit the transmission of control or signaling information or the use of repetitive codes where required by the technology.
To reduce potential for harmful interference to co-channel mobile satellite systems, this device operates in the 5150-5250 MHz band, and is for indoor use only.
IMPORTANT NOTE:
IC Radiation Exposure Statement:
This equipment complies with IC RSS-102 radiation exposure limits set forth for an uncontrolled environment. This equipment should be installed and operated so there is at least 8 inches (20cm) between the radiator and your body.
Important Safety Instructions
Read these operating instructions carefully before using the unit. Follow all the safety instructions listed below.
Keep these operating instructions handy for future reference.
1 Read these instructions.
2 Keep these instructions.
3 Heed all warnings.
4 Follow all instructions.
5 Do not use this apparatus near water.
6 Clean only with a dry cloth.
7 Do not block any ventilation openings. Install in accordance with the manufacturer's instructions.
8 Do not install near any heat sources such as radiators, heat registers, stoves, or other apparatus (including AV receivers) that produce heat.
9 Do not defeat the safety purpose of the polarized or grounding-type plug. A polarized plug has two blades with one wider than the other. A grounding type plug has two blades and a third grounding prong. The wide blade or the third prong are provided for your safety. If the provided plug does not fit into your outlet, consult an electrician for replacement of the obsolete outlet.
10 Protect the power cord from being walked on or pinched particularly at plugs, convenience receptacles, and the point where it exits the apparatus.
11 Only use attachments/accessories specified by the manufacturer.
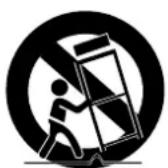
12 Use only with the cart, stand, tripod, bracket, or table specified by the manufacturer, or sold with the apparatus. When a cart is used, use caution when moving the cart/apparatus combination to avoid injury from tip-over.
13 Unplug this apparatus during lightning storms or when unused for long periods of time.
14 Refer all servicing to qualified service personnel. Servicing is required when the apparatus has been damaged in any way, such as when the power-supply cord or plug is damaged, liquid has been spilled or objects have fallen into the apparatus, the apparatus has been exposed to rain or moisture, does not operate normally, or has been dropped.

Safety precautions

Power Supply Precautions
- This may result in abnormal heat or fire.
a dry cloth only.
the outlet.
- If the connection is unstable, there is a risk of fire.

Installation Precautions
(candles, mosquito coils, heaters, radiators, etc.). Do not install in direct sunlight.
cord) from the unit.
- A damaged cord may cause a fire and poses a risk of electric shock.
lead to quality problems or cause the product to malfunction. Before you install the product in an environment that is outside the norm, please contact a Samsung service center for additional information.
upwards.
- Dropping the product can cause it to malfunction and poses a risk of injury. Severe vibration or impact can also cause the product to malfunction and lead to a fire hazard.
- Leave at least 4 inches (10cm) at the rear of the product and more than 2 inches (5cm) on each side of the product.
- Children playing with the plastic packing materials run the risk of suffication.
Usage Precautions
- If you are exposed to sound louder than 85db for an extended time, you may adversely affect your hearing. The louder the sound is, the more seriously damaged your hearing may become. Note that an ordinary conversation is between 50 to 60 db and road noise is approximately 80 db.
modify it yourself.
- Contact a Samsung service center when your product is in need of repair.
cosmetics, chemicals, etc.). Do do not allow any metal objects (e.g. coins, hair clips, etc.) or flammable material (e.g. paper, matches, etc.) to enter the product (through the air vents, I/O ports, etc.).
- If any harmful material or liquid enters the product, turn off the product immediately, unplug the power cord, and then contact a Samsung service center.
contact a Samsung service center.
- There is a risk of fire or electric shock.
- A damaged cable can cause the product to malfunction, cause a fire, and poses a risk of electric shock.
immediately and contact a Samsung service center.
Do not turn the product off or on.
sharp object.
Cleaning Precautions
product, or spray insecticide on the product.
- Using any of these materials can discolor the exterior coating or cause it to split or peel off, or remove the labelling on the product.
soft cloth (Microfiber, cotton).
- Avoid leaving dust on the product. Dust can scratch its the surface.
Additional Information
About NFC (Android only)
powered on and off.
the Bluetooth device is blinking.
About the Network Connection
or modem's documentation.
another communication device nearby, radio interference may result in communication failure.
WEP, TKIP, or TKIP-AES (WPA2 Mixed) security encryption in networks running in the 802.11n mode.
conditions (such as wireless router performance, distance, obstruction, interference with other wireless devices, etc.)
- Compatible products

NOTE
√ Some devices may not be compatible with the product.
√ Note that a product of an older version may not be supported.
Copyright
© 2014 Samsung Electronics Co., Ltd.
All rights reserved; No part or whole of this user's manual may be reproduced or copied without the prior written permission of Samsung Electronics Co., Ltd.
Contents
SAFETY INFORMATION
Regulatory Compliance Statements.... 2
Warning 2
FCC Statement: (for U.S.A) 2
IC Statement: (for Canada)....3
Important Safety Instructions....4
Safety precautions....5
Power Supply Precautions ....5
Installation Precautions....5
Usage Precautions....6
Cleaning Precautions ....6
Additional Information....7
About NFC (Android only)....7
About the Network Connection....7
Compatible products....7
Copyright 7
UNDERSTANDING YOUR M7
Before you begin 12
Communication Basics ....12
Basic Connection 12
How you can enjoy your M7 13
GETTING STARTED
Top Panel 14
Rear Panel....15
Accessories....16
Available Accessories (Not Included)....16
Connecting the Power Cable....17
Connecting the Cover-Stand 18
Separating the cover-stand 19
Installing on a wall....20
Attaching the toroidal ferrite core to the power cord of the M7....21
Looping the power cable around the toroidal ferrite core....21
Sleep Mode....22
CONNECTIONS
Connecting with a HUB (Not Included).... 23
Connecting the M7(s) to Your Network with a HUB (Not Included)....23
Connecting without a HUB (Not Included).... 25
Connecting the M7 to Your Network with a LAN Cable (For a Single M7) ......25
Connecting the M7 to Your Network via the WPS Method (For a Single M7)......27
Connecting the M7 to Your Network via the Wi-Fi Setup Method (For a Single M7) - For Android....29
Connecting the M7 to Your Network via the Wi-Fi Setup Method (For a Single M7) - For iOS 32
Connecting with TV SoundConnect function.... 36
Disconnecting TV SoundConnect....37
Connecting the M7 to Bluetooth Devices.... 38
Disconnecting Bluetooth ....39
Connecting with NFC function - For Android.... 40
Connecting to the AUX IN....41
Disconnecting AUX connection ....42
Adding an M7 43
Adding an extra M7 to a HUB that is connected to an M7....43
Adding another M7 and Hub to a single M7 in use....44
Adding a HUB 46
Relocating the M7 46
FUNCTIONS
Installing the Samsung Multiroom App.... 47
Accessing the Samsung Multiroom App 47
Using the Samsung Multiroom App 48
Renaming a connected M7 48
Switching the input source....48
Changing the sort order of listed M7s 49
Grouping M7s....50
Playing a Song....51
Sorting songs....51
Creating a Playlist....52
Listening to a radio station ....54
Setting Presets....54
Setting the Default Radio Stations in Speaker Preset....56
Searching for a Radio Station....56
Playing music from content providers ....57
Playing music from the Amazon cloud player....57
Playing music from a selected device....57
Using the Settings menu....58
Guide....58
Service....59
Speaker Settings....60
Clock 63
Support....64
Open source licenses....65
App Version....65
Reset your product....66
Resetting the M7....66
Resetting the HUB (Not Included)....66
APPENDIX
Troubleshooting 67
Open Source License Notice 69
Licences....69
Specifications 70
Understanding Your M7

Before you begin

Communication Basics

flowchart
graph LR
    A["Internet"] <--> B["Wireless Router"]
    B <--> C["Smart Device: Android, iOS (App Control)"]
1 Requirements: Wireless Router, Smart Device
2 The wireless router should be connected to the Internet.
3 The smart device should be connected to the router via a Wi-Fi connection.

Basic Connection

How you can enjoy your M7
Internet radio, music services, and Samsung Link.
- Note that Bluetooth and TV SoundConnect are not configured for Multi-room set-ups.

flowchart
graph TD
    A["You can play music from your smart devices through the M7 using a Wi-Fi connection."] --> B["Enable the Bluetooth function of your smart device and the [Samsung"] M7 will appear on the device list.]
    C["You can listen to the sound from your Samsung TV through the M7 by using the TV SoundConnect function."] --> D["You can play music on devices connected to your local network using App's Devices menu."]
    E["You can play music on devices connected to your local network using App's Devices menu."] --> F["You can play music on devices connected to your local network using App's Devices menu."]

NOTES
√ Depending on your region or manufacturer, supported streaming music services may differ.
Getting Started
Top Panel
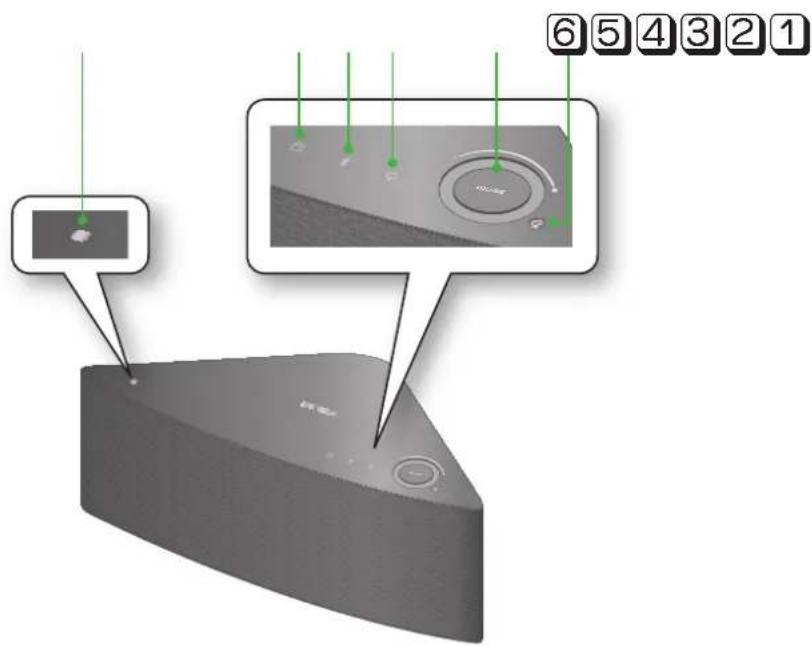
| 1 | NFC Tag | Connect your NFC compatible device via Bluetooth to the M7 using the simple NFC tagging procedure. (Android only) |
| 2 | Internet Radio Preset button | Press this button to listen to an Internet radio station. Each time you press the button, you change the radio station. |
| 3 | Bluetooth button | Press this button to enable Bluetooth. |
| 4 | TV SoundConnect button | Press this button to enable TV SoundConnect. |
| 5 | Volume Control | Controls the volume level.Touch and drag softly with your finger to make adjustments.This will not work if you press with excessive force. |
| 6 | Mute button | Mutes the sound from this M7. Press again to restore the sound to the previous volume level. |

NOTES
√ When you turn on the M7, touch buttons appear on its top panel.
√ Press and hold the ✅ Mute button for more than 5 seconds to place the M7 into Sleep Mode.
√ Press and hold the TV SoundConnect button for more than 5 seconds to reset the TV SoundConnect and connect a new TV.
√ You can listen to a radio station by pressing the Internet Radio Preset button on the top panel of the M7. Each time you press the button, the M7 changes the station.
√ Enable your smart device's Bluetooth by touching it to the N NFC Tag on the top panel of the M7. (Android only)

| 1 | SPK ADD button (Speaker Add) | Press this button to add an M7 to your network. |
| 2 | WPS/Wi-Fi SETUP button | Press this button to connect your M7 to your network using WPS or Wi-Fi setup. |
| 3 | AUX IN | Lets you connect the M7 to the analog output of a smart device. |
| 4 | SERVICE | For service only. Lets service technicians update the firmware of the M7. |
| 5 | ETHERNET | Lets you connect the M7 to your network using a LAN cable. |
| 6 | POWER | Connection for the M7's power cord. |

NOTES
√ SPK ADD Button: Press for 1 second to pair your M7 with a HUB.
√ WPS / Wi-Fi SETUP Button:
- Press for 1 second to connect the M7 to your wireless router using WPS.
- Press and hold down for more than 5 seconds until you hear a fast, 3 note beep to connect the M7 to your network through your smart device using the Wi-Fi Setup method.
Accessories
Confirm you have the supplied accessories shown below.

natural_image
3D rendering of a gray rectangular electronic device with a circular button on the side (no visible text or symbols)Wireless Audio - Multiroom M7
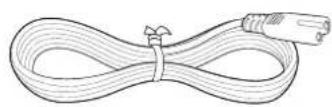
Power cord (WAM750 : 3903-000910 WAM751 : 3903-000911)

natural_image
3D rendered image of a gray ergonomic chair or seat (no text or symbols)Cover-Stand (WAM750 : AH96-02695A WAM751 : AH96-02695B)
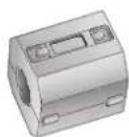
Toroidal ferrite core (3301-000144)

Quick Start Guide (AH68-02665A)

Getting started (AH68-02665D)
Available Accessories (Not Included)

natural_image
Line drawing of two audio/video cables tied together (no text or symbols)Audio cable HUB: WAM250 Wall Mount


(6ea) (M5 X L50mm-6ea)
NOTES
√ Information on available accessories and their release dates can be found on the Samsung website.
√ When purchasing an accessory, check whether it is compatible with the M7.
√ Use authentic Samsung accessories. Damage and problems caused by unauthorized accessories can void your warranty.

Connecting the Power Cable
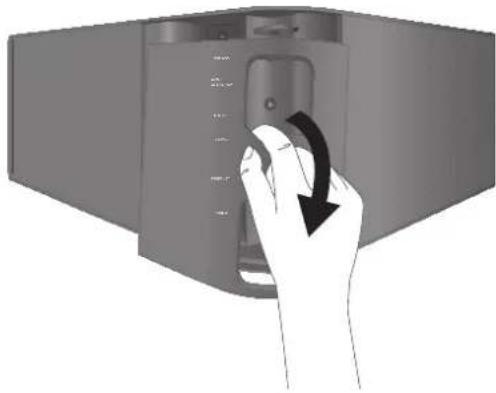
1 Remove the rear cover.
natural_image
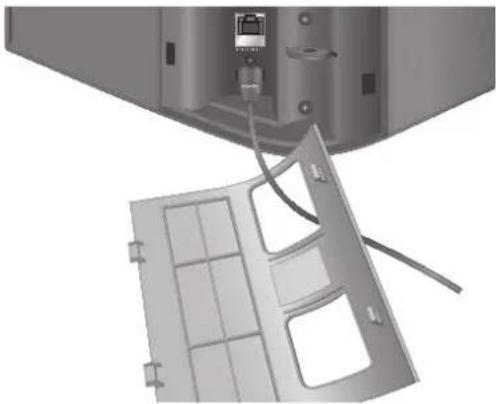
Hand pressing a button on a computer monitor (no text or symbols visible)2 Insert the power cable through the rear cover hole into the M7 power port.
natural_image
3D rendering of a mechanical assembly with a component inserted into a housing (no visible text or symbols)3 Close the rear cover.

natural_image
Exterior view of a modern office building (no signage)
NOTE
√ When completing network setup, close the rear cover.

Connecting the Cover-Stand
1 Before attaching the Cover-Stand, remove the rear cover. Insert the power cable through the Cover-Stand hole into the M7 power port.

natural_image
3D rendering of a device with exposed internal components and cable, no visible text or symbols2 The inside of the Cover-Stand has two sides. One side (A) has four tabs - two large tabs and two small tabs. The other side (B) has two large tabs only. Insert the two large tabs on side A into the two slots in the area marked A in the diagram.

natural_image
3D rendering of a mechanical device with a labeled component 'A' (no text or symbols on the object itself)3 Turn the M7 so the side marked B in the diagram is facing you. With the thumbs of both hands, press side B of the Cover-Stand so that the tabs on side B snap into the slots in the area marked B in the diagram. You may need to press side B of the Cover-Stand with some force.

natural_image
3D mechanical component with a red arrow and label B, no readable text or symbols present4 The M7 can now be installed vertically.

natural_image
3D rendering of a black triangular electronic device with a curved top and base, mounted on a flat base (no text or symbols visible)
Caution
√ Do not place the M7 on an unstable surface.
Separating the cover-stand
1 Locate the Cover-Stand's handle. See the diagram on the right.

natural_image
3D mechanical assembly diagram showing a bracket with red dashed lines indicating alignment or connection points (no text or symbols present)2 Push the Cover-Stand's handle while applying force to the Cover-Stand in the direction of the arrow. Important : Push the Cover-Stand straight ahead, parallel to the surface of the M7. You may need to use some force.

natural_image
3D diagram of a mechanical component with a red arrow indicating direction, no text or symbols present3 The tabs release and the Cover-Stand separates as shown in the figure.

natural_image
Illustration of a hand inserting a mechanical component into a housing (no text or symbols visible)
NOTES
√ Do not lift up the M7 by the stand. It may separate from the stand and cause damage or personal injury.
√ When installing the M7 vertically, please make sure to use the stand.
If you do not, vibrations from the M7's speakers may cause the M7 to tip over or fall, damaging it.
Installing on a wall

Warning
√ Please have a qualified installer install the Wall Mount Bracket.
√ Check the strength of the wall before you install the Wall Mount Bracket. If the strength is insufficient, make sure to reinforce the wall before installing the Wall Mount Bracket and the M7 on the wall.
√ Samsung Electronics is not liable for any damage to the product due to the product being installed inappropriately.
√ After the installation is complete, do not hang on the M7 and avoid striking it or subjecting it to severe impact. When reinstalling the Wall Mount Bracket and M7 in another location, use the same screws as those supplied with the Wall Mount Bracket. (You can buy the screws from your product provider.)
1 Finish pairing the M7, and then make sure the App plays music properly through the M7.
2 Close the back cover of the M7.
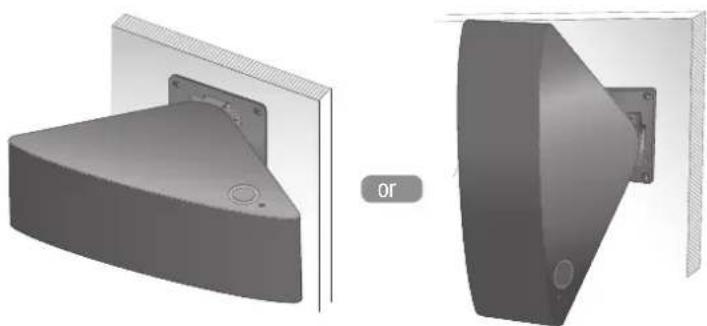
3 Install the Wall Mount Bracket (sold separately). You can mount it vertically or horizontally. Follow the directions that come with the Bracket.

natural_image
Technical illustration of a mechanical assembly showing a front view and side view (no text or symbols)4 Fit the M7 into the corresponding slots of the Wall Mount Bracket. The installation is complete.
natural_image
3D CAD model of a mechanical component with two views, one showing a flange and the other a conical component (no text or symbols)
NOTE
√ For more information, please refer to the Wall Mount's Quick Setup Guide.
Attaching the toroidal ferrite core to the power cord of the M7
Attaching the Toroidal ferrite core to the power cord of the M7 helps prevent RF interference from radio signals.
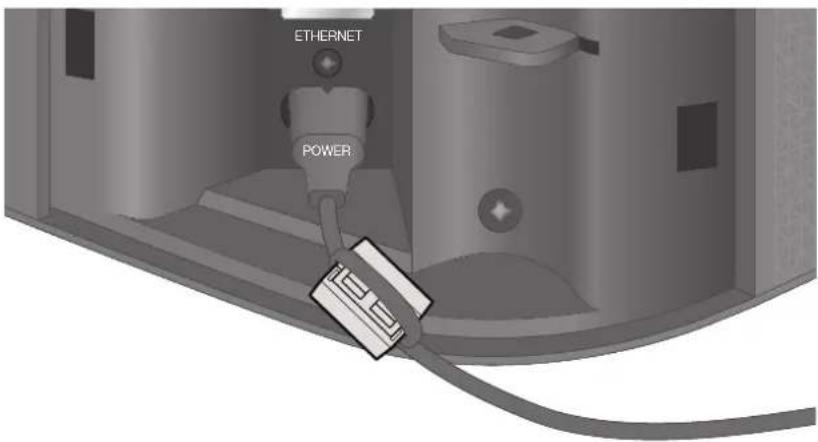
1 Pull the fixing tab of the Toroidal ferrite core to open it.
2 Make a loop around the core with the power cable of the M7.
3 Attach the toroidal ferrite core to the M7 power cord as shown in the figure, and then press it until it clicks.
Looping the power cable around the toroidal ferrite core

natural_image
Diagram showing a device component before and after transformation, with no visible text or symbols.Lift up to release the lock and open the core.
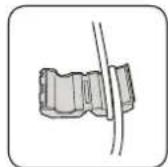
the core with the power cable.


NOTE
√ It is better to attach Toroidal ferrite cores at each end of the cable, one close to the wall plug and another close to the terminal where it connects to the M7.
Sleep Mode
In Wi-Fi / Bluetooth / TV SoundConnect mode
- The M7 switches to the sleep mode if there is no music playback or no button operation (either from the top panel or from the app) for 25 minutes.
In AUX mode
- The M7 switches to the sleep mode if there is no button operation (either from the top panel or from the app) for 8 hours.

NOTES
√ While playing music in the Wi-Fi, Bluetooth, or TV SoundConnect connection modes, the M7 will not switch to the Sleep mode.
√ While playing music in AUX mode, it may switch to the Sleep mode.
√ To switch to the Sleep mode manually, press and hold the ✗ Mute button for more than 5 seconds.
Connections

Connecting with a HUB (Not Included)
place the M7 closer to the HUB or your router and try again.
be disrupted because of the distance between it and other devices on the network, obstructions, or interference from other wireless devices.
Connecting the M7(s) to Your Network with a HUB (Not Included)
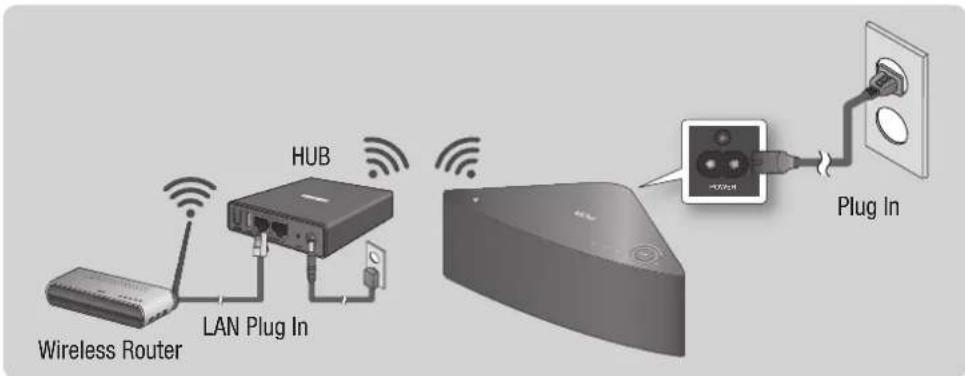
1 Connect a LAN cable to the router and the ETHERNET SWITCH on the back of the HUB.

NOTE
√ You can connect the LAN cable to any ETHERNET SWITCH Port on the HUB.
2 Attach the HUB's power cord to the power port on the rear of the HUB, and then plug the power cord into an electrical outlet.
3 The power ( ) and the HUB ( ) indicators on the HUB's front turn on.
When the pairing indicator ( 📤 ) begins to flash, plug the M7(s) into an outlet.
The pairing indicator on the M7 starts to flash.
If the HUB's pairing indicator does not flash, press the SPK ADD button on the rear of the HUB.

NOTE
√ If you are adding multiple M7s, connect all the M7's to electrical outlets. If you are not connecting all the M7s, refer to pages 43\~45. Press here
4 Wait until the pairing indicator on the M7 stops flashing. If the M7's LED indicator turns solid blue, pairing is complete. The M7 may also beep.

NOTES
√ Place each M7 at least 20 inches (50 cm) from the HUB when connecting them to the HUB.
√ Your smart device cannot connect to the M7 or the HUB if there is no wireless router.
√ To confirm you have a proper connection, check the pairing indicator on the front of the HUB.
- When you turn on the HUB for the first time, there is a 20 minute pairing period.
The pairing indicator (💡) will blink for these 20 minutes or until pairing occurs. When you press the SPK ADD button to pair additional M7s, the pairing period is reduced to 10 minutes. The pairing indicator (💡) flashes for 10 minutes or until pairing occurs. Turn on the M7 you want to pair while the pairing indicator is flashing.
- If pairing mode has expired, press the SPK ADD button on the rear of the HUB to turn on pairing mode again. Then, turn the M7 off and then on or press the SPK ADD button on the rear of the M7 to link the M7 to the HUB.
√ For a proper connection, connect the HUB to your router before turning on the M7.
- Connecting the M7 to the HUB may take a few minutes.
- There will be a brief sound when the connection is established.
5 Connect your smart device to your Wi-Fi network. (The HUB and the smart device should be connected to the same router.)
6 Download the Samsung Multiroom app from Google Play or App Store of your smart device.
7 On your smart device, select the Samsung Multiroom app. Setup starts.

flowchart
graph LR
    A["Wireless Audio Multiroom"] --> B["Setup"]
    B --> C["Testing Setup"]
    C --> D["Testing Setup to Setup"]
    D --> E["To the Speaker Will Beep Until it is properly connected to the network."]
    E --> F["Checking..."]
    F --> G["To the Speaker Will Beep Until it is properly connected to the network."]
    G --> H["Testing Setup to Setup"]
    H --> I["To the Speaker Will Beep Until it is properly connected to the network."]
    I --> J["Testing Setup to Setup"]
    J --> K["To the Speaker Will Beep Until it is properly connected to the network."]
    K --> L["Testing Setup to Setup"]
    L --> M["To the Speaker Will Beep Until it is properly connected to the network."]
    M --> N["Testing Setup to Setup"]
    N --> O["To the Speaker Will Beep Until it is properly connected to the network."]
    O --> P["Testing Setup to Setup"]
    P --> Q["To the Speaker Will Beep Until it is properly connected to the network."]
    Q --> R["Testing Setup to Setup"]
    R --> S["To the Speaker Will Beep Until it is properly connected to the network."]
    S --> T["Testing Setup to Setup"]
    T --> U["To the Speaker Will Beep Until it is properly connected to the network."]
    U --> V["Testing Setup to Setup"]
    V --> W["To the Speaker Will Beep Until it is properly connected to the network."]
    W --> X["Testing Setup to Setup"]
    X --> Y["To the Speaker Will Beep Until it is properly connected to the network."]
    Y --> Z["Testing Setup to Setup"]
    Z --> AA["To the Speaker Will Beep Until it is properly connected to the network."]
    AA --> AB["Testing Setup to Setup"]
    AB --> AC["To the Speaker Will Beep Until it is properly connected to the network."]
    AC --> AD["Testing Setup to Setup"]
    AD --> AE["To the Speaker Will Beep Until it is properly connected to the network."]
    AE --> AF["Testing Setup to Setup"]
    AF --> AG["To the Speaker Will Beep Until it is properly connected to the network."]
    AG --> AH["Testing Setup to Setup"]
    AH --> AI["To the Speaker Will Beep Until it is properly connected to the network."]
    AI --> AJ["Testing Setup to Setup"]
    AJ --> AK["To the Speaker Will Beep Until it is properly connected to the network."]
    AK --> AL["Testing Setup to Setup"]
    AL --> AM["To the Speaker Will Beep Until it is properly connected to the network."]
    AM --> AN["Testing Setup to Setup"]
    AN --> AO["To the Speaker Will Beep Until it is properly connected to the network."]
    AO --> AP["Testing Setup to Setup"]
    AP --> AQ["To the Speaker Will Beep Until it is properly connected to the network."]
    AQ --> AR["Testing Setup to Setup"]
    AR --> AS["To the Speaker Will Beep Until it is properly connected to the network."]
    AS --> AT["Testing Setup to Setup"]
    AT --> AU["To the Speaker Will Beep Until it is properly connected to the network."]
    AU --> AV["Testing Setup to Setup"]
    AV --> AW["To the Speaker Will Beep Until it is properly connected to the network."]
    AW --> AX["Testing Setup to Setup"]
    AX --> AY["To the Speaker Will Beep Until it is properly connected to the network."]
    AY --> AZ["Testing Setup to Setup"]
    AZ --> BA["To the Speaker Will Beep Until it is properly connected to the network."]
    BA --> BB["Testing Setup to Setup"]
    BB --> BC["To the Speaker Will Beep Until it is properly connected to the network."]
    BC --> BD["Testing Setup to Setup"]
    BD --> BE["To the Speaker Will Beep Until it is properly connected to the network."]
    BE --> BF["Testing Setup to Setup"]
    BF --> BG["To the Speaker Will Beep Until it is properly connected to the network."]
    BG --> BH["Testing Setup to Setup"]
    BH --> BI["To the Speaker Will Beep Until it is properly connected to the network."]
    BI --> BJ["Testing Setup to Setup"]
    BJ --> BK["To the Speaker Will Beep Until it is properly connected to the network."]
    BK --> BL["Testing Setup to Setup"]
    BL --> BM["To the Speaker Will Beep Until it is properly connected to the network."]
    BM --> BN["Testing Setup to Setup"]
    BN --> BO["To the Speaker Will Beep Until it is properly connected to the network."]
    BO --> BP["Testing Setup to Setup"]
    BP --> BQ["To the Speaker Will Beep Until it is properly connected to the network."]
    BQ --> BR["Testing Setup to Setup"]
    BR --> BS["To the Speaker Will Beep Until it is properly connected to the network."]
    BS --> BT["Testing Setup to Setup"]
    BT --> BU["To the Speaker Will Beep Until it is properly connected to the network."]
    BU --> BV["Testing Setup to Setup"]
    BV --> BW["To the Speaker Will Beep Until it is properly connected to the network."]
    BW --> BX["Testing Setup to Setup"]
    BX --> BY["To the Speaker Will Beep Until it is properly connected to the network."]
    BX --> BZ["Testing Setup to Setup"]
    BZ --> CA["To the Speaker Will Beep Until it is properly connected to the network."]
8 If the automatic setup fails, run the App again and follow the instructions in the app guide on your device to connect the M7 and the HUB.

NOTE
√ After pairing is complete, the M7 naming screen appears. Edit the name or enter a name of your own choosing.

Connecting without a HUB (Not Included)
place the M7 closer to the HUB or your router and try again.
be disrupted because of the distance between it and other devices on the network, obstructions, or interference from other wireless devices.
Connecting the M7 to Your Network with a LAN Cable (For a Single M7)

flowchart
graph TD
    A["Router"] -->|LAN| B["Wireless Router"]
    B -->|Plug In| C["Plug-in"]
    C --> D["Ethernet"]
    D --> E["Power"]
1 Connect one end of the LAN cable to the M7's ETHERNET port. Connect the other end to your wireless router. (You cannot use the M7 without a wireless router.)
2 Plug the M7 into an electrical outlet. The LED pairing indicator starts to blink.
3 Connect your smart device to your Wi-Fi network.
4 Download the Samsung Multiroom app from Google Play or App Store of your smart device.
5 On your Smart device, select the Samsung Multiroom app. Setup starts.

6 In the app, select "I don't have a Hub", and then press Next. On the next screen, select M5/M7, and then press Next. On the next screen, select Wired, and then press Next.
7 Unplug the M7's power cable, and then plug it in again.
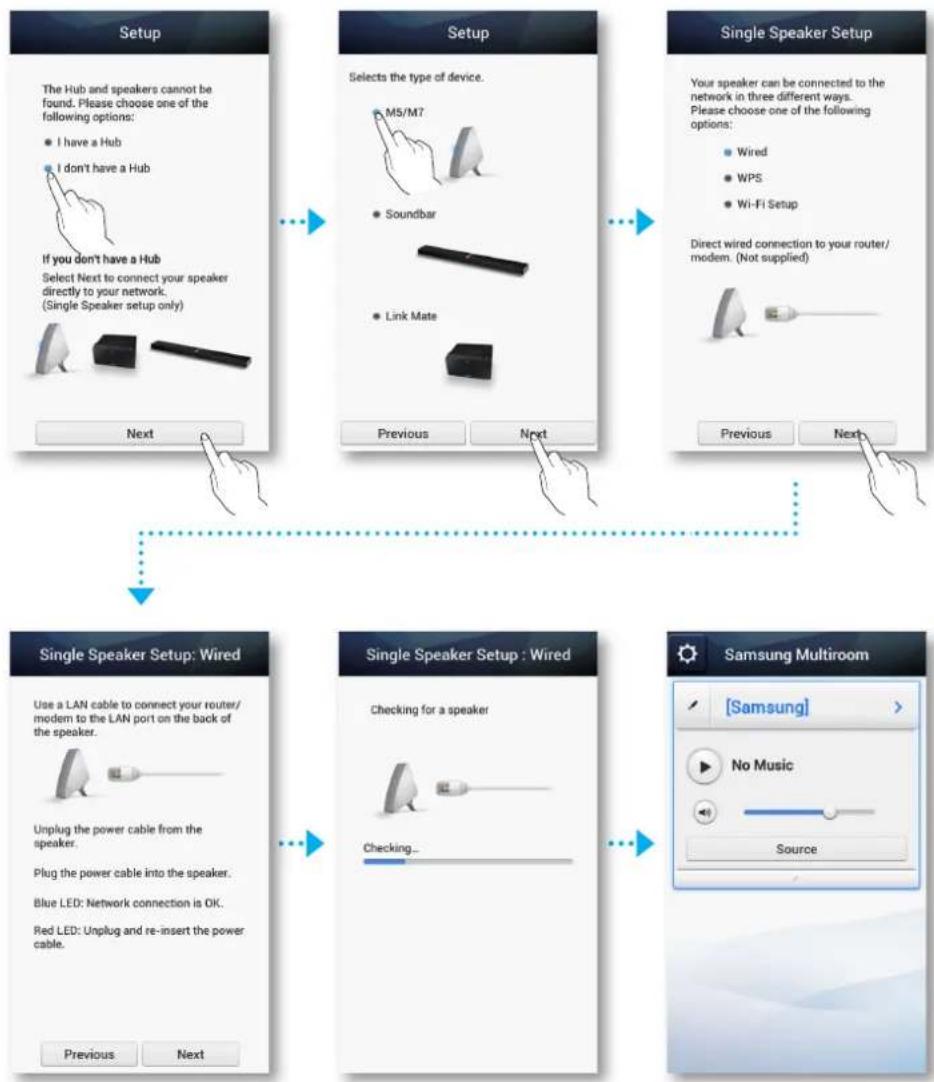
flowchart
graph TD
    A["Setup"] --> B["Setup"]
    B --> C["Single Speaker Setup"]
    C --> D["Single Speaker Setup: Wired"]
    D --> E["Samsung Multiroom"]

    subgraph Setup
        F["The Hub and speakers cannot be found. Please choose one of the following options:<br>● I have a Hub<br>● I don't have a Hub"]
        G["If you don't have a Hub<br>Select Next to connect your speaker directly to your network.<br>(Single Speaker setup only)"]
        H["Next"] --> I
    end

    subgraph Setup
        I["Selects the type of device:<br>M5/M7<br>● Soundbar<br>● Link Mate"]
        J["Previous"] --> K["Next"]
    end

    subgraph Single Speaker Setup
        L["Your speaker can be connected to the network in three different ways.<br>Please choose one of the following options:<br>● Wired<br>● WPS<br>● Wi-Fi Setup"]
        M["Direct wired connection to your router/modem. (Not supplied)"]
        N["Previous"] --> O["Next"]
    end

    subgraph Single Speaker Setup: Wired
        P["Use a LAN cable to connect your router/modem to the LAN port on the back of the speaker."]
        Q["Unplug the power cable from the speaker."]
        R["Plug the power cable into the speaker."]
        S["Blue LED: Network connection is OK."]
        T["Red LED: Unplug and re-insert the power cable."]
        U["Previous"] --> V["Next"]
    end

    subgraph Single Speaker Setup: Wired
        W["Checking for a speaker"]
        X["Checking..."]
    end

    subgraph Samsung Multiroom
        Y["[Samsung"]] --> Z["No Music"]
        Z --> AA["Source"]
    end

NOTE
√ After pairing is complete, the M7 naming screen appears. Edit the name or enter a name of your own choosing.
Connecting the M7 to Your Network via the WPS Method (For a Single M7)
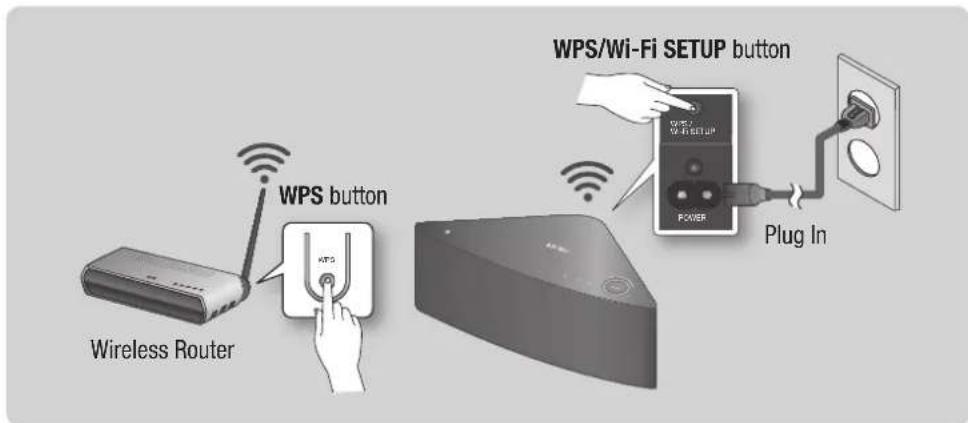

NOTES
√ The M7 does not support Wi-Fi Direct or Wi-Fi Setup (tethering).
√ Some Wi-Fi devices may search for and find the M7, but not support the connection.
√ For activation of the WPS function on a relevant AP, refer to the AP's manual.
√ The WPS function may not be supported on some APs.
In that case connect to the Internet using a wired network or the M7's Wi-Fi Setup.
1 Plug the M7 into an electrical outlet. The LED pairing indicator starts to blink.
2 Connect your smart device to your Wi-Fi network.
3 Download the Samsung Multiroom app from Google Play or App Store of your smart device.
4 On your smart device, select the Samsung Multiroom app. Setup starts.

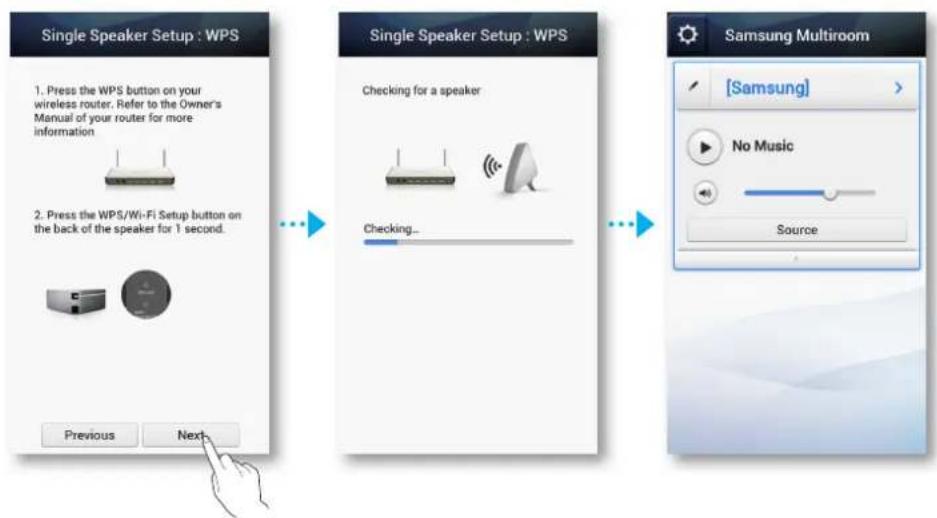
5 In the app, select "I don't have a Hub", and then press Next. On the next screen, select M5/M7, and then press Next. On the next screen, select WPS, and then press Next.

6 Press the WPS button on your wireless router, and then press the WPS/Wi-Fi SETUP button on the back of the M7. Once the M7 is connected, the M7 produces a sound, and the LED pairing indicator on the front stops flashing.
Press Next on your smart device when the LED pairing indicator stops flashing.
flowchart
graph LR
    A["Single Speaker Setup : WPS"] --> B["1. Press the WPS button on your wireless router. Refer to the Owner's Manual of your router for more information"]
    B --> C["2. Press the WPS/Wi-Fi Setup button on the back of the speaker for 1 second."]
    C --> D["Previous"]
    C --> E["Next"]
    F["Single Speaker Setup : WPS"] --> G["Checking for a speaker"]
    G --> H["Checking..."]
    H --> I["..."]
    I --> J["Samsung Multiroom"]
    J --> K["[Samsung"]]
    K --> L["No Music"]
    L --> M["Source"]

NOTES
√ The M7 goes into stand-by for 2 minutes when you press the WPS/Wi-Fi SETUP button. While the M7 is in stand-by, press the WPS button of your router.
√ For the WPS stand-by duration and the specifications of your router, refer to the router's manual.
√ After pairing is complete, the M7 naming screen appears. Edit the name or enter a name of your own choosing.
Connecting the M7 to Your Network via the Wi-Fi Setup Method (For a Single M7) - For Android

1 Plug the M7 into an electrical outlet. The LED pairing indicator starts to blink.
2 Connect your smart device to your Wi-Fi network.
3 Download the Samsung Multiroom app from Google Play of your smart device.
4 On your smart device, select the Samsung Multiroom app. Setup starts.
5 In the app, select "I don't have a Hub", and then press Next. On the next screen, select M5/M7, and then press Next. On the next screen, select Wi-Fi Setup, and then press Next.
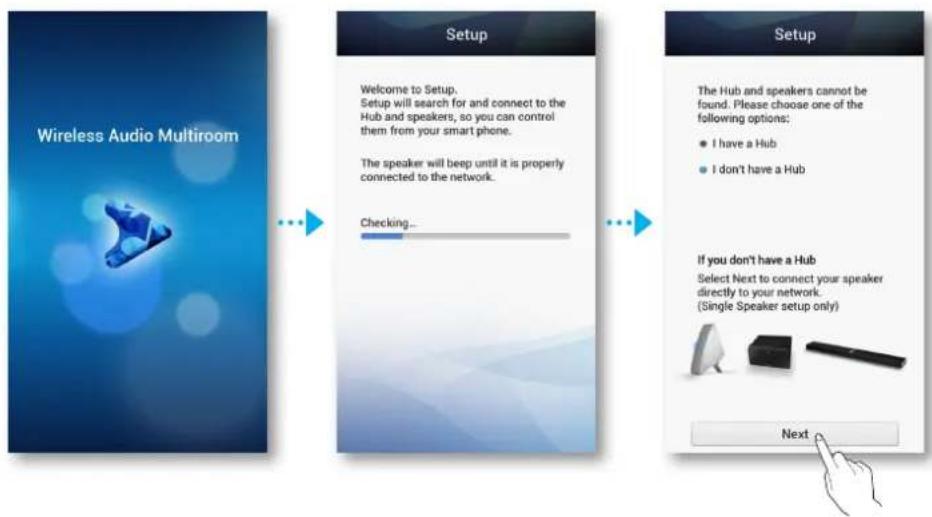
flowchart
graph LR
    A["Wireless Audio Multiroom"] --> B["Setup"]
    B --> C["Setup"]
    C --> D["Next"]
    style A fill:#333,stroke:#fff,color:#fff
    style B fill:#fff,stroke:#000
    style C fill:#fff,stroke:#000
    style D fill:#fff,stroke:#000

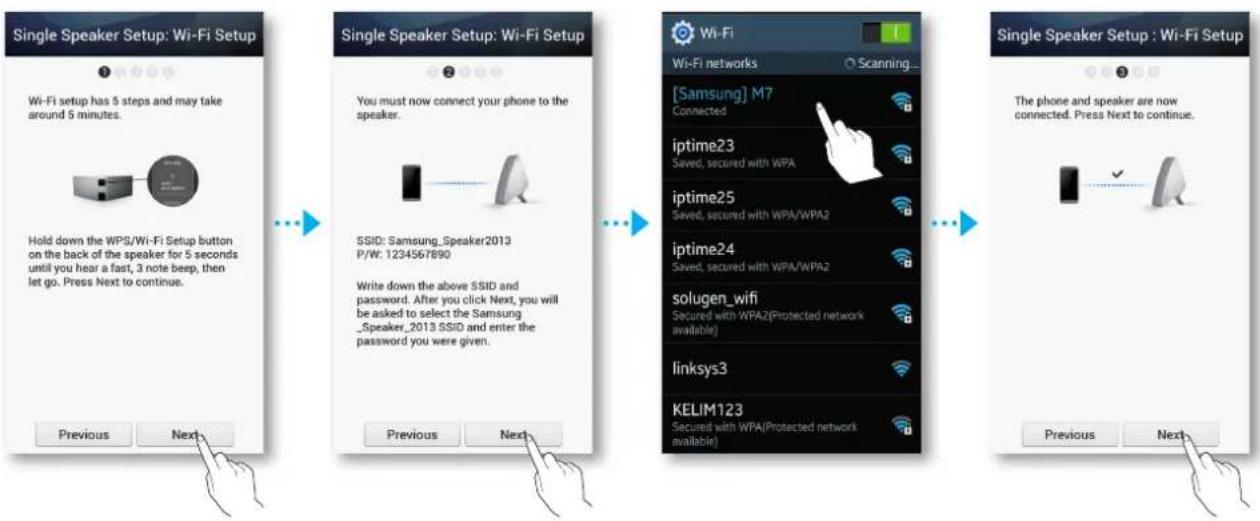
6 Press and hold the WPS/Wi-Fi SETUP button on the back of your M7 for 5 seconds. The indicator LED stops blinking and turns solid blue. You should also hear a notification sound.
7 Press Next. The smart device lists available networks and devices.
8 Select [Samsung] M7. This is the default M7 name. The M7 connects to your smart device.
(The default security PIN is 1234567890.)
9 Press Next. The smart device lists available networks. Select your network from the list.
flowchart
graph LR
    A["Single Speaker Setup: Wi-Fi Setup"] --> B["Wi-Fi setup has 5 steps and may take around 5 minutes."]
    B --> C["Hold down the WPS/Wi-Fi Setup button on the back of the speaker for 5 seconds until you hear a fast, 3 note beep, then let go. Press Next to continue."]
    C --> D["Previous"]
    C --> E["Next"]

    F["Single Speaker Setup: Wi-Fi Setup"] --> G["You must now connect your phone to the speaker."]
    G --> H["SSID: Samsung_Speaker2013 P/W: 1234567890"]
    H --> I["Write down the above SSID and password. After you click Next, you will be asked to select the Samsung_Speaker_2013 SSID and enter the password you were given."]
    I --> J["Previous"]
    I --> K["Next"]

    L["Wi-Fi Networks"] --> M["Wi-Fi networks"]
    M --> N["[Samsung"] M7 Connected]
    N --> O["iptime23 Saved, secured with WPA"]
    O --> P["iptime25 Saved, secured with WPA/WPA2"]
    P --> Q["iptime24 Saved, secured with WPA/WPA2"]
    Q --> R["solugen_wifi Secured with WPA2(Protected network available)"]
    R --> S["linksys3"]
    S --> T["KELIM123 Secured with WPA(Protected network available)"]

    U["Single Speaker Setup: Wi-Fi Setup"] --> V["The phone and speaker are now connected. Press Next to continue."]
    V --> W["Previous"]
    V --> X["Next"]
10 If you have a password for your network, the Security screen appears on your smart device. Use the keyboard that appears to enter your password.
When done, press Done.

flowchart
graph LR
    A["Single Speaker Setup: Wi-Fi Setup"] --> B["Select a Wi-Fi network for connecting the speaker."]
    B --> C["Wi-Fi Networks<br>iptime24<br>solugen_wifi<br>ollehWiFi<br>ollehWiFi<br>ELT5<br>ELT1"]
    C --> D["..."]
    D --> E["Single Speaker Setup: Wi-Fi Setup"]
    E --> F["Enter the password for 'iptime24'.<br>Show Password"]
    F --> G["..."]
    G --> H["Single Speaker Setup: Wi-Fi Setup"]
    H --> I["Enter the password for 'iptime24'.<br>Show Password"]
11 Your smart device connects to the same network your M7 is attached to. When the connection is complete, press Next.
![Single Speaker Setup: Wi-Fi Setup Press Next to connect your phone to the same Wi-Fi network as your Speaker. Previous Next Samsung Multiroom [Samsung] No Music Source](/content/2026/06/1203565/images/b1fb1296d138b783436dfa5bc8e4eb313863bd69b27b484721f6a1de9323bbb1.jpg)

NOTES
√ Connecting to a secure wireless network requires the correct password.
- For the password of your secured home or work wireless network, consult your Internet service provider or the network administrator.
- For the password of a Wi-Fi network in a public place such as a cafe or theater, consult the location's general manager or information center.
√ After pairing is complete, the M7 naming screen appears. Edit the name or enter a name of your own choosing.
Connecting the M7 to Your Network via the Wi-Fi Setup Method (For a Single M7) - For iOS

1 Plug the M7 into an electrical outlet. The LED pairing indicator starts to blink.
2 Connect your smart device to your Wi-Fi network.
3 Download the Samsung Multiroom app from App Store of your smart device.
4 On your smart device, select the Samsung Multiroom app. Setup starts.
5 In the app, select "I don't have a Hub", and then press Next. On the next screen, select M5/M7, and then press Next. On the next screen, select Wi-Fi Setup, and then press Next.

flowchart
graph LR
    A["Wireless Audio Multiroom"] --> B["Setup"]
    B --> C["Setup"]
    C --> D["Next"]
    B --> E["Checking..."]
    E --> F["The Speaker(s) will beep until it is properly connected to the network."]
    B --> G["Welcome to Setup. Setup will search for and connect to the Hub and speaker(s), so you can control them from your smart phone."]
    C --> H["If you don't have a Hub. Select Next to connect your speaker directly to your network (Single Speaker setup only)."]
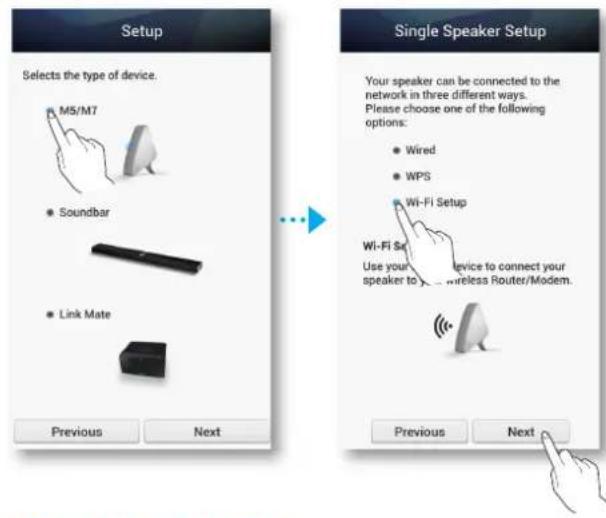
6 Press and hold the WPS/Wi-Fi SETUP button on the back of your M7 for 5 seconds. The indicator LED stops blinking and turns solid blue. You should also hear a notification sound.
7 Press Next.
8 Press OK.

9 Press the smart device's Home button to leave app and select Settings.
10 Choose the M7's Wi-Fi point.
11 Select [Samsung] M7. This is the default M7's name. The M7 connects to your smart device.
(The default security PIN is 1234567890.)

12 Use the keyboard that appears to enter your password.
![Enter the password for "Samsung_Speaker2013" Cancel Enter Password Join Password Q W E T Y Y I O P A S D F G H J K L Z X C V B N M .?123 spaceJJon ...→ Joining "Samsung_Speaker2013"... Cancel Enter Password Join Password ••••••••• Settings Wi-Fi Wi-Fi ✓ Samsung_Speaker... CHOOSE A NETWORK... DIR655_dongho ↓ + DIRECT-06 ↓ + DIRECT-2q[MON]k... ↓ + DIRECT-5F ↓ + DIRECT-Cu ↓ + DIRECT-ee ↓ + DIRECT-EL ↓ + DIRECT-gO ↓ +](/content/2026/06/1203565/images/d25e2fb251f3726c5e91c5590b41fdd0901796a7e2b733ba1d2ca91ccd8789ef.jpg)
13 Press the Next on the app screen. The smart device lists available networks. Select your network from the list.
14 If you have a password for your network, the Security screen appears on your smart device. Use the keyboard that appears to enter your password.
When done, press Connect.

flowchart
graph LR
    A["Single Speaker Setup: WiFi Setup"] --> B["Connecting phone and speaker. Please wait..."]
    B --> C["Select a Wi-Fi network for connecting the speakers"]
    C --> D["Wi-Fi Networks"]
    D --> E["Home-AP"]
    E --> F["Security: WPA/WPA2 PSK\nWireless password"]
    F --> G["Show password."]
    F --> H["Show advanced option"]
    G --> I["Connect"]
    H --> J["Connect"]
    I --> K["Home-AP"]
    J --> L["Home-AP"]
15 Your smart device connects to the same network your M7 is attached to. When the connection is complete, press Next.
![Single Speaker Setup : Wi-Fi Setup Press Next to connect your phone to the same Wi-Fi network as your speaker Previous Next Samsung Multiroom [Samsung] No Music Source](/content/2026/06/1203565/images/58a5329f071e7cc005100e818c5988b3790b33725cad07d675e6fe6c92656536.jpg)

NOTES
√ Connecting to a secure wireless network requires the correct password.
- For the password of your secured home or work wireless network, consult your Internet service provider or the network administrator.
- For the password of a Wi-Fi network in a public place such as a cafe or theater, consult the location's general manager or information center.
√ After pairing is complete, the M7 naming screen appears. Edit the name or enter a name of your own choosing.
Connecting with TV SoundConnect function
This section explains how to connect the M7 to Bluetooth compatible SAMSUNG TVs.

1 Plug the M7 into an outlet, and then press the TV SoundConnect button on its top panel.
2 Set Add New Device to On in the TV's TV SoundConnect Settings menu. (Refer to the TV's user manual for details.)
A message asking whether to proceed with Bluetooth pairing appears.
3 Select Yes.
The M7 pairs with the TV.
4 Select the desired track to play from your TV's music list.
5 The M7 plays the track you selected.

NOTES
√ Press and hold the TV SoundConnect button for more than 5 seconds to reset the TV SoundConnect.
√ Optimal pairing distance is 3.3 feet(1 m) or less.
√ If you unplug the M7, the TV SoundConnect connection is terminated. To re-establish the connection, plug the M7 into an outlet, and then set the TV SoundConnect connection again.
√ When the M7 is sleep mode, the TV SoundConnect connection is not terminated.
√ Only one M7 can be connected to the TV via TV SoundConnect.
√ Operational range of TV SoundConnect
- Recommended pairing range: up to 3.3 feet(1 m).
- Recommended operating range: up to 6.5 feet(2 m).
- The connection may be lost or sound may stutter if the distance between the TV and the M7 exceeds 6.5 feet(2 m).
√ Before activating this function, be sure to activate the Samsung TV's SoundConnect or SoundShare mode.
√ The SoundConnect feature is available on some Samsung TVs released since 2012. Check whether your TV supports the SoundShare or SoundConnect function.
(For further details, refer to the TV's user's manual.)
√ Instability in the network environment may cause connection to be lost or sound to stutter.
Disconnecting TV SoundConnect
To disconnect the TV SoundConnect connection, turn off the TV SoundConnect function on your TV.
(For more information, please refer to the TV's user manual.)
You can also disconnect the TV SoundConnect connection in the App.
1 On your Smart device, select the Samsung Multiroom app.
2 Press the Source button.
![Samsung Multiroom [Samsung] Connected: [TV]Samsung LED55 Source ... Samsung Multiroom Source • Wi-Fi • TV SoundConnect Listen to boosted TV sound by connecting your speakers to your Samsung TV. • Bluetooth • AUX Cancel OK](/content/2026/06/1203565/images/7975e68a216ca512087b74d6d922cb7155c94fe1ed30f439c3040941e0e9a9c0.jpg)
3 Switch to another mode and the TV SoundConnect connection terminates.

NOTES
√ To establish a Wi-Fi connection, see pages 23\~35. Press here
To establish a Bluetooth connection, see page 38. Press here
To use the AUX connection, see page 41. Press here
√ You can also terminate the TV SoundConnect connection by pressing the ✪ Bluetooth or 📋 Internet Radio Preset button on the M7.

Connecting the M7 to Bluetooth Devices
You can connect the M7 to Bluetooth devices and enjoy music with high quality stereo sound, all without wires.
Bluetooth technology lets Bluetooth-compliant devices interconnect easily with each other using a short, wireless connection.
To connect a Bluetooth device to your M7, follow these steps:

1 Plug the M7 into an electrical outlet, and then press the Bluetooth button on its top panel.
2 Enable your smart device's Bluetooth function, and then select Scan for Devices.
3 Select the [Samsung] M7.
4 Select the desired track to play from your smart device's music list.
5 The M7 plays the track you selected.

NOTES
√ A Bluetooth device may cause noise or malfunction, depending on usage, when:
- A part of your body is in contact with the receiving/transmitting system of the Bluetooth device on the M7.
- It is subject to electrical variation from obstructions caused by a wall, corner, or by office partitioning.
- It is exposed to electrical interference from same frequency-band devices including medical equipment, microwave ovens, and wireless LANs.
√ Pair the M7 with the Bluetooth device while they are close together.
√ The further the distance between the M7 and the Bluetooth device, the worse the quality. If the distance exceeds the Bluetooth operational range, the connection is lost.
√ The Bluetooth connection only works when the Bluetooth device is close to the M7. The connection is automatically cut off if the Bluetooth device moves out of range. Even within range, the sound quality may be degraded by obstacles such as walls or doors.
√ This M7 may cause electric interference during its operation.
√ In Bluetooth connection mode, the Bluetooth connection will be lost if the distance between the M7 and the Bluetooth device exceeds 16.25 ft (5m).
√ You may be required to enter a PIN code (password) when connecting the Bluetooth device to the M7. If the PIN code input window appears, enter 0000.
√ The M7 supports SBC data (44.1kHz, 48kHz).
√ The AVRCP feature is not supported.
√ Connect only to a Bluetooth device that supports the A2DP (AV) function.
√ You cannot connect to a Bluetooth device that supports only the HF (Hands Free) function.
√ Only one Bluetooth device can be paired at a time.
√ If you unplug the M7, the Bluetooth connection is terminated. To re-establish the connection, plug the M7 into an outlet, and then set the Bluetooth connection again.
Disconnecting Bluetooth
To disconnect the Bluetooth connection, turn off the Bluetooth function on your smart device. (For more information, please refer to the smart device's user manual.)
You can also disconnect the Bluetooth connection in the App.
1 On your smart device, select the Samsung Multiroom app.
2 Press the Source button.
![Samsung Multiroom [Samsung] Connected: SHV-E160S Source ... Samsung Multiroom [Samsung] Source • Wi-Fi • TV SoundConnect • Bluetooth Listen to stored music from: Bluetooth enabled devices. • AUX Cancel OK](/content/2026/06/1203565/images/bca782c2c10823b15f02e63604ee40bc7f90f1428687939324ef06a933bea59d.jpg)
3 Switch to another mode and the Bluetooth connection will terminate.

NOTES
√ To establish a Wi-Fi connection, see pages 23\~35. Press here To establish a TV SoundConnect connection, see page 36. Press here To use the AUX connection, see page 41. Press here
√ You can also terminate the Bluetooth connection by pressing the 📄 SoundConnect or 🏠 Internet Radio Preset button on the M7.
Connecting with NFC function - For Android
You can connect the M7 to Bluetooth devices easily by gently touch the smart device to the N mark on the top panel of the M7.
Connect your NFC compatible device to enjoy music with high quality stereo sound, all without wires.

1 Plug the M7 into an electrical outlet.
2 Turn on the NFC function on your Smart device, and then gently touch the device to the N mark on the top panel of the M7.
3 The Bluetooth screen appears on your Smart device.
4 Select OK.
5 Select the desired track to play from your smart device's music list.
6 The M7 plays the track you selected.

NOTES
√ To disconnect the Bluetooth connection, gently touch the smart device to the Ⓞ mark on the top panel of the M7 again.
√ Please be careful not to disturb other buttons around the NFC tag.
√ Do not place or play back your NFC device on top of the NFC tag on the M7. Vibrations from the music may cause the device to tip over and cause the M7 to disconnect or damage the device.
√ The NFC function is built into Android devices running Android OS 4.1 Jellybean or later.
√ The position of the NFC antenna differs on different devices. Check where the NFC antenna is before connecting.
√ If your device is covered with a thick case, the connection may not succeed.
√ The N mark is a trademark or registered trademark of NFC Forum, Inc. in the United States and in other countries.
√ If you unplug the M7, the NFC connection is terminated. To re-establish the connection, plug the M7 into an outlet, and then set the NFC connection again.
Connecting to the AUX IN
This section explains how to connect the M7 to an audio device using the AUX IN terminal.
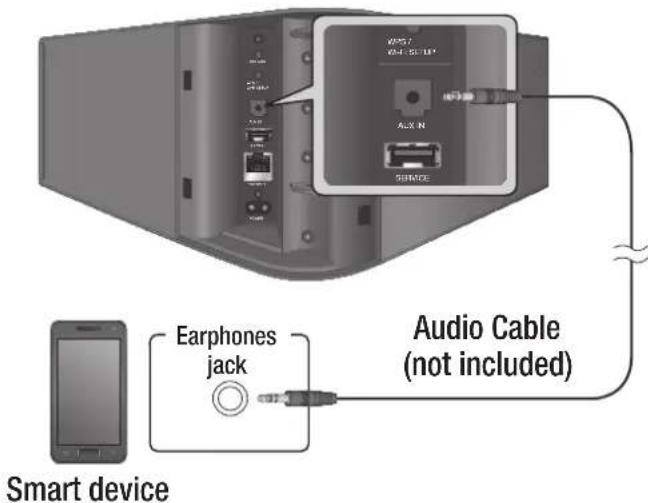
1 Plug the M7 into an electrical outlet.
2 Connect the audio cable (not included) to the M7's AUX IN and the smart device's AUX OUT.
3 Select the desired track to play from your smart device's music list.
4 The M7 plays the track you selected.
Disconnecting AUX connection
To terminate the AUX connection, disconnect the audio cable from the smart device. You can also disconnect the AUX connection in the App.
1 On your Smart device, select the Samsung Multiroom app.
2 Press the Source button.
![Samsung Multiroom [Samsung] Connected Source ... ... Source • Wi-Fi • TV SoundConnect • Bluetooth • AUX Listen to music from audio devices that can be connected via Aux cable. Cancel OK](/content/2026/06/1203565/images/37a88626b010dd06dfc4b495e4b706deaee8819e4d04f33e091e2c11779300cb.jpg)
3 Switch to another mode and the AUX connection terminates.

NOTE
√ To establish a Wi-Fi connection, see pages 23\~35. Press here To establish a TV SoundConnect connection, see page 36. Press here To establish a Bluetooth connection, see page 38. Press here

Adding an M7
that an existing M7 is connected to, the existing M7 will disappear from the Samsung Multiroom app. To re-connect the existing M7, connect it to the newly added HUB.
Adding an extra M7 to a HUB that is connected to an M7
1 Press the SPK ADD button on the back of the HUB.
(The Pairing indicator on the front of the HUB will blink.)

NOTE
√ The pairing indicator (💡) flashes during the pairing mode. You plug in M7 while the indicator is flashing.
2 Plug the M7 you are adding into an electrical outlet, and then press the SPK ADD button on the back of the M7.
When the M7 connects to the HUB, the M7 beeps or sounds, and the M7's LED indicator stops flashing.
3 On your smart device, select the Samsung Multiroom app. Setup starts.
![Wireless Audio Multiroom Setup Welcome to Setup. Setup will search for and connect to the Hub and speakers, so you can control them from your smart phone. The speaker will beep until it is properly connected to the network. Checking... Samsung Multiroom [Samsung] No Music Source Group [Samsung]](/content/2026/06/1203565/images/274a9db906c21a00534f7ced2fca618c583b5fd3cb613f3d5e539e72a2a398a2.jpg)

NOTE
√ After pairing is complete, the M7 naming screen appears. Edit the name or enter a name of your own choosing.
Adding another M7 and Hub to a single M7 in use
When the M7 in use is connected to the router with a LAN cable
1 Disconnect the LAN cable from the M7 in use.
2 Connect the HUB to the wireless router with the LAN cable, and then plug in the HUB's power cable.
3 Plug in the power cable of the new M7. The new M7's blue LED pairing indicator starts to flash. Wait until the pairing indicator on the M7 stops flashing. When the indicator stops flashing, pairing is complete. The M7 may also beep.
4 Turn off the old M7 by disconnecting the power cable. Then, connect it again. Press the SPK ADD button on the back of the M7. The M7's blue LED pairing indicator starts to flash. Wait until the pairing indicator on the M7 stops flashing. When the indicator stops flashing, pairing is complete. The M7 may also beep.
5 On your smart device, select the Samsung Multiroom app. Setup starts.
![Wireless Audio Multiroom Samsung Multiroom [Samsung] No Music Source Group [Samsung]](/content/2026/06/1203565/images/ccb0105ee69964edba2c808f1b68b74c98ac86d797db477ae5045d42ebb1b8e0.jpg)
When the M7 in use is connected using WPS or the Wi-Fi Setup method
1 Connect the HUB to your wireless router with a LAN cable, and then plug the HUB's power cable into an electrical outlet.
2 Plug in the power cable of the new M7. The new M7's blue LED pairing indicator starts to flash. Wait until the pairing indicator on the M7 stops flashing. When the indicator stops flashing, pairing is complete. The M7 may also beep.
3 Turn off the old M7 by disconnecting the power cable. Then, connect it again. Press the SPK ADD button the back of the old M7. The old M7's blue LED pairing indicator starts to flash. Wait until the pairing indicator on the M7 stops flashing. When the indicator stops flashing, pairing is complete. The M7 may also beep.
4 On your smart device, select the Samsung Multiroom app. Setup starts.
![Wireless Audio Multiroom Samsung Multiroom [Samsung] No Music Source Group [Samsung]](/content/2026/06/1203565/images/dd7c6f9971c356c01c7f10b03c78371c1963bd481970e978bd8653c6fbf49925.jpg)
Adding a HUB
An M7 and a HUB may not pair successfully if the M7 and HUB are too far apart or are on different floors.
In such cases, you can link two HUBs together by setting the second HUB to Repeater mode. The additional HUB amplifies the signal and lets you pair the M7 to the closest HUB.
1 Set the HUB that is connected to the wireless router to Pairing mode by pressing its SPK ADD button for 1 second.
2 Plug in the new HUB you are using as an extender, and then press its SPK ADD button for 10 seconds.
3 The newly added HUB's LED indicators turn off and on, and it switches to Repeater mode.
4 Once the connection between the two HUBs has been established, the added HUB's ( ) indicator stops blinking.

NOTES
√ If your smart device is not connected to the wireless router with a Wi-Fi connection, the M7 will not appear on the Samsung Multiroom app.
√ Place the HUB that is in Repeater mode in an appropriate location between the M7 and the HUB that is connected to the wireless router.
√ You can set only one HUB to Repeater mode.

Relocating the M7
When relocating your M7, refer to the below table.
| HUB\Wireless router | If you want to connect your M7 to the current wireless router. | If you want to connect your M7 to a different wireless router. |
| Without a HUB | Turn off the M7, relocate it and then turn it on. | Turn off the M7, relocate it, then establish the new connection as described in the installation instructions on pages 23 through 35. Press here |
| With a HUB | Connect a LAN cable between the HUB and the new wireless router, turn on the HUB, and then turn on the M7. |
Functions
Installing the Samsung Multiroom App
To use the M7, you must download and then install the Samsung Multiroom App by accessing the app through Google play or App Store.
With the Samsung Multiroom App installed, you can play music stored in your smart device, from connected devices and other content providers, and from Internet radio stations.
Android
Market search : Samsung Multiroom

iOS
Market search : Samsung Multiroom

Accessing the Samsung Multiroom App
To access the Samsung Multiroom app, press the Multiroom app icon on your smart device.


Using the Samsung Multiroom App
Renaming a connected M7
You can rename M7s connected to your network.
1 Tap the √ and then enter the name you want using the keyboard. When finished, select Done or Save.
![Samsung Multiroom [Samsung] Living Room Bed Room Bath Room Room Source ... Samsung Multiroom Living Room No Music Source 1 2 3 4 5 6 7 8 9 0 q w e r t y u i o p a s d f g h j k l ↑ z x c v b n m Sym KF Done](/content/2026/06/1203565/images/9e505bee531908fb8b283553b7e7c25547e7674c6cd3b236e9f8cf3ff935e89c.jpg)
Switching the input source
You can switch the input source.
1 Press the Source button on the Speaker List screen.
2 Select a source from the list of sources that appears.
![Samsung Multiroom [Samsung] No Music Source ... Samsung Multiroom [Samsung] Source Wi-Fi Select the function that is suitable for how you will use the speaker. TV SoundConnect Bluetooth AUX Cancel OK](/content/2026/06/1203565/images/33d2ffc7fba92524fb871aafd1bfb986b13c6d0154a516808e96dddcb228ac1d.jpg)
Changing the sort order of listed M7s
If you have added multiple M7s, this function is available. (See pages 43\~45.) Press here
1 Drag the of the M7 you want to re-order up or down.
![Samsung Multiroom [Samsung] No Music Source Group [Samsung] ... Samsung Multiroom [Samsung] No Music Source Group [Samsung] ... Samsung Multiroom [Samsung] No Music Source Group](/content/2026/06/1203565/images/0d3774fefbe878320660d186cb674d7ddbac9c68ead6301998eafe47d2925124.jpg)
Grouping M7s
You can group multiple M7s linked to the App and play the same music on all connected M7s in the same group.
This function is available only If you have added multiple M7s. (See pages 43\~45.) Press here

NOTES
√ This function is available only when M7s are connected to a HUB.
If there are no M7s connected to a HUB, the Group button will not appear.
√ The Group Play function is not available for Bluetooth, NFC tagging(Android only), TV SoundConnect, and AUX IN connections.
1 Press the Group button on the Speaker List screen.
![Samsung Multiroom [Samsung] No Music Source Group [Samsung]](/content/2026/06/1203565/images/947efc2fd5d096904c4929d5895a25d6be53328f612bab9b96bab60d864d5cae.jpg)
2 Select the M7's you want to group from the list that appears. When finished, select Done.
![Samsung Multiroom Group To create a new group. Choose some speakers. ✓ Select All ✓ [Samsung] No Music ✓ [Samsung] Cancel Done ... Samsung Multiroom [Samsung] + [Sams... No Music [Samsung] [Samsung] EQ Source Edit Ungroup](/content/2026/06/1203565/images/c7ff184ea590c16f87c63bfa43d894ef1aefbd48a1444d11d655e61f8d873140.jpg)

NOTE
√ You cannot assign an M7 to more than one group.
Playing a Song
1 Press the . [Samsung]
![Samsung Multiroom [Samsung] No Mul Source](/content/2026/06/1203565/images/ce2935752f74c1603764b6db23e6de7fe5e6a9cdc67932426594ae5ee3c8e66b.jpg)
2 Select My Phone.
![[Samsung] My Phone Tunes Services Music Devices Songs A B Albums More + A A B](/content/2026/06/1203565/images/f98dbba8e3ce96ce6f9dd400b4752a35e15f66addcc16a0f7815dcafc1721a2f.jpg)
3 Select the desired song from the list that appears. The song plays.
Sorting songs
You can list and sort the songs in your smart device by selecting one of the tabs on the My Music screen.
Creating a Playlist
1 Press the . √
![[Samsung] My Phone Tunels Services Music Devices Songs Playlists Albums More + Search A C D E F G H](/content/2026/06/1203565/images/50731a62c484074fb87ca9677f560c33500da923fe6abc0db96dac8934c94969.jpg)
2 Select the desired tracks. When done, select Add to Playlists, and then select Create Playlist.
![[Samsung] My Phone Tuneln Services Music Devices Songs Playlists Albums More + Cancel Play Add to Playlists A A B B C C D D E E F F G G ... [Samsung] Add to Playlists Cancel Create Playlist](/content/2026/06/1203565/images/d3e113c8f4b57a0eb61edb6a3b9184a5a11d07d3dcf138996d6c5ee5cd2788e2.jpg)
3 Enter a name for the playlist, and then select Done or Save. The track is added to the Playlist folder.
![[Samsung] Create Playlist Enter a title playlist 1 Cancel Done [ Samsung ] My iPhone Tunes Services Music Devices Songs Playlists Albums More + < playlist 1 (2) Add Songs Delete Songs A A B B Sym KF Done](/content/2026/06/1203565/images/d1ba0bbb973b185b998e865248733784f5292b9dd570f293615b4b0749d72cd5.jpg)
4 Select the desired Playlist.
5 Select the desired song from the list that appears. The song plays.
- Listening to a radio station
1 Select Tuneln.
The Tuneln screen appears with the following tabs:
![[Samsung] My Phone Tunetin Services Music Devices Favorites Browse Search Edit Presets Radio 1 Radio](/content/2026/06/1203565/images/4a7d0b3115bb219bbbbc51bcc0cedcd50150f9a6b5c3228d3ff65d078bc1a762.jpg)
2 Select the desired radio station from the displayed list. The selected radio station plays.

NOTES
√ You can listen to a radio station by pressing the 📄 Internet Radio Preset button on the top panel of the M7.
The M7 switches automatically to a default Internet radio station.
√ Each time you press the ⏻ Internet Radio Preset button, the M7 switches to the next default station, cycling through the 3 default stations.
To change the default stations, see page 56. Press here
Setting Presets
Add a channel to the Presets list so you can quickly find a desired station.
1 Search for the desired radio station using the Browse menu.
![[Samsung] My Phone Tunes Services Music Devices Favorites Browse Search Edit ... [Samsung] My Phone Tunes Services Music Devices Favorites Browse Search Local Radio > Recents > Trending > Recommended > Music > Talk > Sports > News > ... [Samsung] My Phone Tunes Services Music Devices Favorites Browse Search Local Radio Stations Radio 4 Radio Radio 5 Radio Radio 6 Radio Radio 7 Radio Radio 8 Radio Radio 9 Radio Radio 10](/content/2026/06/1203565/images/8d8db577b61f11f610bcb2fb89d953cc6988f4ccc2259c8d9650965410f97c10.jpg)
2 Select a station from the radio play list to display the selected radio station's front page. Touch, and then select Save.
![[Samsung] My Phone Tunes Services Music Devices Favorites Browse Search MBA Stations Radio 9 Radio Radio 10 Radio Radio 4 Radio Radio 5 Radio Radio 6 Radio Radio 7 Radio Radio 10 Radio ... [Samsung] + Tunets Radio 10 Music Camp ... [Samsung] + Tunets Radio 10 Music Camp My Favorite Radio 10 Cancel Save](/content/2026/06/1203565/images/35c6aa9fd01de717745e5861faba523304561d1687c878d5e20580b27c035ac0.jpg)
3 The selected radio station is added to the Presets list.
![[Samsung] My Phone iTunes Services Music Densers Favorites Browse Search Edit Presents Radio 1 Radio Radio 2 Radio Radio 3 Radio My Favorite Radio 10 Radio](/content/2026/06/1203565/images/b89a8c60c1607c6819a5a3fb39b8433265561e335b6861240c918632ef388588.jpg)
Setting the Default Radio Stations in Speaker Preset
Each time you press the ⏻ Internet Radio Preset button on the M7's top panel, the M7 switches automatically to a default Internet radio station.
To replace the randomly selected default Internet radio stations with your own Internet radio stations, follow these steps:
1 Press the Edit button to open the edit box.
Press and drag = for each selection up to Presets, and then select Done.
![[Samsung] My Phone Tunes Services Music Devices Favorites Browse Search Edit Presets 1 Radio 1 Radio 2 Radio 2 Radio 3 Radio 3 Radio My Favorite Radio 10 Radio ... Radio 10 Radio ... [Samsung] My Phone Tunes Services Music Devices Favorites Browse Search Done Presets 1 Radio 1 Radio 2 Radio 2 Radio 3 Radio 3 Radio My Favorite Radio 10 Radio ... [Samsung] My Phone Tunes Services Music Devices Favorites Browse Search Done Presets 1 Radio 1 Radio 2 Radio 2 Radio 3 Radio 10 Radio My Favorite Radio 3 Radio](/content/2026/06/1203565/images/34efe2d027d080e0c033c325d1f7bfb9b002ba227fa686a020132b832ee8e3c2.jpg)

NOTE
√ If you press the Ⓞ Internet Radio Preset button and then run the App while listening to an Internet Radio station, the App jumps to the radio station editing page automatically.
Searching for a Radio Station
1 Select Tuneln.
The Tuneln screen appears.
2 Select Search to find the desired radio station.
Touch the Search box, and then enter the name or call letters of the radio station you want to search for using the keyboard.
Playing music from content providers
1 Select Services.
2 You can play music from content providers.
![[Samsung] My Phone Tuneln Services Music Devices P Pandora Rhapsody](/content/2026/06/1203565/images/e092a09442a9ef847b26f0e555344815b982e7f7889a92fc2861e5bf1c0bceb8.jpg)

NOTES
√ Depending on your region or manufacturer, supported content services may differ.
√ You may not subscribe to a service using your smart device.
To use a for-pay service, first subscribe to the service through your computer.
Playing music from the Amazon cloud player
1 Select Music.
2 You can play music from the Amazon cloud player.
![[Samsung] My Phone Tuneln Services Music Devices amazon cloud play](/content/2026/06/1203565/images/bd0c75f0bc56c89169af87264e0639f397681a656ae182e76914c6f067c91a38.jpg)
Playing music from a selected device
Displays a list of devices connected to your wireless router.
- You can play the music on devices connected to your local network using the M7's Devices menu.
1 Select Devices.
2 Select the desired device.
3 You can play music from the selected device on the M7.
![[Samsung] My Phone Tuneln Services Music No Result](/content/2026/06/1203565/images/b28ef7d6da6843d024fbef3353f882d230084aa6f36fbac6e1c8eb4eec63eb65.jpg)
Using the Settings menu
1 Press the button.
![Samsung Multiroom [msung] No Music Source Settings Guide App Tutorial Coach Mark Services Amazon Music Tuneln Radio Pandora Rhapsody Speaker Settings Add Speaker Front LED](/content/2026/06/1203565/images/e23216a482db23fb26f560e7844d0b104cc718df693c1bf5faea0e5cf68fe701.jpg)
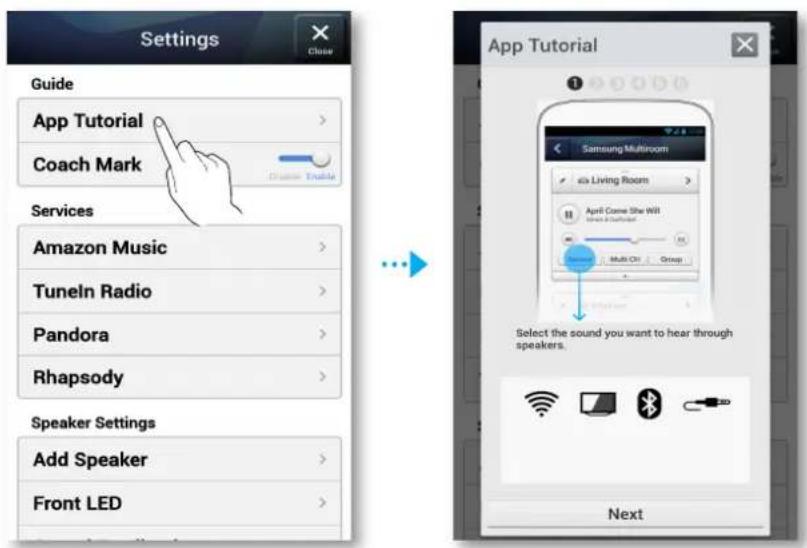
1 Guide
App Tutorial
Select App Tutorial to learn how to use the app.
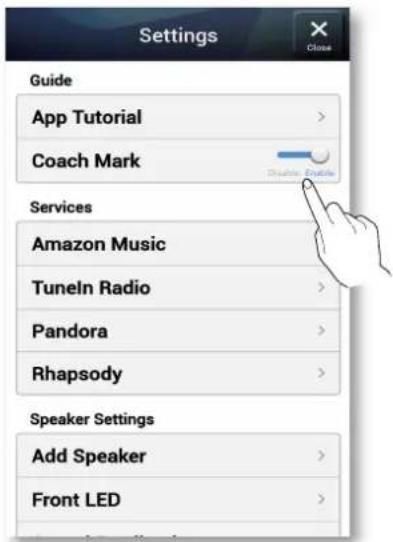
Coach Mark
Service
Amazon Music, Pandora, Rhapsody
Displays a list of available services.


NOTES
√ Depending on your region or manufacturer, supported content services may differ.
√ You may not subscribe to a service using your smart device.
To use a for-pay service, first subscribe to the service through your computer.
Tuneln Radio
Gives you access to TuneIn Radio.

Speaker Settings
Add Speaker
Lets you can add one or more M7s to the App and enjoy the music stored in your smart device from one or more connected M7s.

Front LED
![Settings Speaker Settings Add Speaker Front LED Sound Feedback Software Auto U Clock Alarm Sleep Timer Support Device ID Contact Samsung Front LED Speakers [Samsung] Off On](/content/2026/06/1203565/images/9524fecb5d6bd357abc76506c45ac67c085ead4fe776b3d38b028fa456a2cf02.jpg)
Sound Feedback
![Settings Speaker Settings Add Speaker Front LED Sound Feedback Software Auto Up Clock Alarm Sleep Timer Support Device ID Contact Samsung Sound Feedback Speakers [Samsung] Off On](/content/2026/06/1203565/images/6fb4d2db4a53532e4b8675e1fd8d02fb3248e4c5459fb3e4fb58719a4d6da58c.jpg)
Software Auto Update
Shows the M7's current software version, and lets you turn auto update on or off.
![Settings Speaker Settings Add Speaker > Front LED > Sound Feedback > Software Auto Update > Clock Alarm Sleep Timer > Support Device ID Contact Samsung Software Auto Update Speakers [Samsung] M7 WA 4750WWB-1501.5 Software version of M7](/content/2026/06/1203565/images/256485f7f9a6acdd6b021c86bac3a408f12a67aa9c29aca70c16ab3f39f57472.jpg)

NOTES
√ Auto update is available when your M7 is connected to a network and the Software Auto Update function is set to On.
√ It is strongly recommended that Software Auto Update settings on all the M7s used are set to On. Problems with networked functions (such as Group Play and Ear to Hear) may otherwise occur due to incompatibility issues when a variety of M7 software versions is used on linked M7s.
√ For each M7 with an outdated software version,
1) set the Software Auto Update setting to On and
2) press and hold the ✗ Mute button for more than 5 seconds.
The M7 will then turn off and on so as to update its software automatically.
Clock
Alarm
Lets you set the Alarm.


![Add Alarm Cancel Save Speaker [Samsung] Edit AM 07 25 PM 08 : 26 09 27 Frequency S M T W T F S Tuneln Radio Please, select station > Volume](/content/2026/06/1203565/images/a2fe93868c4910019af0e99949e79225b3ba722dc5b464cb7cb8e08500611d7d.jpg)
Sleep Timer
Lets you set the Sleep Timer.


![Sleep Timer Speakers [Samsung] off](/content/2026/06/1203565/images/5454c92327f8e72efa2bc87bc7041c78221211cf75a8e9936584df8fbae1e413.jpg)

![[Samsung] Off On 14 15 : min 16 Start](/content/2026/06/1203565/images/f0557f1f178d6c54259cd028ff63e24a279c45d1c769abe048c84d9526914d49.jpg)
Support
Device ID
Lets you check the Device ID.
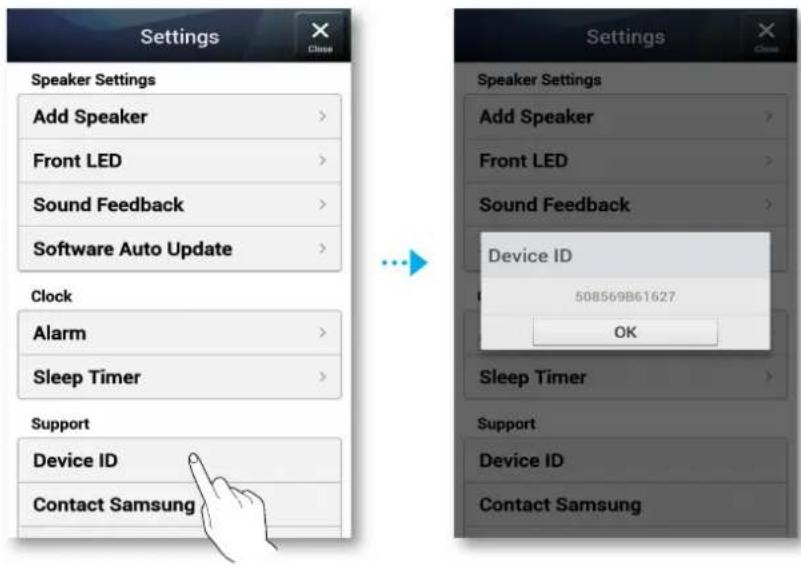
Contact Samsung
Provides a link to the Samsung website.

Open source licenses
Lets you view the Open source licenses.

App Version
Lets you view the App Version.


Reset your product
1 Resetting the M7
1 Press and hold both the 📄 Internet Radio Preset and ✕ Mute buttons for more than 5 seconds to reset the M7.
2 The Touch button on the M7 will blink twice.
3 Press and hold the Internet Radio Preset button for more than 5 seconds to reboot the M7.

NOTE
√ After resetting the M7, stored information will be lost.
Resetting the HUB (Not Included)
1 Press and hold the reset hole with a pen tip for 5 seconds, and wait for all LEDs to begin to flash.
Then, unplug the HUB and plug it in again.

natural_image
Front view of a Siemens 4 Ethernet router with ports and a USB cable (no visible text or symbols)2 Unplug and then plug in your M7s.

NOTE
√ If you have reset the HUB, you must unlug and plug in your M7s for a proper connection with the HUB.
Appendix

Troubleshooting
Refer to the table below when this product does not function properly. If the problem you are experiencing is not listed below or if the instructions below do not help, turn off the product, disconnect the power cord, and contact Samsung Electronics at 1-800-SAMSUNG (1-800-726-7864).
| Symptom Check Remedy | ||
| The unit will not turn on. | outlet? | outlet. |
| A function does not work when the button is pressed. | connect it again. | |
| Sound is not produced. | Mutebutton tocancel the mute function. | |
| The TV SoundConnect (TV pairing) failed. | SoundConnect?version?connecting? | some Samsung TVs released after 2012. Check your TV to see if it supports TV SoundConnect.Press and hold theSoundConnectbutton to the connection.firmware.Press and hold theSoundConnectbutton for more than 5 seconds to reset TV SoundConnect and connect a new TV. |
| HUB doesn't work properly | the wireless router and the HUB properly?the HUB's front indicators show it's operating properly? | ETHERNET SWITCHon the back of the HUB and to your wireless router.Press hereconnecting the HUB and M7, try relocating the M7 so that the M7 is closer to the wireless router or HUB. |
| M7 doesn't work properly | remain red 5 minutes after turning on? | you're using had been certified for Wi-Fi.and then reconnect it to the router.Press here- Make sure the smart device and the HUB are connected to the same Wi-Fi network.- Make sure the HUB's indicator LED's show that it is working correctly. (See page 23, item 3.)Press here- If the problem persists, reset the HUB (see page 66). Press here- Unplug, then plug in the HUB. Then, unplug and plug in the M7.- If you experience troubles with connecting the HUB and M7, try relocating the M7 so that the M7 is closer to the wireless router or HUB. |
| I cannot group speakers. | network via Wi-Fi? | to the network via Bluetooth, NFC tagging(Android only), TV SoundConnect, or AUX IN, you cannot use the group speakers function. |
| App doesn't work properly | accessing the app? | compatible with the app. (See page 7)Press hereversion.turns from red to blue.- Make sure the HUB and the smart device are connected to same router.- Make sure the HUB's indicator LED's show that it is working correctly. (See page 23, item 3.)Press here- If you experience troubles with connecting the HUB and M7, try relocating the M7 so that the M7 is closer to the wireless router or HUB. |

NOTE
√ If the problem persists, consult the service center for troubleshooting.

Open Source License Notice
opensource.samsung.com

Licences
www.spotify.com/connect/third-party-licenses.
com/connect

Spotify®
Specifications
| General | Power Requirements AC 110-120V ~50/60Hz | |
| Power Consumption 24 W | ||
| Weight | 8.6 lbs | |
| Dimensions 15,8 (W) X 7,6 (D) X 5,3 (H) inches | ||
| Operating Temperature Range +41°F to +95°F | ||
| Operating Humidity Range 10 % to 75 % | ||
| Amplifier | Input sensitivity / Impedance 450mV / KOHM (AUX) | |
| S/N ratio (analog input) 65dB | ||
| Separation(1KHz) 65dB | ||
| Network | Ethernet 100BASE - TX Terminal | |
| Wireless LAN Built-in | ||
| Security | WEP (OPEN) | |
| WPA-PSK (TKIP) | ||
| WPA2-PSK (AES) | ||
| WPS(PBC/PIN) Supported | ||
- Network speeds equal to or below 10Mbps are not supported.
- Design and specifications are subject to change without prior notice.
- Weight and dimensions are approximate.
- Dispose unwanted electronics through an approved recycler.
To find the nearest recycling location, go to our website: www.samsung.com/recyclingdirect or call, (877) 278 - 0799.
- This user manual is based on the product using the Android or iOS operating system.
- App screen is based on Android operating system and it may change after you upgrade the software version.
- For further details on using the product, visit www.samsung.com.
This SAMSUNG brand product, as supplied and distributed by SAMSUNG and delivered new, in the original carton to the original consumer purchaser, is warranted by SAMSUNG against manufacturing defects in materials and workmanship for a limited warranty period of:
One (1) Year Parts and Labor\* (\*90 Days Parts and Labor for Commercial Use)
This limited warranty begins on the original date of purchase, and is valid only on products purchased and used in the United States. To receive warranty service, the purchaser must contact SAMSUNG for problem determination and service procedures. Warranty service can only be performed by a SAMSUNG authorized service center. The original dated bill of sale must be presented upon request as proof of purchase to SAMSUNG or SAMSUNG's authorized service center. Transportation of the product to and from the service center is the responsibility of the purchaser.
SAMSUNG will repair or replace this product, at our option and at no charge as stipulated herein, with new or reconditioned parts or products if found to be defective during the limited warranty period specified above. All replaced parts and products become the property of SAMSUNG and must be returned to SAMSUNG. Replacement parts and products assume the remaining original warranty, or ninety (90) days, whichever is longer.
SAMSUNG's obligations with respect to software products distributed by SAMSUNG under the SAMSUNG brand name are set forth in the applicable end user license agreement. Non-SAMSUNG hardware and software products, if provided, are on an "AS IS" basis.
Non-SAMSUNG manufacturers, suppliers, publishers, and service providers may provide their own warranties.
This limited warranty covers manufacturing defects in materials and workmanship encountered in normal, and except to the extent otherwise expressly provided for in this statement, noncommercial use of this product, and shall not apply to the following, including, but not limited to: damage which occurs in shipment; delivery and installation; applications and uses for which this product was not intended; altered product or serial numbers; cosmetic damage or exterior finish; accidents, abuse, neglect, fire, water, lightning or other acts of nature; use of products, equipment, systems, utilities, services, parts, supplies, accessories, applications, installations, repairs, external wiring or connectors not supplied and authorized by SAMSUNG, or which damage this product or result in service problems; incorrect electrical line voltage, fluctuations and surges; customer adjustments and failure to follow operating instructions, cleaning, maintenance and environmental instructions that are covered and prescribed in the instruction book; product removal or reinstallation; reception problems and distortion related to noise, echo, interference or other signal transmission and delivery problems. SAMSUNG does not warrant uninterrupted or error-free operation of the product.
THERE ARE NO EXPRESS WARRANTIES OTHER THAN THOSE LISTED AND DESCRIBED ABOVE, AND NO WARRANTIES WHETHER EXPRESS OR IMPLIED, INCLUDING, BUT NOT LIMITED TO, ANY IMPLIED WARRANTIES OF MERCHANTABILITY OR FITNESS FOR A PARTICULAR PURPOSE, SHALL APPLY AFTER THE EXPRESS WARRANTY PERIODS STATED ABOVE, AND NO OTHER EXPRESS WARRANTY OR GUARANTY GIVEN BY ANY PERSON, FIRM OR CORPORATION WITH RESPECT TO THIS PRODUCT SHALL BE BINDING ON SAMSUNG. SAMSUNG SHALL NOT BE LIABLE FOR LOSS OF REVENUE OR PROFITS, FAILURE TO REALIZE SAVINGS OR OTHER BENEFITS, OR ANY OTHER SPECIAL, INCIDENTAL OR CONSEQUENTIAL DAMAGES CAUSED BY THE USE, MISUSE OR INABILITY TO USE THIS PRODUCT, REGARDLESS OF THE LEGAL THEORY ON WHICH THE CLAIM IS BASED, AND EVEN IF SAMSUNG HAS BEEN ADVISED OF THE POSSIBILITY OF SUCH DAMAGES. NOR SHALL RECOVERY OF ANY KIND AGAINST SAMSUNG BE GREATER IN AMOUNT THAN THE PURCHASE PRICE OF THE PRODUCT SOLD BY SAMSUNG AND CAUSING THE ALLEGED DAMAGE. WITHOUT LIMITING THE FOREGOING, PURCHASER ASSUMES ALL RISK AND LIABILITY FOR LOSS, DAMAGE OR INJURY TO PURCHASER AND PURCHASER'S PROPERTY AND TO OTHERS AND THEIR PROPERTY ARISING OUT OF THE USE, MISUSE OR INABILITY TO USE THIS PRODUCT SOLD BY SAMSUNG NOT CAUSED DIRECTLY BY THE NEGLIGENCE OF SAMSUNG. THIS LIMITED WARRANTY SHALL NOT EXTEND TO ANYONE OTHER THAN THE ORIGINAL PURCHASER OF THIS PRODUCT, IS NONTRANSFERABLE AND STATES YOUR EXCLUSIVE REMEDY.
Some states do not allow limitations on how long an implied warranty lasts, or the exclusion or limitation of incidental or consequential damages, so the above limitations or exclusions may not apply to you. This warranty gives you specific legal rights, and you may also have other rights which vary from state to state.
To obtain warranty service, please contact SAMSUNG customer care center.
The benefits of this Limited Warranty extend only to the original purchaser of Samsung products from an authorized Samsung reseller.
THIS LIMITED WARRANTY SHALL NOT APPLY TO ANY SAMSUNG PRODUCTS PURCHASED FROM UNAUTHORIZED RESELLERS OR RETAILERS, EXCEPT IN STATES WHERE SUCH RESTRICTION MAY BE PROHIBITED.
For a list of Samsung authorized retailers, please go to: http://www.samsung.com/us/peaceofmind/authorized_resellers.html.
Contact SAMSUNG WORLD WIDE
If you have any questions or comments relating to Samsung products, please contact the SAMSUNG customer care center.
| Area Contact Center | # | Web Site | |
| North America | CANADA | 1-800-SAMSUNG(726-7864) | www.samsung.com/ca/support (English)www.samsung.com/ca_fr/support (French) |
| U.S.A - Consumer Electronics | 1-800-SAMSUNG(726-7864) www.samsung.com/us/support | ||
| Latin America | MEXICO 01-800- | SAMSUNG(726-7864) www.samsung.com/mx/support | |
| ARGENTINE 0800- | 333-3733 www.samsung.com/ar/support | ||
| URUGUAY 000-405- | 437-33 | www.samsung.com/latin/support (Spanish)www.samsung.com/latin_en/support (English) | |
| PARAGUAY 009- | 542-0001 | www.samsung.com/latin/support (Spanish)www.samsung.com/latin_en/support (English) | |
| BRAZIL | 124-421 (Demais cidades e regiões)4004-0000 (Capitais e grandes centros) | www.samsung.com/br/support | |
| CHILE 800-SAMSUNG(726-7864) www.samsung.com/cl/support | |||
| BOLIVIA 800-10- | 7260 www.samsung.com/cl/support | ||
| COLOMBIA | 600 12 72Gratis desde cualquier parte del país 01 8000112 112 ó desde su celular #SAM(726) | www.samsung.com/co/support | |
| COSTA RICA | 507-726700-800-1-SAMSUNG (726-7864) | www.samsung.com/latin/support (Spanish)www.samsung.com/latin_en/support (English) | |
| DOMINICA 1-800- | 751-2676 | www.samsung.com/latin/support (Spanish)www.samsung.com/latin_en/support (English) | |
| ECUADOR | 10-726701-800-SAMSUNG (72-6786) | www.samsung.com/latin/support (Spanish)www.samsung.com/latin_en/support (English) | |
| EL SALVADOR 800- | 6225 | www.samsung.com/latin/support (Spanish)www.samsung.com/latin_en/support (English) | |
| GUATEMALA | 299-00131-800-299-0033 | www.samsung.com/latin/support (Spanish)www.samsung.com/latin_en/support (English) | |
| HONDURAS | 27919267800-2791-9111 | www.samsung.com/latin/support (Spanish)www.samsung.com/latin_en/support (English) | |
| JAMAICA | 234-72671-800-SAMSUNG (726-7864) | www.samsung.com/latin/support | |
| NICARAGUA | 5077267 | www.samsung.com/latin/support (Spanish)www.samsung.com/latin_en/support (English) | |
| PANAMA | 7267800-0101 | www.samsung.com/latin/support (Spanish)www.samsung.com/latin_en/support (English) | |
| PERU | 777-08Desde celulares por favor llamar al número 3368686 | www.samsung.com/pe/support | |
| PUERTO RICO | 682-3180 | www.samsung.com/latin/support (Spanish)www.samsung.com/latin_en/support (English) | |
| TRINIDAD & TOBAGO | 726-7864 | www.samsung.com/latin/support (Spanish)www.samsung.com/latin_en/support (English) | |
| Venezuela | 7864 | www.samsung.com/ve/support | |
| Europe | AUSTRIA | SAMSUNG (0800 - 7267864) | www.samsung.com/at/support |
| BELGIUM | 201-24-18 | www.samsung.com/be/support (Dutch)www.samsung.com/be_fr/support (French) | |
| BOSNIA | 331 999 | www.samsung.com/support | |
| BULGARIA | 33 11, sharing cost | www.samsung.com/bg/support | |
| CROATIA | 726 786 | www.samsung.com/hr/support | |
| CZECH | SAMSUNG (800-726786) | www.samsung.com/cz/support | |
| DENMARK 70 70 | 19 70 www.samsung.com/dk/support | ||
| FINLAND | 6227 515 | www.samsung.com/fi/support | |
| Europe | FRANCE 01 48 63 00 00 www.samsung.com/fr/support | ||
| GERMANY | 0180 6 SAMSUNG bzw.0180 6 7267864*(*0,20 €/Anruf aus dem dt. Festnetz, aus dem Mobilfunk max. 0,60 €/Anruf) | www.samsung.com/de/support | |
| CYPRUS 8009 4000 only from landline, toll free | www.samsung.com/gr/support | ||
| GREECE | 80111-SAMSUNG (80111 726 7864) only from land line(+30) 210 6897691 from mobile and land line | ||
| HUNGARY | 0680SAMSUNG (0680-726-786)0680PREMIUM (0680-773-648) | http://www.samsung.com/hu/support | |
| ITALIA 800-SAMSUNG (800.7267864) www.samsung.com/it/support | |||
| LUXEMBURG 261 03 710 www.samsung.com/support | |||
| MONTENEGRO 020 405 888 www.samsung.com/support | |||
| SLOVENIA | 080 697 267090 726 786 | www.samsung.com/si/support | |
| NETHERLANDS 0900-SAMSUNG (0900-7267864) (€ 0,10/Min) www.samsung.com/nl/support | |||
| NORWAY 815 56480 www.samsung.com/no/support | |||
| POLAND | 0 801-172-678* lub +48 22 607-93-33 **(całkowity koszt połączenia jak za 1 impuls według taryfy operatora)** (koszt połączenia według taryfy operatora) | www.samsung.com/pl/support | |
| PORTUGAL 808 20 7267 www.samsung.com/pt/support | |||
| ROMANIA | 08008 SAMSUNG (08008 726 7864)TOLL FREE No. | www.samsung.com/ro/support | |
| SERBIA | 011 321 6899 | www.samsung.com/rs/support | |
| SLOVAKIA | 0800 - SAMSUNG(0800-726 786) | www.samsung.com/sk/support | |
| SPAIN | 0034902172678 | www.samsung.com/es/support | |
| SWEDEN 0771 726 7864 (SAMSUNG) www.samsung.com/se/support | |||
| SWITZERLAND 0848 726 78 64 (0848-SAMSUNG) | www.samsung.com/ch/support (German)www.samsung.com/ch_fr/support (French) | ||
| U.K | 0330 SAMSUNG (7267864) | www.samsung.com/uk/support | |
| EIRE | 0818 717100 | www.samsung.com/ie/support | |
| LITHUANIA | 8-800-77777 | www.samsung.com/lt/support | |
| LATVIA | 8000-7267 | www.samsung.com/lv/support | |
| ESTONIA | 800-7267 | www.samsung.com/ee/support | |
| CIS | RUSSIA | 8-800-555-55-55 | www.samsung.com/ru/support |
| GEORGIA | 0-800-555-555 | www.samsung.com/support | |
| ARMENIA | 0-800-05-555 | www.samsung.com/support | |
| AZERBAIJAN 088-55-55-555 www.samsung.com/support | |||
| KAZAKHSTAN | 8-10-800-500-55-500(GSM: 7799, VIP care 7700) | www.samsung.com/support | |
| UZBEKISTAN | 8-10-800-500-55-500 | www.samsung.com/support | |
| KYRGYZSTAN | 8-10-800-500-55-500 | www.samsung.com/kz_ru/support | |
| TADJIKISTAN | 8-10-800-500-55-500 | www.samsung.com/support | |
| MONGOLIA | 7-800-555-55-55 | www.samsung.com/support | |
| UKRAINE | 0-800-502-000 | www.samsung.com/ua/support (Ukrainian)www.samsung.com/ua_ru/support (Russian) | |
| BELARUS | 810-800-500-55-500 | www.samsung.com/support | |
| MOLDOVA | 0-800-614-40 | www.samsung.com/support | |
| Asia Pacific | AUSTRALIA 1300 | 362 603 www.samsung.com/au/support | |
| NEW ZEALAND | 0800 SAMSUNG (0800 726 786) www.samsung.com/nz/support | ||
| CHINA 400-810- | 5858 www.samsung.com/cn/support | ||
| HONG KONG (852) | 3698 4698 | www.samsung.com/hk/support (Chinese)www.samsung.com/hk_en/support (English) | |
| INDIA | 1800 3000 8282 - Toll Free1800 266 8282 - Toll Free30308282 - Non Toll Free | www.samsung.com/in/support | |
| INDONESIA | 0800112888021-56997777 | www.samsung.com/id/support | |
| JAPAN 0120-327 | -527 www.samsung.com/jp/support | ||
| MALAYSIA 1800 | -88-9999 www.samsung.com/my/support | ||
| PHILIPPINES | 1-800-10-7267864 [PLDT]1-800-8-7267864 [Globe landline and Mobile]02-4222111 [Other landline] | www.samsung.com/ph/support | |
| SINGAPORE 1800 | -SAMSUNG(726-7864) www.samsung.com/sg/support | ||
| THAILAND | 0-2689-3232,1800-29-3232 | www.samsung.com/th/support | |
| TAIWAN 0800-32 | -9999 www.samsung.com/tw/support | ||
| VIETNAM 1800 | 588 889 | www.samsung.com/vn/support | |
| MENA | U.A.E | 800-SAMSUNG (726-7864) | www.samsung.com/ae/support (English)www.samsung.com/ae_ar/support (Arabic) |
| OMAN 800-SAMSUNG(726-7864) | |||
| KUWAIT 183-2255 (183-CALL) | |||
| BAHRAIN 8000-4726 | |||
| QATAR | 800-2255 (800-CALL) | ||
| EGYPT | 08000-72678616580 | www.samsung.com/eg/support | |
| ALGERIA | 021 36 11 00 | www.samsung.com/n_africa/support | |
| PAKISTAN | 0800-Samsung (72678) | www.samsung.com/pk/support | |
| TUNISIA 80-1000-12 | www.samsung.com/n_africa/support | ||
| JORDAN | 0800-2227306 5777444 | www.samsung.com/Levant/support (English) | |
| SYRIA | 18252273 | www.samsung.com/Levant/support (English) | |
| IRAN | 021-8255 | www.samsung.com/iran/support | |
| MOROCCO | 080 100 2255 | www.samsung.com/n_africa/support | |
| SAUDI ARABIA | 920021230 | www.samsung.com/sa/supportwww.samsung.com/sa_en/support (English) | |
| TURKEY 444 77 | 11 | www.samsung.com/tr/support | |
| Africa | NIGERIA | 0800-726-7864 | www.samsung.com/africa_en/support |
| Ghana | 0800-100770302-200077 | ||
| Cote D' Ivoire | 8000 0077 | www.samsung.com/africa_fr/support | |
| SENEGAL | 800-00-0077 | ||
| CAMEROON | 7095-0077 | ||
| KENYA | 0800 545 545 | www.samsung.com/support | |
| UGANDA | 0800 300 300 | ||
| TANZANIA | 0685 88 99 00 | ||
| RWANDA | 9999 | ||
| BURUNDI 200 | |||
| DRC | 499999 | ||
| SUDAN | 1969 | ||
| SOUTH AFRICA 0860 SAMSUNG (726 7864) | www.samsung.com/support | ||
| BOTSWANA 8007260000 | |||
| NAMIBIA | 08 197 267 864 | ||
| ZAMBIA 0211 350370 | |||
| MOZAMBIQUE | 847267864 / 827267864 | ||
SAMSUNG
QUESTIONS OR COMMENTS?
| AREA CALL OR VISIT US ONLINE AT WRITE | |||
| IN THE US | 1-800-SAMSUNG (726-7864) | www.samsung.com/us/support | Samsung Electronics America, Inc. 85 Challenger Road Ridgefield Park, NJ 07660 |


- Safety Information
- Regulatory Compliance Statements
- Warning
- FCC Statement: (for U.S.A)
- Federal Communication Commission Interference Statement
- IMPORTANT NOTE
- FCC Radiation Exposure Statement
- IC Statement: (for Canada)
- CAN ICES-3 (B)/NMB-3(B)
- IMPORTANT NOTE:
- IC Radiation Exposure Statement:
- Important Safety Instructions
- Safety precautions
- Power Supply Precautions
- Installation Precautions
- Usage Precautions
- Cleaning Precautions
- Additional Information
- About NFC (Android only)
- About the Network Connection
- - Compatible products
- NOTE
- Copyright
- Contents
- Regulatory Compliance Statements.... 2
- Safety precautions....5
- Additional Information....7
- Copyright 7
- UNDERSTANDING YOUR M7
- Before you begin 12
- Basic Connection 12
- How you can enjoy your M7 13
- GETTING STARTED
- CONNECTIONS
- FUNCTIONS
- APPENDIX
- Before you begin
- Communication Basics
- Basic Connection
- How you can enjoy your M7
- NOTES
- Top Panel
- Accessories
- Available Accessories (Not Included)
- Connecting the Power Cable
- Connecting the Cover-Stand
- Caution
- Separating the cover-stand
- Installing on a wall
- Attaching the toroidal ferrite core to the power cord of the M7
- Looping the power cable around the toroidal ferrite core
- Sleep Mode
- In Wi-Fi / Bluetooth / TV SoundConnect mode
- In AUX mode
- Connecting with a HUB (Not Included)
- Connecting the M7(s) to Your Network with a HUB (Not Included)
- Connecting without a HUB (Not Included)
- Connecting the M7 to Your Network with a LAN Cable (For a Single M7)
- Connecting the M7 to Your Network via the WPS Method (For a Single M7)
- Connecting the M7 to Your Network via the Wi-Fi Setup Method (For a Single M7) - For Android
- Connecting the M7 to Your Network via the Wi-Fi Setup Method (For a Single M7) - For iOS
- Connecting with TV SoundConnect function
- Disconnecting TV SoundConnect
- Connecting the M7 to Bluetooth Devices
- Disconnecting Bluetooth
- Connecting with NFC function - For Android
- Connecting to the AUX IN
- Disconnecting AUX connection
- Adding an M7
- Adding an extra M7 to a HUB that is connected to an M7
- Adding another M7 and Hub to a single M7 in use
- When the M7 in use is connected to the router with a LAN cable
- When the M7 in use is connected using WPS or the Wi-Fi Setup method
- Adding a HUB
- Relocating the M7
- Installing the Samsung Multiroom App
- Android
- iOS
- Accessing the Samsung Multiroom App
- Using the Samsung Multiroom App
- Renaming a connected M7
- Switching the input source
- Changing the sort order of listed M7s
- Grouping M7s
- Playing a Song
- Sorting songs
- Creating a Playlist
- Press the . √
- - Listening to a radio station
- Select Tuneln.
- Setting Presets
- Setting the Default Radio Stations in Speaker Preset
- Searching for a Radio Station
- Playing music from content providers
- Playing music from the Amazon cloud player
- Playing music from a selected device
- Using the Settings menu
- Press the button.
- Guide
- App Tutorial
- Coach Mark
- Service
- Amazon Music, Pandora, Rhapsody
- Tuneln Radio
- Speaker Settings
- Add Speaker
- Front LED
- Sound Feedback
- Software Auto Update
- Clock
- Alarm
- Sleep Timer
- Support
- Device ID
- Contact Samsung
- Open source licenses
- App Version
- Reset your product
- Resetting the M7
- Resetting the HUB (Not Included)
- Troubleshooting
- Open Source License Notice
- Licences
- One (1) Year Parts and Labor\* (\*90 Days Parts and Labor for Commercial Use)
- Contact SAMSUNG WORLD WIDE
- SAMSUNG
Brand : Hanwha
Model : Shape M7
Category : Loudspeaker