
MMBPP3P4CN - Blender BOSCH - Free user manual and instructions
Find the device manual for free MMBPP3P4CN BOSCH in PDF.


| Product Type | High Performance Blender |
| Brand | Bosch |
| Model | MMBPP3P4CN |
| Dimensions (H x W x D) | 500 x 200 x 225 mm |
| Weight | Approx. 4.2 kg (estimate) |
| Power Rating | 1600 W |
| Voltage / Frequency | 220 V ~ 50 Hz |
| Jug Capacity | Up to 2.0 L (max filling) |
| Jug Material | Tritan (unbreakable plastic, BPA-free) |
| Maximum Motor Speed | 45,000 rpm |
| Speed Control | Continuous rotary selector (Min to Max) |
| Pulse Function | Yes, momentary button for max speed |
| Automatic Programs | Shake, Smoothie, Soup |
| Heating Function | Yes, via high-speed friction (Soup program) |
| Safety Systems | Start lock-out, automatic cut-out, overload protection with reset button |
| Dishwasher Safe Parts | Blender jug and lid (base unit not dishwasher safe) |
| Cleaning | Wipe base with damp cloth; jug and lid rinse or dishwasher |
| Accessories Included | Blender jug, lid with locking cap, pusher, recipe book |
| Warranty | Subject to country-specific conditions (see manual) |
| Certification | GB 4706.1-2005, GB 4706.30-2008 |
Frequently Asked Questions - MMBPP3P4CN BOSCH
User questions about MMBPP3P4CN BOSCH
0 question about this device. Answer the ones you know or ask your own.
Ask a new question about this device
Download the instructions for your Blender in PDF format for free! Find your manual MMBPP3P4CN - BOSCH and take your electronic device back in hand. On this page are published all the documents necessary for the use of your device. MMBPP3P4CN by BOSCH.
USER MANUAL MMBPP3P4CN BOSCH
Instruction manual
High-speed blender
High performance blender 11
3
Main uses
careline.china@bshg.com
Company website:
www.bosch-home.cn
Technical data:
| 电气连接(电压-频率) | 220V~50Hz |
| 额定功率 1600W | |
| 尺寸 (高x宽x深) | 500x200x225 mm |
Contents
Main uses ....3
Important safety information 3
Overview 5
Before first use 5
Symbols and signs 5
Parts and controls 5
Intended use 6
Automatic programs....7
Cleaning and maintenance 8
Safety systems 8
Troubleshooting 8
Recipes 9
Environmentally friendly disposal 10
Warranty 10
Overview
→ Figure A
1 Base unit / motor unit
This appliance is intended for domestic use and the household environment only. Use the appliance only for processing normal amounts of food and for normal amounts of time for domestic use. Do not exceed permitted maximum quantities (see “Recipes”). This appliance is suitable for mixing liquid or semi-solid food, for cutting or chopping raw fruit and vegetables, for puréeing food and for chopping frozen food (such as fruit) or for crushing ice cubes. The appliance must not be used for processing other substances or objects.
Only use the appliance indoors at room temperature and up to 2000 m above sea level.
Important safety information
Read and follow the operating instructions carefully and keep for later reference! Enclose these instructions when you give this appliance to someone else.
If the instructions for correct use of the appliance are not observed, the manufacturer's liability for any resulting damage will be excluded.
This appliance can be used by persons with reduced physical, sensory or mental capabilities or lack of experience and/or knowledge if they have been given supervision or instruction concerning use of the appliance in a safe way and if they understand the hazards involved. Keep children away from the appliance and connecting cable and do not allow them to use the appliance. Do not let children play with the appliance. Cleaning and user maintenance must not be performed by children.
⚠️ Risk of electric shock and fire!
■ Connect and operate the appliance only in accordance with the specifications on the rating plate. Do not use the appliance if the power cord and/or appliance are damaged. Only our customer service may repair the appliance, e.g. by replacing a damaged power cord, in order to avoid hazards. ■ Never connect the appliance to timer switches or remote-controllable sockets. Never leave the appliance unattended while it is switched on! ■ Do not place the appliance on or near hot surfaces, e.g. hobs. The power cord must not come into contact with hot parts or be pulled across sharp edges. ■ Never immerse the base unit in water or place it in the dishwasher. Do not steam-clean the appliance. Do not use the appliance with damp hands.
■ After each use, whenever the appliance is unsupervised, prior to assembly, prior to disassembly, prior to cleaning and in the event of an error, the appliance must always be disconnected from the mains.
Risk of injury!
■ Before replacing accessories or additional parts which move during operation, the appliance must be switched off and disconnected from the power supply.
■ Never reach into the attached blender! Never use the blender without the lid in place.
■ Care should be taken when handling the sharp cutting blades, emptying the container and during cleaning.
■ Before switching off, it is essential to turn the rotary selector in an anticlockwise direction as far it will go (zero setting).
■ After switching off, the drive continues for a short time. Wait until the drive has come to a standstill.
■ The appliance must be completely assembled before use.
Risk of scalding!
■ Care should be taken when filling hot liquids. Sudden formation of steam may cause the liquid to spurt out of the container.
- You should always use one hand to hold the lid firmly in place while you work, but don’t place your hand over the filling opening! When you process hot ingredients in the jug, steam will escape through the filling opening in the lid.
Risk of suffocation!
Do not allow children to play with packaging material.
Caution!
■ Check that there are no foreign objects in the blender jug. Do not insert objects (e.g. knives, spoons) into the jug. Only use the pusher provided with the lid on!
■ We recommend that the appliance is never switched on for longer than is necessary to process the ingredients. Do not operate at no-load.
⚠️ Important!
It is essential to clean the appliance thoroughly after each use or after it has not been used for an extended period. → “Cleaning and maintenance” see page 17
Congratulations on the purchase of your new Bosch appliance. You can find further information about our products on our web page.
Manufacturer:
BSH Home Appliances (China) Co., Ltd. 20/F, 21/F, CN International Mansion, 129 Zhongshan Road, Nanjing, Jiangsu Province, PRC.
Applicable standards:
GB 4706.1-2005 Safety of Household and Similar Electrical Appliances Part 1: General Requirements GB 4706.30-2008 Safety of Household and Similar Electrical Appliances – Particular Requirements for Kitchen Machines
Careline:
4008855888
Service E-mail:
careline.china@bshg.com
Company website:
www.bosch-home.com
Technical specifications:
| Electrical connection (voltage – frequency) | 220 V~50 Hz |
| Power rating 1.600 W | |
| Dimensions (H x W x D) | 500x200x225 mm |
Contents
Intended use....11
Important safety information....11
Overview....13
Before using the appliance
for the first time....14
Symbols and markings ....14
Parts and operating controls....14
Use 15
Automatic programmes ....17
Cleaning and maintenance....17
Safety systems....18
Troubleshooting....19
Recipes....20
Disposal....21
Guarantee....22
Overview
→ Fig. A
1 Base unit / Motor block
a Cushion pad b Drive c Reset button (overload protection)
2 Control panel
a On/off switch b Rotary selector with mark c Status display (LED) d Min mark e Max mark f Pulse button g 3 programme selection buttons with LEDs
3 Blender jug
a Container made of Tritan b Scale c Blender knife d Handle e Handle cover (removable)
4 Lid
a Opening for pusher / for adding more ingredients b Locking cap with scale c Pusher
5 Recipe book
Before using the appliance for the first time
Before the new appliance can be used, it must be fully unpacked, cleaned and checked.
Caution!
Never operate a damaged appliance!
■ Remove the base unit and all accessories from the packaging and dispose of all packing materials. ■ Check that all the parts are present and examine them for obvious damage. → Fig. A ■ Thoroughly clean and dry all parts before using for the first time. → "Cleaning and maintenance" see page 17
Symbols and markings
| Symbol Meaning | |
 | Do not expose the blender jug to temperatures above 80°C. |
 | Warnings on the lid■ Do not use the appliance unless this cover is correctly attached■ Do not expose the blender jug to temperatures above 80°C |
 | Warning on the motor block■ Do not operate without the rubber pad |
Parts and operating controls
High-speed motor block
The blender is equipped with a high-speed motor with a motor speed of up to 45000 revolutions per minute. This not only provides particularly fast and fine blending results but also makes it possible to heat food. Using the Soup automatic programme, for example, a hot soup can be made from cold ingredients.
Note: At the max speed setting, the blender runs at the highest speed when using the Pulse button and with certain automatic programmes. In order to prevent unwanted heating of food, process the ingredients for a shorter time or at a lower speed.
On/off switch
To switch the appliance on and off.
Status display
To display the appliance status and as a mark for the zero setting of the rotary selector.
Display
Display lights up: appliance is switched on and ready for use
Display flashes:
- fault in the appliance
- Blender jug is not correctly positioned or has become detached
- Rotary selector not at zero setting when switched on – after interruption of the power supply
- longer than 5 1/2 minutes of continuous operation (manual mode)
Rotary selector
For continuous adjustment of the blender knife speed.
Settings
Zero setting (mark points to the status display) = standstill
min (min) Lowest speed
When the appliance automatically turns off after 5½ minutes of continuous operation at the max (max) speed setting, only use the max (max) speed setting for another 1-2 minutes at the most after turning the machine back on. Otherwise, the food may heat up too much and damage the container.
Notes:
- The status display flashes if the rotary selector is not at the zero setting when switched on, if the blender jug has become detached, or if the electricity supply has been interrupted. Turn the rotary selector first to the zero setting and then continue.
- The rotary selector setting does not affect the use of the Pulse function.
Pulse button
For switching to the maximum speed for a short time. The appliance works at maximum speed while the Pulse button is pressed.
Note: The function cannot be used while an automatic programme is running.
Programme selection buttons with LEDs
For selecting and starting automatic programmes. → "Automatic programmes" see page 17
All LEDs light up after switching on. The selected programme will start after pressing the button and the appliance will run automatically.
Blender jug
For processing up to 2 litres of food. The blender jug is made of Tritan. Tritan is an unbreakable plastic with no discernable taste or smell.
Caution!
Do not expose the blender jug to temperatures above 80°C.
Lid with locking cap
To securely close the blender jug during processing. To add chopped or liquid ingredients, turn the locking cap anticlockwise and remove.
Pusher
To push ingredients that either stick to the edge or do not blend well towards the blender knife. To do so, turn the locking cap anticlockwise, remove and place the pusher into the opening. → "Using the pusher" see page 16
Safety systems
The appliance has various safety systems.
→ "Safety systems" see page 18
Use
Risk of injury!
- Do not insert the mains plug until all preparations for working with the appliance are complete and the blender jug has been correctly positioned on to the base unit.
- Never put your hand in the blender jug once it is in place, and always put the lid on before using the appliance.
Note: The appliance will only work if the blender jug has been correctly positioned.
→ Fig. B
- Place the base unit onto a stable and level work surface. Position the cushion pad on to the base unit, observing the recess.
Important: Never attach the blender jug without the cushion pad.
- Place the blender jug on to the cushion pad. Make sure the blender jug is firmly positioned on the appliance.
- Put the desired ingredients into the blender jug.
- Put the lid with the locking cap in place and press it firmly.
- Turn the rotary selector in an anticlockwise direction as far as it will go (zero setting).
- Plug the mains plug into the mains. Switch on the appliance with the on/off switch. All LEDs are lit.
- Slowly turn the rotary switch clockwise until the desired speed is reached. The status LED lights up.
Note: Using the programme buttons
→ "Automatic programmes" see page 17.
- Process the ingredients until the desired consistency is achieved.
- Turn the rotary selector in an anticlockwise direction as far as it will go (zero setting). Wait until the appliance comes to a standstill.
- Switch off the appliance with the on/off switch. Disconnect the mains plug.
- Remove the blender jug. Remove the lid.
- Pour the blended food into another container.
Clean all parts. → "Cleaning and maintenance" see page 17
Adding more ingredients
→ Fig. ©
- Turn the locking cap in an anticlockwise direction and remove.
- Add more chopped or liquid ingredients through the opening, remembering to observe the maximum capacity.
- Put on the locking cap and tighten it by turning in a clockwise direction.
- Process the ingredients until the desired consistency is achieved.
→ Fig. D
Adding larger quantities:
- Turn the rotary selector in an anticlockwise direction as far as it will go (zero setting). Wait until the appliance comes to a standstill.
- Switch off the appliance with the on/off switch. Disconnect the mains plug.
Risk of injury!
Never remove the lid while the appliance is plugged in.
- Remove the lid.
- Add the extra ingredients.
- Replace the lid.
- Plug the mains plug into the mains. Switch on the appliance with the on/off switch. All LEDs are lit.
- Slowly turn the rotary switch clockwise until the desired speed is reached. The status LED lights up.
- Process the ingredients until the desired consistency is achieved.
Using the pusher
Risk of injury!
Never use the pusher without the lid attached!
→ Fig. E
- Turn the locking cap in an anticlockwise direction and remove.
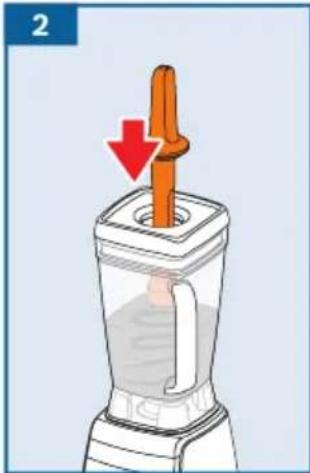
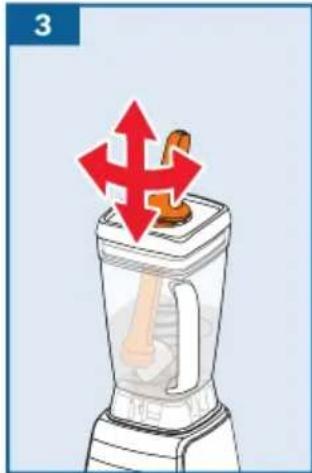
- Place the pusher provided into the opening.
- Push the ingredients with the pusher towards the blender knife by guiding the pusher along the corners and sides of the blending jug.
- Then remove the pusher again immediately. Put on the locking cap and tighten it by turning in a clockwise direction.
Note: Using the pusher can considerably improve the quality of the blending result.
Using the Pulse function
■ With the appliance switched on, press and hold the Pulse button.
■ While the Pulse button is pressed, the appliance will run at maximum speed. ■ Release the Pulse button. The appliance will start again with the previously selected speed.
Note: While an automatic programme is running, the Pulse function cannot be used.
Automatic programmes
The appliance has 3 automatic programmes. After pressing the relevant button, the programme selected starts and processes the ingredients at preset speeds and processing times. The programme ends automatically after preparation.
The following programmes can be selected:
| Programmes | |
| 奶昔(Shake) | For fruit smoothies and milkshakes with fresh ingredients |
| 冰沙(Smoothie) | For green smoothies and fruit smoothies with frozen ingredients |
| 浓汤(Soup) | For preparing hot soups |
Caution!
When the automatic programme
Soup has finished, do not restart the
Soup programme. Otherwise, the food may heat up too much and damage the container.
Please note:
- Only use cold ingredients with the Soup automatic programme. If hot ingredients are added, the temperature increases too much.
- An automatic programme can only be started when the rotary selector is at the zero setting.
- An automatic programme can be ended at any time by repressing the relevant programme selection button or by switching off with the on/off switch.
An example
Making a pear smoothie
(recipe → "Pear smoothie" see page 19)
→ Fig. F
- Place the base unit onto a stable and level work surface. Position the cushion pad on to the base unit, observing the recess.
Important: Never attach the blender jug without the cushion pad.
- Place the blender jug on to the cushion pad. Make sure the blender jug is firmly positioned on the appliance.
- Put the desired ingredients into the blender jug.
- Put the lid with the locking cap in place and press it firmly.
- Turn the rotary selector in an anticlockwise direction as far as it will go (zero setting).
- Plug the mains plug into the mains. Switch on the appliance with the on/off switch. All LEDs are lit.
- Press the Shake programme selection button. The LED on the button lights up.
- The appliance processes the ingredients automatically.
- The appliance ends processing automatically. All LEDs are lit.
- Switch off the appliance with the on/off switch. Disconnect the mains plug.
- Remove the blender jug. Remove the lid.
- Pour the finished fruit smoothie into glasses.
■ Clean all parts. → "Cleaning and maintenance" see page 17
Cleaning and maintenance
The appliance and the individual parts used must be thoroughly cleaned after each use.

Risk of electric shock!
– Unplug the appliance before cleaning it. – Never immerse the base unit in liquids and do not clean in the dishwasher. – Do not use a steam cleaner.

Risk of injury!
Do not touch the blender blades with your bare hands. Use a brush.
Caution!
- Do not use any cleaning agents containing alcohol or spirits.
- Do not use any sharp, pointed or metal objects.
- Do not use abrasive cloths or cleaning agents.
Notes:
– Clean all parts immediately after use. This will prevent residues from drying on and possibly attacking the plastic (e.g. essential oils in herbs). – When processing food such as carrots, the plastic parts may become discoloured, but this can be removed with a few drops of cooking oil. – To make cleaning the blender jug easier, remove the cover from the handle and replace once dry.
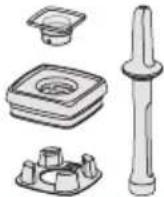
In Fig. C, you will find a summary of how to clean the individual parts.
Safety systems
Start lock-out and automatic cut-out
The appliance can only be operated if the blender jug has been correctly positioned and if the rotary selector is turned to the zero setting when switching on the appliance or after an interruption in the power supply. The appliance will switch off automatically if the blender jug becomes detached while it is running. The appliance automatically switches off in manual mode (speed min – max) after 5½ minutes of continuous operation.
→ "Troubleshooting" see page 18
Overload protection
The motor switches off automatically if the appliance overheats. → "Troubleshooting" see page 18
Note: When activating the overload protection, a slightly strange smell may occur. This is not a sign of malfunction.
Troubleshooting
Risk of injury!
Before dealing with any faults, unplug the mains plug.
Note: The appliance will no longer switch on if there is an error in appliance operation, if the electronic fuses trip or the appliance has a defect. First try to eliminate the problem which has occurred with the help of the following information.
Caution!
If a fault cannot be eliminated, please contact customer service.
Fault
Appliance fails to start up or switches off while in use. The status display flashes.
Possible causes
- Blender jug is not correctly positioned, has become detached or has been removed.
- Rotary selector was not at the zero setting when switching on or after an interruption in power.
- The appliance was operating continuously in manual mode (speed min - max) for longer than 5 1/2 minutes.
Remedy
■ Switch off the appliance with the on/off switch. ■ Position the blender jug correctly. ■ Turn the rotary selector in an anticlockwise direction as far as it will go (zero setting). ■ Switch on the appliance with the on/off switch. The status display lights up.
Fault
Appliance fails to start up or switches off while in use.
Possible cause
The overload protection device is activated.
Remedy
■ Turn the rotary selector in an anticlockwise direction as far as it will go (zero setting). ■ Switch off the appliance with the on/off switch. Disconnect the mains plug. ■ Remove the blender jug. ■ Leave the appliance to cool for approx. 15-20 minutes and then switch it on again. ■ If the appliance does not start, turn the appliance upside down. Press the reset button on the bottom (→ Fig. A - 1c). ■ If the reset button is blocked, leave the appliance to cool again and try it again later.
Recipes
Notes:
- In Fig. H, you will find a table with other application examples. Clean and chop food before processing. Remove hard components such as cores and peel.
- The recipes and application examples can also be carried out without an automatic programme. To do this, use the rotary selector to increase the speed from min to max and blend all the ingredients until the desired consistency is reached.
Pear smoothie
- 3 bananas
- 3 pears – Juice of two oranges (approx. 200 ml)
- 100 ml cold water
■ Cut the washed pears and the peeled bananas into pieces. ■ Add the ingredients to the blender jug and put on the lid with the locking cap.
■ Press the Shake button.
■ After ending the automatic programme, serve the smoothie immediately.
Tip: Pears can differ greatly in taste depending on their variety. If you don't have any sweet pears, a smoothie can be sweetened by adding two to four dates – these give it a very mild sweetness that harmonises perfectly with the rest of the ingredients.
Berry and honey smoothie
- 400 g frozen raspberries / berry mixture
- 1 banana
- 500 ml milk
- 3 tbsp lemon juice
- 2 tbsp honey
■ Let the raspberries / berry mixture thaw. ■ Cut the peeled banana into pieces. ■ Add the ingredients to the blender jug and put on the lid with the locking cap.
■ Press the Smoothie button. ■ After ending the automatic programme, serve the smoothie immediately.
Fresh fruit-ginger smoothie
- 4 handfuls corn salad -2 pears
- 2 bananas
- 1 piece fresh ginger, (approx. 15 g)
- 10 ice cubes
- 200 ml cold water
■ Wash the corn salad thoroughly. ■ Cut the washed pears and the peeled bananas into pieces. - Peel the ginger. ■ Add the ingredients to the blender jug and put on the lid with the locking cap.
■ Press the Smoothie button.
■ After ending the automatic programme, serve the smoothie immediately.
Raspberry ice cream
- 1 untreated lemon
- 150 g full-fat yoghurt
- 150 g icing sugar
- 600 g frozen blueberries
- 150 ml cold whole milk ■ Add the ingredients to the blender jug and put on the lid with the locking cap.
Disposal
■ Increase the speed slowly with the rotary selector and blend all the ingredients until a creamy consistency has been achieved. ■ Pour the ice cream into another container and put it into the freezer for a while if a firmer consistency is desired.
Tip: The ice cream can also be made with other frozen berries (e.g. raspberries, strawberries or berry mixtures).
Green sauce
– One bunch each of parsley, borage, sorrel, salad burnet, cress, chervil, chives - 2 tbsp water - 460 g crème fraîche - 230 g sour cream - 1 tsp mustard - 3 tbsp oil (e.g. walnut oil) - 1 tbsp vinegar or lemon juice - Salt and pepper
■ Wash and dry the herbs, remove the hard stalks.
■ Add the ingredients to the blender jug and put on the lid with the locking cap.
■ Increase the speed slowly with the rotary selector and blend all the ingredients until a creamy consistency has been achieved.
■ Season the sauce and put in the fridge.
Tip: The sauce is a perfect accompaniment to boiled eggs, potatoes and vegetables.
Pancake mixture
- 300 ml milk
- 100 g flour
- 2 small eggs
- 1 pinch salt
- 1 tsp oil (e.g. sunflower oil)
■ Add the ingredients to the blender jug and put on the lid with the locking cap.
■ Set the rotary selector to max and blend all the ingredients for 30-60 seconds.
■ Pour the pancake mixture in portions into a hot and greased pan and fry.
Tomato soup
- 750 g fresh tomatoes or tinned tomatoes
- 2 red peppers
- 90 g cashew nuts
- 6 basil leaves
- Salt and pepper
■ Wash the fresh tomatoes and remove the thick stem.
■ Add the ingredients to the blender jug and put on the lid with the locking cap.
■ Press the Soup button and run the automatic programme.
■ After ending the automatic programme, season the hot soup and serve.
Note: If the soup is not hot enough once the automatic programme has finished, turn the rotary selector to max and mix for another 1-2 minutes at the most.
Disposal

Dispose of packaging in an environmentally-friendly manner. This appliance is labelled in accordance with European Directive 2012/19/EU concerning used electrical and electronic appliances (waste electrical and electronic equipment – WEEE). The guideline determines the framework for the return and recycling of used appliances as applicable throughout the EU. Please ask your specialist retailer about current disposal facilities.
Guarantee
The guarantee conditions for this appliance are as defined by our representative in the country in which it is sold. Details regarding these conditions can be obtained from the dealer from whom the appliance was purchased. The bill of sale or receipt must be produced when making any claim under the terms of this guarantee.
Changes reserved.


4

C

2
3



F 1
2
3
4
5
6
7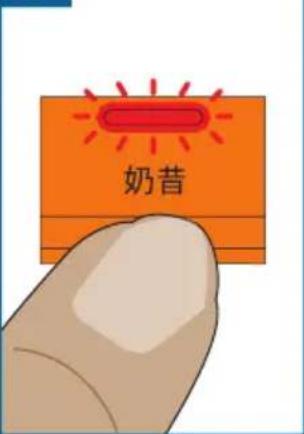
8
9
12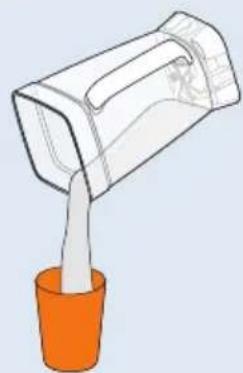
 |  |  | |
 | √ |  |  |
 |  |  |  |
 |  |  |  |
| [IMAGE] |  |  | [k ] ] | ||||
30% |  |  | 300-2000 ml |  | 奶昔 | ||
30% |  |  | 300-2000 ml |  | 冰沙 | ||
40% |  |  | 2000 ml | [6ZTA] | 冰沙 | ||
 | 300 ml | [66ZZ] | 最大 | ||||
 |  |  | 600 ml (218( [HBXH] | [6CCZ][K17Y] | 浓汤 | ||
<70°C |  |  |  |  | 奶昔 | ||
| [YTBY] |  |  | 最大 | ||||
 |  |  |  |  | 最大 | ||
 |  |  |  |   | 脉冲 | ||
1x1 cm |  |  |  |    | 脉冲 | ||
 |  |  |  |  [CH7S] [CH7S] | 脉冲 | ||




- MAIN USES
- CONTENTS
- OVERVIEW
- → FIGURE A
- BASE UNIT / MOTOR UNIT
- IMPORTANT SAFETY INFORMATION
- ⚠️ RISK OF ELECTRIC SHOCK AND FIRE
- RISK OF INJURY
- RISK OF SCALDING
- RISK OF SUFFOCATION
- CAUTION
- ⚠️ IMPORTANT
- MANUFACTURER
- APPLICABLE STANDARDS
- CARELINE
- SERVICE E-MAIL
- COMPANY WEBSITE
- → FIG. A
- BASE UNIT / MOTOR BLOCK
- CONTROL PANEL
- BLENDER JUG
- LID
- RECIPE BOOK
- BEFORE USING THE APPLIANCE FOR THE FIRST TIME
- SYMBOLS AND MARKINGS
- PARTS AND OPERATING CONTROLS
- HIGH-SPEED MOTOR BLOCK
- ON/OFF SWITCH
- STATUS DISPLAY
- DISPLAY
- DISPLAY FLASHES
- ROTARY SELECTOR
- SETTINGS
- NOTES
- PULSE BUTTON
- PROGRAMME SELECTION BUTTONS WITH LEDS
- LID WITH LOCKING CAP
- PUSHER
- SAFETY SYSTEMS
- USE
- → FIG. B
- ADDING MORE INGREDIENTS
- → FIG. ©
- → FIG. D
- ADDING LARGER QUANTITIES
- USING THE PUSHER
- → FIG. E
- USING THE PULSE FUNCTION
- AUTOMATIC PROGRAMMES
- PLEASE NOTE
- AN EXAMPLE
- MAKING A PEAR SMOOTHIE
- → FIG. F
- CLEANING AND MAINTENANCE
- RISK OF ELECTRIC SHOCK
- START LOCK-OUT AND AUTOMATIC CUT-OUT
- OVERLOAD PROTECTION
- TROUBLESHOOTING
- FAULT
- POSSIBLE CAUSES
- REMEDY
- POSSIBLE CAUSE
- RECIPES
- PEAR SMOOTHIE
- BERRY AND HONEY SMOOTHIE
- FRESH FRUIT-GINGER SMOOTHIE
- RASPBERRY ICE CREAM
- DISPOSAL
- GREEN SAUCE
- PANCAKE MIXTURE
- TOMATO SOUP
- GUARANTEE
Brand : BOSCH
Model : MMBPP3P4CN
Category : Blender