
ARK-2151S - Security Camera Advantech - Free user manual and instructions
Find the device manual for free ARK-2151S Advantech in PDF.

| Product Type | Outdoor Full HD NVR with 4 PoE Ports |
| Brand | Advantech |
| Model | ARK-2151S |
| Processor | Intel Core i5-4300U 1.9 GHz |
| Chipset | Intel GT2-4400 graphics |
| System Memory | 1 x 204-pin SODIMM DDR3L 1600 MHz, up to 8 GB |
| Storage | 1 x removable 2.5" drive bay (max 9.5 mm height) + 1 x full-size mSATA |
| PoE Ports | 4 x 10/100 Mbps, IEEE802.3af Class 2 (7W per port) or Class 3 (15.4W per port, 2 ports max) |
| Video Output | 1 x VGA (up to 1920x1200@60Hz), 1 x HDMI (up to 4K@24Hz) |
| Audio | Realtek ALC888S, Line-in, Line-out, Mic-in |
| Digital I/O | 6 x DI, 2 x DO with 3KV isolation |
| Expansion Slots | 1 x full-size mini PCIe (mSATA), 1 x half-size mini PCIe (WLAN), 2 x full-size mini PCIe with SIM holder (WWAN) |
| Power Input | 9-36 VDC, 1.5KV isolated |
| Operating Temperature | -20°C to 60°C (with extended temp peripherals, 0.7 m/s airflow) |
| Storage Temperature | -40°C to 85°C |
| Dimensions (W x H x D) | 264.5 x 75.1 x 133.0 mm (10.41" x 2.96" x 5.24") |
| Certifications | CE, FCC Class A, CCC, BSMI, UL, CB |
| Warranty | 2 years |
| Watchdog Timer | 255-level timer interval, setup by software |
| RTC Battery | 3.0 V @ 200 mAH lithium battery |
Frequently Asked Questions - ARK-2151S Advantech
User questions about ARK-2151S Advantech
0 question about this device. Answer the ones you know or ask your own.
Ask a new question about this device
Download the instructions for your Security Camera in PDF format for free! Find your manual ARK-2151S - Advantech and take your electronic device back in hand. On this page are published all the documents necessary for the use of your device. ARK-2151S by Advantech.
USER MANUAL ARK-2151S Advantech
natural_image
Illustration of four electronic circuit boards with white outlines on a purple background, no text or symbols present.ARK-2151S
Outdoor Full HD NVR w/4 PoE Ports
Attention!
This package contains a hard-copy user manual in Chinese for China CCC certification purpOS, Please download the latest English user manual and drivers on website:
http://www2.advantech.tw/products/1-flnuyz/ark-2151s/mod_16ea37f7-c70e-4dd7-8946-559db4f93bd3.aspx
Please disregard the printed Chinese copy of the user manual if the product is not to be sold and/or installed in China.
甲類警語:
The documentation and the software included with this product are copyrighted 2015 by Advantech Co., Ltd. All rights are reserved. Advantech Co., Ltd. reserves the right to make improvements in the products described in this manual at any time without notice. No part of this manual may be reproduced, copied, translated or transmitted in any form or by any means without the prior written permission of Advantech Co., Ltd. Information provided in this manual is intended to be accurate and reliable. However, Advantech Co., Ltd. assumes no responsibility for its use, nor for any infringements of the rights of third parties, which may result from its use.
Acknowledgements
Intel® and Pentium® are trademarks of Intel Corporation.
Microsoft Windows® is a registered trademark of Microsoft Corp.
All other product names or trademarks are properties of their respective owners.
Product Warranty (2 years)
Advantech warrants to you, the original purchaser, that each of its products will be free from defects in materials and workmanship for two years from the date of purchase.
This warranty does not apply to any products which have been repaired or altered by persons other than repair personnel authorized by Advantech, or which have been subject to misuse, abuse, accident or improper installation. Advantech assumes no liability under the terms of this warranty as a consequence of such events.
Because of Advantech's high quality-control standards and rigorous testing, most of our customers never need to use our repair service. If an Advantech product is defective, it will be repaired or replaced at no charge during the warranty period. For out-of-warranty repairs, you will be billed according to the cost of replacement materials, service time and freight. Please consult your dealer for more details.
If you think you have a defective product, follow these steps:
-
Collect all the information about the problem encountered. (For example, CPU speed, Advantech products used, other hardware and software used, etc.) Note anything abnormal and list any onscreen messages you get when the problem occurs.
-
Call your dealer and describe the problem. Please have your manual, product, and any helpful information readily available.
-
If your product is diagnosed as defective, obtain an RMA (return merchandise authorization) number from your dealer. This allows us to process your return more quickly.
-
Carefully pack the defective product, a fully-completed Repair and Replacement Order Card and a photocopy proof of purchase date (such as your sales receipt) in a shippable container. A product returned without proof of the purchase date is not eligible for warranty service.
-
Write the RMA number visibly on the outside of the package and ship it prepaid to your dealer.
Part No. 2006215131 Edition 2
Printed in China November 2015
Declaration of Conformity
CE
This product has passed the CE test for environmental specifications. Test conditions for passing included the equipment being operated within an industrial enclosure. In order to protect the product from being damaged by ESD (Electrostatic Discharge) and EMI leakage, we strongly recommend the use of CE-compliant industrial enclosure products.
FCC Class A
Note: This equipment has been tested and found to comply with the limits for a Class A digital device, pursuant to part 15 of the FCC Rules. These limits are designed to provide reasonable protection against harmful interference when the equipment is operated in a commercial environment. This equipment generates, uses, and can radiate radio frequency energy and, if not installed and used in accordance with the instruction manual, may cause harmful interference to radio communications. Operation of this equipment in a residential area is likely to cause harmful interference in which case the user will be required to correct the interference at his own expense.
Technical Support and Assistance
- Visit the Advantech web site at www.advantech.com/support where you can find the latest information about the product.
- Contact your distributor, sales representative, or Advantech's customer service center for technical support if you need additional assistance. Please have the following information ready before you call:
– Product name and serial number
– Description of your peripheral attachments
– Description of your software (operating system, version, application software, etc.)
– A complete description of the problem
– The exact wording of any error messages
Warnings, Cautions and Notes
Warning! Warnings indicate conditions, which if not observed, can cause personal injury!

Caution! Cautions are included to help you avoid damaging hardware or losing data.

Note! Notes provide optional additional information.

Document Feedback
To assist us in making improvements to this manual, we would welcome comments and constructive criticism. Please send all such - in writing to: support@advantech.com
Packing List
Before setting up the system, check that the items listed below are included and in good condition. If any item does not accord with the table, please contact your dealer immediately.
1 x ARK-2151S unit
■ 1 x Hard copy user manual (Simplified Chinese)
■ 1 x 3 pin phoenix power block 3.81mm
■ 1 x 10 pin DIO plug block
Ordering Information
P/N Description
| ARK-2151S-S9A1E | Intel | Core | i5 4300U DC 1.9 GHz w/4 POE |
Safety Instructions
- Read these safety instructions carefully.
- Keep this User Manual for later reference.
- Disconnect this equipment from any AC outlet before cleaning. Use a damp cloth. Do not use liquid or spray detergents for cleaning.
- For plug-in equipment, the power outlet socket must be located near the equipment and must be easily accessible.
- Keep this equipment away from humidity.
- Put this equipment on a reliable surface during installation. Dropping it or letting it fall may cause damage.
- Do not leave this equipment in an environment unconditioned where the storage temperature under -40^ C or above 80^ C, it may damage the equipment. Operating temperature is -20^ C to 60^ C.
- The openings on the enclosure are for air convection. Protect the equipment from overheating. DO NOT COVER THE OPENINGS.
- Make sure the voltage of the power source is correct before connecting the equipment to the power outlet. Cable of Power source should be shielded.
- Position the power cord so that people cannot step on it. Do not place anything over the power cord. The voltage and current rating of the cord should be greater than the voltage and current rating marked on the product.
- All cautions and warnings on the equipment should be noted.
- If the equipment is not used for a long time, disconnect it from the power source to avoid damage by transient overvoltage.
- Never pour any liquid into an opening. This may cause fire or electrical shock.
- Never open the equipment. For safety reasons, the equipment should be opened only by qualified service personnel.
- If one of the following situations arises, get the equipment checked by service personnel:
■ The power cord or plug is damaged.
- Liquid has penetrated into the equipment.
■ The equipment has been exposed to moisture.
The equipment does not work well, or you cannot get it to work according to the user's manual.
■ The equipment has been dropped and damaged.
■ The equipment has obvious signs of breakage.
-
CAUTION: The computer is provided with a battery-powered real-time clock circuit. There is a danger of explosion if battery is incorrectly replaced. Replace only with same or equivalent type recommended by the manufacture. Discard used batteries according to the manufacturers instructions.
-
ATTENTION: L'ordinateur est muni d'un circuit en temps réel de l'horloge alimentée par betterie. Il ya un danger d'explosion si la pile est replacée de façon incorrecte. Remplacez uniquement par un type identique ou équivalent recommandé par le fabricant. Jetez les piles usagées selon les instructions du fabricant.
-
CAUTION: Always completely disconnect the power cord from your chassis whenever you work with the hardware. Do not make connections while the power is on. Sensitive electronic components can be damaged by sudden power surges.
- CAUTION: Always ground yourself to remove any static charge before touching the motherboard, backplane, or add-on cards. Modern electronic devices are very sensitive to static electric charges. As a safety precaution, use a grounding wrist strap at all times. Place all electronic components on a static-dissipative surface or in a static-shielded bag when they are not in the chassis.
- CAUTION: Any unverified component could cause unexpected damage. To ensure the correct installation, please always use the components (ex. screws) provided with the accessory box.
- ATTENTION: Tout composant non vérifiée pourrait causer des dommages inattendu. Pour garantir une installation correcte, s'il vous plaît utilisez toujours les composants( vis ex.) fournies avec la boîte d'accessories.
Contents
Chapter 1 General Introduction ......1
1.1 Introduction 2
1.2 Features .... 3
1.3 Specifications 3
Table 1.1: Power Input / Output Support Information ...... 4
1.4 Dimensions 4
Figure 1.1 ARK-2151S dimensions .... 4
Chapter 2 Hardware installation ....5
2.1 Overview of Hardware Installation & Upgrading 6
2.2 Installing Memory 6
2.3 Installing storage 7
2.3.1 Installing 2.5" SSD or HDD 7
2.3.2 Installing mSATA Storage....7
2.4 Installing Optional Modules 8
2.4.1 Installing WLAN module....8
2.4.2 Installing WWAN module 9
Chapter 3 Jumper and Switch Settings ......11
3.1 Setting Jumpers and Switches.... 12
3.1.1 Main Board.... 13
Figure 3.1 Top side of main board.... 13
Figure 3.2 Bottom side of main board.... 13
3.2 Jumper Lists.... 14
3.2.1 Main Board.... 14
3.3 Jumper Settings 14
3.3.1 Main Board.... 14
Table 3.1: Auto Power On Setting (J2).... 14
Table 3.2: LCD Power (J3) 14
Table 3.3: mPCIe & mSATA Selection (SW2).... 15
Table 3.4: Clear CMOS (SW3) 15
Chapter 4 Pin Assignments ......17
4.1 ARK-2151S-S9A1E I/O Connectors.... 18
4.1.1 ARK-2151S-S9A1E Front I/O View.... 18
4.1.2 ARK-2151S-S9A1E Rear I/O View 18
4.2 ARK-2151S-S9A1E I/O Pin Definition.... 18
4.2.1 VGA Connector.... 18
Figure 4.1 VGA Connector 18
Table 4.1: VGA Connector Pin Assignments.... 18
4.2.2 USB Connector 19
Figure 4.2 USB Connector [Upper (black): USB2.0 / Down (blue): USB 3.0] .... 19
Table 4.2: USB Connector Pin Assignments.... 19
4.2.3 Ethernet Connector....19
Figure 4.3 Ethernet Connector .....19
Table 4.3: Ethernet Connector Pin Assignments.... 19
4.2.4 HDMI Connector 20
Figure 4.4 HDMI Connector....20
Table 4.4: HDMI / Display Port Connector Pin Assignments .... 20
4.2.5 DIO Connector.... 20
Figure 4.5 DIO Connector 20
4.2.6 Power Input Connector 21
Figure 4.6 Power Input Connector.... 21
4.2.7 Power Over Ethernet 21
Figure 4.7 Power Over Ethernet Connector 21
Table 4.5: Power Over Ethernet (PoE) Pin Definition ...... 21
4.2.8 System Audio Connector 22
Figure 4.8 System Audio Connector.... 22
Table 4.6: Audio Connector Pin Assignments.... 22
4.2.9 Optional I/O 22
Table 4.7: COM Connector Pin Assignments.... 22
4.2.10 Power On/Off Button.... 23
Figure 4.9 Power ON/OFF Button 23
4.2.11 Reset 23
Figure 4.10Reset 23
4.2.12 LED Indicator 23
Figure 4.11LED Indicator....23
Chapter 5 BIOS settings 25
5.1 Introduction 26
Figure 5.1 Setup program initial screen.... 26
5.2 Entering Setup 27
5.2.1 Main Setup.... 27
Figure 5.2 Main setup screen 27
5.2.2 Advanced BIOS Features Setup.... 28
Figure 5.3 Advanced BIOS features setup screen .... 28
Figure 5.4 PCI Subsystem Settings.... 29
Figure 5.5 PCI Express Device Register Settings .... 30
Figure 5.6 ACPI Setting.... 31
Figure 5.7 Trusted Computing Configuration ...... 32
Figure 5.8 S5 RTC Wake Settings .... 33
Figure 5.9 CPU Configuration Setting 34
Figure 5.10SATA Configuration.... 35
Figure 5.11 Intel® Rapid Technology 36
Figure 5.12AMT Configuration 37
Figure 5.13PCH-FW Configuration.... 38
Figure 5.14USB Configuration.... 39
Figure 5.15Embedded Controller Configuration 40
Figure 5.16 Super IO Configuration.... 41
Figure 5.17 Serial Port Console Redirection 42
5.2.3 Chipset 43
Figure 5.18 Chipset Setup.... 43
Figure 5.19System Agent (SA) Configuration 44
Figure 5.20Intel IGFX Configuration.... 45
Figure 5.21LCD Control.... 46
Figure 5.22Memory Configuration 47
Figure 5.23PCH-IO Configuration 48
Figure 5.24PCI Express Configuration 49
Figure 5.25USB Configuration.... 50
Figure 5.26PCH Azalia Configuration.... 51
5.2.4 Boot Settings 52
Figure 5.27Boot Setup Utility.... 52
5.2.5 Security Setup 53
Figure 5.28Password Configuration 53
5.2.6 Save & Exit 54
Figure 5.29Save & Exit.... 54
Appendix A WDT Sample Code....57
A.1 Watchdog Timer Sample Code 58
Chapter 1
General Introduction
This chapter gives background information on ARK-2151S series.
1.1 Introduction
ARK-2151S is an industrial grade dual core mobile device for outdoor NVR solution. ARK-2151S support Full-HD NVR solution for and is fully integrated certified hardware and intelligent management software design. Well-developed vehicle software SDK and APIs for surveillance applications. Also, extension capacity and wireless communication (Wi-fi/3G /mSATA) for excellent connectivity, high graphic power (Up to 1080P@ 120fps) for video preview, and integrated software for manageability and security.
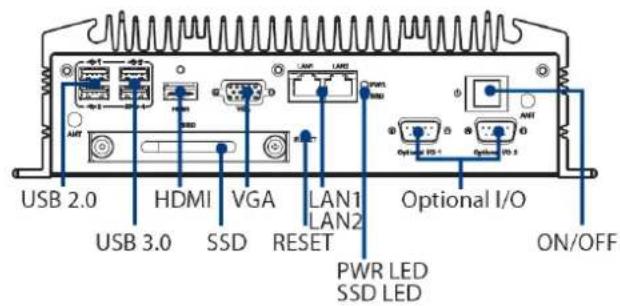
ARK-2151S-S9A1E I/O Overview

1.2 Features
Intel® Core i5-4300U 1.9 GHz SoC
■ 4 PoE Ports to Support Mainstream IP Cameras
■ Diversity Communication Abilities, ex. WWAN, WLAN
9 \~ 36 Vdc* Wide Power Input w/isolation (*: Power input constraint at low power 9 \~ 10.9 V.)
■ Dual storage: 1 x removable 2.5" drive bay & 1 x F/S mSATA
■ Supports iManager, SUSIAccess and Embedded Software APIs
1.3 Specifications
CPU:
- ARK-2151S-S9A1E: Intel Core i5 4300U DC 1.9 GHz
Chipset:
- ARK-2151S-S9A1E: GT2-4400 graphics
BIOS: AMI EFI 128 Mbit
System memory:
- ARK-2151S-S9A1E: 1 x 204pin SODIMM, DDR3L 1600 MHz, up to 8 GB
Storage:
- 2.5" drive bay: 1 x removable 2.5" drive bay (Max 9.5 mm height)
– mSATA: 1x full size mSATA storage
Optional I/O:
- ARK-2151S-S9A1E: 2 x RS-232/422/485
■ Universal serial bus (USB) port: 2 x USB 2.0 & 2 x USB3.0
■ LAN port: 2 x Giga LAN 10/100/1000 Mbps, supports wake on LAN
■ Power over Ethernet, POE: Supports 4 x 10/100 Mbps
- 4 ports full-load, IEEE802.3af Class 2 (7 Watt)
- 2 ports full-load, IEEE802.3af Class 3 (15.4 Watt)
■ LED: Power LED, SSD LED
■ Graphic output:
- 1 x VGA, up to 1920 x 1200 with 60 Hz, 154 MHz pixel clock rate
- 1 x lockable HDMI connector, up to 4K at 24 Hz
■ Mini PCI express bus expansion slot:
- 1 x full size mini PCIe slot, support mSATA storage
- 1 x half size mini PCIe slot, support WLAN module
- 2 x full size mini PCIe slots w/SIM holder, support WWAN module (USB interface)
■ Watchdog timer: 255-level timer interval, setup by software
■ RTC Battery: 3.0 V @ 200 mAH lithium battery.
Digital I/O: 6 x DI & 2 x DO w/ 3KV isolation
– Input Voltage: 0 to 30 VDC at 25 Hz,
- Output Current: Max. 500 mA per channel
– On-state Voltage: 24 VDC nominal, open collector to 30 VDC
Audio:
- Main system: Realtek ALC888S, High Definition Audio (HD), Line-in, Line out, Mic-in
Power Requirement:
– Power type: ATX/AT
- Input voltage:
Supports: 9 \~ 36 VDC*
Table 1.1: Power Input / Output Support Information
| Output: 12V (for M/B) Output: 48 V (for PoE) | |
| Input 11 V ~ 36 V 5 A 0.75 A | |
| Input 10.0 V ~ 10.9 V 4 A 0.5 A | |
| Input 9.0 ~ 9.9 V 3.5 A N/A | |
- Isolation: 1.5 KV Isolated
■ Dimensions: (W x H x D): 264.5 x 75.1 x 133.0 mm (10.41" x 2.96" x 5.24")
■ Enclosure: Ruggedized aluminum housing.
- Operating temperature:
- With extended temperature peripherals:-20 \~ 60° C with 0.7m/s air flow
- With standard temperature peripherals: 0 45^ C with 0.7 ~m / s air flow
■ Storage temperature: -40 \~ 85°C (-40 \~ 185°F)
■ Relative humidity: 95% @ 40°C (non-condensing)
Vibration during operation: With mSATA/SSD: 3 Grms, IEC 60068-2-64, random 5\~500 Mz, 1 hr/axis
■ Shock during operation: With mSATA/SSD: 30 G, IEC 60068-2-27, half sine, 11 ms duration
Certifications:
- EMC: CE/FCC Class A, CCC, BSMI
– Safety: UL,CB, CCC, BSMI
1.4 Dimensions
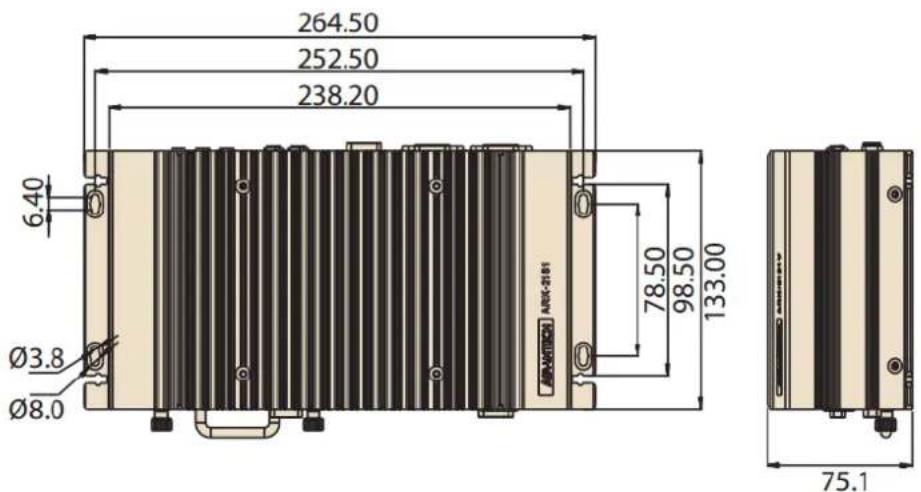
Figure 1.1 ARK-2151S dimensions
Chapter 2
Hardware installation
This chapter introduces the installation of ARK-2151S Hardware.
2.1 Overview of Hardware Installation & Upgrading
Warning! Do not remove the ruggedized aluminum covers until verifying that no power is flowing within the computer. Power must be switched off and the power cord must be unplugged. Take care in order to avoid injury or damage to the equipment.
2.2 Installing Memory
Need to remove total 9pcs screws and can install memory on the top side of board. (4pcs on top and 5pcs on side of top cover)
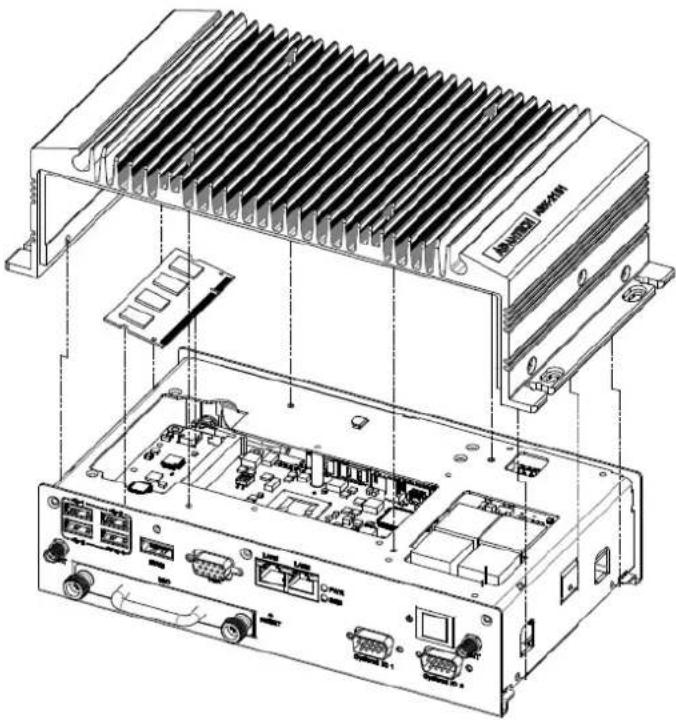
natural_image
Technical line drawing of an electronic device chassis showing internal components like heat sinks, connectors, and ports (no text or labels)2.3 Installing storage
2.3.1 Installing 2.5" SSD or HDD
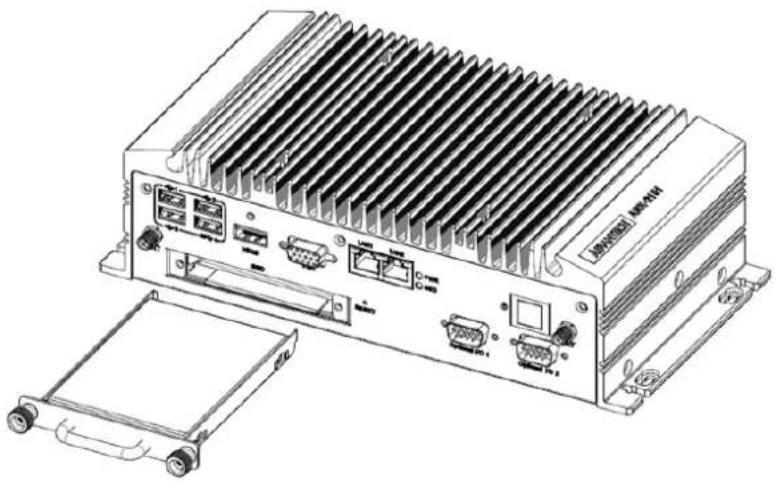
natural_image
Technical line drawing of a server rack with heat sinks and ports, shown from front and side views (no text or symbols)2.3.2 Installing mSATA Storage
- Remove 6pcs screws on bottom cover.

natural_image
Technical line drawing of a rectangular electronic device frame with mounting brackets and mounting holes (no text or symbols)- Remove 2.5" drive bay and Insert full size mSATA storage in marked place.

2.4 Installing Optional Modules
2.4.1 Installing WLAN module
- Remove 6pcs screws on bottom cover.

natural_image
Technical line drawing of a rectangular electronic device with mounting brackets and mounting holes (no text or symbols)- Remove 2.5" drive bay and Insert half size WLAN module in marked place.
2.4.2 Installing WWAN module
- Remove 6pcs screws on bottom cover.

natural_image
Technical line drawing of a rectangular electronic device frame with mounting holes and mounting brackets (no text or symbols)- Insert full size WWAN module in marked place.

Chapter 3
Jumper and Switch Settings
This chapter explains how to set up ARK-2151S Series hardware, including instructions on setting jumpers and connecting peripherals, and how to set switches and read indicators.
Be sure to read all the safety precautions before beginning the installation procedure.
3.1 Setting Jumpers and Switches
It is possible to configure the Computing Box to match the needs of the application by resetting the jumpers. A jumper is the simplest kind of electrical switch. It consists of two metal pins and a small metal clip, often protected by a plastic cover that slides over the pins to connect them. To “close” a jumper, connect the pins with the clip. To “open” a jumper, remove the clip. Sometimes a jumper has three pins, labeled 1, 2, and 3. In this case, connect either pins 1 and 2, or pins 2 and 3.

Open

Closed

Closed 2-3

Open

Closed

Closed 2-3
A pair of needle-nose pliers may be helpful when working with jumpers. If there are any doubts about the best hardware configuration for the application, contact the local distributor or sales representative before making any changes.
An arrow is used on the motherboard to indicate the first pin of each jumper.
3.1.1 Main Board

Figure 3.1 Top side of main board

natural_image
Green printed circuit board with various electronic components and connectors (no readable text or symbols)Figure 3.2 Bottom side of main board
3.2 Jumper Lists
3.2.1 Main Board
Jumpers & Switches
| J2 Auto Power On Setting |
| J3 LCD Power |
| SW2 mPCIe & mSATA selection |
| SW3 Clear CMOS |
3.3 Jumper Settings
3.3.1 Main Board
3.3.1.1 Auto Power On Setting (J2)

OPEN

Closed
Table 3.1: Auto Power On Setting (J2)
| Setting Function |
| NC Power Button for Power On |
| (1-2)* Auto Power On (default) |
3.3.1.2 LCD Power (J3)

(1-3)*

(3-5)

(3-4)
Table 3.2: LCD Power (J3)
| Setting Function |
| (1-3)* +3.3 V (default) |
| (3-5) +5 V |
| (3-4) +12 V |
3.3.1.3 PCIe & mSATA Selection (SW2)
(1 & 2)*

(3 & 4)

(2 & 4)
Table 3.3: mPCIe & mSATA Selection (SW2)
| Setting Function | |
| (1 & 2)* mSATA (default) | |
| (3 & 4) mPCIe | |
| (2 & 4) | Auto Detect ^1 |
^1 Some of mSATA or mPCIe modules can't be recognized correctly through the Auto Detect setting. Suggest to use mSATA or mPCIe setting directly if meet any compatibility problem.
3.3.1.4 Clear CMOS (SW3)

(1-2)*

(2-3)
Table 3.4: Clear CMOS (SW3)
| Setting Function |
| (1-2)* Normal |
| (2-3) Clear CMOS |
Chapter 4
Pin Assignments
This chapter explains Pin Assignments of ARK-2151S Series.
4.1 ARK-2151S-S9A1E I/O Connectors
4.1.1 ARK-2151S-S9A1E Front I/O View
4.1.2 ARK-2151S-S9A1E Rear I/O View

4.2 ARK-2151S-S9A1E I/O Pin Definition
4.2.1 VGA Connector
The ARK-2151S provides a high resolution VGA interface connected by a D-sub 15-pin connector to support a VGA CRT monitor. It supports display resolution of up to 1920 x 1200 with 60 Hz.

Figure 4.1 VGA Connector
Table 4.1: VGA Connector Pin Assignments
| Pin Signal Name Pin Signal Name | ||||||
| 1 | R | e | d | 2 | G | |
| 3 Blue 4 NC | ||||||
| 5 GND 6 GND | ||||||
| 7 GND 8 GND | ||||||
| 9 | N | C | 1 | 0 | G | N |
| 11 | NC | 12 | DDC Date | |||
| 13 | H-SYNC | 14 | V-SYNC | |||
| 15 | DDC Clock | |||||
4.2.2 USB Connector
The ARK-2151S provides up to four USB interface connectors - 2 x USB 2.0 & 2 x USB 3.0, which give complete Plug & Play. The USB interface is compliant with USB UHCI, Rev. 2.0 & 3.0. The USB interface supports Plug and Play, which enables you to connect or disconnect a device whenever you want, without turning off the computer.
Figure 4.2 USB Connector [Upper (black): USB2.0 / Down (blue): USB 3.0]
Table 4.2: USB Connector Pin Assignments
| Pin Signal Name Pin Signal Name | |||||||
| 1 | + | 5 | V | 2 | D - | ||
| 3 | D | + | 4 | G | N D | ||
| 5 SSRX- 6 SSRX+ | |||||||
| 7 GND 8 SSTX- | |||||||
| 9 SSTX+ | 10 | +5V | |||||
| 11 | D- | 12 | D+ | ||||
| 13 | GND | ||||||
4.2.3 Ethernet Connector
ARK-2151S provides two RJ45 LAN interface connectors, which are fully compliant with IEEE 802.3u 10/100/1000 Base-T CSMA/CD standards. LAN1 is equipped with Intel I218 GbE and LAN2 is equipped with Intel I210 GbE. The Ethernet ports use standard RJ-45 jack connectors with LED indicators on the front side to show Active/Link status and Speed status.
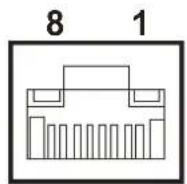
Figure 4.3 Ethernet Connector
Table 4.3: Ethernet Connector Pin Assignments
| Pin Signal Name Pin Signal Name | |||
| 1 TX+(10/100),BI_DA+(GHz) | 5 BI_DC-(GHz) | ||
| 2 TX-(10/100),BI_DA-(GHz) | 6 | RX-(10/100),BI_DB-(GHz) | |
| 3 RX+(10/100),BI_DB+(GHz) | 7 BI_DD+(GHz) | ||
| 4 BI_DC+(GHz) | 8 BI_DD-(GHz) | ||
4.2.4 HDMI Connector
ARK-2151S provides 1 x lockable HDMI port which resolution can support up to 4K at 24 Hz.

Figure 4.4 HDMI Connector
Table 4.4: HDMI / Display Port Connector Pin Assignments
| Pin Signal Name Pin Signal Name | |||||||
| 1 TMDS_Data2+/ DP_Data0+ 2 GND | |||||||
| 3 | T | M | D | S | _ | D | a t |
| 5 GND | 6 TMDS_Data1-/ DP_Data1- | ||||||
| 7 TMDS_Data0+/ DP_Data2+ 8 GND | |||||||
| 9 TMDS_Data0-/ DP_Data2- | 10 | TMDS_Clock+/ DP_Data3+ | |||||
| 11 | GND | 12 | TMDS_Clock-/ DP_Data3- | ||||
| 13 | NC | 14 | NC | ||||
| 15 | SCL/ AUX_CH+ | 16 | SDA/ GND | ||||
| 17 | DDC GND/ AUX_CH- | 18 | +5V/ Hot plug detect | ||||
| 19 | Hot plug detect/ Return | 20 | DP_PWR | ||||
4.2.5 DIO Connector
ARK-2151S offers an 8-bit pheonix type DIO connector and two ground pin. 6 x DI & 2 x DO w/ 3 KV isolation.
■ Connector Type: 10-pin screw terminal block (6 DI points, 2 DO points, GND)
■ Input Voltage: 0 to 30 VDC at 25 Hz
■ Digital Input Levels for Dry Contacts:
- Logic level 0: Close to GND
- Logic level 1: Open
■ Digital Input Levels for Wet Contacts:
- Logic level 0: +3 V max.
- Logic level 1: +5 V to +30 V
■ Output Current: Max. 500 mA per channel
On-state Voltage: 24 VDC nominal, open collector to 30 VDC
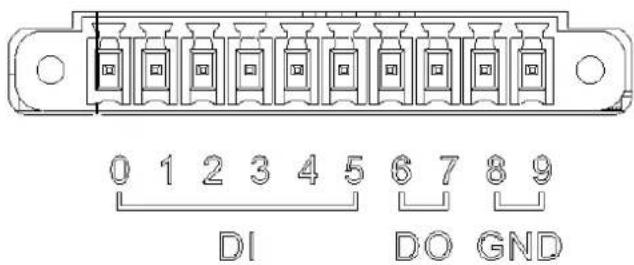
Figure 4.5 DIO Connector
4.2.6 Power Input Connector
ARK-2151S comes with 3-pin phoenix type power input connector for 9 \~ 36 VDC input.
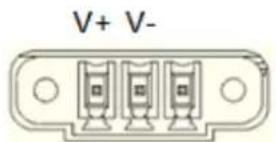
Figure 4.6 Power Input Connector
4.2.7 Power Over Ethernet
ARK-2151S-S9A1E provides 4 x 10/100 PoE ports.
■ 4 ports full-load, IEEE802.3af Class 2 (7 Watt)
■ 2 ports full-load, IEEE802.3af Class 3 (15.4 Watt)
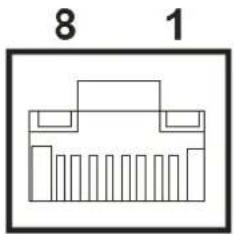
Figure 4.7 Power Over Ethernet Connector
Table 4.5: Power Over Ethernet (PoE) Pin Definition
| Pin Signal Name Pin Signal Name |
| 1 Rx + / DC + 5 unused |
| 2 RX - / DC + 6 Tx - / DC - |
| 3 Tx + / DC - 7 Unused |
| 4 Unused 8 Unused |
4.2.8 System Audio Connector
ARK-2151S offers stereo audio ports by a phone jack connector of Line-out, Mic-in & Line-in. The audio chip controller is by Realtek ALC888, High Definition Audio.

Figure 4.8 System Audio Connector
Table 4.6: Audio Connector Pin Assignments
| Pin Audio Signal Name | ||||
| 1 | MIC | |||
| 2 | L | i | n | e |
| 3 | L | i | n | e |
4.2.9 Optional I/O
ARK-2151S-S9A1E provides two optional DB9 connectors.
■ 2 x DB9 connectors for RS-232/422/485 signal (Default)
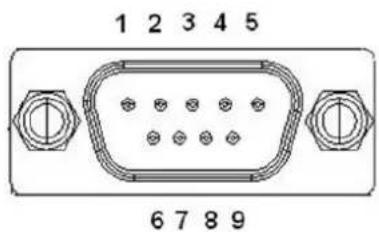
Table 4.7: COM Connector Pin Assignments
| RS-232 RS-422 RS-485 | |||
| Pin Signal Name Signal Name Signal Name | |||
| 1 | DCD | Tx- | DATA- |
| 2 | RxD | Tx+ | DATA+ |
| 3 | TxD | Rx+ | NC |
| 4 | DTR | Rx- | NC |
| 5 | GND | GND | GND |
| 6 | DSR | NC | NC |
| 7 | RTS | NC | NC |
| 8 | CTS | NC | NC |
| 9 | RI | NC | NC |
4.2.10 Power On/Off Button
ARK-2151S comes with a Power On/Off button, that support dual function of Soft Power -On/Off (Instant off or Delay 4 Second), and Suspend.

Figure 4.9 Power ON/OFF Button
4.2.11 Reset
ARK-2151S comes with reset function for users to reset the unit if necessary.

Figure 4.10 Reset
4.2.12 LED Indicator
There are two LEDs on ARK-2151S front metal face plate for indicating system status: PWR LED is for power status; and SSD LED is for SSD flash disk status.

Figure 4.11 LED Indicator
Chapter 5
BIOS settings
This chapter introduces how to set BIOS configuration data.
5.1 Introduction
With the AMIBIOS Setup program, you can modify BIOS settings and control the various system features. This chapter describes the basic navigation of the ARK-2151S BIOS setup screens.
![Aptio Setup Utility - Copyright (C) 2012 American Megatrends, Inc. Main Advanced Chipset Boot Security Save & Exit BIOS Information BIOS Vendor American Megatrends Core Version 4.6.5.4 0.32 x64 Compliancy UEFI 2.3.1; PI 1.2 Project Version ARK L510X019 Build Date and Time 12/24/2014 17:09:30 Memory Information Memory Frequency 1600 Mhz Total Memory 8192 MB (DDR3) System Date [Sat 12/27/2014] System Time [13:45:06] Access Level Administrator Set the Date. Use Tab to switch between Date elements. +: Select Screen ↑↓: Select Item Enter: Select +/-: Change Opt. F1: General Help F2: Previous Values F3: Optimized Defaults F4: Save & Exit ESC: Exit Version 2.15.1236. Copyright (C) 2012 American Megatrends, Inc.](/content/2026/06/1202330/images/892ffd465c57291c6c499f7d72da28206c4095be93bfdd9a4a73ad62181c14e8.jpg)
Figure 5.1 Setup program initial screen
AMI's BIOS ROM has a built-in setup program that allows users to modify the basic system configuration. This information is stored in battery-backed CMOS so it retains the setup information when the power is turned off.
5.2 Entering Setup
Turn on the computer and then press to enter the Setup menu.
5.2.1 Main Setup
When you first enter the BIOS Setup Utility, you will enter the Main setup screen. You can always return to the Main setup screen by selecting the Main tab. There are two Main Setup options. They are described in this section. The Main BIOS Setup screen is shown below.
![Aptio Setup Utility - Copyright (C) 2012 American Megatrends, Inc. Main Advanced Chipset Boot Security Save & Exit BIOS Information BIOS Vendor Core Version Compliancy Project Version Build Date and Time Memory Information Memory Frequency Total Memory System Date System Time Access Level American Megatrends 4.6.5.4 0.32 x64 UEFI 2.3.1; PI 1.2 ARK L510X019 12/24/2014 17:09:30 1600 Mhz 8192 MB (DDR3) [Sat 12/27/2014] [13:45:06] Administrator Set the Date. Use Tab to switch between Date elements. ++: Select Screen 11: Select Item Enter: Select +/-: Change Opt. F1: General Help F2: Previous Values F3: Optimized Defaults F4: Save & Exit ESC: Exit Version 2.15.1236. Copyright (C) 2012 American Megatrends, Inc.](/content/2026/06/1202330/images/9ca5ccd9bc3ac99cfc2eef28892f84cf924292d757fa70d5337f9b5ff44945b2.jpg)
Figure 5.2 Main setup screen
The Main BIOS setup screen has two main frames. The left frame displays all the options that can be configured. Grayed-out options cannot be configured; options in blue can. The right frame displays the key legend.
Above the key legend is an area reserved for a text message. When an option is selected in the left frame, it is highlighted in white. Often a text message will accompany it.
System Time / System Date
Use this option to change the system time and date. Highlight System Time or System Date using the
5.2.2 Advanced BIOS Features Setup
Select the Advanced tab from the ARK-2151S setup screen to enter the Advanced BIOS Setup screen. You can select any of the items in the left frame of the screen, such as CPU Configuration, to go to the sub menu for that item. You can display an Advanced BIOS Setup option by highlighting it using the
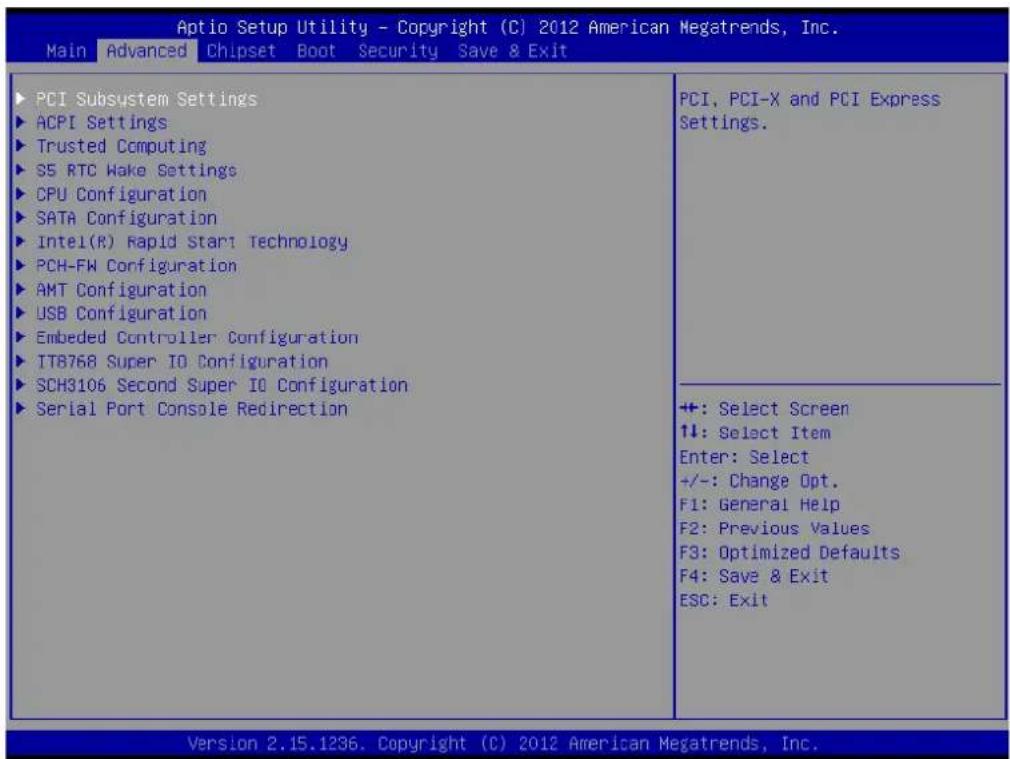
Figure 5.3 Advanced BIOS features setup screen
5.2.2.1 PCI Subsystem Settings
![Aptio Setup Utility - Copyright (C) 2012 American Megatrends, Inc. Advanced PCI Bus Driver Version V.2.05.02 PCI Common Settings PCI Latency Timers [S2 PCI Bus Clocks] VGA Palette Snoop [Disabled] PERK# Generation [Disabled] SERR# Generation [Disabled] PCI Express Settings Value to be programmed into PCI Latency Timer Register. +: Select Screen ↑↓: Select Item Enter: Select +/-: Change Opt. F1: General Help F2: Previous Values F3: Optimized Defaults F4: Save & Exit ESC: Exit Version 2.15.1236. Copyright (C) 2012 American Megatrends, Inc.](/content/2026/06/1202330/images/f2d2481a0b9ce127113364c574871794565e08992113d54842df2922a7c590fd.jpg)
Figure 5.4 PCI Subsystem Settings
PCI Latency Timer
This item allows users to program the PCI Latency timer.
VGA Palette Snoop
This item allows users to enable or disable VGA Palette Snoop.
PERR# Generation
This item allows users to enable or disable PERR# Generation.
SERR# Generation
This item allows users to enable or disable SERR# Generation
5.2.2.2 PCI Express Device Register Settings
![Aptio Setup Utility - Copyright (C) 2012 American Megatrends, Inc. Advanced PCI Express Device Register Settings Relaxed Ordering [Disabled] Extended Tag [Disabled] No Snoop [Enabled] Maximum Payload [Auto] Maximum Read Request [Auto] PCI Express Link Register Settings ASPM Support [Disabled] WARNING: Enabling ASPM may cause some PCI-E devices to fail Extended Synch [Disabled] Link Training Retry [5] Link Training Timeout (uS) 100 Unpopulated Links [Keep Link ON] Restore PCIE Registers [Disabled] Enables or Disables PCI Express Device Relaxed Ordering. +: Select Screen ↑↓: Select Item Enter: Select +/-: Change Opt. F1: General Help F2: Previous Values F3: Optimized Defaults F4: Save & Exit ESC: Exit Version 2.15.1236. Copyright (C) 2012 American Megatrends, Inc.](/content/2026/06/1202330/images/ab52024bab86339a4d1269436ebe082fd9a7685d59337e8f2a252a0759d48643.jpg)
Figure 5.5 PCI Express Device Register Settings
■ Relaxed Ordering
Enable or disable Relaxed Ordering.
■ Extended Tag
Enable or disable Extended Tag.
■ No Snoop
Enable or disable No Snoop.
■ Maximum Payload
This item allows users to set the Maximum Payload.
■ Maximum Read Request
This item allows users to set the Maximum Read Request.
■ ASPM Support
Enable or disable ASPM Support.
■ Extended Synch
Enable or disable Extended Synch.
■ Link Training Retry
This item allows users to set the Link Training Retry.
■ Link Training Timeout (uS)
This item allows users to set the Link Training Timeout (uS).
■ Unpopulated Links
This item allows users to set the Unpopulated Links.
■ Restore PCIE Registers
Enable or disable Restore PCIE Registers.
5.2.2.3 ACPI Settings
![Aptio Setup Utility - Copyright (C) 2012 American Megatrends, Inc. Advanced ACPI Settings Enable ACPI Auto Configuration [Disabled] Enable Hibernation [Enabled] ACPI Sleep State [S3 only(Suspend to ...)] Lock Legacy Resources [Disabled] S3 Video Repost [Disabled] ACPI Low Power S0 Idle [Disabled] Enables or Disables BIOS ACPI Auto Configuration. +: Select Screen 1↓: Select Item Enter: Select +/-: Change Opt. F1: General Help F2: Previous Values F3: Optimized Defaults F4: Save & Exit ESC: Exit Version 2.15.1236. Copyright (C) 2012 American Megatrends, Inc.](/content/2026/06/1202330/images/f6a6d42f5c37c0c1716941aa959687214a4988e724c6e6caf995edaacb5e714a.jpg)
Figure 5.6 ACPI Setting
■ Enable ACPI Auto Configuration
This item allows users to enable or disable BIOS ACPI auto configuration.
■ Enable Hibernation
This item allows users to enable or disable hibernation.
ACPI Sleep State
This item allows users to set the ACPI sleep state.
■ Lock Legacy Resources
This item allows users to lock legacy devices' resources.
S3 Video Repost
This item allows users to enable or disable VBIOS run after S3 resume.
■ ACPI Low Power S0 Idle
This item allows users to enable or disable system wake on alarm event by Items setting.
5.2.2.4 Trusted Computing
![Aptio Setup Utility - Copyright (C) 2012 American Megatrends, Inc. Advanced Configuration Security Device Support [Disable] Current Status Information NO Security Device Found Enables or Disables BIOS support for security device. O.S. will not show Security Device. TCG EFI protocol and INT1A interface will not be available. +: Select Screen ↑↓: Select Item Enter: Select +/-: Change Opt. F1: General Help F2: Previous Values F3: Optimized Defaults F4: Save & Exit ESC: Exit Version 2.15.1236. Copyright (C) 2012 American Megatrends, Inc.](/content/2026/06/1202330/images/34370c7d28436011a7e31605ae63212fbfd7adff14b77901c8496c958b4b1038.jpg)
Figure 5.7 Trusted Computing Configuration
■ Security Device Support
Enable or disable BIOS support for security device.
5.2.2.5 S5 RTC Wake Settings
![Aptio Setup Utility - Copyright (C) 2012 American Megatrends, Inc. Advanced Wake system with Fixed Time [Disabled] Enable or disable System wake on alarm event. when enabled, System will wake on the hr::min::sec specified +: Select Screen ↑↓: Select Item Enter: Select +/-: Change Opt. F1: General Help F2: Previous Values F3: Optimized Defaults F4: Save & Exit ESC: Exit Version 2.15.1236. Copyright (C) 2012 American Megatrends, Inc.](/content/2026/06/1202330/images/3919413414bb14eb2c25dc20c921c99f592ce18070c603adaf4effab1f634a9e.jpg)
Figure 5.8 S5 RTC Wake Settings
■ Wake system with fixed time
Enable or disable system wake on alarm event.
5.2.2.6 CPU Configuration

Figure 5.9 CPU Configuration Setting
Hyper Threading Technology
This item allows users to enable or disable Intel Hyper Threading technology.
■ Active Processor Cores
This item allows users to set how many processor cores should be active.
■ Limit CPUID Maximum
This item allows users to limit the maximum value of CPUID.
■ Execute Disable Bit
This item allows users to enable or disable the No-Execution page protection technology.
Intel Virtualization Technology
This item allows users to enable or disable intel's virtualization technology.
Hardware Prefetcher
This item allows users to enable or disable the hardware prefetcher feature.
■ Adjacent Cache Line Prefetch
This item allows users to enable or disable the adjacent cache line prefetch feature.
5.2.2.7 SATA Configuration
![Aptio Setup Utility - Copyright (C) 2012 American Megatrends, Inc. Advanced SATA Controller(s) [SATA Mode Selection Aggressive LPM Support SATA Controller Speed ► Software Feature Mask Configuration Serial ATA Port 0 Software Preserve Port 0 Hot Plug External SATA SATA Device Type Serial ATA Port 1 Software Preserve Port 1 Hot Plug External SATA SATA Device Type Serial ATA Port 2 Software Preserve Port 2 Hot Plug External SATA SATA Device Type [Enabled] [AHCI] [Enabled] [Default] Empty Unknown [Enabled] [Disabled] [Disabled] [Hard Disk Drive] Empty Unknown [Enabled] [Disabled] [Disabled] [Hard Disk Drive] Enable or disable SATA Device. +: Select Screen ↑↓: Select Item Enter: Select +/-: Change Opt. F1: General Help F2: Previous Values F3: Optimized Defaults F4: Save & Exit ESC: Exit Version 2.15.1236. Copyright (C) 2012 American Megatrends, Inc.](/content/2026/06/1202330/images/079229ee80951fb68ba2bf98ce5efeb4ed583a35af017d3619b1418c52c55b75.jpg)
Figure 5.10 SATA Configuration
■ SATA Controller(s)
This item allows users to enable or disable the SATA controller(s).
■ SATA Mode Selection
This item allows users to select mode of SATA controller(s).
■ SATA Controller(s)
This item allows users to enable or disable the SATA controller(s).
■ SATA Mode Selection
This item allows users to select mode of SATA controller(s).
■ Aggressive LPM Support
This item allows users to enable or disable the Aggressive LPM Support.
■ SATA Controller Speed
This item allows users to select mode of SATA Controller Speed.
Serial ATA Port 1/2/3
This item allows users to enable or disable the SATA Port.
Hot Plug
This item allows users to enable or disable the Hot Plug.
External SATA
This item allows users to enable or disable the External SATA.
■ SATA Device type
This item allows users to select mode of SATA Device type.
5.2.2.8 Intel® Rapid Start Technology
![Aptio Setup Utility - Copyright (C) 2012 American Megatrends, Inc. Advanced Intel(R) Rapid Start Technology [Disabled] Enable or disable Intel(R) Rapid Start Technology. +: Select Screen ↓: Select Item Enter: Select +/-: Change Opt. F1: General Help F2: Previous Values F3: Optimized Defaults F4: Save & Exit ESC: Exit Version 2.15.1236. Copyright (C) 2012 American Megatrends, Inc.](/content/2026/06/1202330/images/72cf8fb60114b6a668f40d50662c959ae43172c1d3a5450cd9e33bf76798866d.jpg)
Figure 5.11 Intel® Rapid Technology
Intel® Rapid Start Technology
This item allows users to enable or disable Rapid Start Technology, if supported.
5.2.2.9 AMT Configuration
![Aptio Setup Utility - Copyright (C) 2012 American Megatrends, Inc. Advanced Intel AMT [Enabled] BIOS Hotkey Pressed [Disabled] MEBx Selection Screen [Disabled] Hide Un-Configure ME Confirmation [Disabled] MEBx Debug Message Output [Disabled] Un-Configure ME [Disabled] Amt Wait Timer 0 Disable ME [Disabled] ASF [Enabled] Activate Remote Assistance Process [Disabled] USB Configure [Enabled] PET Progress [Enabled] AMT CIRA Timeout 0 WatchDog [Disabled] OS Timer 0 BIOS Timer 0 Enable/Disable Intel (R) Active Management Technology BIOS Extension. Note : iAMT H/W is always enabled. This option just controls the BIOS extension execution. If enabled, this requires additional firmware in the SPI device +: Select Screen ↑↓: Select Item Enter: Select +/-: Change Opt. F1: General Help F2: Previous Values F3: Optimized Defaults F4: Save & Exit ESC: Exit Version 2.15.1236. Copyright (C) 2012 American Megatrends, Inc.](/content/2026/06/1202330/images/c2e8299628fff719db0471504fb6a85ed8c2023e5b58bb8f8676037d90046b2c.jpg)
Figure 5.12 AMT Configuration
Intel AMT
This item allows users to enable or disable Intel AMT BIOS extension.
BIOS Hotkey Pressed
This item allows users to enable or disable BIOS hotkey press.
■ MEBx Selection Screen
This item allows users to enable or disable MEBx selection screen.
■ Hide Un-Configuration ME Confirmation
This item allows users to hide un-configure ME without password confirmation prompt.
■ MEBx Debug Message Output
This item allows users to enable or disable MEBx debug message.
Un-Configure ME
This item allows users to un-configure ME without password.
Amt Wait Timer
Set timer to wait before sending ASF_GET_BOOT_OPTIONS.
Disable ME
This item allows users to enable or disable Intel ME.
ASF
This item allows users to enable or disable Alert Specification Format.
■ Activate Remote Assistance Process
This item allows users to enable or disable trigger CIRA boot.
USB Configure
This item allows users to enable or disable USB configure function.
PET Progress
This item allows users to enable or disable PET events progress to receive PET events or not.
■ AMT CIRA Timeout
OEM defined timeout for MPS connection to be established.
WatchDog
This item allows users to enable or disable WatchDog Timer.
OS Timer
Set OS watchdog timer.
BIOS Timer
Set BIOS watchdog timer.
5.2.2.10 PCH-FW Configuration
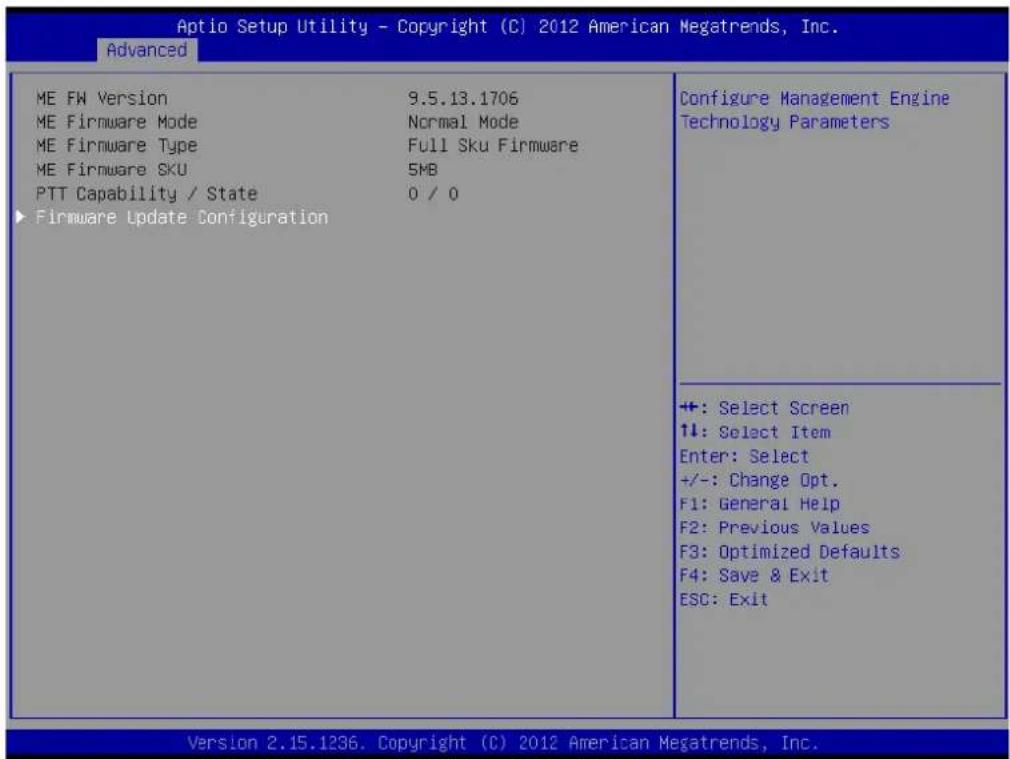
Figure 5.13 PCH-FW Configuration
■ Firmware Update Configuration
This item allows users to enable or disable ME FW image re-flash function.
5.2.2.11 USB Configuration
![Aptio Setup Utility - Copyright (C) 2012 American Megatrends, Inc. Advanced USB Configuration USB Module Version 8.10.28 USB Devices: 1 Drive, 2 Keyboards, 1 Hub Legacy USB Support [Enabled] USB3.0 Support [Enabled] XHCI Hand-off [Enabled] EHCI Hand-off [Disabled] USB Mass Storage Driver Support [Enabled] USB hardware delays and time-outs: USB transfer time-out [20 sec] Device reset time-out [20 sec] Device power-up delay [Auto] Mass Storage Devices: USB FLASH DRIVE PMAP [Auto] Enables Legacy USB support. AUTO option disables legacy support if no USB devices are connected. DISABLE option will keep USB devices available only for EFI applications. ++: Select Screen ↑↓: Select Item Enter: Select +/-: Change Opt. F1: General Help F2: Previous Values F3: Optimized Defaults F4: Save & Exit ESC: Exit Version 2.15.1236. Copyright (C) 2012 American Megatrends, Inc.](/content/2026/06/1202330/images/cf2834c737e12df9c305180e9724835fafd3656a35bca532951a57f372461a56.jpg)
Figure 5.14 USB Configuration
Legacy USB Support
Enable support for legacy USB. Auto option disables legacy support if no USB devices are connected.
USB3.0 Support
This item allows users to enable or disable USB 3.0 support.
XHCI Hand-Off
This is a workaround for the OS without XHCI hand-off support. The XHCI ownership change should claim by XHCI driver.
EHCI Hand-Off
This is a workaround for the OS without EHCl hand-off support. The EHCl ownership change should claim by EHCl driver.
USB transfer time-out
Set the time-out value for Control, Bulk, and Interrupt transfers.
■ Device reset time-out
Set USB mass storage device Start Unit command time-out value.
■ Device power-up delay
Set the maximum time of the device will take before it properly reports itself to the Host Controller. 'Auto' uses default value: for a Root port it is 100 ms, for a Hub port the delay is taken from Hub descriptor.
5.2.2.12 Embedded Controller Configuration
![Aptio Setup Utility - Copyright (C) 2012 American Megatrends, Inc. Advanced EC Firmware Version I2865X0103 EC Power Saving Mode [Normal] EC Hardware Monitor CPU Temperature : +43°C/ +109°F VBAT : +2.370 V +VSSB : +5.072 V +Vin : +11.886 V Vcore : +1.718 V Current : +1.327 A EC Watch Dog Function [Disable] Select EC Power Saving Mode +: Select Screen ↑↓: Select Item Enter: Select +/-: Change Opt. F1: General Help F2: Previous Values F3: Optimized Defaults F4: Save & Exit ESC: Exit Version 2.15.1236. Copyright (C) 2012 American Megatrends, Inc.](/content/2026/06/1202330/images/cf6c75b20d0e4c2dc278e14a7c6afd7c2aed5c85ee0583915960a28184c3a35b.jpg)
Figure 5.15 Embedded Controller Configuration
■ EC iManager WatchDog IRQ
This item allows users to set the IRQ number of EC watchdog.
■ EC Power Saving Mode
This item allows users to set board's power saving mode when off.
■ Backlight Mode
This item allows users to set backlight Function.
EC Watchdog Function
This item allows users to select EC watchdog timer.
5.2.2.13 Super IO Configuration
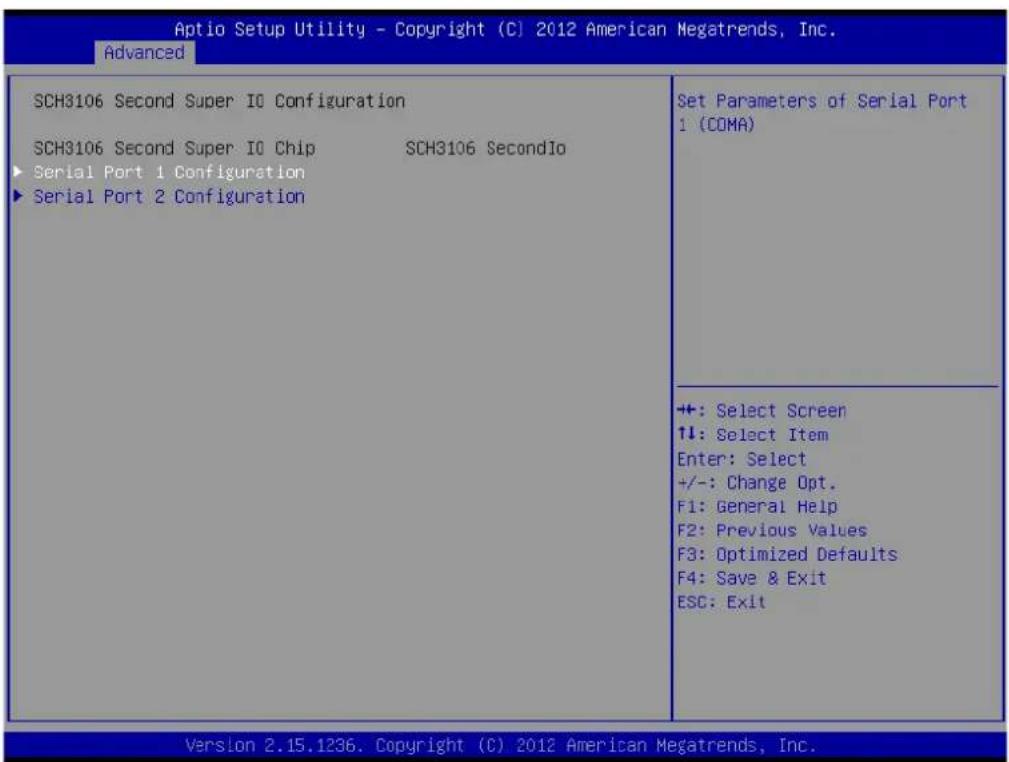
Figure 5.16 Super IO Configuration
Serial Port 1 Configuration
This item allows users to configure serial port 1.
Serial Port 2 Configuration
This item allows users to configure serial port 2.
5.2.2.14 Serial Port Console Redirection
![Aptio Setup Utility - Copyright (C) 2012 American Megatrends, Inc. Advanced COM3 Console Redirection [Disabled] ► Console Redirection Settings Serial Port for Out-of-Band Management/ Windows Emergency Management Services (EMS) Console Redirection [Disabled] ► Console Redirection Settings Console Redirection Enable or Disable. +: Select Screen ↑↓: Select Item Enter: Select +/-: Change Opt. F1: General Help F2: Previous Values F3: Optimized Defaults F4: Save & Exit ESC: Exit Version 2.15.1236. Copyright (C) 2012 American Megatrends, Inc.](/content/2026/06/1202330/images/1b26a5b1698ef1b2846d5979661c88a7e5ebe34761a528ddd5536d4bfbd6b1f9.jpg)
Figure 5.17 Serial Port Console Redirection
■ Console Redirection
This item allows users to enable or disable console redirection for Microsoft Windows Emergency Management Services (EMS).
■ Console Redirection
This item allows users to configuration console redirection detail settings.
5.2.3 Chipset
Select the Chipset tab from the ARK-2151S setup screen to enter the Chipset BIOS Setup screen. You can display a Chipset BIOS Setup option by highlighting it using the
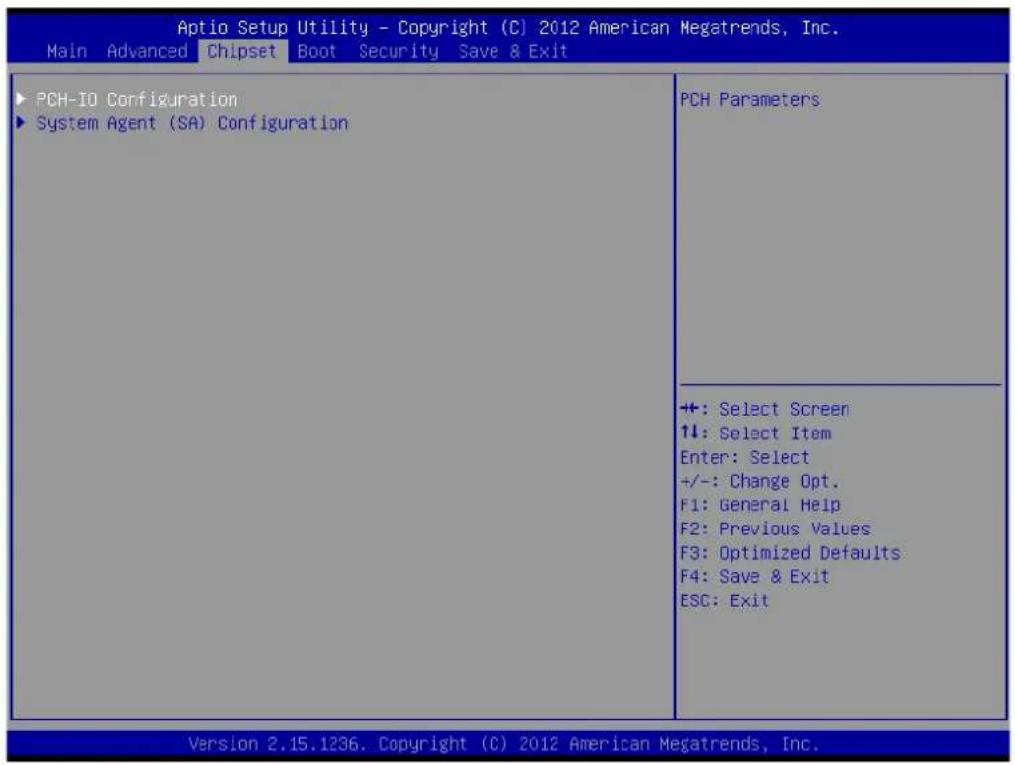
Figure 5.18 Chipset Setup
5.2.3.1 System Agent (SA) Configuration
![Aptio Setup Utility - Copyright (C) 2012 American Megatrends, Inc. Chipset System Agent Bridge Name Haswell System Agent RC Version 1.6.2.0 VT-d Capability Supported VT-d [Enabled] ► Graphics Configuration ► Memory Configuration Check to enable VT-d function on MCH. ++ +: Select Screen ↑↓: Select Item Enter: Select +/-: Change Opt. F1: General Help F2: Previous Values F3: Optimized Defaults F4: Save & Exit ESC: Exit Version 2.15.1236, Copyright (C) 2012 American Megatrends, Inc.](/content/2026/06/1202330/images/550b0b76fa99856450a9bd1fb4ac4eb5b978ebcfa8f13a68ac8d2ace0ef554e1.jpg)
Figure 5.19 System Agent (SA) Configuration
VT-d
This item allows users to enable or disable VT-d.
Intel IGFX Configuration
![Aptio Setup Utility - Copyright (C) 2012 American Megatrends, Inc. Chipset Graphics Configuration IGFX VBIOS Version 2170 IGfx Frequency 400 MHz Graphics Turbo IMON Current 31 Primary Display [Auto] Internal Graphics [Auto] Aperture Size [256MB] DVMT Pre-Allocated [32M] DVMT Total Gfx Mem [256M] Gfx Low Power Mode [Enabled] Panel Power Enable [Disabled] LCD Control Graphics turbo IMON current values supported (14-31) +: Select Screen 1↓: Select Item Enter: Select +/-: Change Opt. F1: General Help F2: Previous Values F3: Optimized Defaults F4: Save & Exit ESC: Exit Version 2.15.1236. Copyright (C) 2012 American Megatrends, Inc.](/content/2026/06/1202330/images/71b253b0b4c2241a9e3528fa428808b941cd03a345fba70d5ee520336908f213.jpg)
Figure 5.20 Intel IGFX Configuration
- Graphics Turbo IMON Current
This item allows users to select which Graphics Turbo IMON Current.
- Primary Display
This item allows users to select Primary Display.
- Internal Graphics
This item allows users to enable or disable IGD.
- Aperture Size
This item allows users to select aperture size.
- DVMT Pre-Allocated
This item allows users to select DVMT pre-allocated memory size.
- DVMT Total Gfx Mem
This item allows users to select DVMT total memory size.
- Panel Power Enable
This item allows users to enable or disable Panel Power. Graphics Performance.
- Analyzers
This item allows users to enable or disable Graphics Performance Analyzers.
- LCD Control
![Aptio Setup Utility - Copyright (C) 2012 American Megatrends, Inc. Chipset LCD Control Primary IGFX Boot Display [VBIOS Default] Select the Video Device which will be activated during POST. This has no effect if external graphics present. Secondary boot display selection will appear based on your selection. VGA modes will be supported only on primary display +: Select Screen ↑↓: Select Item Enter: Select +/-: Change Opt. F1: General Help F2: Previous Values F3: Optimized Defaults F4: Save & Exit ESC: Exit Version 2.15.1236. Copyright (C) 2012 American Megatrends, Inc.](/content/2026/06/1202330/images/92a95db013f152cbf94abc4c7b16c591e94d0b4d62079c9895892fcfe5a509cb.jpg)
Figure 5.21 LCD Control
Primary IGFX Boot Display
Select boot display device at post stage.
LVDS
This item allows users to enable or disable LVDS.
LCD Panel Type
This item allows users to select panel resolution.
■ Memory Configuration
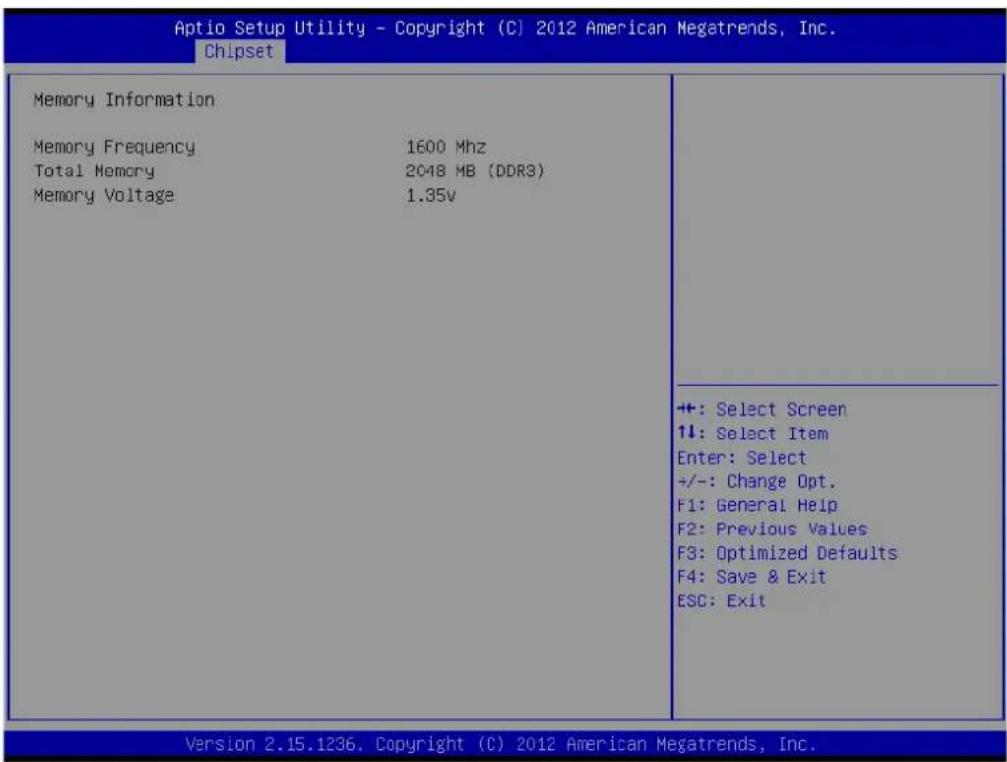
Figure 5.22 Memory Configuration
- Memory Information
This item shows memory configuration parameters.
5.2.3.2 PCH-IO Configuration
![Aptio Setup Utility - Copyright (C) 2012 American Megatrends, Inc. Chipset Intel PCH RC Version 1.6.2.0 Intel PCH SKU Name Premium SKU Intel PCH Rev ID 04/B2 PCI Express Configuration USB Configuration PCH Azalla Configuration LAN1 Controller [Enabled] LAN1 PXE Rom [Disabled] Make on LAN [Disabled] LAN2 Controller [Enabled] LAN2 PXE Rom [Disabled] PCIE Wake From S5 [Disabled] USB Wake From S4 Support [Disabled] SLP_S4 Assertion Width [1-2 Seconds] Restore AC Power Loss [Power Off] PCI Express Configuration settings +: Select Screen ↑↓: Select Item Enter: Select +/-: Change Opt. F1: General Help F2: Previous Values F3: Optimized Defaults F4: Save & Exit ESC: Exit Version 2.15.1236. Copyright (C) 2012 American Megatrends, Inc.](/content/2026/06/1202330/images/9bf6a4f2a5c6842d3b73aff57f855c73e236bd1d6b57c8aec3ea6ba11e0ec97d.jpg)
Figure 5.23 PCH-IO Configuration
PCI Express Clock Gating
This item allows users to enable or disable PCI Express Clock Gating for each root port.
PCI Express Configuration
This item allows users to configuration PCIE1\~PCIE8 root port detail settings.
USB Configuration
This item allows users to configuration detail of USB functions.
■ PCH Azalia Configuration
This item allows users to configuration detail of azalia functions.
■ LAN 1/2 controller
Enables or disables the LAN 1/2 controller.
Wake on LAN
Enables or disables LAN1 wake up from sleep state.
■ LAN 1/2 PXE Rom
This item allows users to enable or disable PXE Rom for LAN 1/2.
■ PCIE Wake from S5
Enables or disables PCIE device wake up from S5.
USB Wake From S4 Support
Enable or disable USB to wake the system from S4.
■ SLP_S4 Assertion Width
This item allows users to set a delay of sorts.
Restore AC Power Loss
This item allows users to select off, on and last state.
PCI Express Configuration
![Aptio Setup Utility - Copyright (C) 2012 American Megatrends, Inc. Chipset PCI Express Configuration PCI Express Clock Gating [Enabled] DMI Link ASPM Control [Enabled] DMI Link Extended Synch Control [Disabled] PCIe-USB Glitch N/A [Disabled] PCIE Root Port Function Swapping [Disabled] Subtractive Decode [Disabled] PCI Express Root Port 1 PCI Express Root Port 2 PCI Express Root Port 3 PCIE Port 4 is assigned to LAN2 PCIE Port 5 is assigned to LAN1 PCI Express Root Port 6 Enable or disable PCI Express Clock Gating for each root port. +: Select Screen ↑↓: Select Item Enter: Select +/-: Change Opt. F1: General Help F2: Previous Values F3: Optimized Defaults F4: Save & Exit ESC: Exit Version 2.15.1236. Copyright (C) 2012 American Megatrends, Inc.](/content/2026/06/1202330/images/048c3da5972c07411160d98332f42ee86b10f7ecf0bf72da6f11ba89f8de519b.jpg)
Figure 5.24 PCI Express Configuration
- PCI Express Clock Gating
This item allows users to enable or disable PCI Express Clock Gating for each root port.
- DMI Link ASPM Control
This item allows users to enable or disable the DMI Link ASPM Control.
- DMI Link Extended Synch Control
This item allows users to configure Mini PCI Express setting.
- PCIe-USB Glitch W/A
This item allows users to enable or disable PCIe-USB Glitch W/A. PCIe-USB Glitch W/A for bad USB device(s) connected behind PCIE/PEG Port.
- Subtractive Decode
This item allows users to enable or disable Subtractive Decode.
- PCI Express Root Port 1/2/3/6
This item allows users to configure PCI Express Root port 1/2/3/6 setting.
USB Configuration
![Aptio Setup Utility - Copyright (C) 2012 American Megatrends, Inc. Chipset USB Configuration USB Precondition [Disabled] XHCI Mode [Auto] XHCI Idle L1 [Enabled] BTCG [Enabled] USB Ports Per-Port Disable Control [Disabled] Precondition work on USB host controller and root ports for faster enumeration. +: Select Screen 1↓: Select Item Enter: Select +/-: Change Opt. F1: General Help F2: Previous Values F3: Optimized Defaults F4: Save & Exit ESC: Exit Version 2.15.1236. Copyright (C) 2012 American Megatrends, Inc.](/content/2026/06/1202330/images/715805ab3343b21f45b42351fb0a92b62a21e56b4283fd81b0d77d68418ca3f4.jpg)
Figure 5.25 USB Configuration
- USB Precondition
This item allows users to enable or disable USB Precondition. Precondition work on the USB host controller and root ports for faster enumeration.
-XHCI Mode
This item allows users to select mode of operation of XHCI mode.
-XHCI Idle L1
This item allows users to enable or disable XHCI Idle L1. XHCIIDLE L1 can be set to disable for LPT-LP Ax stepping to workaround USB3 hot plug will fail after 1 hot plug removal.
- BTCG
This item allows users to enable or disable trunk clock gating.
- USB Ports Per-Port Disable Control
This item allows users to enable or disable USB Ports Per-Port Disable Control. Control each of the USB ports (0\~13) disabling.
■ PCH Azalia Configuration
![Aptio Setup Utility - Copyright (C) 2012 American Megatrends, Inc. Chipset PCH Azalia Configuration Azalia [Auto] Control Detection of the Azalia device. Disabled = Azalia will be unconditionally disabled Enabled = Azalia will be unconditionally Enabled Auto = Azalia will be enabled if present, disabled otherwise. +: Select Screen ↑↓: Select Item Enter: Select +/-: Change Opt. F1: General Help F2: Previous Values F3: Optimized Defaults F4: Save & Exit ESC: Exit Version 2.15.1236. Copyright (C) 2012 American Megatrends, Inc.](/content/2026/06/1202330/images/e7ea2bd105e509c142d203876328fdf81036657bd441d34911b2a1620814d346.jpg)
Figure 5.26 PCH Azalia Configuration
- Azalia
This item allows users to change Azalia settings.
– Control detection of the Azalia device
Disable- Azalia will be unconditionally Disabled.
Enabled- Azalia will be unconditionally Enabled.
Auto- Azalia will be enabled if present, disabled otherwise.
5.2.4 Boot Settings

Figure 5.27 Boot Setup Utility
Setup Prompt Timeout
This item allows users to select the number of seconds to wait for setup activation key.
■ Bootup NumLock State
Select the Power-on state for Numlock.
Quiet Boot
If this option is set to Disabled, the BIOS displays normal POST messages. If Enabled, an OEM Logo is shown instead of POST messages.
Boot Option #1
This item allows users to set the system boot order.
■ Hard Drive BBS Priorities
This item allows users to set the order of the legacy devices in this group.
CSM Support
This item allows users to enable or disable CSM support.
5.2.5 Security Setup

Figure 5.28 Password Configuration
Select Security Setup from the MIO-5271 Setup main BIOS setup menu. All Security Setup options, such as password protection and virus protection are described in this section. To access the sub menu for the following items, select the item and press
Change Administrator / User Password: Select this option and press
5.2.6 Save & Exit
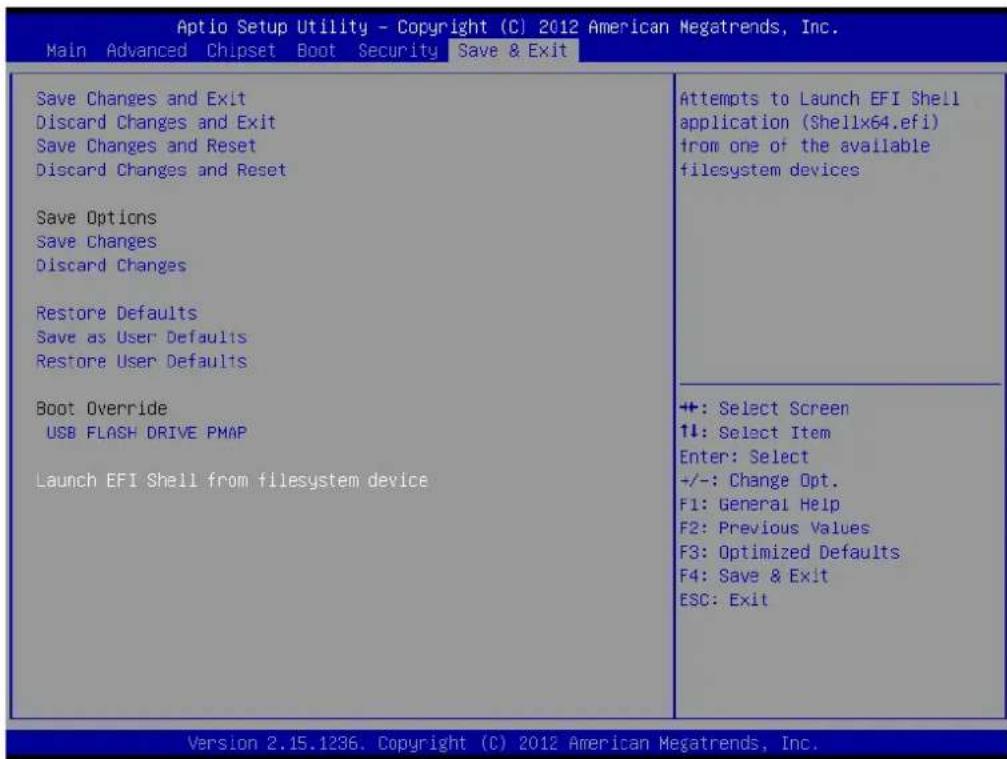
Figure 5.29 Save & Exit
■ Save Changes and Exit
When users have completed system configuration, select this option to save changes, exit BIOS setup menu and reboot the computer if necessary to take effect of all system configuration parameters.
■ Discard Changes and Exit
Select this option to quit Setup without making any permanent changes to the system configuration.
■ Save Changes and Reset
When users have completed system configuration, select this option to save changes, exit BIOS setup menu and reboot the computer to take effect all system configuration parameters.
■ Discard Changes and Reset
Select this option to quit Setup without making any permanent changes to the system configuration and reboot the computer.
■ Save Changes
When users have completed system configuration, select this option to save changes without exit BIOS setup menu.
- Discard Changes
Select this option to discard any current changes and load previous system configuration.
Restore Defaults
The ARK-2151S automatically configures all setup items to optimal settings when users select this option. Optimal Defaults are designed for maximum system performance, but may not work best for all computer applications. In particular, do not use the Optimal Defaults if the user's computer is experiencing system configuration problems.
■ Save as User Defaults
When users have completed system configuration, select this option to save changes as user defaults without exit BIOS setup menu.
The users can select this option to restore user defaults.
Boot Override
This item allows users to choose boot device.
Appendix A
WDT Sample Code
A.1 Watchdog Timer Sample Code
EC_Command_Port = 0x29Ah
EC_Data_Port = 0x299h
Write EC HW ram = 0x89
Watch dog event flag = 0x57
Watchdog reset delay time = 0x5E
Reset event = 0x04
Start WDT function = 0x28

================

.model small
.486p
.stack 256
.data
.code
org 100h
.STARTup

mov dx, EC_Command_Port
mov al, 89h ; Write EC HW ram.
out dx, al

mov dx, EC_Data_Port
mov al, 5Fh ; Watchdog reset delay time low byte (5Eh is high byte) index.
out dx, al

mov dx, EC_Data_Port
mov al, 30h ; Set 3 seconds delay time.
out dx, al

mov dx, EC_Command_Port
mov al, 89h ; Write EC HW ram.
out dx, al

mov dx, EC_ EC_Data_Port
mov al, 57h ; Watch dog event flag.
out dx, al

mov dx, EC_Data_Port
mov al, 04h ; Reset event.
out dx, al

mov dx, EC_Command_Port
mov al, 28h ; start WDT function.
out dx, al
.exit
ADVANTECH
Enabling an Intelligent Planet
www.advantech.com
Please verify specifications before quoting. This guide is intended for reference purposes only.
All product specifications are subject to change without notice.
No part of this publication may be reproduced in any form or by any means, electronic, photocopying, recording or otherwise, without prior written permission of the publisher.
All brand and product names are trademarks or registered trademarks of their respective companies.
© Advantech Co., Ltd. 2015
- ARK-2151S
- Outdoor Full HD NVR w/4 PoE Ports
- Attention!
- Acknowledgements
- Product Warranty (2 years)
- Declaration of Conformity
- CE
- FCC Class A
- Technical Support and Assistance
- Warnings, Cautions and Notes
- Document Feedback
- Packing List
- Ordering Information
- Safety Instructions
- Contents
- Chapter 1 General Introduction ......1
- Chapter 2 Hardware installation ....5
- Chapter 3 Jumper and Switch Settings ......11
- Chapter 4 Pin Assignments ......17
- Chapter 5 BIOS settings 25
- Appendix A WDT Sample Code....57
- Chapter 1
- General Introduction
- Introduction
- Features
- Specifications
- Dimensions
- Chapter 2
- Overview of Hardware Installation & Upgrading
- Installing Memory
- Installing storage
- Installing 2.5" SSD or HDD
- Installing mSATA Storage
- Installing Optional Modules
- Installing WLAN module
- Installing WWAN module
- Chapter 3
- Jumper and Switch Settings
- Setting Jumpers and Switches
- Main Board
- Jumper Lists
- Main Board
- Jumper Settings
- Main Board
- Auto Power On Setting (J2)
- LCD Power (J3)
- PCIe & mSATA Selection (SW2)
- Clear CMOS (SW3)
- Chapter 4
- Pin Assignments
- ARK-2151S-S9A1E I/O Connectors
- ARK-2151S-S9A1E Front I/O View
- ARK-2151S-S9A1E Rear I/O View
- ARK-2151S-S9A1E I/O Pin Definition
- VGA Connector
- USB Connector
- Ethernet Connector
- HDMI Connector
- DIO Connector
- Power Input Connector
- Power Over Ethernet
- System Audio Connector
- Optional I/O
- Power On/Off Button
- Reset
- LED Indicator
- Chapter 5
- BIOS settings
- Introduction
- Entering Setup
- Main Setup
- System Time / System Date
- Advanced BIOS Features Setup
- PCI Subsystem Settings
- PCI Express Device Register Settings
- ACPI Settings
- Trusted Computing
- ■ Security Device Support
- S5 RTC Wake Settings
- ■ Wake system with fixed time
- CPU Configuration
- SATA Configuration
- Intel® Rapid Start Technology
- Intel® Rapid Start Technology
- AMT Configuration
- PET Progress
- ■ AMT CIRA Timeout
- WatchDog
- OS Timer
- BIOS Timer
- PCH-FW Configuration
- ■ Firmware Update Configuration
- USB Configuration
- Embedded Controller Configuration
- Super IO Configuration
- Serial Port Console Redirection
- ■ Console Redirection
- Chipset
- System Agent (SA) Configuration
- VT-d
- Intel IGFX Configuration
- - LCD Control
- Primary IGFX Boot Display
- LVDS
- LCD Panel Type
- ■ Memory Configuration
- - Memory Information
- PCH-IO Configuration
- PCI Express Configuration
- - PCI Express Clock Gating
- - DMI Link ASPM Control
- - DMI Link Extended Synch Control
- - PCIe-USB Glitch W/A
- - Subtractive Decode
- - PCI Express Root Port 1/2/3/6
- USB Configuration
- - USB Precondition
- -XHCI Mode
- -XHCI Idle L1
- - BTCG
- - USB Ports Per-Port Disable Control
- ■ PCH Azalia Configuration
- - Azalia
- – Control detection of the Azalia device
- Boot Settings
- Setup Prompt Timeout
- ■ Bootup NumLock State
- Quiet Boot
- Boot Option #1
- ■ Hard Drive BBS Priorities
- CSM Support
- Security Setup
- Save & Exit
- ■ Save Changes and Exit
- ■ Discard Changes and Exit
- ■ Save Changes and Reset
- ■ Discard Changes and Reset
- ■ Save Changes
- - Discard Changes
- Restore Defaults
- ■ Save as User Defaults
- Boot Override
- Appendix A
- ADVANTECH
- www.advantech.com
Brand : Advantech
Model : ARK-2151S
Category : Security Camera