
ARTG30LHTDP - Air-conditioner FUJITSU - Free user manual and instructions
Find the device manual for free ARTG30LHTDP FUJITSU in PDF.

| Product Type | Air Conditioner (Duct type) |
| Brand | Fujitsu |
| Model | ARTG30LHTDP |
| Refrigerant | R410A |
| Remote Controller | Wired remote controller with LCD display, backlight, and cursor buttons |
| Operation Modes | Auto, Cool, Dry, Fan, Heat |
| Inverter Technology | Yes |
| Economy Mode | Yes |
| Auto Changeover | Yes |
| Weekly Timer | Yes, up to 8 patterns per day, 2 weekly schedules |
| On/Off Timer | Yes, up to 24 hours in 30-minute increments |
| Auto-off Timer | Yes, 30 to 240 minutes in 10-minute increments, with valid hour setting |
| Zone Control | Optional, supports up to 8 zones and 5 room temperature sensors |
| Temperature Setting Range | Cool/Dry/Auto: 18-30 °C (64-88 °F); Heat: 16-30 °C (60-88 °F) |
| Operating Temperature Range (Cooling) | Outdoor: -5 °C to 46 °C; Indoor: 18 °C to 32 °C |
| Operating Temperature Range (Heating) | Outdoor: -15 °C to 24 °C; Indoor: 10 °C to 30 °C |
| Fan Speed Settings | Auto, High, Medium, Low, Quiet |
| Air Filter | Washable, filter cleaning indicator |
| Key Lock Function | Child lock or Part lock |
| Demand Response Compatible | Yes (DR modes 1, 2, 3) |
| Power Source | Requires electrical breaker; specific voltage not provided |
| Safety Precautions | Do not service yourself; use qualified personnel; avoid fire or flammable gases |
Frequently Asked Questions - ARTG30LHTDP FUJITSU
User questions about ARTG30LHTDP FUJITSU
0 question about this device. Answer the ones you know or ask your own.
Ask a new question about this device
Download the instructions for your Air-conditioner in PDF format for free! Find your manual ARTG30LHTDP - FUJITSU and take your electronic device back in hand. On this page are published all the documents necessary for the use of your device. ARTG30LHTDP by FUJITSU.
USER MANUAL ARTG30LHTDP FUJITSU
OPERATING MANUAL
Duct type
Indoor Unit
ARTG24LHTDP
ARTG30LHTDP
ARTG36LHTDP
ARTG45LHTDP
ARTG54LHTDP
ARTG45LDTA
ARTG54LDTA
ARTG60LDTA
KEEP THIS MANUAL FOR FUTURE REFERENCE
FUJITSU GENERAL LIMITED
CAUTION
R410A REFRIGERANT
This Air Conditioner contains and operates with refrigerant R410A.
THIS PRODUCT MUST ONLY BE INSTALLED OR SERVICED BY QUALIFIED PERSONNEL.
Refer to Commonwealth, State, Territory and local legislation, regulations, codes, installation & operation manuals, before the installation, maintenance and/or service of this product.
[Barcode]
PART No. 9381067145
OPERATING MANUAL
PART No. 9381067145
Air Conditioner (Duct type)
CONTENTS
- INTRODUCTION.... 2
1-1. Safety precautions 2
1-2. Features and functions ...... 3
1-3. Remote controller overview 3
1-4. About "Monitor" screen 4
1-5. About zone control * 5
1-5-1. Zone (single) setting 5
1-5-2. Zone (group) setting 6
- BASIC OPERATIONS 6
2-1. Starting the operation 6
2-1-1. On/Off setting 7
2-1-2. Operation mode setting 7
2-1-3. Set temperature adjustment 7
2-1-4. Fan speed setting 7
2-2. Setting items in Menu 8
2-3. Setting items in Submenu....9
- FUNCTION SETTING.... 10
3-1. Switching to the "Function" screen 10
3-2. Function setting items 10
3-2-1. Economy setting 10
3-2-2. Set temp. auto return setting 10
3-2-3. Set temp. range limitation setting .....11
- TIMER SETTING 12
4-1. Switching to the "Timer" screen 12
4-2. Timer setting items 12
4-2-1. On timer setting 12
4-2-2. Off timer setting 13
4-2-3. Weekly timer setting ....13
4-2-4. Auto-off timer setting.... 20
- SUBMENU SETTING 21
5-1. Switching to the "Submenu" screen 21
5-2. Date/Time setting 21
5-2-1. Date setting 21
5-2-2. Time setting 22
5-2-3. Summer time (Daylight saving time) setting 22
5-2-4. Change display format setting 22
5-3. Screen setting 23
5-3-1. Automatic off time setting 23
5-3-2. Brightness setting 23
5-3-3. Contrast setting 24
5-4. Filter sign setting 24
5-4-1. Filter sign reset setting 24
5-4-2. Display setting 24
5-5. R.C. sensor control setting 25
5-6. Room temp. display setting 25
5-7. Key lock select setting 26
5-8. Initial setting 26
5-8-1. Language setting 26
5-8-2. Temperature unit setting 27
5-9. Zone user setting * 27
5-9-1. Day/Night setting 27
5-9-2. Name setting 28
6. DEMAND RESPONSE AND INDOOR UNIT OPERATION 30
7. CLEANING AND CARE 31
8. ERROR CODE 31
9. TROUBLESHOOTING 31
9-1. Troubleshooting (general) 31
9-2. Troubleshooting in zone-controlled system * ...... 33
9-3. Operating tips 33
9-4. Temperature and humidity range 35
- Sections marked with * are dedicated instructions for zone-controlled system.
- Depending on the configuration and the setup of your air-conditioning system, some contents that appear in the screen illustrations in this manual may differ to the actual screen display you are using.
This product uses a bitmap font made and developed by Ricoh Company, Ltd.
1. INTRODUCTION
1-1. Safety precautions
To prevent personal injury, or property damage, read this section carefully before you use this product, and be sure to comply with the following safety precautions. Incorrect operation due to failure to follow the instructions may cause harm or damage, the seriousness of which is classified as follows:

WARNING
This mark warns of death or serious injury.

CAUTION
This mark warns of injury or damage to property.

This mark denotes an action that is COMPULSORY.

This mark denotes an action that is PROHIBITED.

WARNING

- This product contains no user-serviceable parts. Always consult authorized service personnel for repairing, installation, and relocation of this product. Improper installation or handling will cause leakage, electric shock, or fire.
- In the event of a malfunction such as burning smell, immediately stop operation of the air conditioner, and disconnect all the power supply by turning off the electrical breaker or disconnecting the power plug. Then consult authorized service personnel.
- Take care not to damage the power supply cable. If the supply cord is damaged, it must be replaced by the manufacturer, its service agent or similarly qualified persons in order to avoid a hazard.
- In the event of refrigerant leakage, be sure to keep away from fire or any flammables, and consult authorized service personnel.
- If you see lightning or hear thunder, there might be a lightning strike. To prevent electric shock hazard, turn off the air conditioner by using the remote controller, and do not touch this product or the power source during thunderstorm.

- Do not start or stop the operation of this product by inserting or pulling out the power plug, or by turning on or off the circuit breaker.
- Do not use inflammable gases near this product. It may cause a fire from leaking gas.
- Do not expose yourself directly to the cooling airflow for many hours.
- Dispose of the packing materials safely. Tear and dispose of the plastic packing bags so that children cannot play with them. There is the danger of suffocation if children play with the original plastic bags.
- Do not insert your fingers or any other objects into outlet port or inlet port.
• Do not operate with wet hands.
- This appliance is not intended for use by persons (including children) with reduced physical, sensory or mental capabilities, or lack of experience and knowledge, unless they have been given supervision or instruction concerning use of the appliance by a person responsible for their safety. Children should be supervised to ensure that they do not play with the appliance.

CAUTION

- Provide occasional ventilation during use.
• Always operate this product with air filters installed. - Ensure that any electronic equipment is at least 1 meter away from this product.
- Turn off power source when not using this product for extended periods.
- After long period of use, check whether the installation stand does not deteriorate to prevent this product from falling down.
- When restarting after a long period of disuse in the winter, turn the power source on at least 12 hours before starting the unit.
- The airflow direction and the room temperature should be carefully considered when you use this product in a room with infants, children, elderly or sick persons.
- Keep the surroundings of the outdoor unit clean and tidy, and do not place items around it. Any objects blocking or entering from the outlet ports may cause product malfunction.
- Do not set vessels containing liquid on this unit, or expose it directly to water. Doing so will cause heating, fire or electric shock.
- Do not place electrical devices within 1 m (3.3 ft.) of this unit. It may cause malfunction or failure.
- Do not use fire near this unit or place a heating apparatus nearby. It may cause malfunction.
- Do not touch the switches with sharp objects. Doing so will cause injury, trouble, or electric shock.
- Do not insert objects into the slit parts of this unit. Doing so will cause trouble, heating, or electric shock.

- Do not direct the airflow at fireplaces or heating apparatus.
- Do not block or cover the inlet port and the outlet port.
• Do not apply any heavy pressure to radiator fins.
- Do not climb on, place objects on, or hang objects from this product.
- Do not place any other electrical products or household belongings under this product. Dripping condensation from this product might get them wet, and may cause damage or malfunction of your property.
• Do not expose this product directly to water.
- Do not use this product for preservation of food, plants, animals, precision equipment, art work, or other objects. This may cause quality deterioration of those items.
- Do not expose animals or plants to the direct airflow.
• Do not drink the drainage from the air conditioner.
• Do not pull the power supply cable.
- Do not touch the aluminium fins of heat exchanger built-in this product to avoid personal injury when you install or maintain the unit.
- Do not stand on unstable steps when operating or cleaning this product. It may overturn and can cause injury.
1-2. Features and functions
INVERTER
At the start of operation, large amount of power is used to bring the room quickly to the desired temperature. Afterwards, the unit automatically switches to a low power setting for economic and comfortable operation.
ECONOMY OPERATION
When Economy operation mode is operated, the room temperature will be little higher than the set-temp under Cooling mode and lower than set-temp under Heating* mode. Therefore, the Economy mode is able to save more energy than other normal mode.
AUTO CHANGEOVER
The operation mode (Cooling, Dry, Heating*) is switched automatically to maintain the set temperature, and the temperature is kept constant at all times.
WEEKLY TIMER
Use this timer function to set operating times for each day of the week. Use the Day off setting to switch off timed operation for a selected day in the coming week. Because all days can be set together, the weekly timer can be used to repeat the timer settings for all of the days.
The wired remote controller allows convenient control of indoor unit operation.
WIRELESS REMOTE CONTROLLER (OPTION)
The optional wireless remote controller can be used. When you use the wireless remote controller, there are the following differences as compared with using the wired remote controller.
[Additional functions for wireless remote controller]
- SLEEP timer
- TIMER
• 10 °C HEAT operation
You can use both wireless and wired remote controller simultaneously, however, the functions listed above will be restricted.
ZONE CONTROL
This function enables efficient air-conditioning by selecting specific zones from the various zones divided within the indoor space.
To use this function, installation of the optional "Zone control interface" is necessary. For details, please consult your dealer or authorized service personnel.
1-3. Remote controller overview

CAUTION

- Press the button lightly with a finger. It may cause a failure if pressed with excessive force.
- Do not press the screen too hard. It may cause a failure.
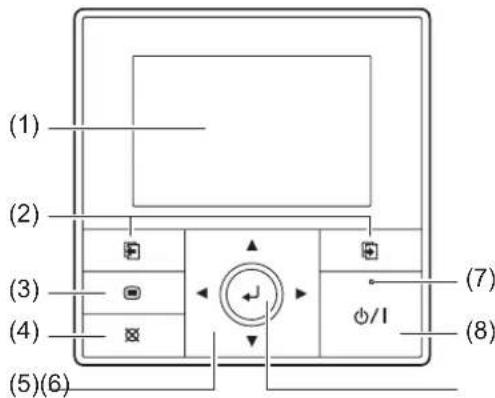
(1) Display panel (with backlight)
- Backlights when you press any button.
• Depending on the operation or setting, the content changes. - The brightness, contrast, and automatic light-off setting of the backlight can be adjusted.
Refer to "5. SUBMENU SETTING".
i NOTES
- While the backlight is off by the automatic light-off, the first button operation does not work, and the backlight illuminates. (The On/Off button is excluded.)
- While the backlight is set to [Off], it is effective from the first button operation.
(2) Screen switch button (Left/Right)
Backwards the screen to previous setting item or forwards the screen to next setting item.
Ex.) "Date" screen
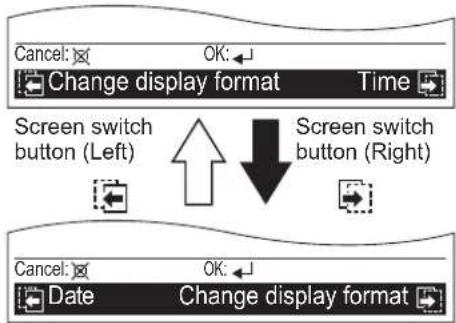
i NOTE
• These buttons are active only when any combinations of
or 📋 and the relevant screen names are displayed
in the black field at the bottom of the screen.

(3) Menu button
When you press this button while the "Monitor" screen is displayed, it switches to the "Menu" screen.
If you press the button again "Menu" screen, it switches to the "Submenu" screen.
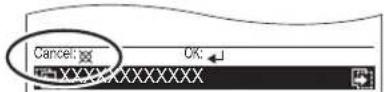
(4) Cancel button
Cancels the current selection and returns to previous screen.
Operable control at the setting is displayed in the lower left of each setting screen as follows:
- When you press this button while setting, the setting is canceled and returns to the previous screen.
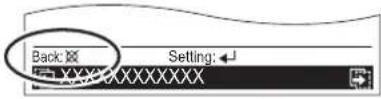
En-3
- When this button is pressed after setting (or before setting), it returns to the previous screen.
(5) Cursor button
When up/down ▲▼ or left/right ▼arrows are displayed on the screen, you can move the cursor to change the selected items.
Up/down arrows are also displayed when the setting item is adjustable or changeable.
i NOTE
- Press the marked part on the [Cursor button]. It does not respond correctly when diagonally operating it.
(6) Enter button
Selects the highlighted item or finalize the setting.
i NOTE
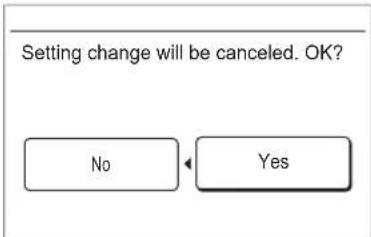
- When switching to another setting screen before the setting is completed, the cancel confirmation screen is displayed. When canceling the setting, select [Yes] with the [Cursor button (Left/Right)] and press the [Enter button].
(7) Power indicator
Lights green when the unit is turned on, and goes off when the unit is turned off.
i NOTE
• It blinks when an error occurs.
(8) On/Off button
Starts or stops the operation.
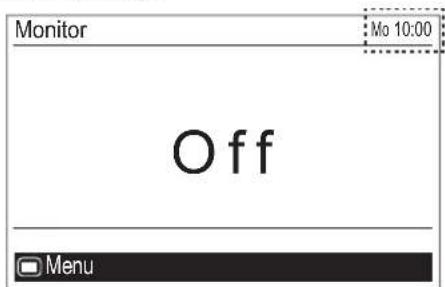
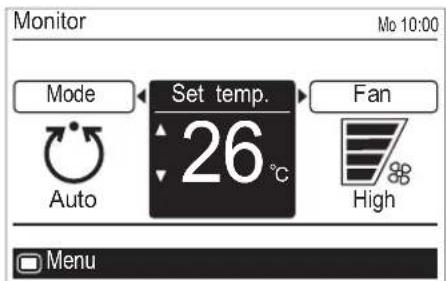
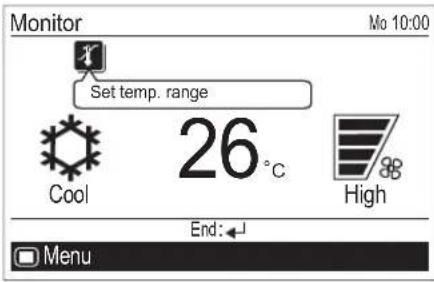
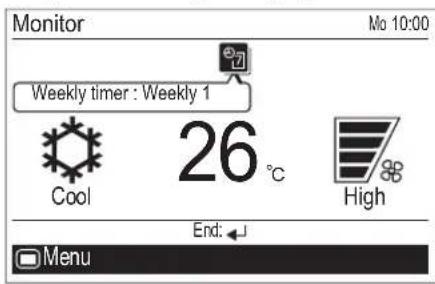
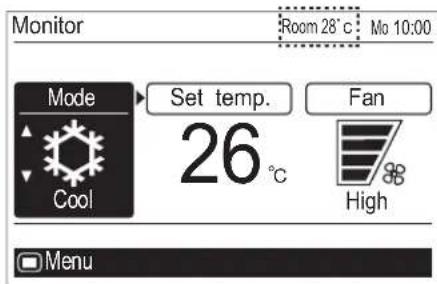
1-4. About "Monitor" screen
"Monitor" screen shows several statuses such as the operating status of the air conditioner, function setting, or other current operating conditions.
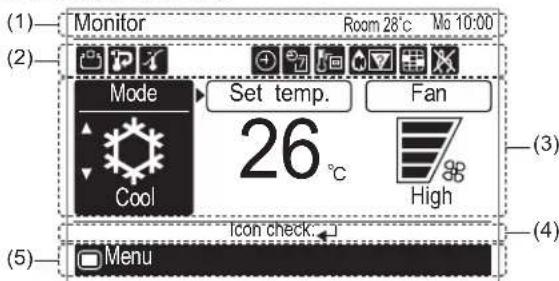
(1) Screen status and current conditions
Shows the current screen name, room temperature, day of the week, and clock.
i NOTES
- The clock can be changed to 24-hour clock, AM/PM (12-hour: 12:00–11:59 or 0:00–11:59) clock. (Refer to "5-2-4. Change display format setting".)
- Room temperature indication is available only if the "Room temp. display" function is enabled. (Refer to "5-6. Room temp. display setting".)
(2) Icon display
Shows the function that is currently working or set.
i NOTE
- In this section, all the possible icons are displayed for description.
| Icon | Function name | See page | |
| - Economy 10 | |||
| Set temp. (temperature) auto return | 10 | ||
| Set temp. (temperature) range limitation | 11 | ||
| On timer 12 | |||
| Off timer 13 | |||
| Auto-off timer 20 | |||
| Weekly timer | 13 | ||
| - | R.C. (Remote Controller) sensor control | 25 | |
| - | Automatic defrosting, oil recovery, or mode mismatch | 32 | |
| Filter cleaning notification | 24 | ||
| - | R.C. (Remote Controller) prohibition | - | |
White icon on a black background:
Indicates that the function is valid and performing the function or standby state.
Black icon on a white background:
Indicates that the controller is in non-operating state because R.C. prohibition on the primary unit is working, or timer has been set, though the function is valid.
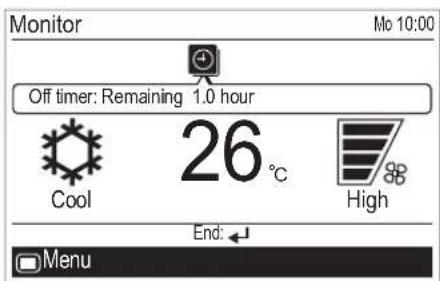
About "Icon check" function:
In "Monitor" screen, you can check the name of the icon that indicates function currently set.
i NOTE
- This function is only available when at least 1 icon is displayed on the icon display.
- Message balloon with the function name appears when you press the [Enter button] and select the icon by using the [Cursor button (Left/Right)].
- Item that has a timer function, remaining time until the timer expires is also displayed.
En-4
- If multiple timers have been set, up/down arrows ▼ are displayed in the message balloon. To check the target timer function, press the [Cursor button (Up/Down)].
Off timer: Remaining 1.0 hour
- With pressing the [Cursor button (Left/Right)], you can check the other icon functions when several icons are displayed on the "Monitor" screen.
- When you press the [Enter button] again, the message balloon is closed.
- If there is no additional button operation for 3 seconds, the icon check function is finished.
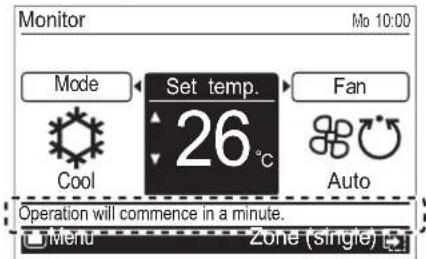
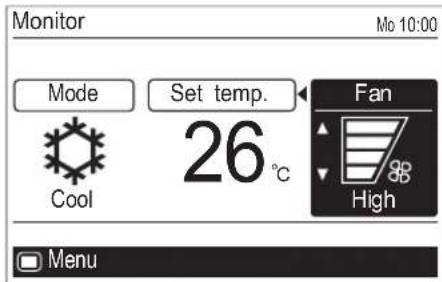
(3) Operating condition display
Shows the operating mode, set temperature, and fan speed that are currently working or set.
- Mode display: Operating mode is displayed.
- Set temp. display: Set temperature is displayed.
- Fan display: Fan speed is displayed.
(4) Operation guidance display
Shows the current operable items and the button to be pressed.
(5) Screen switch guidance display
Any combination of [Menu button] mark (☐) with name of switchable screen by pressing the [Menu button] or [Screen switch button (Left/Right)] mark (☐ or ☐) with name of switchable screen by pressing the [Screen switch button (Left/Right)] is displayed.
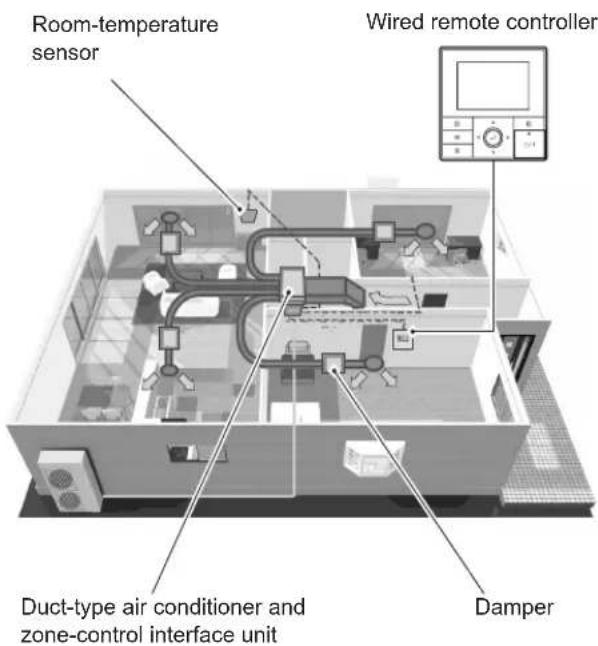
1-5. About zone control \*
"Zone control" enables an efficient air-conditioning by selecting only specific zone from some divided zones in the indoor space.
Application or non-application of air conditioning is controlled by opening or closing of pre-installed damper(s). And an area that is air-conditioned with one damper is defined as one zone.
Up to 8 zones can be set by installing maximum of 8 dampers in one air-conditioning system.
Also, up to 5 room-temperature sensors can be installed in one air-conditioning system. With specifying most suitable sensor among those sensors, it enables more comfortable room-temperature control.
Construction example
En-5
If your air-conditioning system is zone-controlled, related setting screens are prepared, and the switchable setting screen name is displayed in the "Monitor" screen as follows:
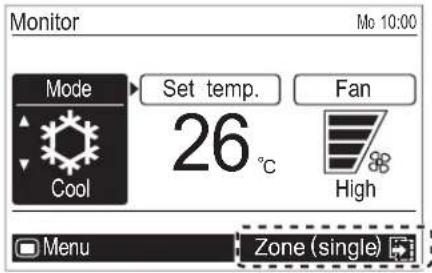
There are 2 types of zone-control settings; "Zone (single)" controls each individual zone, and "Zone (group)" controls some selected zones all at once.
You can also register desired name for each zone or room-temperature sensor.
For the settings, refer to "5-9. Zone user setting".
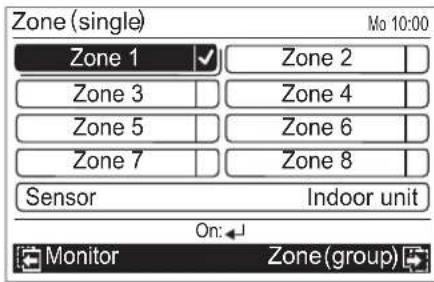
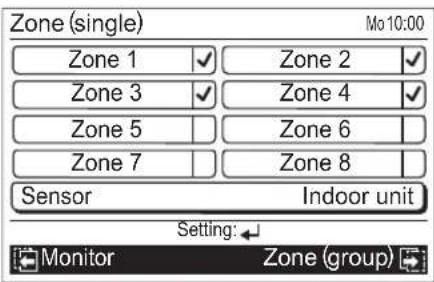
● 1-5-1. Zone (single) setting
Enables application or non-application of the air conditioning for each zone, and selection of the room-temperature sensor.
1 In "Monitor" screen, press [Screen switch button (Right)]. "Zone (single)" screen opens.
Zones and room-temperature sensor currently connected are displayed.
As an setting example, Zone 1 to 8 are supposed to be connected in following instructions.
i NOTES
- If any names have been registered for zones and sensors in [Zone user setting], the registered names are displayed on this screen.
• Only connected zones and sensor are displayed.
2 Select zones applying or non-applying the air conditioning as follows:
Select the zone with the [Cursor button], and press the [Enter button].
Zones marked with a check are air-conditioned.
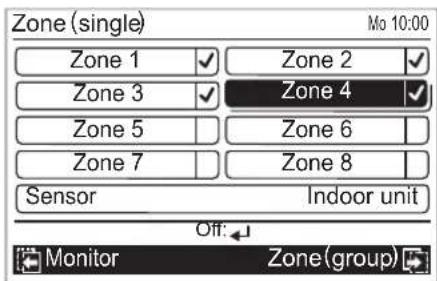
To cancel the air conditioning, set the cursor to the zone marked with a check, and press the [Enter button] to remove the check mark. Unchecked zone is not air-conditioned.
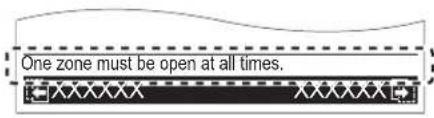
i NOTE
- Depending on the initial setup in the installation, there is a case that at least one zone need to be selected. In that case, following message is displayed on the screen, and you need to put a check mark at least one zone.
3 Select room-temperature sensor as follows: Set the cursor to [Sensor] with the [Cursor button], and press the [Enter button].
Select desired sensor with pressing the [Cursor button (Up/Down)].
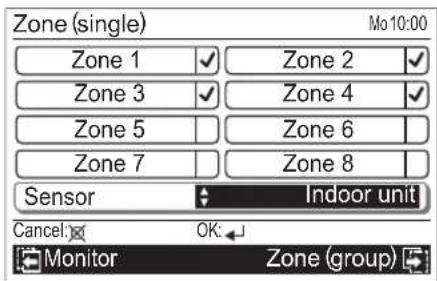
Each time you press the [Cursor button (Up/Down)], displayed sensor switches as follows. Non-connected sensor will be skipped.

flowchart
graph LR
    A["Indoor unit"] <--> B["Primary RC"]
    B <--> C["Secondary RC"]
    D["Optional 1"] <--> E["Optional 2"]
To complete the setting, press the [Enter button]
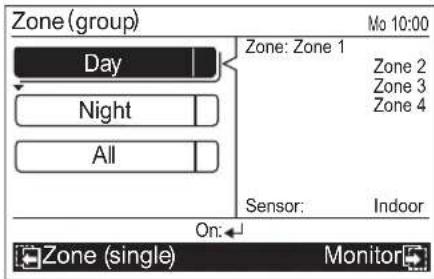
- 1-5-2. Zone (group) setting Enables the simultaneous setting of zone(s) and room-temperature sensor registered into two groups that you might have different lifestyle; "Day" and "Night". This setting also allows simultaneous setting to all of the connected zones, as "All".
i NOTE
- When "All" is selected, the room temperature sensor specified in "Sensor" of [Zone (single) setting] is applied.
For how to group the zone(s) into "Day" or "Night", refer to "5-9-1. Day/Night setting".
1 In "Monitor" screen, press the [Screen switch button (Right)] twice.
"Zone (group)" screen opens.
i NOTES
- Zone(s) and room-temperature sensor grouped into "Day" or "Night" in [Zone user setting] are displayed.
- If any names have been registered for zones and sensors in [Zone user setting], the registered names are displayed on this screen.
- Only zones to be air-conditioned are displayed. Undisplayed zones on this screen will not be air-conditioned.
2 Select the group to be air-conditioned with the [Cursor button (Up/Down)], and press the [Enter button].
The group marked a check is air-conditioned.
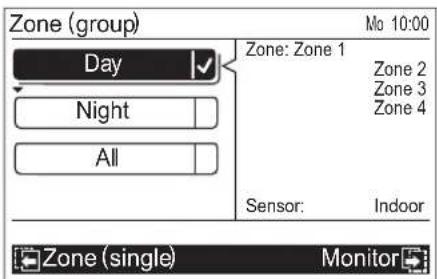
i NOTE
- The check mark currently displayed on the screen can be unchecked only if you mark a check to the other group on this screen, or when any setting change is done in "Zone (single)" screen.
2. BASIC OPERATIONS
2-1. Starting the operation
PREPARATION:
Check whether the current time is displayed correctly on the screen. When changing the time or switching the setting for summer time (daylight saving time), follow the instructions in "5-2. Date/Time setting".
En-6

● 2-1-1. On/Off setting
Press the [On/Off button].
The power indicator (green) lights, and the air conditioner starts the operation.
When you press the button again, the operation is stopped, and the power indicator is turned off.
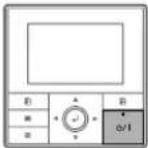
i NOTE
- In a zone-controlled air-conditioning system, depending on the type of installed damper, it takes some time until the air conditioner starts the operation after you press the [On/Off button]. In that case, following message is displayed on the "Monitor" screen for about 1 minute, after you press the [On/Off button] to start the operation.
The message will go off when the operating preparation of the system is done.
● 2-1-2. Operation mode setting
In "Monitor" screen, select [Mode], and switch to the desired operation mode with the [Cursor button (Up/Down)].
Operation mode marks

Auto

Cool

Dry

Fan

Heat
i NOTE
• Only the adjustable operation mode is displayed.
If there is another operation setting to be changed, you can continue the configuration. Move to desired item by using [Cursor button (Left/Right)].
● 2-1-3. Set temperature adjustment
In "Monitor" screen, select [Set temp.] with the [Cursor button (Left/Right)], and adjust the room temperature with the [Cursor button (Up/Down)].
En-7
i NOTES
- Possible temperature setting ranges in the operation mode are as follows:
Cool, Dry, Auto 18 to 30 °C (64 to 88 °F)
Heat 16 to 30 °C (60 to 88 °F)
- When operation mode is set to [Fan], the set temperature cannot be adjusted. ([Set temp.] cannot be selected.)
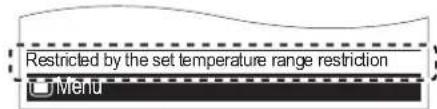
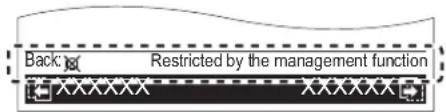
- If the temperature is being out of the range configured in [Set temp. range] setting, message indicating that the temperature is restricted is displayed on the screen.
● 2-1-4. Fan speed setting
In "Monitor" screen, select [Fan] with the [Cursor button (Left/Right)], and adjust the fan speed with the [Cursor button (Up/Down)].
Fan speed marks

Auto

High

Medium

Low

Quiet
i NOTE
- When the operation mode is set to [Dry], Fan speed switches to [Auto]. (Fan speed cannot be selected.)
About fan speed [Auto]
When the fan speed is set to [Auto], behavior of the indoor unit fan in non-zone-controlled system and the one in zone-controlled system is different as follows.
In non-zone-controlled system:
If the room temperature approaches to the configured temperature in [Set temp.], the fan rotates with reduced speed.
In zone-controlled system:
The fan speed is adjusted depending on the number of air-conditioned zone(s).
If the volume of provided airflow by [Auto] is not agreeable to your preference, adjust it to just the right fan speed by changing the fan speed.
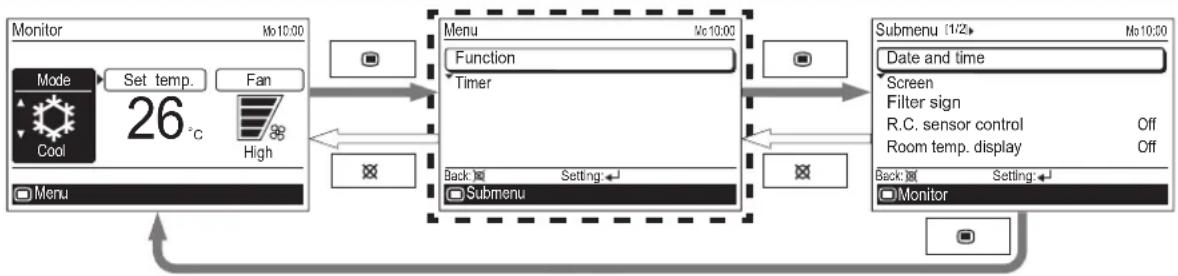
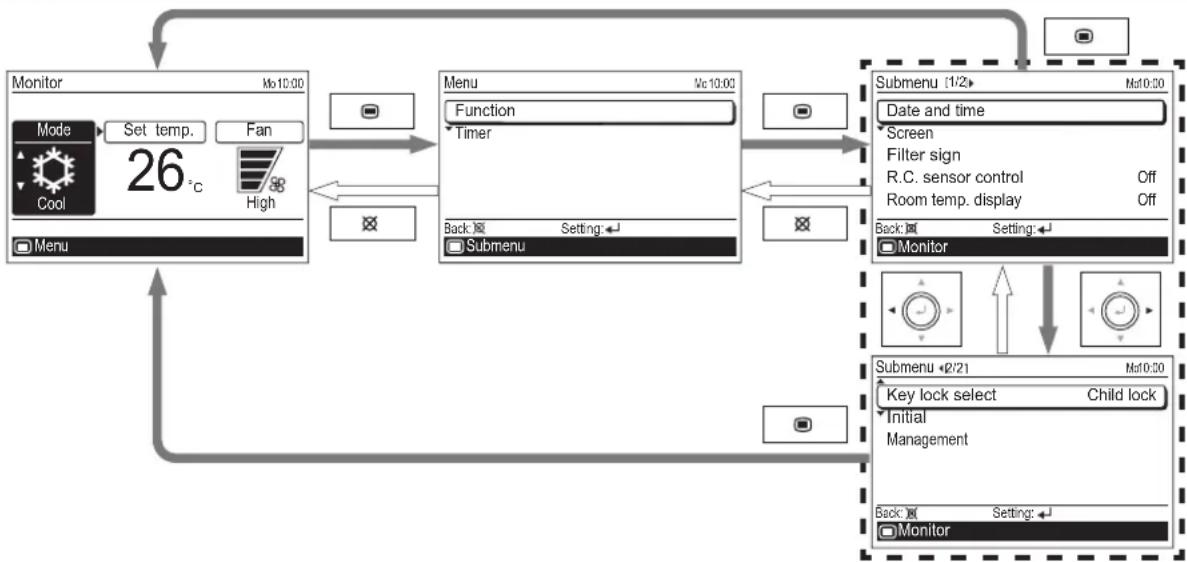
2-2. Setting items in Menu
flowchart
graph LR
    A["Monitor Mode"] --> B["Set temp. 26°C Fan"]
    B --> C["Menu"]
    C --> D["Menu Function"]
    D --> E["Submenu"]
    E --> F["Submenu (1/2) Date and time"]
    F --> G["Screen Filter sign R.C. sensor control Off Room temp. display Off"]
    G --> H["Back: Submenu"]
    H --> I["Back: Monitor"]
Following items can be adjusted in Menu.
i NOTES
- Functions marked “—” in “Secondary unit” column of following table cannot be adjusted from the remote controller that is specified as the secondary control unit. Adjust the function on the primary unit.
- Depending on the type of the indoor unit, some functions cannot be set.
| Settings and Display Items Details | Operation(See page) | Secondaryunit | |||
| Function Economy The room temperature will be little higher than the set-temp under cooling mode and lower than set-temp under heating mode.Therefore, the economy mode is able to save more energy than other normal mode. | 10 | O | |||
| Set temp. (temperature) auto return | The temperature automatically returns to the preset value after a certain period of time has elapsed since the set temperature was changed.The set time can be set from 30 to 120 minutes in units of 10 minutes. | 10 – | |||
| Set temp. (temperature) range limitation | Limits the range of the set temperature.The temperature range can be limited through the operation mode. | 11 – | |||
| Timer On timer Use this timer function to start air conditioner operation. The timer operates and air condition operation starts after the set time has passed. The timer can be set up to 24 hours in advance.Can be set up to 24 hours in units of 30 minutes. | 12 – | ||||
| Off timer Use this timer function to stop air conditioner operation. The timer operates and air conditioner operation stops after the set time has passed. The timer can be set up to 24 hours in advance.Can be set up to 24 hours in units of 30 minutes. | 13 – | ||||
| Weekly timer Operation start and end times can be set to 1 week.Up to 8 patterns of On/Off, operation mode, and temperature setting can be set in 1 day.2 sets of the weekly timer, [Weekly 1] and [Weekly 2], can be set.For example, you can assign the [Weekly 1] for summer and [Weekly 2] for winter. Then you only need to switch [Weekly 1] and [Weekly 2] by the season. | 13 – | ||||
| Auto-off timer Operation end time can be set if the air conditioning operation has been started with the [On/Off button] of this remote controller.The set time can be set from 30 to 240 minutes in units of 10 minutes.You can also specify the valid hour in a day for this timer. | 20 – | ||||
i NOTE
- If the function you are selecting is restricted by [Management] function, following message is displayed in the operation guidance display.
En-8
2-3. Setting items in Submenu
flowchart
graph TD
    A["Monitor<br>Mo 10:00"] --> B["Menu<br>Function<br>Timer"]
    B --> C["Submenu (1/2)<br>Date and time<br>Screen<br>Filter sign<br>R.C. sensor control<br>Room temp. display Off Off"]
    C --> D["Submenu (2/21)<br>Key lock select Child lock<br>Initial Management<br>Back Setting: Monitor"]
    D --> E["Monitor"]
    F["Mode<br>Cool"] --> G["Set temp.<br>Fan"]
    G --> H["26 °C High"]
    H --> I["Menu"]
    I --> J["Back Setting: Submenu"]
    J --> K["Submenu (1/2)<br>Date and time<br>Screen<br>Filter sign<br>R.C. sensor control Off Room temp. display Off Off"]
    K --> L["Back Setting: Monitor"]
Following items can be adjusted in Submenu.
i NOTES
- Function marked “—” in “Secondary unit” column of following table cannot be adjusted from the remote controller that is specified as the secondary control unit. Adjust the function on the primary unit.
- Depending on the type of the indoor unit, some functions cannot be set.
| Settings and Display Items Details | Operation(See page) | Secondary unit | ||
| Date and time | Date Sets and corrects | the date. | 21 | O |
| Time Sets and corrects | the time. | 22 | O | |
| Summer timeDaylight saving time | Sets or cancels daylight saving time. | 22 | O | |
| Change display format | The display format for the date and time can be changed. 22 O | |||
| Screen The LCD backlight time, backlight brightness, and LCD contrast can be changed. | 23 | O | ||
| Filter sign*1 | Filter sign reset Removes the filter sign. 24 O | |||
| Display Switches between displaying and non-displaying the filter sign. 24 O | ||||
| R.C. (Remote Controller) sensor control*1,*2 | The room temperature sensor of the indoor unit can be switched to the room temperature sensor that is built into this remote controller. | 25 | O | |
| NOTE | ||||
| This setting can be set on either of one of the primary unit or the secondary unit. | ||||
| Room temp. (temperature) display Sw | Switches between displaying and non-displaying the room temperature.The displayed room temperature is the temperature around the remote control. | 25 | O | |
| Key lock select | Child lock | Restricts all the button operation. | 26 O | |
| Part lock | Restricts the [Menu button] operation. | 26 O | ||
| Initial | Language*2 | Switches the display language of the remote control.The following languages can be selected: English, German, French, Spanish, Italian, Greek, Russian, Portuguese, and Turkish. | 26 | O |
| Temp. (Temperature) unit | Switches the set temperature and the room temperature display between Celsius and Fahrenheit. | 27 | O | |
| Password setting | Password for “Management” function setting can be set.(Refer to the installation manual.) | - | O | |
| Management | Restricts the operations of some functions by non-authorized person.With the password control, only the administrator can get access to the function setting.(Refer to the installation manual.) | - | O | |
| Zone user setting*3 | Day/Night setting | Enables the simultaneous setting of zone(s) and room-temperature sensor registered into two groups that you might have different lifestyle; “Day” and “Night”. | 27 | - |
| Name setting | Enables registration of desired name for each zone, group, and room-temperature sensor. | 28 | O | |
^*1 : Functions set to inactive at the factory, and they are not displayed on the "Submenu" screen. To activate these functions, consult authorized service personnel.
^*2 : Dedicated functions for non-zone-controlled system.
*3: Dedicated function for zone-controlled system.
En-9
3. FUNCTION SETTING
3-1. Switching to the "Function" screen
1 In "Menu" screen, select [Function] with the [Cursor button (Up/Down)], and press the [Enter button].
2 "Function" screen is displayed. To return to the "Menu" screen, press the [Cancel button].
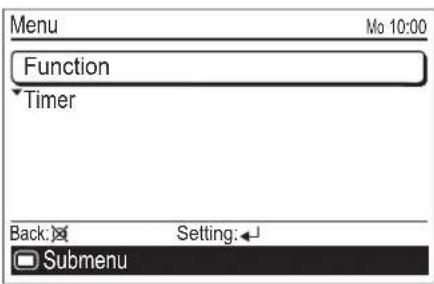
3-2. Function setting items
In "Function" screen, select the target function with the [Cursor button (Up/Down)], and press the [Enter button]. Then the setting screen of the selected function is displayed.
● 3-2-1. Economy setting
1 In "Function" screen, select [Economy] with the [Cursor button (Up/Down)].
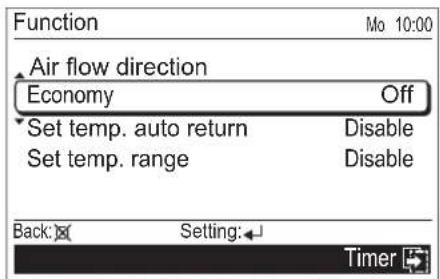
To change the setting, press the [Enter button].
2 Select [On] or [Off] by pressing the [Cursor button (Up/Down)], and press the [Enter button] to complete the setting.
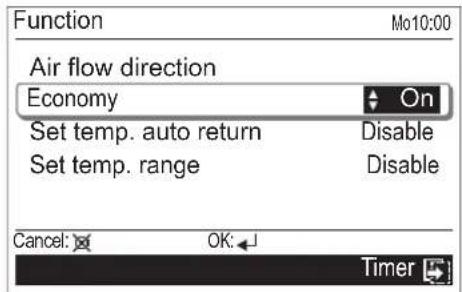
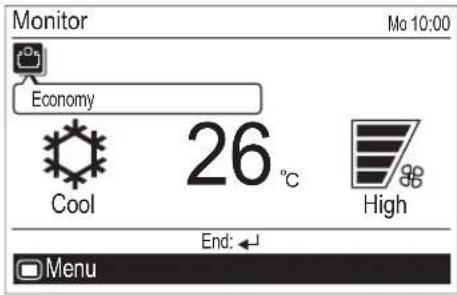
When you return to the "Monitor" screen, the icon is displayed. To check the function, press the [Enter button] and select the icon with the [Cursor button (Left/Right)].
● 3-2-2. Set temp. auto return setting
1 In "Function" screen, select [Set temp. auto return] with the [Cursor button (Up/Down)].
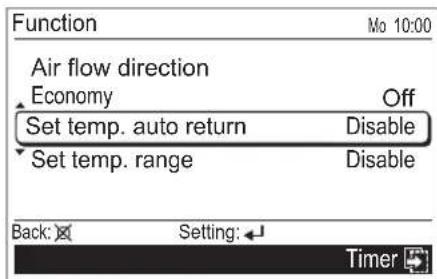
To change the setting, press the [Enter button].
2 "Set temp. auto return" screen is displayed.
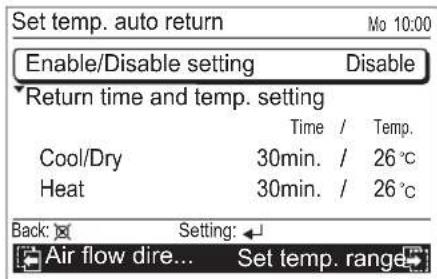
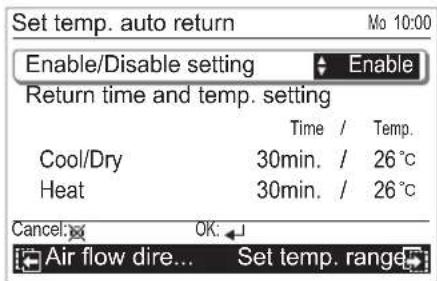
Select the item with the [Cursor button (Up/Down)], and press the [Enter button].
3 For [Enable/Disable setting], select [Enable] or [Disable] with the [Cursor button (Up/Down)], and press the [Enter button] to complete the setting.

4 For [Return time and temp. setting], select operation mode with the [Cursor button (Up/Down)], and press the [Enter button]. Adjust the value with the [Cursor button (Up/Down)].
With the [Cursor button (Left/Right)], the cursor can be switched [Time] and [Temp].
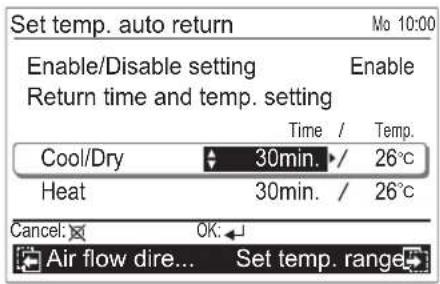
To complete the setting, press the [Enter button]. To return to the "Function" screen, press the [Cancel button].
i NOTES
- The set time can be set from 30 to 120 minutes in units of 10 minutes.
• Possible temperature setting ranges in the operation mode are as follows:
Cool, Dry 18 to 30 °C (64 to 88 °F)
Heat 16 to 30 °C (60 to 88 °F) - If any ranges have been set in [Set temp. range] setting, adjustable temperature range in this setting follows the restricted range.
- If you set any ranges in the [Set temp. range] setting after setting of [Set temp. auto return], the restricted range set in the [Set temp. range] also overrides [Set temp. auto return] setting.
- Even if the temperature setting change is done on the secondary remote controller, it returns to the set value in [Set temp. auto return] on the primary remote controller.
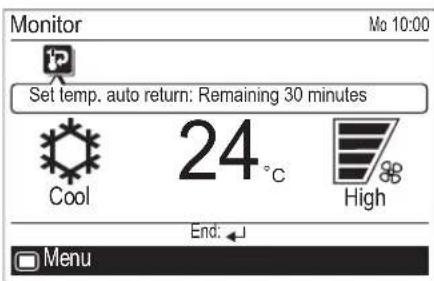
When you return to the "Monitor" screen, the icon is displayed. To check the function, press the [Enter button] and select the icon with the [Cursor button (Left/Right)].
● 3-2-3. Set temp. range limitation setting
1 In "Function" screen, select [Set temp. range] with the [Cursor button (Up/Down)].
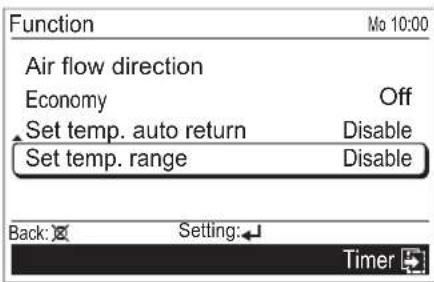
To change the setting, press the [Enter button].
2 "Set temp. range" screen is displayed.
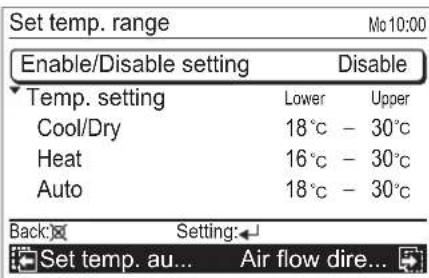
Select the item with the [Cursor button (Up/Down)], and press the [Enter button].
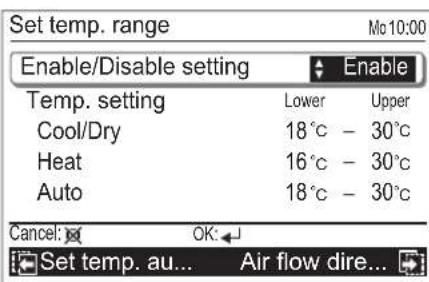
3 For [Enable/Disable setting], select [Enable] or [Disable] with the [Cursor button (Up/Down)], and press the [Enter button] to complete the setting.
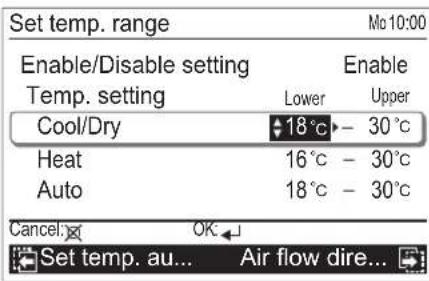
4 For [Temp. setting], select mode with the [Cursor button (Up/Down)] and press the [Enter button].
Adjust [Lower] and [Upper] value with the [Cursor button (Up/Down)].
With the [Cursor button (Left/Right)], the cursor can be switched [Lower] and [Upper].
To complete the setting, press the [Enter button].
i NOTES
- Possible temperature setting ranges in the operation mode are as follows:
Cool, Dry, Auto .... 18 to 30 °C (64 to 88 °F) Heat .... 16 to 30 °C (60 to 88 °F)
- If the temperature out of the Set temp. range limitation is set, it will be reset at the nearest temperature within the range.
- Even if the temperature setting change is done on the secondary remote controller, it returns to temperature within the range set in [Set temp. range] on the primary remote controller.
When you return to the "Monitor" screen, the icon is displayed. To check the function, press the [Enter button] and select the icon with the [Cursor button (Left/Right)].
4. TIMER SETTING
4-1. Switching to the "Timer" screen
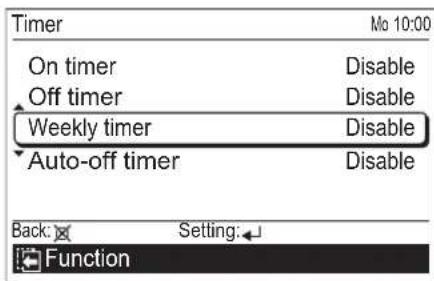
1 In "Menu" screen, select [Timer] with the [Cursor button (Up/Down)], and press the [Enter button].
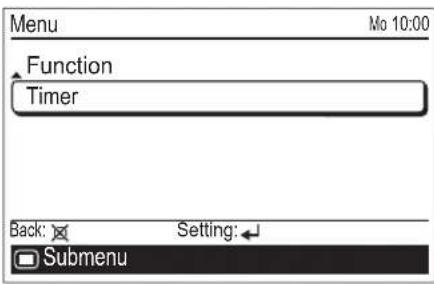
2 "Timer" screen is displayed. To return to the "Menu" screen, press the [Cancel button].
4-2. Timer setting items
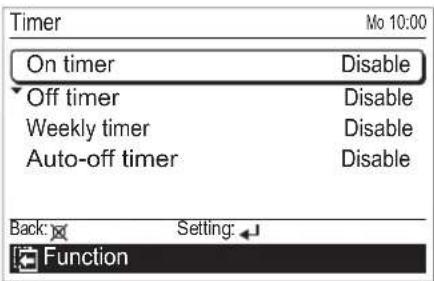
● 4-2-1. On timer setting
1 In "Timer" screen, select [On timer] with the [Cursor button (Up/Down)], and press the [Enter button].
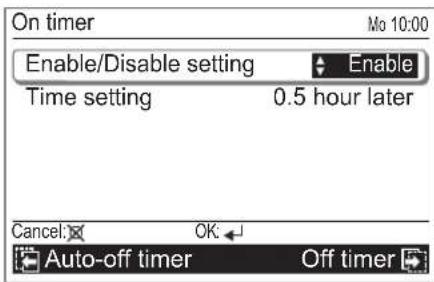
2 "On timer" screen is displayed.
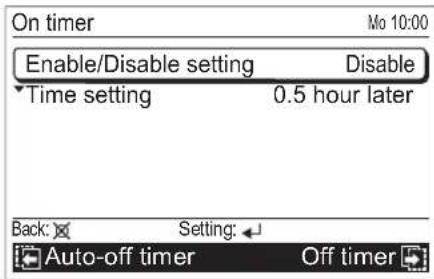
To change the setting, select the item with the [Cursor button (Up/Down)], and press the [Enter button].
3 For [Enable/Disable setting], select [Enable] or [Disable] with the [Cursor button (Up/Down)], and press the [Enter button] to complete the setting.
4 For [Time setting], adjust the time with the [Cursor button (Up/Down)], and press the [Enter button] to complete the setting.
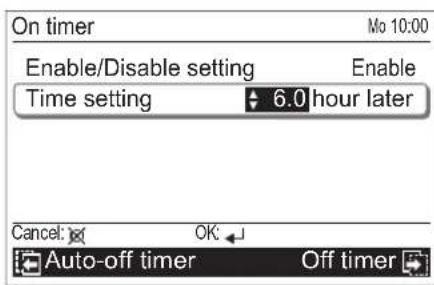
i NOTE
- The [Time setting] can be set up to 24 hours in units of 30 minutes.
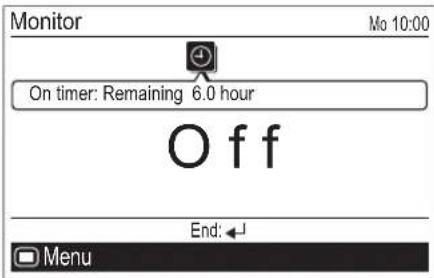
When you return to the "Monitor" screen, the icon is displayed. When the timer is enabled, the remaining time until the timer expires is displayed in the message balloon. To check the function, press the [Enter button] and select the icon with the [Cursor button (Left/Right)].
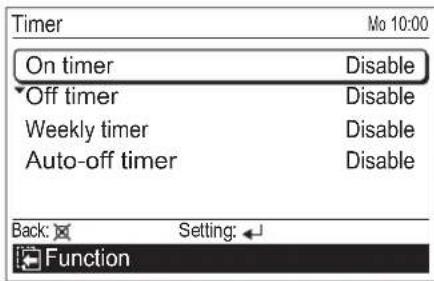
● 4-2-2. Off timer setting
1 In "Timer" screen, select [Off timer] with the [Cursor button (Up/Down)], and press the [Enter button].
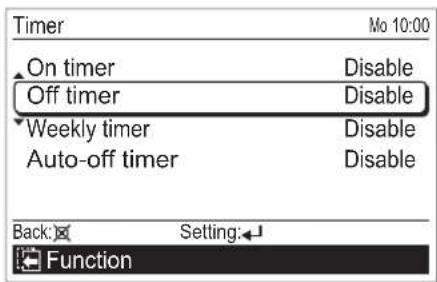
2 "Off timer" screen is displayed.

To change the setting, select the item with the [Cursor button (Up/Down)], and press the [Enter button].
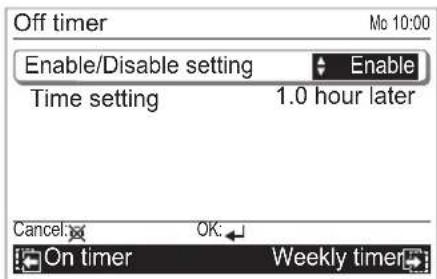
3 For [Enable/Disable setting], select [Enable] or [Disable] with the [Cursor button (Up/Down)], and press the [Enter button] to complete the setting.
4 For [Time setting], adjust the time with the [Cursor button (Up/Down)], and press the [Enter button] to complete the setting.
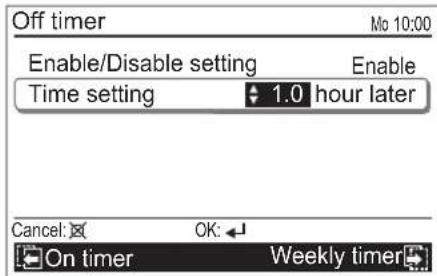
i NOTE
- The [Time setting] can be set up to 24 hours in units of 30 minutes.
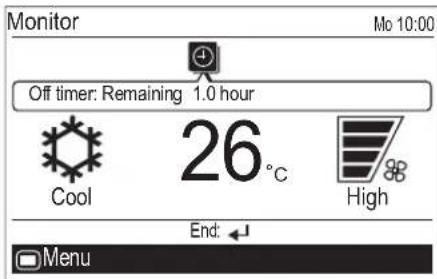
When you return to the "Monitor" screen, the icon is displayed. When the timer is enabled, the remaining time until the timer expires is displayed in the message balloon. To check the function, press the [Enter button] and select the icon with the [Cursor button (Left/Right)].
● 4-2-3. Weekly timer setting
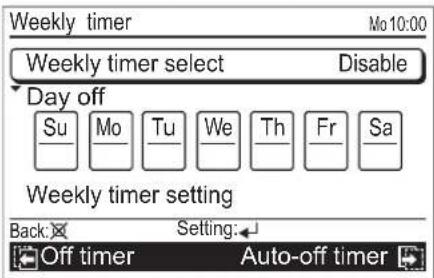
1 In "Timer" screen, select [Weekly timer] with the [Cursor button (Up/Down)], and press the [Enter button].
2 "Weekly timer" screen is displayed.
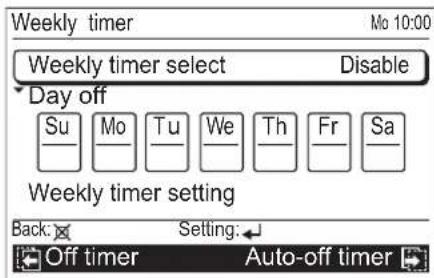
To change the setting, select the item with the [Cursor button (Up/Down)], and press the [Enter button].
En-13
3 To set up and activate the weekly timer, you need to configure following 2 items at least:
• Weekly timer select
• Weekly timer setting
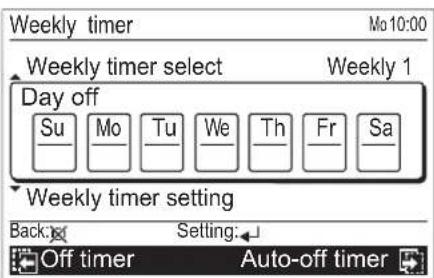
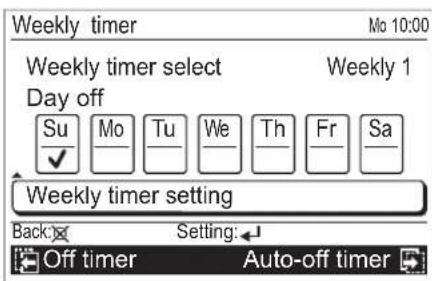
Weekly timer select:
In [Weekly timer select] setting, you can select [Weekly 1], [Weekly 2], or [Disable].
Each of [Weekly 1] and [Weekly 2] has scheduled timer setting configured in [Weekly timer setting].
- Select [Weekly timer select] with the [Cursor button (Up/Down)], and press the [Enter button].
- Select any of [Weekly 1], [Weekly 2], or [Disable] with the [Cursor button (Up/Down)], and press the [Enter button].

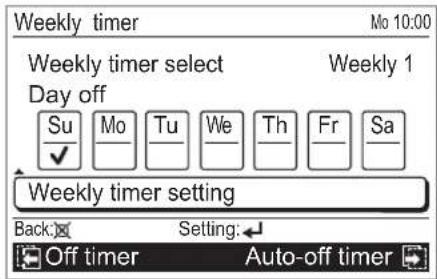
Day off setting:
In [Day off] setting, select the inapplicable days of the week if there are any days that you want to skip the weekly timer operation.
- Select [Day off] with the [Cursor button (Up/Down)], and press the [Enter button].
- Select the day of the week with the [Cursor button (Left/Right)] and enter check mark with the [Cursor button (Up/Down)].
To complete the day off setting, press the [Enter button].
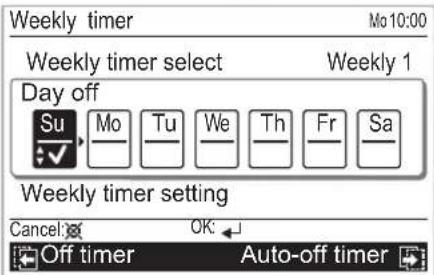
i NOTE
- Weekly timer skips the checked day of the week only once. From the next week, it will perform the scheduled weekly timer that is configured in [Weekly timer setting].
Weekly timer setting (without zone control):
*If your air-conditioning system is zone-controlled, go to "Weekly timer setting (with zone control)" on page 16.
In "Weekly timer setting" screen, you can setup the schedule for each of [Weekly 1] and [Weekly 2].
- Select [Weekly timer setting] with the [Cursor button (Up/Down)], and press the [Enter button].
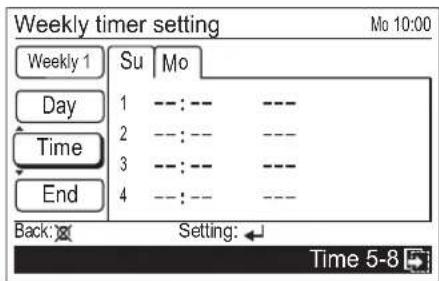
- "Weekly timer setting" screen (Time 1-4) opens.
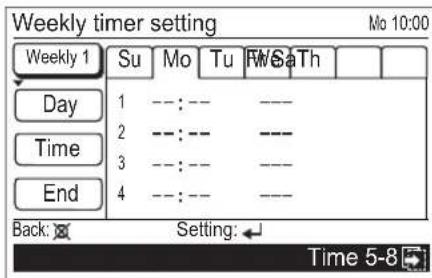
i NOTE
- "Weekly timer setting" screen consists of 2 pages "Time 1-4" and "Time 5-8". You can set 4 patterns per page, and with pressing the [Screen switch button (Left/Right)], the screen switches between "Time 1-4" and "Time 5-8" during the setting.

- Press the [Enter button]. Then select [Weekly 1] or [Weekly 2] with the [Cursor button (Up/Down)], and press the [Enter button].
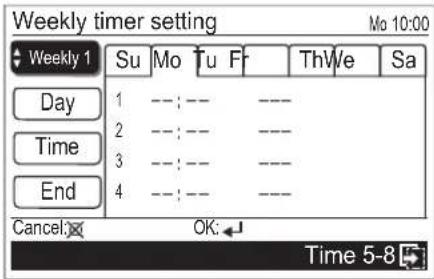
- Select applicable days of the week as follows:
(1) Select [Day] with the [Cursor button (Up/Down)] and press the [Enter button].
(2) Setting screen for the current day of the week opens.
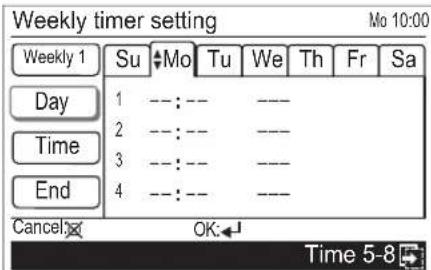
(3) Select applicable day of the week with the [Cursor button (Left/Right)], and press the [Cursor button (Up/Down)]. Selected day of the week is highlighted.
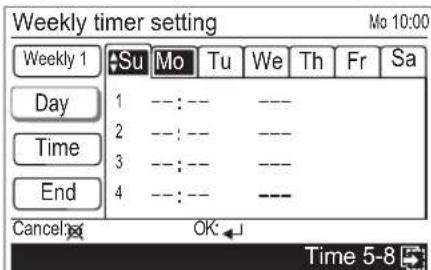
Only the selected days of the week are displayed when you press the [Enter button].
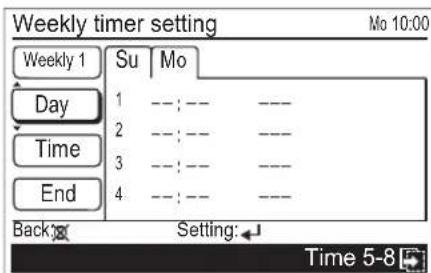
If you press the [Cancel button] here, the selection of the day will be canceled.
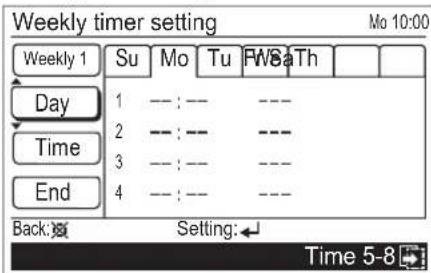
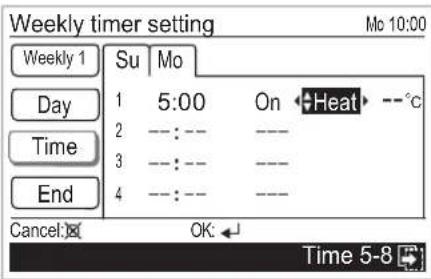
- Set the desired conditions on the timer, such as time setting of On/Off timer, On/Off, operating mode (only for the On timer), and temperature (only for the On timer), up to 8 patterns per selected day as follows:
(1) Select [Time] with the [Cursor button (Up/Down)] and press the [Enter button].
(2) Move the cursor between each pattern number with the [Cursor button (Up/Down)], and press the [Cursor button (Left/Right)] to set the time setting of On/Off timer, On/Off, operating mode and temperature for each pattern.
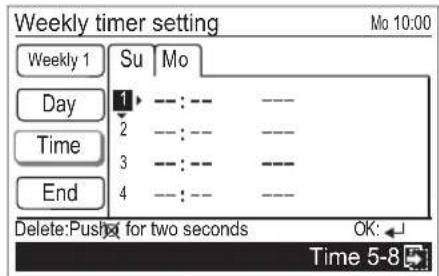

NOTE
- To delete the setting, move the cursor to the pattern number, and press the [Cancel button] for 2 seconds.
(3) Adjust time setting of On/Off timer with the [Cursor button (Up/Down)].
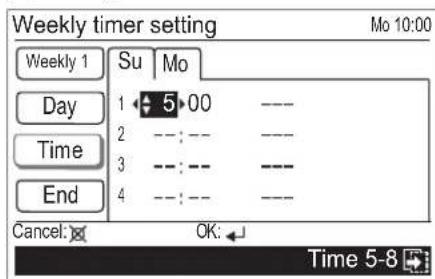
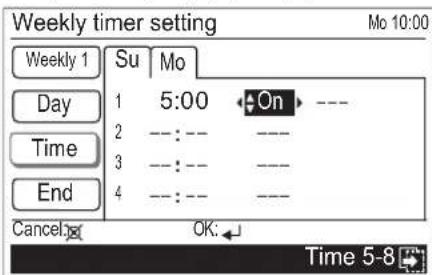
(4) Select [On] (On timer) or [Off] (Off timer) with the [Cursor button (Up/Down)]. When you selected [Off] (Off timer) here, skip following step (5) and (6).
En-15
(5) When you selected [On] (On timer), select the operating mode with the [Cursor button (Up/Down)].
(6) When you selected [On] (On timer), adjust the value to the desired temperature with the [Cursor button (Up/Down)].
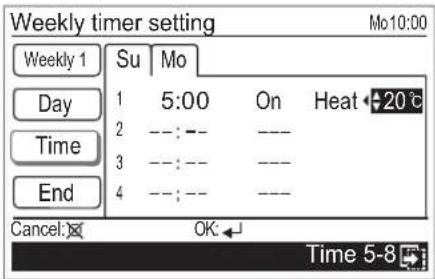
i NOTES
- When you set "On timer", you need to set both of the operating mode and the temperature firmly.
Without these configurations, the timer will not work. - Possible temperature setting ranges in the operation mode are as follows:
Cool, Dry, Auto .... 18 to 30 °C (64 to 88 °F) Heat .... 16 to 30 °C (60 to 88 °F) - If the temperature out of the Set temp. range limitation is set, it will be reset at the nearest temperature within the range. However, the adjusted temperature value in this setting will not be corrected automatically.
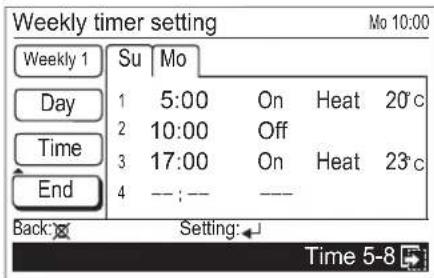
(7) To complete the [Time] setting, press the [Enter button]. When setting the other days of the week continually, perform procedures in step 4 and 5. - To finalize the setting you have set in step 5, select [End] with the [Cursor button (Up/Down)] and press the [Enter button].
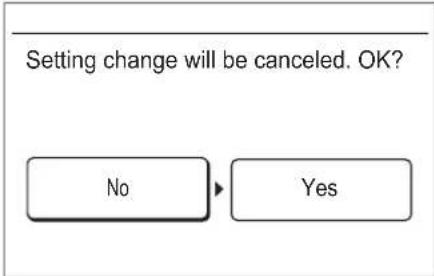
If you press the [Cancel button] before you finalize the setting, following cancel confirmation screen is displayed.
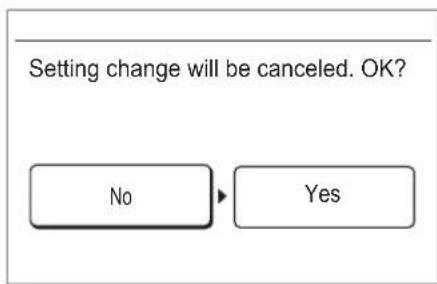
Select [No] or [Yes] with the [Cursor button (Left/Right)], and press the [Enter button].
If you select [Yes] and press the [Enter button] here, all the configured items in step 5 will be canceled.
If you select [No] and press the [Enter button] here, the "Weekly timer setting" screen is displayed. To finalize the setting, select [End] with the [Cursor button (Up/Down)] and press the [Enter button].
i NOTE
- When the "Weekly timer setting" screen is displayed again after finalizing the setting, the set patterns you have registered will be sorted in time order. (Sorting function)
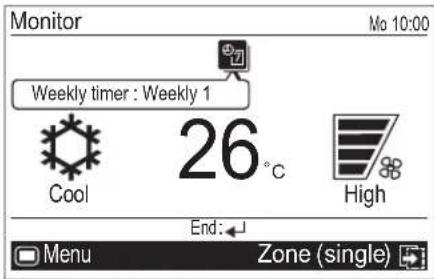
When you return to the "Monitor" screen, the icon is displayed. To check the function, press the [Enter button] and select the icon with the [Cursor button (Left/Right)].
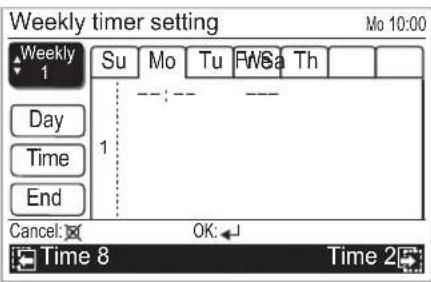
Weekly timer setting (with zone control):
In "Weekly timer setting" screen, you can setup the schedule for each of [Weekly 1] and [Weekly 2].
- Select [Weekly timer setting] with the [Cursor button (Up/Down)], and press the [Enter button].
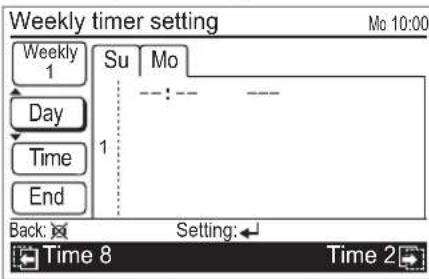
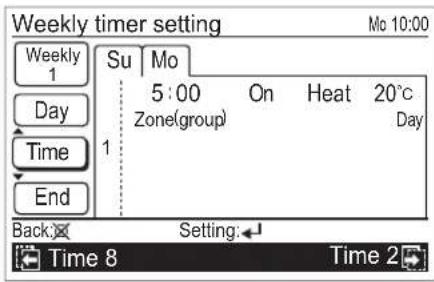
- "Weekly timer setting" screen (Time 1) opens.
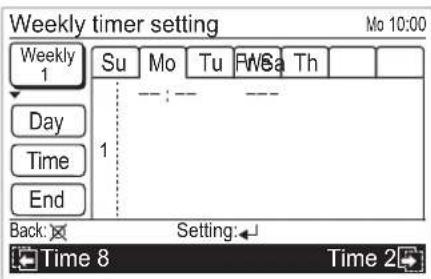
i NOTE
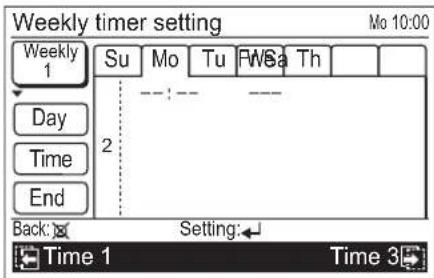
- "Weekly timer setting" screen consists maximum of 8 pages, from "Time 1" to "Time 8". You can set one pattern per page, and maximum of 8 pattern per a day. With pressing the [Screen switch button (Left/Right)] during setting, the screen switches to the previous page or the next page.
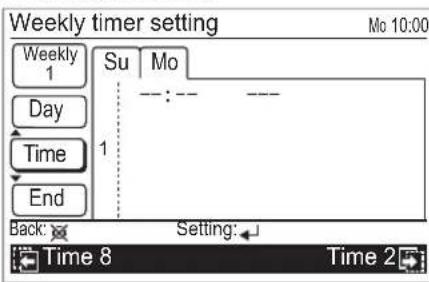
Example: When the [Screen switch button (Right)] is pressed once on page "Time 1".
- Press the [Enter button]. Then select [Weekly 1] or [Weekly 2] with the [Cursor button (Up/Down)], and press the [Enter button].
- Select applicable days of the week as follows:
(1) Select [Day] with the [Cursor button (Up/Down)], and press the [Enter button].
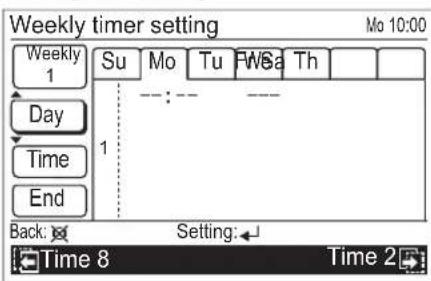
(2) Setting screen for the current day of the week opens.
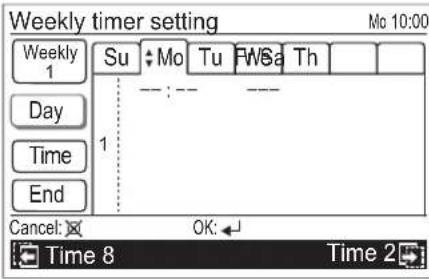
(3) Select applicable day of the week with the [Cursor button (Left/Right)], and press the [Cursor button (Up/Down)]. Selected day of the week is highlighted.
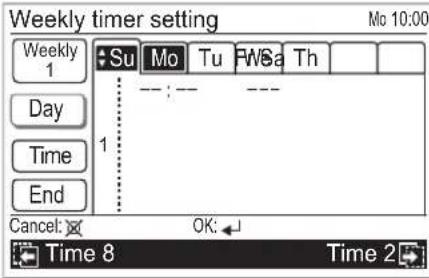
Only the selected days of the week are displayed when you press the [Enter button].
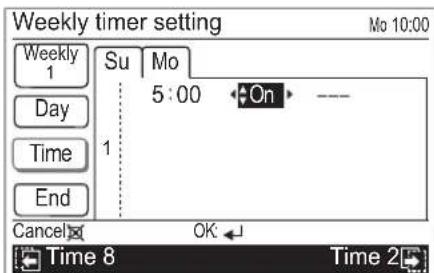
- Set the desired conditions on the timer, such as time setting of On/Off timer, On/Off, operating mode (only for the On timer), and temperature (only for the On timer), up to 8 patterns per selected day.
(1) Select [Time] with the [Cursor button (Up/Down)], and press the [Enter button].
(2) Select the pattern number with the [Cursor button (Up/Down)]. Then press the [Cursor button (Right)] to set the time setting of On/Off timer, On/Off, operating mode, and temperature for the current selected pattern.
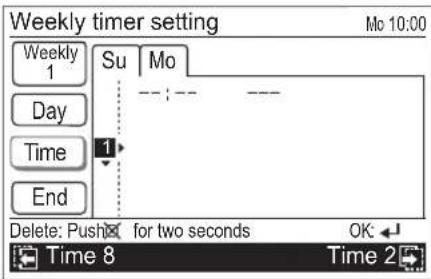

NOTE
• To delete the setting, move the cursor to the pattern number, and press the [Cancel button] for 2 seconds.
(3) Adjust time setting of On/Off timer with the [Cursor button (Up/Down)].
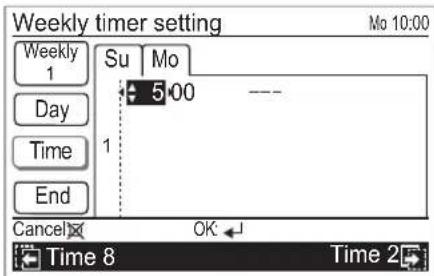
(4) Select [On] (On timer) or [Off] (Off timer) with the [Cursor button (Up/Down)].
When you selected [Off] (Off timer), the necessary setting for this pattern is completed here. If you continue to set other pattern, press the [Cursor button (Right)]. If you complete all of the setting on timer conditions for each pattern here, proceed to step 6.
(5) When you selected [On] (On timer), select the operating mode with the [Cursor button (Up/Down)].
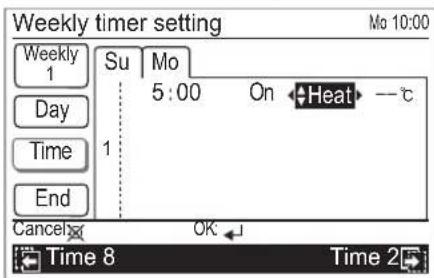
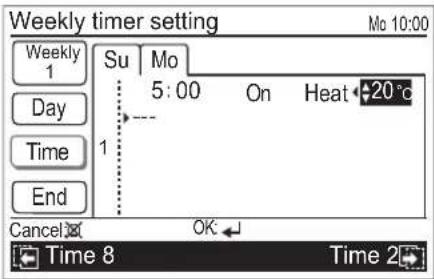
(6) When you selected [On] (On timer), adjust the value to the desired temperature with the [Cursor button (Up/Down)].

NOTES
- Possible temperature setting ranges in the operation mode are as follows:
Cool, Dry, Auto ...... 18 to 30 °C (64 to 88 °F)
Heat 16 to 30 °C (60 to 88 °F)
- If the temperature out of the Set temp. range limitation is set, it will be reset at the nearest temperature within the range. However, the adjusted temperature value in this setting will not be corrected automatically.
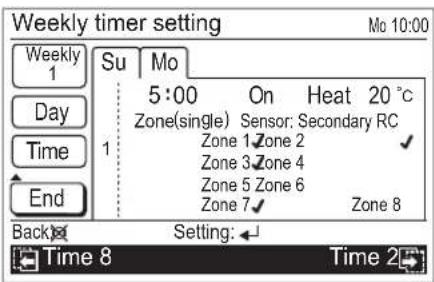
(7) Select [Zone (single)] (individual setting of zone control) or [Zone (group)] (simultaneous setting of zone control) as follows:
Individual setting of zone control:
Select [Zone (single)] with the [Cursor button (Up/Down)]. Then press the [Cursor button (Right)] to move the cursor to next setting item.
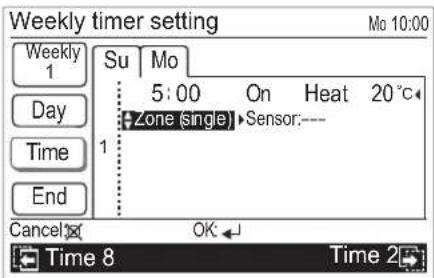
Select the room-temperature sensor with the [Cursor button (Up/Down)]. Then press the [Cursor button (Right)] to move the cursor to next setting item.
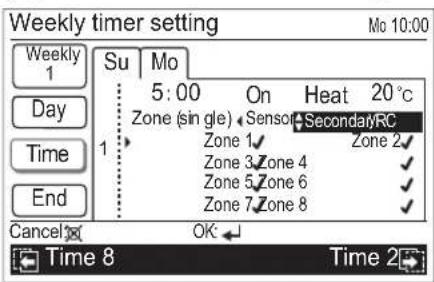

Select applicable zone name with the [Cursor button (Left/Right)], and press the [Cursor button (Up/Down)] to mark a check.
Check-marked: The zone is air-conditioned. Blank: The zone is not air-conditioned.

After you select all the applicable zones, press the [Enter button] to complete the individual setting of zone control.
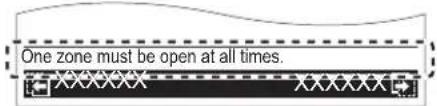
NOTES
- When you set "On timer", you need to set all of operating mode, temperature, room-temperature sensor, and applicable zone(s).
Without these configurations, the timer will not work. - Depending on the initial setup in the installation, there is a case that at least one zone need to be selected. In that case, following message is displayed on the screen, and you need to put a check mark at least one zone.
Simultaneous setting of zone control: Select [Zone (group)] with the [Cursor button (Up/Down)]. Then press the [Cursor button (Right)] to move the cursor to next setting item.
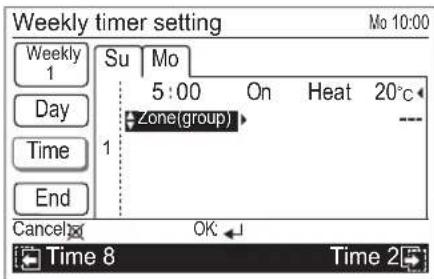
Select the applicable group with the [Cursor button (Up/Down)].
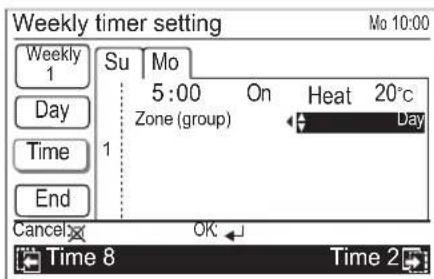
To complete the simultaneous setting of zone control, press the [Enter button].
(8) When setting the other days of the week continually, perform procedures in step 4 and 5.
- To finalize the setting you have set in step 5, select [End] with the [Cursor button (Up/Down)], and press the [Enter button].
Example: Weekly timer setting screen for Zone (single)
If you press the [Cancel button] before you finalize the setting, following cancel confirmation screen is displayed.
Select [No] or [Yes] with the [Cursor button (Left/Right)], and press the [Enter button].
If you select [Yes] and press the [Enter button] here, all the configured items in step 5 will be canceled.
If you select [No] and press the [Enter button] here, the "Weekly timer setting" screen is displayed. To finalize the setting, select [End] with the [Cursor button (Up/Down)] and press the [Enter button].
i NOTES
- If any names have been registered for zones and sensors in [Zone user setting], the registered names are displayed on this screen.
• Only connected zones and sensor are displayed. - When the "Weekly timer setting" screen is displayed again after finalizing the setting, the set patterns you have registered will be sorted in time order. (Sorting function)
When you return to the "Monitor" screen, the icon is displayed. To check the function, press the [Enter button] and select the icon with the [Cursor button (Left/Right)].
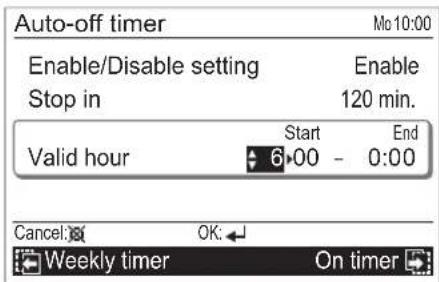
● 4-2-4. Auto-off timer setting
1 In "Timer" screen, select [Auto-off timer] with the [Cursor button (Up/Down)], and press the [Enter button].
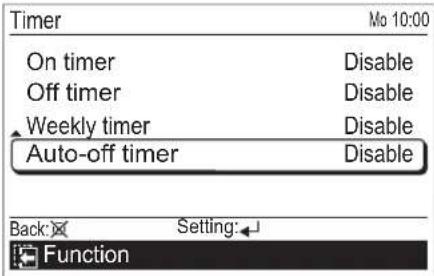
2 "Auto-off timer" screen is displayed.
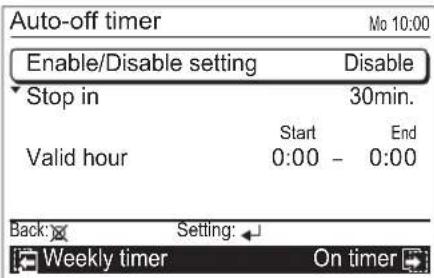
To change the setting, select the item with the [Cursor button (Up/Down)], and press the [Enter button].
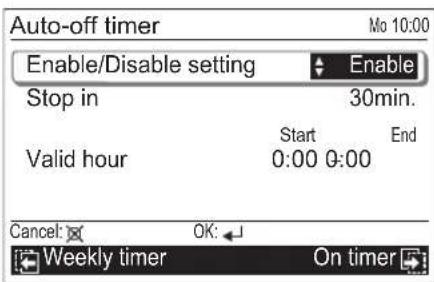
3 For [Enable/Disable setting], select [Enable] or [Disable] with the [Cursor button (Up/Down)], and press the [Enter button] to complete the setting.
4 For [Stop in], adjust the timer with the [Cursor button (Up/Down)]. To complete the setting, press the [Enter button].
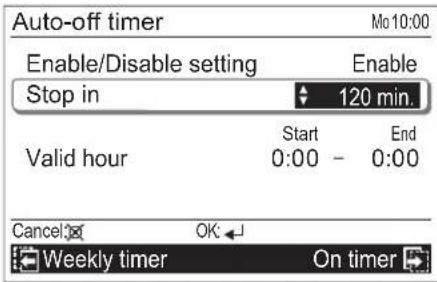
i NOTE
- The set time can be set from 30 to 240 minutes in units of 10 minutes.
5 For [Valid hour], applicable time slot for the Auto-off timer can be set. Set the time with the [Cursor button (Up/Down)], and press the [Enter button].
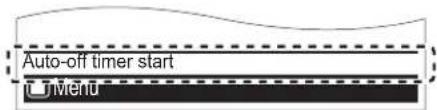
i NOTES
- Counting down of the Auto-off timer is valid only if the air conditioning operation has been started with the [On/Off button] of this remote controller. When Auto-off timer become active, following message is displayed on the screen.
- Even if the valid hour is ended during Auto-off timer is working, the function will work after the set time in [Stop in] elapsed.
- The timer started counting down within the valid hour of the function, even if the current time is being out of the valid hour during the counting down, the function works.
- If the air conditioning operation is On by Weekly timer after counting down of Auto-off timer has started, the Auto-off timer will not work.
When you return to the "Monitor" screen, and current time is within the valid hour, the icon is displayed as follows.
To check the function, press the [Enter button] and select the icon with the [Cursor button (Left/Right)].
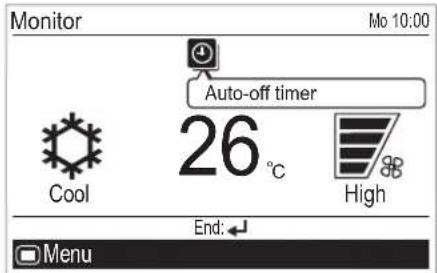
If the current time is out of the valid hour, the icon will be displayed as follows:

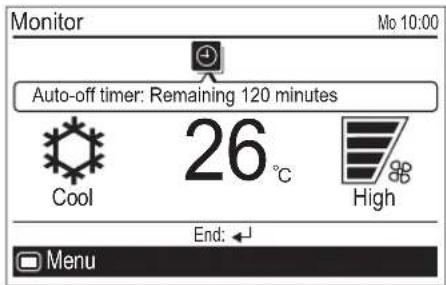
Displayed icon color and the message differs by the condition as follows:
- Current time is within the valid hour, and the operation has been started by pressing the [On/Off button]:
When the Auto-off timer is enabled, white icon on black background and the message balloon with the remaining time until the timer expires are displayed.
5. SUBMENU SETTING
5-1. Switching to the "Submenu" screen
When [Menu button] is pressed twice while "Monitor" screen is displayed, it switches to the "Submenu" screen. (If [Menu button] is pressed while the "Submenu" screen is displayed, the display returns to the "Monitor" screen.)
![Submenu [1/2]► Date and time Screen Filter sign R.C. sensor control Off Room temp. display Off Back: Setting: Monitor](/content/2026/06/1202196/images/e5802e7c0b5c09b7420ced920802c27e683b6f3442e947c41ef7cc0108fc2395.jpg)
5-2. Date/Time setting
In "Submenu" screen, select [Date and time] with the [Cursor button (Up/Down)], and press the [Enter button].
![Submenu [1/2]► Mo 10:00 Date and time Screen Filter sign R.C. sensor control Off Room temp. display Off Back: Setting: Monitor](/content/2026/06/1202196/images/7619466ec8475d14a1b1e2116221a019d13413a1e4ed966b34a3e611b0eb5756.jpg)
"Date and time" screen is displayed.
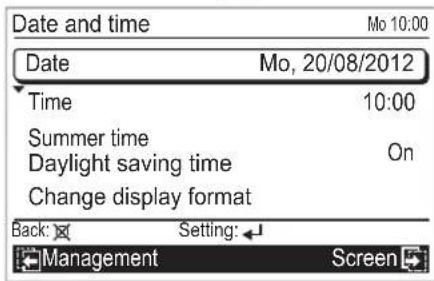
- 5-2-1. Date setting
1 In "Date and time" screen, select [Date] with the [Cursor button (Up/Down)], and press the [Enter button].
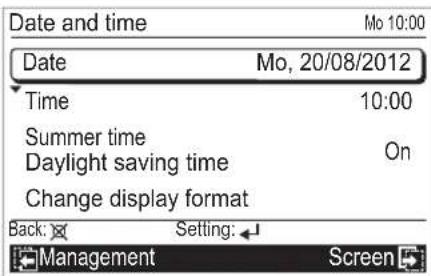
2 "Date" screen is displayed.
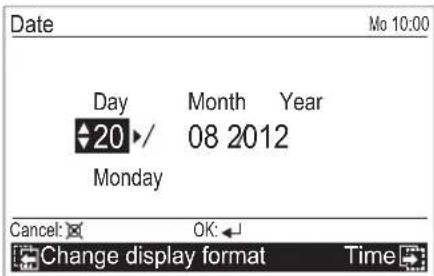
Select the setting items (Day, Month, or Year) with the [Cursor button (Left/Right)] and set the value with the [Cursor button (Up/Down)].
To complete the setting, press the [Enter button]. The screen returns to the "Date and Time" screen.
i NOTE
- Display format of date depends on the setting. Refer to "5-2-4. Change display format setting".
● 5-2-2. Time setting
1 In "Date and time" screen, select [Time] with the [Cursor button (Up/Down)], and press the [Enter button].
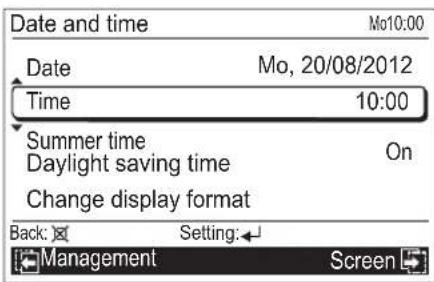
2 "Time" screen is displayed. Select the setting items (hour, min., or AM/PM) with the [Cursor button (Left/Right)] and set with the [Cursor button (Up/Down)]. When setting the minutes, setting can be completed quickly if the button is pressed continuously.
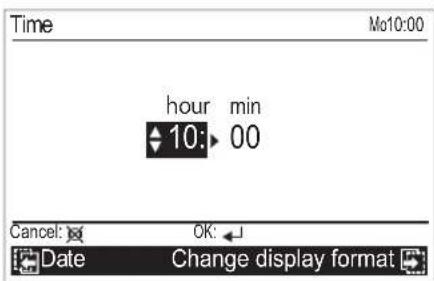
To complete the setting, press the [Enter button]. The screen returns to the "Date and Time" screen.
i NOTES
- Display format of time depends on the setting. Refer to "5-2-4. Change display format setting".
• Even when summer time (daylight saving time) is applied, set the standard time here.
Set On/Off with "5-2-3. Summer time (Daylight saving time) setting".
● 5-2-3. Summer time (Daylight saving time) setting
i NOTE
- Set only for users in an area where summer time (daylight saving time) is applicable.
1 In "Date and time" screen, select [Summer time (daylight saving time)] with the [Cursor button (Up/Down)], and press the [Enter button].
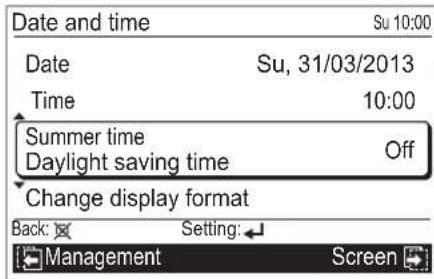
2 Select [On] or [Off] with the [Cursor button (Up/Down)].
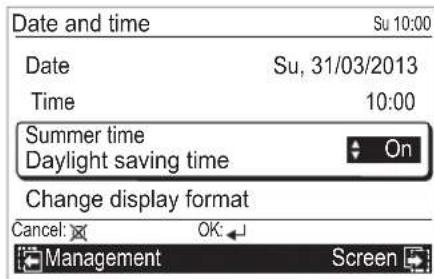
To complete the setting, press the [Enter button]. Screen returns to the "Date and Time" screen.
i NOTE
- When it is set to [On], the time 1-hour in advance from the standard time is displayed. When it is set to [Off], the standard time is displayed.
● 5-2-4. Change display format setting
1 In "Date and time" screen, select [Change display format] with the [Cursor button (Up/Down)], and press the [Enter button].
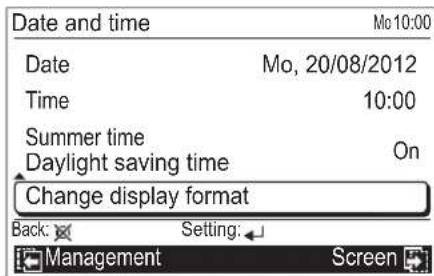
2 "Change display format" screen is displayed. Select the setting items (Date format or Time format) with the [Cursor button (Left/Right)] and set with the [Cursor button (Up/Down)].
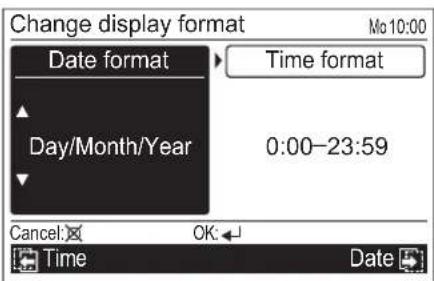
Available display formats are as follows:
Date format: Time format:
• Day/Month/Year • 0:00-23:59
• Month/Day/Year • 0:00-11:59 AM/PM
• Year/Month/Day • 12:00-11:59 AM/PM
To complete the setting, press the [Enter button].
The screen returns to the "Date and Time" screen.
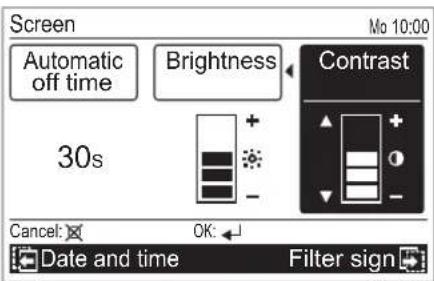
5-3. Screen setting
In "Submenu" screen, select [Screen] with the [Cursor button (Up/Down)], and press the [Enter button].
![Submenu [1/2]► Date and time Screen Filter sign R.C. sensor control Off Room temp. display Off Back: Setting: Monitor](/content/2026/06/1202196/images/aa0a32a0f82b9a771f2cc2490d8cb5ec00ae33afd24e1695b394ac6c94c89413.jpg)
"Screen" screen is displayed.
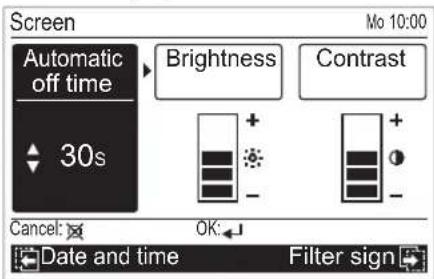
● 5-3-1. Automatic off time setting
1 In "Screen" screen, select [Automatic off time] with the [Cursor button (Left/Right)], and set with the [Cursor button (Up/Down)].
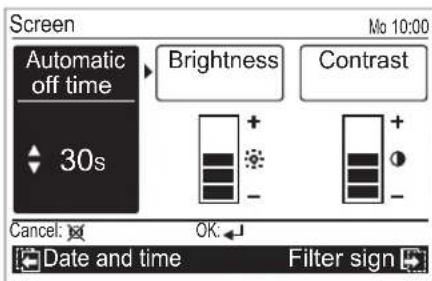
Configurable values of [Automatic off time] are as follows:
· 30s
· 60s
- Off (No illumination)

NOTE
- When the backlight is turned off by the [Automatic off time], the first button operation is not effective, and illuminates the backlight.
If [Automatic off time] is set to [Off], it is effective from the first button operation.
2 Other screen setting items can be set continually. To complete the setting, press the [Enter button].
Screen returns to the "Submenu" screen.
● 5-3-2. Brightness setting
1 In "Screen" screen, select [Brightness] with the [Cursor button (Left/Right)], and set with the [Cursor button (Up/Down)].
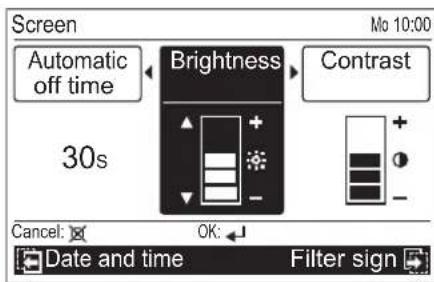

NOTES
• The set is reflected while setting it.
- When the automatic off time setting is set in "Off", Brightness setting is not displayed (It is not possible to set it).
2 Other screen setting items can be set continually. To complete the setting, press the [Enter button].
Screen returns to the "Submenu" screen.
En-23
- 5-3-3. Contrast setting
1 In "Screen" screen, select [Contrast] with the [Cursor button (Left/Right)], and set with the [Cursor button (Up/Down)].
i NOTE
• The set is reflected while setting it.
2 Other screen setting items can be set continually. To complete the setting, press the [Enter button].
Screen returns to the "Submenu" screen.
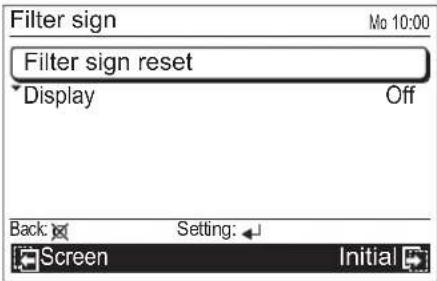
5-4. Filter sign setting
i NOTE
- This function can be used only if the setting is activated in the installation. To activate this function, consult authorized service personnel.
In "Submenu" screen, select [Filter sign] with the [Cursor button (Up/Down)], and press the [Enter button].
![Submenu [1/2]► Date and time Screen Filter sign R.C. sensor control Off Room temp. display Off Back: Setting:◀ Monitor](/content/2026/06/1202196/images/dd18cbc184b510c441829981161b035a7812814cd5bce910c6505af5bdc3b932.jpg)
"Filter sign" screen is displayed.
● 5-4-1. Filter sign reset setting
If filter sign icon is displayed on the "Monitor" screen, clean the air filter on the relevant indoor unit first, and then reset the filter sign as follows:
i NOTE
- Before resetting the filter sign on this remote controller, clean the air filter on the relevant indoor unit. Refer to "7. CLEANING AND CARE".
1 In the "Filter sign" screen, select [Filter sign reset] with the [Cursor button (Up/Down)], and press the [Enter button].
Following screen is displayed.
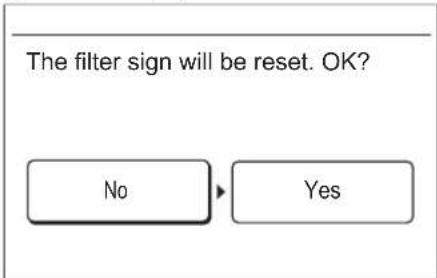
2 Select [Yes] or [No] with the [Cursor button (Left/Right)], and press the [Enter button]. When [Yes] is selected, the filter sign icon on the display is turned off.
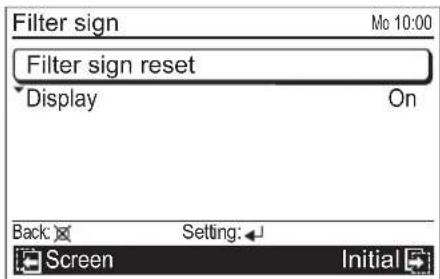
● 5-4-2. Display setting
You can select [On] (display) or [Off] (non-display) for the filter sign icon indication.
i NOTE
- When you set this setting to [Off], the filter sign icon will not be displayed regardless of the necessity of filter cleaning on the indoor unit.
1 In the "Filter sign" screen, select [Display] with the [Cursor button (Up/Down)], and press the [Enter button].
Following screen is displayed.
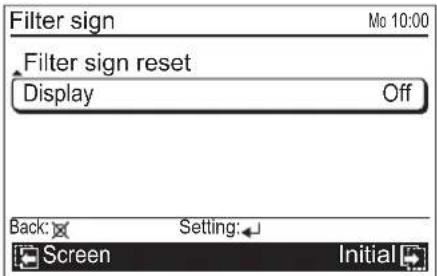

2 Select [On] or [Off] with the [Cursor button (Up/Down)], and press the [Enter button].
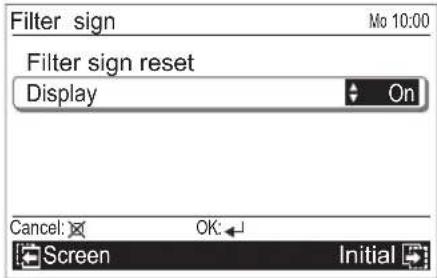
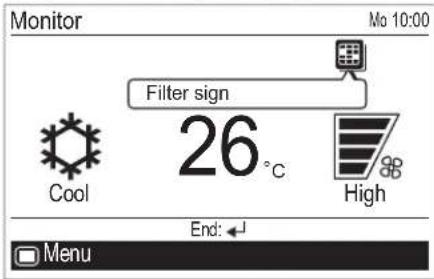
When you set this setting to [On], and air filter cleaning on the indoor unit is required, the icon is displayed on the "Monitor" screen.
To check the function, press the [Enter button] and select the icon with the [Cursor button (Left/Right)].
5-5. R.C. sensor control setting
i NOTE
- This function can be used only if the setting is activated in the installation. To activate this function, consult authorized service personnel.
1 In "Submenu" screen, select [R.C. sensor control] with the [Cursor button (Up/Down)], and press the [Enter button].
![Submenu [1/2]► Date and time Screen Filter sign R.C. sensor control Off Room temp. display Off Back: Setting:← Monitor](/content/2026/06/1202196/images/b2aa96ff392aba3fa1f6d3511578abdf3857721c0add21a178e7f27abe53aafc.jpg)
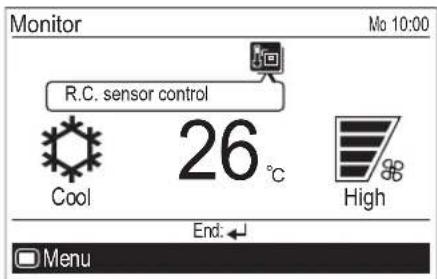
2 Select [On] or [Off] with the [Cursor button (Up/Down)], and press the [Enter button].
![Submenu [1/2] Date and time Screen Filter sign R.C. sensor control On Room temp. display Off Cancel: OK Monitor](/content/2026/06/1202196/images/5e9959e36eddd842fc0ba9f9910b553b9665fa9b2a488b379d8089f58a22c170.jpg)
En-25
When you set this setting to [On], the icon is displayed on the "Monitor" screen.
To check the function, press the [Enter button] and select the icon with the [Cursor button (Left/Right)].
5-6. Room temp. display setting
1 In "Submenu" screen, select [Room temp. display] with the [Cursor button (Up/Down)], and press the [Enter button].
![Submenu [1/2]► Date and time Screen Filter sign R.C. sensor control Off Room temp. display Off Back: Setting: Monitor](/content/2026/06/1202196/images/6e87a1300d7c5e286916a0530bdec2b4d1b3e3930d9b7c1a0ca66dba40a91a7f.jpg)
2 Select [On] or [Off] with the [Cursor button (Up/Down)], and press the [Enter button].
![Submenu [1/2] Mo 10:00 Date and time Screen Filter sign R.C. sensor control Off Room temp. display On Cancel: OK Monitor](/content/2026/06/1202196/images/9c1f83a34d0e7b22a2382622e6870bba47caef757a3b53bea667e1fe3905c5c3.jpg)
When you set this setting to [On], the room temperature is displayed on the screen.
i NOTE
- Displayed room temperature is the approximate temperature detected around this remote controller, and it could be different from the actual room temperature. It also be influenced by the installation environment of the remote controller.
5-7. Key lock select setting
A locking function is provided to prevent careless operation by children or outsiders. Release the lock on the "Monitor" screen when operating.
To lock up:
When the [Cancel button] is pressed for about 3 seconds or more continuously on the "Monitor" screen.
To release the lock:
When the [Cancel button] is pressed for about 3 seconds or more continuously on the "Monitor" screen, the lock is released, and each applicable lock name on the screen turns off.
Following key lock functions are available:
-Child lock: Restricts all the button operation
- Part lock: Restricts the [Menu button] operation
When [Child lock] is set
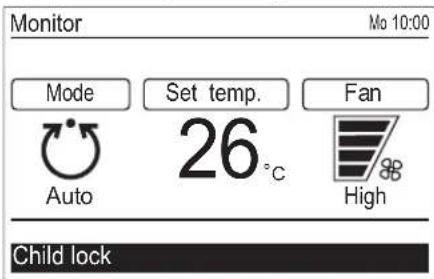
When [Part lock] is set
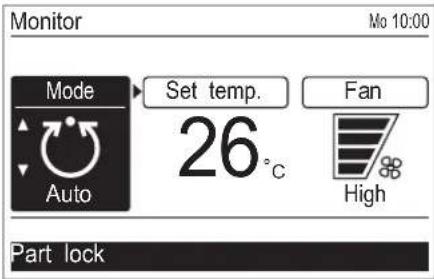
NOTE
- [Child lock] or [Part lock] indicator blinks when the restricted button operation is performed.
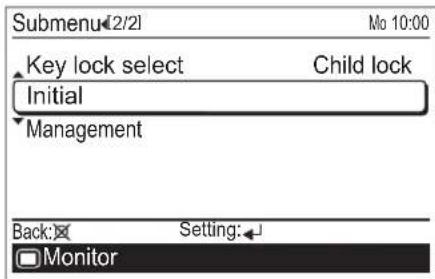
When switching [Child lock] and [Part lock]:
1 In "Submenu" screen, select [Key lock select] with the [Cursor button (Up/Down)], and press the [Enter button].
![Submenu [2/2] Mo 10:00 Key lock select Child lock Initial Management Back Setting: Monitor](/content/2026/06/1202196/images/4dec6abd1abfb051d5367e411320e0753540e6f060b335745a94c5cb5cfb3ee2.jpg)
2 Select [Child lock] or [Part lock] with the [Cursor button (Up/Down)], and press the [Enter button].
![Submenu [2/2] Mo 10:00 Key lock select Child lock Initial Management Cancel: OK ← Monitor](/content/2026/06/1202196/images/2e0e73909312957b438063f2b7e31004198a95eea5d2122754ff03c74f6a6815.jpg)
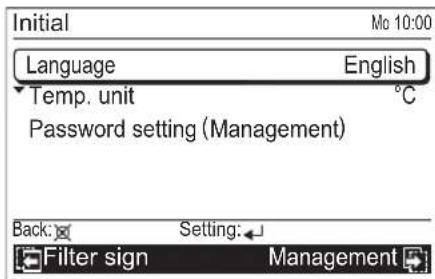
5-8. Initial setting
In "Submenu" screen, select [Initial] with the [Cursor button (Up/Down)], and press the [Enter button].
"Initial" screen is displayed.
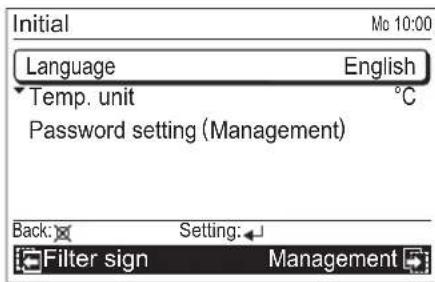
- 5-8-1. Language setting
NOTE
- In zone-controlled system, [Language] setting cannot be performed, and the setting item is not displayed on the screen. Only English guidance is available.
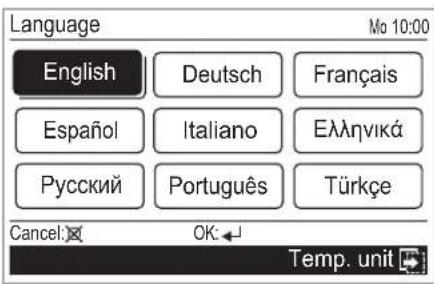
1 In "Initial" screen, select [Language] with the [Cursor button (Up/Down)], and press the [Enter button].
En-26
2 Select the desired language with the [Cursor button] and press the [Enter button].
The screen returns to the "Initial" screen and displays the selected language.
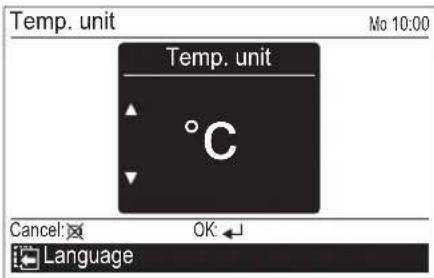
● 5-8-2. Temperature unit setting
1 In "Initial" screen, select [Temp. unit] with the [Cursor button (Up/Down)], and press the [Enter button].
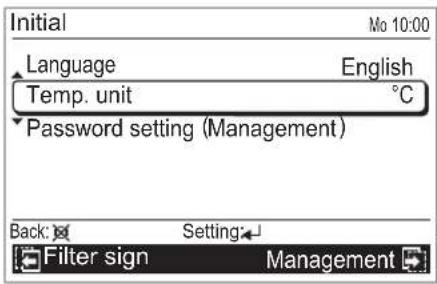
2 Select [°C] or [°F] with the [Cursor button (Up/Down)] and press the [Enter button].
The screen returns to the "Initial" screen.
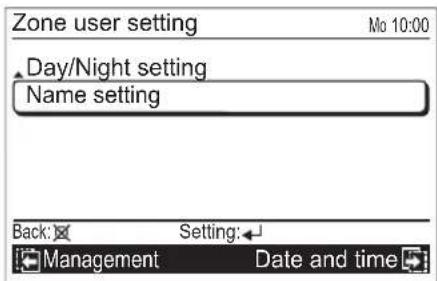
5-9. Zone user setting \*
In "Submenu" screen, select [Zone user setting] with the [Cursor button (Up/Down)], and press the [Enter button].
![Submenu [2/2] Mo 10:00 Initial Management Zone user setting Back: Setting: Monitor](/content/2026/06/1202196/images/2b3318836906b98acbc6ac6a685a67df49c1193d7bf9cc50fcb024950c43716b.jpg)
"Zone user setting" screen opens.
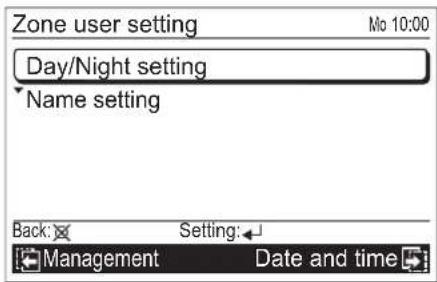
● 5-9-1. Day/Night setting
You can register zone(s) and room-temperature sensor to each group of "Day" and "Night".
1 In "Zone user setting" screen, select [Day/Night setting] with the [Cursor button (Up/Down)], and press the [Enter button].
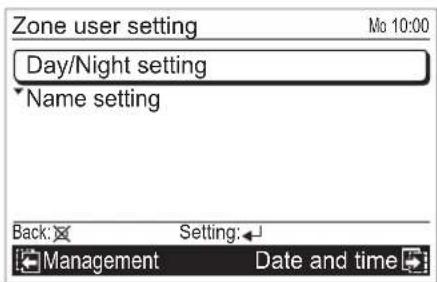
"Day/Night setting" screen opens.

2 Select [Day setting] for the registration of group "Day", and select [Night setting] for the registration of group "Night", with the [Cursor button (Up/Down)]. When you press the [Enter button], registerable zones and room-temperature sensor are displayed.
As an setting example, Zone 1 to 8 are supposed to be connected in "Day setting" screen in following instructions.
Setting procedures are common to [Day setting] and [Night setting].
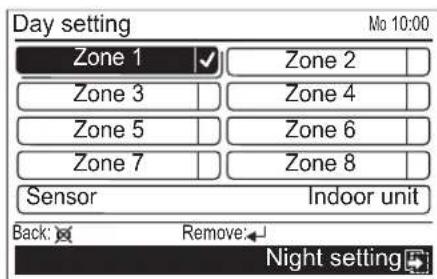
En-27
3 Select zone to be registered in the group with the [Cursor button]. When you press the [Enter button], a check mark is displayed.
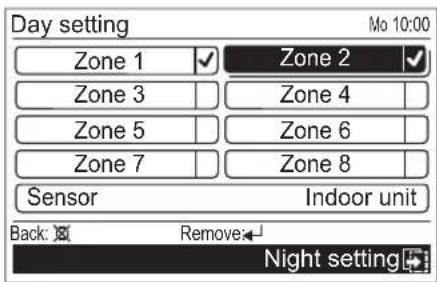
To remove the check mark, adjust the cursor to the zone name to be unchecked, and press the [Enter button] again.
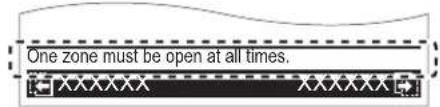
i NOTE
- Depending on the initial setup in the installation, not the all of the check-mark fields cannot be kept blank. In that case, following message is displayed on the screen, and you need to put a check mark at least one zone.
4 Select the room-temperature sensor to be registered in the group as follows:
- Select [Sensor] with the [Cursor button (Up/Down)], and press the [Enter button].
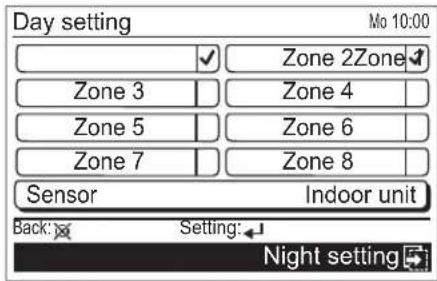
- Select the room-temperature sensor with the [Cursor button (Up/Down)].
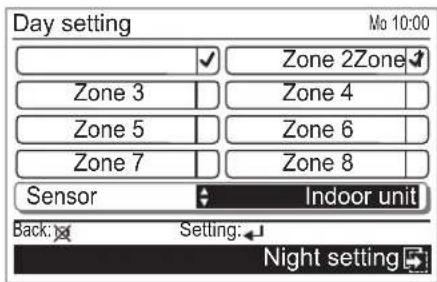
Each time you press the [Cursor button (Up/Down)], displayed sensor switches as follows. Non-connected sensor will be skipped.

flowchart
graph LR
    A["Indoor unit"] <--> B["Primary RC"]
    B <--> C["Secondary RC"]
    D["Optional 1"] <--> E["Optional 2"]
- To finalize the selected room-temperature sensor, press the [Enter button].
- 5-9-2. Name setting
You can register desired name of zones, groups, and room-temperature sensors.
1 In "Zone user setting" screen, select [Name setting] with the [Cursor button (Up/Down)], and press the [Enter button].
2 Select zone, group, or room-temperature sensor to be named.
You can register desired names for following items.
Zone: Group: Sensor:
- Zone 1
- Day
- Indoor unit
- Zone 2
- Night
- Primary RC
- Zone 3
- Secondary RC
- Zone 4
- Optional 1
- Zone 5
- Optional 2
- Zone 6
- Zone 7
- Zone 8
i NOTE
• Only connected zones and sensors are displayed.
Selecting zone to be named:
- In "Zone user setting" screen, select [Zone name setting] with the [Cursor button (Up/Down)]. When you press the [Enter button], "Name setting (group)" screen is displayed.
As a setting example, Zone 1 to 8 are supposed to be connected in following instructions.
![Name setting (zone) [1/4]► Mo 10:00 Zone 1 ---- Zone 2 ---- Zone 3 ---- Zone 4 ---- Zone 5 ---- Back: Setting:← Day/Night setting](/content/2026/06/1202196/images/9706dc50cedc09b6dafaec379d2df99fbd16a78302f238d2cd68b295b5df0b39.jpg)
If any names have been registered for the zones already, the registered names are displayed instead of “---” on this screen.
If more than 6 zones are connected, you will have an extra page.
Any of following actions make the screen switches from "Name setting (zone) [1/4]" to the extra setting screen.
- Pressing the [Cursor button (Right)] in "Name setting (zone) [1/4]" screen.
- Pressing the [Cursor button (Down)] during the cursor is set to the last zone name in "Name setting (zone) [1/4]" screen.
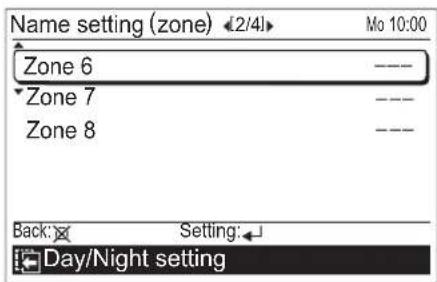
- Select the zone to be named with the [Cursor button (Up/Down)], and press the [Enter button].
Selecting group to be named:
- In "Name setting (zone)" screen, press the Cursor button (Right). "Name setting (group)" screen opens.
![Name setting (group) [3/4] Mo 10:00 Day ---- Night ---- Back: Setting: Day/Night setting](/content/2026/06/1202196/images/4b39e7c9afd1af1e6b640bbc0b449cdb8ebbcf6f195a845601ec1fd78ab7c8ec.jpg)
If any names have been registered for the groups already, the registered names are displayed instead of “---” on this screen.
- Select the group to be named with the [Cursor button (Up/Down)], and press the [Enter button].
Selecting room-temperature sensor to be named:
- In "Name setting (group)" screen, press the [Cursor button (Right)]. "Name setting (sensor)" screen opens.
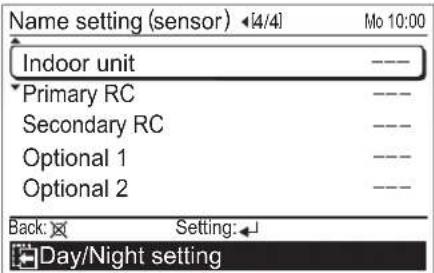
If any names have been registered for the sensors already, the registered names are displayed instead of “---” on this screen.
- Select the sensor to be named with the [Cursor button (Up/Down)], and press the [Enter button].
When you press the [Enter button] after selecting any of zone, group, or sensor, "Name setting" screen opens.
As the setting example, name setting screen for "Zone 1" is used in following instructions.
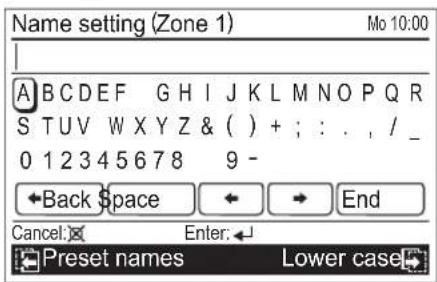
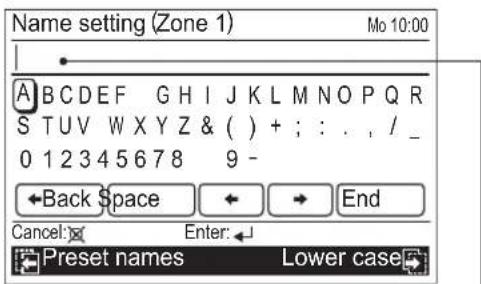
3 Enter desired name.
For entering the text of the name, there are following 3 screens.
• Capital
- Lower case
- Preset names
You can enter mixed text with "Capital", "Lower case", and "Preset names", up to 12 characters.
When you press the [Screen switch button (Left/Right)] during entering the text, the screen switches as follows.

Capital:
You can select and enter desired capital letter.
In "Capital" screen, set the cursor to the target letter with the [Cursor button], and press the [Enter button].
Selected letter is displayed in the text field.
Text field
En-29
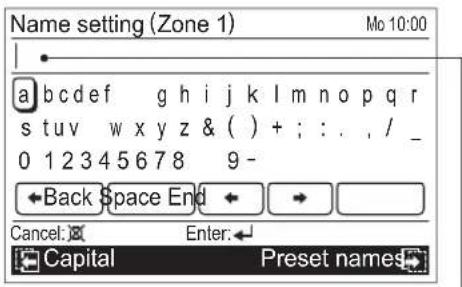
Lower case:
You can select and enter desired lower case.
In "Lower case" screen, set the cursor to the target letter with the [Cursor button], and press the [Enter button].
Selected letter is displayed in the text field.
Text field
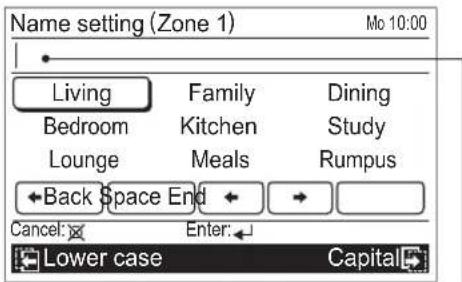
Preset names:
You can select and enter desired preset name.
In "Preset names" screen, set the cursor to the target name with the [Cursor button], and press the [Enter button].
Selected name is displayed in the text field.
Text field
i NOTE
- Maximum text number you can enter is 12 characters including a space. If you try to enter the 13th character, message indicating that the entering text number is exceeding is displayed in the text field as follows: (The 13th character is not displayed.)
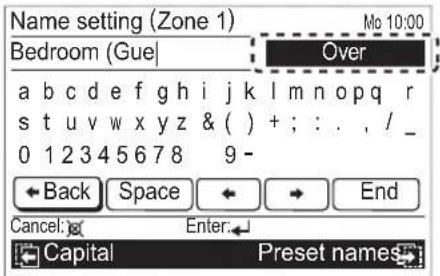
4 Set the cursor to [End] with the [Cursor button], and press the [Enter button] to finalize the name registration. Screen returns to the "Name setting" screen, and registered name is displayed.
6. DEMAND RESPONSE AND INDOOR UNIT OPERATION
This product is designed to be compatible with Air Conditioning Demand Response program.
To utilize the function, you need a separate arrangement with your electricity supplier. Please check availability in the place of use.
When your electricity supplier activates one of the following 3 Demand Response (DR) modes, the air conditioner switches over to the appropriate operation. If the optional IR receiver is installed, operation indicators will inform you when the unit has entered the DR mode.
For detailed information on indicator patterns, please refer to the operation manual included in the IR receiver kit.
| DR mode | Description of operation in this mode |
| DR mode 1 | Compressor off. |
| DR mode 2 | The air conditioner continues to cool or heat during the Demand Response event, but the electrical energy consumed by the air conditioner in a half hour period is not more than 50% of the total electrical energy that would be consumed if operating at the rated capacity in a half hour period. |
| DR mode 3 | The air conditioner continues to cool or heat during the Demand Response event, but the electrical energy consumed by the air conditioner in a half hour period is not more than 75% of the total electrical energy that would be consumed if operating at the rated capacity in a half hour period. |
When the unit enters the DR mode, it performs moderate operation so the cooling or heating effect may be reduced. You cannot override this function by changing the temperature setting using the remote controller or other actions unless the unit finishes the function.
i NOTE
- Stopping the operation of the air conditioner by using the remote controller or by OFF timer are valid in DR mode. If the timer operation is interfered by an interruption of power supply such as a blackout and the power supply is resumed, no indication of the DR mode is performed. During the DR mode, no indication of "filter sign" is performed.
When the unit finishes the function, it will perform the operation that was previously performed before entering the DR mode.
If you have operational issues, contact your electricity supplier first to check whether they are activating any of the DR mode described above.
If the air conditioner is under demand controlling, consult the issues with your electricity supplier.
If they are not demand controlling the air conditioner, refer to your warranty card for the contact details of Fujitsu General (AUST.)
PTY LIMITED or visit our website : www.fujitsugeneral.com.au
En-30
7. CLEANING AND CARE

CAUTION

- Before cleaning the unit, be sure to stop the operation and disconnect the power supply.
- Do not pour water or cleaning solvent on the unit directly, or wash the unit with them.
- Do not expose the unit body to liquid insecticides or hair sprays.
- Keep the surroundings of the outdoor unit clean and tidy, and do not place anything around it. If it is covered with fallen leaves, there could be an infiltration of small animals or insects which in contact with internal electrical components may lead to product malfunction.
- Do not stand on unstable steps when operating or cleaning the air conditioner. It may overturn and can cause injuries.
When used for extended periods, the unit may accumulate dirt inside, reducing its performance. We recommend that the unit be inspected regularly, in addition to your own cleaning and care. For more information, consult authorized service personnel.

NOTE
- Do not use scouring cleanser, volatile solvents such as benzene or thinner.
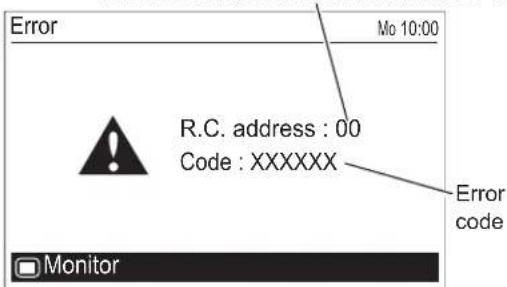
8. ERROR CODE
If an error occurs, the power indicator (green) blinks and the following screen will be shown.
If "Error" is displayed, immediately stop the air conditioner operation, and consult authorized service personnel.
Address number of the relevant indoor unit
9. TROUBLESHOOTING
Instructions relating to heating (*) are applicable only to Heating and Cooling model (Reverse Cycle).

WARNING

- In the event of a malfunction (burning smell, etc.), immediately stop operation, turn off the electrical breaker, and consult authorized service personnel.
- Merely turning off the unit's power switch will not completely disconnect the unit from the power source. Always be sure to turn off the electrical breaker to ensure that power is completely off.
9-1. Troubleshooting (general)
Before requesting service, perform the following checks:
● Normal function
Does not operate immediately
- If the unit is stopped and then immediately started again, the compressor will not operate for about 3 minutes, in order to prevent fuse blowouts.
- Whenever the electrical breaker is turned off then on again, the protection circuit will operate for about 3 minutes, preventing unit operation during that period.
Noise is heard
- During operation and immediately after stopping the unit the sound of water flowing in the air conditioner's piping may be heard. Also, noise may be particularly noticeable for about 2 to 3 minutes after starting operation (sound of coolant flowing).
- During heating operation, a sizzling sound may be heard occasionally. This sound is produced by the automatic defrosting operation.
<
Smells
- Some smell may be emitted from the indoor unit. This smell is the result of room smells (furniture, tobacco, etc.) which have been taken into the air conditioner.
Mist or steam are emitted
- During cooling or dry operation, a thin mist may be seen emitted from the indoor unit. This results from the sudden cooling of room air by the air emitted from the air conditioner, resulting in condensation and misting.
- During heating operation, the outdoor unit's fan may stop, and steam may be seen rising from the unit. This is due to the automatic defrosting operation.
<
Airflow is weak or stops
* • When heating operation is started, fan speed is temporarily very low, to allow internal parts to warm up.
* During heating operation, if the room temperature rises above the thermostat setting, the outdoor unit will stop, and the indoor unit will operate at very low fan speed. If you wish to warm the room further, set the thermostat to a higher setting.
* During heating operation, the unit will temporarily stop operation (maximum 15 minutes) as the automatic defrosting mode operates. During the automatic defrosting operation, 🏻/💡 will be shown on the remote controller display.
<
* During heating operation, the unit will temporarily stop operation (maximum 15 minutes) as the automatic defrosting mode operates. During the automatic defrosting operation, 🏻/💡 will be shown on the remote controller display.
<
- The fan may operate at very low speed during dry operation or when the unit is monitoring the room's temperature.
- During quiet operation, the fan will operate at very low speed.
- In the monitor auto operation, the fan will operate at very low speed.
| Water is produced from the outdoor unit |
| * · During heating operation, water may be produced from the outdoor unit due to the automatic defrosting operation.< |
| The filter indicator blinks |
| · Clean the filter. Afterwards, turn the Filter indicator off. < |
| thermo sensor display on the remote controller is flashing |
| · The room temperature sensor may be malfunctioning. Please consult authorized service personnel. |
| Airflow is stopped and is displayed on the icon display of the “Monitor” screen |
| · Airflow is stopped due to the automatic defrosting, oil recovery, or mode mismatch. |
| Order of timer patterns from [Time 1] to [Time 8] in [Weekly timer setting] is different from what you registered |
| · If more than 2 timer patterns per a day are registered in [Weekly timer setting] and they are not in proper time order, those patterns are sorted automatically in time order when you finalize the [Weekly timer setting]. (Sorting function)< |
| Humidity does not drop |
| In the case of dry operation.· In some conditions of the room, the humidity does not drop.· In order to lower the humidity, set a lower room temperature. |
- Check once more
| Does not operate at all |
| Has the circuit breaker been turned off?Has there been a power failure?Has a fuse blown out, or a circuit breaker been tripped? |
| Is the timer operating? |
| Is key lock enabled? <> |
| Poor cooling (or heating*) performance |
| Is the air filter dusty?Are the air conditioner's intake grille or outlet port blocked?Did you adjust the room temperature settings (thermostat) correctly?Is there a window or door open?In the case of cooling operation, is a window allowing bright sunlight to enter? (Close the curtains.)In the case of cooling operation, are there heating apparatus and computers inside the room, or are there too many people in the room?In the unit set for quiet operation?Do you have an arrangement with your electric company for demand response? |
| Following functions cannot be set:• Economy• Set temp. auto return• Set temp. range limitation• On timer• Off timer• Weekly timer• Auto-off timer |
| • If the function you are selecting is restricted by [Management] function, following message is displayed in the operation guidance display.[IMAGE] |
| • Has the function setting been set to [Enable] or [On]? |
| On timer or Off timer does not work |
| • Has there been a power outage? Any power outage cancels the On or Off timer.• After the power supply is resumed, set the [Enable/Disable setting] to [Enable] again.< |
| Weekly timer does not work |
| • Have all the necessary settings been completed in [Weekly timer setting]?< |
| Operation is automatically stopped |
| • Has off timer been set?• Has weekly timer been set?<< |
| • Has auto-off timer been set?<< |
| Operation does not stopped even if auto-off timer has been set |
| • Has the operation been started by pressing the [On/Off button] on this remote controller?• Has the operation been started by weekly timer or on timer?• Has the weekly timer been on during the counting down of the Auto-off timer?• Has it been within the valid hour?<< |
| • Has there been a power outage? Any power outage cancels the Auto-off timer. |
| • Is message [R.C. prohibition (All, on/off)] and icon displayed?<< |
| Set temperature is changed automatically |
| • Has set temp. auto return been set?<< |
| Does not return to the set temperature |
| • Has set temp. auto return been set?<< |
| Set temperature cannot be changed |
| • Has set temp. range limitation been set?<< |
| • Is message [R.C. prohibition (Set temp. all)] and icon displayed?<< |
If the problem persists after performing these checks, or if you notice burning smells, stop operation immediately, disconnect the power supply, and consult with authorized service personnel.
9-2. Troubleshooting in zone-controlled system \*
Before requesting service, perform the following checks:
- Normal function
Volume of airflow changes
• Volume of the airflow is affected by configurations in the zone setting.
• If the airflow is too strong, set the fan speed setting lower
• If the airflow is too weak, set the fan speed setting higher.
<
Airflow does not come out soon after the air conditioner is turned on
- Depending on the type of installed damper, the air conditioner does not start operation for about 1 minute until the spring damper is ready to work.
<
Check mark cannot be removed in [Zone (group) setting]
- Only marking a check is allowed in [Zone (group) setting].
- Mark a check to other group in [Zone (group) setting], or change any setting in [Zone (single) setting].
<
- Check once more
No airflow comes out even if the air conditioner is on
- Has a check been marked on the applicable zone properly in [Zone (single) setting] or in [Zone (group) setting]?
- If there is no airflow even if a check is marked on the applicable zone in these settings, there might be a malfunction of the installed damper. Consult your dealer or authorized service personnel.
<
Zone setting screen does not open
- There might be an installation failure. Consult your dealer or authorized service personnel.
Registered name in [Name setting] on one wired remote controller is not displayed on the other wired remote controller when using 2 wired remote controllers
- Has [Name setting] been done on both wired remote controllers?
- When using 2 wired remote controllers, the name registration in [Name setting] need to be done on both wired remote controllers.
<
9-3. Operating tips
Instructions relating to heating (*) are applicable only to Heating and Cooling model (Reverse Cycle).
- Heating performance\*
- This air conditioner operates on the heat-pump principle, absorbing heat from outdoor air and transferring that heat indoors. As a result, the operating performance is reduced as outdoor air temperature drops. If you feel that insufficient heating performance is being produced, we recommend you use this air conditioner in conjunction with another kind of heating appliance.
- Heat-pump air conditioners heat your entire room by recirculating air throughout the room, with the result that some time may be required after first starting the air conditioner until the room is heated.
- When indoor and outdoor temperature are high\*
When both indoor and outdoor temperatures are high during use of the Heating mode, the outdoor unit's fan may stop at times to protect the unit.
● Fan speed: Auto
Heating*: The fan will operate at very low speed when the temperature of the air issued from the indoor unit is low. Cooling: As the room temperature approaches that of the set temperature, the fan speed becomes slower.
Fan: The fan runs at medium fan speed.
- Microcomputer-controlled automatic defrosting\*
- When using the Heating mode under conditions of low outdoor temperature and high humidity, frost may form on the outdoor unit, resulting in reduced operating performance. In order to prevent this kind of reduced performance, this unit is equipped with a microcomputer-controlled automatic defrosting function. During the defrost cycle, the indoor fan will shutdown and ⚙/⏻ will be displayed on the remote controller. It will take maximum 15 minutes before the air conditioner starts up again.
- After Heating operation stops, if frost forms on the outdoor unit, the unit will start Automatic defrosting operation. At this time, the outdoor unit will automatically stop after operating for a few minutes.
● Low ambient cooling
When the outdoor temperature drops, the outdoor unit's fans may switch to low speed, or one of the fans may stop intermittently.
- Hot start\*
The indoor unit prevents cold drafts when Heating operation begins.
The indoor unit fan will not operate or it will operate at a very low speed until the heat exchanger reaches the set temperature.
- Dual remote controllers (optional)
An additional remove controller can be added up to the maximum of two remote controllers. Either remote controller can control the air conditioner. However, the timer functions cannot be used at the slave unit.
- Group control
One remote controller can control up to 16 air conditioners. All of the air conditioners will be operated with the same settings.
- Mode operation
Auto (in cooling model)
- When Auto (automatic changeover) operation first selected, the fan will operate at very low speed for about a few minutes, during which time the indoor unit detects the room conditions and selects the proper mode.
Room temperature is higher than the defined temperature in temperature setting → Cooling mode or dry mode
Room temperature is close to or lower than the defined temperature in temperature setting → Monitor operation
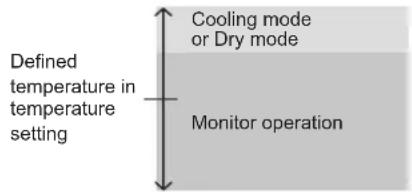
- When the indoor unit has adjusted your room's temperature to near the temperature setting, it will begin monitor operation. In the monitor operation mode, the fan will operate at low speed. If the room temperature subsequently changes, the indoor unit will once again select the appropriate operation (cooling) to adjust the temperature to the value set in the temperature setting. - If the mode automatically selected by the unit is not what you wish, select one of the mode operation (Cooling, Dry, Fan).
Auto [in heating and cooling (Reverse cycle) model]
- When Auto (automatic changeover) is selected, the air conditioner selects the appropriate operation mode (cooling or heating) according to your room's present temperature. - When Auto operation first selected, the fan will operate at low speed for about a few minute, during which time the indoor unit detects the room conditions and selects the proper operation mode.
Room temperature is higher than the defined temperature in temperature setting → Cooling mode or dry mode
Room temperature is close to the defined temperature in temperature setting → Determined by outdoor temperature
Room temperature is lower than the defined temperature in temperature setting → Heating mode
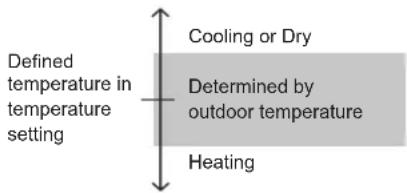
- When the air conditioner has adjusted your room's temperature to near the thermostat setting, it will begin monitor operation. In the monitor operation mode, the fan will operate at low speed. If the room temperature subsequently changes, the air conditioner will once again select the appropriate operation (heating, cooling) to adjust the temperature to the value set in the thermostat. - If the mode automatically selected by the unit is not what you wish, select one of the mode operation (Heating, Cooling, Dry, Fan).
Heat\*
• Use to warm your room.
- When Heating mode is selected, the air conditioner will operate at very low fan speed for about 3 to 5 minutes, after which it will switch to the selected fan setting. This period of time is provided to allow the indoor unit to warm up before beginning full operation.
- When the room temperature is very low, frost may form on the outdoor unit, and its performance may be reduced. In order to remove such frost, the unit will automatically enter the defrost cycle from time to time. During Automatic defrosting operation, the Heating operation will be interrupted.
• After the start of Heating operation, it takes sometime before the room gets warmer.
Cool
• Use to cool your room.
Dry
• Use for gently cooling while dehumidifying your room.
• You cannot heat the room during Dry mode.
- During Dry mode, the unit will operate at low speed; in order to adjust room humidity, the indoor unit's fan may stop from time to time. Also, the fan may operate at very low speed when adjusting room humidity.
- The fan speed cannot be changed manually when Dry mode has been selected.
Fan
• Use to circulate the air throughout your room.

NOTES
\*During Heating mode:
Set the thermostat to a temperature setting that is higher than the current room temperature. The Heating mode will not operate if the thermostat is set lower than the actual room temperature.
During Cooling/Dry mode:
Set the thermostat to a temperature setting that is lower than the current room temperature. The Cooling and Dry modes will not operate if the thermostat is set higher than the actual room temperature (in Cooling mode, the fan alone will operate).
During Fan mode:
You cannot use the unit to heat or cool your room.
● Automatic restart
In Event of Power Interruption
- Should the power supply to the air conditioner be interrupted by a power failure, the air conditioner will restart automatically in the previously selected mode once the power is restored.
- Use of other electrical appliances (electric shaver, etc.) or nearby use of a wireless radio transmitter may cause the air conditioner to malfunction. In this event, temporarily disconnect the power supply, reconnect it, and then use the remote controller to resume operation.
- Notices
* During use of the Heating mode, the outdoor unit will occasionally commence the defrost operation for brief periods. During the defrosting operation, if the user sets the indoor unit for heating again, the defrosting mode will continue, and the Heating operation will begin after completion of defrosting, with the result that some time may be required before warm air is emitted.
* During use of the Heating mode, the top of the indoor unit may become warm, but this is due to the fact that coolant is circulated through the indoor unit even when it is stopped; it is not a malfunction.
9-4. Temperature and humidity range
Permissible ranges of temperature and humidity are as follows;
• Cooling / Dry operation
| Outdoor temperature | About -5°C to 46°C |
| Indoor temperature | About 18°C to 32°C |
| Indoor humidity Below | approximately 80%.If the air conditioner is usedcontinuously for many hours, watermay condense on the surface anddrip. |
- Heating operation
| Outdoor temperature About -15°C to 24°C |
| Indoor temperature About 10°C to 30°C |
If the unit is used under higher temperature conditions than those noted here, the automatic protection circuit may operate, interrupting the operation.
If the unit is used under lower temperature conditions than those noted here, the heat exchanger may freeze, causing water leakage or other malfunction.
- If the air conditioner is used outside of the specified temperature range, it may shorten the product life.
- Do not use the air conditioner for any purpose other than room cooling/dry, room heating, or fan.
- OPERATING MANUAL
- CONTENTS
- INTRODUCTION
- 1-1. Safety precautions
- WARNING
- CAUTION
- 1-2. Features and functions
- INVERTER
- ECONOMY OPERATION
- AUTO CHANGEOVER
- WEEKLY TIMER
- WIRELESS REMOTE CONTROLLER (OPTION)
- ZONE CONTROL
- 1-3. Remote controller overview
- i NOTES
- i NOTE
- En-3
- Cursor button
- Enter button
- Power indicator
- On/Off button
- 1-4. About "Monitor" screen
- Screen status and current conditions
- Icon display
- White icon on a black background:
- Black icon on a white background:
- About "Icon check" function:
- Operating condition display
- Operation guidance display
- Screen switch guidance display
- 1-5. About zone control \*
- En-5
- ● 1-5-1. Zone (single) setting
- BASIC OPERATIONS
- 2-1. Starting the operation
- PREPARATION:
- ● 2-1-1. On/Off setting
- ● 2-1-2. Operation mode setting
- ● 2-1-3. Set temperature adjustment
- ● 2-1-4. Fan speed setting
- About fan speed [Auto]
- 2-2. Setting items in Menu
- En-9
- FUNCTION SETTING
- 3-1. Switching to the "Function" screen
- 3-2. Function setting items
- ● 3-2-3. Set temp. range limitation setting
- TIMER SETTING
- 4-1. Switching to the "Timer" screen
- 4-2. Timer setting items
- ● 4-2-1. On timer setting
- ● 4-2-2. Off timer setting
- ● 4-2-3. Weekly timer setting
- En-13
- Weekly timer select:
- Day off setting:
- Weekly timer setting (without zone control):
- NOTE
- En-15
- Weekly timer setting (with zone control):
- NOTES
- Individual setting of zone control:
- ● 4-2-4. Auto-off timer setting
- SUBMENU SETTING
- 5-1. Switching to the "Submenu" screen
- 5-2. Date/Time setting
- - 5-2-1. Date setting
- ● 5-2-2. Time setting
- ● 5-2-4. Change display format setting
- Date format: Time format:
- 5-3. Screen setting
- ● 5-3-1. Automatic off time setting
- ● 5-3-2. Brightness setting
- En-23
- - 5-3-3. Contrast setting
- 5-4. Filter sign setting
- ● 5-4-1. Filter sign reset setting
- ● 5-4-2. Display setting
- 5-5. R.C. sensor control setting
- En-25
- 5-6. Room temp. display setting
- 5-7. Key lock select setting
- To lock up:
- To release the lock:
- When switching [Child lock] and [Part lock]:
- 5-8. Initial setting
- ● 5-8-2. Temperature unit setting
- 5-9. Zone user setting \*
- ● 5-9-1. Day/Night setting
- En-27
- - 5-9-2. Name setting
- Zone: Group: Sensor:
- Selecting zone to be named:
- Selecting group to be named:
- Selecting room-temperature sensor to be named:
- Capital:
- En-29
- Lower case:
- Preset names:
- DEMAND RESPONSE AND INDOOR UNIT OPERATION
- CLEANING AND CARE
- ERROR CODE
- TROUBLESHOOTING
- 9-1. Troubleshooting (general)
- Does not operate immediately
- Noise is heard
- Smells
- Mist or steam are emitted
- Airflow is weak or stops
- 9-2. Troubleshooting in zone-controlled system \*
- - Normal function
- Volume of airflow changes
- Airflow does not come out soon after the air conditioner is turned on
- Check mark cannot be removed in [Zone (group) setting]
- - Check once more
- No airflow comes out even if the air conditioner is on
- Zone setting screen does not open
- Registered name in [Name setting] on one wired remote controller is not displayed on the other wired remote controller when using 2 wired remote controllers
- 9-3. Operating tips
- - Heating performance\*
- - When indoor and outdoor temperature are high\*
- ● Fan speed: Auto
- - Microcomputer-controlled automatic defrosting\*
- ● Low ambient cooling
- - Hot start\*
- - Dual remote controllers (optional)
- - Group control
- - Mode operation
- Auto (in cooling model)
- Auto [in heating and cooling (Reverse cycle) model]
- Heat\*
- Cool
- Dry
- Fan
- \*During Heating mode:
- During Cooling/Dry mode:
- During Fan mode:
- ● Automatic restart
- In Event of Power Interruption
- - Notices
- 9-4. Temperature and humidity range
Brand : FUJITSU
Model : ARTG30LHTDP
Category : Air-conditioner