Series 7000 S7521 - Electric razor PHILIPS - Free user manual and instructions
Find the device manual for free Series 7000 S7521 PHILIPS in PDF.

User questions about Series 7000 S7521 PHILIPS
0 question about this device. Answer the ones you know or ask your own.
Ask a new question about this device
Download the instructions for your Electric razor in PDF format for free! Find your manual Series 7000 S7521 - PHILIPS and take your electronic device back in hand. On this page are published all the documents necessary for the use of your device. Series 7000 S7521 by PHILIPS.
USER MANUAL Series 7000 S7521 PHILIPS
natural_image
Black-and-white photo of a Philips Series 7000 electric shaver with three rotary buttons and power button (no visible text or symbols on body)フィリップ ス電 動 シェー バー
品番
S7520/26, S7520/12, S7521/26, S7521/12
取扱説明書
保証書付
natural_image
Line drawing of a stylized object resembling a hand or blade with three circular indentations on top (no text or symbols)本体
natural_image
Line drawing of a mechanical device with a handle and central component (no text or symbols)洗淨充電器
[スマートクリーン(乾燥機能無)]
●JC5107
natural_image
Line drawing of a stylized object resembling a container or device (no text or symbols)トリマー
natural_image
Simple line drawing of a connected power plug and cable (no text or symbols)充電アダプタ
クリー ニングカートリッジ
natural_image
Simple line drawing of a mechanical component with a handle and circular base (no text or symbols)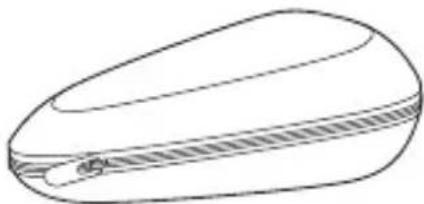
natural_image
Simple line drawing of a rounded rectangular object with a textured center and a small symbol at the bottom (no text or symbols)収納ケーススタンド
Guidance in English 25\~51
● 保 証
保証とアフターサービス …55……
仕様 56
無料修理規定 …58……
保証書 ...... 最終ページ
必ずお守り ください
安全上のご注意
natural_image
Simple line drawing of a rectangular container with a rounded top and side edges (no text or symbols)natural_image
Line drawing of a mechanical device with a lever and housing (no text or symbols)●JC5107
※付属モデルのみ
●洗浄ランプ

natural_image
Line drawing of a hand holding two circular buttons with power and spiral symbols, next to a mechanical device (no text or labels)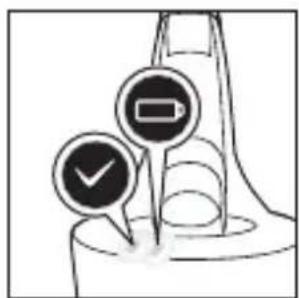
充電の仕方
お客様による充電池の交換はできません。
この商品は通常1 時間充電です。
満充電で約50分使用できます。
natural_image
Simple line drawing of a biological structure with an arrow pointing upward (no text or symbols)クイックチャージ
natural_image
Diagram showing a hand pressing a circular object on a vehicle (no text or symbols present)natural_image
Illustration of a person applying facial hair to their ear with a brush (no text or symbols)natural_image
Illustration of a person applying facial massage to the ear with a finger, showing motion arrows (no text or symbols)ほお
natural_image
Illustration of a hand performing a neck massage technique with a curved arrow indicating motion (no text or symbols)あごの裏側
natural_image
Illustration of a person performing a medical or therapeutic procedure on another person's neck (no text or symbols present)ほおの奥から首筋
natural_image
Line drawing of a person applying a medical or cosmetic tool to their neck area, with no visible text or symbols.鼻の下
natural_image
Illustration of a person applying a product to their ear with a brush (no text or symbols)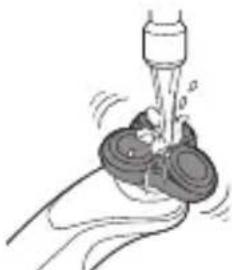
natural_image
Illustration of a hand washing a cup with a water dispenser (no text or symbols)natural_image
Illustration of a hand holding a conical object with an upward arrow and a cross symbol (no text or labels)natural_image
Illustration of a person using a handheld device to apply hair (no text or symbols present)3
natural_image
Simple line drawing of a hand holding two circular buttons with spiral patterns, next to a stand (no text or symbols)4
natural_image
Diagram showing two steps of a food processor: one with an upward arrow emerging from a container, the other with a downward arrow emerging from a base.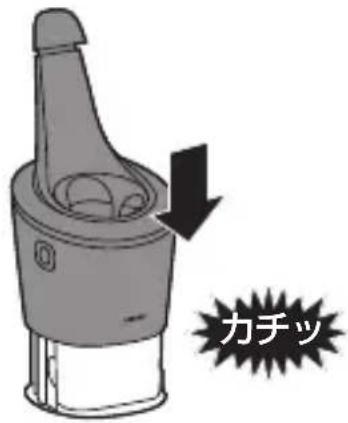

注意
natural_image
Illustration of a hand holding a circular device with an arrow pointing to a multi-circular component (no text or symbols)natural_image
Illustration of a hand using a pipette to lift a small object into a dark container (no text or symbols)トリマーのお手入れ方法
natural_image
Line drawing of a foot stepping on a small object, possibly a device or tool, with no visible text or symbols.natural_image
Simple line drawing of a spray nozzle emitting particles (no text or symbols)natural_image
Illustration showing a hand holding a device with a downward arrow, next to a close-up of the device's tip (no text or symbols present)natural_image
Illustration of a UFO with a cross symbol and upward arrow, above a stylized hand (no text or symbols)natural_image
Diagram showing mechanical components with arrows indicating motion, no text or symbols presentカチッと音がするまで回してください。
natural_image
Illustration of a tool interacting with a device, showing a tool tip and a separate view (no text or symbols)natural_image
Diagram of two mechanical components with directional arrows, no text or symbols presentnatural_image
Illustration of two skis, one with a curved arrow indicating motion, the other with an arrow pointing to a specific object (no text or symbols present)natural_image
Illustration of a robotic hand holding a tool, with an arrow indicating motion (no text or symbols present)S7521/26, S7521/12, S7520/26, S7520/12
Introduction
Congratulations on your purchase and welcome to Philips! To fully benefit from the support that Philips offers, register your product at www.philips.com/welcome.
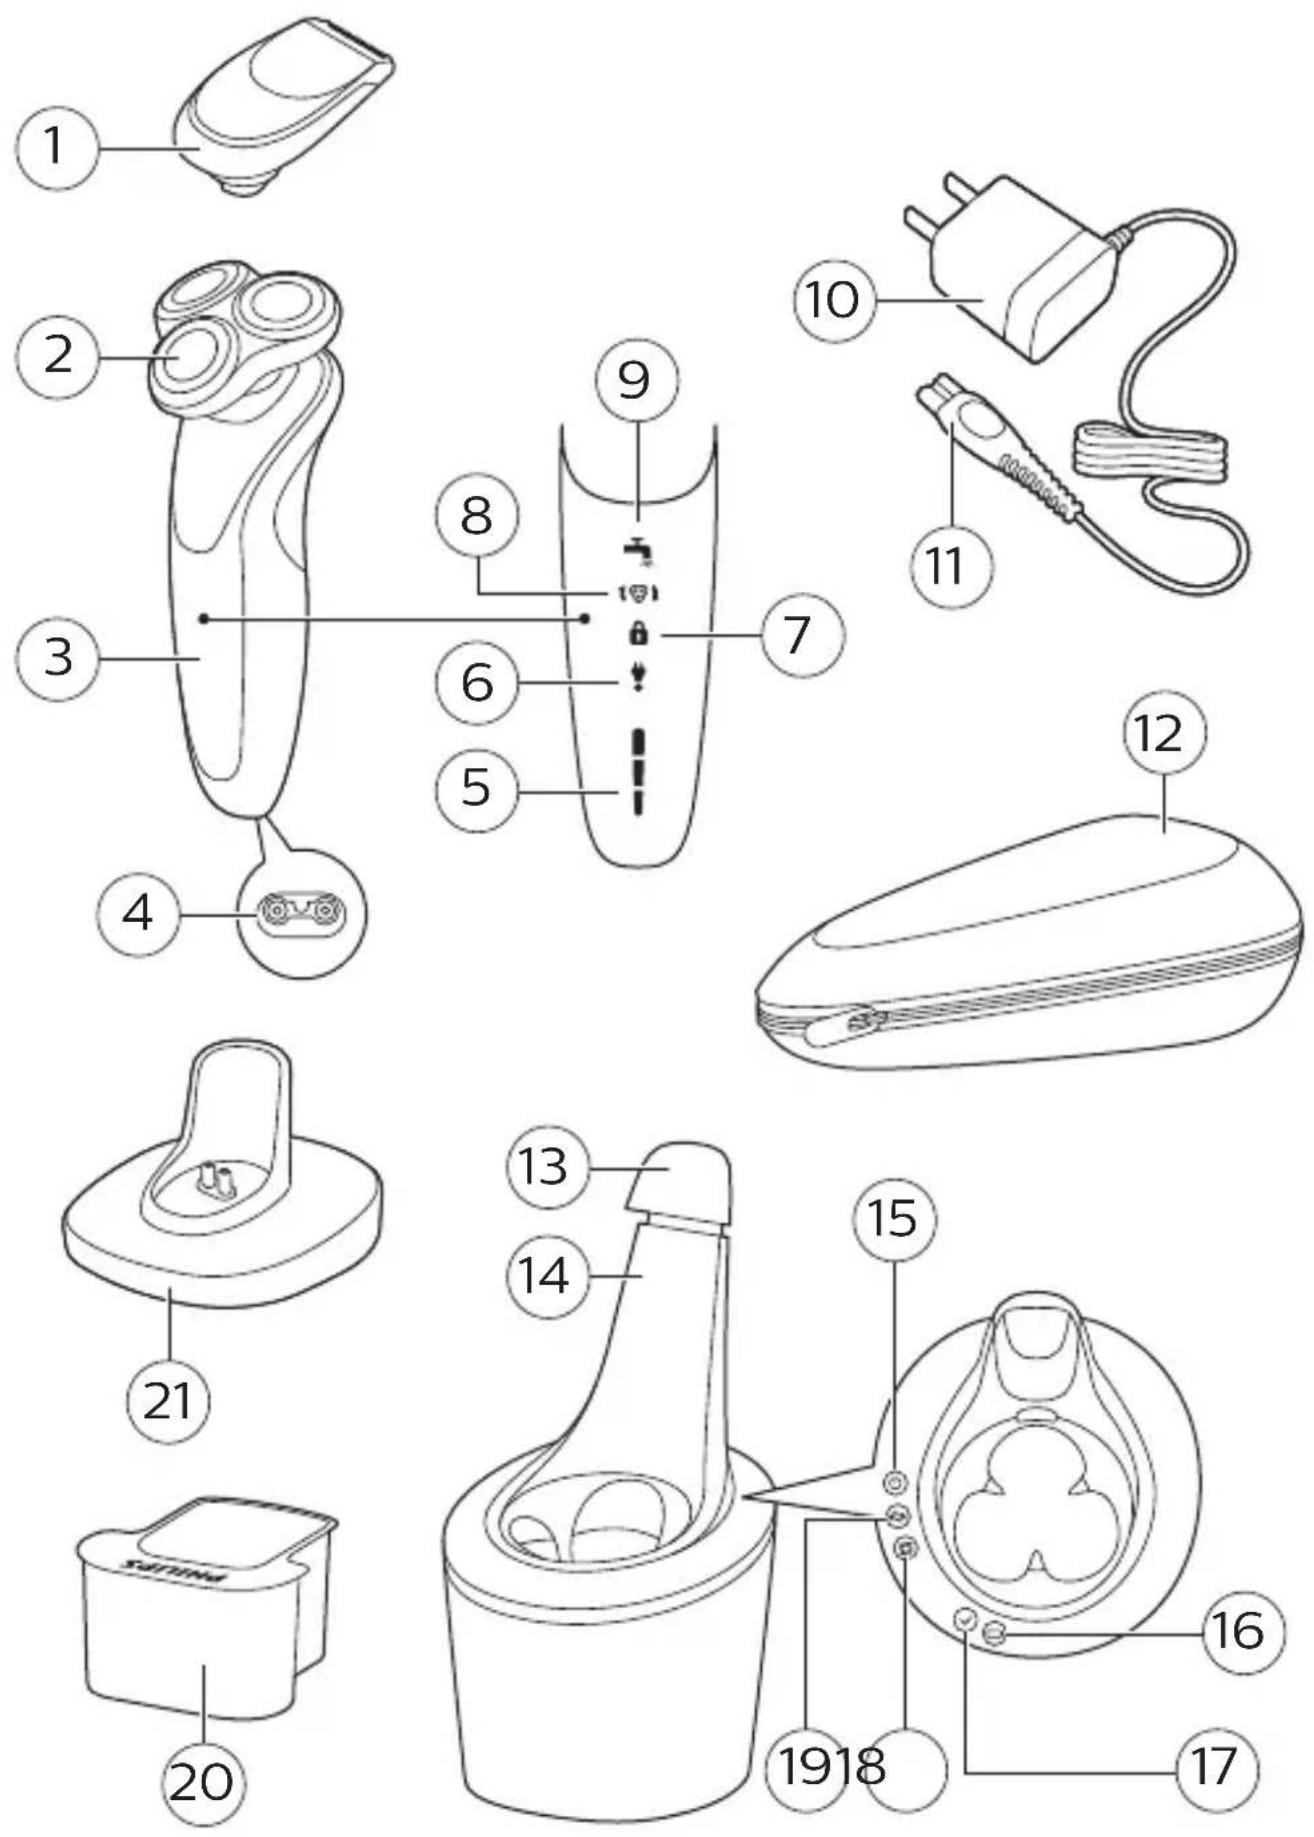
General description (Fig. 1)
1 Click-on trimmer attachment
2 Click-on shaving unit
3 Handle
4 Socket for small plug
5 Battery charge indicator with 1 light
6 Unplug for use symbol
7 Travel lock symbol
8 Replacement reminder
9 Cleaning reminder
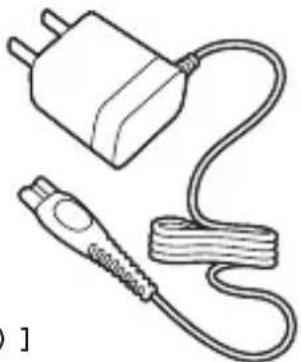
10 Supply unit
11 Small plug
12 Pouch
13 Cap of SmartClean system
14 SmartClean system (S7521/26, S7520/26 only)
15 On/off button
16 Battery symbol
17 Ready symbol
18 Rinsing symbol
19 Replacement symbol
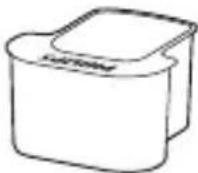
20 Cleaning cartridge for SmartClean system
21 Product stand
The accessories supplied may vary for different products. The box shows the accessories that have been supplied with your appliance.
Important safety information
Read this important information carefully before you use the appliance and its accessories and save it for future reference. The accessories supplied may vary for different products.
Danger

natural_image
No sign depicting a faucet with a diagonal line and a diagonal line, crossed out by a diagonal line (no text or symbols)Warning
-Keep the supply unit dry.
-To charge the battery, only use the detachable supply unit (HQ8505) provided with the appliance.
-The supply unit contains a transformer. Do not cut off the supply unit to replace it with another plug, as this causes a hazardous situation.
-This appliance can be used by children aged from 8 years and above and persons with reduced physical, sensory or mental capabilities or lack of experience and knowledge if they have been given supervision or instruction concerning use of the appliance in a safe way and understand the hazards involved. Children shall not play with the appliance. Cleaning and user maintenance shall not be made by children without supervision.
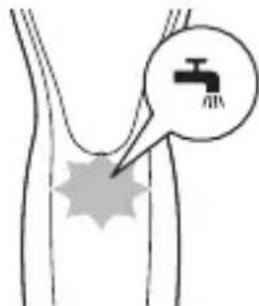
-Always unplug the shaver before you clean it under the tap.
-Always check the appliance before you use it. Do not use the appliance if it is damaged, as this may cause injury. Always replace a damaged part with one of the original type.
-Do not open the appliance to replace the rechargeable battery.
English
Caution

natural_image
No sign depicting a faucet with a diagonal line and a diagonal line, crossed out by a diagonal line (no text or symbols)- Never immerse the cleaning system or the charging stand in water and do not rinse it under the tap.
-Never use water hotter than 80^ C to rinse the shaver.
-Only use this appliance for its intended purpose as shown in the user manual.
-For hygienic reasons, the appliance should only be used by one person.
- Never use compressed air, scouring pads, abrasive cleaning agents or aggressive liquids such as petrol or acetone to clean the appliance.
-If your shaver comes with a cleaning system, always use the original Philips cleaning fluid (cartridge or bottle, depending on the type of cleaning system).
-Always place the cleaning system on a stable, level and horizontal surface to prevent leakage.
-If your cleaning system uses a cleaning cartridge, always make sure the cartridge compartment is closed before you use the cleaning system to clean or charge the shaver.
-When the cleaning system is ready for use, do not move it to prevent leakage of cleaning fluid.
-Water may drip from the socket at the bottom of the shaver when you rinse it. This is normal and not dangerous because all electronics are enclosed in a sealed power unit inside the shaver.
-Do not use the supply unit in or near wall sockets that contain an electric air freshener to prevent irreparable damage to the supply unit.
Electromagnetic fields (EMF)
-This Philips appliance complies with all applicable standards and regulations regarding exposure to electromagnetic fields.
General
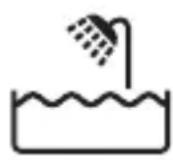
-This shaver is waterproof. It is suitable for use in the bath or shower and for cleaning under the tap. For safety reasons, the shaver can therefore only be used without cord.
-The appliance is suitable for mains voltages ranging from 100 to 240 volts.
-The supply unit transforms 100-240 volts to a safe low voltage of less than 24 volts.
The display
Charging
Note: If you press the on/off button during charging, the 'unplug for use' symbol flashes white to remind you that you have to disconnect the appliance from the wall socket.
Battery charge indicator with 3 lights
Quick charge: When the battery is empty and you connect the appliance to the wall socket, the lights of the battery charge indicator light up one after the other repeatedly. When the appliance contains enough energy for one shave, the bottom light of the battery charge indicator starts flashing slowly. While the appliance continues to charge, first the bottom light of the battery charge indicator flashes and then lights up continuously. Then the second light flashes and then lights up continuously, and so on until the appliance is fully charged.
natural_image
Diagram of a medical or laboratory procedure showing a pointed tool interacting with a curved structure, with an inset magnified view (no text or symbols)English
Battery fully charged
Note: When the battery is full, the display switches off automatically after 30 minutes.
Note: This appliance can only be used without cord.
natural_image
Diagram of a biological structure with a highlighted circular region containing two vertical bars (no text or symbols present)Battery charge indicator with 3 lights
When the battery is fully charged, all lights of the the battery charge indicator light up white continuously.
Note: When the battery is full, the display switches off automatically after 30 minutes.
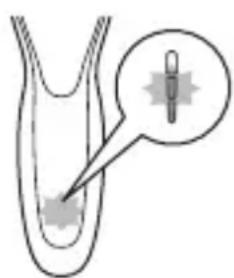
Battery low
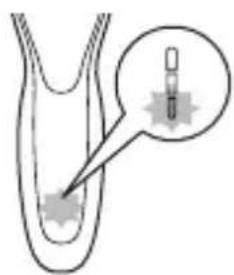
natural_image
Diagram of a biological or medical procedure showing a pointed tool interacting with a curved structure, with an inset magnified view (no text or symbols)Battery charge indicator with 3 lights
When the battery is almost empty, the bottom light of the battery charge indicator flashes orange.
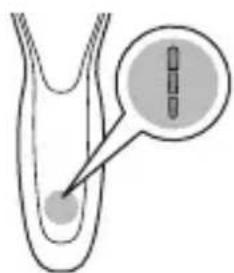
Remaining battery charge
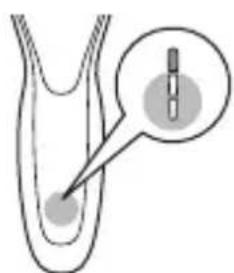
natural_image
Diagram of a biological structure with a magnified inset showing internal components (no text or labels)Battery charge indicator with 3 lights
The remaining battery charge is shown by the lights of the battery charge indicator that light up continuously.
'Unplug for use' reminder

The appliance is equipped with an ‘unplug for use’ reminder. The ‘unplug for use’ symbol flashes to remind you that you have to disconnect the appliance from the supply unit before you can switch it on.
Cleaning reminder
Clean the shaver after every shave for optimal performance. When you switch off the appliance, the cleaning reminder flashes to remind you to clean the appliance.
Travel lock
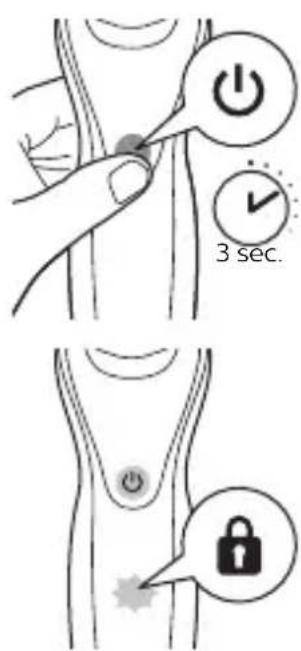
You can lock the appliance when you are going to travel. The travel lock prevents the appliance from being switched on by accident.
Activating the travel lock
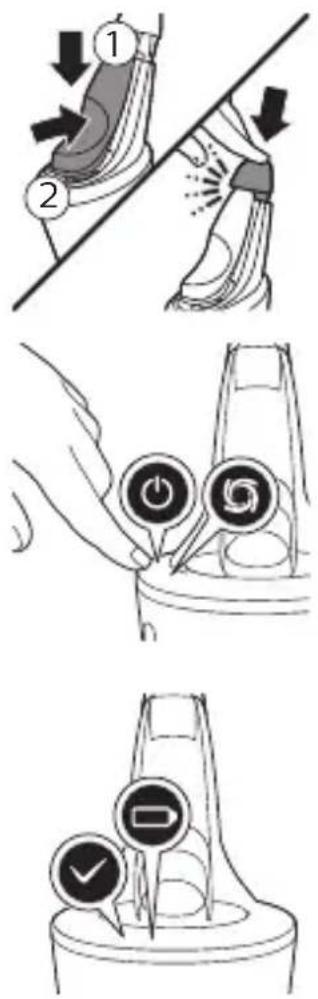
1 Press the on/off button for 3 seconds to enter the travel lock mode.
While you activate the travel lock, the travel lock symbol lights up continuously. When the travel lock is activated, the travel lock symbol flashes.
Deactivating the travel lock
1 Press the on/off button for 3 seconds.
English

natural_image
Illustration of a human torso with a padlock icon and a circular button, no text or symbols presentThe travel lock symbol flashes and then lights up continuously. The appliance is now ready for use again.
Replacing shaving heads

For maximum shaving performance, we advise you to replace the shaving heads every two years. The appliance is equipped with a replacement reminder which reminds you to replace the shaving heads. The shaving unit symbol lights up and the arrows flash to indicate that you have to replace the shaving heads.
Note: After replacing the shaving heads, you need to reset the replacement reminder by pressing the on/off button for 7 seconds.
Charging
Charge the shaver before you use it for the first time and when the display indicates that the battery is almost empty.
Charging takes approx. 1 hour. A fully charged shaver has a shaving time of up to 50 minutes.
Note: You cannot use the appliance while it is charging.
Charging with the supply unit
1 Make sure the appliance is switched off.
2 Put the supply unit in the wall socket and put the small plug in the appliance.
3 After charging, remove the supply unit from the wall socket and pull the small plug out of the appliance.
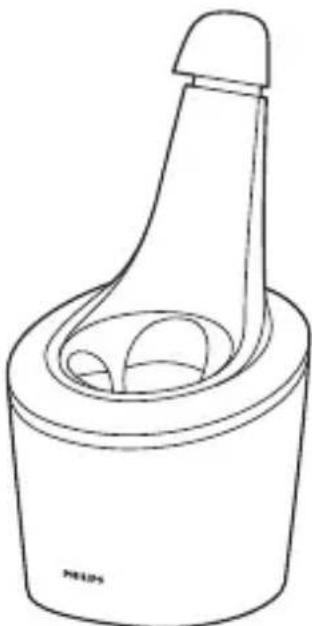
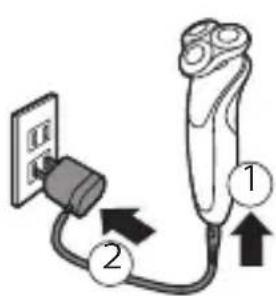
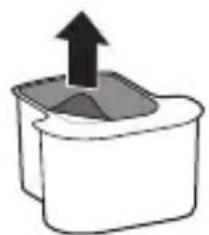
Charging in the SmartClean system (specific types only)
natural_image
Illustration of a hand holding a small object with arrows indicating motion, alongside a circular diagram showing two figures (no text or symbols)1 Put the small plug in the back of the SmartClean system.
2 Put the supply unit in the wall socket.
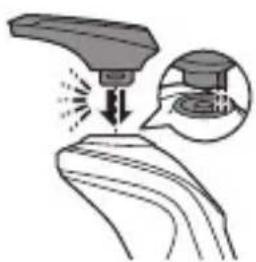
3 Press the top cap to be able to place the shaver in the holder ('click').
4 Hold the shaver upside down above the holder. Make sure the front of the shaver points towards the SmartClean system.
5 Place the shaver in the holder (1), tilt the shaver backwards (2) and press down the top cap to connect the shaver ('click') (3).
The battery symbol starts to flash to indicate that the appliance is charging. When the battery is fully charged, the battery symbol lights up continuously.
(S7521/26, S7520/26 only)
Using the appliance
Note: This appliance can only be used without cord.
English
Switching the appliance on and off
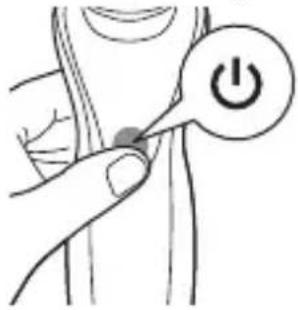
1 To switch on the appliance, press the on/off button once.
2 To switch off the appliance, press the on/off button once.
Battery charge indicator with 3 lights: The display lights up for a few seconds to show the remaining battery status.
Shaving
Skin adaptation period
Your first shaves may not bring you the result you expect and your skin may even become slightly irritated. This is normal. Your skin and beard need time to adapt to any new shaving system. To allow your skin to adapt to this new appliance, we advise you to shave regularly (at least 3 times a week) and exclusively with this appliance for a period of 3 weeks.
natural_image
Illustration of a person applying makeup to their face with a brush (no text or symbols)Dry shaving
1 Switch on the appliance.
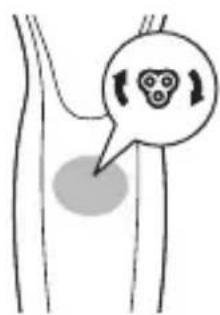
2 Move the shaving heads over your skin in circular movements to catch all hairs growing in different directions. Exert gentle pressure for a close comfortable shave.
Note: Do not press too hard, this can cause skin irritation.
3 Clean the appliance after use (see 'Cleaning and maintenance').
Wet shaving
You can also use this appliance on a wet face with shaving foam or shaving gel.
To shave with shaving foam or shaving gel, follow the steps below:
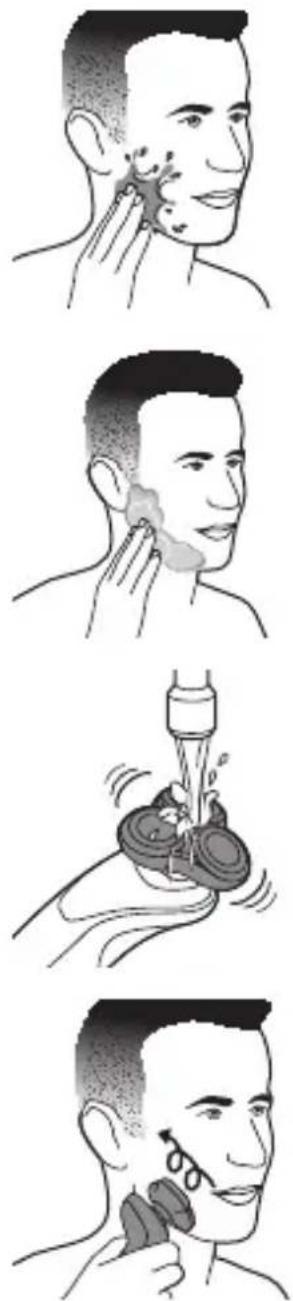
1 Apply some water to your skin.
2 Apply shaving foam or shaving gel to your skin.
3 Rinse the shaving unit under the tap to ensure that the shaving unit glides smoothly over your skin.
4 Switch on the appliance.
5 Move the shaving heads over your skin in circular movements to catch all hairs growing in different directions. Exert gentle pressure for a close comfortable shave.
Note: Do not press too hard, this can cause skin irritation.
Note: Rinse the shaving unit regularly to ensure that it continues to glide smoothly over your skin.
6 Dry your face.
7 Clean the appliance after use (see 'Cleaning and maintenance').
Note: Make sure you rinse all foam or shaving gel off the appliance.
English
Using the click-on attachments
Note: The accessories supplied may vary for different products. The box shows the accessories that have been supplied with your appliance.
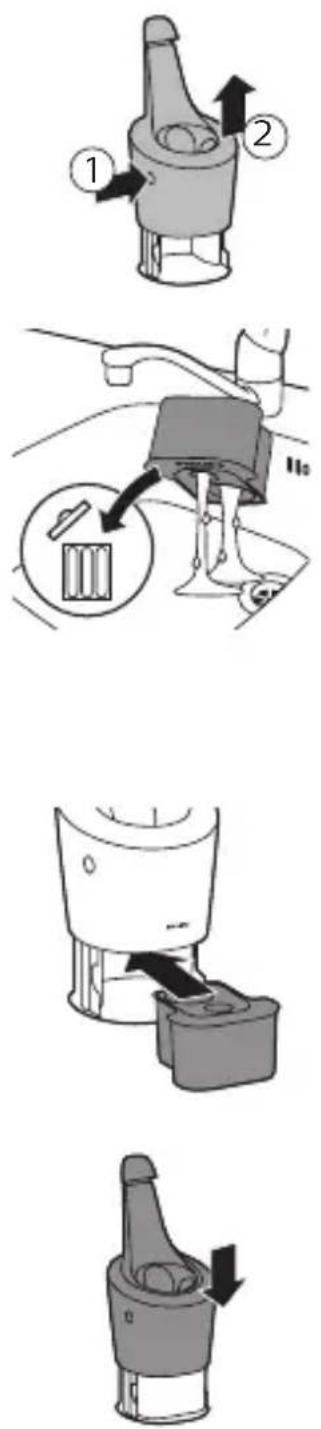
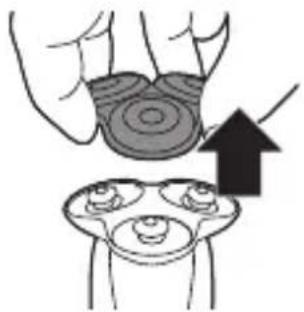
Removing or attaching the click-on attachments
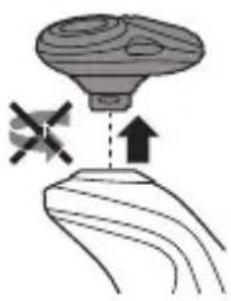
natural_image
Diagram showing a droplet on a surface with an arrow indicating upward motion, no text or symbols present1 Make sure the appliance is switched off.
2 Pull the attachment straight off the appliance.
Note: Do not twist the attachment while you pull it off the appliance.
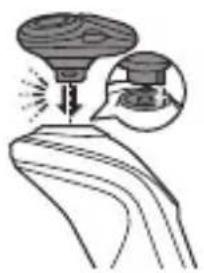
natural_image
Diagram of a mechanical or electrical component with an arrow indicating direction, and a magnified inset showing a device (no text or symbols present)3 Insert the lug of the attachment into the slot in the top of the appliance. Then press down the attachment to attach it to the appliance ('click').
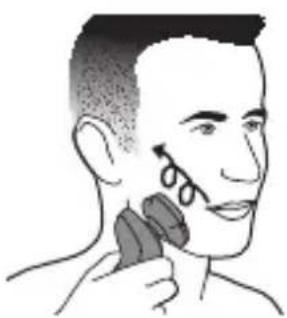
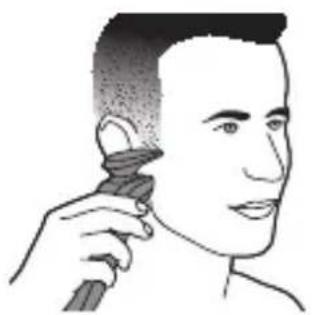
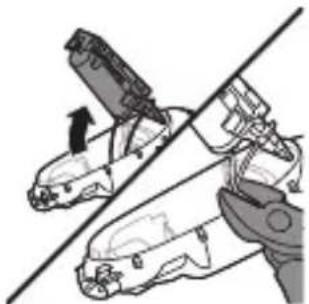
Using the trimmer attachment
You can use the trimmer attachment to groom your sideburns and moustache.
1 Attach the attachment to the appliance ('click').
2 Switch on the appliance.
natural_image
Illustration of a robotic arm with motion arrows and a close-up inset showing a mechanical component (no text or symbols)3 Hold the trimmer attachment perpendicular to the skin and move the appliance downwards while you exert gentle pressure.
4 Clean the attachment after use (see 'Cleaning and maintenance').
natural_image
Illustration of a person applying a hair to their neck, showing the brush and facial features (no text or symbols)Cleaning and maintenance
Note: The accessories supplied may vary for different products. The box shows the accessories that have been supplied with your appliance.
Cleaning the shaver in the SmartClean system (specific types only)
(S7521/26, S7520/26 only)
natural_image
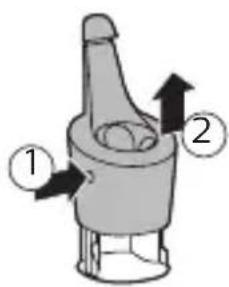
Simple line drawing of a paintbrush with a cross mark and spray effect (no text or symbols)Preparing the SmartClean system for use Caution: Do not tilt the SmartClean system to prevent leakage.
Note: Hold the SmartClean system while you prepare it for use.
Note: If you clean the shaver in the SmartClean system once a week, the SmartClean cartridge lasts approximately three months.
1 Put the small plug in the back of the SmartClean system.
2 Put the supply unit in the wall socket.
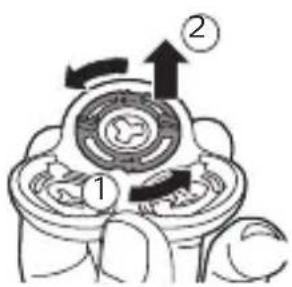
3 Press the button on the side of the SmartClean system (1) and lift the top part of the SmartClean system (2).
natural_image
Simple line drawing of a container with an upward arrow, no text or symbols present4 Pull the seal off the cleaning cartridge.
English

5 Place the cleaning cartridge in the SmartClean system.
6 Push the top part of the SmartClean system back down ('click').
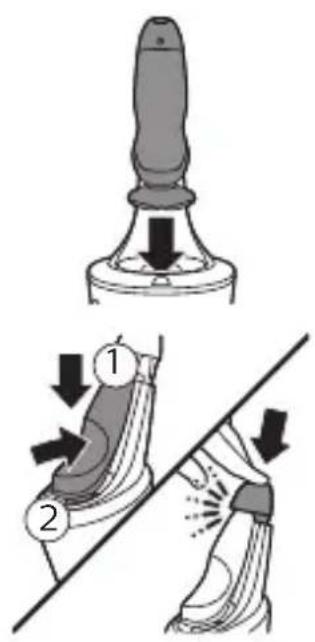
Using the SmartClean system
Caution: Always shake excess water off the shaver before you place it in the SmartClean system.
1 Press the top cap to be able to place the shaver in the holder ('click').
2 Hold the shaver upside down above the holder. Make sure the front of the shaver points towards the SmartClean system.
3 Place the shaver in the holder (1), tilt the shaver backwards (2) and press down the top cap to connect the shaver ('click') (3).
The battery symbol starts to flash, which indicates that the shaver is charging.
4 Press the on/off button on the SmartClean system to start the cleaning program.
During the rinsing phase, the rinsing symbol flashes. When the rinsing phase is done (after approx. 10 minutes), the rinsing symbol lights up continuously.
When the cleaning program is done, the ready symbol lights up continuously.
30 minutes after the cleaning program and charging are done, the SmartClean system switches off automatically.
The battery symbol lights up continuously to indicate that the shaver is fully charged. Charging takes approx. 1 hour.
5 To let the shaver dry, you can leave it in the SmartClean system until your next shave. You can also remove the shaver from the SmartClean system, shake off excess water, open the shaving unit and let the shaver air dry.
Note: If you press the on/off button of the SmartClean system during the cleaning program, the program aborts. In this case, the rinsing or drying symbol goes out.
Note: If you remove the supply unit from the wall socket during the cleaning program, the program aborts.
English
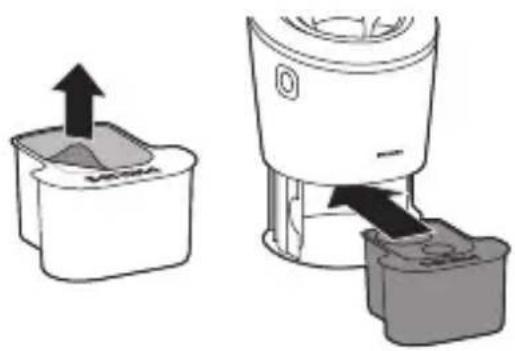
Replacing the cartridge of the SmartClean system
Replace the cleaning cartridge when the replacement symbol flashes orange or when you are no longer satisfied with the cleaning result. If you clean the shaver in the SmartClean system once a week, the SmartClean cartridge lasts approximately three months.
1 Press the button on the side of the SmartClean system (1) and lift the top part of the SmartClean system (2).
2 Remove the cleaning cartridge from the SmartClean system and pour out any remaining cleaning fluid.
You can simply pour the cleaning fluid down the sink.
3 Throw away the empty cleaning cartridge.
4 Unpack the new cleaning cartridge and pull off the seal.
5 Place the cleaning cartridge in the SmartClean system.
6 Push the top part of the SmartClean system back down ('click').
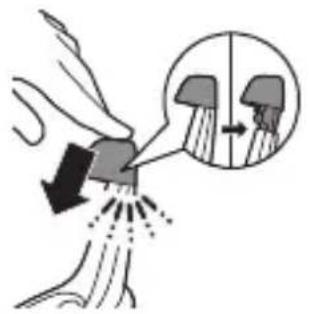
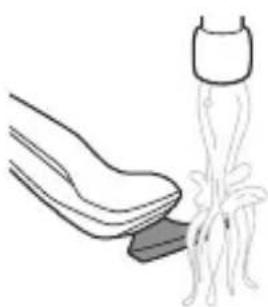
Cleaning the shaver under the tap
Clean the shaver after every shave for optimal performance.
Caution: Be careful with hot water. Always check if the water is not too hot, to prevent burning your hands.
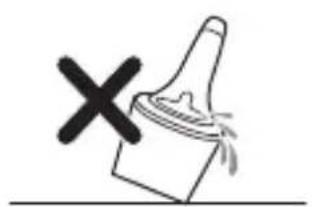
Never dry the shaving unit with a towel or tissue, as this may damage the shaving heads.

1 Switch on the appliance.
2 Rinse the shaving unit under a warm tap.
3 Switch off the appliance. Pull the shaving head holder off the bottom part of the shaving unit.
4 Rinse the hair chamber under the tap.
5 Rinse the shaving head holder under a warm tap.
6 Carefully shake off excess water and let the shaving head holder dry.
English
natural_image
Illustration showing a hand holding a circular object with concentric rings and a downward arrow pointing to a separate view of a multi-ring object (no text or symbols)7 Attach the shaving head holder to the bottom part of the shaving unit ('click').
Cleaning the click-on attachments
Never dry trimmer or beard styler attachments with a towel or tissue, as this may damage the trimming teeth.
The accessories supplied may vary for different products. The box shows the accessories that have been supplied with your appliance.
Cleaning the trimmer attachment
Clean the trimmer attachment every time you have used it.
natural_image
Illustration of a shoe being lifted by a string, showing the blade and cord (no text or symbols)1 Switch on the appliance with the trimmer attachment attached.
2 Rinse the attachment under a warm tap.
3 After cleaning, switch off the appliance.
4 Carefully shake off excess water and let the attachment dry.
Tip: For optimal performance, lubricate the teeth of the attachment with a drop of sewing machine oil every six months.
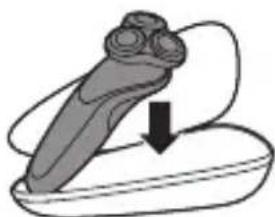
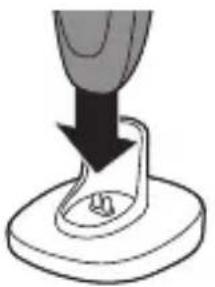
Storage
natural_image
Illustration of a medical device with a downward arrow indicating compression or disassembly (no text or symbols)Store the appliance in the pouch (if supplied).
Note: We advise you to let the appliance dry before you store it in the pouch.
natural_image
Simple line drawing of a mechanical component with a downward arrow indicating force or direction (no text or symbols)Alternatively, place the appliance in the product stand.
Replacement
Replacing the shaving heads

For maximum shaving performance, we advise you to replace the shaving heads every two years. Replace damaged shaving heads immediately. Always replace the shaving heads with original Philips shaving heads (see 'Ordering accessories').
Replacement reminder
The replacement reminder indicates that the shaving heads need to be replaced. The shaving unit symbol and arrows light up when you switch off the appliance.
natural_image
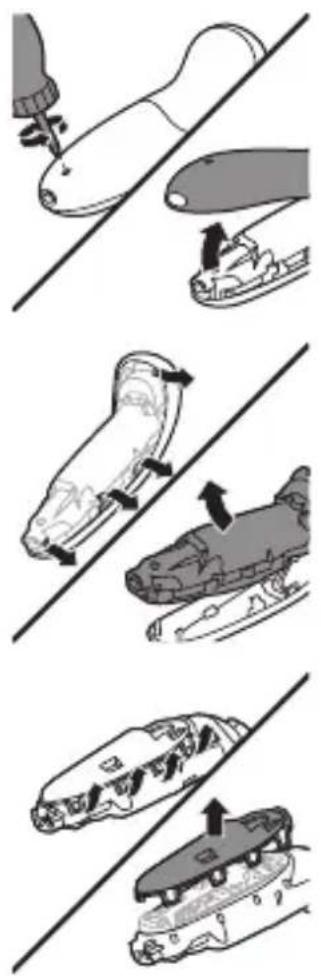
Illustration of a hand holding a circular object above a tray with three small objects, with an upward arrow indicating motion (no text or symbols)1 Switch off the appliance.
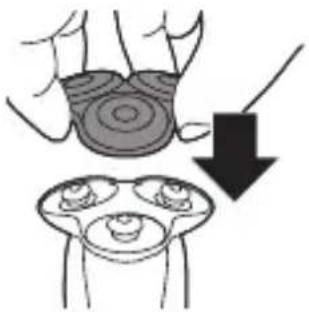
2 Pull the shaving head holder off the bottom part of the shaving unit.
3 Turn the retaining rings anticlockwise and remove them. Place them aside in a safe place.
English

4 Remove the shaving heads from the shaving head holder.
Throw away the used shaving heads immediately to avoid mixing them with the new shaving heads.
5 Place the new shaving heads in the shaving head holder.
Note: Make sure the notches on both sides of the shaving heads fit exactly onto the projections in the shaving head holder.
6 Place the retaining rings back onto the shaving heads and turn them clockwise to reattach the retaining ring.
-Each retaining ring has two recesses that fit exactly into the projections of the shaving head holder. Turn the ring clockwise until your hear a click to indicate that the ring is fixed.
Note: Hold the shaving head holder in your hand when you reinsert the shaving heads and reattach the retaining rings. Do not place the shaving head holder on a surface when you do this, as this may cause damage.
7 Attach the shaving head holder to the bottom part of the shaving unit ('click').
8 To reset the replacement reminder, press and hold the on/off button for approx. 7 seconds.
Ordering accessories
To buy accessories or spare parts, visit
www.shop.philips.com/service or go to your
Philips dealer. You can also contact the Philips Consumer Care Centre in your country (see the worldwide guarantee leaflet for contact details).
The following accessories and spare parts are available:
-SH70 Philips shaving heads
-RQ111 Philips beard styler attachment
-SH575 Philips cleansing brush attachment
-SH560 Philips cleansing brush replacement head
-JC301, JC302, JC303, JC304, JC305 cleaning cartridge
-HQ8505 supply unit
Note: The availability of the accessories may differ by country.
Recycling
-Do not throw away the product with the normal household waste at the end of its life, but hand it in at an official collection point for recycling. By doing this, you help to preserve the environment.
-This product contains a built-in rechargeable battery which shall not be disposed of with normal household waste. We strongly advise you to take your product to an official collection point or a Philips service centre to have a professional remove the rechargeable battery.
English
-Follow your country's rules for the separate collection of electrical and electronic products and rechargeable batteries. Correct disposal helps prevent negative consequences for the environment and human health.
Removing the rechargeable appliance battery
Only remove the rechargeable battery when you discard the appliance. Before you remove the battery, make sure that the appliance is disconnected from the mains and that the battery is completely empty.
Take any necessary safety precautions when you handle tools to open the appliance.
Be careful, the battery strips are sharp.
1 Remove the screw in the back panel with a screwdriver. Then remove the back panel.
2 Bend the hooks aside and remove the power unit.
3 Break the snap hooks and remove the front panel of the power unit.
natural_image
Diagram showing two hands operating a tool with a black arrow indicating direction (no text or symbols present)4 Take out the battery holder and cut the battery tags with a pair of cutting pliers.
Guarantee and support
If you need information or support, please visit www.philips.com/support or read the separate worldwide guarantee leaflet.
Guarantee restrictions
The shaving heads (cutters and guards) are not covered by the terms of the international guarantee because they are subject to wear.
Troubleshooting
This chapter summarizes the most common problems you could encounter with the appliance. If you are unable to solve the problem with the information below, visit www.philips.com/support for a list of frequently asked questions or contact the Consumer Care Center in your country.
Shaver
Problem Possible cause Solution
| The appliance does not work when I press the on/off button. | The appliance is still attached to the wall socket. For safety reasons, the appliance can only be used without cord. | Unplug the appliance and press the on/off button to switch on the appliance. |
| The rechargeable battery is empty. | Recharge the battery (see 'Charging'). |
Problem Possible cause Solution
| The travel lock is activated. | Press the on/off button for 3 seconds to deactivate the travel lock. | |
| The shaving unit is soiled or damaged to such an extent that the motor cannot run. | Clean the shaving heads thoroughly or replace them. Also see 'Hairs or dirt obstruct the shaving heads' for a detailed description of how to clean the shaving heads thoroughly. | |
| The appli-ance does not shave as well as it used to. | The shaving heads are damaged or worn. | Replace the shaving heads (see 'Replacement'). |
| Hairs or dirt obstruct the shaving heads. | Clean the shaving heads in the regular way or clean them thoroughly. | |
| To clean the shaving heads thoroughly, remove the shaving heads from the shaving head holder one by one (see 'Replacement'). Then separate the cutter from its guard and rinse each matching set under the tap. After rinsing, place the cutter back into its corresponding guard. Finally, put the shaving heads back into the shaving head holder (see 'Replacement'). |
Problem Possible cause Solution
| I replaced the shaving heads, but the replacement reminder is still showing. | You have not reset the appliance. | Reset the appliance by pressing the on/off button for approx. 7 seconds. |
| A shaving head symbol has suddenly appeared on the display. | This symbol is a replacement reminder. | Replace the shaving heads (see 'Replacement'). |
| Water is leaking from the bottom of the appliance. | During cleaning, water may collect between the inner body and the outer shell of the appliance. | This is normal and not dangerous because all electronics are enclosed in a sealed power unit inside the appliance. |
SmartClean system
Problem Possible cause Solution
| The SmartClean system does not work when I press the on/off button. | The SmartClean system is not connected to the wall socket. | Put the small plug in the SmartClean system and put the supply unit in the wall socket. |
| The cleaning cartridge is empty. The replacement symbol flashes to indicate that you have to replace the cleaning cartridge. | Place a new cleaning cartridge in the SmartClean system. |
Problem Possible cause Solution
| The shaver is not entirely clean after I clean it in the SmartClean system. | You have not placed the shaver in the SmartClean system properly, so there is no electrical connection between the SmartClean system and the shaver. | Press down the top cap ('click') to ensure a proper connection between the shaver and the SmartClean system. |
| The cleaning cartridge needs to be replaced. | Replace the cleaning cartridge. | |
| You have used another cleaning fluid than the original Philips cleaning cartridge. | Only use the original Philips cleaning cartridge. | |
| The drain of the cleaning cartridge is blocked. | Remove the cartridge from the SmartClean system and push the hairs down the drain with a toothpick. | |
| The shaver is not fully charged after I charge it in the SmartClean system. | You have not placed the shaver in the SmartClean system properly, so there is no electrical connection between the SmartClean system and the shaver. | Press down the top cap ('click') to ensure a proper connection between the shaver and the SmartClean system. |