Series 9 TU9210 - Television Kogan - Free user manual and instructions
Find the device manual for free Series 9 TU9210 Kogan in PDF.


| Product Type | 55" Smart HDR 4K LED TV |
| Model | Series 9 TU9210 |
| Brand | Kogan |
| Screen Size | 55 inches |
| Resolution | 3840 x 2160 (4K UHD) |
| Display Technology | LED |
| HDR Support | HDR10, HLG |
| Refresh Rate | 60Hz |
| Contrast Ratio | 1200:1 |
| Response Time | 8ms |
| Viewing Angle | 176° / 176° |
| Audio Output | 2 x 10W speakers |
| Operating System | Android 10.0 |
| CPU | ARM CA53 Quad Core 1.5GHz |
| RAM | 2GB |
| Storage | 8GB |
| Connectivity | Wi-Fi 802.11b/g/n, Ethernet RJ45, Bluetooth 4.2, HDMI 2.0 (3), USB 2.0 (2), Composite AV, Optical Audio Out |
| Power Consumption | 150W (average), 260 kWh/year |
| Energy Rating | 6 Star |
| Dimensions (with stand) | 1235.7 x 759.2 x 238.5 mm |
| Weight (with stand) | 10.5 kg |
| VESA Wall Mount Pattern | 200 x 200 mm |
| Care Instructions | Unplug before cleaning. Use soft damp cloth with water and mild detergent. Avoid liquid cleaners. |
| Safety Notes | Stability hazard: secure furniture and TV. Keep ventilation clear. Do not expose to rain or moisture. |
| Included Accessories | Remote control (with batteries), stand (2 screws), AV converting cable, quick start guide, warranty card |
| Reparability | No user-serviceable parts. Contact qualified service personnel for repairs. |
Frequently Asked Questions - Series 9 TU9210 Kogan
User questions about Series 9 TU9210 Kogan
0 question about this device. Answer the ones you know or ask your own.
Ask a new question about this device
Download the instructions for your Television in PDF format for free! Find your manual Series 9 TU9210 - Kogan and take your electronic device back in hand. On this page are published all the documents necessary for the use of your device. Series 9 TU9210 by Kogan.
USER MANUAL Series 9 TU9210 Kogan
Safety and Warnings 02 - 03
Components 04
Product overview 05
Input / Output Ports ....05
Assembly and Installation....06
Stand Assembly 06
Connect to Antenna....06
TV Control 07
Remote Control Overview 08
Initial Setup 09 - 10
Basic Operation 11
Channel Selection 11
Channel Edit ....11
Volume Adjustment 11
Input Source....11
Electronic Program Guide ...... 11
Time-shift Function .....11
User Settings 12 - 14
Quick Settings 12
TV Setting 12 - 14
Media Player 15
Wall Mount Installation 16
Specifications....17
Troubleshooting....18
THIS USER MANUAL COVERS THE FOLLOWING MODELS
Kogan 55" Smart HDR 4K LED TV (Series 9 TU9210)
SAFETY AND WARNINGS
Thank you for buying this Kogan product. Please read all safety instructions before using your TV.
WARNING
Stability Hazard: A television set may fall, causing serious personal injury or death. Many injuries, particularly to children, can be avoided by taking simple precautions such as:
- ALWAYS use cabinets or stands or mounting methods recommended by the manufacturer of the television set.
• ALWAYS use furniture that can safely support the television set.
- ALWAYS ensure the television set is not overhanging the edge of the supporting furniture.
• ALWAYS educate children about the dangers of climbing on furniture to reach the
television set or its controls.
- NEVER place a television set in an unstable location.
- NEVER place the television set on tall furniture (for example, cupboards or bookcases) without anchoring both the furniture and the television set to a suitable support.
- NEVER place the television set on cloth or other materials that may be located between the television set and supporting furniture.
- NEVER place items that might tempt children to climb, such as toys and remote controls, on the top of the television or furniture on which the television is placed.
If the existing television set is being retained and relocated, the same considerations as above should be applied.
• To reduce the risk of fire or electric shock, do not expose this apparatus to rain or moisture.
• The apparatus shall not be exposed to dripping or splashing, and no objects filled with liquids, (for example, vases), shall be placed on the apparatus.
- When discarding used batteries, always be mindful of the environment. Ensure you follow any guidelines for recycling and safe disposal of batteries that apply in your local area. Don't throw used batteries in rubbish bin.
- When installing your TV, maintain a distance of at least 10 cm between the TV and other objects (walls, cabinet sides, etc.) to ensure proper ventilation. Failing to maintain proper ventilation may result in a fire or a problem with the product caused by an increase in its internal temperature.
- The openings/slots on the back of the apparatus have been provided for necessary ventilation. Ventilation should not be impeded by blocking these openings in any way (for example, newspapers, table-cloths, curtains, etc.)
- No naked flame sources, such as lit candles, should be placed on the apparatus. To prevent the spread of fire, keep candles or other open flames away from this product at all times.
• The device may malfunction when under electrostatic discharge. It can be manually resumed by switching power off completely (at wall outlet), then switching power on again.
• To avoid any injury caused by overturn of the product when installed with base stands, please always ensure the whole product is placed horizontally within the supporting surface and that the television is not overhanging the edge of the supporting furniture.
- If not using with base stands, use only a wall or ceiling mount which has been recommended by the manufacturer of the television.
SAFETY AND WARNINGS
- Keep small accessories out of reach of children so they are not mistakenly swallowed.
CAUTION: Connecting the power cord
Most appliances recommend they be placed upon a dedicated circuit; that is, a single outlet circuit which powers only that appliance and has no additional outlets or branch circuits.
Do not overload wall outlets. Overloaded wall outlets, loose or damaged wall outlets, extension cords, frayed power cords, or damaged or cracked wire insulation are dangerous. Any of these conditions could result in electric shock or fire. Periodically examine the cord of your appliance, and if appearance indicates damage or deterioration, immediately discontinue use of the appliance until the cord is replaced with an exact replacement part by an authorized servicer.
Protect the power cord from physical or mechanical abuse, such as being twisted, kinked, pinched, closed in a door, or walked upon. Pay particular attention to plugs, wall outlets, and the point where the cord exits the appliance.
The MAINS plug is used as the disconnect device, and the disconnect device shall remain readily operable.
Operating Temperature: 5°C to 40°C
Storage Temperature: 15°C to 45°C
Operating Humidity: 20% to 80%
Storage Humidity: 10% to 90%
CAUTION
Do not attempt to modify this product in any way without written authorization from supplier. Unauthorized modification could void the user's authority to operate this product.
It is not recommended to keep a certain still image displayed on the screen for a long time as well as displaying extremely bright images on screen.
Figures and illustrations in this User Manual are provided for reference only and may differ from actual product appearance. Product design and specifications may be changed without notice.
Refer to the table below as a guide to the symbols and warnings which may be on your TV.
| CAUTIONRISK OF ELECTRIC SHOCKDO NOT OPEN | CAUTION: TO REDUCE THE RISK OF ELECTRIC SHOCK DO NOT REMOVE COVER (OR BACK). NO USER SERVICEABLE PARTS INSIDE. REFER TO QUALIFIED SERVICE PERSONNEL. |
 | The lightning flash with arrowhead symbol, within an equilateral triangle, is intended to alert the user to the presence of non-insulated “dangerous voltage” within the product’s enclosure that may be of sufficient magnitude to constitute a risk of electric shock. |
 | The exclamation point within an equilateral triangle is intended to alert the user to the presence of important operating and maintenance instructions in the literature accompanying the appliance. |
 | Class II product: This symbol indicates that a safety connection to electrical earth (ground) is not required. If this symbol is not present on a product with a mains lead, the product MUST have a reliable connection to protective earth (ground). |
| AC voltage: Rated voltage marked with this symbol is AC voltage. | |
| DC voltage: Rated voltage marked with this symbol is DC voltage. | |
 | Caution. Consult instructions for use: This symbol instructs the user to consult the user manual for further safety related information. |
COMPONENTS
natural_image
Gradient black rectangle with no text or symbolsA
B
C
D
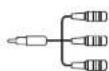
E
F
G
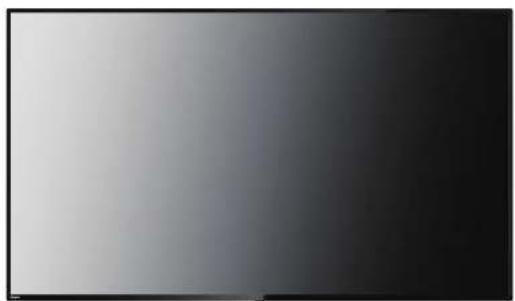
A Kogan 55" Smart HDR 4K LED TV (x1)
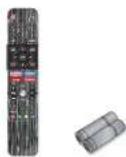
B Remote control (x1) & Batteries (2)
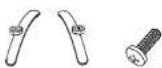
C Stand (x2) & Screw (x4)
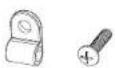
D TV Restraining Braket (x2) & Screw (x2)
E AV Converting Cable (x1)
F Quick Start Guide (x1)
G Warranty Card (x1)
PRODUCT OVERVIEW
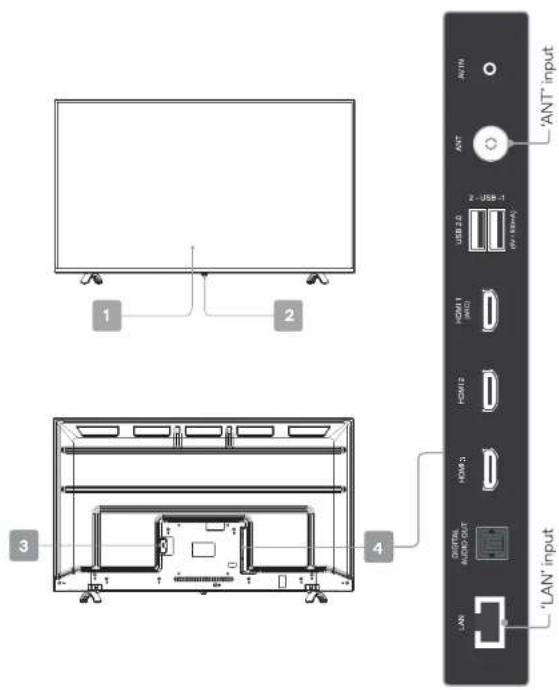
1 HDR 4K LED TV display screen
2 Remote Sensor / Power Indicator / TV Control Button
3 Power Cord Connector
4 Input / Output Ports
Input / Output Ports
| AV IN | Receive audio and video signal from connected AV device. | ||
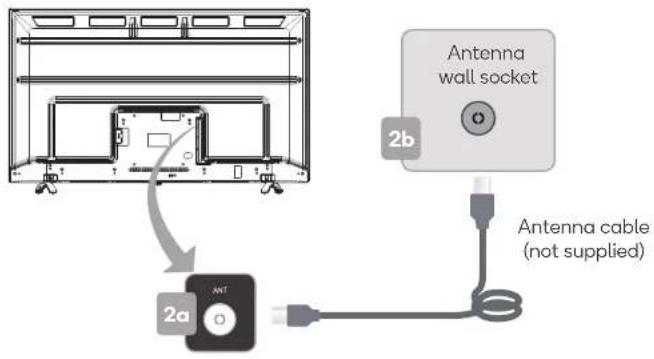
| ANT | For free-to-air TV, use an antenna cable (not supplied) to connect to a working antenna, either via an antenna wall socket, or directly. | ||
| USB 2.0 | USB storage devices can be inserted to pause live DTV in Timeshift mode, or to watch media files stored on device in media player mode. | ||
| HDMI | Connect an HDMI cable between the HDMI port on the TV and the HDMI port on the DVD player/Sot-Top Box.HDMI port supports ARC function (Audio Return Channel). | ||
| DIGITAL AUDIO OUT (optical) | Use an optical cable to output your TV's digital audio signal to a compatible digital audio receiver. | ||
| LAN | For a wired internet connection via a broadband modem or router, connect on Ethernet cable to the LAN port. |

ASSEMBLY AND INSTALLATION
1. Stand Assembly
a. Take out the TV and carefully put it (screen downward) on a stable and flat table with a soft cloth or cushion on it as shown in fig.1.
b. Attach stands to base of TV, ensuring 'A' and 'B' markings on the TV and stands match with each other.
c. Insert two stand screws for each stand and use Phillips head screwdriver (not supplied) to tighten.
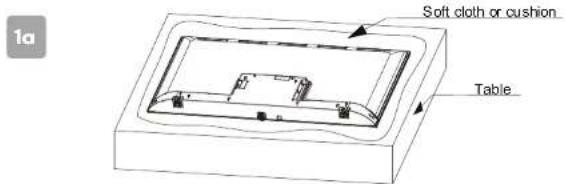
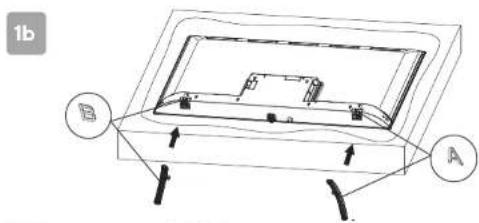
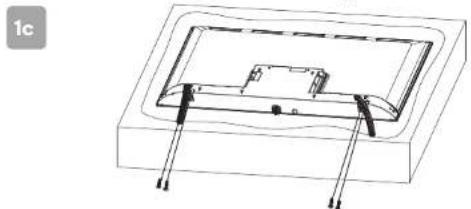
natural_image
Technical line drawing of a mechanical assembly with two vertical rods and a central rectangular component (no text or symbols)2. Connect to Antenna
a. Connect an antenna cable (not supplied) via the 'ANT' input port at the back of the TV. b. Ensure the antenna cable is also connected to a working antenna, either via an antenna wall socket in your home, or directly.
TV CONTROL
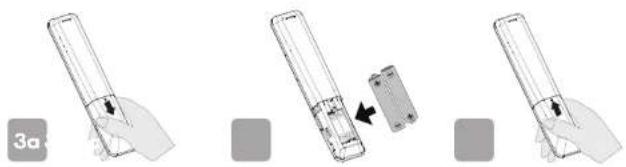
3. Remote Control Assembly
a. Open the battery compartment cover on the back side.
b. Insert two 1.5V AAA size batteries, making sure to match the polarity markings (+ / -) of the batteries with the diagram inside the compartment.
c. Replace battery compartment cover.
natural_image
Three-step diagram showing a hand holding a rectangular device, with a close-up of the internal components and a separate view (no text or symbols)WARNINGS
- If you do not intend to use the remote control for a long period of time, remove them to avoid damage due to leakage.
- Do not use old and new batteries together.
- The batteries (battery pack or batteries installed) shall not exposed to excessive heat such as sunshine, fire or the like.
- Danger of explosion if the batteries are incorrectly replaced. Replace batteries only with the same or equivalent type.
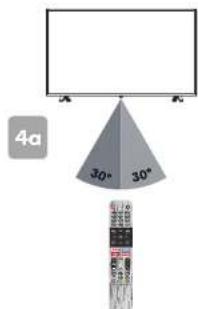
4. Using Remote Control Without Bluetooth
Your Android TV remote control has bluetooth capability, but until this is paired with your TV, you will need to ensure the distance between the remote control and the TV is no greater than 8 metres, at an angle of no more that 30 degrees on either side (4a). Point the remote towards the sensor at the front of the TV (this may differ from the illustration).
TIPS
Do not block the path between the sensor and the remote control.
5. Turning on / Tuning off the TV
a. Connect the power cord with the TV and a suitable power outlet. The TV's power indicator is lit in red, showing that the TV is in standby mode.
b. Press the POWER (u) button on your remote control, or press middle of TV Control Button to turn on the TV. The power indicator is lit in green in working mode.
c. Press the POWER ( 0) button on your remote control to turn the TV into standby mode.
d. To power off the TV completely, please unplug the power cord from the power outlet.
e. Do not leave your TV in standby mode for long periods of time. If you will not use the TV for a long time, it is recommended to unplug the TV from both the power outlet and antenna.
6. TV Control Button
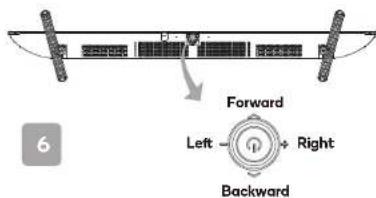
a. Press Middle
- In standby mode, press it to turn on the TV.
- In working status,
- Without the source list, short press it to access the source list.
- With the source list, short press it to enter the selected source.
- Long press it to exit the source list or turn the TV to standby mode.
b. Press Left / Right
Adjust the TV sound volume.
c. Press Forward / Backward
Switch channels, or select the input source in source list.
REMOTE CONTROL OVERVIEW
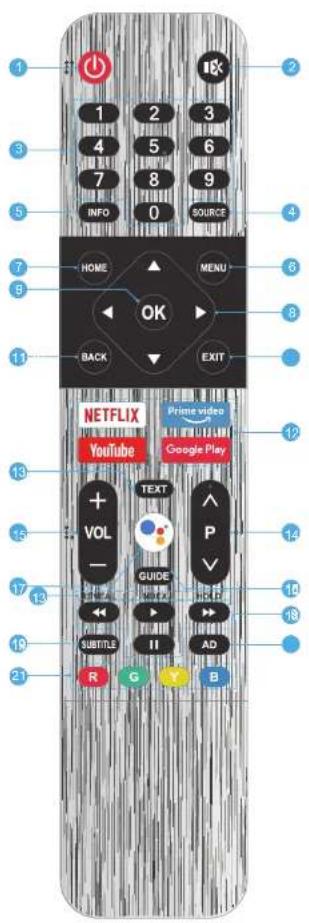
-
POWER (☐): Turn the TV on or to standby mode.
-
MUTE (1): Mute or restore the TV sound.
-
Number buttons (0-9): Select the channel directly, or input a number.
-
SOURCE: Select the input source.
-
INFO: Access the INFO interface.
-
MENU: Access the menu of quick settings.
-
HOME: Access the home page.
-
Navigation Buttons (▲ /▼ / ◀ /▶):
Navigate the menu to select the content you need.
-
OK: Confirm, enter or execute the selected item, or show the list of Quick Button.
-
EXIT: Exit the current operation.
-
BACK: Return to upper-level content, or exit the current screen.
-
Application Buttons: Access specific applications directly.
-
***Teletext Buttons***
- TEXT: Access or exit the teletext menu.
- REVEAL: Display or hide the concealed information.
• INDEX: Display index page.
- HOLD: Hold the teletext page on screen without updates or changes.
-
Program Up/Down (P ∧ v): Switch channels.
-
Volume Up/Down (VOL +/-): Adjust the sound volume.
-
GUIDE: Access the EPG interface in DTV mode.
-
MIC(●): Start talking to Google Assistant of the TV.
-
*** USB Play Control Buttons***
- PLAY( ▶ ): Start the playback.
- PAUSE ( II ): Pause the playback.
- Fast Backward (◀): Fast backward the playback.
- Fast Forward (▶): Fast forward the playback.
-
SUBTITLE: Turn on or turn off the subtitle function.
-
AD: Turn on or turn off the function of audio description.
-
Color Buttons (R/G/Y/B): Execute the prompt function in specific mode.
FIRST TIME SETUP
When turning the TV on for the first time, the Welcome screen will appear. Use the ▲, ▼ and OK buttons to navigate the following options.
Bluetooth
Your Android TV remote control has bluetooth capabilities. Follow the onscreen prompts to pair the remote with the TV, holding the HOME and buttons simultaneously, then select the remote from the accessory list and press OK. Your remote's LED light will flash while pairing. This will allow you to use voice commands with your remote via the Google Assistant button.
If the Bluetooth pairing process is skipped, refer to the Remotes & Accessories section of the Settings menu.
Language
Select your menu language.
Quickly set up with Android phone
If you have an Android smartphone, you can easily transfer your phone's Wi-Fi network and Google account to your TV. If not, select 'Skip'.
Select Wi-Fi network
Your Android TV will automatically scan for wireless networks nearby. Ensure the TV is within range of your wireless modem or router, and have your password handy. Follow the prompts to input your password and connect your TV to your selected network.
If you'd prefer to connect an Ethernet cable to connect to the internet, simply insert the cable (not supplied) to the 'LAN' input port at the back of the TV (6a, next page), and ensure that it is correctly connected to the internet.
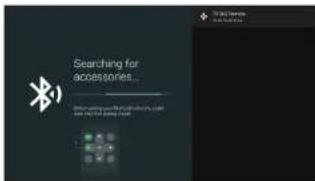
Pairing your bluetooth remote control with your Android TV will enable your remote's Google Assistant voice control function.
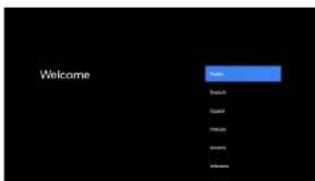
Select your language. This can be changed later in the global settings.
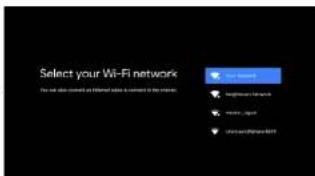
Connect to Wi-Fi by selecting your network and entering your password. A broadband internet connection is required for this step.
Google Account sign-in
Linking your Google Account to your Android TV will allow you to install new apps from the Play store, as well as receive recommendations from Google.
Terms of Service
This page will allow you to read each of the Google Terms of Service, Privacy Policy, and Google Play Terms of Service in full, and to accept.
Location
Grant permission for your Android TV to detect your location. You can adjust these permissions at any time from Settings.
Help improve Android
Grant permission for your Android TV to detect your location to automatically send diagnostic information to Google.
Install additional apps
Get started with some of our handpicked selections from the Play Store. Following this you will be shown a brief overview of Android TV's features.
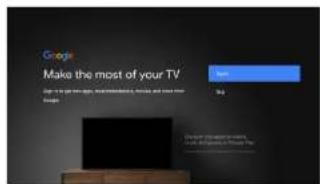
Sign in to your Google account here.
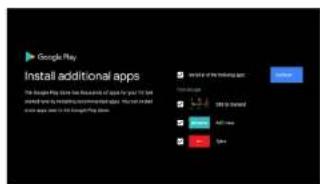
Installing additional apps from the Google Play Store.
Country
To ensure your TV is set up properly, select your country/region from the list.
LCN switch
Select logical channel numbering on, off, or default to channel settings.
Password
Set a default password.
Timezone
Select your region's time zone.
Select TV mode
The 'home mode' is optimized for efficient usage for home use. The 'retail mode' is optimized for store Demo with fixed settings.
Chromecast
Let your TV be detected as a Google Cast device and allow Google Assistant and other services to wake the TV to respond to cast commands, even when in standby mode.
INITIAL SETUP
Step 13: Turn on or turn off the LCN switch (Logical Channel Number).
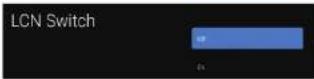
Step 14: Input your local postal code. It is only available for Indonesia.

Step 15: Select the country region. It is only available for Australia.
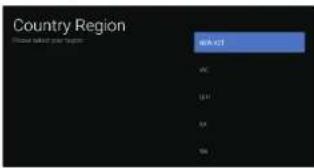
Step 16: Select the TV source.
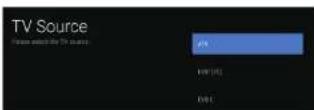
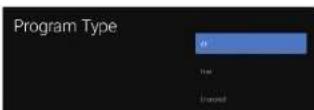
Step 17: Select the program type.
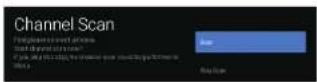
Step 18: Select whether or not to start "Channel Scan".
NOTE
• The pictures are only for references, and please refer to actual screens of your Android TV for clear images and correct contents.
- Initial settings may change without notice, which depends on Google requirements. You need to finish all initial settings according to what is indicated on the screen.
- If you want to restart the initial setup after the first time, please select
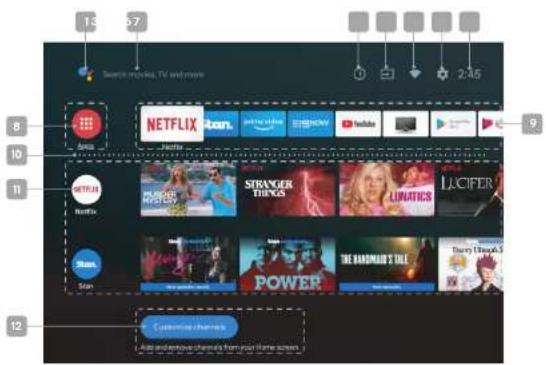
1 Google Assistant
Click to launch the built-in virtual assistant, which will begin listening for voice commands. Give it a try, ask "What's the weather today?"
2 Text Search
Enter text manually to search TV apps.
3 System Notifications
This option will only appear when notifications are present.
4 Source
Access free-to-air channels or other input source channels.
5 Internet Connection
This will display as a Wi-Fi or LAN icon, depending on your connection. Select for connectivity options.
6 Settings
Access the settings menu.
7 Clock
Show the current time. Time and date can be adjusted in the settings menu.
8 Apps
Access the App Centre to display all installed apps. Free-to-air channels can be accessed under the 'Live TV' option.
9 Favourites List
A customisable list of apps available at a single click.
10 Play Next
Displays the program you are watching or have queued to play next. You can add to this list by long pressing OK button, then selecting "Add to play next". If the play next queue is empty, it will not be shown on the home page.
11 Pinned Channels
Show the program list of pinned channels. The order of this list can be adjusted by pressing <from the channel icon and selecting the "▲/▼" icon. Empty channels will not be shown on the home page.
12 Customise Channels
Add or remove pinned channels from the home screen.
BASIC OPERATION
Channel Selection
There are two ways to select a channel:
- Using number buttons followed by OK button on the remote control to select channel directly. When using the number buttons, you can directly select channels that were either not saved during the auto tuning, or manually erased.
- Using P button on the remote control, or press forward / backward of TV control button to switch channels in sequence. You will see all the channels that the TV has saved, but will not see channels that were either not saved, or manually erased.
Channel Edit
While watching programs in TV mode, press OK button to show the list of "Quick Button", in which you can select and enter "CH LIST"(channel list).
- In channel list, press ▲/▼/▲/▲ button to select the desired channel in the category "All". Then press and hold OK button to open the menu of channel edit which includes "Rename(only for DTV mode)", "Delete", "Skip" and "Favorite". You can rename, delete, skip the selected channel, or add it into the favorite list.
- In channel list, you can check the list of all favorite channels in the category "FavList"(favorite list) on the top line. In the favorite list, press ▲/▼/▲/▲ button to select the desired favorite channel, then press and hold OK button to decide if you will remove it from the favorite list.
- While playing favorite channels in the favorite list, you can only switch to play another favorite channel while pressing ^P∨ button. If you want to watch all saved channels, please return to the category "All" in the channel list.
Volume Adjustment
Press +VOL - buttons on the remote control, or press left / right of the TV control button to adjust the sound volume of the TV.
Press the MUTE(1) button to turn on or turn off the TV sound. The mute icon will appear in the lower-right corner of the screen. To resume sound when TV is muted, press the MUTE(1) button again, or simply press VOL +button.
Input Source
Input options are accessible directly from the home screen by selecting the Source icon. Press OK button to confirm your selection.
Alternatively, you can use the SOURCE button on your remote control to access the list of input sources from any channel or screen.
Electronic Program Guide
Electronic Program Guide is supplied by the program providers and offers information about the programs to be broadcast. You can access it in DTV mode by pressing the
GUIDE button on the remote control.
- Press the RED button to edit the selected program.
Remind: Setup a watching appointment to remind you of viewing the selected program.
Schedule: Show the list of watching appointments. - Press GREEN button to skip to the position where you can change the date by pressing ◀/▶ navigation button.
Time-shift Function
Time-shift is used to record a DTV program when your viewing is interrupted or delayed. Press the PAUSE (Ⅱ) button to pause playing the DTV program and start to record the program. Press the PLAY (▶) button to continue playing the program from when you paused. Press the EXIT button to call out a prompt reminder, asking you whether or not to stop the time-shift function.
NOTE
- While in time-shift mode, please do not turn off the TV.
- Before time-shift, you'd better format your USB device to ensure there is enough space for time-shift recording.
- The recorded program of time-shift will be cleared automatically after playing the program or stopping time-shift function.
- If time-shift recording lasts too long, and there is no more space for recording new program, the TV will start to play the program automatically from the recording beginning to release the space of program which has been played for new program recording.
- If you want to change the settings for Time-shift function, please select
USER SETTINGS
Quick Settings
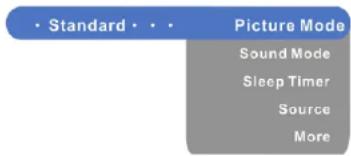
Frequently-used options for your TV (picture mode, sound mode, etc.) can be accessed by pressing MENU button on your remote control.
TV Setting
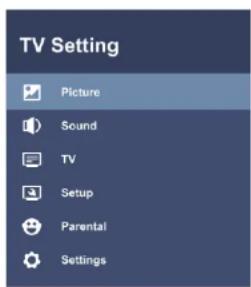
- To access the TV setting menu, please select "More" in the menu of quick settings. Here you will find all of the adjustable options for your Android TV's interface, connectivity, apps and so on.
- In the TV setting menu, press Navigation Buttons (▲/▼/◄/►) and OK button to select and adjust an item. Press BACK button to back to the upper-level menu, and press EXIT button to exit the TV setting menu.
NOTE
Items in the TV setting menu may vary depending on the region, model or input source.
PICTURE
Adjust the settings related to the picture quality.
Picture Mode
Select the picture mode which best corresponds to your viewing environment. Choices may very depending on the input sources.
Dynamic Backlight
Turn on to automatically adjust the screen backlight depending on the input source.
Back Light
Adjust the backlight of the screen.
Brightness
Adjust the lightness of the picture.
Contrast
Adjust the difference between light and dark areas of the picture.
Saturation
Adjust the colorfulness of the color relative to its own brightness.
HUE
Adjust the color tint of the picture.
Sharpness
Adjust the edge of the picture.
Gamma
Adjust the light intensity of original image.
Color Temperature
Adjust the overall color tone of the picture.
Advanced
Adjust the following advanced settings of the picture, which may vary depending on the region or model.
- Remove the noise from the picture signal.
- Adjust the luma of the picture automatically depending on the input signal.
• Control local contrast. - Reduce the signal created while compressing or converting the MPEG signal.
- Suppress the image jitter to achieve a stable and fluent play of dynamic picture.
USER SETTINGS
SOUND
Adjust the settings related to the sound effect.
Sound Mode
Select the sound mode which best corresponds to your viewing requirements. Choices may very depending on the input sources.
Balance
Control the sound balance between left and right speakers.
Bass
Adjust the low frequency of the sound.
Treble
Adjust the high frequency of the sound.
DTS Studio Sound
Turn on or turn off the sound system of DTS Studio Sound.
Auto Volume
Turn on to automatically adjust the sound volume depending on the input signal.
Speakers
Turn on or turn off the TV speakers
SPDIF Type
Select the type of digital audio output.
Spdif Delay
Select the delay value of digital audio output.
Audio Type
Select the type of audio output. Choices are Normal and Visually Impaired.
Visually Impaired
Adjust Speaker and Volume to help the visually-impaired viewers understand and enjoy the program. It is available only after "Visually Impaired" has been selected in "Audio Type".
TV (Only for TV mode)
Search for channels automatically or manually.
Channels
Search for channels automatically or manually.
LCN Switch
Turn on to get channel number automatically from the program. It is only available for DTV mode.
HBBTV
Turn on or turn off HBBTV function. It is only available for some countries.
SETUP
Adjust settings related to the TV, channel or program.
Auto Standby
Turn on to automatically turn off the TV when there is no operations in designated time.
Fast Boot
Turn on or turn off the function of fast boot. If you turn on it and press POWER button to close the TV, the TV will close, but the system still runs continuously. In such case, it will consume more energy, but it could take short time to turn on the TV again.
Screen Mode
Select the desired screen mode. Choices may vary depending on the input source. It is available only after you have searched for channels.
OAD
Turn on or turn off the function of OAD manual download. It is only available for some countries.
Subtitle Language
- Select the digital subtitle languages.
- Select the subtitle type. "Hearing Impaired" is used to help the hearing-impaired viewers understand and enjoy the program.
Audio Language
Select the audio languages.
Teletext
- Select the digital teletext language.
- Select the decoding page language.
HDMI 2.0 Setting
Select HDMI signal format. Choices are HDMI 1.4 and HDMI 2.0.
Postal Code
Input your local postal code. It is only available for Indonesia.
End User Licence Agreement
Read the end user licence agreement.
TimeShift Setting
Setup for the best usage of Time-shift function.
Reset Default
Reset user settings to the factory default values.
USER SETTINGS
PARENTAL
Setup the parental lock system.
Please enter password
Password is needed for entering the parental lock system, and the initial password is "0000".
Channel Block
Restrict unauthorized access to specific channel based on the channel information. It is only available for TV mode.
Parogram Block
Restrict unauthorized access to specific program based on the age rating.
Change Password
Change the password of the parental lock system. If you forget your password, you can use the super one "8899".
Clear All
Cear all user settings in the parental lock system.
SETTINGS
Adjust the settings related to your Android TV's system.
Suggestions
Show the recommended or unfinished settings for the best usage of your TV.
Network & Internet
- Connect the TV to the wireless or wired network.
- Adjust settings related to the network configuration.
- Setup WOW/WOL function to turn on the TV from standby mode by your mobile device through network connection.
Inputs
- Setup the input sources.
- Setup to control the connected HDMI devices.
Accounts & Sign In
Sign in to your Google Account for new apps, recommendations, movies and more from Google.
Apps
• Show the list of recently-opened, installed or system apps.
- Setup specific app permissions.
Device Preferences
• Show basic device information.
- Adjust settings related to the system and features of your Android TV device.
- Setup the home page channels and application restrictions.
- Restart the initial setup.
Remotes & Accessories
Search and connect the Bluetooth remote control and other Bluetooth devices. Before Bluetooth searching, please make sure that you have turned external Bluetooth devices in the pairing mode. For the remote control supplied with your TV, please press and hold◀ and HOME buttons simultaneously to open its pairing mode. For other Bluetooth devices, please read their own instruction manuals for opening the pairing mode.
MEDIA PLAYER
Please select
Step 1: Connect your USB device to the TV.
Step 2: Press HOME button to enter the home page.
Step 3: Press ▲/▼/◄/► and OK button to select and enter "Apps".
Step 4: Press ▲/▼/◄/► and OK button to select and enter "Multimedia Player".
Step 5: Press ▲/▼/◄/► and OK button to select and play the desired media file.
Step 6: Press OK button to start the playback.
Step 7: Press BACK button to exit the playback.
Watch Movies
While watching a movie, press the following buttons to control the movie playback.
| Button | Function |
| OK | Without control bar, call out the control bar. |
| With control bar, pause or play. | |
| MENU | Access the menu of quick settings. |
| ▲ | Access movie menu settings. |
| ▼ | Show the movie playlist. |
| ◀/▶ | Fast backward or fast forward. |
| ◀◀/▶▶ |
Play Music
While playing music, press the following buttons to control the music playback.
| Button Function | |
| OK | Pause or play. |
| MENU Access the menu of quick settings. | |
| ▲ | Access music menu settings. |
| ▼ | Show the music playlist. |
| ◀/▶ | Short press to skip to previous or next piece of music. |
| Long press to fast backward or fast forward. | |
| ◀◀/▶▶ | Fast backward or fast forward. |
Browse Photos
While browsing a photo, press the following buttons to control the photo playback.
| Button | Function |
| OK | Access photo menu settings. |
| MENU | Access the menu of quick settings. |
| ▲/▼ | Show the photo playlist. |
| ◀/▶ | Skip to previous or next photo. |
Supported File Formats in Media Player
| Type Formats | |
| Video | Video Codes: H.263, H.264, H.265, VP8, VP9, MPEG2, MPEG4, HDR10, HLG, AVL |
| File Extension Names: exl, det, mpeg, mpe, mpg, volb, mp4f, mov, mkv, ts, fp, tp, ml2ts, ms, m4v, f4v, tv, osf, 3go, webm | |
| Audio | Audio Codes: DoxyMS12, AMRNB, AAC, PCM, MPS, C71t, HEAAC |
| File Extension Names: mp3, AAC, m4o, fixc, omr, mp2, mpga, ogg, AC3, wov | |
| Photo | .jpg, jpeg, png, bmp, gif |
WALL MOUNT INSTALLATION
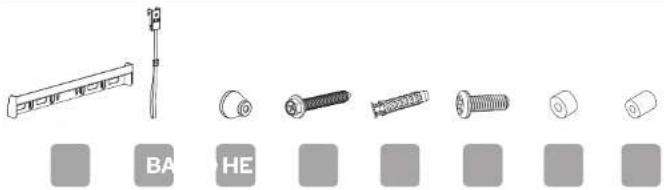
Wall mount kit is not included. Please contact the local customer service center for the wall-mount installation. Instructions below is for reference to install the wall mount kit recommended by TV manufacturer.
natural_image
Illustration of various mechanical parts including a tool, bolts, and square components (no text or symbols)A Wall Mounting Bracket (x1)
E Expansion Bolt (x4)
B TV Hanging Bracket (x2)
F M6 Screw (x4)
C Pastic Tube (x4)
G 5mm Plastic Spacer (x4)
D Self-tapping Screw (x4)
H 10mm Plastic Spacer (x4)
Wall-mounting Installation
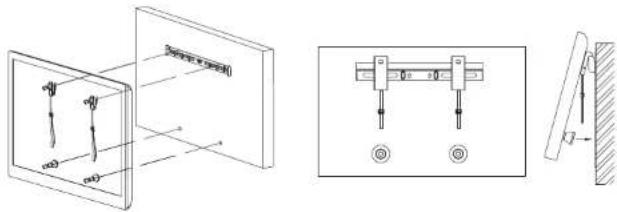
a. Use the wall mounting bracket as a guide to mark the positions for the holes on the wall with a pencil.
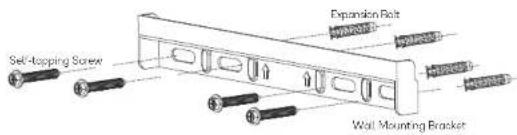
b. Use a drill to create four holes at the marked positions on the wall. Securely fix the wall mounting bracket on the wall with four expansion bolts and four self-tapping screws as shown in the following picture.
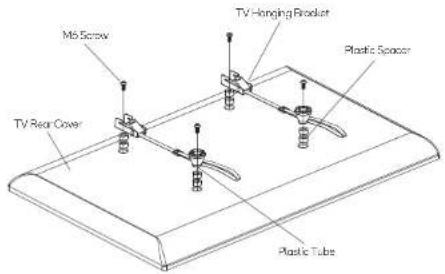
c. Fix the TV hanging bracket onto the TV rear cover with M6 screws and plastic spacers as shown in the following picture.
d. Hang the assembled TV onto the wall mounting bracket fixed tightly on the wall. Please make sure that the hook has been self-locked and it can't fall off while lifting the TV.
natural_image
Technical line drawings of mechanical components and assembly (no text or symbols)NOTE:
Only use wall-mount kit that is recommended by the TV manufacturer, and purchased from the local customer service center. Contact professional technician to implement the wall mount installation to avoid any damage or injury.
SPECIFICATIONS
Audio
Speakers 2 x 10W
Connectivity
Ethernet (RJ45) Yes
HDMI 2.0
HDMI-ARC Yes | HDMI 1
USB 2.0
Wi-Fi IEEE 802.11b/g/n
Dimensions & Weight
Distance Between Legs 1016.6mm
Dimensions Without Stand 1235.7 x 724.2 x 91.7mm
Dimensions With Stand 1235.7 x 759.2 x 238.5mm
VESA Wall Mount Pattern 200 x 200
Weight Without Stand 10.3kg
Weight With Stand 10.5kg
Display
Colours 1.07G
Computer Supported Resolutions 640×360, 853×480, 1024×576, 1280×720, 1366×768, 1920×1080, 3840×2160 (@60Hz)
Contrast Ratio 1200:1
Native Aspect Ratio 16:9
Refresh Rate 60Hz
Resolution 3840 x 2160
Response Time 8ms
Size 55"
Viewing Angle 176°/176°
Features
EPG Yes
HDCP Yes | 2.2
TV Resolution 4K UHD
Browser QJY
Inputs
Composite (AV) 1
ANTENNA
USB 2
HDMI 3
LAN 1
Outputs
Optical Audio Out 1
Performance
CPU ARM CA53 Quad Core with TEE1.5GHz
GPU G52 MC1
OS Android 10.0
RAM 2GB
Storage Capacity 8GB
Power
Average Consumption 150W
Energy Consumption 260kWh per year
Energy Rating 6 Star
Tuning And Signal
Tuner Type DVB-T
Note:
- Design and specifications are subject to change without notice.
- Weight and dimension shown are approximate.
• Pictures in this user manual are only for reference.
TROUBLESHOOTING
Common fixes
Many minor issues can be resolved by hard resetting, or power cycling the unit or upgrading the firmware.
To perform a hard reset, or power cycle, please use the following steps.
- Unplug it from the main power socket and leave it for 10-15 minutes.
- Press and hold the power button on the TV for 5 seconds.
- Connect the TV back to the power and turn it on.
Poor picture and sound quality
- Try a different channel
- Adjust the antenna
- Check all connections
No picture or sound in TV status
- Try another channel
- Press the source button
• Make sure TV is plugged in - Check the antenna connection
Remote control malfunctions
- Replace remote control batteries (we recommend lithium AAA batteries for best results)
- Ensure battery terminal polarity (+/-) is correct
- Remote is out of range, move closer to TV
- Bluetooth remote not paired to TV (refer to Settings > Remotes & Accessories to pair)
- Remove any obstructions between remote and IR sensor of TV
• Make sure the power cord to your TV is plugged in and turned on
No sound or sound is too low at maximum volume
- Check the volume settings on any external speakers connected to your television
- Adjust the TV volume accordingly
- Check another channel or input
- Check that MUTE hasn't been turned on
Blurred or snowy picture, distorted sound
- Check direction, location and connections to your antenna
- Issues may be caused by the use of an indoor antenna (poor signal)
Picture rolls vertically
- Check all connections
No colour, wrong colour or tints
• Make sure the program itself is broadcast in colour
- Select the picture menu, then adjust the colour and tint submenus
Image is not centred on the screen
- Adjust the horizontal and vertical position
"No Signal" on HDMI source
- Test the device with a different HDMI cable
- Plug the device into another HDMI port
- Try a different device connected to the same cable and port
• Perform a factory reset on your TV
Care & maintenance
Unplug the television from the power supply before cleaning. Do not use any liquid cleaners or harsh chemicals. Always use a soft, damp cloth.
Cleaning the screen
Wet a soft cloth in a mixture of lukewarm water and a little fabric softener or dish washing detergent. Wring the cloth until it's almost dry, and then use it to wipe the screen.
Make sure the excess water is off the screen, and then let it air-dry before you turn on your TV.
Cleaning the casing
To remove dirt or dust, wipe the TV casing with a soft, dry, lint-free cloth. Please be sure not to use a wet cloth.
For our full TV troubleshooting guide, head online to help.kogan.com
- THIS USER MANUAL COVERS THE FOLLOWING MODELS
- SAFETY AND WARNINGS
- WARNING
- CAUTION: Connecting the power cord
- CAUTION
- COMPONENTS
- PRODUCT OVERVIEW
- ASSEMBLY AND INSTALLATION
- Stand Assembly
- Connect to Antenna
- TV CONTROL
- Remote Control Assembly
- WARNINGS
- Using Remote Control Without Bluetooth
- TIPS
- Turning on / Tuning off the TV
- TV Control Button
- a. Press Middle
- b. Press Left / Right
- c. Press Forward / Backward
- REMOTE CONTROL OVERVIEW
- FIRST TIME SETUP
- Bluetooth
- Language
- Quickly set up with Android phone
- Select Wi-Fi network
- Google Account sign-in
- Terms of Service
- Location
- Help improve Android
- Install additional apps
- Country
- LCN switch
- Password
- Timezone
- Select TV mode
- Chromecast
- INITIAL SETUP
- NOTE
- Google Assistant
- Text Search
- System Notifications
- Source
- Internet Connection
- Settings
- Clock
- Apps
- Favourites List
- Play Next
- Pinned Channels
- Customise Channels
- BASIC OPERATION
- Channel Selection
- Channel Edit
- Volume Adjustment
- Input Source
- Electronic Program Guide
- Time-shift Function
- USER SETTINGS
- Quick Settings
- TV Setting
- PICTURE
- Picture Mode
- Dynamic Backlight
- Back Light
- Brightness
- Contrast
- Saturation
- HUE
- Sharpness
- Gamma
- Color Temperature
- Advanced
- SOUND
- Sound Mode
- Balance
- Bass
- Treble
- DTS Studio Sound
- Auto Volume
- Speakers
- SPDIF Type
- Spdif Delay
- Audio Type
- Visually Impaired
- TV (Only for TV mode)
- Channels
- HBBTV
- SETUP
- Auto Standby
- Fast Boot
- Screen Mode
- OAD
- Subtitle Language
- Audio Language
- Teletext
- HDMI 2.0 Setting
- Postal Code
- End User Licence Agreement
- TimeShift Setting
- Reset Default
- PARENTAL
- Please enter password
- Channel Block
- Parogram Block
- Change Password
- Clear All
- SETTINGS
- Suggestions
- Network & Internet
- Inputs
- Accounts & Sign In
- Apps
- Device Preferences
- Remotes & Accessories
- MEDIA PLAYER
- Watch Movies
- Play Music
- Browse Photos
- WALL MOUNT INSTALLATION
- Wall-mounting Installation
- NOTE:
- SPECIFICATIONS
- Audio
- Connectivity
- Dimensions & Weight
- Display
- Features
- Outputs
- Performance
- Power
- Tuning And Signal
- TROUBLESHOOTING
- Common fixes
- Poor picture and sound quality
- No picture or sound in TV status
- Remote control malfunctions
- No sound or sound is too low at maximum volume
- Blurred or snowy picture, distorted sound
- Picture rolls vertically
- No colour, wrong colour or tints
- Image is not centred on the screen
- "No Signal" on HDMI source
- Care & maintenance
- Cleaning the screen
- Cleaning the casing
Brand : Kogan
Model : Series 9 TU9210
Category : Television