
XVTHP200 - Soundbar VIZIO - Free user manual and instructions
Find the device manual for free XVTHP200 VIZIO in PDF.

| Product Type | Wireless headphone system with charging dock |
| Model | XVTHP200 |
| Brand | VIZIO |
| Headphone Dimensions (H x W x D) | 7.38 x 7.33 x 2.88 inches (187.55 x 186.11 x 73.13 mm) |
| Dock Dimensions (H x W x D) | 8.64 x 7.82 x 3.58 inches (219.45 x 198.60 x 90.75 mm) |
| Driver Size | 40 mm Neodymium |
| Impedance | 32 Ohm ± 20% at 1 kHz |
| Sensitivity | 96 ± 3 dB at 1 mW |
| Maximum Sound Pressure Level | 110 dB SPL per 1 mW |
| Battery Capacity | 940 mAh |
| Power Supply | 100-240 V AC adapter (for dock) and travel charger |
| Audio Inputs | iPod/iPhone dock, SPDIF (optical), RCA (AUX) |
| Wireless Range | Up to 60 feet (18 meters) |
| Audio Technologies | SRS TruSurround HD, SRS TruVolume, Dolby Digital, Active Noise Reduction (ANR) |
| Compatibility | Made for iPod and iPhone; works with other audio sources via wired or wireless |
| Maintenance | Wipe with a clean, dry, soft cloth; do not use volatile solvents |
| Safety Warnings | Long-term exposure to loud music may cause hearing damage; do not use while driving or cycling |
| Warranty | One-year limited warranty on parts and labor (non-commercial use) |
| Disposal | Dispose of properly according to local laws; contains electronic components and battery |
| FCC Compliance | Class B digital device; complies with Part 15 of FCC rules |
| Product Inclusions | Headphones, wireless dock, power adapter, travel charger, 3.5mm audio cable, RCA audio cable, carrying case |
Frequently Asked Questions - XVTHP200 VIZIO
User questions about XVTHP200 VIZIO
0 question about this device. Answer the ones you know or ask your own.
Ask a new question about this device
Download the instructions for your Soundbar in PDF format for free! Find your manual XVTHP200 - VIZIO and take your electronic device back in hand. On this page are published all the documents necessary for the use of your device. XVTHP200 by VIZIO.
USER MANUAL XVTHP200 VIZIO
IMPORTANT SAFETY INFORMATION

Long-term exposure to loud music may cause hearing damage. Avoid extreme volume when using headphones, especially for extended periods.

Do not use headphones while operating a motor vehicle or a bicycle. Doing so is dangerous and may violate local laws and regulations.

Sounds that you rely on as reminders or warnings may have an unfamiliar character when using headphones. Be aware of how these sounds may vary in character so you can recognize them as needed.

Do not drop, sit on, or allow the headphones to be immersed in water. Do not wear headphones in the rain.

Do not use headphones if the inability to hear outside sounds may present a danger to you or others.

For important information on listening guidelines, see Information on Hearing Damage on page 16.

TruSurround HD

TruVolume
Incorporated under license from SRS Labs, Inc. SRS TruSurround HD and SRS TruVolume are trademarks of SRS Labs, Inc.

DIGITAL
Manufactured under license from Dolby Laboratories. Dolby and the Double-D symbol are trademarks of Dolby Laboratories.
Made for

iPod iPhone
iPhone® and iPod® are trademarks of Apple Inc., registered in the U.S. and other countries.
PACKAGE CONTENTS
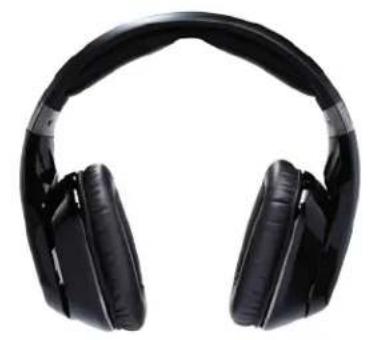
natural_image
Black outdoor headphones with plain white background (no text or symbols visible)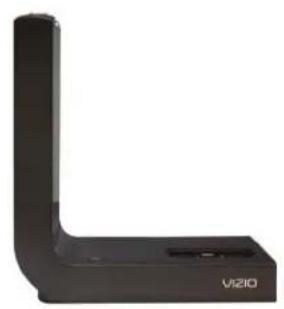
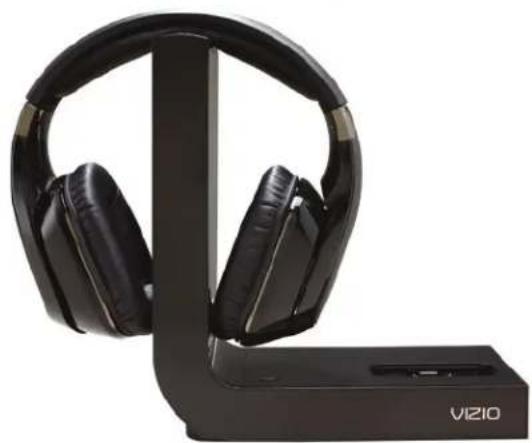
natural_image
Black L-shaped electronic device with visible brand logo and 'VIZIO' branding (no additional text or symbols)
Quick Start GuideHigh Definition
natural_image
Black and white photo of a portable electronic device with a cable and power outlet (no text or symbols visible)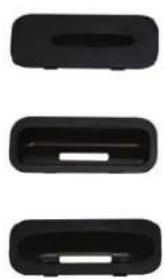
natural_image
Three black plastic buttons with white cutouts, arranged horizontally (no text or symbols visible)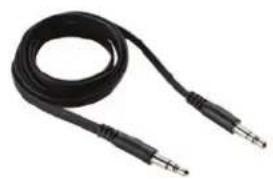
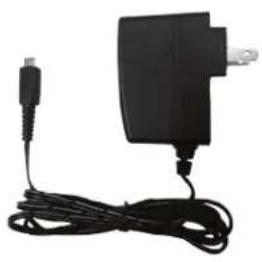
natural_image
Coiled black audio jack with two leads (no text or symbols visible)3.5mm Audio CablePower Adapter
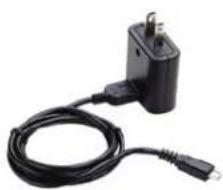
natural_image
Black electrical plug with attached cable, no visible text or symbols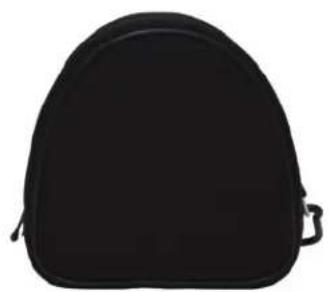
natural_image
Black hard hat with two side buttons, no visible text or symbols
Travel Charger for Headphones Carrying Case RCA Audio Cable
CONTROLS AND CONNECTIONS
Headphones
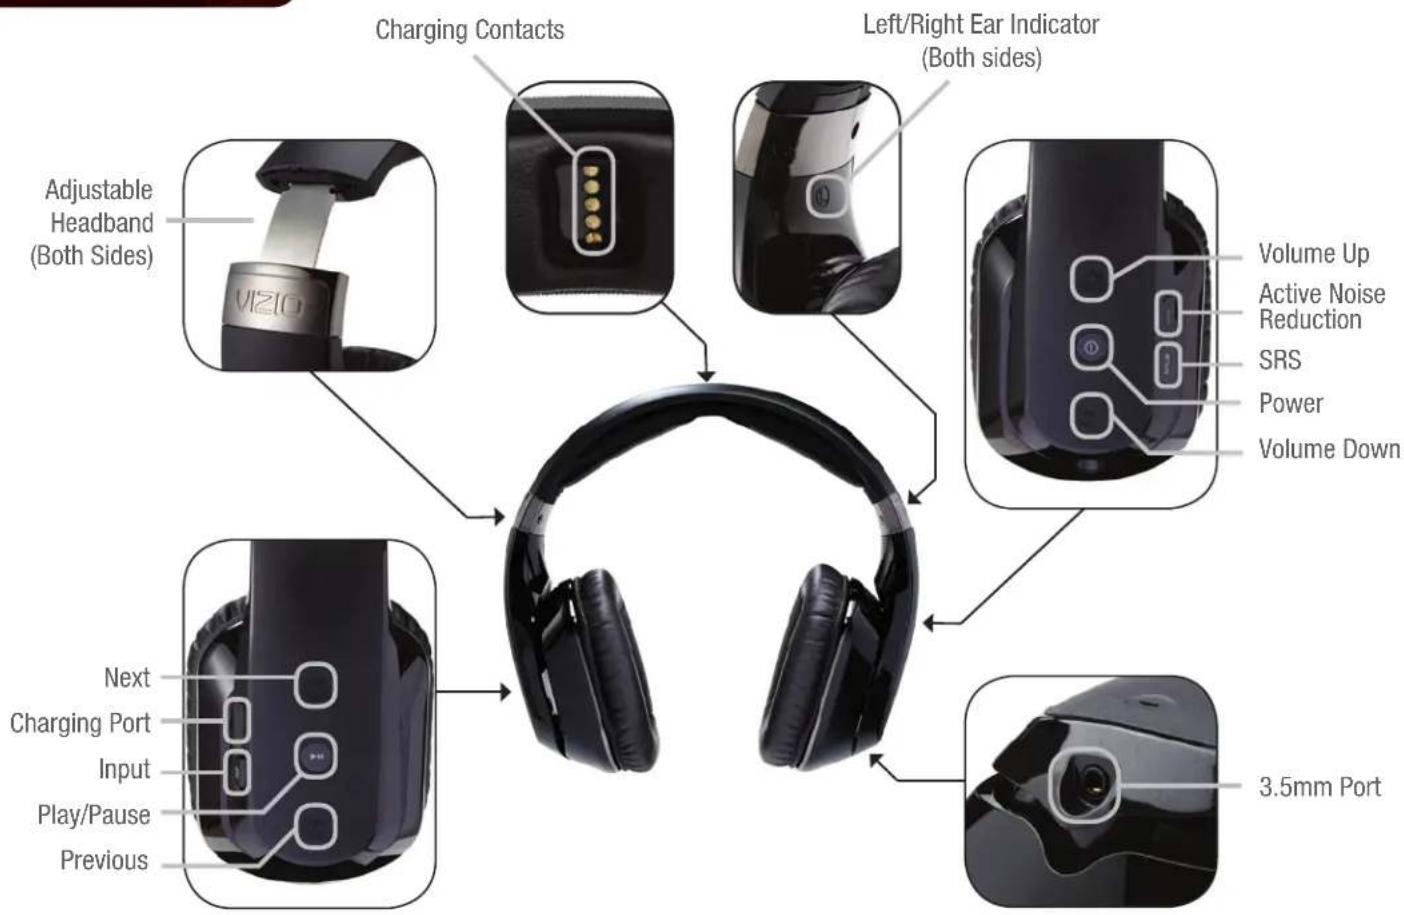
Charging Contacts: Must touch dock contacts to charge
Adjustable Headband: Extend headband to fit
Next: Go to next track on iPod/iPhone
Mini USB Port: Connect to travel charger
Input: Change audio source
Play/Pause: Play or pause audio
Previous: Go to previous track on iPod/iPhone
Volume Up: Increase volume
Active Noise Reduction: Activate to block background noise
SRS: Activate SRS sound processing when listening to the wireless dock
Power: Press and hold for 2 seconds to turn on or off
Volume Down: Decrease volume
3.5mm Port: Connect portable device
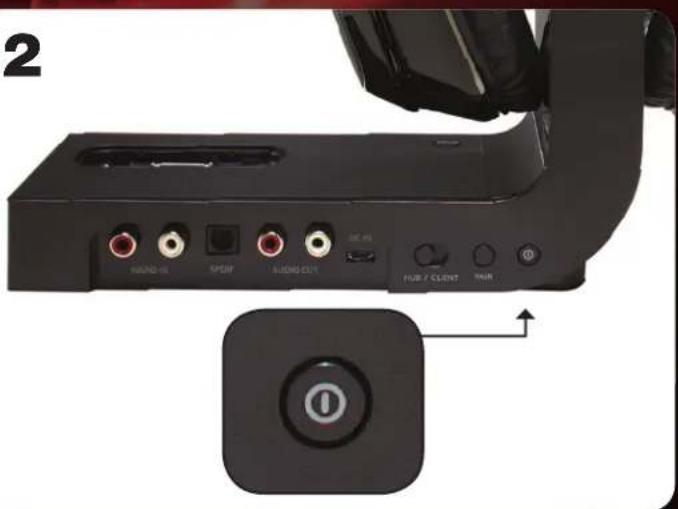
Wireless Dock - Rear Front
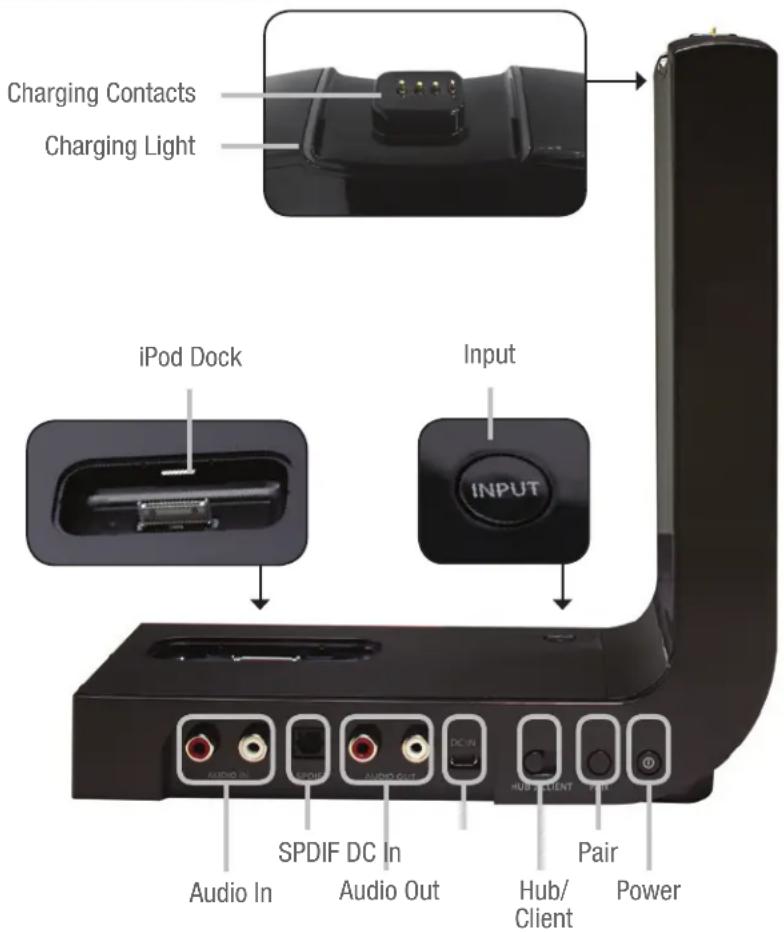
Charging Contacts: Must touch headphone contacts to charge
Charging Light: Turns on when headphones are charging
Input: Change audio source
iPod Dock: Connect iPod to use as audio source
SPDIF: Connect digital audio device
Audio Out: Connect analog receiver or powered speakers
Pair: Connect dock to headphones wirelessly
Power: Press to turn on/off
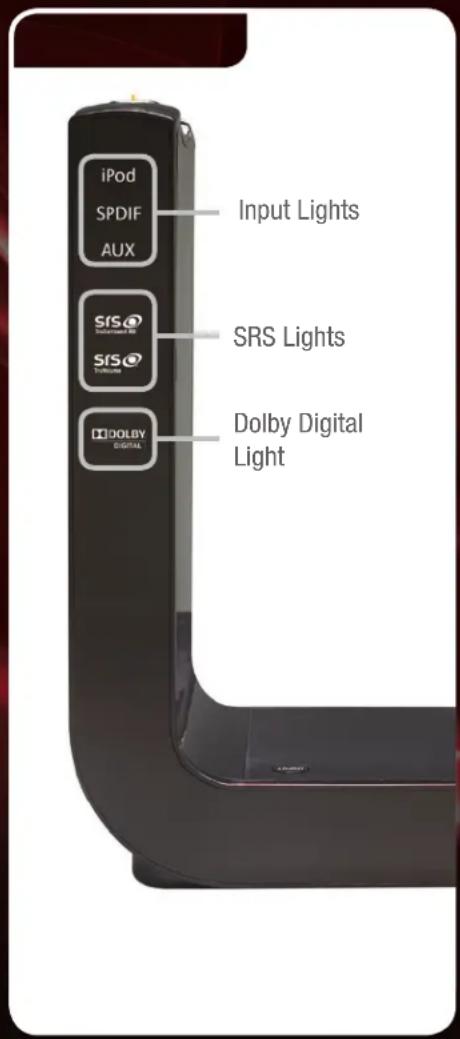
Input Lights: The light corresponds to the input currently selected
SRS Lights: When SRS TruVolume or SRS TruSurround HD is on, the corresponding light is on
Dolby Digital Light: When playing a Dolby Digital source, the light is on (SPDIF only)
FIRST-TIME SETUP
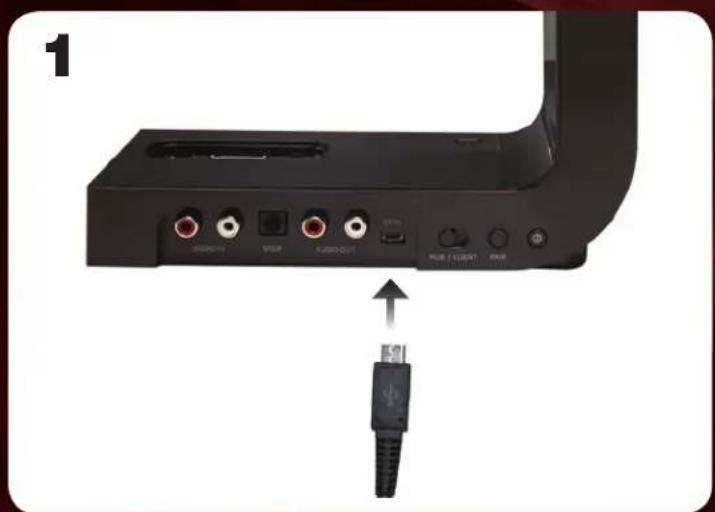
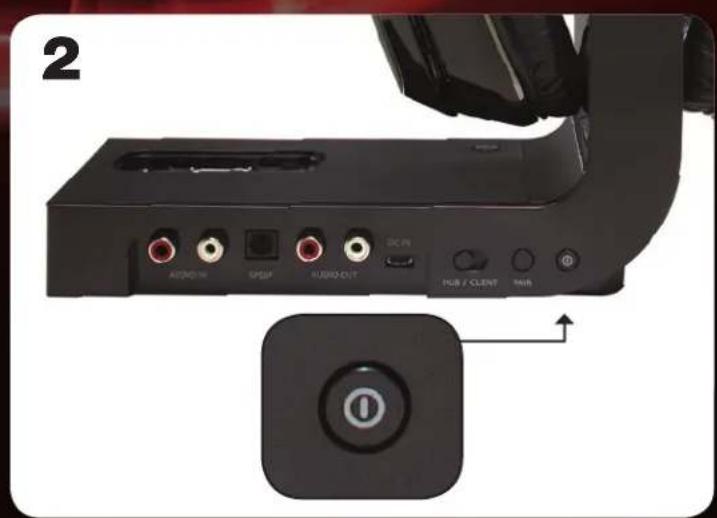
Connect the power adapter to the DC IN port on the wireless dock.
natural_image
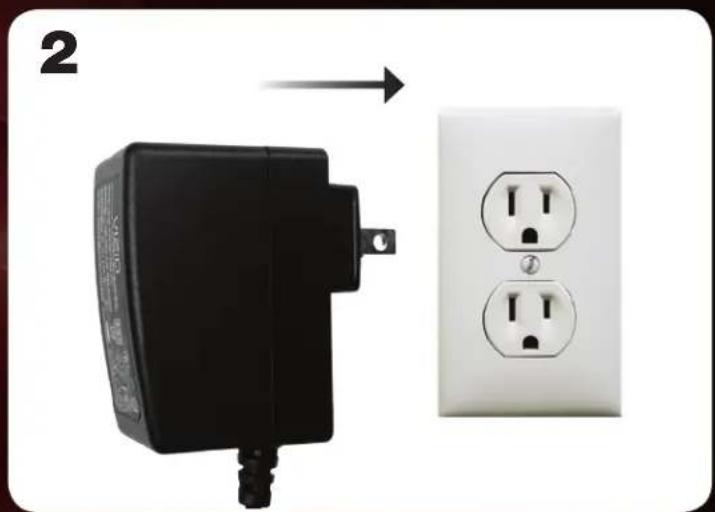
Electric shock absorber with two outlets and a power outlet, shown alongside an arrow indicating direction (no text or symbols on the device itself)Connect the other end of the power adapter to an electrical outlet.

Do not connect the travel charger to the dock.
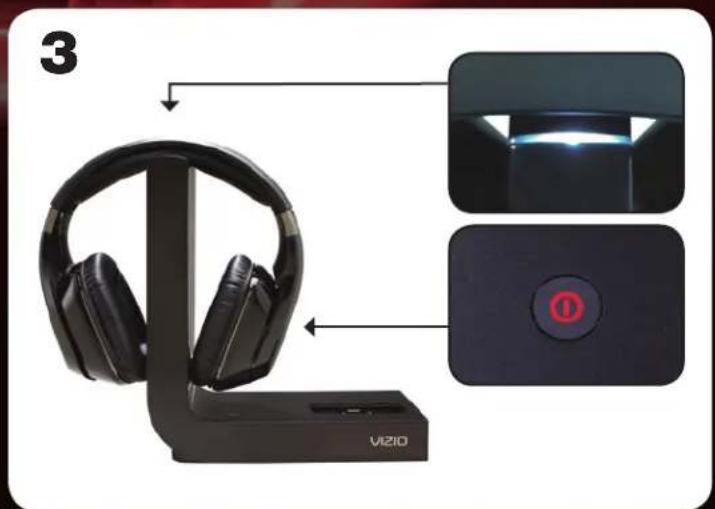
Charge the headphones by placing them on the top of the wireless dock. Ensure the charging contacts are touching.
When the headphones are charging, the charging light is on and the power button on the headphones is red.
Allow the headphones to fully charge.
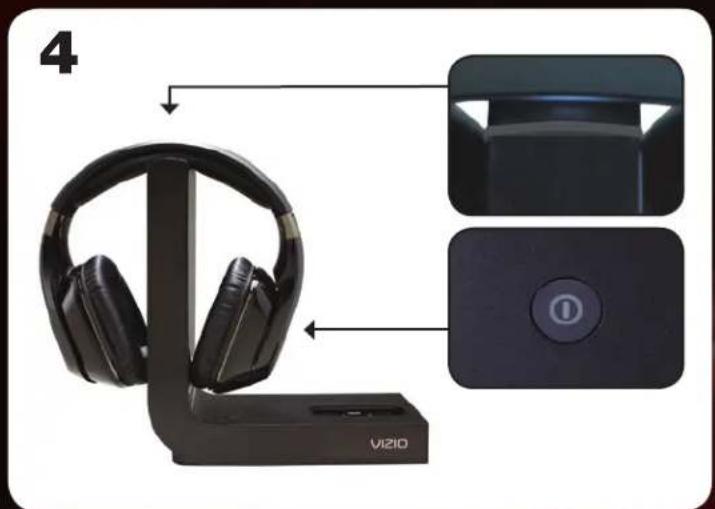
The headphones are fully charged when the charging light is off and the power button on the headphones is off.
5
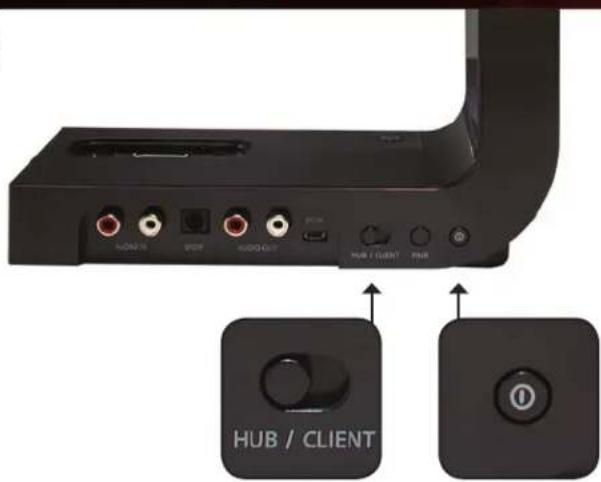
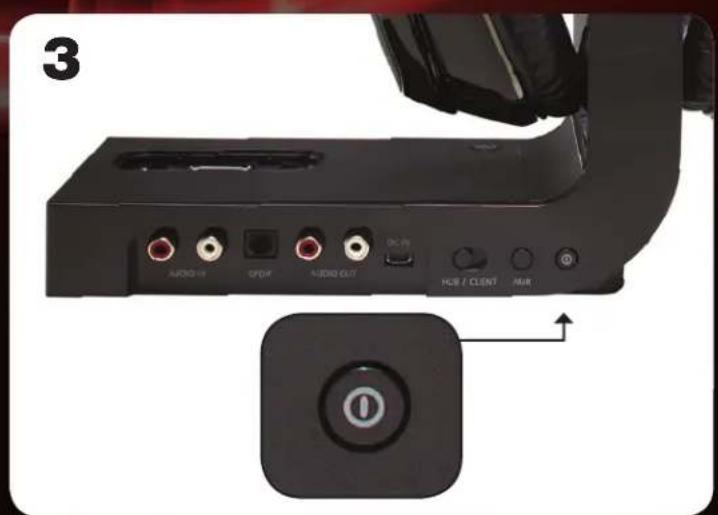
Ensure the HUB/CLIENT switch is in the HUB position.
Turn on the wireless dock by pressing the Power button.
The wireless dock is on when the lights on the front are on.
6

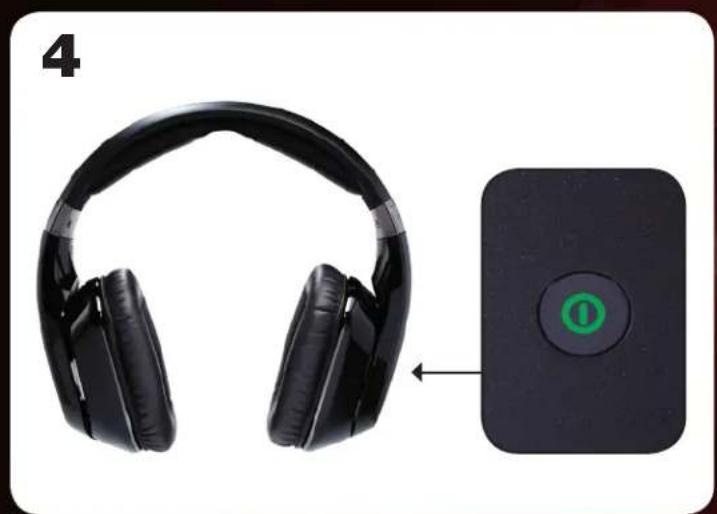
natural_image
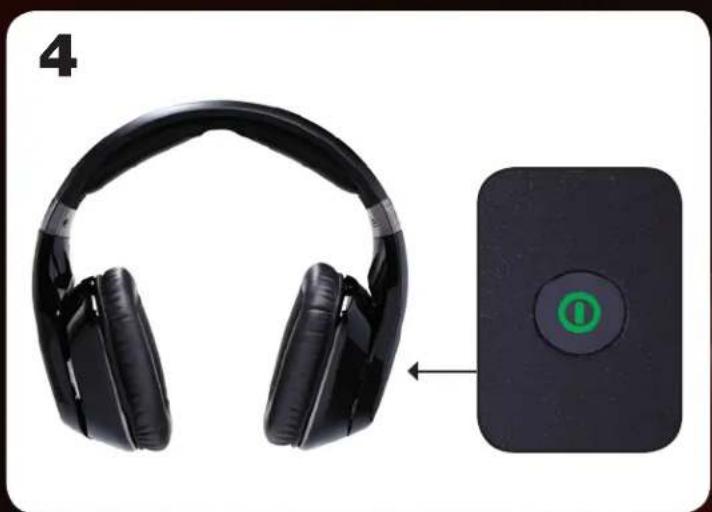
Black headboard headphones with a green circular button labeled 'O' on a black rectangular device (no text or symbols on the headphones or device)Remove the headphones from the wireless dock. Turn on the headphones. Press and hold the Power button for 2 seconds, then release.
When the headphones are on, the Power button is green.
7
natural_image
Black VIZIO ear headphones displayed on a stand (no text or symbols visible on the devices)The wireless dock and headphones are ready to use.
See Listening to Your iPodon page 6 or Listening to Your Devices on page 8.
LISTENING TO YOUR iPod
Complete First-Time Setup on page 4.
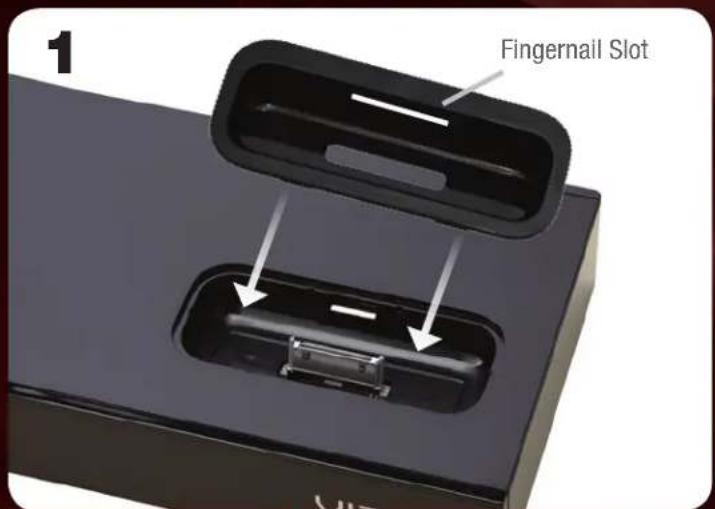
Locate the tray that fits your iPod/iPhone, then place it in the wireless dock. Trays can be removed by lifting from the fingernail slot.
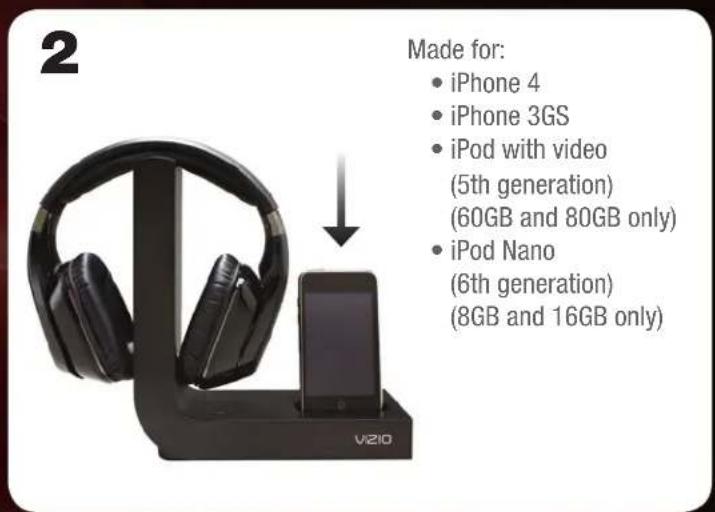
Place your iPod/iPhone in the wireless dock.
Ensure your iPod/iPhone is inserted completely.
Turn on the wireless dock by pressing the Power button.
The wireless dock is on when the front lights are on.
natural_image
Black headboard headphones next to a black rectangular device with a green circular button (no text or symbols visible)Remove the headphones from the wireless dock. Turn on the headphones. Press and hold the Power button for 2 seconds, then release.
The headphones are on when the Power button is green.
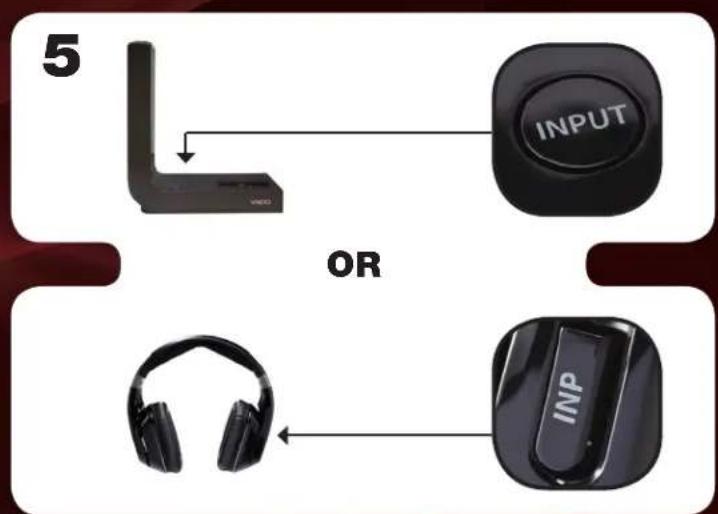
flowchart
graph TD
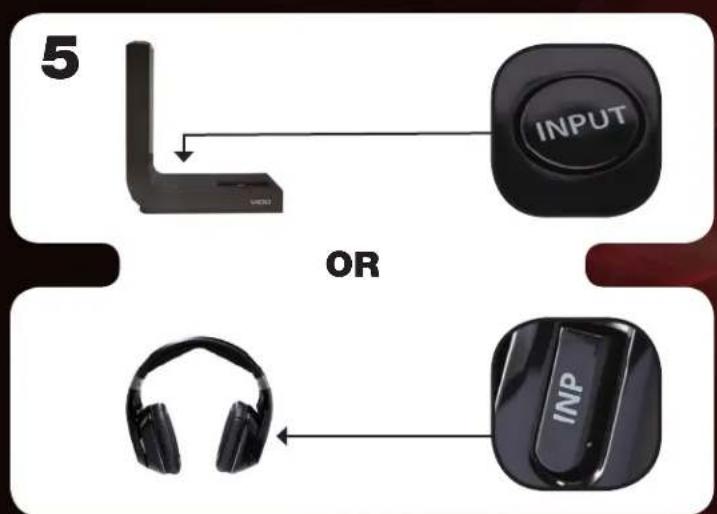
A["INPUT"] --> B["OR"]
C["INP"] --> B["OR"]
Press the INPUT button on the wireless dock or the INP button on the headphones until the input light on the wireless dock displays iPod.
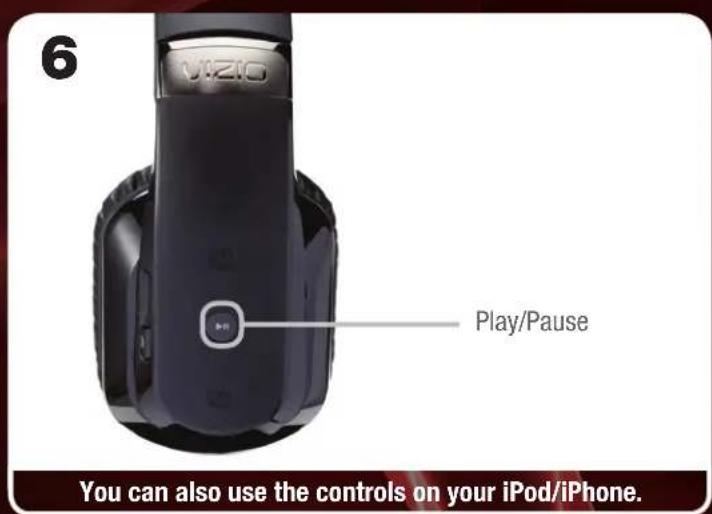
To play or pause your music, press the Play/Pause button on the headphones.

To play the next track, press the Next button on the headphones. To play the previous track, press the Previous button on the headphones.
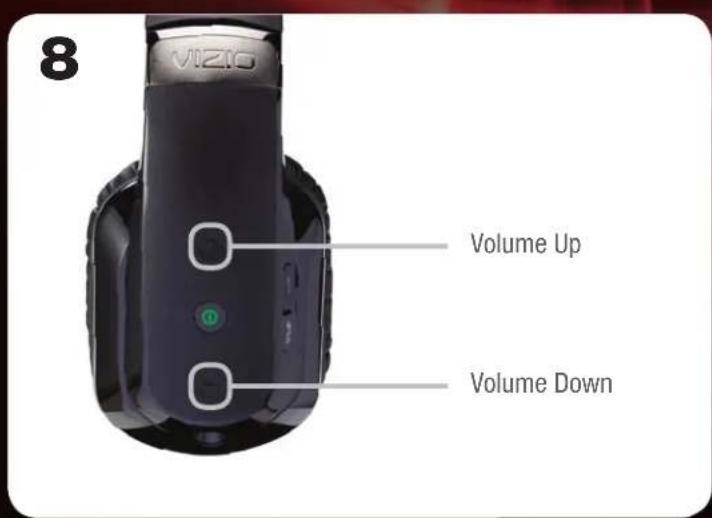
To increase or decrease the volume, press the Volume Up or Volume Down buttons on the headphones. When the headphones are at maximum or minimum volume, you will hear a tone.
LISTENING TO YOUR DEVICES
flowchart
graph LR
    A["Best Sound"] --> B["Good Sound"]
    B --> C["SpDIF"]
    C --> D["SPDIF/Optical Cable*"]
    D --> E["SpDIF"]
    B --> F["RCA Audio Cable"]
    F --> G["AUDIO OUTAUDIO IN"]
    style A fill:#90EE90
    style B fill:#90EE90
    style C fill:#FFA500
    style D fill:#FFA500
    style E fill:#FFA500
    style F fill:#FFA500
    style G fill:#FFA500
    note right of F
        *SPDIF/Optical Cable Not Included
    end
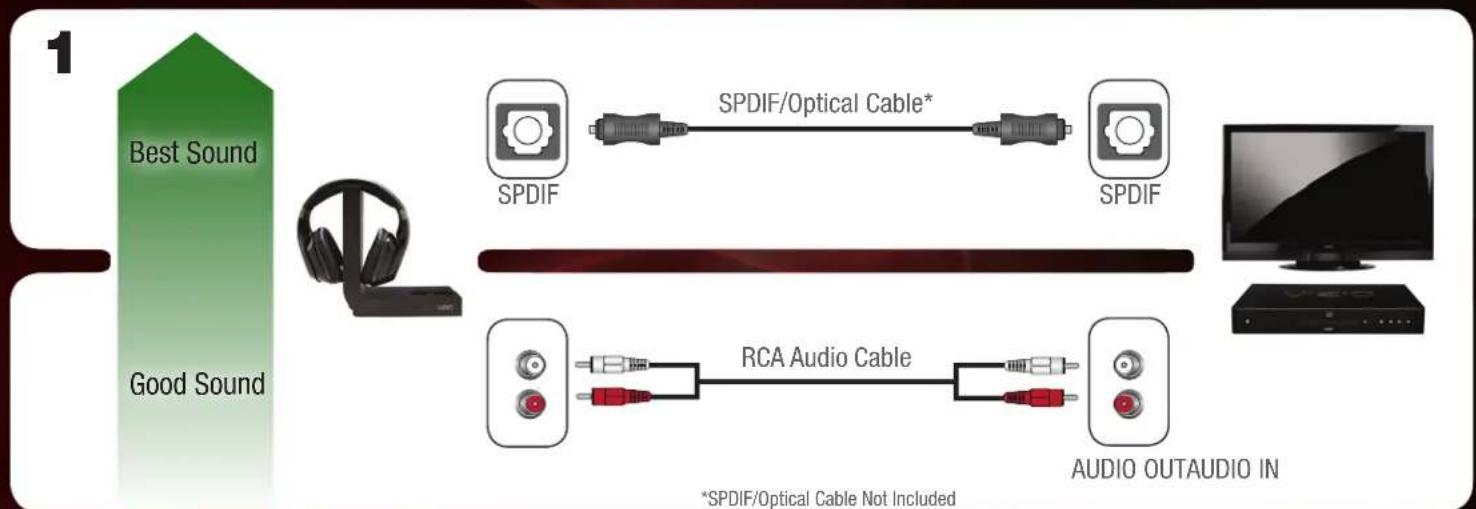
Complete First-Time Setup on page 4, then choose the best connection to the wireless dock. Connect a SPDIF/optical or RCA audio cable from your device to the wireless dock as shown. Remember, you can connect two devices - one device to each port.
Turn on the wireless dock by pressing the Power button. The wireless dock is on when the lights on the front are on.
natural_image
Black television set with a monitor and a black audio device (no visible text or symbols)Turn on the device you connected to the wireless dock.
natural_image
Black headboard headphones with a small electronic device labeled 'O' pointing to the front panel (no text or symbols on the headphones or device)Remove the headphones from the wireless dock. Turn on the headphones. Press and hold the Power button for 2 seconds, then release.
The headphones are on when the Power button is green.
Press the INPUT button on the wireless dock or the INP button on the headphones until the input light on the wireless dock displays SPDIF or AUX (AUDIO IN).
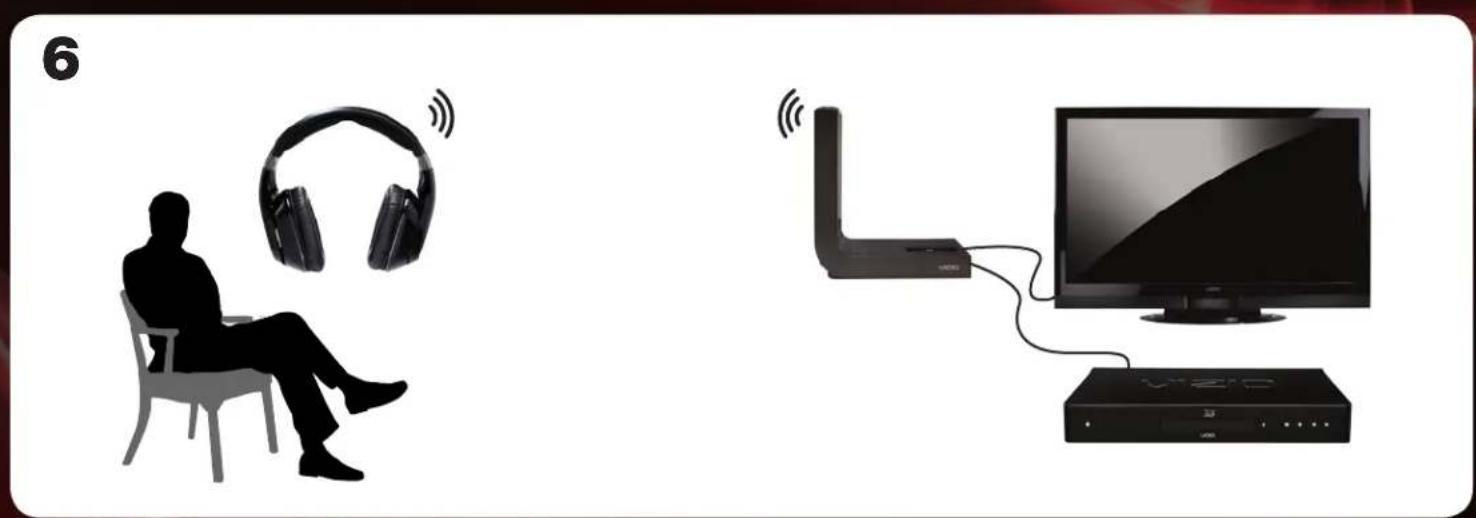
natural_image
Silhouette of a person sitting in a chair with headphones, connected to a TV and streaming device (no text or symbols visible)You can now listen to your devices wirelessly using the headphones—up to 60 feet away!
Complete First-Time Setup on page 4.
Connect your home stereo to the wireless dock using an RCA audio cable as shown. (Devices differ—see your home stereo's user manual for details.)
2
Turn on the wireless dock by pressing the Power button.
The wireless dock is on when the lights on the front are on.
3
natural_image
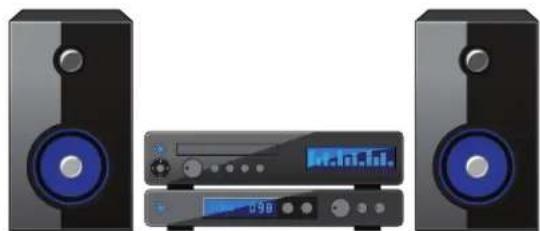
Illustration of a CD-ROM with two speakers and a digital audio workstation (no text or symbols visible)Turn on your home stereo.
Set your home stereo input to the port to which the wireless dock is connected.
4
natural_image
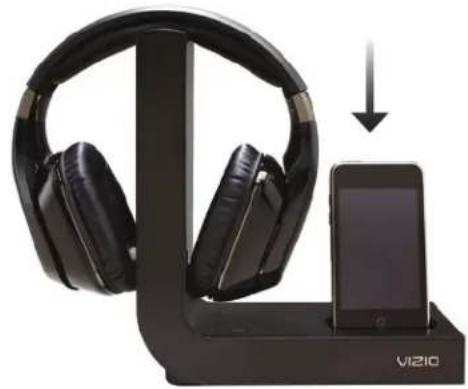
Black Vizio headphones connected to a smartphone in a charging station (no text or symbols visible)Place your iPod/iPhone in the iPod dock. Ensure your iPod/iPhone is inserted completely.
5
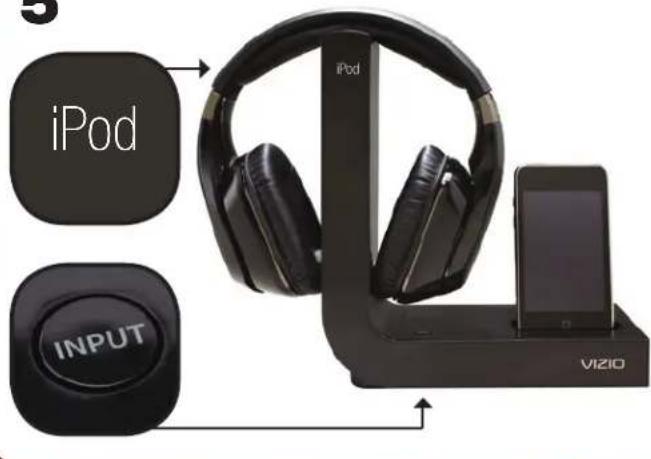
Press the INPUT button on the wireless dock until the input light on the wireless dock displays iPod.
6
natural_image
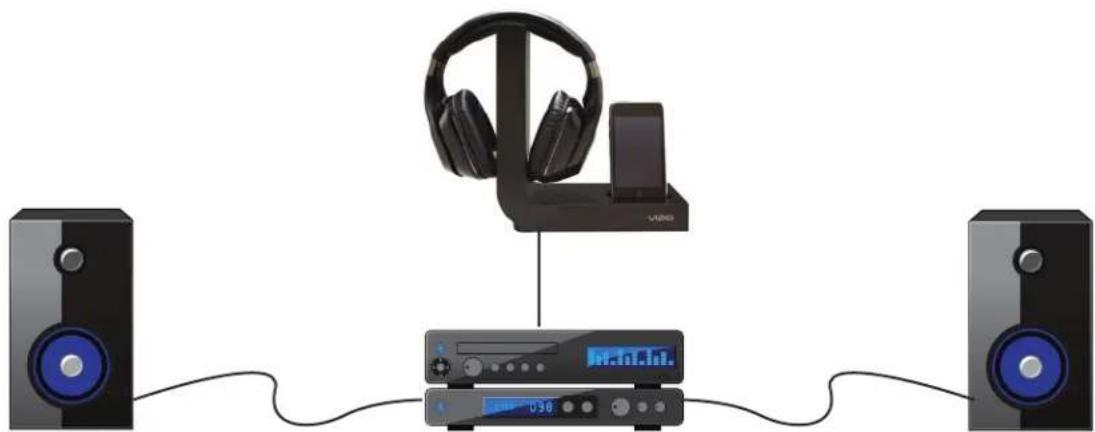
Audio equipment setup with headphones, audio/video modulator, and two speakers (no text or symbols visible)You can now share your iPod/iPhone music on your home stereo.
Use the controls on your iPod/iPhone to play, pause, or change tracks. Use the volume controls on your home stereo to increase or decrease volume.
TRAVELING WITH YOUR HEADPHONES
Your headphones are comfortable, portable, and feature Noise Cancellation, all of which make them the perfect travel companion.
And because they feature a 3.5mm audio port, you can connect them to an in-flight entertainment system or your favorite media device.
Your headphones include the following travel accessories:
• 3.5mm Audio Cable
- Travel Charger
- Charging Cable
- Travel Case
For the best travel experience with your headphones, follow the tips on this page.
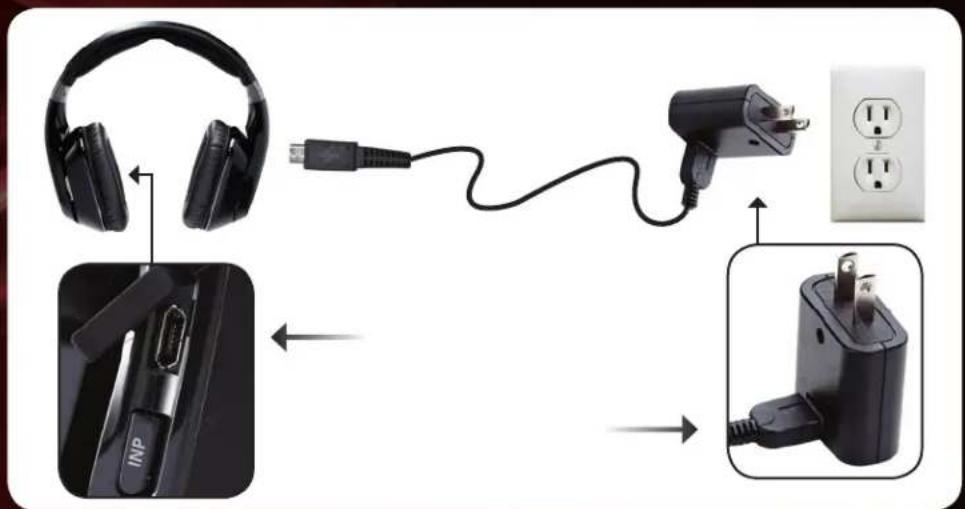
To charge the headphones, gently lift the rubber cover on the right side of the headphones and connect the charging cable.
Connect the other end of the charging cable to the travel charger, then plug the travel charger into an electrical outlet. You can also connect the charging cable to a USB port on your laptop.
natural_image
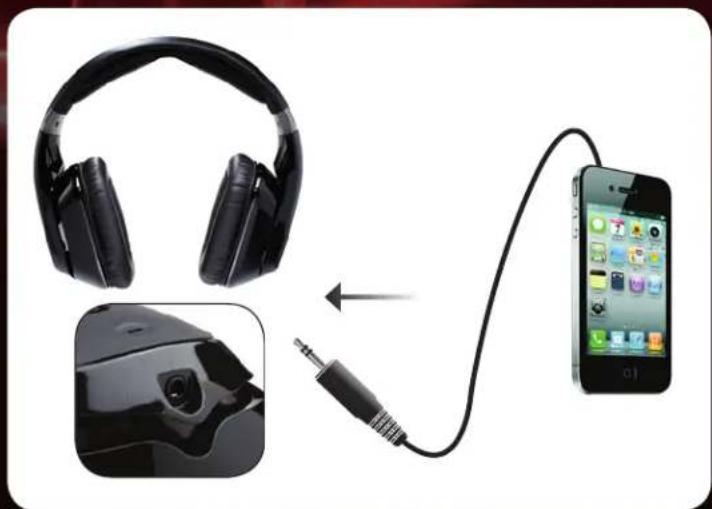
Illustration of a smartphone connected to an audio headset, showing ear and microphone connection (no text or symbols)Connect the 3.5mm cable to your iPod, iPhone, or other device. Connect the other end to the 3.5mm audio port on the headphones.

Only the Volume Up/Down, ANR, and Power buttons function when the headphones are connected with the 3.5mm cable.
natural_image
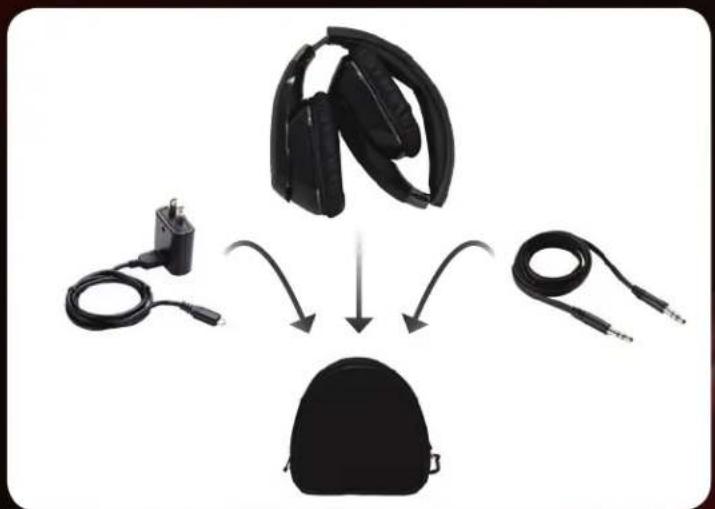
Diagram showing three types of headphones connected to a black backpack, with no visible text or symbols.When transporting the headphones, fold them as shown and place them in the travel case.
The travel case also has room for the 3.5mm cable, charging cable, and travel charger. Don't forget to bring them with you!
What is SRS TruVolume?
SRS TruVolume eliminates volume spikes, enabling you to enjoy your music, television, movies, and other media at a comfortable and consistent volume level.
What is SRS TruSurround HD?
SRS TruSurround HD provides an enhanced listening experience for your music, movies, television, games, and other media. SRS technology creates “phantom” speakers that seem to extend all around the listener, producing an amazing surround sound effect. TruSurround HD includes the functionality of SRS WOW HD to present an expansive three dimensional sound field.
Can I use TruVolume and TruSurround HD at the same time?
Yes.
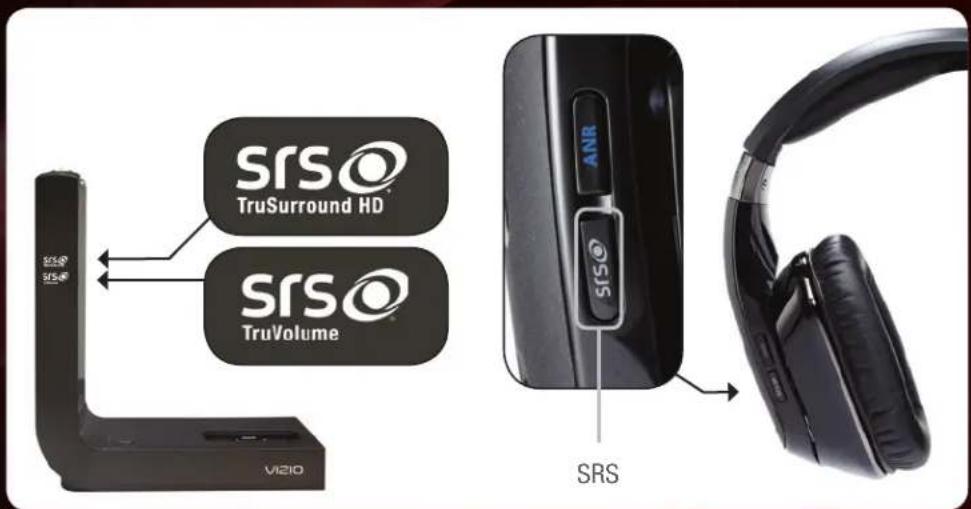
To turn SRS TruVolume on or off, press the SRS button on the left side of the headphones. When TruVolume is on, the SRS TruVolume light is on.
To turn SRS TruSurround HD on or off, press and hold the SRS button for 2 seconds.
When TruSurround is on, the SRS TruVolume light is on.
USING ACTIVE NOISE CANCELLATION
What is Active Noise Cancellation?
Active Noise Cancellation (ANR) reduces unwanted background noise so you can enjoy your music and media.
How does Active Noise Cancellation work?
Your headphones incorporate technology that detects loud, continuous noises. The headphones then generate a signal that interferes with the unwanted noise. Now you can listen to music or media without distractions.
Where does Active Noise Cancellation work best?
ANR works best when reducing continuous humming sounds, like vacuum cleaners, lawn mowers, or airplane and bus engines. This makes your headphones an ideal travel accessory!
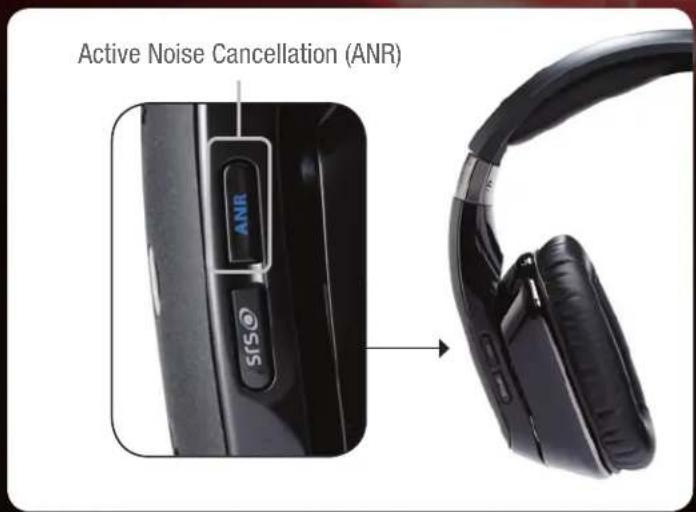
To use active noise cancellation, press the ANR button on the left side of the headphones.
When active noise cancellation is on, the ANR button light is on.
WIRELESS HD AUDIO (WHDA)
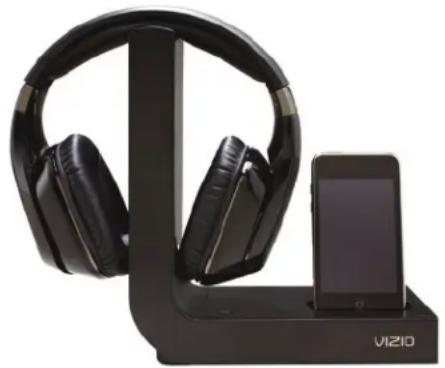
natural_image
Black VIZIO headphones displayed in a black rack beside an iPod device (no text or symbols visible on the devices themselves)CRYSTAL CLEAR AUDIO
Never before has sound been like this. Our new Wireless HD Audio Technology allows you to hear even the most minute sounds the way they were intended to be heard—with accuracy and clarity. After all, sound is one of the most important parts of the picture. Don't miss it.
UNWIRE YOUR HOME THEATER
Break the constraints of unsightly cables and wires. Free your sound systems from the limitations of their cords. Unleash your audio and bring a whole new listening experience to your HDTV system. Introducing VIZIO's intelligent, Wireless HD Audio (WHDA) featuring Dolby Digital, SRS TruSurround™ and SRS TruVolume™.
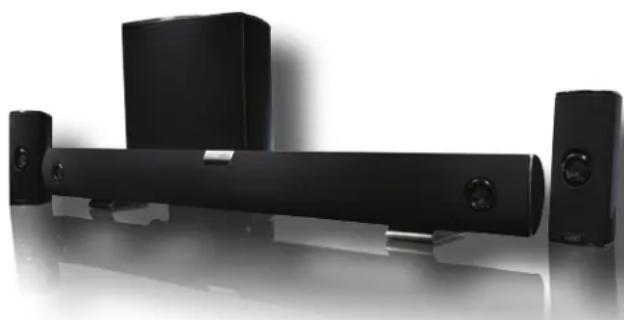
natural_image
Black outdoor audio equipment including a speaker, sound block, and speakers (no visible text or symbols)
natural_image
Silhouette of a person in motion with abstract light blue wave patterns (no text or symbols)WHOLE HOME AUDIO
Picture this. A home audio system that truly encompasses every room of your house. Plug in your Wireless Dock for iPod and listen to your favorite tunes as you move from room to room. Hear the lines from your favorite movie as you go from the living room to the back porch. Never miss the play-by-play as you pile the goodies on your mammoth burger during the big game. That's the beauty of Wireless Audio from VIZIO.
Your new wireless headphones work with other WHDA products! For more information on Wireless HD Audio, visit www.VIZIO.com.
HELP TOPICS
| There is no power. | Fully charge the battery each time you charge the headphones. See First-Time Setup on page 4.Press the Power button on the rear of the wireless dock. Ensure the lights on the front of the dock are on.Press and hold thePower button for 2 seconds to turn the headphones on.Ensure the power adapter for the wireless dock, not the travel charger, is securely connected to the DC IN port. |
| There is no sound. | Increase the volume. PressVolume Upon the headphones and/or on your device.Ensure the headphones are on and within range of the wireless dock (up to 60 feet).If connected with the 3.5mm cable, ensure the cable is securely connected to your device and to the headphones. You may need to increase the volume on both your device and the headphones.Ensure the HUB/CLIENT switch is in the HUB position.Press the INPUT button until the light on the front of the wireless dock matches the input to which you want to listen. |
| The buttons on the headphones do not control my music player. | The buttons on the headphones only control iPod/iPhone.The iPod/iPhone must be connected to the wireless dock. SeeListening to the iPod Dock on page 6. |
| The Power button on the headphones is blinking green and there is no sound. | Pair the headphones to the wireless dock:Turn off the headphones and wireless dock.Turn on the wireless dock. Press and hold thePAIRbutton for 7 seconds. The lights on the dock begin to blink.Press and hold thePowerbutton on the headphones for 7 seconds.When the pairing is complete, the lights on the dock and headphones stop blinking. |
| The headphones do not charge when placed on the wireless dock. | Ensure the dock is plugged into a working electrical outlet with the power adapter for the wireless dock.Ensure the metal contacts on the headphones are touching the metal pins on the wireless dock. When the headphones are charging, the charging light on the top of the wireless dock is on.Try charging the headphones using the travel charger and cable. SeeTraveling with Your Headphones on page 12. |
| When I connect my device with an RCA audio cable, there is low or no volume | Ensure the RCA audio cable is connected to the AUDIO OUT port on your device and the AUDIO IN port on the dock.Some devices, such as TVs, support variable audio out over RCA audio cables. Set your device to “fixed” or “line level” audio out. (Devices differ—see your device’s user manual for details.)If your device does not support the “fixed” or “line level” setting, increase the volume on the device. |
| I hear static, the sound quality is low, or my music drops out. | Ensure you are in range of the wireless dock (up to 60 feet). Range is affected by obstructions (walls, furniture) between the headphones and the dock.You may be hearing interference from other wireless devices. Try repositioning the dock away from other devices or adjusting the wireless settings on your other devices. (See your device’s user manual.) |
| I hear beeping in the headphones. | When the headphones need charging, you will hear a beep every few minutes. Charge the headphones. SeeFirst-Time Setup on page 4 or Traveling with Your Headphones on page 12.When the headphone volume is at maximum or minimum, you will hear a beep. This is normal. |
| When I connect my device with a SPDIF/optical cable, there is no sound. | Your device may be sending audio in an unsupported format. Change your device to output PCM or Dolby Digital Bitstream. Other audio formats, such as DTS, are not supported. (Devices differ—see your device’s user manual for details.) |
ONE-YEAR LIMITED WARRANTY
ON PARTS AND LABOR
Covers units purchased as new in United States and Puerto Rico Only
VIZIO provides a warranty to the original purchaser of a new Product against defects in materials and workmanship for a period of one year of non-commercial usage and ninety (90) days of commercial use. If a Product covered by this warranty is determined to be defective within the warranty period, VIZIO will either repair or replace the Product at its sole option and discretion.
To obtain warranty service, contact VIZIO Technical Support via email: TechSupport@VIZIO.com or via phone at 877 MY VIZIO (877.698.4946) from 6:00AM to 9:00PM Monday through Friday and 8:00AM to 4:00PM Saturday and Sunday, Pacific Time, or visit www.VIZIO.com. PRE-AUTHORIZATION MUST BE OBTAINED BEFORE SENDING ANY PRODUCT TO A VIZIO SERVICE CENTER. Proof of purchase in the form of a purchase receipt or copy thereof is required to show that a Product is within the warranty period.
Parts and Labor
There will be no charge for parts or labor during the warranty period. Replacement parts and Products may be new or recertified at VIZIO's option and sole discretion. Replacement parts and Products are warranted for the remaining portion of the original warranty or for ninety (90) days from warranty service or replacement, whichever is greater.
Type of Service
Defective Products must be sent to a VIZIO service center to obtain warranty service. VIZIO is not responsible for transportation costs to the service center, but VIZIO will cover return shipping to the customer. PRE-AUTHORIZATION IS REQUIRED BEFORE SENDING ANY PRODUCT TO A VIZIO SERVICE CENTER FOR WARRANTY SERVICE. Product returns to VIZIO's service centers must utilize either the original carton box and shipping material or packaging that affords an equal degree of protection. VIZIO
Technical Support will provide instructions for packing and shipping the covered Product to the VIZIO service center.
Limitations and Exclusions
VIZIO's one-year limited warranty only covers defects in materials and workmanship. This warranty does not cover, for example: cosmetic damage, normal wear and tear, improper operation, improper voltage supply or power surges, signal issues, damages from shipping, acts of God, any type of customer misuse, modifications or adjustments, as well as installation and set-up issues or any repairs attempted by anyone other than by a VIZIO authorized service center. Products with unreadable or removed serial numbers, or requiring routine maintenance are not covered. This one year limited warranty does not cover Products sold "AS IS", "FACTORY RECERTIFIED", or by a non-authorized reseller.
THERE ARE NO EXPRESS WARRANTIES OTHER THAN THOSE LISTED OR DESCRIBED ABOVE. ANY IMPLIED WARRANTIES, INCLUDING ANY IMPLIED WARRANTY OF MERCHANTABILITY AND FITNESS FOR A PARTICULAR PURPOSE, SHALL BE LIMITED IN DURATION TO THE PERIOD OF TIME SET FORTH ABOVE. VIZIO'S TOTAL LIABILITY FOR ANY AND ALL LOSSES AND DAMAGES RESULTING FROM ANY CAUSE WHATSOEVER INCLUDING VIZIO'S NEGLIGENCE, ALLEGED DAMAGE, OR DEFECTIVE GOODS, WHETHER SUCH DEFECTS ARE DISCOVERABLE OR LATENT, SHALL IN NO EVENT EXCEED THE PURCHASE PRICE OF THE PRODUCT. VIZIO SHALL NOT BE RESPONSIBLE FOR LOSS OF USE, LOSS OF INFORMATION OR DATA, COMMERCIAL LOSS, LOST REVENUE OR LOST PROFITS, OR OTHER INCIDENTAL OR CONSEQUENTIAL DAMAGES. SOME STATES DO NOT ALLOW LIMITATIONS ON HOW LONG AN IMPLIED WARRANTY LASTS OR THE EXCLUSION OF INCIDENTAL OR CONSEQUENTIAL DAMAGES, SO THE ABOVE LIMITATIONS OR EXCLUSIONS MAY NOT APPLY TO YOU. THIS WARRANTY GIVES YOU SPECIFIC LEGAL RIGHTS, AND YOU MAY ALSO HAVE OTHER RIGHTS, WHICH VARY FROM STATE TO STATE. THIS WARRANTY IS SUBJECT TO CHANGE WITHOUT NOTICE. CHECK www.VIZIO.com FOR THE MOST CURRENT VERSION.
INFORMATION ON HEARING DAMAGE
Understanding Noise Induced Hearing Loss
Exposure to loud sounds can damage your hearing, causing hearing loss and tinnitus (ringing or buzzing in the ears). While a variety of things can lead to hearing loss, including aging and side effects of certain medications, the most common cause of non-age-related hearing damage is loud noise. Extremely loud sounds, such as gun shots or firecrackers at close range, can cause immediate hearing damage. Hearing damage can also occur over time due to repeated exposure to loud sounds such as industrial noise or loud music. With continued exposure to loud noises, ears may become accustomed to the sound level, which may result in permanent damage to hearing without any noticeable discomfort.
Temporary and Permanent Hearing Loss
Noise induced hearing loss and tinnitus may be temporary or permanent. Ears typically recover from temporary hearing damage in a short time. However, ears may not recover completely, and some damage may be permanent. Repeated exposure to loud sound can cause more and more damage, and eventually lead to serious hearing problems. Scientists generally agree that, over time, exposure to harmful levels of noise can lead to permanent noise induced hearing loss by damaging and/or destroying the inner ear's sensory hair cells.
Loud Sounds + Time = Hearing Loss
The more time you spend exposed to loud sounds, the more likely you are to damage your hearing. All of the loud sounds that you are exposed to during a day add up - continued exposure to loud sounds can prevent your ears from recovering and also cause additional damage.
Symptoms of Hearing Loss
While not all noise induced hearing loss is noticeable, symptoms may include a sensation of pressure or fullness in your ears, ringing in your ears, or muffled speech. If you experience these symptoms or believe you may have experienced noise induced hearing loss, you should have your hearing checked by an ear doctor or audiologist.
CARE & MAINTENANCE
Do not use volatile solvents (such as toluene, rosin, or alcohol) to clean this product. Such chemicals may damage it. Do not spray cleaners directly on the product. To clean the wireless dock or headphones, gently wipe them with a clean, dry, soft cloth.
LEGAL & COMPLIANCE
FCC Class B Radio Interference Statement
NOTE: This equipment has been tested and found to comply with the limits for a Class B digital device, pursuant to Part 15 of the FCC Rules. These limits are designed to provide reasonable protection against harmful interference in a residential installation. This equipment generates, uses and can radiate radio frequency energy, and if not installed and used in accordance with the instructions, may cause harmful interference to radio communications. However, there is no guarantee that interference will not occur in a particular installation. If this equipment does cause harmful interference to radio or television reception, which can be determined by turning the equipment off and on, the user is encouraged to try to correct the interference by one or more of the following measures:
- Reorient or relocate the receiving antenna.
- Increase the separation between the equipment and receiver.
- Connect the equipment into an outlet on a circuit different from that to which the receiver is connected.
- Consult the dealer or an experienced radio/TV technician for help.
This device complies with Part 15 of the FCC Rules. Operation is subject to the following two conditions: (1) this device may not cause harmful interference, and (2) this device must accept any interference received, including interference that may cause undesired operation.
Notice:
- The changes or modifications not expressly approved by the party responsible for compliance could void the user's authority to operate the equipment.
- Shielded interface cables and AC power cord, if any, must be used in order to comply with the emission limits.
- The manufacturer is not responsible for any radio or TV interference caused by unauthorized modification to this equipment. It is the responsibilities of the user to correct such interference.
TECHNICAL SUPPORT
Products are often returned due to a technical problem rather than a defective product that may result in unnecessary shipping charges billed to you. Our trained support personnel can often resolve the problem over the phone. For more information on warranty service or repair, after the warranty period, please contact our Support Department at the number below.
Customer support and quality service are integral parts of VIZIO's commitment to service excellence. For technical assistance contact our VIZIO Technical Support Department via email or phone. Please have your VIZIO model number, serial number, and date of purchase available before your call.
Address: 39 Tesla
Irvine, CA 92618, USA
Phone: (877) 698-4946
Fax: (949) 585-9563
Email: techsupport@vizio.com
Web: www.vizio.com
Hours of operation:
Monday - Friday: 6 am to 9 pm (PST)
Saturday - Sunday: 8 am to 4pm (PST)
RF Exposure Information
This device meets the government's requirements for exposure to radio waves. This device is designed and manufactured not to exceed the emission limits for exposure to radio frequency (RF) energy set by the Federal Communications Commission of the U.S. Government. This device complies with FCC radiation exposure limits set forth for an uncontrolled environment.
IC Statement
Operation is subject to the following two conditions:
- This device may not cause interference, and
- This device must accept any interference, including interference that may cause undesired operation of the device.
This Class B digital apparatus complies with Canadian ICES-003.
This equipment complies with IC RSS-102 radiation exposure limits set forth for an uncontrolled environment. This equipment should be installed and operated with minimum distance 20cm between the radiator & your body.
Disposal and Recycling
You must dispose of this product properly, according to local laws and regulations. Because this product contains electronic components and a battery, it must be disposed of separately from household waste. Contact local authorities to learn about disposal and recycling options.
Made for iPod and Made for iPhone
"Made for iPod" and "Made for iPhone" mean that an electronic accessory has been designed to connect specifically to iPod or iPhone, respectively, and has been certified by the developer to meet Apple performance standards. Apple is not responsible for the operation of this device or its compliance with safety and regulatory standards. Please note that the use of this accessory with iPod or iPhone may affect wireless performance.
SPECIFICATIONS
Speakers: 40mm Neodymium Drivers
Sensitivity 96±3 dB 1mW at 1.5mm
Distortion: 1KHz < 10%
Impedance: 32 Ohm ± 20% at 1KHz
SPL: 110 dB SPL per 1mW
Battery Power: Battery - 940mAh
Voltage: Adapter - 100V\~240V
Dimensions: Headphones - 7.38" x 7.33" x 2.88" (187.55 x 186.11 x 73.13mm)
Dock - 8.64" x 7.82" x 3.58" (219.45 x 198.60 x 90.75mm)
Certifications: SRS Circle Surround, SRS TruVolume, Dolby Digital, Made for iPod
Compliances: FCC, IC

TRADEMARKS SHOWN ARE THE PROPERTY OF THEIR RESPECTIVE OWNERS. IMAGES USED ARE FOR ILLUSTRATION PURPOSES ONLY. VIZIO, THE V LOGO, WHERE VISION MEETS VALUE, AND OTHER VIZIO TRADEMARKS ARE THE INTELLECTUAL PROPERTY OF VIZIO INC. PRODUCT FEATURES AND SPECIFICATIONS ARE SUBJECT TO CHANGE WITHOUT NOTICE. © 2010 VIZIO INC. ALL RIGHTS RESERVED.


- IMPORTANT SAFETY INFORMATION
- CONTROLS AND CONNECTIONS
- LISTENING TO YOUR iPod
- TRAVELING WITH YOUR HEADPHONES
- What is SRS TruVolume?
- What is SRS TruSurround HD?
- Can I use TruVolume and TruSurround HD at the same time?
- USING ACTIVE NOISE CANCELLATION
- What is Active Noise Cancellation?
- How does Active Noise Cancellation work?
- Where does Active Noise Cancellation work best?
- WIRELESS HD AUDIO (WHDA)
- CRYSTAL CLEAR AUDIO
- UNWIRE YOUR HOME THEATER
- WHOLE HOME AUDIO
- ONE-YEAR LIMITED WARRANTY
- ON PARTS AND LABOR
- Covers units purchased as new in United States and Puerto Rico Only
- Parts and Labor
- Type of Service
- Limitations and Exclusions
- INFORMATION ON HEARING DAMAGE
- Understanding Noise Induced Hearing Loss
- Temporary and Permanent Hearing Loss
- Loud Sounds + Time = Hearing Loss
- Symptoms of Hearing Loss
- CARE & MAINTENANCE
- LEGAL & COMPLIANCE
- FCC Class B Radio Interference Statement
- Notice:
- TECHNICAL SUPPORT
- RF Exposure Information
- IC Statement
- Disposal and Recycling
- Made for iPod and Made for iPhone
- SPECIFICATIONS
Brand : VIZIO
Model : XVTHP200
Category : Soundbar