2XL-53C - Speaker PowerBass - Free user manual and instructions
Find the device manual for free 2XL-53C PowerBass in PDF.

User questions about 2XL-53C PowerBass
0 question about this device. Answer the ones you know or ask your own.
Ask a new question about this device
Download the instructions for your Speaker in PDF format for free! Find your manual 2XL-53C - PowerBass and take your electronic device back in hand. On this page are published all the documents necessary for the use of your device. 2XL-53C by PowerBass.
USER MANUAL 2XL-53C PowerBass
powerbass® X T R E M E

natural_image
Exterior view of a black speaker with electronic components including a power box, speaker, and microphone (no visible text or symbols)2XL-53C
2XL-63C
2XL SPEAKER CONVERTIBLES
Application Guide
Please read through this manual to familiarize yourself with your new speakers. Should your PowerBass speaker components ever require service, you will need to have the original dated receipt.
powerbass® X T R E M E
Thank you and Congratulations
Congratulations on your purchase of Powerbass Xtreme speakers. You now own a speaker of uncompromising design and engineering from a factory that truly believes in the relentless pursuit of perfection. Incorporating the highest quality parts and state-of-the-art materials, these speakers display the ultimate balance between high fidelity, extreme performance and long-lasting reliability.

text_image
powerbase powerbase powerbase powerbaseAt PowerBass USA, Inc. we are confident you will have many years of outstanding enjoyment from this great SPEAKER investment. For maximum performance we recommend that you have your new Power-Bass Xtreme product installed by an Authorized PowerBass Xtreme Dealer. Doing so will also automatically extend your warranty to a full THREE YEAR Period.
To learn more about PowerBass Xtreme, please visit us on the World Wide Web at http://www.powerbassusa.com
Δ Warning Δ
Continuous exposure to sound pressure levels in excess of 100 dB can cause permanent hearing loss. PowerBass Xtreme Speakers are capable of producing sound pressure levels well over 170 dB. Please observe all local sound ordinances while listening to your PowerBass Xtreme system. PowerBass USA, Inc. accepts no liability for hearing loss, bodily injury, or property damage due to the result of use or misuse of this product.property damage due to the result of use or misuse of this product.
2 IN 1 CONVERTIBLE 2XL SPEAKER FEATURES
Stamped Steel Non-resonant Basket: These rigid baskets are designed to give the moving parts of the speaker a solid platform to perform. Each basket has been treated with an acoustical sound reduction coating that greatly reduces sound transmission and reflection which dampens ringing and tinning making the basket acoustically “dead”.
Wool /Paper Composite Cone: The premium grade cones contain the optimum ratio of paper to wool resulting in a transducer that is strong and rigid, yet lightweight. This offers increased performance and improved low end bass reproduction.
High Damping Butyl Rubber Surround: Selected for efficiency and minimum distortion the surround material is impervious to harsh elements such as salt air, heat and smog. Offers improved output throughout the entire frequency range.
High Powered Muti-Layer 3-ohm Voice Coil: Kapton® is a high temperature voice coil former that is light weight and designed for greater efficiency and increased power handling that provides loud and clean output. The 3-ohm impedance allows the speaker to operate more efficiently and make better use of amplifier power.
High Powered 12dB Crossover Network: These asymmetrical crossovers were designed using a sophisticated computer program LEAP to provide a smooth, flat frequency transition between the midrange and tweeter. High quality air cores, parallel stacked high stability metal film capacitors, low DC resistance inductors.
Additional Features: PBX custom mesh grill, gold plated input terminals, customized rubber boot to protect the magnet, professional mounting hardware and speaker lead harness adds further value to your investment.
COMPONENT SEPARATES FEATURES
Spun Aluminum Phase Plug: Bullet design reduces phase cancellations.
Tweeter Mounting Kit: Flush, surface and angle-mounting cups allows multiple mounting options for custom tailored high frequency dispersion.
COAXIAL FEATURES
Emperor's Silk Soft Dome Pivoting Tweeter: These very large 1-inch hand treated silk dome tweeters incorporate a neodymium motor structure and edge wound ribbon wire voice coil to provide an extremely wide bandwidth.
Kapton® is a registered trademark of E.I. du Pont de Nemours and Company
(due to Constant Improvement, Specification and Parameter are subject to change without notice)
| Model Size Nominal Impedance | Frequency Response Sensitivity | 1W/1M | Magnet Size Mounting Depth Power | RMS/Max |
| 2XL-53C 5.25" 3 Ohm | 62 Hz - 20 kHz90 dB 12 oz. 2.2" 70 W / 140 W | |||
| 2XL-63C 6.5" 3 Ohm | 58 Hz - 20 kHz 91 dB 14 oz. 2.5" 90 W / 180 W |
2XL COMPONENT TWEETER SPECIFICATIONS
| DOME SIZE (25mm) | MOUNTING (DIAMETER) | NOMINAL IMPEDANCE | FREQUENCY RESPONE | SENSITIVITY (1M / 1M) | MOUNTING (DEPTH) | POWER (RMS/PEAK) |
| 1.0" SILK | 1 7/8" | 4Ω | 3.5K-21Khz | 92 dB | 7/8" | 60/120 |
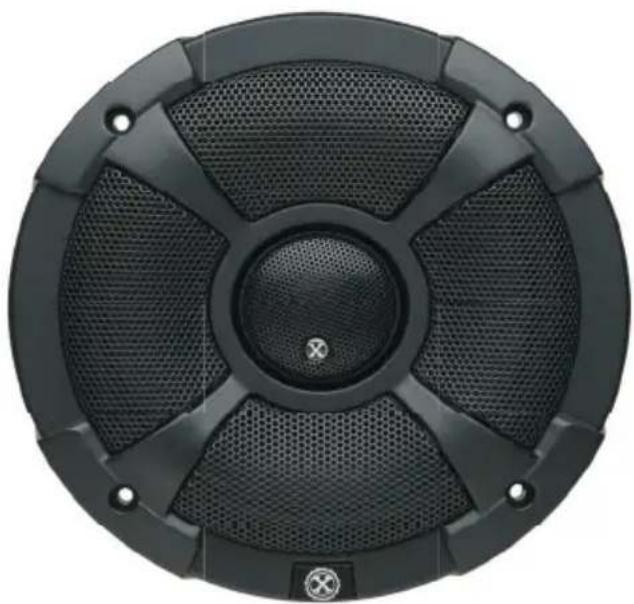
natural_image
Top-down view of a black speaker grille with hexagonal mesh pattern and central hub (no text or symbols)INSTALLATION EXPERIENCE
Installation of PowerBass Xtreme Speakers requires experience with a variety of mechanical and electrical procedures. This manual only provides general installation and operation instructions. If you have any reservations about your installation skills or lack of the proper tools, please contact your local PowerBass Xtreme dealer for assistance.
TIPS TO GET THE MOST OUT OF YOUR POWERBASS SYSTEM
Your PowerBass Xtreme speakers have been meticulous engineered and designed to handle high power musical reproduction. Despite their rugged construction, it is possible to damage your speaker if they are improperly used. In general, you will hear distortion as a so-called warning before any damage occurs. If you hear distortion in your system, immediately reduce the musical level to the point where the sound retains its clarity.
- Be sure you supply the speakers with enough unclipped amplifier power to drive them properly. (More damage can be done to a speaker by under-powering and clipping your amplifier than any other way!)
- Where possible, a separate amplifier just for your speaker should be used with an electro ic crossover to set the frequency range. One amplifier with passive crossovers will work (Tri-Way Setup), but the system will do more with less stress on the amplifier by using two amps.
- To avoid any possible sound cancellation from the front of the speaker to that of the rear of the speaker, cut a panel of Masonite or MDF to firmly mount the speaker if the vehicle's original cutout is too big.
- When connecting speaker wires from the amplifier or head unit to that of the speaker itself, pay attention to the polarity of the connection. This will insure optimum sound reproduction and performance.
- For maximum dynamic performance use weather stripping to insure a tight seal.
- Do not mount any speakers or external crossovers where they will get wet.
- Remember the Golden Rule "Measure twice...cut once."
When installed properly, your PowerBass Xtreme component system will make a remarkable improvement in the quality of virtually any mobile audio sound system and give years of superior performance.
PREPARING FOR INSTALLATION
NOTE: The tools listed below may be required for proper installation.
- An electric drill with drill bits
- Phillips-head and standard screwdrivers
- Wire strippers
- Crimping tool and needle-nose pliers
- Silicone sealant or closed cell weather-stripping
- Metal file
- Hole saw
INSTALLATION PRECAUTIONS
NOTE: Proceed only if you are a qualified installer otherwise; let your dealer do it.
• Always wear protective eyewear when using tools.
- Turn off all stereo and other electrical devices before you begin.
- Disconnect the (-) negative lead from your vehicle's battery.
- Keep the speakers in the package until final installation.
- Locate all fuel lines, brake lines, oil lines, and electrical cables when planning your installation.
- Check to see if there is enough clearance behind the mounting surface before installing the speakers.
- When running speaker wires through sheet metal, be sure to use grommets to properly insulate the wires from metal edges.
INSTALLATION PROCEDURES
- Since these speakers utilize a unique low profile swivel tweeter housing that has minimal tweeter protrusion, original factory mounting cutouts can still be used with the factory grills in many cases.
- These PowerBass Xtreme speakers can be used above or below the mounting hole. Typically, your vehicle factory's speaker cutouts will accommodate these new speakers without any modifications. When the speaker has been correctly installed, there should be no air leaks between the front and back of the speaker.
- For door installations, check the clearance of the windows throughout the entire range of the window's travel.
- Check the available mounting depth before installing the speaker. Use care when removing factory grills, door panels and factory speakers.
2-WAY COMPONENT CONVERTIBLE SPEAKER SET
These component speakers can also be used coaxial speakers; making them “convertibles”. The mid range speaker will fit into many standard factory mounting holes in your vehicle.
To find the best suitable location, carefully remove the trim panels and inspect the installation area before you cut and drill any holes required to mount the speaker. Removing the panel will also make it much easier to route wiring inside the doors. Look for original equipment (OEM) speaker cutouts that can be used to install your speakers with little or no modifications. Use the supplied template to help you locate and mark the holes needed to install the speakers.
If you planning to install your speakers in the door panel, be sure the speaker will not interfere with the window lowering mechanism. Use care so the speaker wires will clear all moving parts inside the door.
Should you need to cut or drill in order to mount your speaker be sure to thoroughly clean the area of all filings and shavings before you mount the speaker.
COMPONENT SYSTEM INSTALLATION
Your speakers have been assembled at the factory as components. This portion of the manual will cover component system installation.
2XL Component Midrange
The proper installation procedure for mounting these high performance midrange speakers is to secure the speaker to the vehicle's speaker mounting hole. The speaker should fit snug to the location without air gaps. Never force the a speaker into an area that is too small, this can cause damage to the speaker. Once the speaker is in place, determine if the supplied grill needs to be installed. If so, place the grill in place over the speaker and screw the speaker into the mounting hole.
COMPONENT SYSTEM INSTALLATION
PowerBass Xtreme Component Tweeter
These high quality tweeters come complete with several mounting housings for installation versatility. Expe- ment with the tweeter positioned in several locations to determine the best imaging result before cutting out any panel. Typically tweeters should be mounted on axis and as close to ear level as possible. Once a suitable location has been found then you can evaluate your mounting options shown on the next page.

text_image
Tweeter WooferINSTALLATION PROCEDURES
By mounting the tweeter separately from the woofer (or mid-range driver) the installer can choose the best location for sound quality and imaging. Optimum results are usually obtained by locating the tweeters and midrange speakers relatively close to each other, and by keeping the sound path lengths between the listener and the left and right speakers as equal as possible. Three mounting types are possible allowing more versatility for the tweeter location. These are flush mount, surface mount, and angle mount.
Flush Mounting (Type A)
The best location for the tweeter is usually high up on the door and as far forward as possible without interference from the dashboard. If the desired location is flat and space behind the door panel allows the use of the flush mount housing, follow the drawing as shown below:

text_image
Door Body Silver Screw Clearance Hole Mounting Clip Mounting Hole Door Panel Flat Base Tweeter in Flush HousingAfter checking for clearance, cut the mounting hole in the door panel (see Tweeter Specifications for hole size). Mount the Flat Base from the outside with the mounting clip on the inside of the door panel. Secure the mounting clip to the Flat Base with the long silver screw provided.
Surface/Angle Mounting (Type B and C)
If mounting the tweeter on the surface works out best, refer to the following drawing to see how to best mount the tweeter. Black sheet metal screws have been provided to attach the surface base to the door panel.
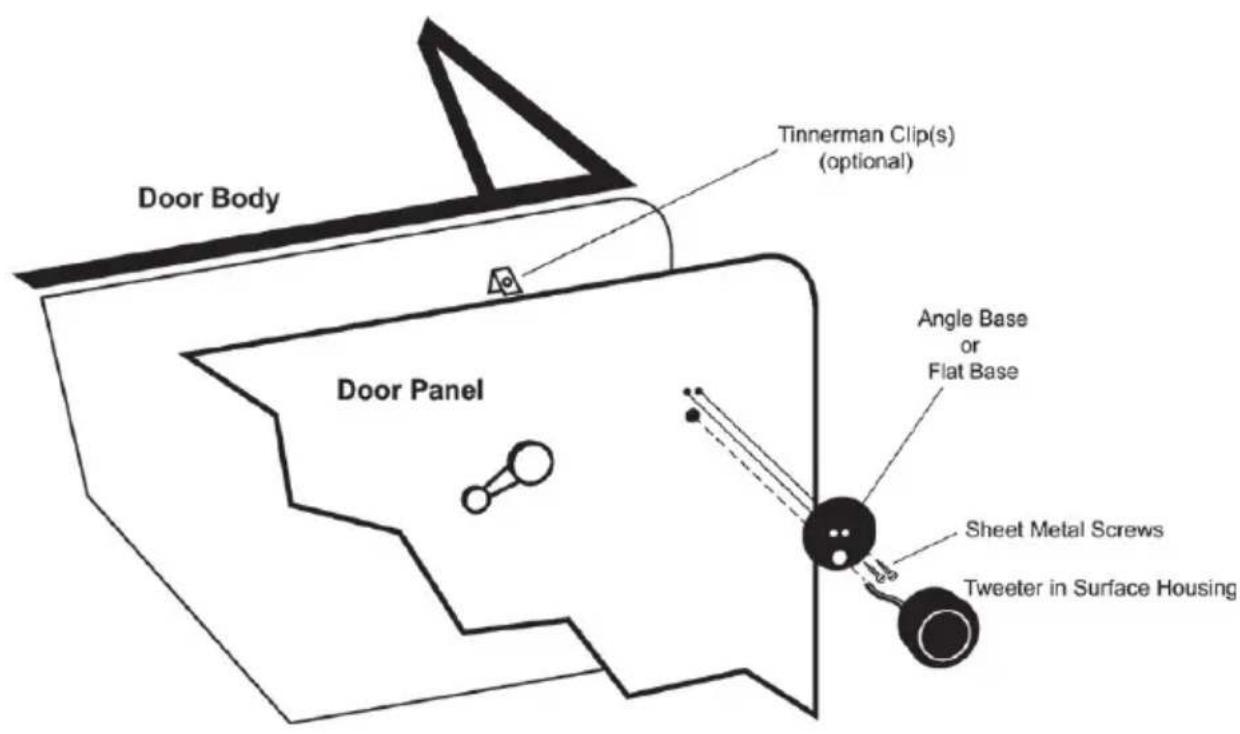
text_image
Door Body Door Panel Tinnerman Clip(s) (optional) Angle Base or Flat Base Sheet Metal Screws Tweeter in Surface HousingPOWERBASS XTREME COMPONENT TWEETERS
These high quality tweeters come complete with several mounting housings for installation versatility. After you have chosen the housing to be used, gently press the tweeter in the proper mounting base. Once the tweeter base is mounted, push and “twist” the housing until it locks to the base. Below are exploded views showing the possible types of tweeter mounting.
EXAMPLE OF MOUNTING
Type A
Flush Mount Tweeter

natural_image
Simple line drawing of a vertical panel with a curved top edge (no text or symbols)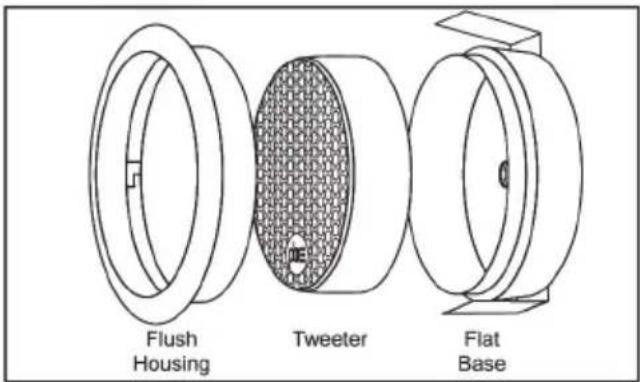
text_image
Flush Housing Tweeter Flat BaseType B
Surface Mount Tweeter

natural_image
Simple line drawing of a 3D rectangular prism with a curved cutout on the left side (no text or symbols)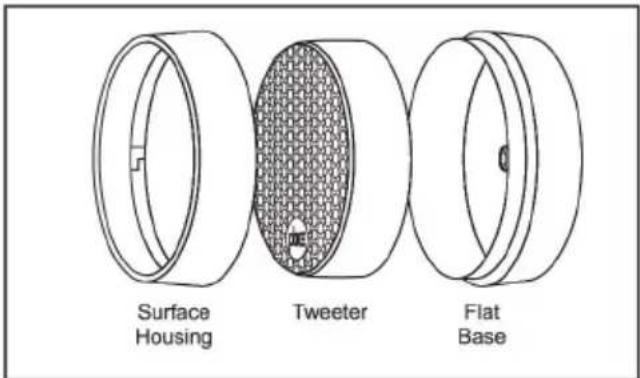
text_image
Surface Housing Tweeter Flat BaseType C
Angle Mount Tweeter

natural_image
Simple geometric shape resembling a truncated pyramid or sector (no text or symbols)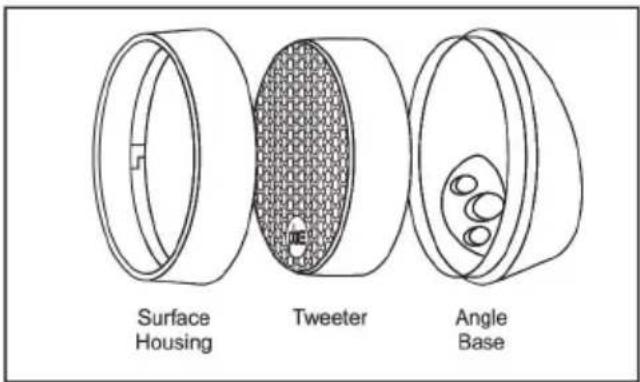
text_image
Surface Housing Tweeter Angle BaseIf the tweeter has to be removed from the mounting cup, insert a small screwdriver in the back of the tweeter and carefully push the tweeter from the mounting cup.
COMPONENT TO COAXIAL ASSEMBLY
In a coaxial application, the tweeter is placed directly in the center of the woofer—replacing the aluminum phase plug. To do this, unscrew and remove the center bullet from the threaded base by turning the phase plug counter-clockwise as shown below. (We suggest you keep the phase bullet for future use).

text_image
Bullet (Aluminum Phase Plug)With the phase plug removed, you should be able to see through the hole in the magnet to where the bullet was previously located.
Next, screw the ball joint assembly to the back of the tweeter. Be sure to feed the wire coming from the tweeter through the flat base of the ball joint as shown in the drawing.
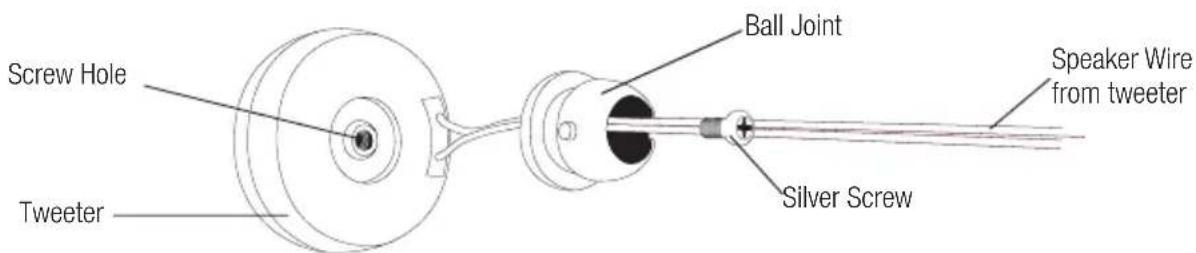
text_image
Screw Hole Tweeter Ball Joint Speaker Wire from tweeter Silver ScrewNow take the pole piece and feed the tweeter's speaker wire through the threaded opening at the base. Align the pin on the ball joint assembly with the slotted groove on the pole piece and gently "snap" the two pieces together. If done correctly, the tweeter should pivot while remaining connected to the pole piece.
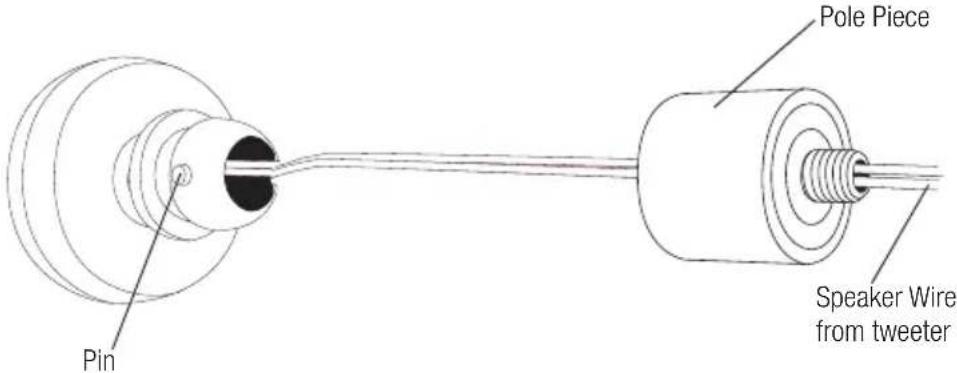
text_image
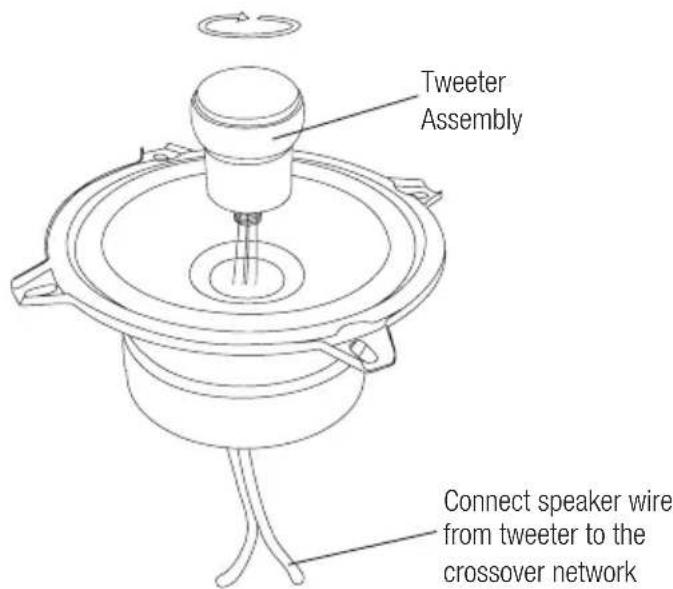
Pin Pole Piece Speaker Wire from tweeterFinally feed the tweeter's speaker wire from the tweeter assembly through the basket and magnet. Thread the pole piece to the basket (where the phase bullet was removed) by turning clockwise taking care not to damage the midrange voice coil assembly.
text_image
Tweeter Assembly Connect speaker wire from tweeter to the crossover networkOnce fully assembled, route the tweeter's speaker wire in the channel on the back of the magnet and down through the heat sink fin. Attach a new magnet label over the wire and the magnet to help keep the wire in place. This will prevent the speaker wire from interfering with any mechanisms behind the door panel.
The conversion from Component to Coaxial is now complete! It will still be necessary to use the crossover network just the same as with the component speaker. Please refer to the Component Set Crossover Installation and Wiring section of this manual for proper mounting and wiring instructions.
NOTE: The midrange will wire to the crossover network in the same manner regardless if used as a component or coaxial.
CROSSOVER NETWORK INSTALLATION AND WIRING
Your PowerBass Autosound Component system contains two separate 2-way crossover networks. When choosing a location to mount the crossovers, keep in mind they contain electronic parts which can be damaged by moisture and dirt.
Correct wiring of the crossover is critical to avoid damage to the speakers and ensure true high fi delity sound. Pay close attention to the markings on the crossover to be certain the correct speakers are in the correct outlets as follows:
1) Connect the amplifier or head unit output to the crossover's INPUT terminals.
2) Connect the terminals labeled WOOFER to the component midrange speaker.
3) Connect the terminals labeled TWEETER to the component tweeter set.
CAUTION: Care must be taken when adjusting the screws on the input terminals that fasten the speaker wires to the crossover network. Make sure each connection is secure without over tightening. Use of power tools to tighten these screws is not recommended as they can strip the screws and permanently damage the input terminals.
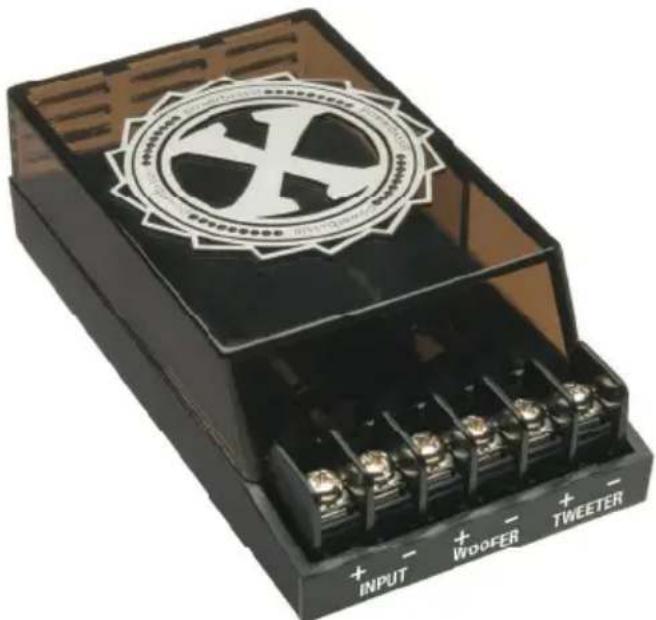
natural_image
Black electronic component with a circular logo and labeled terminals (no readable text beyond labels)NOTE: BE SURE TO OBSERVE PROPER POLARITY WHEN CONNECTING SPEAKER WIRES TO THE CROSSOVER NETWORK TERMINALS.
This manual is the exclusive property of PowerBass USA, Inc. Any reproduction of this manual, or use other than its intentions is strictly prohibited without the express consent of PowerBass USA, Inc. Copyright 2013 PowerBass USA, Inc.
POWERBASS XTREME LIMITED WARRANTY POLICY
PowerBass USA, Inc. offers limited warranty on PowerBass products under normal use on the following terms:
PowerBass Xtreme Speakers are to be free of defects in material and workmanship for a period of one (1) year. The warranty is extended to three (3) years for parts and labor, if an Authorized PowerBass Xtreme Dealer completes the installation.
This warranty applies only to PowerBass products sold to consumers by Authorized PowerBass Dealers in the United States of America. Products purchased by consumers from a PowerBass dealer in another country are covered only by that country's Distributor and not by PowerBass USA.
This warranty covers only the original purchaser of PowerBass product. In order to receive service, the purchaser must provide PowerBass with the receipt stating the consumer name, dealer, product and date of purchase.
Products found to be defective during the warranty period will be repaired or replaced (with a product deemed to be equivalent) at PowerBass's discretion and will not be liable for incidental or consequential damages. PowerBass will not warranty this product under the following situations:
- Speakers received with bent frames or water damage
- Abuse such as holes in the cone, surround or ripped spider
- Voice coil damage due to amplifier clipping or distortion
- Product that has not been installed according to this owners manual
Any implied warranties including warranties of fitness for use and merchantability are limited in duration to the period of the express warranty set forth above. Some states do not allow limitations on the length of an implied warranty, so this limitation may not apply. No person is authorized to assume for PowerBass any other liability in connection with the sale of this product.
Please call (909) 923-3868 for PowerBass Customer Service. You must obtain an RA# (Return Authorization Number) to return any product to PowerBass. The RA number must be prominently marked on the outside of the shipping carton or the delivery will be refused. Please pack your return carefully; we are not responsible for items damaged in shipping. Return the defective product along with a copy of the original dated retail sales receipt, plus \$12.00 for handling and diagnostic evaluation to:
Residents of HI, AK and US territories will be charged for return shipping. All inquires regarding service and warranty should be sent to the above address.
Removed or altered serial numbers will void this warranty

text_image
powerbass powerbass powerbass powerbassPowerBass Xtreme (PBX) – A division of PowerBass USA, Inc.
2133 S. Green Privado – Ontario, CA 91761
Tel. (909) 923-3868 - Fax (909) 923-8048
www.powerbassusa.com