CD360 - CD Player Califone - Free user manual and instructions
Find the device manual for free CD360 Califone in PDF.

User questions about CD360 Califone
0 question about this device. Answer the ones you know or ask your own.
Ask a new question about this device
Download the instructions for your CD Player in PDF format for free! Find your manual CD360 - Califone and take your electronic device back in hand. On this page are published all the documents necessary for the use of your device. CD360 by Califone.
USER MANUAL CD360 Califone
CD360 Personal CD Player
Owner's Manual


CD360 Personal CD Player Owner's Manual
Thank you for purchasing the Califone CD360. This personal CD player is designed for accessible classroom use and allows for differentiated instruction, whether alone or in small groups with an added jackbox and headphones.
We encourage you to visit our website www.califone.com to register your CD Player for its warranty coverage, sign up to receive our enewsletter, download our catalog, and learn more about the complete line of Califone audio visual products including: Portable and installed wireless PA systems, multi-media players & recorders, headphones and headsets, computer peripheral equipment, visual presentation products and language learning materials.
Unpacking
Check carefully for damage which may have taken place during transit. Report any damage claim directly to the freight carrier immediately. Save product(s) and packaging for inspection by the carrier's claim agent. Notify your dealer of the pending claim.
Contents
a) CD360 Personal CD Player
b) Power Adapter
c) Owner's Manual
d) 8200-HP headphone
Service Repairs
Should your unit require repair, contact the dealer or Califone Service Department at: (800) 722-0500 or via email warranty@califone.com or techsupport@califone.com to obtain a Return Authorization (RA) number. After receiving the RA from Califone then ship the unit to Califone prepaid, writing the RA visibly on the outside of the box.
Warranty
Califone warrants this product to be free from defective material and workmanship for one year from the purchase date. Our “Project Intercept” Customer Satisfaction program will replace defective parts and repair malfunctioning equipment under this warranty when the defect occurs under normal use.
Table of Contents
Introduction....1
- Unpacking
- Contents
- Service Repairs
- Warranty
Table of Contents....2
CD360 Overview & Display....3
AC & Battery Operation....5
General Information....6
- Connecting Earphones
- Switching On/Off Keylock
- Adjusting Volume
- Sound Effects
Basic Functions....7
Additional Functions....9
Safety & Cleaning....11
Specifications....12
8200-HP Digital Stereo Headphone....13
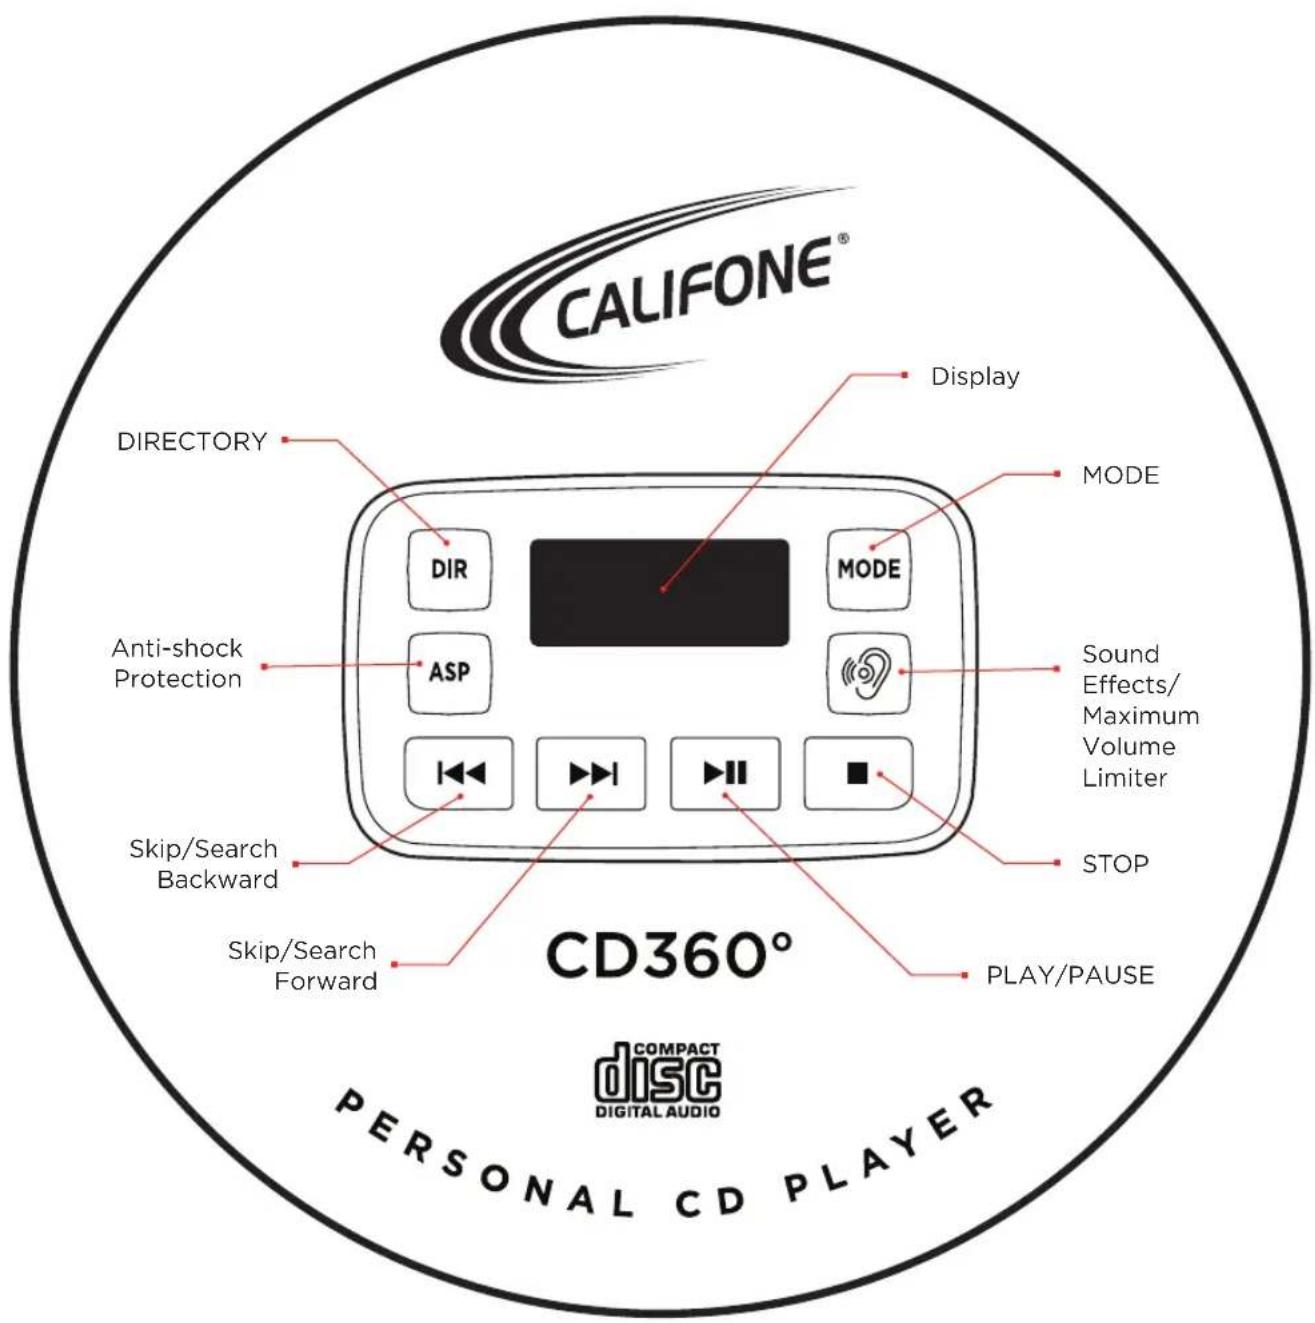
Overview
The Display
CD-DA has been inserted.
MP3 MP3 CD has been inserted.
BY displays the total number of titles or the current track (CD-DA).
0324 Displays the total playing time or the elapsed playing time of the title (CD-DA).
Displays the total number of titles or the current file (MP3).
83 displays the total number of albums or the current album.
02.36 Displays the elapsed playing time of the file (MP3).
H758 "Maximum Volume Limiter" is switched off.
A file or a track is repeated.
All tracks on the MP3 CD or all files on the CD-DA are replayed.
All DRE files of the current album are played back repeatedly (MP3).
PGM track memory is created or played back.
SHUFFiles or tracks are played back in ran dom order.
INTRO first ten seconds of each title or file are played.
ASP: anti-shock system has been activated.
BBSe Boss Boost system has been activated.
POPSHAZ vs the selected sound effect.
Informs about the state of the batteries.
Notes
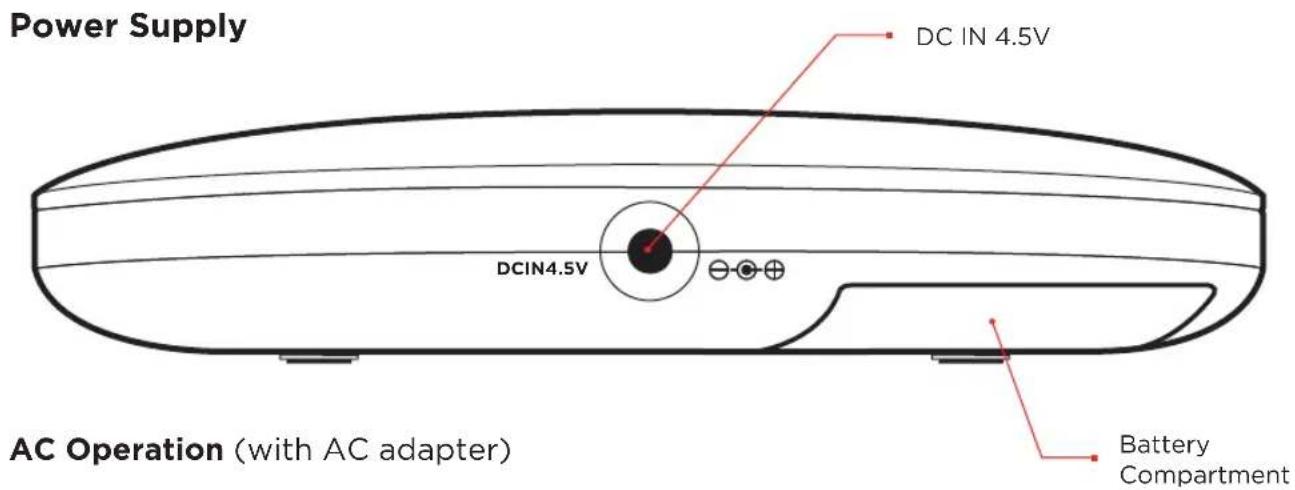
Unplug the AC adapter from the DC socket when you are not using the device.
1 Insert the DC plug, at the end of the AC adapter cord into the » DC IN 4.5V ⊖-●⊕ « socket.
2 Plug the AC adapter into AC power outlet socket.
Caution: Only operate the device with the power supply provided.
Battery Operation
1 Pull out the AC adapter cable.
2 Open the lid of the battery compartment on the bottom of the device.
3 Insert two AA batteries in the battery compartment observing the polarity.
4 Close the battery compartment carefully.
Notes
- The device display tells you about the state of the batteries when low in charge. If » « flashes in the display, this indicates that the batteries are losing their charge and they must be replaced.
- The batteries are switched off during AC operation. Remove the batteries when they are flat or when you know that the device will not be used for a long period of time. The manufacturer accepts no liability for damage resulting from leaking batteries.
Environmental Note
Batteries, including those which contain no heavy metal, should not be disposed of with house hold waste. Please dispose of used batteries in an environmen tally responsible manner. Find out about the legal regulations which apply in your area.
General Information
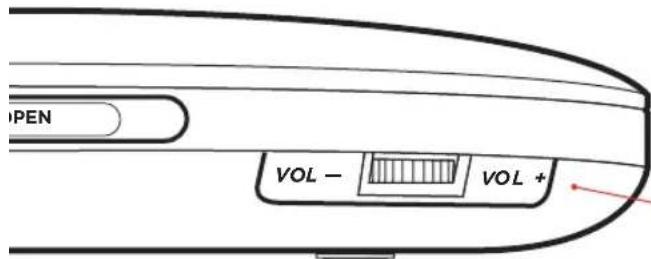
Connecting Earphones
1 Connect the earphones to the » PHONES 🔊« socket (ø 3.5 mm).
Notes
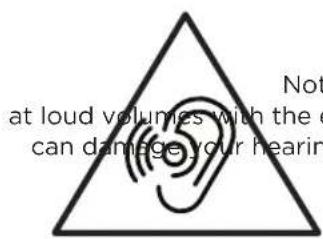
- Excessive volume can be hazard ous to yourself and other users. listen at a volume which still allows you to hear outside noises clearly.
- The output of the device guaran tees the best possible sound at medium volume. Prolonged listening at loud volumes can damage your hearing.
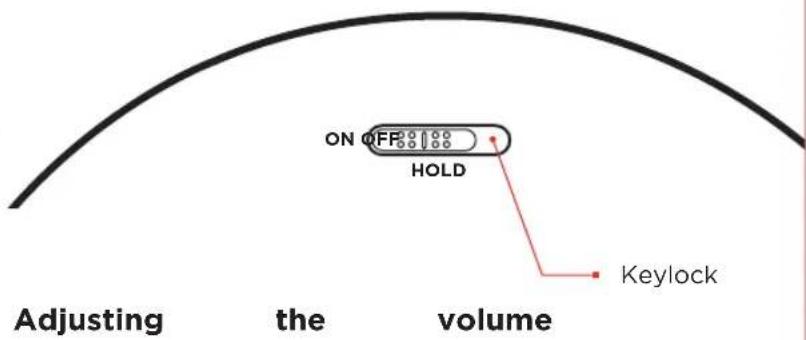
Switching on / off the key lock
1 Switch on the keylock by moving the slider »HOLD« to the position »ON« - The keys on the device are locked.
2 Switch off the keylock by moving the slider »HOLD« to the position »OFF«
Switch off the Maximum Volume limiter
To protect your hearing, alter switching on the device, only reduced volume is available. You can switch off this "Volume restriction".
1 » « press and hold. - Display: »HIGH« flashes for 5 seconds.
2 While HIGH is flashing on the display, depress the Max. Vol. limiter button once more. »
Note: The volume restriction is reacti vated after switching off or chang ing the disk.
Sound effects
During playback you can choose between the following sound effects: Voice (no display), BBS, Pop, Jazz, Rock, Classic.
1 Select the sound effects by short pressing »
Inserting a disc
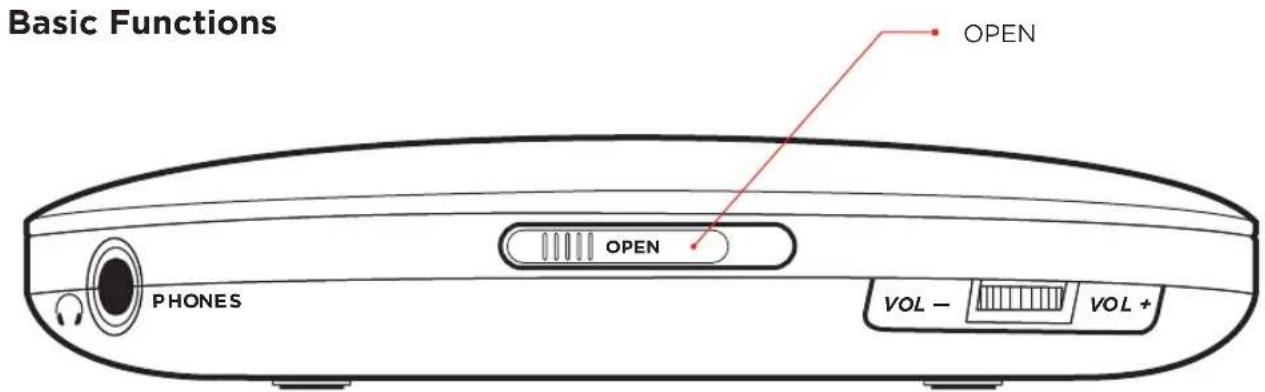
1 Press the »IIIIII▶OPEN« sliding switch to the right and open the CD lid.
2 Insert the disc with the label facing upwards and gently push the centre of the disc to latch it into place.
3 Close the CD compartment.
Removing the disc
Note
Press »■« before you open the CD compartment.
1 Press the »IIIIII▶OPEN« sliding switch to the right and open the CD lid.
2 Remove the disc
3 Close the CD compartment.
CD playback
The device automatically recognises the type of disc inserted (CD-DA, CD-R, CD-RW, MP3 CD).
1 Press the »▶II« to switch on the device.
- Playback of the disc inserted starts automatically. It begins with the first track or file.
- Display: briefly displays the total number of files, albums or tracks and then the number of the first file or track and the elapsed playing time.
2 Use »▶ll« to switch to playback pause.
-Display: the playing time of the file or track flashes.
3 Continue playback with »▶II«
4 Press »■« to end playback.
5 To switch off the device, press »■« again.
Basic Functions
Notes
- Playback stops automatically when the end of the disc is reached, if the CD compartment is opened or if the batteries run out.
- The device switches off automati cally after the end of playback if you do not press a button within 30 seconds.
Resume function
1 End playback by pressing »■« twice.
-When playback is resumed, it starts from the position at which it was ended.
2 To start playback of the first track, press »■« once and start playback with »▶ll«.
Selecting another file or track
1 During playback, keep pressing »|◀◀« or »▶▶|« briefly until you see the number of the file or track you want in the display.
- Playback of the selected track starts automatically.
Selecting albums (only MP3)
1 During playback, press »DIR« repeatedly until the number of the desired album appears in the dis play.
- Playback begins with the first file of the selected album.
Additional Functions
Note
- All additional functions except For "Creating a track memory" can be exited by pressing »MODE« repeatedly.
Repeating a file or track
1 During playback, press »MODE« once. - Display: » ↩ 1«, the file or track is played back repeatedly.
Repeating all files or titles
1 During playback, press »MODE« until » ↻ ↻ appears in the display. - All files or tracks are played back repeatedly.
Repeating all the files on an album (only MP3)
1 During playback, press »MODE« until » DIR« appears in the display. - All the files in an album are repeated.
Playing the introductions of tracks or files on the disc (Intro)
1 During playback, press »MODE« so often until »INTRO« flashes in the display.
2 To start this function, press »▶II«. - The first seconds of each track are played.
3 To play back the whole of the current track, press »▶II« again.
Playing back files or tracks in random order (Shuffle)
1 During playback, press »MODE« so often until »SHUF« flashes in the display.
2 To start this function, press »▶II« - All of the tracks on the disc are played back in random order.
Creating a track memory
This function enables you to save up to 64 tracks or files on the current disc in a particular order and then play them back. The same track may be stored more than once.
1 Insert the disc and press »■« alter start playback.
Additional Functions
2 Press »MODE« to call up the function
3 Select the desired album with »DIR« (only MP3).
4 Select the desired file or track by pressing »|◀◀« or »▶▶|«.
5 Save the file or track by pressing »MODE«.
Notes
• To store more files or tracks, repeat steps 3 or 4 to 5.
- If you try to store more than 64 files or tracks, the first track you saved is displayed.
Playing back a track memory
1 Start the track memory by pressing »▶II«.
- Display: playback begins with the first programmed file or track.
Deleting the track memory
1 In Stop mode, press »■« or open the CD compartment.
Note
The track or file memory is also deleted if the power adapter is disconnected or if the batteries are removed from the device.
Digital anti-shock system (DAS)
The anti-shock system reads the data on the CD-DA 40 seconds in advance (or 120 seconds in MP3 mode). DAS ON - memory used For reducing battery consumption (CD stops after a while). DAS OFF - optimum anti-shock performance, memory is constantly loaded. You cannot switch off the anti shock system in MP3 mode.
1 Press » ASP «. to switch the anti-shock system on or off.
Safety and Cleaning
Safety
• This device is designed for the play back af audio signals. Any other use is expressly prohibited
- Protect the device from moisture (water drops or splashes), direct sunlight and heat.
- Do not place any vessels such as vases on the device.
- Only use the device in o moderate climate.
- Do not place any objects such as burning candles on the device.
- Please note when deciding where to put the device that Furniture surfaces are covered by various types of lacquer and plastic, most of which contain chemical additives. These may cause corrosion to the feet of the device, thus resulting in stains on the surface of the furniture which can be difficult or impossible to remove.
• The device contains self-lubricating bearings, which must not be oiled or greased.
- Condensation may Form on the lens if the device is taken into a warm room from the cold. This prevents it from playing a Disc.
- Never touch the lens on the device. Always keep the disc compartment closed to prevent dust from collecting on the lens.
- Only operate the device with the power supply provided.
- Never open the device casing. No warranty claims are accepted for damage resulting from improper handling.
Note,
prolonged
listening
Cleaning
- If the device is unable to scan discs perfectly, use a standard, com mercially available cleaning CD to clean the laser optics. Other cleaning methods may damage the laser optics.
- Clean the device with a clean, damp leather cloth. Do not use any cleaning agents.
- WARNING: The batteries (battery pack or batteries installed) shall not be exposed to excessive heat such as sunshine, fire or the like.
Specifications
Display: LCD Display w/track number, track time, & track folder
(MP3 only), low battery indicator
Channels: 2 (left and right, stereo)
Anti-Shock/Skip: 40 sec. and 120 sec. (MP3 only) protection
Volume Control: Rotary and Digital
Earphones RMS Output power;
Max volume (THD_< 1%) 2x2.6mW
Frequency Response: 20Hz - 20kHz
Channel Isolation: >40dB
Max. Volume Limiter: yes (ear symbol)
Playable format: CD-DA, WMA, MP3
Resume play: Yes, to the second
Maximal Folders: 255 (CD)
Maximal Files: 999 (CD)
Signal to Noise Ratio: >80dB
Power: Can be operated by batteries or power adapter
Power Adapter: INPUT: 100-240V 50/60Hz 0.3A
OUTPUT: 4.5V - 0.6A
Batteries: 2x1.5V(LR6,AM3,AA)
Dimensions: 5.629" W x 5.590" D x 1" H
Safety/Compliance FCC, UL (adapter only)
Caution: This product utilizes a laser. Use of controls or adjustments or performance of procedures other than those specified herein may result in hazardous radiation exposure. Do not open covers and do not repair yourself. Refer servicing to qualified Califone personnel or our authorized service facilities.
Warning: To reduce the risk of fire, electric shock or product damage, do not expose the CD360 Personal CD Player to moisture of any kind.
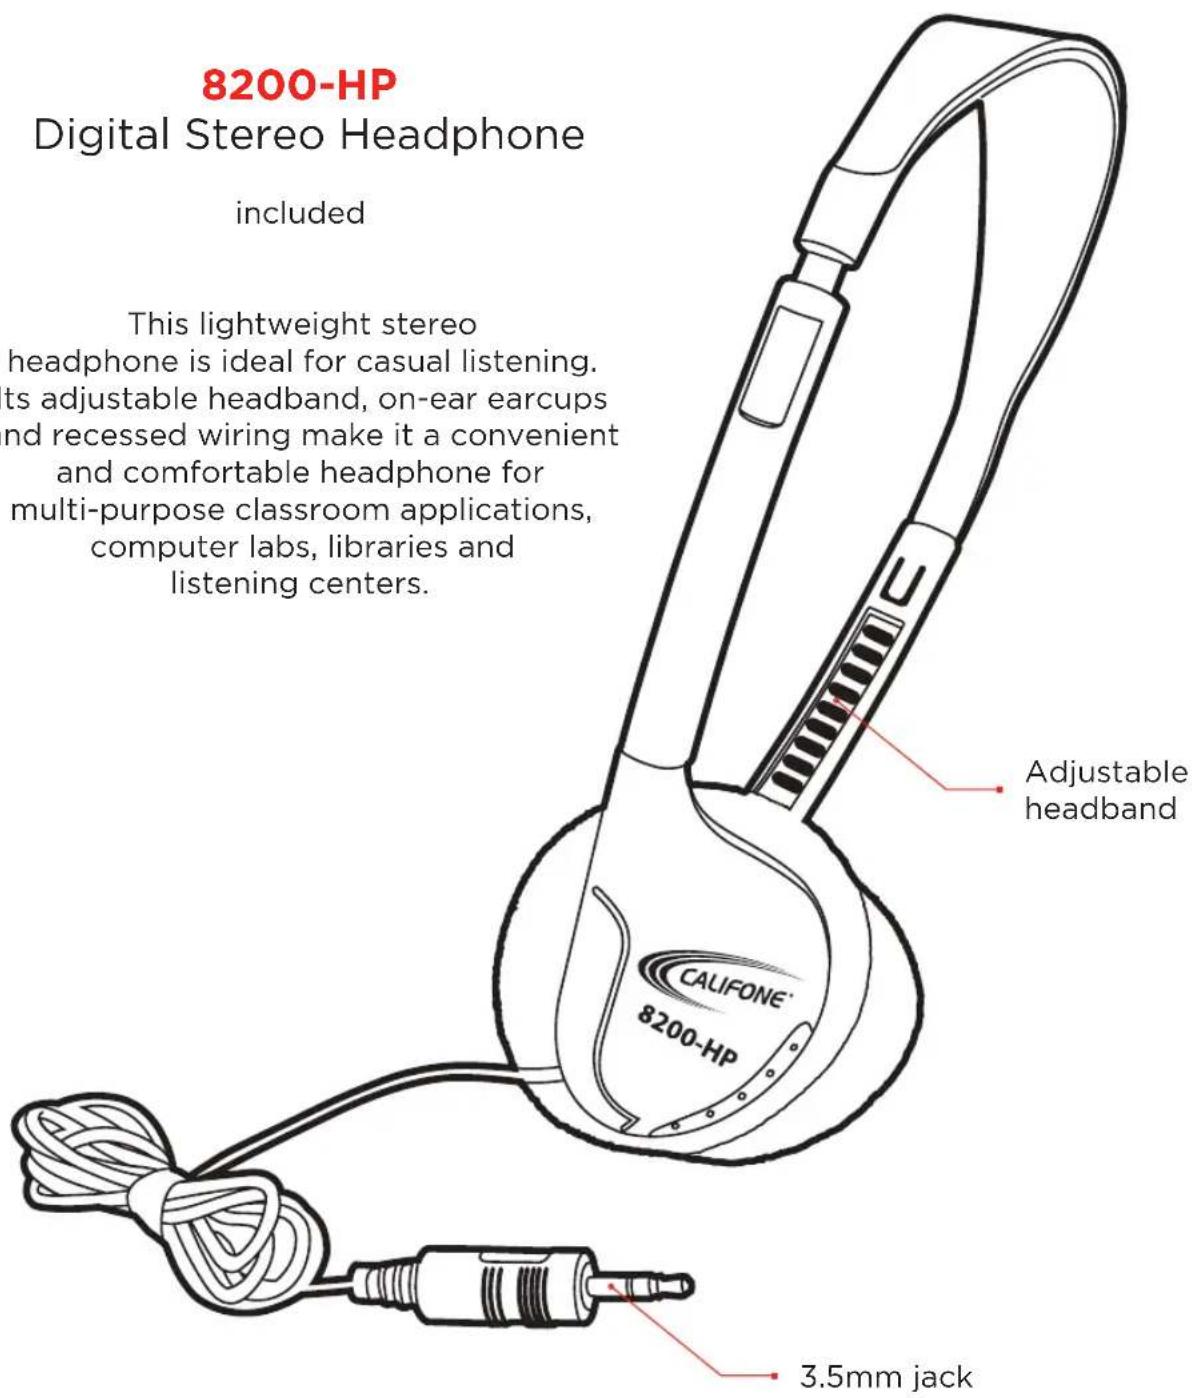
8200-HP
Digital Stereo Headphone
included
This lightweight stereo headphone is ideal for casual listening. Its adjustable headband, on-ear earcups and recessed wiring make it a convenient and comfortable headphone for multi-purpose classroom applications, computer labs, libraries and listening centers.
CAUTION
RISK OF ELECTRIC SHOCK - DO NOT OPEN

CAUTION: TO REDUCE THE RISK OF ELECTRIC SHOCK, DO NOT REMOVE COVER OR BACK. NO USER SERVICEABLE PARTS INSIDE. REFER SERVICING TO QUALIFIED PERSONNEL.

The lightening flash with arrowhead within a triangle is intended to tell the user that parts inside the product are a risk of electric shock to persons.

The exclamation point within a triangle is intended to tell the user that important operating and servicing instructions are in the papers with the appliance.
WARNING: TO REDUCE THE RISK OF FIRE OR ELECTRIC SHOCK, DO NOT EXPOSE THIS APPLIANCE TO RAIN OR MOISTURE.
IMPORTANT SAFETY INSTRUCTIONS
Attention: all safety and operating instructions should be read before operating appliance. All operating and use instructions should be followed when operating the appliance. Heed and adhere to all warnings on the appliance and in the operating instructions. Retain all safety and operating instructions for future reference.
Water & moisture - do not use the appliance near water; ie. Bathtub, washbowl, kitchen sink, laundry tub, wet basement or swimming pool.
Ventilation - do not situate the appliance so that its location or position interferes with its proper ventilation. For example, the appliance should not be situated on a bed, sofa, rug or similar surface that may block the ventilation openings. The appliance should not be placed in a built-in installation, such as a bookcase or cabinet, that may impede the flow of air through the ventilation openings.
Heat - situate the appliance away from heat sources such as radiators, heat registers, stoves or other appliances (including amplifiers) that produce heat.
Power sources - connect the appliance only to a power supply type described in the operating instructions or marked on the appliance.
Grounding or polarization - precautions should be taken so that the grounding or polarization means of the appliance are not defeated.
Power cord protection - power supply cords should be routed so that they are not likely to be walked on or pinched by items placed upon or against them, paying particular attention to cords at plugs, convenience receptacles, and the point where they exit from the appliance.
Cleaning - the appliance should be cleaned only as recommended by the manufacturer.
Non use periods - unplug the appliance power cord from the outlet when left unused for a long period of time.
Object & liquid entry - care should be taken so that objects do not fall and liquids are not spilled into the enclosure through openings.
Damage requiring service - the appliance should be serviced by qualified service personnel when: (a) the power supply cord or the plug has been damaged (b) objects have fallen or liquid has been spilled into the appliance (c) the appliance has been exposed to rain (d) the appliance does not appear to be operating normally or exhibits a marked change in performance (e) the appliance has been dropped or the enclosure damaged.
Servicing - the user should not attempt to service the appliance beyond that described in the operating instructions. All other servicing refer to a qualified service personnel.

Califone' International, LLC
9135 Alabama Avenue, #B, Chatsworth, CA 91311
Tel (818)407-2400 | (800)722-0500 | Fax (818)407-2405 | (877)402-2248
Visit us online at califone.com