SL3 - Gps COBRA - Free user manual and instructions
Find the device manual for free SL3 COBRA in PDF.

| Product Type | GPS Navigator |
| Brand | Cobra |
| Model | SL3 |
| Dimensions (H x W x D) | 4.7 x 2.8 x 1.2 inches |
| Weight | 7.1 oz (with batteries) |
| Display Size | 2.2 inch color TFT |
| Display Resolution | 240 x 320 pixels |
| Power Source | 2 AA batteries (included) |
| Battery Life | Up to 10 hours |
| GPS Receiver | High-sensitivity SiRFstarIII |
| Water Rating | IPX7 (submersible up to 1m for 30 min) |
| Preloaded Maps | North America (US, Canada, Mexico) |
| Waypoints | 500 |
| Routes | 20 |
| Tracks | 10,000 points |
| Connectivity | USB (mini-B) for data transfer |
| Antenna | Internal patch antenna |
| Languages | English, French, Spanish |
| Operating Temperature | -4°F to 140°F (-20°C to 60°C) |
| Warranty | 1 year limited |
Frequently Asked Questions - SL3 COBRA
User questions about SL3 COBRA
0 question about this device. Answer the ones you know or ask your own.
Ask a new question about this device
Download the instructions for your Gps in PDF format for free! Find your manual SL3 - COBRA and take your electronic device back in hand. On this page are published all the documents necessary for the use of your device. SL3 by COBRA.
USER MANUAL SL3 COBRA
S Cobra® OPERATING INSTRUCTIONS
OPERATING INSTRUCTIONS
text_image
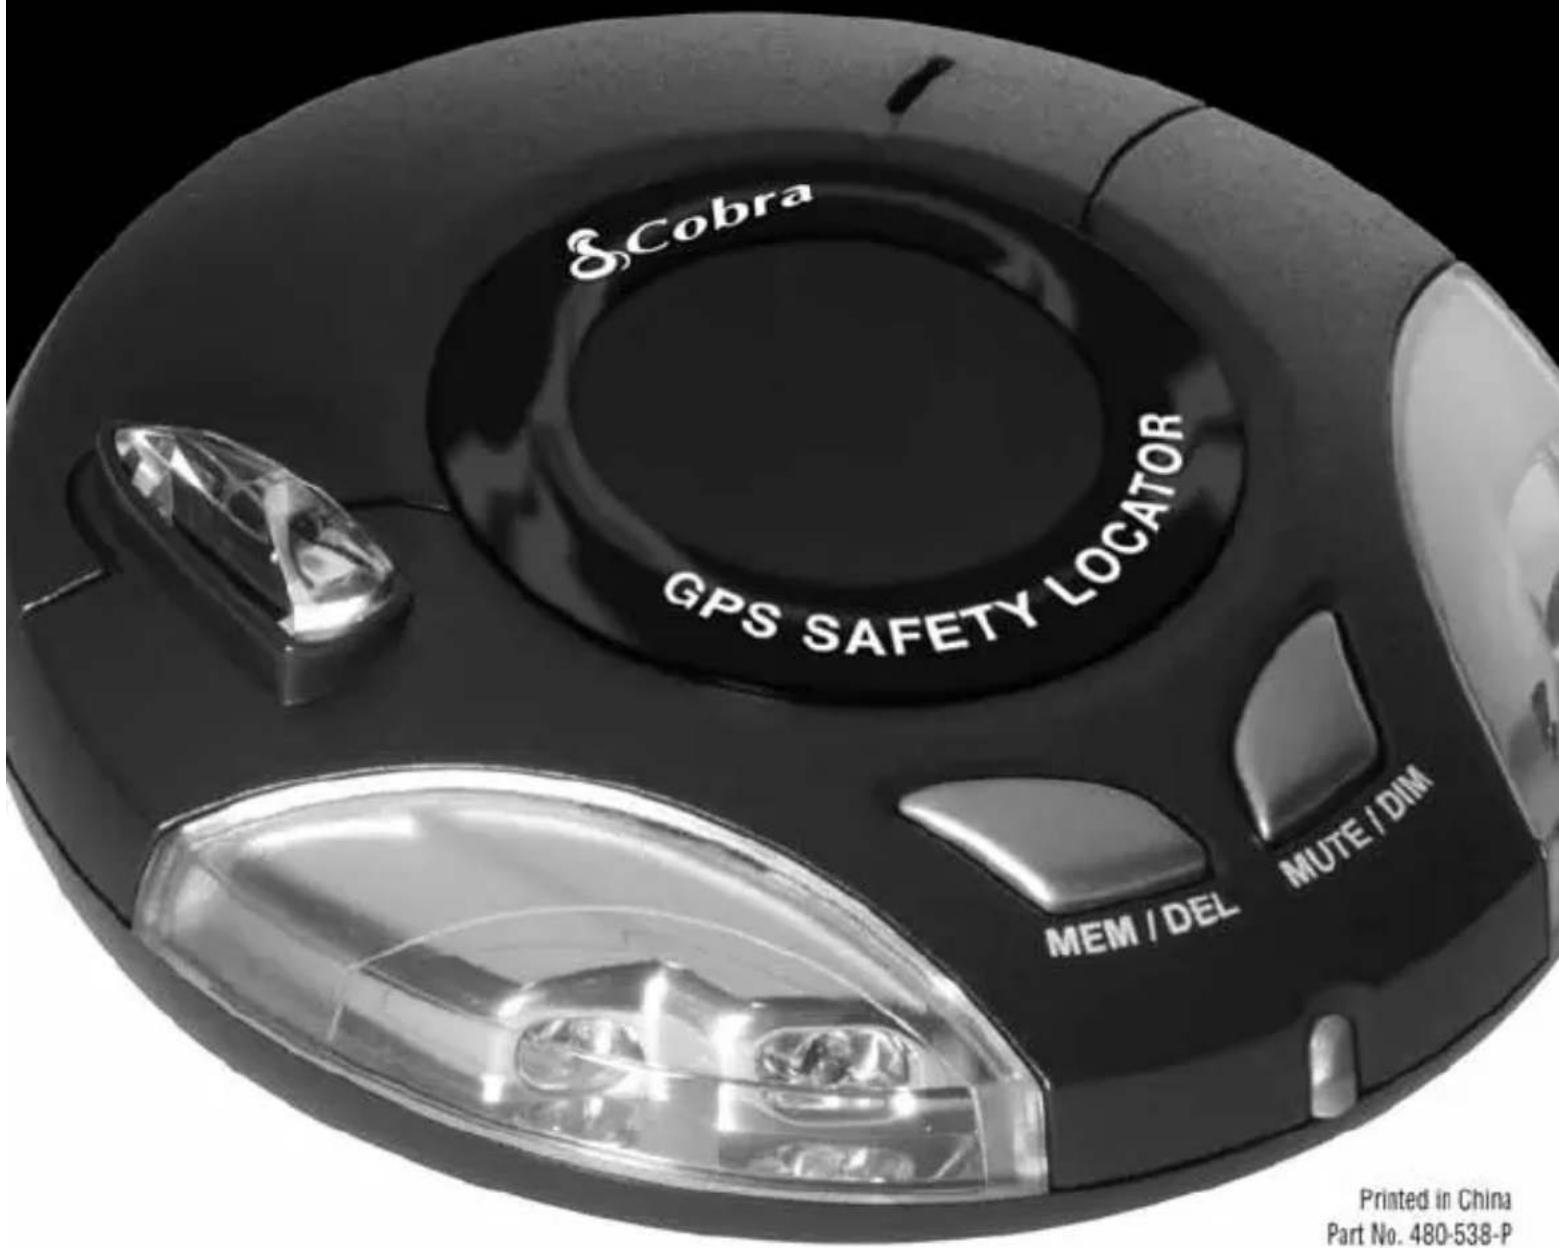
S.Cobra GPS SAFETY LOCATOR MEM / DEL MUTE / DIM Printed in China Part No. 480-538-PPrinted in China
Part No. 480-538-P
Version B
SL3
GPS SAFETY LOCATOR WITH

AURA™
Camera & Driving Hazard Database
Introduction 2
Important Information and Customer Assistance .... 3
Components 4
Features 5
Registration and Downloading 6
Installation 7
Operating Instructions 12
Troubleshooting 16
Limited 1-Year Warranty .... 17
Product Service and Trademark Acknowledgement 18
Thank you for purchasing the Cobra SL3 GPS Safety Locator.
This user manual aims to provide you with installation and user instructions for the SL3 GPS Safety Locator.
Utilizing the very latest Global Positioning Satellite (GPS) technology, Cobra has created the SL3, which has been specifically designed to help you drive safely in today's driving environment by alerting you quickly and easily to the presence of red light cameras, speed cameras, accident "hot spots" and known speed traps.
AURA™ Camera and Driving Hazard Database
The AURA database contains the geographical coordinates of all “fixed” speed/red light camera monitoring systems, many officially designated accident “hot spots” and known speed trap locations. The AURA database is constantly monitored and updated by our data collection team, ensuring that you are alerted to every potentially hazardous stretch of road or danger spot. The SL3 connects quickly and easily to your PC so that you can download and update the database in a matter of minutes. Please note that a certain level of System Software is required on your PC, see the section on System Software in this manual for further details. Once the database has been downloaded, your SL3 compares your position using it’s built-in GPS antenna, with the position of every known “fixed” speed monitoring/red light camera system, accident “hot spot” and known speed trap locations alerting you both audibly and visually via a loud piezo beeper and a LED display ensuring your highest concentration at all times.
Drive Safely with AURA
The Cobra SL3 has been designed and manufactured to help enhance road safety and should not be used as a license to speed or a substitute for concentration. Driving within the posted speed limit while carefully observing current road conditions and local regulations is essential.
Important Information
Safe Driving
Motorists, as well as operators of emergency or service vehicles, are expected to exercise all due caution while using this product, and to obey all applicable traffic laws.
Security of Your Vehicle
Before leaving your vehicle, always remember to conceal your GPS Safety Locator in order to reduce the possibility of break-in and theft.
Customer Assistance
Should you encounter any problems with this product, or not understand its many features, please refer to this owner's manual. If you require further assistance after reading this manual, Cobra Electronics offers the following customer assistance services:
For Assistance in the U.S.A.
Automated Help Desk English only. 24 hours a day, 7 days a week 773-889-3087 (phone).
Customer Assistance Operators English and Spanish. 8:00 a.m. to 5:30 p.m. Central Time Mon. through Fri. (except holidays) 773-889-3087 (phone).
Questions English and Spanish. Faxes can be received at 773-622-2269 (fax).
Technical Assistance English only. www.cobra.com (on-line: Frequently Asked Questions). English and Spanish. productinfo@cobra.com (e-mail).
For Assistance Outside the U.S.A.
Contact Your Local Dealer
©2009 Cobra Electronics Corporation
6500 West Cortland Street
Chicago, Illinois 60707 USA
www.cobra.com
Components
Introduction
Components
The following components come as standard with your Cobra SL3 GPS Safety Locator:
1 x SL3 system
1 x Windshield bracket with suction cups
1 pair x Hook & Loop fastener
1 x Coiled 12V power cord with cigarette lighter socket adaptor
1 x USB - PC connecting cable

text_image
Cobra GPS SAFETY LOCATOR MEM / DEL MUTE / DIM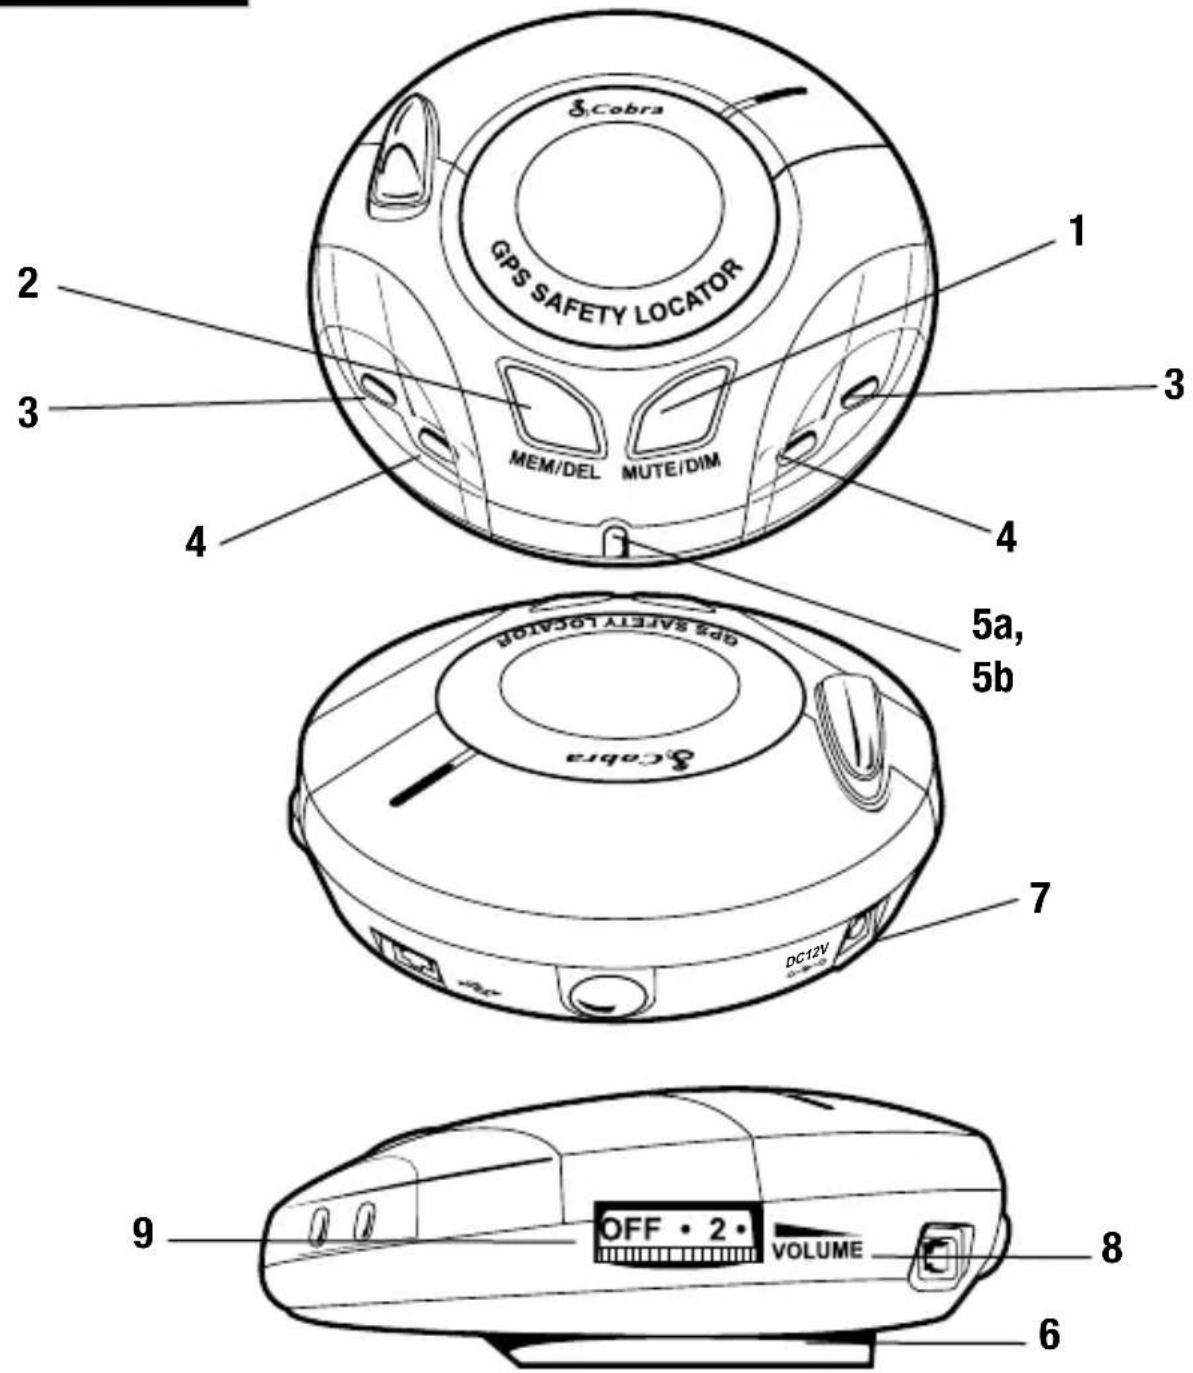
text_image
Cobra GPS SAFETY LOCATOR MEM/DEL MUTE/DIM 1 2 3 4 5a, 5b Cabra GPS SAFETY LOCATOR DC12V 7 9 OFF • 2 • VOLUME 8 6- Mute/Dim Button
- Memory/Delete Button
- Zone 1 Alert* (Green LED)
- Zone 2 Alert* (Amber LED)
5a. Zone 3 Alert* (Red LED)
5b. GPS Status Indicator
-Flashing Red: establishing satellite connection when singly lit.
-Green: satellite connection established.
- Bracket Mounting Slot
- 12V Power Input Socket
- USB Socket
- Power On/Off/Volume Control
* Refer to "Alerts" section of the manual for Zone.
Registration
IMPORTANT PLEASE READ BEFORE USING YOUR COBRA SL3!
Registering your Cobra SL3:
The database built into your Cobra SL3 is populated with the latest data available during production. However, you will need to register your SL3 to receive your one (1) year free database “update” subscription to the AURA™ Camera and Driving Hazard Database. Please note that the database may not be 100% up-to-date due to the time elapsed between production and your purchase of the SL3. Therefore it is recommended that you register your product and periodically perform AURA database updates to ensure that your SL3 works as effectively as possible.
Register On-line:
Go to the official AURA website http://aura.cobra.com and register on-line. Your unit and your one (1) year free subscription to AURA will be activated immediately upon registration.
Downloading
- First time registration: go to http://aura.cobra.com, select the SL3 model, complete the registration form and click "Register".
- Click on "Update My Data" and follow the online instructions. (Caution: Do not plug in the SL3 into your PC's USB port until the GPS data updater is installed.)
- Once installed, proceed to launch the updater and follow on screen instructions.
Caution: While updating your SL3, do not plug unit in using the 12v power supply. The USB port will supply all necessary power.
For future updates, simply plug your GPS Locator into your PC's USB drive for automatic update of new data.

natural_image
Diagram showing a USB cable connector inserted into a device via a cable, with a circular inset showing internal components (no text or symbols)Minimum system requirements:
- Windows® XP or Vista.
- USB 1.1 or above.
- Access to the Internet.

NOTE: This device complies with part 15 of FCC rules: Operation is subject to the following two conditions: (1) This device may not cause harmful interference, and (2) This device must accept any interference received including interference that may cause undesired operation.
Installation
Once you have performed a download it is time to install the Cobra SL3 into your vehicle. The most important aspect of this installation is ensuring that the SL3 is positioned in such a way that it has a clear view of the sky while ensuring that the device is situated so that it does not interfere with the vehicle controls, jeopardize passenger or driver safety.
For best results, mount the SL3 on to the vehicles dashboard so that the top of the unit has a clear view of the sky. When positioning your SL3 ensure that it is located in such a way that you can easily view the LED display without having to take your eyes from the road and so that you can reach the controls safely.
Please also be aware that you will need to be able to remove the device to perform downloads. Once you have found a suitable location for your SL3, secure it in place with the 'Hook and Loop' fastener or suction cup bracket provided, remembering to clean the area where the fastener or bracket is going to be positioned to ensure a good contact.
More in depth mounting instructions are provided below.

text_image
Windshield Dashboard OFF • 2 • VOLUMEPLEASE NOTE: Be careful to choose a location that does not block the driver's view or endanger the driver or passengers should your vehicle suddenly come to a stop or be involved in an accident.
Installing your Cobra SL3 using the Hook and Loop fastener
The Cobra SL3 can be installed anywhere on the dashboard as long as the built-in GPS antenna has a clear view of the sky, you can easily see the LED display, and you can operate the controls safely. You will also need to be sure that you can connect the power connection cable. Your SL3 can be installed easily with the Hook and Loop fastener if you have a sufficiently flat area on your dashboard. Follow these instructions to mount the control panel in this manner.

text_image
8 Cobra GPS SAFETY LOCATOR MEM/DEL KOTECOM- Use a damp cloth to thoroughly clean the bottom of the SL3 and the area where you intend to mount your unit.
- With the two parts of the Hook & Loop fastener still fastened together, peel the backing tape from the softer 'Loop' side of the fastener and apply it to the bottom of your SL3 unit.
- Next, while the two parts are still fastened, remove the backing tape from the "Hook" side and position the unit onto the desired area.
- Finally, plug the smaller plug on one end of the power cable into the socket marked DC12V on the back off the SL3 and plug the larger plug into the cigarette lighter socket of your vehicle. Your SL3 is now ready for use.
Installing your Cobra SL3 using the Windshield Suction Cup bracket
If you prefer, you can mount your SL3 to the inside of your vehicle's windshield using the suction cup bracket provided. Simply select a position within the windshield so that the top of the unit has a clear view of the sky, remembering that you need to connect the power connection cable, as well as ensuring that you can read the LED display and reach the controls safely.
Follow these instructions to mount the unit in this way
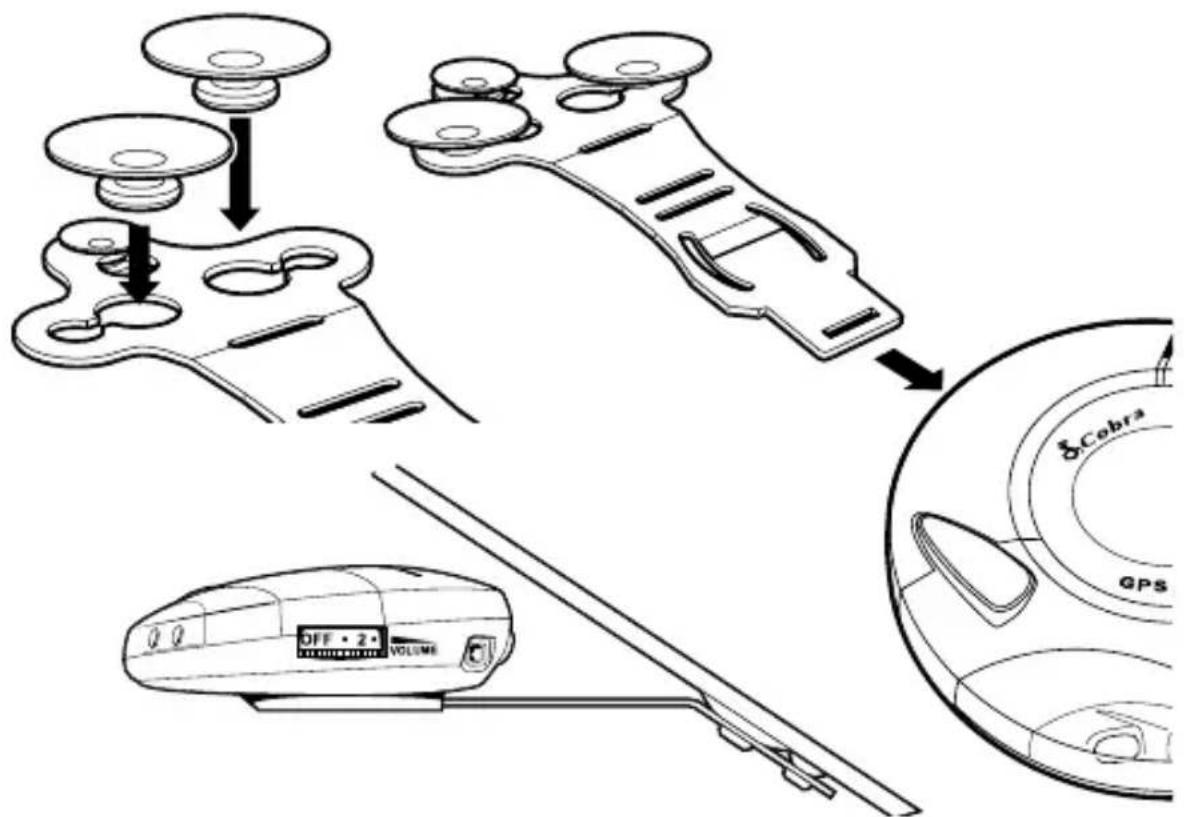
• Install the suction cups onto the bracket by fitting them into its holes.
- Clean the area where you wish to position the bracket thoroughly with a glass cleaner.
- Carefully bend the bracket of the SL3 so that when it is mounted on to the windshield the Control Panel is facing in the desired direction.
- Slide the SL3 onto the bracket until it is secure and the unit is positioned in as horizontal a position as possible.
- To remove the SL3, simply slide the unit off the bracket from the front.
text_image
8 Cobra GPS OFF • 2 • VOLUME- Finally, plug the smaller plug on one end of the power cable into the socket marked DC12V on the back off the SL3 and plug the larger plug into the cigarette lighter socket of your vehicle. Your SL3 is now ready for use.
Power Connection
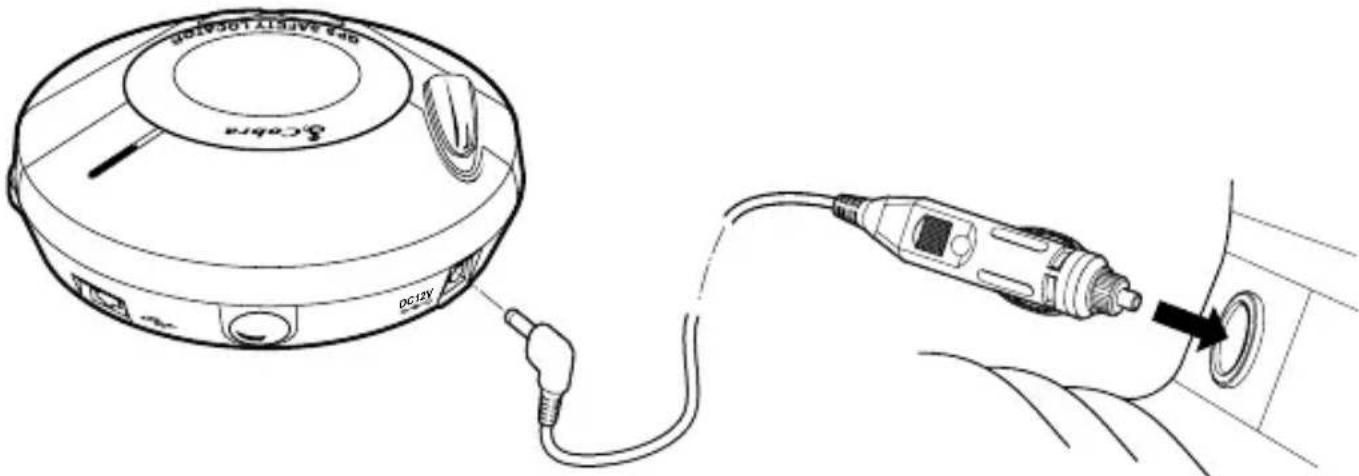
Using the cigarette lighter socket
The Cobra SL3 comes with a power cable designed to plug into your vehicles cigarette lighter socket. Take the power cord and plug the smaller end into the DC 12V input socket on the back of the SL3 and the cigarette lighter adapter in your vehicles cigarette lighter socket.
text_image
CD12V DC12VPlease Note: Do not leave your SL3 plugged into the cigarette lighter socket when you start your vehicle. The cigarette lighter socket is prone to power surges that may damage your unit. If the device does not power up, please check that the cigarette lighter socket is clean of any debris, remembering not to insert any metal objects into the socket. Check that the cigarette lighter adapter is inserted all the way into the socket and that the fuse in the cigarette lighter adapter is operational. If your SL3 will still not power up, please check that the cigarette lighter in your vehicle is functioning correctly.
Replacing the Fuse
If the detector stops operating, the fuse in the cigarette lighter plug may be blown. If it has blown, follow these steps to replace it with a 2 amp, 5 x 20mm, fast-acting fuse.
Caution: Using a fuse that does not meet these ratings or defeating fuse protection can damage your unit, the power cable, or the vehicles electrical system.
- Hold the ring near the tip of the cigarette lighter plug, then carefully unscrew the ring by turning it counterclockwise.

natural_image
Technical line drawing of a USB connector with cable and pin assembly (no text or symbols)Caution: If you must use pliers to loosen the ring, be careful not to crush the tip. Never use pliers or other tools to retighten the ring on the cigarette lighter plug.
- Pull the ring straight out, then remove the metal tip, spring and old fuse.

natural_image
Diagram of a soldering iron plug with internal components and a directional arrow indicating assembly (no text or symbols present)- Check the fuse to see if it has blown. If it has, replace it.

natural_image
Diagram of a cable connector with internal components and rotation arrow (no text or symbols)- Replace the metal tip and spring inside the ring, then place the fuse inside the cigarette lighter plug and screw the ring back onto the plug. Make sure the metal tip is visible when you reassemble the cigarette lighter plug.
Starting Up
After you have successfully installed your Cobra SL3 it is time to perform the first start up. First, make sure your vehicle is parked in as open a space as possible, clear of tall trees and buildings so that the built-in GPS antenna has a clear view of the sky above. Next, power the unit up by turning the on/off/volume towards you. The SL3 will go through a brief self test procedure and then the central red LED will flash indicating that the unit is searching for a satellite connection. The SL3 needs to acquire a minimum of 4 satellites to work effectively. Once this has been achieved the LED will turn green and will stop flashing. Once the solid green LED is displayed your SL3 is ready for use and will now automatically alert you of any locations stored in it's database.
If the GPS Safety Locator has never been used before or has not been used for over a week, the first “cold” start up could take somewhere between 5 to 30 minutes. Once initialized, subsequent start ups will take as little as 60 seconds.
1. Mute Button
If during an alert you decide that you would like to mute it, simply press the 'Mute' button briefly. The LEDs will continue to display a visual alert but no sound will be heard. After you have travelled out of range of the location the device will automatically reset so that next time you encounter a location you will receive both audible and visual alerts as normal.

text_image
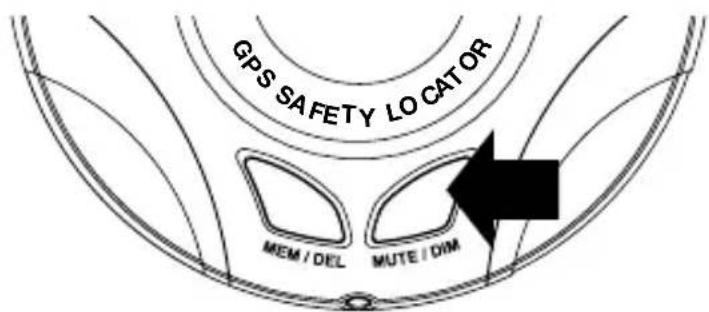
GPS SAFETY LO CATOR MEM / DEL MUTE / DIM2. Setting Brightness
You can adjust the brightness of the display on your SL3 by pressing the MUTE/DIM button when the unit is not detecting or locating a signal. There are 2 levels of brightness to choose from bright or dimmed.
text_image
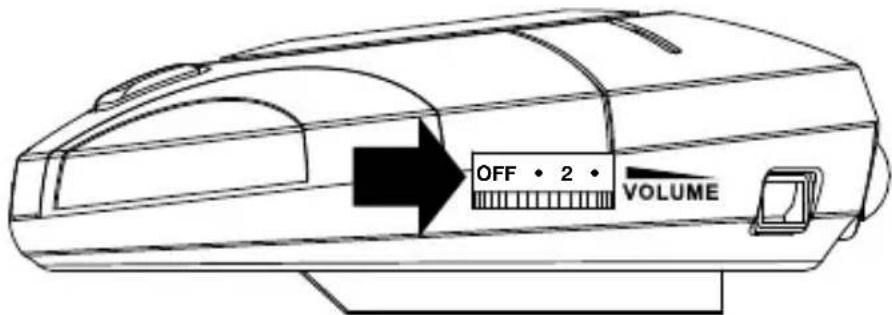
GPS SAFETY LO CAT OR MEM / DEL MUTE / DIM3. Adjusting the volume
The SL3 has an adjustable volume for controlling the loudness of the audible alert. To increase the volume simply turn the volume control on the right hand side of the device, towards you. To decrease the volume of the alert turn the volume control away from you.
text_image
OFF • 2 • VOLUME4. Adding your own locations
It is possible to add your own personal locations to your SL3. To add a new location make sure you are stationary and parked in a safe, legal manner then press the 'MEM/DEL' button (see below) for approximately 2 seconds. It is possible to store up to 1,000 of your own coordinates. When your SL3 detects one of your own co-ordinates the led display and beeper will alert you.

text_image
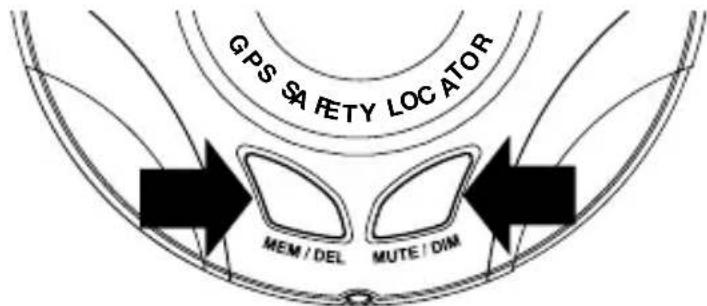
GPS SAFETY LOCATOR MEM / DEL MUTE / DIM5. Deleting your own locations
There are two ways to delete locations you have saved and stored yourself. You can delete them independently by pressing and holding the MEM/DEL button for approximately 2 seconds while you are at that particular location and receiving a User Saved alert. Secondly you can delete all your saved locations at the same time by pressing and holding the MEM/DEL button and the MUTE/DIM button together as you power the unit up. Finally power your SL3 off and then on again. Once a user location has been deleted it cannot be recovered except by re-marking it.
text_image
GPS SAFETY LOCATOR MEM / DEL MUTE / DIMAlerts
The Cobra SL3 responds to four types of alerts: Speed Trap, Photo Enforcement (Red Light and Speed Cameras), Caution Areas (high accident locations) and User Points. The audio alerts are sounded whenever the SL3 crosses the boundaries as shown in Table 1 and Figure 1. The Audio Warnings are shown in Table 2.
Table 1
| SPEED RANGE ZONE BOUNDARY | |
| MPH 1 2 3 | |
| 1 - 45 1000 ft. 500 ft. 150 ft. | |
| Greater than 45 2500 ft. | 1250 ft. 400 ft. |
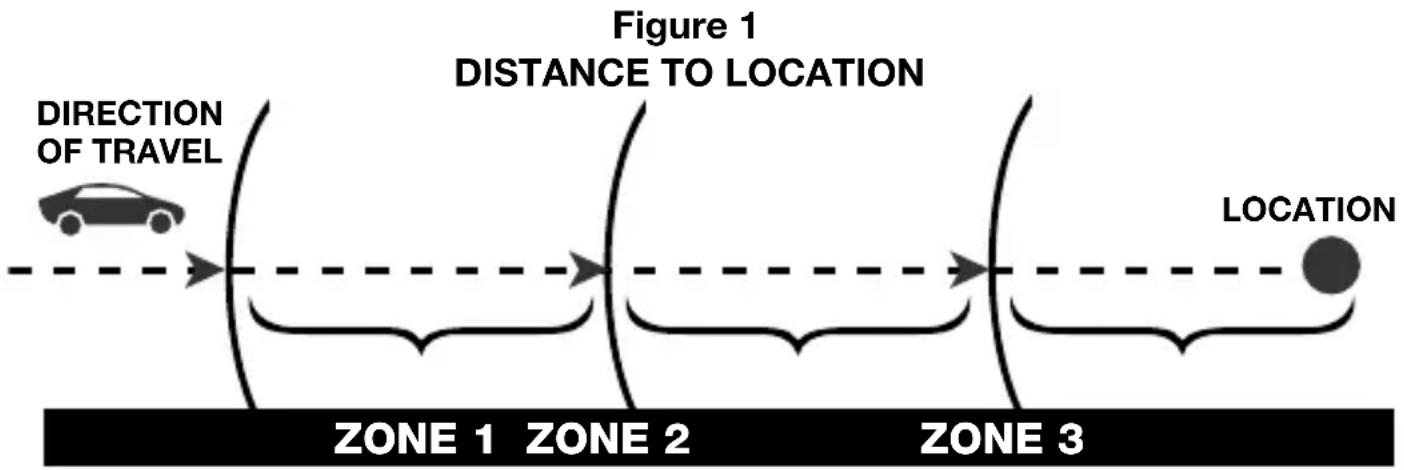
flowchart
graph LR
    A["Car with directional arrow"] --> B["Figure 1: Distance to Location"]
    B --> C["Location"]
    style A fill:#f9f,stroke:#333
    style C fill:#ccf,stroke:#333
    subgraph Zone 1
        D["Car Icon"]
    end
    subgraph Zone 2
        E["Car Icon"]
    end
    subgraph Zone 3
        F["Car Icon"]
    end
    G["Direction of Travel"]
    H["Location"]
Table 2
| ALERT TYPE AUDIO ALERT SOUNDED* | |
| Known Speed Traps 1 Beep | |
| Photo Enforcement Area | 2 Pulses |
| Caution Area | 3 Buzzes |
| User Location | 4 Chirps |
* Upon unit power-up, all alert tones will be played in the order shown on this table as part of a unit self-test.
Alerts (continued)
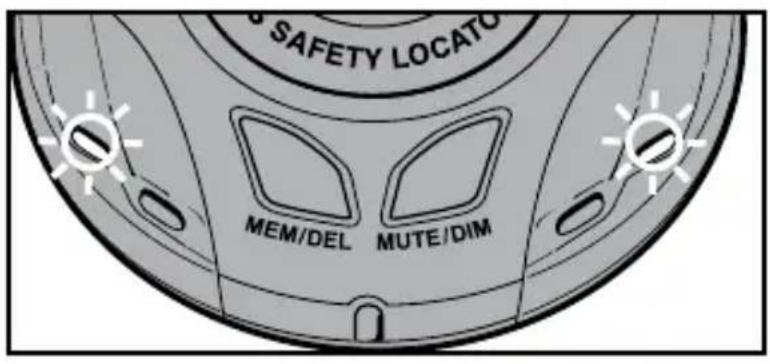
Visually, the zones are indicated with the 5 LEDs flashing while within the zones:
ZONE 1: Outer green LEDs flash.
text_image
SAFETY LOCATO MEM/DEL MUTE/DIMZONE 2: Outer green and middle amber LEDs flash.

text_image
SAFETY LOCATO MEM/DEL MUTE/DIMZONE 3: The green, amber and center red LEDs all flash.

text_image
SAFETY LOCAT MEM/DEL MUTE/DIMTroubleshooting
The unit cannot be switched on
Check that the cigarette lighter adapter is well inserted into the cigarette lighter socket and that the cigarette light socket is functioning properly. Check that the lighter socket is clean and free from debris. Also check that the fuse in the cigarette lighter adaptor is functioning correctly.
The unit cannot acquire satellites
Check that the Cobra SL3's built-in GPS antenna has a clear view of the sky above. If this is the first time you have powered up your SL3, please remember that the first ‘cold’ start may take between 15-30 minutes to acquire sufficient satellites for operation. Disconnect and re-connect the power to the unit and start the power up procedure again.
The satellite signal temporarily or permanently drops out
This may happen temporarily in areas where there are a significant number of tall buildings or trees or while driving through a tunnel. The signal should only be lost for a few seconds and will be quickly reacquired. Check that the device has not moved and that the built-in GPS antenna still has a good clear view of the sky above. Very occasionally you may experience bad satellite coverage that may lead to you losing a signal. This should last no longer than a few short minutes.
The device does not appear to alert properly at camera locations
Have you performed an update recently? If not, perform a fresh update to ensure that you have all the latest coordinates stored on your device. Visit http://aura.cobra.com for the latest database.
For Products Purchased In The U.S.A.
Cobra Electronics Corporation warrants that its SL3 GPS Safety Locators, and the com po nent parts thereof, will be free of defects in workmanship and materials for period of one (1) year from the date of first consumer purchase. This warranty may be enforced by the first consumer purchaser, pro vid ed that the product is utilized within the U.S.A.
Cobra will, without charge, repair or replace, at its option, de fec tive SL3 GPS Safety Locators, products or com po nent parts upon de liv ery to the Cobra Factory Service Department, ac com pa nied by proof of the date of first consumer pur chase, such as a du pli cat ed copy of a sales receipt.
You must pay any initial shipping charges required to ship the product for warranty service, but the return charges will be at Cobra's expense, if the product is repaired or replaced under warranty.
This warranty gives you specific rights, and you may also have other rights which vary from state to state.
Exclusions: This limited warranty does not apply:
1) To any product dam aged by accident.
2) In the event of misuse or abuse of the product or as a result of unauthorized alterations or repairs.
3) If the serial number has been altered, defaced or re moved.
4) If the owner of the product resides outside the U.S.A.
All implied warranties, including war ran ties of mer chant abil i ty and fitness for a par tic u lar purpose are limited in duration to the length of this warranty.
Cobra shall not be liable for any incidental, consequential or other damages; including, without limitation, damages resulting from loss of use or cost of in stabilization.
Some states do not allow limitations on how long an implied warranty lasts and/or do not allow the exclusion or limitation of incidental or consequential damages, so the above limitations may not apply to you.
Product Service
If you have any questions about operation or installing your new Cobra product, or if you are missing parts...
Please call Cobra first! DO NOT RETURN THIS PRODUCT TO THE STORE! See customer assistance on page A1.
If you suspect that your unit requires service, please call 773-889-3087 BEFORE shipping it to Cobra. This will ensure that you receive service as quickly as possible.
If you are asked to send your unit to the Cobra factory, please follow these steps:
1) Send the complete unit, including power cord. (It is not necessary to include the mounting bracket.)
2) For warranty repair, enclose some form of proof-of-purchase, such as a photocopy or carbon copy of a sales receipt. If you send the original receipt, it cannot be returned.
3) Enclose a typed or clearly written description of the problem you are having with your unit, plus the name and address where you want the unit returned.
4) Pack the unit securely to prevent damage during transit. If possible, use the original packing materials.
5) Ship prepaid and insured using a traceable carrier such as United Parcel Service (UPS), Federal Express, or Priority mail with delivery confirmation.
Ship to: Cobra Factory Service, Cobra Electronics Corporation, 6500 West Cortland Street, Chicago, IL 60707 U.S.A.
6) Please allow three (3) to four (4) weeks before contacting us about the status of your service. Call 773-889-3087 for assistance. If your unit is under warranty, it will either be repaired or replaced upon receipt, depending on the model. If your unit is out of warranty, you will receive a letter informing you of the repair or replacement charge.
Trademark Acknowledgement
Cobra ^® , Nothing Comes Close to a Cobra ^® and the snake design are registered trademarks of Cobra Electronics Corporation.
Cobra Electronics Corporation™ and AURA™ are trademarks of Cobra Electronics Corporation, USA.
The Cobra line of quality products includes:
CB Radios
microTALK® Radios
Radar/Laser Detectors
Safety Alert® Traffic Warning System
HighGear® Accessories
CobraMarine® VHF Radios
Power Inverters
Accessories
For more information or to order any of our products, please visit our website: www.cobra.com