PDMICUSB6 - Microphone Pyle - Free user manual and instructions
Find the device manual for free PDMICUSB6 Pyle in PDF.

User questions about PDMICUSB6 Pyle
0 question about this device. Answer the ones you know or ask your own.
Ask a new question about this device
Download the instructions for your Microphone in PDF format for free! Find your manual PDMICUSB6 - Pyle and take your electronic device back in hand. On this page are published all the documents necessary for the use of your device. PDMICUSB6 by Pyle.
USER MANUAL PDMICUSB6 Pyle
PDMICUSB6 USB Recording Microphone
Before using the PDMICUSB6 in your audio or communications application you must confirm that the computer's operating system recognizes the PDMICUSB6.
Windows XP recognition instructions
- Connect the PDMICUSB6 to the computer by using the supplied USB cable
- The PDMICUSB6 will be automatically installed and recognized as a windows audio device.
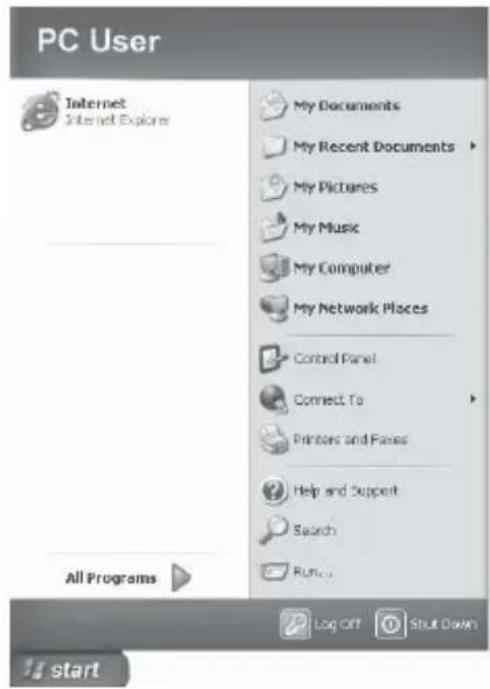
- Go to the Start Menu, select Control Panel.
text_image
PC User Internet Internet Explorer My Documents My Recent Documents My Pictures My Music My Computer My Network Places Control Panel Connect To Printers and Files Help and Support Search Run... All Programs Log Off Shut Down start- Select "Sounds, Speech, and Audio Devices"

text_image
Control Panel File Edit View Favorites Tools Help Search Publishers Address Control Panel Control Panel Switch to Classic View See Also Windows Update HIPS and Support Other Control Panel Options Pick a category Appearance and Themes Pictureurs and Other Hardware Network and Internet Connections User Accounts Add or Remove Programs State, Time, Language, and Biographical Options Sounds, Speech, and Audio Devices Accessibility Options Performance and Maintenance5. Select "Sounds and Audio Devices"

text_image
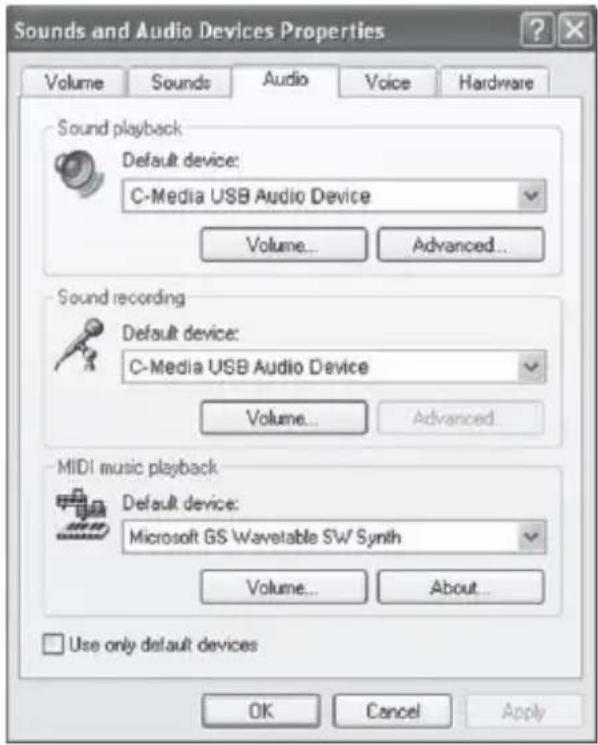
Sounds, Speech, and Audio Devices File Edit View Favorites Tools Help Back Search Porters Address Sounds, Speech, and Audio Devices Go See Also Accessibility Sound Options Advanced Volume Controls Troubleshooters Sound DVD Sounds, Speech, and Audio Devices Pick a task... Adjust the system volume Change the sound scheme Change the speaker settings or pick a Control Panel icon Portable Media Devices Sounds and Audio Devices Speech- Select the “Audio” tab. Confirm that under the “Sound recording” section the “C-Media USB Audio Device” is selected. (The “Sound playback” should remain your usual sound output device).
text_image
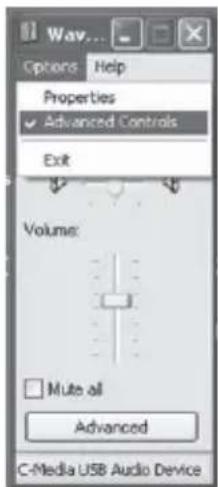
Sounds and Audio Devices Properties Volume Sounds Audio Voice Hardware Sound playback Default device: C-Media USB Audio Device Volume... Advanced... Sound recording Default device: C-Media USB Audio Device Volume... Advanced... MIDI music playback Default device: Microsoft GS Wavetable SW Synth Volume... About... Use only default devices OK Cancel Apply- Select the “Volume” tab. Then select “Advanced Controls” under the Sound recording heading.
text_image
Wav... Options Help Properties ✓ Advanced Controls Exit Volume: Mute all Advanced C-Media USB Audio Device- Click the “Advanced” button to open the “Advanced Controls for Wave In” window. Depending upon your system, you might have the option of selecting “1 AGC” or “Mic boost”.

text_image
Advanced Controls for Wave In These settings can be used to make fine adjustments to your audio. Tone Controls These settings control how the tone of your audio sounds. Bass: Low High Treble: Low High Other Controls These settings make other changes to how your audio sounds. See your hardware documentation for details. ✓1 AGC Close-
Launch your audio recording software.
-
Adjust the position of the PDMICUSB6 from the sound source to get the best results.
- Locate the preferences in your audio program and select the "C-Media USB Audio Device". Adjust the input level in this program so that the audio signal is not distorted.
- Now the PDMICUSB6 USB Recording Microphone is working.
Mac OSX Recognition Instructions
- Connect the PDMICUSB6 to the computer by using the USB cable.
- The PDMICUSB6 will be automatically installed and recognized as a windows audio device.
- Go to the Apple Menu and locate "System Preferences".

text_image
Finder File Edit View Go Window Help About This Mac Software Update... Mac OS X Software... System Preferences... Dock Location Recent Items Force Quit Finder Sleep Restart... Shut Down... Log Out Macintosh User ⌘⌘Q- Under "Hardware" click on the "Sound" icon.

text_image
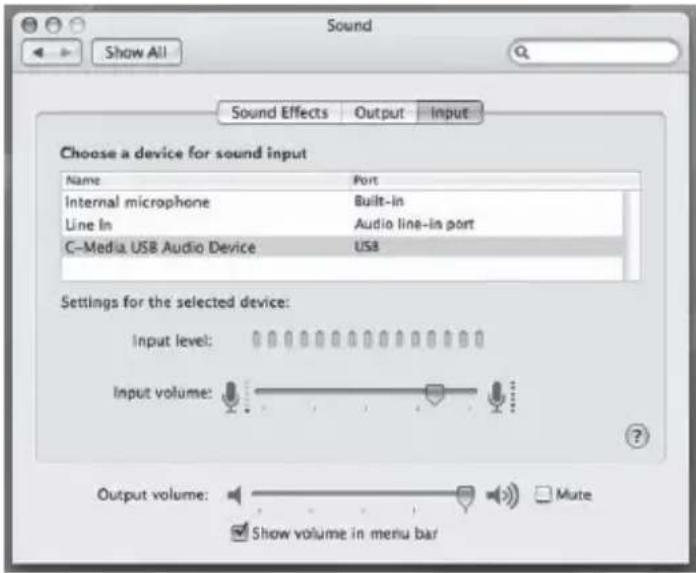
System Preferences Show All Personal Appearance Dashboard & Exposé Desktop & Screen Saver Dock International Security Spotlight Hardware CDs & DVDs Displays Energy Saver Keyboard & Mouse Print & Fax Sound Internet & Network .Mac Network QuickTime Sharing System Accounts Classic Date & Time Software Update Speech Startup Disk Universal Access- Click on the “Input” button and choose the “C-Media USB Audio Device
text_image
Sound Show All Sound Effects Output.Input Choose a device for sound input Name Port Internal microphone Built-in Line In Audio line-in port C-Media USB Audio Device USA Settings for the selected device: Input level: Input volume: Output volume: Mute Show volume in menu bar-
Click on the “Output” button and choose the internal speakers or the output speakers of your choice. (The “Sound playback” should remain your usual sound output device).
-
Position the PDMICUSB6 4 to 6 inches away from your source (your mouth or music instrument).
-
Test the PDMICUSB6 by speaking or playing into the microphone.
-
You will see activity in the "Input Level" meter.
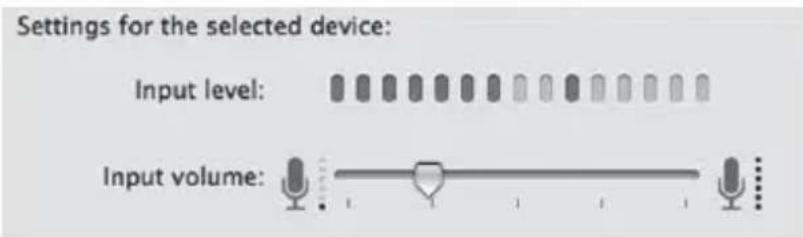
text_image
Settings for the selected device: Input level: Input volume:-
Adjust the "Input Volume" to obtain the best sound quality.
-
Close the System Preferences window to complete the settings.
-
Launch your audio recording software.
-
Adjust the position of the PDMICUSB6 from the sound source to get the best results.
-
Locate the Preferences in your audio program and select the "C-Media USB Audio Device". Adjust the input level.
-
Now the PDMICUSB6 USB Recording Microphone is working.