S7iDPF10 - Digital photo frame Sandstrøm - Free user manual and instructions
Find the device manual for free S7iDPF10 Sandstrøm in PDF.

| Product Type | Digital Photo Frame |
| Display | 7" Digital TFT LCD Panel |
| Display Resolution | 480 x 234 pixels |
| Brightness | 145 cd/m² |
| Contrast Ratio | 500:1 |
| Supported Image Format | JPEG |
| Memory Card Support | SD / MMC / MS |
| USB Support | USB 2.0 (flash drives up to 8GB) |
| Auto Rotation | Yes (90°) in portrait/landscape |
| Slideshow Effects | 10 effects: Random, Windows, Jalousie, Fade, Insert, Reel, Brick, Release, 3DMix, Comb |
| Slideshow Interval | 3s, 5s, 15s, 3min, 5min, 15min |
| Split Slideshow | Up to 4 landscape or 2 portrait images |
| Interchangeable Frame | Yes (removable, multiple designs) |
| Stand | Detachable, supports landscape and portrait |
| Wall Mountable | Yes (mounting hole at back) |
| Power Adapter | Input AC 100-240V ~ 0.2A max, Output DC 5V 1.2A |
| Dimensions (without stand) | Approx. 180 x 113 x 20 mm (W x H x D) |
| Net Weight (without stand) | Approx. 197 g |
| Languages | English, French, German, Spanish, Portuguese, Dutch |
| Calendar Display | Yes (with slideshow) |
| Image Size Modes | Auto Fit, Optimal (original), Full |
| Zoom | Up to 5x |
| Rotate | 90° clockwise per press |
| Adjustable Display | Brightness, Contrast, Color, Tint (0-40) |
| Operating Temperature | 0°C to 40°C |
Frequently Asked Questions - S7iDPF10 Sandstrøm
User questions about S7iDPF10 Sandstrøm
0 question about this device. Answer the ones you know or ask your own.
Ask a new question about this device
Download the instructions for your Digital photo frame in PDF format for free! Find your manual S7iDPF10 - Sandstrøm and take your electronic device back in hand. On this page are published all the documents necessary for the use of your device. S7iDPF10 by Sandstrøm.
USER MANUAL S7iDPF10 Sandstrøm
7" Interchangeable Digital Photo Frame
S7iDPF10
natural_image
Interior scene with a desk, framed pictures, and a photo album on a wall; no visible text or symbols.
natural_image
Two boys sitting on a wooden deck by the lake, with green trees and a wooden structure in the background (no text or symbols visible)
natural_image
Two boys sitting on a wooden deck beside a lake, with green trees and a wooden structure in the background (no text or symbols visible)
natural_image
Person in protective gear operating equipment in a dimly lit room (no visible text or symbols)
bar
| Category | Value | |---|---| | Category 1 | 100 | | Category 2 | 100 | | Category 3 | 100 | | Category 4 | 100 | | Category 5 | 100 | | Category 6 | 100 | | Category 7 | 100 | | Category 8 | 100 | | Category 9 | 100 | | Category 10 | 100 | | Category 11 | 100 | | Category 12 | 100 | | Category 13 | 100 | | Category 14 | 100 | | Category 15 | 100 | | Category 16 | 100 | | Category 17 | 100 | | Category 18 | 100 | | Category 19 | 100 | | Category 20 | 100 | | Category 21 | 100 | | Category 22 | 100 | | Category 23 | 100 | | Category 24 | 100 | | Category 25 | 100 | | Category 26 | 100 | | Category 27 | 100 | | Category 28 | 100 | | Category 29 | 100 | | Category 30 | 100 | | Category 31 | 100 | | Category 32 | 100 | | Category 33 | 100 | | Category 34 | 100 | | Category 35 | 100 | | Category 36 | 100 | | Category 37 | 100 | | Category 38 | 100 | | Category 39 | 100 | | Category 40 | 100 | | Category 41 | 100 | | Category 42 | 100 | | Category 43 | 100 | | Category 44 | 100 | | Category 45 | 100 | | Category 46 | 100 | | Category 47 | 100 | | Category 48 | 100 | | Category 49 | 100 | | Category 50 | 100 | | Category 51 | 100 | | Category 52 | 100 | | Category 53 | 100 | | Category 54 | 100 | | Category 55 | 100 | | Category 56 | 100 | | Category 57 | 100 | | Category 58 | 100 | | Category 59 | 100 | | Category 60 | 100 | | Category 61 | 100 | | Category 62 | 100 | | Category 63 | 100 | | Category 64 | 100 | | Category 65 | 100 | | Category 66 | 100 | | Category 67 | 100 | | Category 68 | 100 | | Category 69 | 100 | | Category 70 | 100 | | Category 71 | 100 | | Category 72 | 100 | | Category 73 | 100 | | Category 74 | 100 | | Category 75 | 100 | | Category 76 | 100 | | Category 77 | 100 | | Category 78 | 100 | | Category 79 | 100 | | Category 80 | 100 | | Category 81 | 100 | | Category 82 | 100 | | Category 83 | 100 | | Category 84 | 100 | | Category 85 | 100 | | Category 86 | 100 | | Category 87 | 100 | | Category 88 | 100 | | Category 89 | 100 | | Category 90 | 100 | | Category 91 | 100 | | Category 92 | 100 | | Category 93 | 100 | | Category 94 | 100 | | Category 95 | 100 | | Category 96 | 100 | | Category 97 | 100 | | Category 98 | 100 | | Category 99 | 100 | | Total (Total) |Contents
Unpacking the Photo Frame ....4
Product Overview ....5
Preparations......6
Attaching the Stand 6
Changing the Frame....7
Connecting to the Mains Power....8
Inserting a Memory Card / USB Flash Drive 9
Basic Operation 10
Display Image 10
Auto Rotation....11
Settings 12
Set Image Size....12
Set Slideshow Effect ....13
Set Slideshow Interval 13
Set Split Slideshow....13
Rotate....14
Zoom File....14
Delete File....15
Reset setting....15
Language....16
Brightness / Contrast / Colour / Tint 16
Time....17
Troubleshooting.... 18
Specifications.... 19
Safety Warnings 20
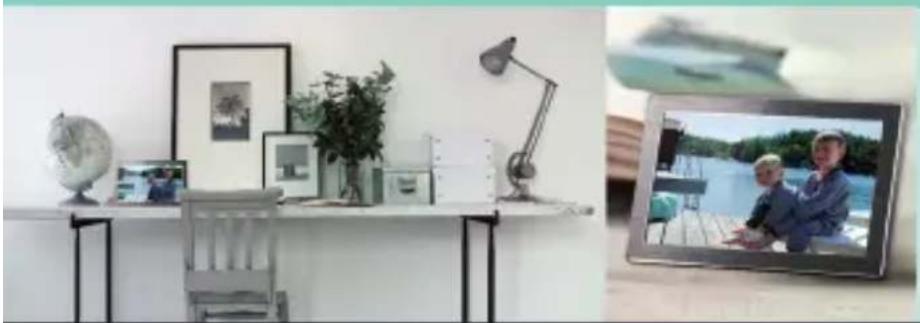
Congratulations on the purchase of your new Sandstrøm Digital Photo Frame.
We recommend that you spend some time reading this instruction manual in order that you fully understand all the operational features it offers. You will also find some hints and tips to help you resolve any issues.
Read all the safety instructions carefully before use and keep this instruction manual for future reference.
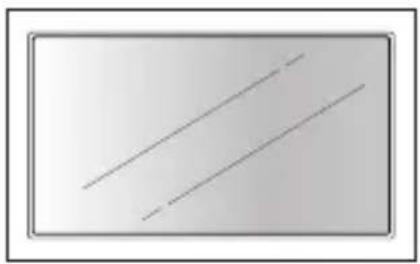
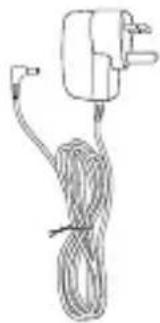
Unpacking the Photo Frame
Remove all packaging from the unit. Retain the packaging. If you dispose it please do so according to local regulations.
natural_image
Simple diagram with two diagonal lines inside a rectangular frame (no text or symbols)- Digital Photo Frame

2. Photo Frame Stand (P.N.: 61-DPF-001)
natural_image
Simple line drawing of a cable being inserted into an electrical plug (no text or symbols)- Mains Adapter (P.N.: 31-0512#UK)

natural_image
Simple 3D rectangular frame with no text or symbols- Photo Frame x 1 (P.N.: 40-DPF970A-001)
- Instruction Manual (P.N.: 71-DPF970A-002)
If items are missing or damaged, please contact partmaster (UK only). Tel: 0844 800 3456 for assistance.
Product Overview
Main Unit
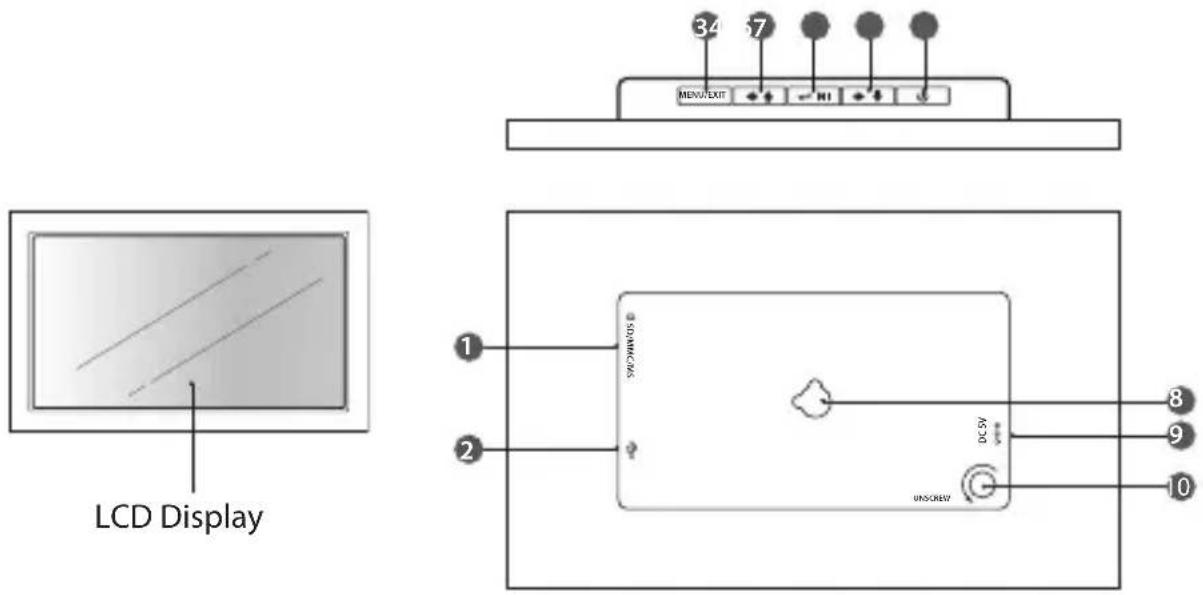
| Name Description | |
| 1 SD/MMC/MS slot □ | • To accommodate SD, MMC, MS cards |
| 2 USB host ↓ | • To accommodate USB devices such as portable USB flash drives or flash memory card readers |
| 3 MENU / EXIT | • To display setting menu• To exit the menu or return to last display |
| 4 button | • To move left or up in the menu / thumbnail mode / option settings• To display the previous photo |
| 5 Enter / Play / Pause button ← → | • To confirm a setting or enter next display• To slideshow the photos• To pause the sildeshow |
| 6 button | • To move right or down in the menu / thumbnail mode / option settings• To display the next photo |
| 7 Power button | • Press and hold to turn the photo frame on / off |
| 8 Wall mounting hole | • For mounting the photo frame on the wall |
| 9 DC-IN socket ➕ ➕ ➕ | • To connect to the mains supply |
| 10 Stand receptacle | • To attach the supplied stand |
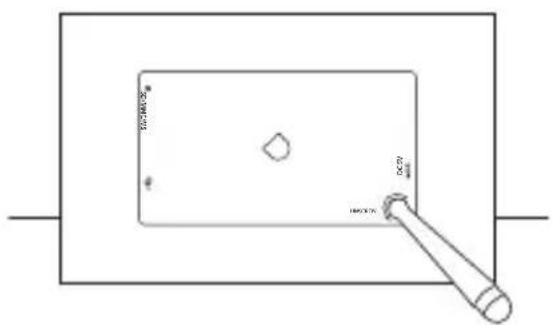
Preparations
Attaching the Stand
- Take out the stand attached at the back of the photo frame.
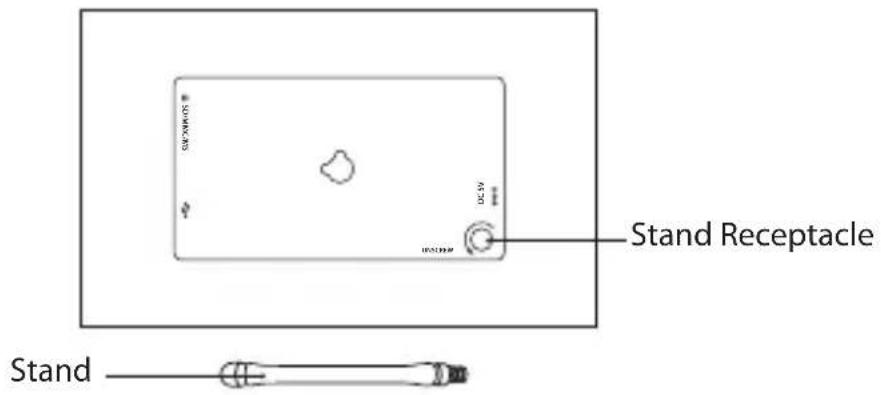
- Screw in the stand into the stand receptacle.
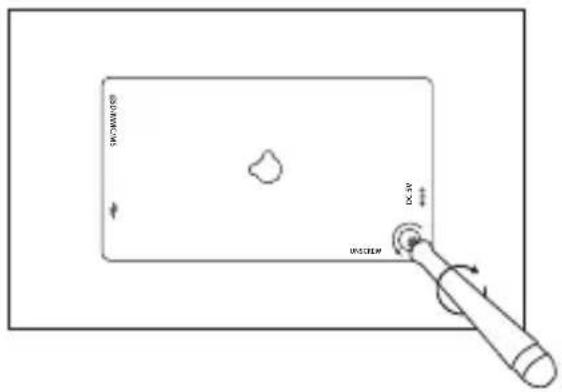
- Now the stand is fixed, you can choose to display your photo frame in a landscape or portrait position.
Landscape Position
Portrait Position
To take off the stand, unscrew it from its receptacle.
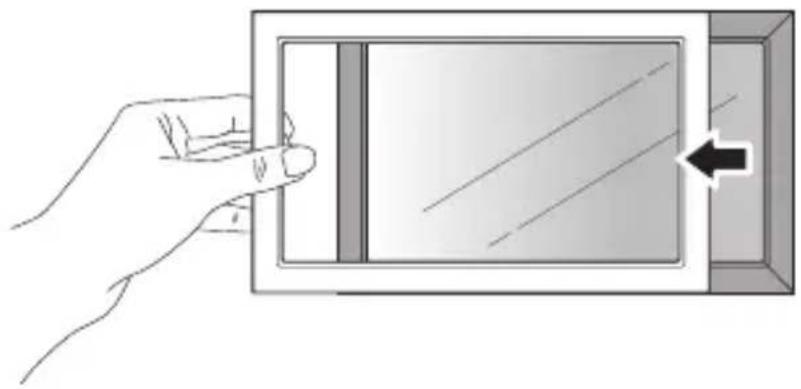
Changing the Frame
1. Removing the interchangeable frame
Release all the hooks on the edges of the interchangeable frame by pulling up the interchangeable frame.
natural_image
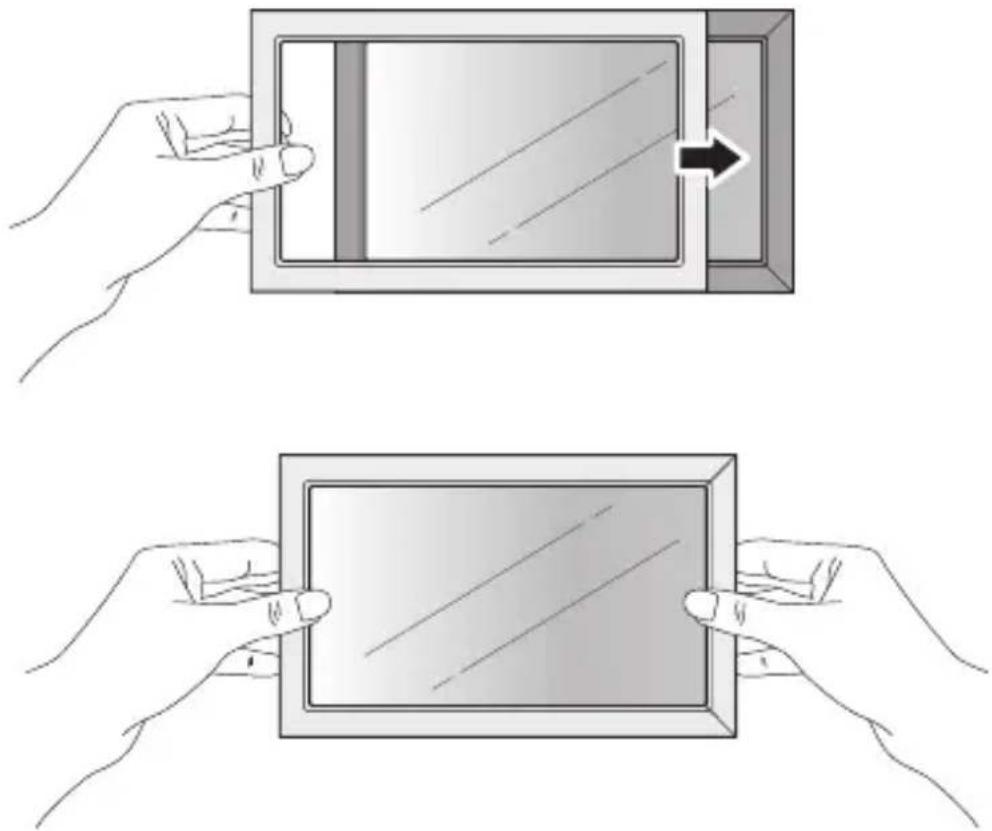
Illustration of a hand inserting a rectangular device into a box, with an arrow pointing to the right side (no text or symbols present)2. Installing the interchangeable frame
- Hold the interchangeable frame and place it on the photo frame.
- Press the interchangeable frame for all the hooks to be fixed in place. Now the interchangeable frame is installed.
natural_image
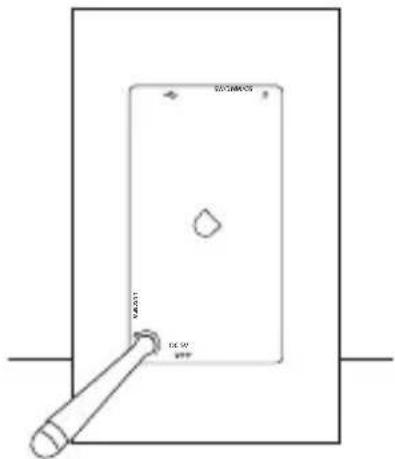
Two-step illustration showing hands holding a tablet device with an arrow indicating the process (no text or symbols present)Connecting to the Mains Power
- Connect the supplied mains adapter (5V DC, 1.2A) to the photo frame, and plug in the mains adapter into the mains socket.
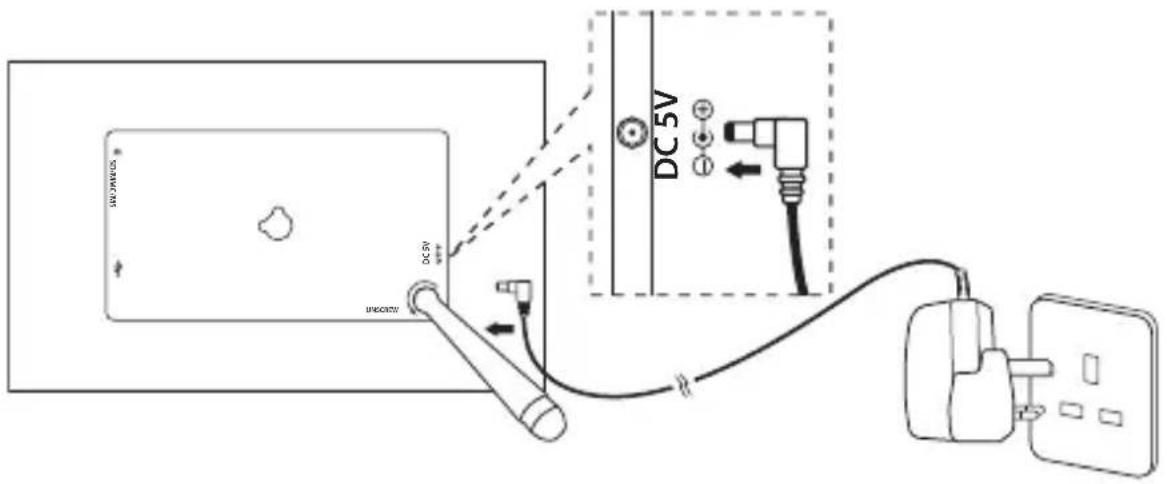
- Press and hold the ⏻ button on the photo frame to turn it on.
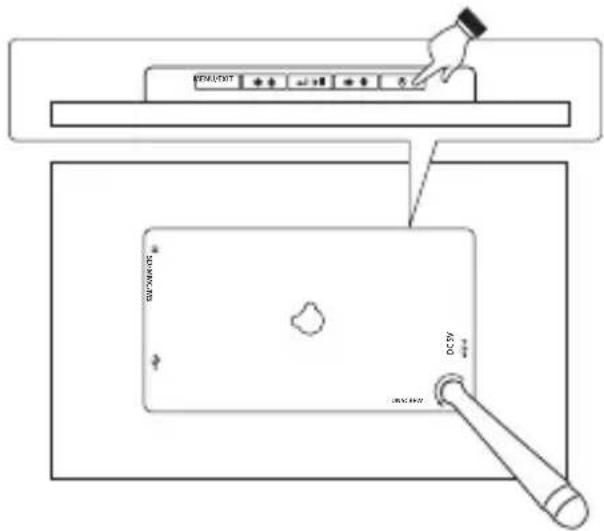
- The opening screen will appear. The display will automatically switch to calendar in 3 seconds. To turn off press and hold the button.

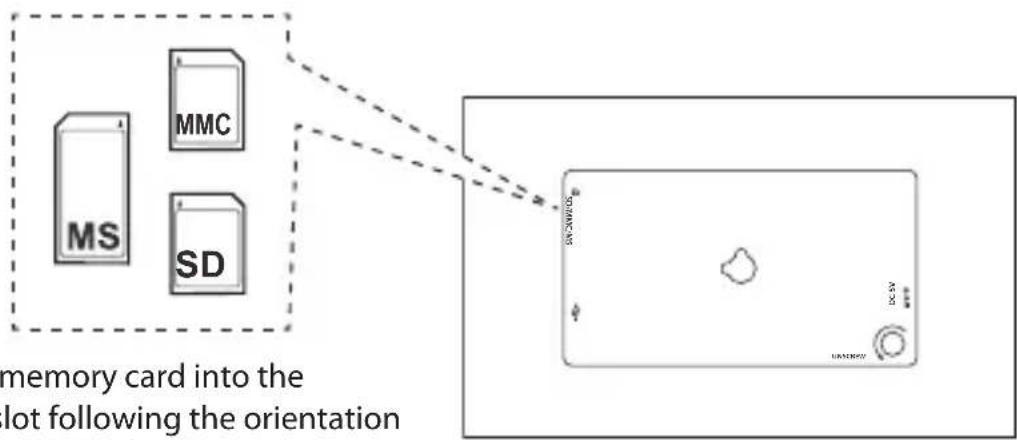
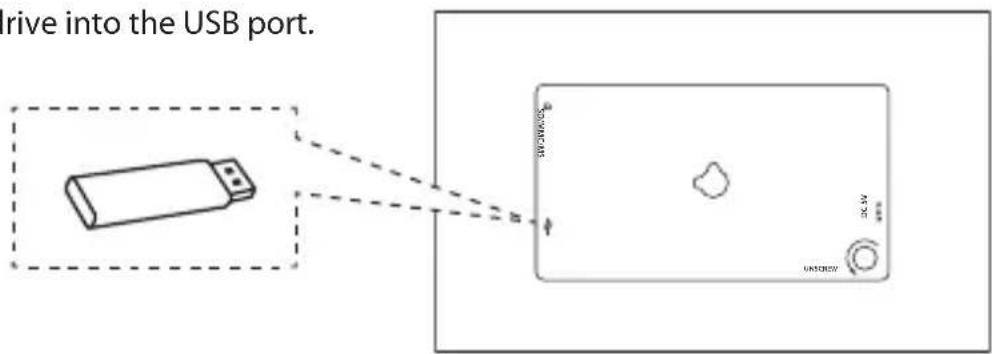
Inserting a Memory Card / USB Flash Drive
Insert a SD memory card, MMC memory card, or Memory Stick into the slot with its label side facing forward.
flowchart
graph TD
    A["MS"] --> B["MMC"]
    C["SD"] --> D["SD"]
    style A fill:#f9f,stroke:#333
    style B fill:#ccf,stroke:#333
    style C fill:#cfc,stroke:#333
    style D fill:#fcc,stroke:#333
    note bottom of A: memory card into the lot following the orientation
- Insert your memory card into the appropriate slot following the orientation marked on the photo frame.

• This unit can play back only one memory card or a USB flash drive at a time.
- This unit does not support any external hard disk and MP3 player connection via the USB 2.0 A-Type port.
• Some of the newer higher capacity cards may not be compatible with this frame.
- Do not insert a micro or mini memory card without an adapter.
- Insert a USB drive into the USB port.
Basic Operation
Display Image
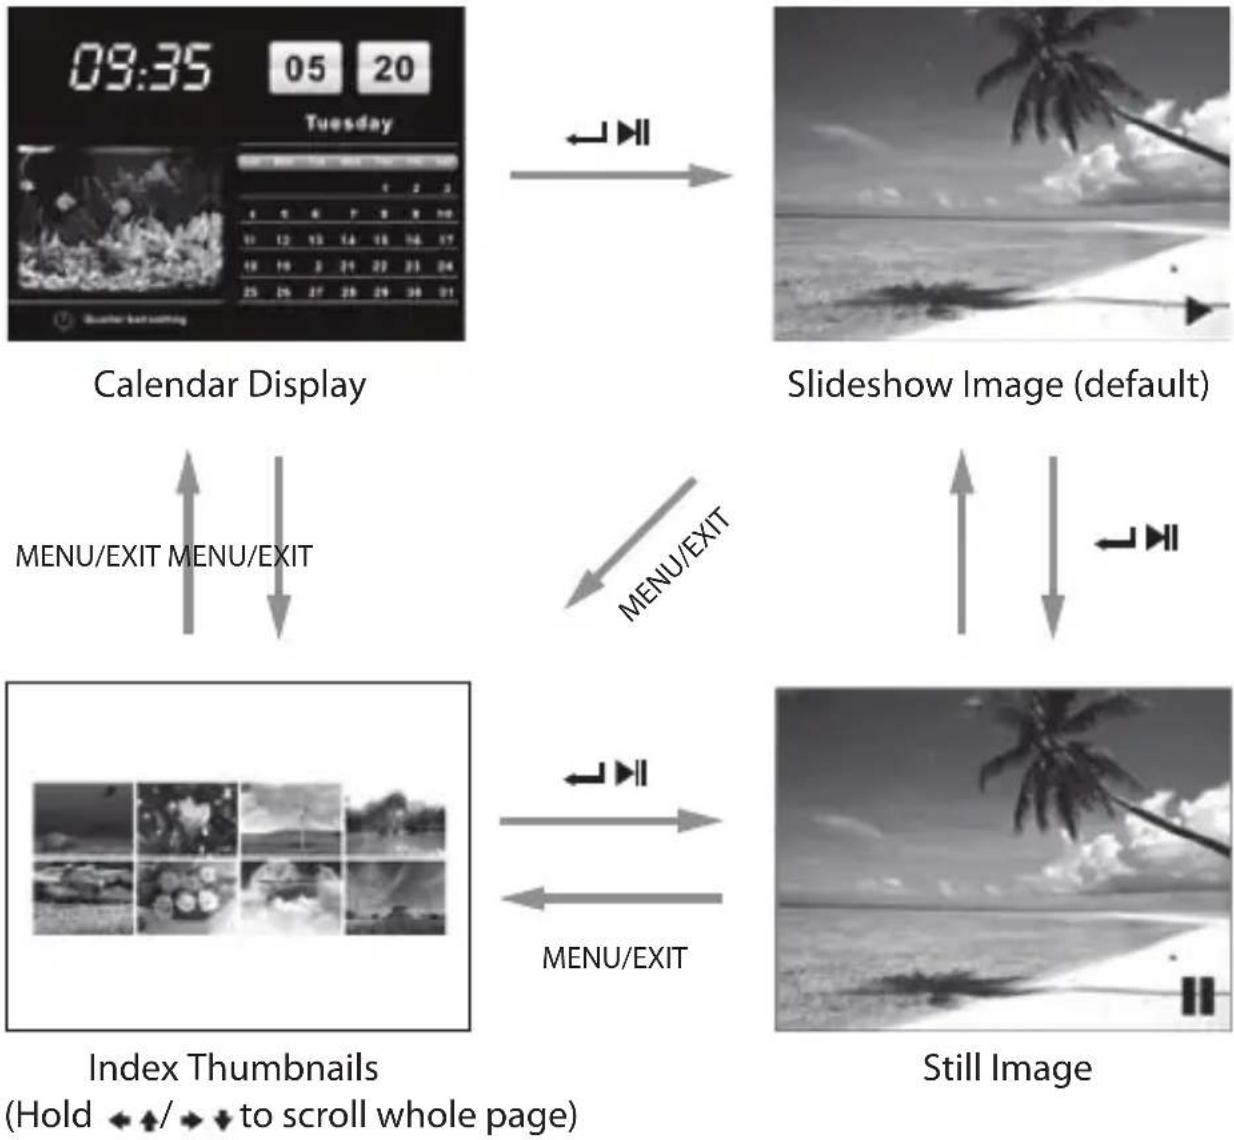
After turning on the unit the opening screen will appear, and after 3 seconds automatically switch to calendar display with slideshow image. If no memory card is inserted, a still image in the internal memory is displayed.
Auto Rotation
Place the unit in either portrait or landscape orientation. The single image rotates automatically 90^ to its proper orientation.
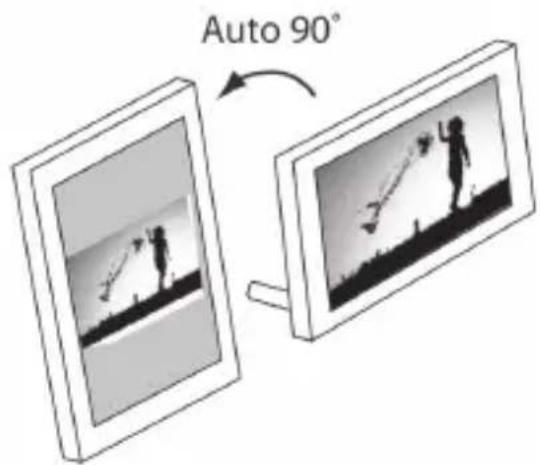

- No auto rotation for setting mode, index image, or calendar display.
- There maybe occasions where image may rotate unstably. To amend, tilt the unit slight to refocus your image and adjust the image orientation. Then place the unit on a flat stable surface.
Settings
Press and hold the MENU / EXIT button to display the setting menu.
Press the ◀◀◀ buttons to select an item, and then press the / button to enter the setting mode and confirm the setting. Press the MENU / EXIT button to exit to last menu.
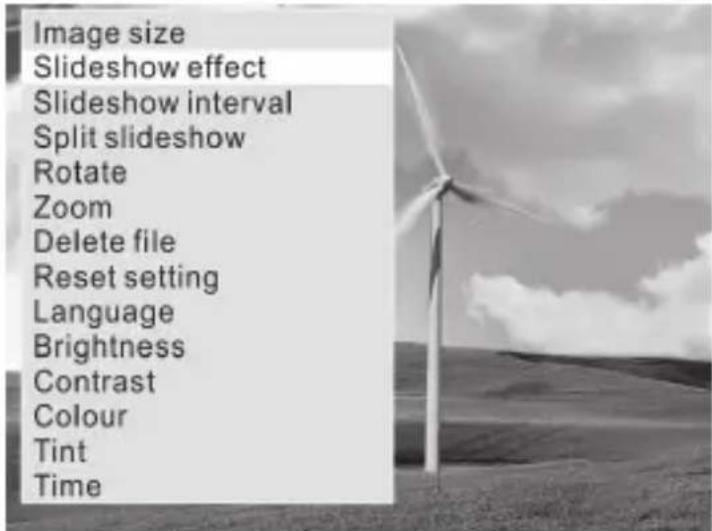

When in slideshow, you need to press the ←/▶ button to still an image, and then you can enter the setting menu.
Set Image size
Press and hold the MENU / EXIT button to display the setting menu. Press the ↗ ↓ button to select image size, then press the ↙ button to select Auto fit / Optimal / Full. The setting will activate when you exit the menu.
Auto Fit Entire image
Optimal Original size (default)

Full Over whole screen
Set Slideshow Effect
In the menu press the ↕ button to select slideshow effect and then press the ↕/ ↕ button to select one of the 10 effects : Radom, Windows, Jalousie, Fade, Insert, Reel, Brick, Release, 3DMix, Comb.
Set Slideshow Interval
In the menu press the◀/ ▶button to select slideshow interval and then press the◀/ ▶button to set a value from 3 seconds (default), 5 seconds, 15 seconds, 3 minutes, 5 mintues and 15 minutes for the interval between images. Set "off" on single or calendar view mode if no need slideshow is required.

During slideshow, no matter what value (including "Off") you set, there is still no function for
Set Split Slideshow
In the menu press the ↕ button to select split slideshow and then press the / ← ↗ button to select On / Off. Set "On" for slideshow of multiple images. Each screen for at most 4 landscape displays or 2 portrait displays.

natural_image
Black-and-white photo collage showing a baby, a close-up of a car, and a distant pyramid (no text or symbols visible)
natural_image
Black-and-white photo collage showing a baby's face and a close-up of a fish jumping over water (no text or symbols)
natural_image
Split black-and-white image: left shows a whale leaping over water with mountain background; right shows a wind turbine on open field (no text or symbols)Rotate (Only available on single view mode)
Select "Rotate" in the setting menu, press the ←/ ▶ button to rotate the current image 90°clockwise. Press the MENU / EXIT button to exit from rotate mode and return the photo back to its original orientation.

natural_image
Black and white photo of a car's rear wheel and side rear wheel, showing motion blur and no visible text or symbols.Zoom File (Only available on single view mode)
Select "Zoom" in the setting menu, press the ←/ ▶ button to enlarge the image for total 5 times. Press the ★ button or hold the / button to move the viewing area. Press the MENU / EXIT button to exit from zoom mode.

natural_image
Black and white photo of a white sports car with visible dynamics and front grille (no text or symbols)
natural_image
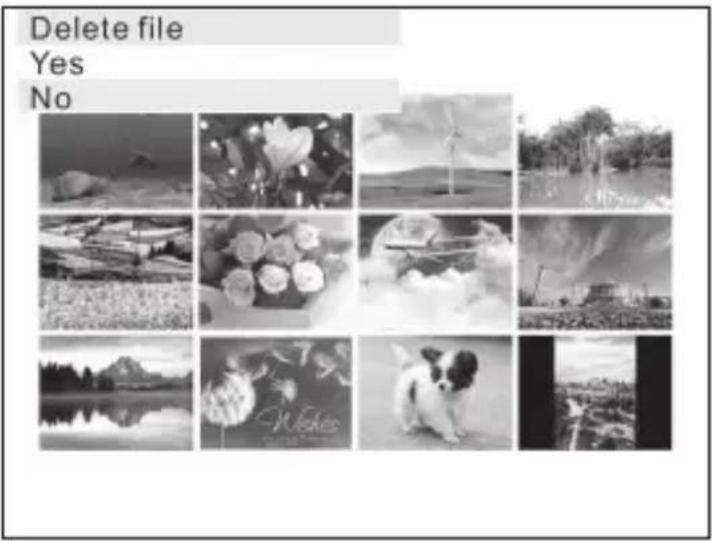
Black and white photo of a white sports car on a road with motion blur, no visible text or symbolsDelete File (Only available in thumbnail mode)
Enter "Delete file" menu, select "Yes" and press the ←/▶ button to delete the selected image from the thumbnails.
Reset Setting
Enter "Reset Setting" menu, select "Yes" and press the ←/▶| button to confirm all settings to return to factory defaults except time setting.
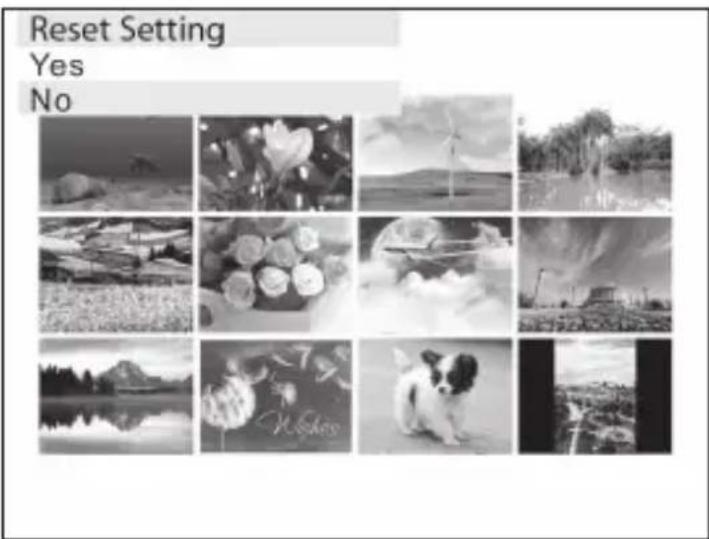

Unplugging the photo frame won't change all the settings but will reset the time to 00:00:00 Jan 1, 2011.
Language
Set the display language on the LCD screen : English (default), French, German, Spanish, Portuguese, Dutch.

Brightness / Contrast / Colour / Tint
Select the item you want to change and press the ← button to display a bar. Press the ← button to adjust the level from 0-40.

natural_image
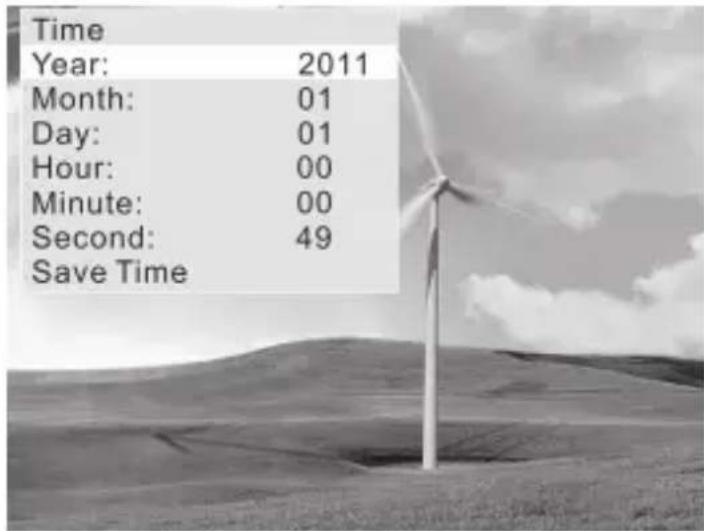
Underwater scene with two dolphins and a dark rectangular object labeled 'Brightness' (no other text or symbols)Time
Press the ←/ button to highlight the year / month / day / hour / minute / second option you want to set. Press the ←/ button to adjust the digit and then press the ←/ button again to confirm.
Finally select "Save Time" and press the ←/▶button to activate the new time.
Troubleshooting
1. No power
- Check to make sure the mains plug is plugged into the mains socket.
• Make sure there is power in the mains socket.
2. Unable to view photos on the Digital Photo Frame
- Not all JPEG files are compatible. Please open the files in a computer and resave them as JPEG files and then try to playback in the photo frame.
- Check if the memory card is compatible.
3. If the photo display is distorted or cannot display properly
- Go to the main menu, then the SETUP and change the display mode to match your photo (Full / Standard).
4. If photo display seems slow
• Use lower resolution photos.
5. The image is distorted or blurred.
- Resolution of the image is too low. Try playing a file with a higher resolution. Resolution of 800 X 600 pixels is recommended.
6. Cannot detect any external device via the USB 2.0 A-Type port
- This photo frame only support a USB flash drives and it does not support any external hard disks or MP3 player via the USB port.
7. The photo frame does not work properly
- Please switch off the photo frame and on again.
Specifications
| Display 7" Digital TFT LCD Panel | |
| View Area 480 x 234 pixels | |
| Brightness 145 cd/m | 2 |
| Contrast 500 : 1 | |
| Stand Detachable | |
| I / O Ports DC IN / USB 2.0 | |
| Memory Card Slot SD / MMC / MS | |
| Support File Format Photo : JPEG | |
| USB Flash Disk Up to 8GB | |
| AC Adapter Input : AC 100–240V ~ 0.2 max. 50/60 Hz | |
| Dimensions Approx. 180 x 113 x 20mm (W x H x D)(without stand) | |
| Net Weight Approx. 197g (without stand) |
Features and specifications are subject to change without prior notice.
Safety Warnings
When using electrical appliances, basic precautions should always be followed, including the following:
- Read all the instructions and retain this instruction manual.
- Ensure that all electrical connections (including the mains adaptor and power cable) are properly made and in accordance with the manufacturer's instructions. Switch off and withdraw the mains adaptor before making or changing connections.
- Consult your dealer if you are ever in doubt about the installation, operation or safety of your photo frame.
- Do not allow the photo frame to be exposed to dripping or splashing.
- Never store in hot or very cold areas. Recommended operating temperature is 0\~40°C.
- Do not use the photo frame in areas with high moisture (e.g. bathroom) or dusty areas.
- Do not place hot objects or naked flame sources such as lighted candles or night lights on or close to the photo frame. High temperatures can melt plastic and lead to fires.
- Do not obstruct the ventilation openings of the photo frame with items such as newspapers, tablecloths, curtains, etc. Overheating will cause damage and shorten the life of the photo frame.
- Do not handle the power cable with wet hands.
- Be careful with the LCD panels on the photo frame.
- Only use attachments/accessories specified by the manufacturer.
GB-20
- When the photo frame is not in use or unattended for a long period of time, disconnect it from the mains socket.
- Do not remove any fixed cover as this may expose dangerous voltages.
- Do not continue to operate the photo frame if you are in any doubt about it working normally, or if it is damaged in any way - switch off, withdraw the mains adaptor and consult your dealer.
- Never let anyone especially children push anything into holes, slots or any other opening on the case - this could result in a fatal electrical shock.
- Route the power cable so that it is not likely to be walked on, crushed, chafed, or subjected to excessive wear, tear or heat.
1. Note about LCD screen
The LCD screen is manufactured using high-precision technology. However, some tiny black points and/or bright points (red, blue or green in colour) may constantly appear on the LCD screen. These points are generated in the manufacturing process and are normal.
| Note: If you require a replacement for any of the items listed below, please quote their corresponding part numbers: | |
| Replacement Part Part Number | |
| Photo Frame Stand 61-DPF-001 | |
| Mains Adapter 31-0512#UK | |
| Photo Frame 40-DPF970A-001 | |
| Instruction Manual 71-DPF970A-002 | |

Visit Partmaster.co.uk today for the easiest way to buy electrical spares and accessories. With over 1 million spares and accessories available we can deliver direct to your door the very
next day. Visit www.partmaster.co.uk or call 0844 800 3456 (UK customers only) Calls charged at National Rate.

natural_image
Symbol of a trash bin crossed out by two diagonal lines, with a solid black rectangle below (no text or labels)This symbol on the product or in the instructions means that your electrical and electronic equipment should be disposed at the end of its life separately from your household waste. There are separate collection systems for recycling in the EU.
For more information, please contact the local authority or your retailer where you purchased the product.
DSG Retail Ltd • Maylands Avenue • Hemel Hempstead
Herts • HP2 7TG • England

bar
| Category | Value | |---|---| | Category 1 | 100 | | Category 2 | 100 | | Category 3 | 100 | | Category 4 | 100 | | Category 5 | 100 | | Category 6 | 100 | | Category 7 | 100 | | Category 8 | 100 | | Category 9 | 100 | | Category 10 | 100 | | Category 11 | 100 | | Category 12 | 100 | | Category 13 | 100 | | Category 14 | 100 | | Category 15 | 100 | | Category 16 | 100 | | Category 17 | 100 | | Category 18 | 100 | | Category 19 | 100 | | Category 20 | 100 | | Category 21 | 100 | | Category 22 | 100 | | Category 23 | 100 | | Category 24 | 100 | | Category 25 | 100 | | Category 26 | 100 | | Category 27 | 100 | | Category 28 | 100 | | Category 29 | 100 | | Category 30 | 100 | | Category 31 | 100 | | Category 32 | 100 | | Category 33 | 100 | | Category 34 | 100 | | Category 35 | 100 | | Category 36 | 100 | | Category 37 | 100 | | Category 38 | 100 | | Category 39 | 100 | | Category 40 | 100 | | Category 41 | 100 | | Category 42 | 100 | | Category 43 | 100 | | Category 44 | 100 | | Category 45 | 100 | | Category 46 | 100 | | Category 47 | 100 | | Category 48 | 100 | | Category 49 | 100 | | Category 50 | 100 | | Category 51 | 100 | | Category 52 | 100 | | Category 53 | 100 | | Category 54 | 100 | | Category 55 | 100 | | Category 56 | 100 | | Category 57 | 100 | | Category 58 | 100 | | Category 59 | 100 | | Category 60 | 100 | | Category 61 | 100 | | Category 62 | 100 | | Category 63 | 100 | | Category 64 | 100 | | Category 65 | 100 | | Category 66 | 100 | | Category 67 | 100 | | Category 68 | 100 | | Category 69 | 100 | | Category 70 | 100 | | Category 71 | 100 | | Category 72 | 100 | | Category 73 | 100 | | Category 74 | 100 | | Category 75 | 100 | | Category 76 | 100 | | Category 77 | 100 | | Category 78 | 100 | | Category 79 | 100 | | Category 80 | 100 | | Category 81 | 100 | | Category 82 | 100 | | Category 83 | 100 | | Category 84 | 100 | | Category 85 | 100 | | Category 86 | 100 | | Category 87 | 100 | | Category 88 | 100 | | Category 89 | 100 | | Category 90 | 100 | | Category 91 | 100 | | Category 92 | 100 | | Category 93 | 100 | | Category 94 | 100 | | Category 95 | 100 | | Category 96 | 100 | | Category 97 | 100 | | Category 98 | 100 | | Category 99 | 100 | | Total (Total) |
bar
| Category | Value | |---|---| | Category 1 | 100 | | Category 2 | 100 | | Category 3 | 100 | | Category 4 | 100 | | Category 5 | 100 | | Category 6 | 100 | | Category 7 | 100 | | Category 8 | 100 | | Category 9 | 100 | | Category 10 | 100 | | Category 11 | 100 | | Category 12 | 100 | | Category 13 | 100 | | Category 14 | 100 | | Category 15 | 100 | | Category 16 | 100 | | Category 17 | 100 | | Category 18 | 100 | | Category 19 | 100 | | Category 20 | 100 | | Category 21 | 100 | | Category 22 | 100 | | Category 23 | 100 | | Category 24 | 100 | | Category 25 | 100 | | Category 26 | 100 | | Category 27 | 100 | | Category 28 | 100 | | Category 29 | 100 | | Category 30 | 100 | | Category 31 | 100 | | Category 32 | 100 | | Category 33 | 100 | | Category 34 | 100 | | Category 35 | 100 | | Category 36 | 100 | | Category 37 | 100 | | Category 38 | 100 | | Category 39 | 100 | | Category 40 | 100 | | Category 41 | 100 | | Category 42 | 100 | | Category 43 | 100 | | Category 44 | 100 | | Category 45 | 100 | | Category 46 | 100 | | Category 47 | 100 | | Category 48 | 100 | | Category 49 | 100 | | Category 50 | 100 | | Category 51 | 100 | | Category 52 | 100 | | Category 53 | 100 | | Category 54 | 100 | | Category 55 | 100 | | Category 56 | 100 | | Category 57 | 100 | | Category 58 | 100 | | Category 59 | 100 | | Category 60 | 100 | | Category 61 | 100 | | Category 62 | 100 | | Category 63 | 100 | | Category 64 | 100 | | Category 65 | 100 | | Category 66 | 100 | | Category 67 | 100 | | Category 68 | 100 | | Category 69 | 100 | | Category 70 | 100 | | Category 71 | 100 | | Category 72 | 100 | | Category 73 | 100 | | Category 74 | 100 | | Category 75 | 100 | | Category 76 | 100 | | Category 77 | 100 | | Category 78 | 100 | | Category 79 | 100 | | Category 80 | 100 | | Category 81 | 100 | | Category 82 | 100 | | Category 83 | 100 | | Category 84 | 100 | | Category 85 | 100 | | Category 86 | 100 | | Category 87 | 100 | | Category 88 | 100 | | Category 89 | 100 | | Category 90 | 100 | | Category 91 | 100 | | Category 92 | 100 | | Category 93 | 100 | | Category 94 | 100 | | Category 95 | 100 | | Category 96 | 100 | | Category 97 | 100 | | Category 98 | 100 | | Category 99 | 100 | | Total (Total) |- 7" Interchangeable Digital Photo Frame
- Contents
- Unpacking the Photo Frame ....4
- Product Overview ....5
- Preparations......6
- Basic Operation 10
- Settings 12
- Troubleshooting.... 18
- Specifications.... 19
- Safety Warnings 20
- Unpacking the Photo Frame
- Product Overview
- Preparations
- Attaching the Stand
- Changing the Frame
- Removing the interchangeable frame
- Installing the interchangeable frame
- Connecting to the Mains Power
- Inserting a Memory Card / USB Flash Drive
- Basic Operation
- Display Image
- Auto Rotation
- Settings
- Set Image size
- Set Slideshow Effect
- Set Slideshow Interval
- Set Split Slideshow
- Rotate (Only available on single view mode)
- Zoom File (Only available on single view mode)
- Delete File (Only available in thumbnail mode)
- Reset Setting
- Language
- Brightness / Contrast / Colour / Tint
- Time
- Troubleshooting
- No power
- Unable to view photos on the Digital Photo Frame
- If the photo display is distorted or cannot display properly
- If photo display seems slow
- The image is distorted or blurred.
- Cannot detect any external device via the USB 2.0 A-Type port
- The photo frame does not work properly
- Specifications
- Safety Warnings
- Note about LCD screen
Brand : Sandstrøm
Model : S7iDPF10
Category : Digital photo frame