
PKM6009 - Coffee maker Profilo - Free user manual and instructions
Find the device manual for free PKM6009 Profilo in PDF.

| Product Type | Turkish Coffee Maker |
| Model | PKM6009 |
| Brand | Profilo |
| Colour | Black |
| Dimensions (H x W x D) | 223 x 290 x 260 mm |
| Power | 1220 - 1450 W |
| Voltage / Frequency | 220-240 V~ 50/60 Hz |
| Water Tank Capacity | 1.2 L |
| Max Cups per Brew | 6 (3 per side) |
| Control Type | Touch control with display |
| Cup Size Options | Small, Medium, Large |
| Child Lock | Yes (activate via cup size button) |
| Automatic Shut-off | After 20 minutes of inactivity |
| Overheat Protection | Yes |
| Water Level Indicator | LED: blue when above min, blinking red when below |
| Heating Surfaces | 2 left, 2 right (4 total) |
| Number of Coffee Pots | 2 (left and right) |
| Measuring Spoon | Included (7 g coffee per spoon) |
| Descaling Recommended | Monthly using vinegar or descaling tablets |
| Cleaning | Hand wash only; wipe with damp cloth |
| Power Cord Length | 88 cm |
| Dishwasher Safe Parts | No (except maybe? manual says do not) |
Frequently Asked Questions - PKM6009 Profilo
User questions about PKM6009 Profilo
0 question about this device. Answer the ones you know or ask your own.
Ask a new question about this device
Download the instructions for your Coffee maker in PDF format for free! Find your manual PKM6009 - Profilo and take your electronic device back in hand. On this page are published all the documents necessary for the use of your device. PKM6009 by Profilo.
USER MANUAL PKM6009 Profilo
Turkish coffee maker
natural_image
Black PROFILO digital kitchen appliance with two side bays and control panel (no visible text or symbols on main body)TR KULLANIM KILAVUZU TÜRK KAHVESİ MAKİNESİ 2–12
EN USER MANUAL TURKISH COFFEE MAKER 13–23
natural_image
Hand inserting a black plug into an electrical outlet, with a device labeled 'SEK. 1' nearby (no text on device or charger)natural_image
Close-up of a finger pressing a button on a device, with an inset showing a simple diagram of connected devices (no text or symbols visible)natural_image
Close-up of a kitchen appliance with a hand inserting a transparent container into its tray (no visible text or symbols)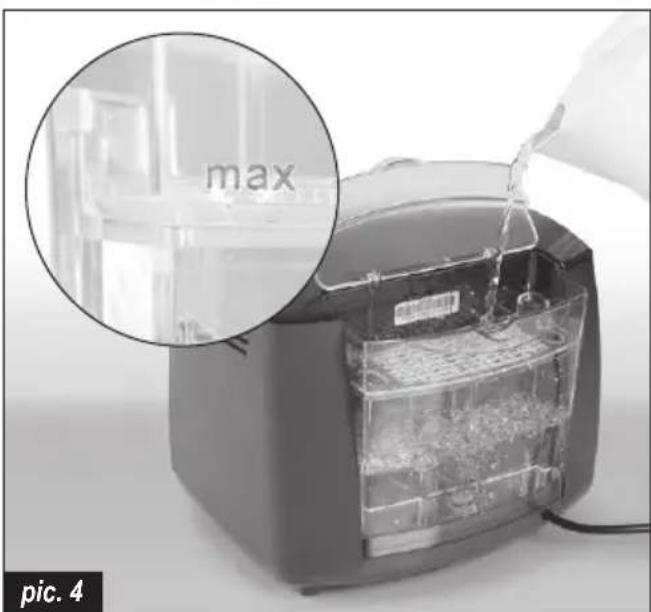
natural_image
Close-up of a hand placing a component into a transparent plastic container, with an inset magnified view showing the 'max' label (no text or symbols on the main subject)
natural_image
Close-up of hands using a food grater to prepare food, showing the lid and interior (no text or symbols visible)
natural_image
Hand inserting a coffee into a Feotilo coffee maker with speaker icon (no text or symbols on device)
natural_image
Close-up of a Kerosa coffee maker with a kettle being poured into a cup, showing its interior design and usage (no text or symbols visible)natural_image
Close-up of a finger pressing a button on a device (no visible text or symbols)natural_image
Hand holding a black plug inserted into a wall socket, with a digital device on the side (no visible text or symbols)natural_image
Close-up of a hand pressing down on a kitchen appliance with an inset showing the process (no text or symbols visible)natural_image
Close-up of hands cleaning a food item from a toaster oven, showing a magnified view of the lid and interior (no text or symbols visible)Temizlik ve bakım
natural_image
Hand cleaning a Profilevo air conditioner with a cloth (no text or symbols visible)natural_image
Hand cleaning a metal tool with a cloth, no visible text or symbolsnatural_image
Hand cleaning a Profilevo air fryer with a cloth (no text or symbols visible)
Congratulations on your choice of our appliance, and welcome among the users of PROFiLO products.
In order to achieve best possible results we recommend using exclusively original PROFiLO accessories. They have been specially designed for this product.
Please read this user manual carefully. Pay special attention to important safety instructions. Keep this user manual for future reference.
Operational safety guidelines

DANGER! / WARNING!
Health hazard
- This appliance can be used by children aged from 8 years and above if they have been given supervision or instruction concerning use of the appliance in a safe way and if they understand the hazards involved. Cleaning and user maintenance shall not be made by children unless they are older than 8 and supervised. Keep the appliance and its cord out of reach of children aged less than 8 years.
- Appliances can be used by persons with reduced physical, sensory or mental capabilities or lack of experience and knowledge if they have been given supervision or instruction concerning use of the appliance in a safe way and understand the hazards involved.
• Children shall not play with the appliance.
- Be careful when using the appliance around children.
Do not operate the appliance if its power cord, housing or the handle are damaged.
- If the power cord is damaged, in order to avoid a hazard it should be replaced by the manufacturer or by
a specialised service centre or by a qualified person.
- The appliance can only be repaired by qualified service personnel. Improper servicing may cause a serious hazard to the user. In case of defects please contact a qualified service center.
- Before cleaning the appliance, and in case of any problems during coffee making, always turn off the appliance and pull the plug out of the socket first.
- Leave it to cool down before putting it away or removing pieces and before cleaning the appliance.
- Do not place your hands underneath steam, hot water or poured coffee, as it may lead to scalds and burns.
- Do not wet or immerse the power cord plug in water.
-
Do not operate the appliance with the cable still coiled.
-
Do not connect the plug into the outlet with wet hands.
- Do not let the cable hang over the edge of the table or work-top, nor let it come into contact with hot surfaces.
- Do not drink the coffee directly from the coffee pots.
• Always hold the coffee pots from their handles. Do not touch to any surfaces of coffee pots when it is hot.
- Do not touch the metal parts of the coffee pots and the surface of the heater when it is hot.
- Do not immerse the appliance in water or any other liquid.
-
Only use the appliance indoors at room temperature and up to 2000 m above sea level.
• The appliance gets hot. -
Never operate the appliance in a cupboard.
- Avoid spillage on the connector.
- A misuse of the appliance can potentially lead to injury.
- After the use the heating element surfaces and warming plate can be subjected to residual heat.
- Cleaning surfaces which come contact with foodstuffs! Please note the special information on cleaning in the instructions.

CAUTION!
Not observance can result in damage to possessions
Always place the appliance on a stable, flat surface.
The water tank should be filled with clean and cold water only. Do not go over the maximum capacity of the water tank.
Do not put hot water into the water tank.
Do not allow the power cord to touch any hot parts of the appliance.
Always turn off the appliance (by means of the ON/OFF switch) before plugging it in or out. You should not unplug the appliance by pulling the power cable – grab only the plug instead.
If the appliance is not used for a longer time or is going to be cleaned, always remember to turn it off and unplug it.
Do not use an extension cord with the appliance, unless it is checked by a qualified technician or service staff member.
The appliance should be plugged into a power socket with alternating current equipped with a safety pin, and voltage compatible with the one given on the rating plate of the appliance.
The appliance is not designed to work with exterior time switches or separate remote control systems.
Do not place the appliance on hot surfaces or near hot objects.
Do not use different coffee pots than original one.
Never scratch heating surface and bottom (metallic part) of the coffee pots with wire wool.
Do not wash the water tank and coffee pots in dishwasher.
Keep your appliance away from steam sources and try not to use it in steamy environments.
Never put any other liquid than the water in the water tank (no milk).
Do not use the coffee pots on any other heating surfaces (stove etc.).
Do not put anything into the coffee pots other than coffee and sugar; water fills into the coffee pots automatically.
SUGGESTION
Information on the product and suggestions for its use
This appliance is intended for domestic use only. In case it is used for gastronomic business purposes, warranty terms and conditions change.
The appliance is designed to work in 4-37°C 80% relative humidity.
Due the production technology applied, your appliance might emit steam and odor at the first use. This is normal for your appliance. It will recover after the first few uses.
Technical data
| Electrical connection | 220-240 V~ 50/60 Hz |
| Output | 1.220-1.450 W |
| Appliance height | 223 mm |
| Appliance width | 290 mm |
| Appliance depth | 260 mm |
| Water capacity | 1.20 l |
| Lenght of the supply cord | 88 cm |
Appliance parts
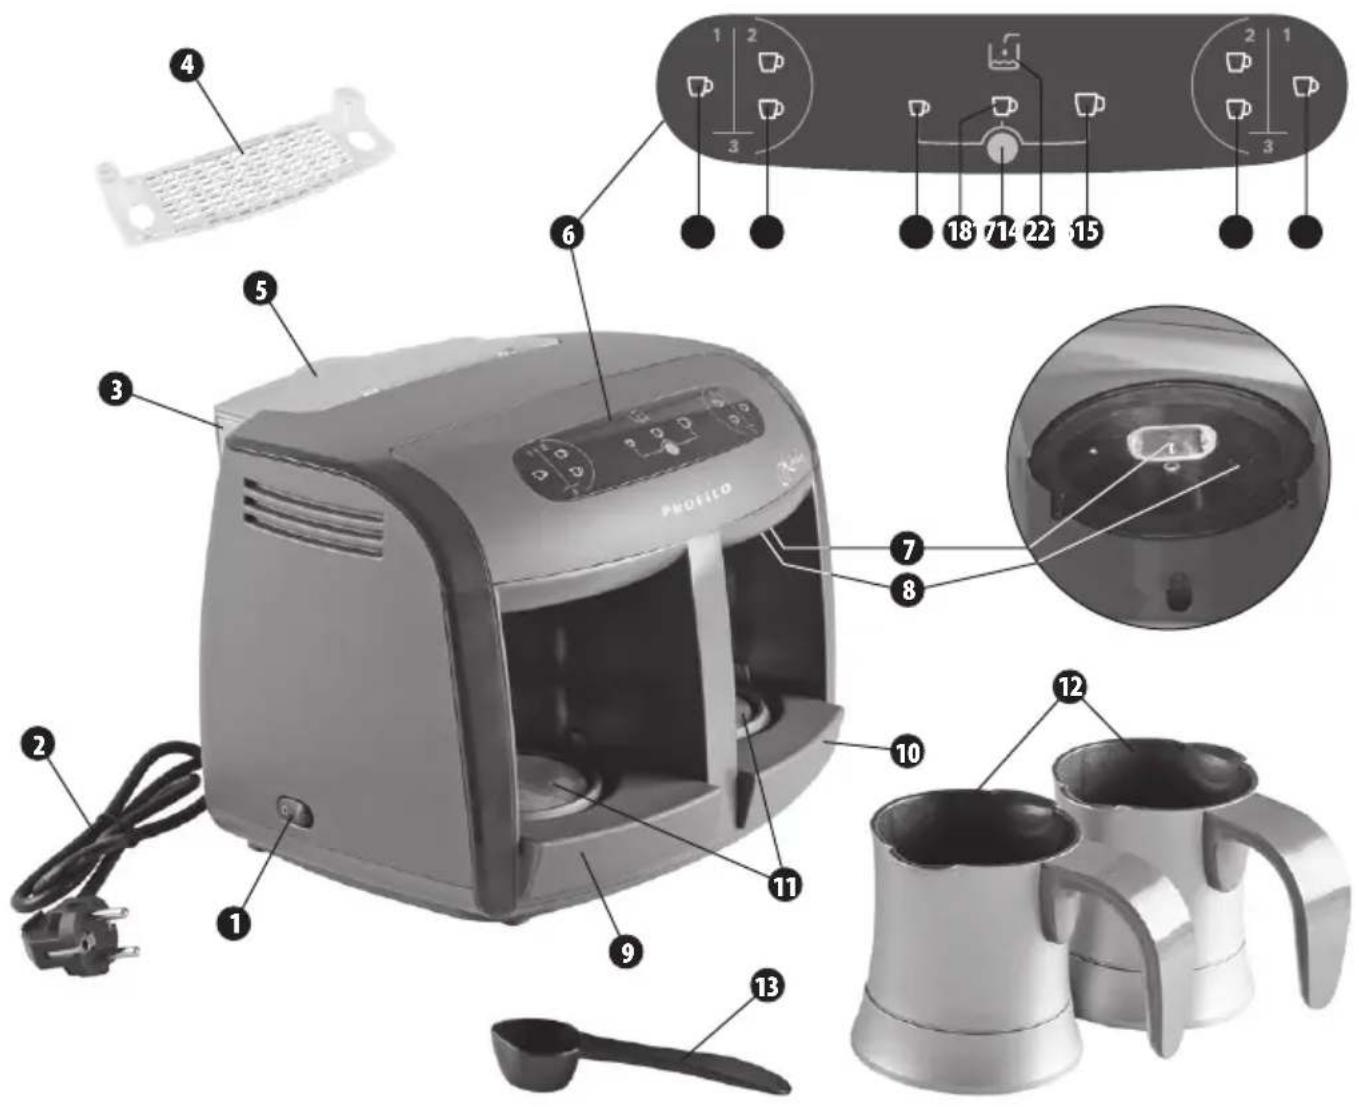
1 ON/OFF switch (on the side)
2 Supply cord
3 Water tank
4 Water tank insert
5 Water tank lid
6 Control panel
7 Cooking detection sensor
8 Nozzle
9 Left cover of heating surface
10 Right cover of heating surface
11 Heating surfaces
12 Coffee pots
13 Measuring spoon
14 Left 1cup coffee option
15 Left 2 cups coffee option
14 + 15 Left 3 cups coffee option (touching at the same time)
16 Cup size controller
17 Small cup indicator
18 Medium cup indicator
19 Large cup indicator
20 Water (level) indicator
21 Right 1cup coffee option
22 Right 2 cups coffee option
20 + 21 Right 3 cups coffee option (touching at the same time)
Before first use
Before using your appliance for the first time, wash all accessories in warm water with a mild detergent. Please do not use cleaning tools that may cause scratches.
During first use it is recommended to wash coffee pots, water washing in small amounts of vinegar added water is recommended. Afterwards, the washed accessories should be rinsed in clean water.
Fill water tank up to MAX and wait 10 min.
For the first usage touch 3 cups cooking option on both sides and wait until the end boiling. Pour boiled water. Place the empty coffee pots. Repeat it three times.
Preparing the appliance for operation
In order to prepare your appliance for operation, follow the instructions below.
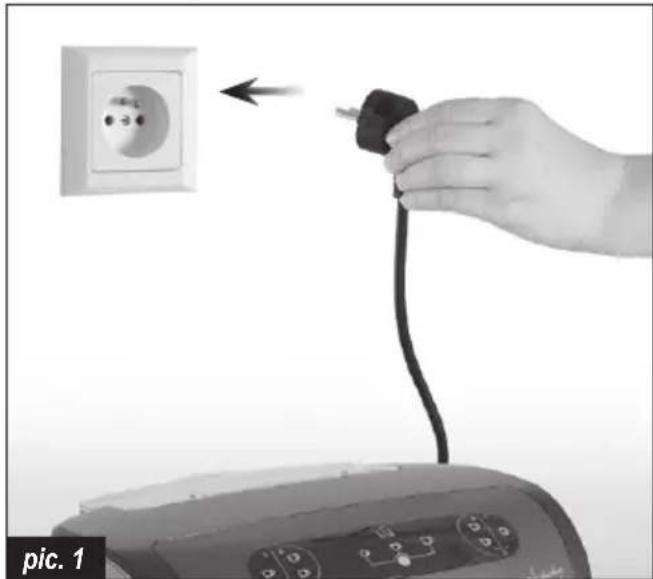
① Connect the appliance to a suitable power source (data on the nameplate).
natural_image
Hand inserting a black plug into an electrical outlet, with a digital device visible below (no text or symbols)② Press the ON/OFF switch (1) and wait a few seconds until the appliance is ready to operate. Icons on the display will turn on.

natural_image
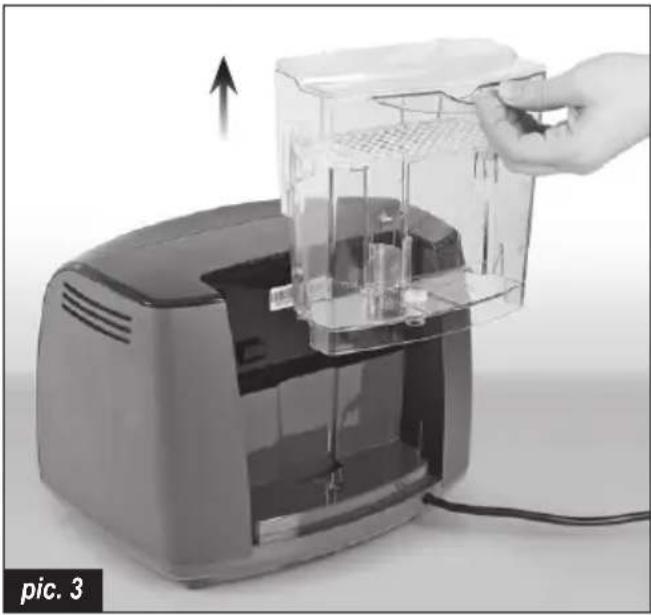
Close-up of a finger pressing a button with an icon showing a device (no text or symbols on the button itself)③ Take out the water tank (3) from the appliance or leave it in the appliance and pour with water.
natural_image
Hand inserting a transparent container into a digital kitchen appliance (no text or symbols visible)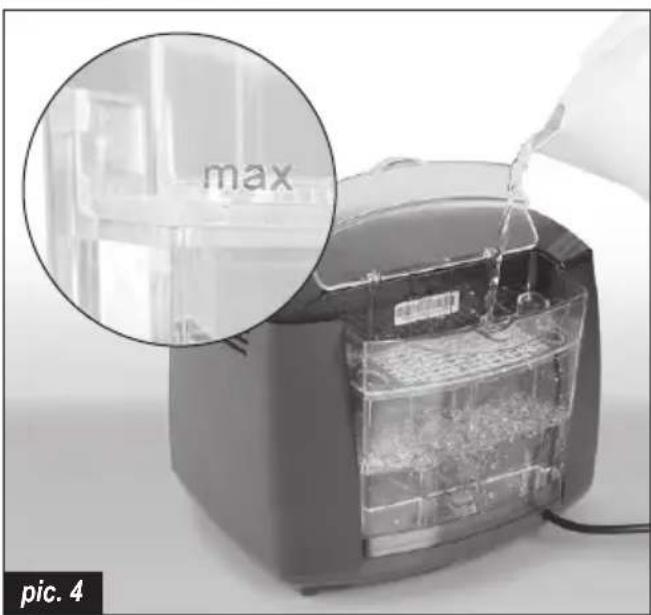
④ Open the lid (5) and fill the water tank (3) with appropriate amount of fresh, cold water between min and max levels.

natural_image
Close-up of a transparent plastic container with an arrow indicating rotation, alongside a magnified inset showing the 'max' label (no text or symbols on the main subject)
You can check the water level by looking on the tank (3) (min max level).

When the water level is above min. level, water indicator (20) lights up blue.

When the water level is under min. level the appliance will not operate and will not brew coffee, water indicator (20) lights up blinking red. In this case, you must add water to the water tank (3).

Max level should not be passed when water is filled. Exceeding the max level will cause water leakage under the device.

While pouring water directly into the water tank (3) mounted on the device (without removing the water tank) be careful not to spill water on the appliance.
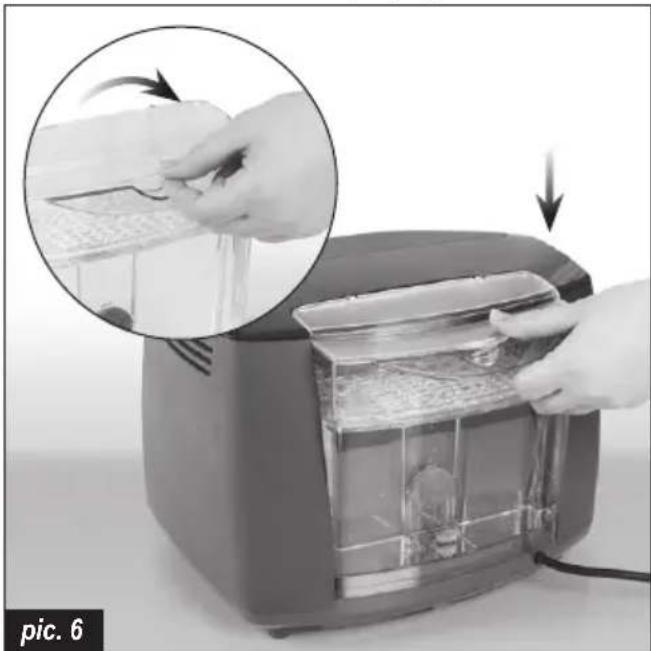
⑤ Close the lid (5) and place the filled water tank (3) on the appliance. After placing the water tank correctly please push the tank down to be sure it fitted properly.
natural_image
Close-up of hands operating a toaster with a close-up inset showing the process (no text or symbols visible)
Water tank (3) should be inserted correctly if not, pump will not work properly. If water tank is not fitted well, water flow cannot occur. This situation causes coffee mixture to have less water than expected. The coffee's taste will be too bitter.
Brewing coffee
To brew coffee, follow the instructions below.
① You can select cup size (small (17) / medium (18) / large (19)) by pressing cup size controller (16). For each press, there will be one bip. Cup size will be memorized for next usage until changed, even though the appliance is turned off and on.
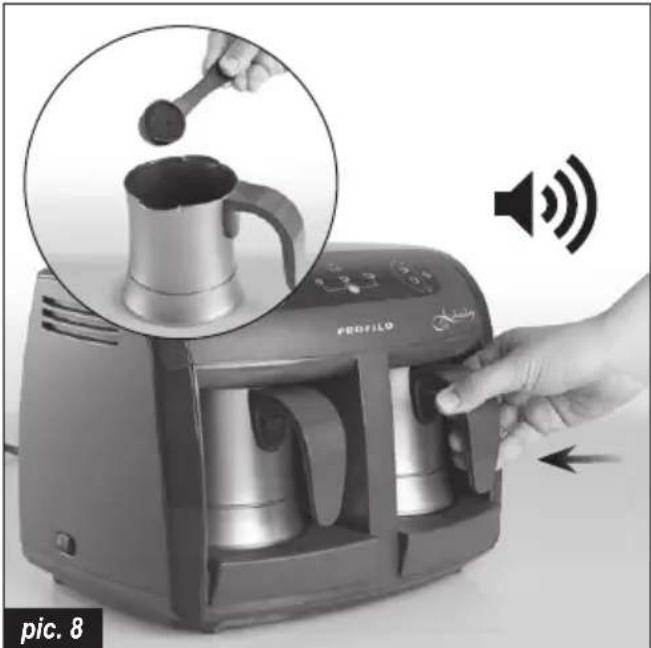
② Put coffee and sugar into the coffee pots (12) for one/two/three cups according to the amounts recommended in below table. Place the coffee pots (12) into the appliance. Make sure to insert the coffee pots (12) correctly (Straight and till they hit the wall of the cooking station. You will hear click sound when coffee pots hits the wall of the cooking station.).
natural_image
Hand inserting a coffee into a Profile brand 3.25 air conditioner, showing the device's interior and speaker icon (no text or symbols on main image)
The appliance will not start operating until the coffee pots (12) are correctly placed. If the coffee pots are correctly placed you will hear a "click" sound.

Please do not use your appliance without adding coffee in the coffee pots. Cooking just water (without coffee) reduces your appliance life.

The cooking functions start after releasing your finger from cooking function icons.
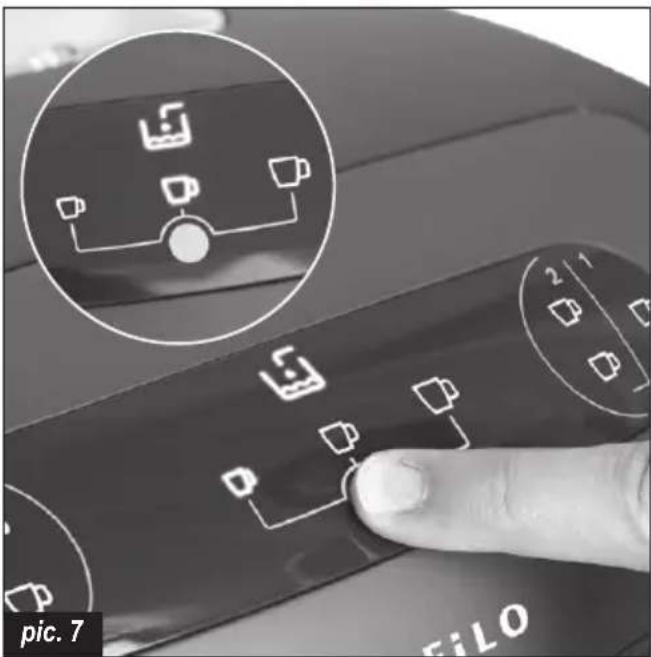
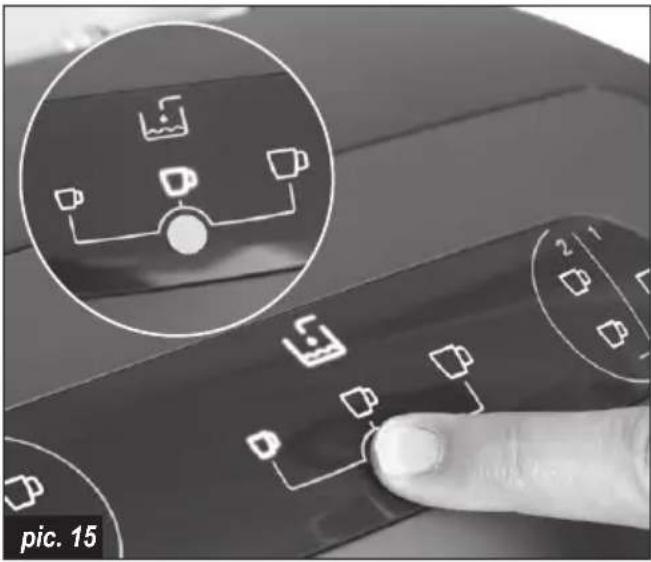
③ Touch 1 cup or 2 cups or 3 cups on the front panel according to the quantity of coffee cups you wish to make.
For 1 cup of coffee, touch 1 cup coffee option on left (14) or/and right (21) side of the control panel.
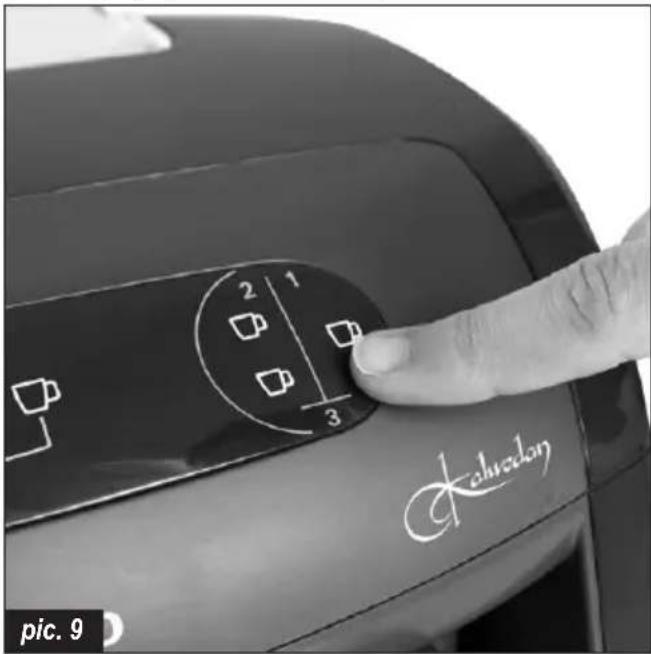
For 2 cups of coffee, touch 2cup coffee option on left (15) or/and right (22) side of the control panel.
For 3 cups of coffee, touch 1cup and 2cups coffee options (1+2 together) at the same time on left (14)+(15) or/and right (21)+(22) side of the control panel.


The appliance can brew up to 6 cups in one operation (3 cups on the left, 3 cups on the right).

Upon choosing the number of cups, and touching the cooking options, the appliance will give a blue light before starting.

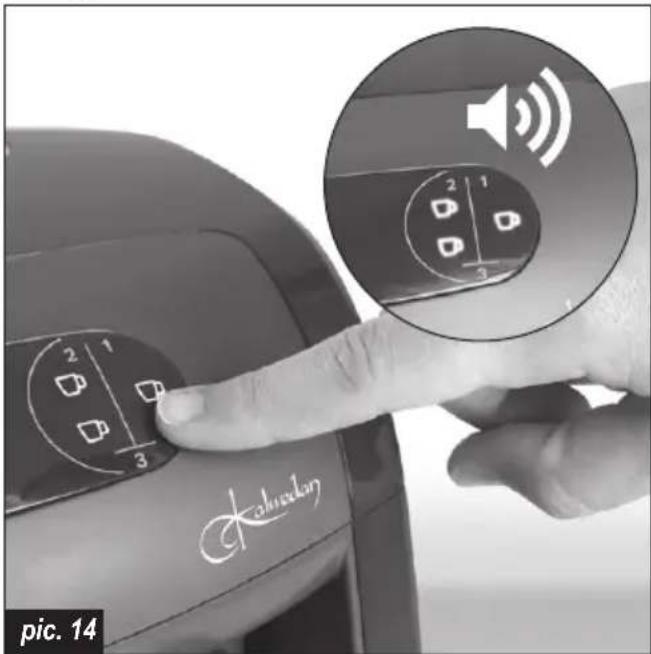
Once the cooking is done, the appliance will emit an audio signal and cup icons will start blinking based on your cup selection.
④ After cooking is done, if you do not pick up the coffee pots (12), the light will continue to blink at intervals and will give audio signal every 5 seconds (until you take the coffee pots (12) out).


You can brew coffee at the same time on both sides of the appliance (left and right).

It is possible to prepare coffee for different cup sizes. For example, cooking at the same time "small cup size 1cup coffee" in right cooking station and "big cup size 3cups coffee" in left cooking station.
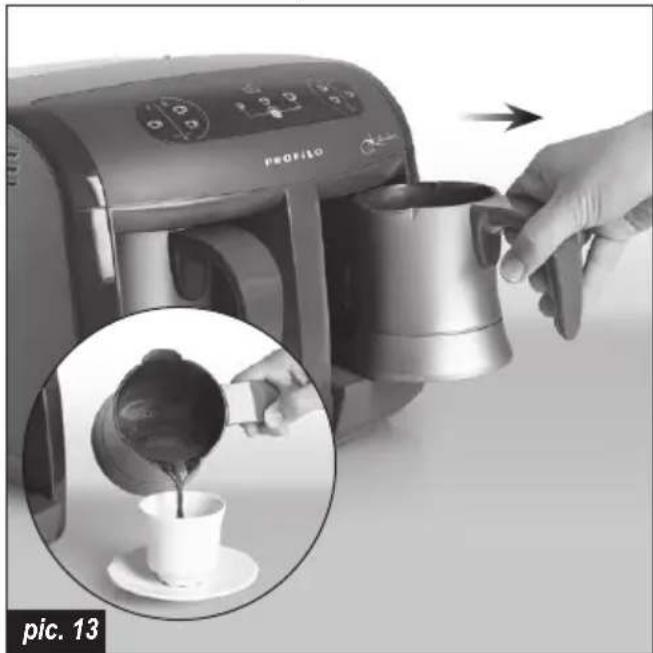
⑤ Take out the coffee pots (12) from the appliance and serve the coffee into the cup.
natural_image
Close-up of a coffee maker using a portable 3D printer to add coffee into a cup, with an inset showing the pouring process (no text or symbols visible)⑥ You can cancel cooking by touching for 3 seconds to the chosen option on the display. It is possible to cancel cooking at right (14) (15) and left cooking stations (21) (22) at the same time. You will hear three beeps and icons will start blinking pink.

Do not operate the appliance before emptying the coffee pots (12). It might cause overflow and your coffee might be diluted.
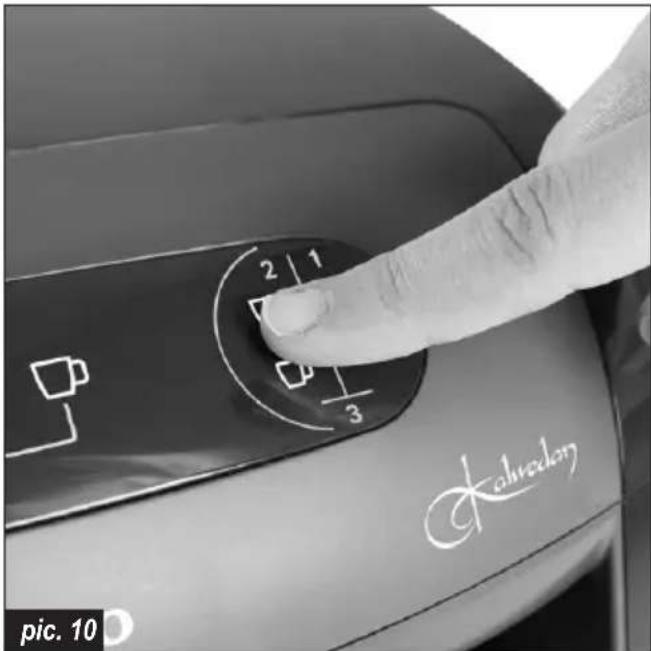
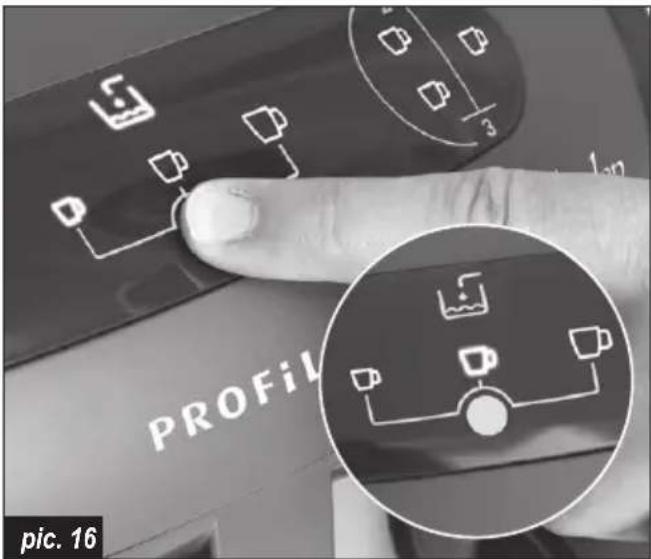
⑦ If you don't use the appliance for 20 minutes, the appliance will automatically switch to standby mode and medium cup indicator (18) will start to blink. To start brewing, touch the cup size controller (16) for 3 seconds and the appliance will be on.
natural_image
Close-up of a finger pressing a button on a device, with an inset showing a simple diagram of devices (no text or symbols visible)
The appliance is equipped with a child lock feature. To activate it, touch the cup size controller (16) for 3 seconds, and the appliance will switch to standby mode.

Make sure to clean and dry bottom metallic part of the coffee pots (12). If the bottom part of the coffee pot is not dry, it might cause some undesired noise during the heating process.

There might be some dripping from the nozzle (8) towards the heating surfaces (11). That's normal and it is caused by the drops left in the water pump. Try to always keep the heating surfaces (11) clean for a better performance.

Do not touch the heating surfaces (11) nor try to clean it before the heating surfaces are completely cooled down. The heating surfaces (11) are very hot, you might burn your skin.

If the coffee pots (12) are put in the appliance with hot liquid inside, 3 cups cooking option icons might blink pink.
Recommended ingredient measurings for preparation of Turkish Coffee
This product is an automated appliance, designed to cook Turkish Coffee. Using the sizes and measurements indicated on below table, you can brew your ideal, Turkish Coffee for your taste.
The below instructions are reference values and only provided as guidance. You can make your own adjustments based on your personal preference.
| Recommended ingredient measurings for preparation of Turkish Coffee | ||||
| No sugar (plain) Little | sugar Medium sugar Very sugary | |||
| Coffee | 1 measuring spoon(7 g of coffee) | 1 measuring spoon(7 g of coffee) | 1 measuring spoon(7 g of coffee) | 1 measuring spoon(7 g of coffee) |
| Sugar - | 1 sugar cube /1 teaspoon sugar(2-3 g of sugar) | 1.5 sugar cubes /1.5 teaspoon sugar(3-4,5 g of sugar) | 2 sugar cubes /2 teaspoon sugar(4,5-6 g of sugar) | |
The above measurings are the recommended dosages for medium sized cups and for one person (1cup cooking option) only.
The appliance is equipped with a measuring spoon (13) placed in the water tank. The above measurings are only valid with the provided measuring spoon.
Use fresh coffee and cold water in order to make delicious and foamy Turkish Coffee.
Turning off the appliance
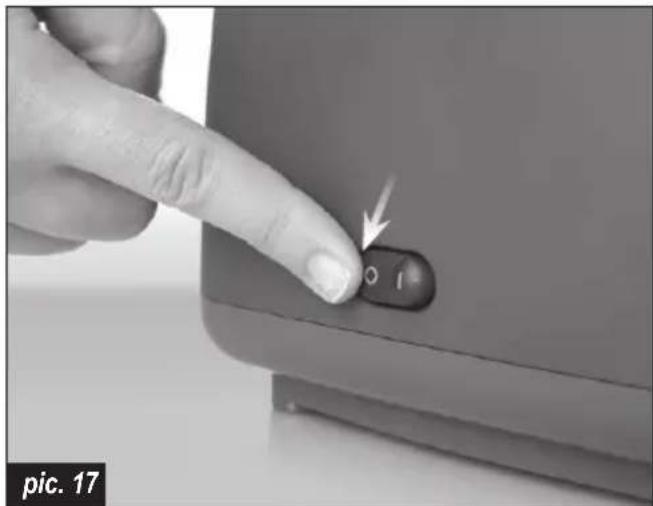
① Presss the ON/OFF switch button (1) and wait for a few seconds until the appliance turns off. The lights on the control panel will go off.
natural_image
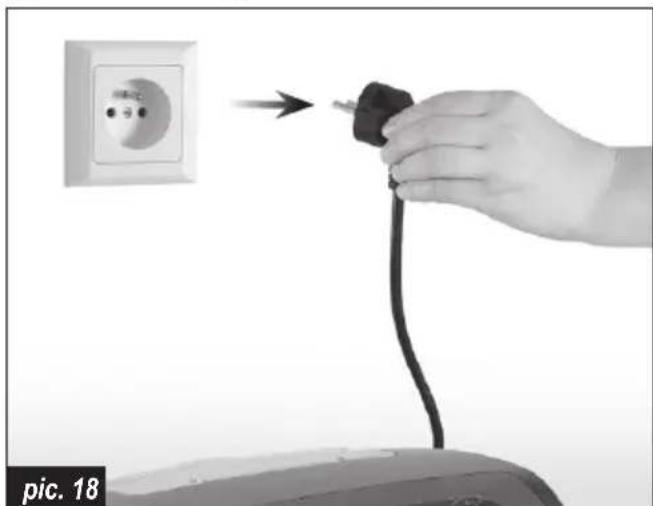
Close-up of a finger pressing a button labeled 'O I' with an arrow, no visible text or symbols beyond the label.② Disconnect the appliance from the power source.
natural_image
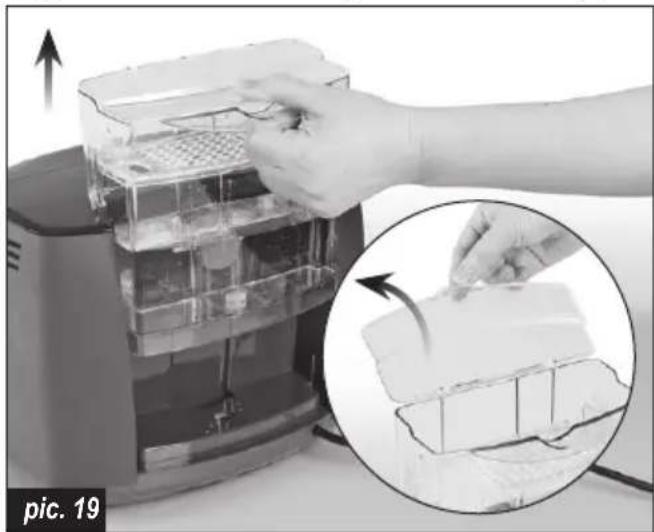
Hand holding a black plug inserted into an electrical outlet, with no visible text or symbols on the plug or charger.③ Take out the water tank (3) from the appliance, open the lid (5) and remove the remaining water from the tank (3).
natural_image
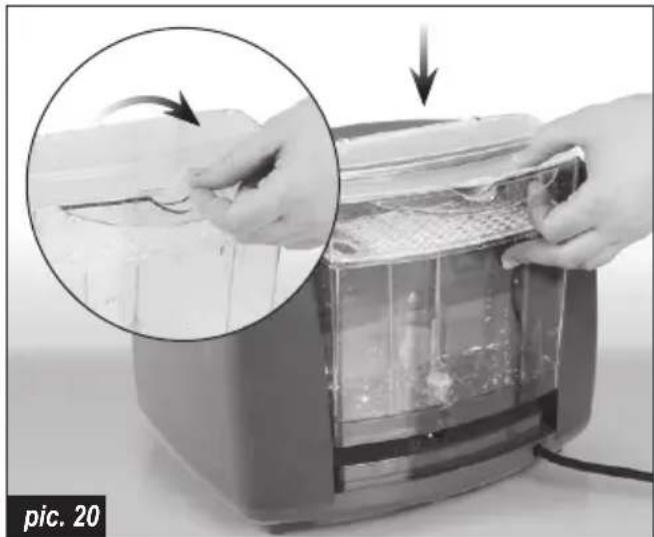
Close-up of a hand placing a tray into a digital kitchen appliance, with an inset showing the process (no text or symbols visible)④ Close the lid (5) and place the water tank (3) on the appliance.
natural_image
Close-up of hands assembling a food item into a toaster oven, with an inset showing the process (no text or symbols visible)Cleaning and maintenance
① Before starting to clean, unplug the appliance.
② Clean the coffee pots after every use to have the best taste for your coffee.
③ Do not wash the appliance or any of its parts in the dishwasher, including the coffee pots. Wiping the surfaces with a moist cloth is recommended.
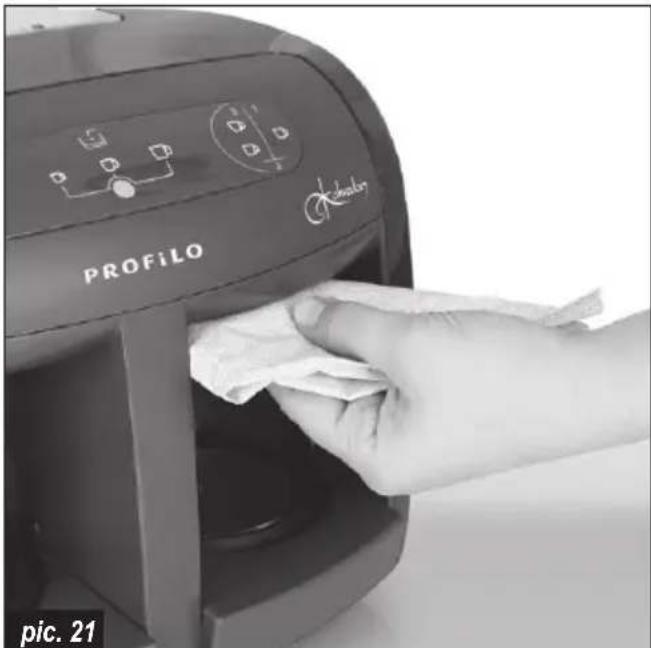
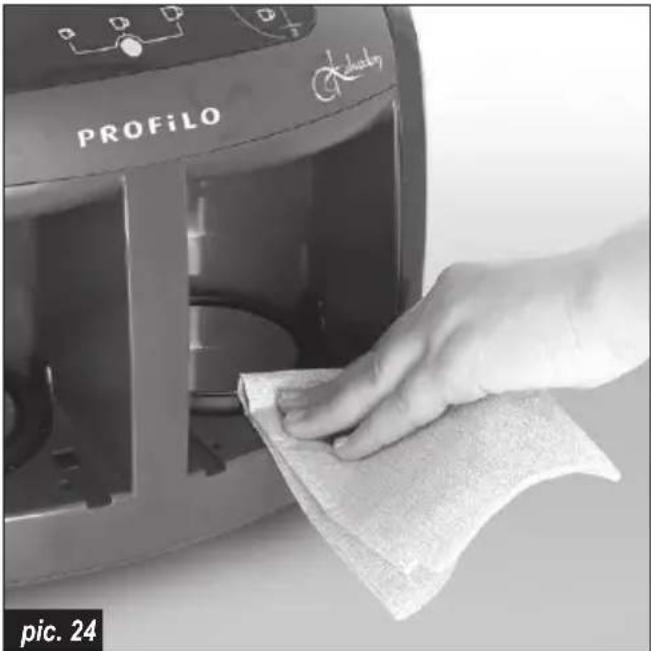
④ Wipe the cooking detection sensor with moist cloth every 15-20 services.
natural_image
Hand cleaning a Profilevo air conditioner with a cloth (no text or symbols visible)⑤ For cleaning, use only delicate cloths with a mild detergent or warm water.
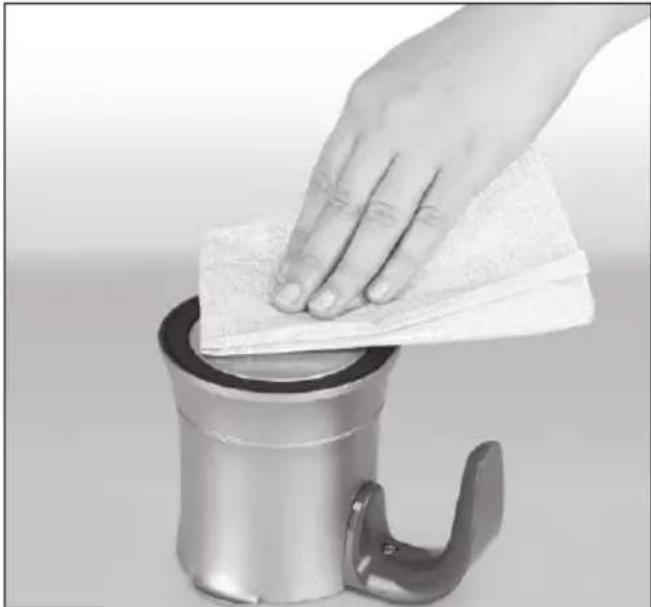
Carefully wipe the heating plates and coffee pots with a soft clothe to avoid scratching and damaging the surfaces.
natural_image
Hand cleaning a metal tool with a cloth over a cylindrical container (no text or symbols visible)pic. 22
For better cleaning take out left and right cover of heating surface.
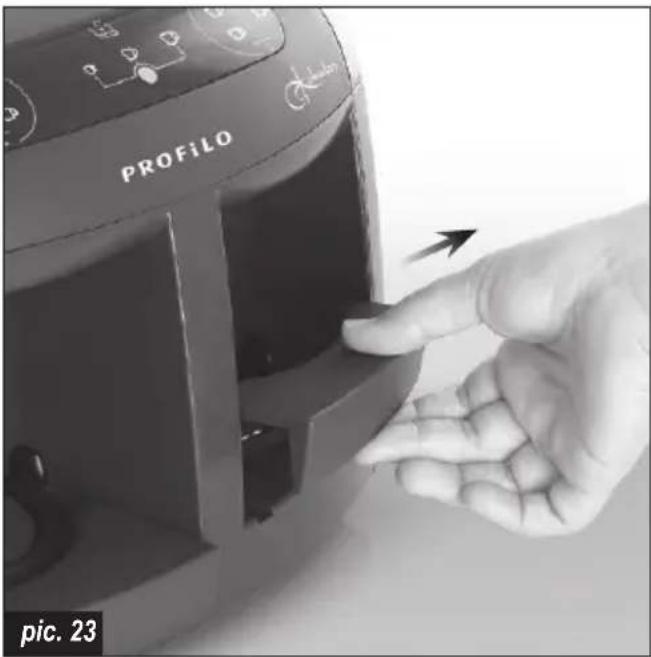
natural_image
Hand cleaning a Profilelo air fryer with a cloth (no text or symbols visible)
Sharp cloths or sponges may scratch the metal parts of the appliance.
⑥ Never use harsh, abrasive or alcohol-based cleaners.
⑦ When coffee drips on the heating surfaces, first wait for the heating surfaces to cool down. Then wipe the coffee stains before they get dry.
⑧ When transporting your appliance, always make sure that there is no water left in the water tank and coffee pots. Do not move the product without removing the coffee pots from the brewing chambers. They might get damaged if they fall.
DESCALING
We recommend that you use purified water or natural spring water in your appliance. The lime formed on your appliance should be cleaned once a month. To clean the resulting lime:
Preparation of lime solvent mixture
- Option: Fill the water tank of your appliance with 3 glasses of vinegar. Fill the remaining part with water to the maximum level.
- Option: Fill the water tank of your appliance with water to the maximum level. Then dissolve in water the 2 decalcifying tablets of code 311821 which you can provide from your authorized service center. You can mix it with a spoon to facilitate melting.
Application of descaling
Without adding coffee or sugar, run the appliance in 3-cup small-size option with only the mixture in the tank. After the appliance has finished heating the water, pour out the water in the pot.
Repeat the above operation 3 times in the right and 3 times in the left compartment.
Then pour the descaling mixture remaining in the water tank, rinse the tank and fill it with clean water only and place it on your appliance. Operate the appliance once more in 3-cup small size option in both compartments (without adding coffee) and wait until the heating process is complete.
Finally pour out the water in the coffee pots and rinse the pots.
Do it before calling technical service
| PROBLEM POSSIBLE CAUSE SOLUTION | ||
| Decrease in the amount of coffee prepared. | Calcification formed in the appliance. | Apply descaling as described in the user manual. |
| Less coffee in the cup after cleaning water tank or taking out the water tank for filing it. | No enough water in water channels. | Without adding any coffee and sugar in the pots select large cup size and press 1cup coffee button on both sides. Stop before it starts to boil. Remove the water from the coffee pots and place them in the appliance.Advice: please take out the tank only for cleaning purposes. |
| 3 beeps when touching the cup icons. | No water in the water tank, or the water level is below the minimum level. | Fill the water tank with cold water between minimum and maximum level. |
| During brewing, cup icons are blinking red and you hear 3 beeps. | The appliance is overheated. Turn off the appliance and wait until it gets cool down.After it is cooled down: Clean the heating surface. Clean inside and outside bottom of the coffee pot (metal parts). | |
| During brewing, cup icons are blinking pink and you hear 3 beeps. | Cooking detection sensor is dirty or amount of coffee is too low in the mixture. | Clean the cooking detection sensor with wet cloth or add more coffee.If it is continuous call technical service. |
| Coffee overflowed. Dirt on cooking detection sensor and heating surfaces. | Clean detection sensor and heating surfaces with moist cloth. If continuous call the technical service. | |
| Water leakage under device. MAX water level exceeded. Wipe the water that has leaked.Remember that MAX level should not be passed when water is filled. | ||
| No water in cup. No water in the system. | Fill the water tank to the Maximum level | and remove and insert it 3 times and wait for 5 minutes. Select the large-cup and 3-cup option and run the device without adding coee and sugar (Press and hold at 3-cup option for 3 seconds after pump noise stops, and cancel before boiling). |

Heating surfaces (11) and the cooking detection sensor (7) window must be cleaned periodically with the moist cloth.
Disposal
Dispose of packaging in an environmentally-friendly manner. This appliance is labelled in accordance with European Directive 2012/19/EU concerning used electrical and electronic appliances (waste electrical and electronic equipment – WEEE). The guideline
determines the framework for the return and recycling of used appliances as applicable throughout the EU. Please ask your specialist retailer about current disposal facilities.
The manufacturer does not accept any liability for any damages resulting from unintended use or improper handling.
The manufacturer reserves his rights to modify the product any time in order to adjust it to law regulations, norms, directives, or due to construction, trade, aesthetic or other reasons, without notifying in advance.
natural_image
Hand cleaning a metal kitchen appliance with a cloth on top (no text or symbols visible)22 صورة رقم
13 ملعقة بمقياس
natural_image
Diagram showing three cups connected by a line to a central circle, with a water tank above (no text or symbols)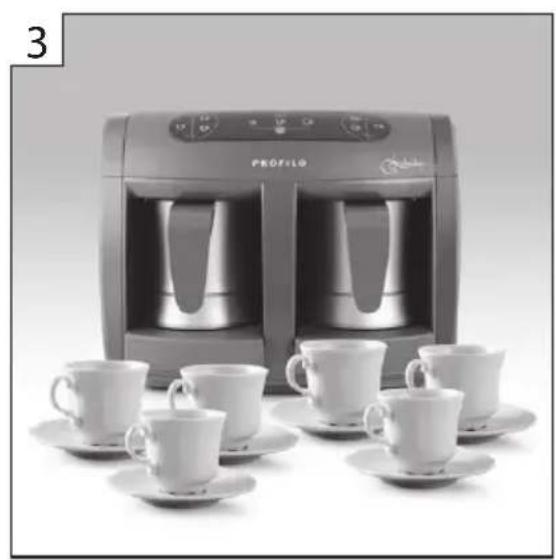
natural_image
Black-and-white photo of a Profile water heater with two identical cups and matching saucers, no visible text or symbols.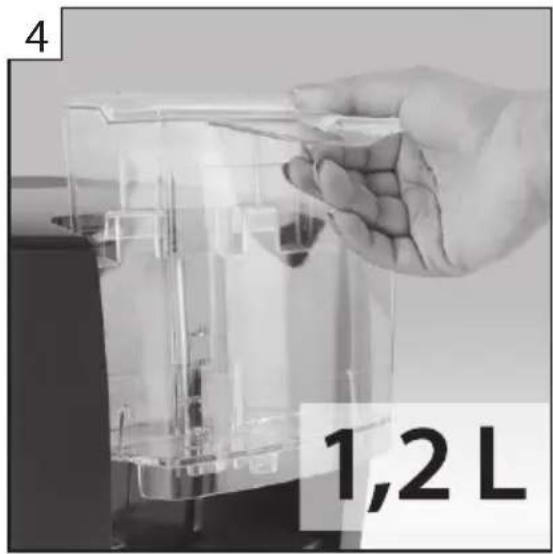
- Touch control 2. Cup selection (small, medium, large) 3. 6 cups in one serving 4. Removable 1,2 L water tank
- Temizlik ve bakım
- Operational safety guidelines
- DANGER! / WARNING!
- Health hazard
- CAUTION!
- Not observance can result in damage to possessions
- SUGGESTION
- Information on the product and suggestions for its use
- Appliance parts
- Before first use
- Preparing the appliance for operation
- Brewing coffee
- Recommended ingredient measurings for preparation of Turkish Coffee
- Turning off the appliance
- Cleaning and maintenance
- Sharp cloths or sponges may scratch the metal parts of the appliance.
- DESCALING
- Preparation of lime solvent mixture
- Application of descaling
- Disposal
Brand : Profilo
Model : PKM6009
Category : Coffee maker