15Z90NRAAS9U1 - Laptop LG - Free user manual and instructions
Find the device manual for free 15Z90NRAAS9U1 LG in PDF.

User questions about 15Z90NRAAS9U1 LG
0 question about this device. Answer the ones you know or ask your own.
Ask a new question about this device
Download the instructions for your Laptop in PDF format for free! Find your manual 15Z90NRAAS9U1 - LG and take your electronic device back in hand. On this page are published all the documents necessary for the use of your device. 15Z90NRAAS9U1 by LG.
USER MANUAL 15Z90NRAAS9U1 LG
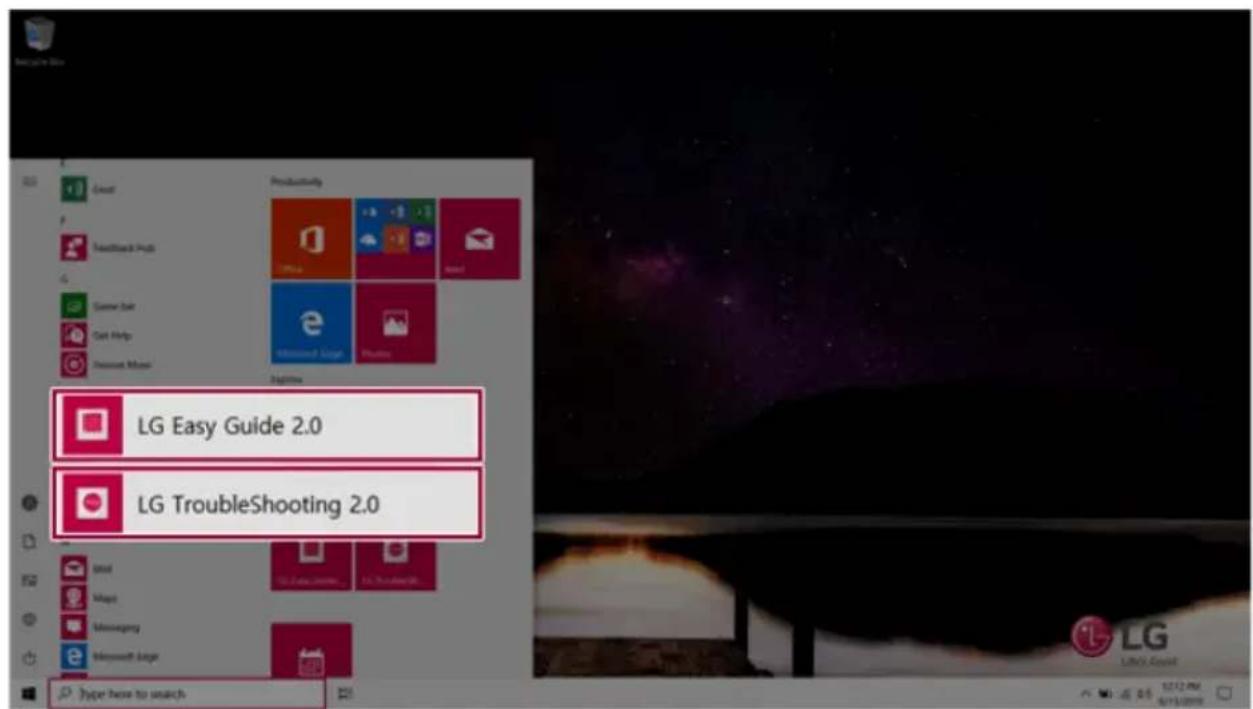
UsingLGEasyGuide,LGTroubleShooting
LG Electronics Inc. provides LG Easy Guide (User's Guide) and LG TroubleShooting (Troubleshooting Guide)tousersfortheireasyandconvenientuseoftheproduct.

TIP
LG Easy Guide and LG TroubleShooting are provided with the UWP app and they can be downloaded again on the Microsoft Store if they are deleted. If you want to download the files again, connect to the Microsoft Store, search for the files and install them.
- Press the [ ] button to run [LG Easy Guide 2.0] or [LG TroubleShooting 2.0].
text_image
LG Easy Guide 2.0 LG TroubleShooting 2.0 type how to switchInformation/PrecautionsBeforeUsing
BeforereadingLGEasyGuide, first check the following information.
• This LG Easy Guide has been written for the Windows 10 operating system.
- The screen and menu configurations may differ from this manual depending on the status of the Windowsandsoftwareupdate.
• Representative images are used in LG Easy Guide. Product purchased may differ in appearance and color.
- LG Easy Guide includes instruction about optional products. There may be information about products you did not purchase.
• The contents of LG Easy Guide are subject to change without prior notice.
- Use, duplication, or reproduction of any part of LG Easy Guide without prior permission from LG ElectronicsInc.isstrictlyprohibited.
- LG Electronics Inc. does not provide warranty for data loss. In order to minimize damage from data loss, pleasemakebackupcopiesofimportantdata.
- The optical disk drive (DVD, CD-ROM, etc.) is optional and may not be provided upon purchasing the product.
- Manufacturers and installers cannot provide services related to human safety as this wireless device maycauseradiointerference.
SafetyPrecautionNotations
The below symbols are to inform you of dangers and safety concerns that you must be aware of. Read the symbol-indicated instructions with caution to avoid any possible mishap.

WARNING
Appearsinthecaseofnoncompliancewiththeinstructionthatmaycauseseriousphysical damageorfatalinjuries.

CAUTION
Appearsinthecaseofnoncompliancewiththeinstructionthatmaycauseminordamagetothe bodyorthemachine.
TextNotations
Thesymbolsbelowareusedtodisplayinformationrequiredtousetheproduct.Familiarizeyourself withtheinstructionsmarkedbythesymbolstoensureproperoperationoftheproduct.

TIP
Indicate that the following information is added to help the user utilize them machine more conveniently.

OPTION
TheOptionsymbolindicatesthattheconcerneddeviceisnotincludedintheproductpackage andthushastobepurchasedseparately,orthedevicemaynotbeappliedtotheuser'smachine dependingonmodeltype.
ManufacturerandCopyright
Microsoft™,MS™,WinPE™,andWindows ® aretheregisteredtrademarksofMicrosoftCorporation™. USBType-CTM andUSB-CTM arethetrademarksofUSBImplementersForum.
Thunderbolt™ is a trademark of Intel Corporation or its subsidiaries in the U.S. and/or other countries. NVMe™isatrademarkofNVMExpress,Inc
ManufacturerandCopyrightrepresentthelogoandtrademarkofthemanufacturer,andbearno relationshiptothefunctionssupportedbytheproduct.
 LG LG | LGlogoisaregisteredtrademarkofLGElectronics,inc. |
 | MicroSDLogoisatrademarkofSD-3C,LLC |
 | TheUFSLogoisatrademarkoftheUniversalFlashStorageAssociation(UFSA). |
 | ForDTSpatents,seehttp://patents.dts.com.ManufacturedunderlicensefromDTS LicensingLimited.DTS,theSymbol,&DTSandtheSymboltogether,DTS:X,theDTS:X logo,andDTS:XUltraareregisteredtrademarksortrademarksofDTS,Inc.inthe UnitedStatesand/orothercountries.©DTS,Inc.AllRightsReserved. |
 | ThetermsHDMI,HDMIHigh-DefinitionMultimedialInterface,andtheHDMILogoare trademarksorregisteredtrademarksofHDMIlicensingAdministrator,Inc. |
 | TheSuperSpeedUSBTridentlogoisaregisteredtrademarkofUSBImplementers Forum,Inc. |

text_image
HEVC Advance™ Covered by Patents at patentlist.hevcadvance.comLG Easy Guide may contain undetectable errors despite our dedicated efforts to provide users with reliable information. We ask for your understanding.
TheillustratedfiguresinLGEasyGuidemaydifferinappearancewiththeactualproducts.
UnauthorizedreproductionorduplicationofanypartofLGEasyGuideisstrictlyprohibited.
LGElectronicsInc.reservestherighttomodifyanypartofthismanualforqualitypurposes,without priornotice.
Copyright(C)2020LGElectronicsInc.DigitalmateCo.,LTD
| CountryofOriginChina | |
| ManufacturerLGElectronicsInc. |
OpenSourceSoftwareNoticeInformation
ToobtainthesourcecodeunderGPL,LGPL,MPL,andotheropensourcelicenses,thatis containedinthisproduct,pleasevisithttp://opensource.lge.com.
Inadditiontothesourcecode, all referredlicenseterms, warrantydisclaimersandcopyright noticesareavailablefordownload.
LGElectronicswillalsopvideopensourcecodetoyouonCD-ROMforachargecoveringthe costofperformingsuchdistribution(suchasthecostofmedia,shipping,andhandling)upon emailrequesttoopensource@lge.com.
This offer is valid for a period of three years after our last shipment of this product. This offer is validtoanyoneinreceiptofthisinformation.
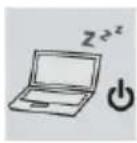
SystemProtectionFeature
If the system becomes too hot, the system protection feature automatically stops recharging and switches the power modeto Hibernate or Off.
ThePCsystemhastocooldownbeforeitcanbereactivated.
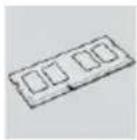
InformationonHardDrive/MemoryCapacity
InformationonHardDrive(HDD, SSD, eMMC) Capacity
The harddrive capacity shown by Windows is slower than that stated by the hard drive manufacturer duetoadifference in calculation.
| ManufacturerHarddrivemanufacturersuseadecimaldefinitionof1KB=1,000Bytes.100GBStorageDevice(HDD,SSD,eMMC):100,000MB/1,000Bytes=100 GB |
| WindowsWindowsusethebinarydefinitionof1KB=1,024Bytes.100GBStorageDevice(HDD,SSD,eMMC):100,000MB/1,024Bytes=97.6GB |
RAMCapacity
RAMcapacityshownbyWindowsmaybelowerthantheactualcapacitybecausethePCusesshared memoryforBIOSandtheintegratedgraphicscard.
DuetoBIOSusingsharedmemory,1,024MBRAMmaybereportedas1,022MBorslightlyless. IfthePChasintegratedgraphicscard,1,024MBRAMmaybereportedas1,022MBorlessthan 1,000MB.
AdjustingVolume(headsetandspeakers)
Checkthevolumebeforelisteningtomusic.

CAUTION

•Beforeusingtheheadset,checkifthevolumeistoohigh.
- Donotusetheheadsettoolong.
ImportantSafetyPrecautions
Pleaseusethemachineintheproperenvironmenttoextendthemachine'slifespan.Usethemachine inasafeandstableplace.
Thewarrantydoesnotcoveranydamageresultingfromrecklessuseoruseinundesirable environments.
ProductInstallation/UsagePrecautions

CAUTION

Placethemachineinasafeplacesoitdoesnotfall.
- Ifdropped,themachinemaybedamagedorcauseaninjury.
Usetheproductinaclean,dust-freeenvironment.
- Otherwise, the system may not function properly.

Donotplaceanyobjectswithin6inchesofthePC.
- LackofventilationmayoverheatthePCfrominsideandputusersatriskofburninjuries.

DonotstoreorusethePCnearamagneticobject(i.e.abagwitha magneticobject,adiary,awallet,amemoboard,high-poweredspeakers,a bracelet,oretc.).
- Otherwise, the storage device (HDD, SSD, eMMC) and the system may be damaged, and the system may fail to operate properly.
DonotusethePConabagwithmagneticobjectsattachedtoit.
- Otherwise, the storage device and the system may be damaged, and the system may fail to operate properly.
Operatetheproductwherethereisnoelectromagneticinterference.
- KeepapproperdistancebetweenthePCandelectronicappliancessuchas radiosorspeakersthatgeneratestrongmagneticfields.
- Otherwise, datamaybelostfromthestoragedevice(HDD, SSD, eMMC) or the LCDcolormaybedamaged.

Donotconnectakey-phonelinetoawiredLANport.
•Afiremayoccurortheproductmaygetdamaged.

If the LCD screen is damaged, donottouch LCD with your hands.
- Contacttheservicecenterasitmaycauseaninjury.
DonotleaveanyobjectssuchasapenbetweenthekeypadandtheLCD.
- YoumightbreaktheLCDbyunwittinglyclosingitwithaforeignobject remainingonthepad.

DonotpressorscratchtheLCDwithasharpobject.
•Itmaycauseimpairment.

Ensure the power is off before shutting the LCD.
• The product may catch fire, be broken or deformed duetotemperaturerise.

DonotimposeexcessiveforceontheLCDscreenordropit.
- YoumaybreaktheLCDglasspanel.

DonotleantheLCDscreenbackwardtoomuch.Donotapplytoomuch forcetotheLCDscreen.
•TheLCDscreenorthemovingpartsmaybedamaged.
TocleantheLCDscreen,usedesignatedagentsandsoftclothandrubthe screeninonedirection.
•ToomuchforcemaydamagetheLCDscreen.
WhenhandlingPCparts, follow the instructions in them anual.
• Otherwise, the product may get damaged.

InstallavaccineprogramonyourPCanddonotdownloadillegalprograms noraccessanycorruptivewebsitesuchasthosepushingpornographic contents.
• Thesystemmaybeinfectedandimpaired.

Donotinsertdevicesotherthandesignatedonesintheports.
• Otherwise, the product may get damaged.

Donotpresstheejectbuttonwhiletheopticaldiskdrive(CD/DVD/Blu-ray) isrunning.
•Anerrormayoccurorthediscmaybeejected,causinginjury.
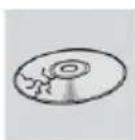
Donotuseadamagedopticaldisc(CD/DVD/Blu-ray).
•Otherwise,theproductmaygetdamagedorcausephysicalinjury.
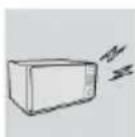
AvoidusingawirelessLANconnectionwithinthe16footradiusofa microwaveorplasmalamp.IfyouhavetousewirelessLANandaplasma bulbwithintherange,dosobetweenchannels11and13.
•Thetransmissionratemaydropeveniftheconnectionismade.
TurnoffthePCifyouarenotgoingtouseitforanextendedperiodoftime.
- Itmayoverheatthebattery.
Makesurethatthememorycoverissecurelyclosedbeforeturningonthe PC.
- Donotusethemachinewhenthememorycoverisopen.Itmaydamagethe machine.

PleaseusepartscertifiedbyLGElectronics,Inc.
• Otherwise, afireorproductdamagemayoccur.

If there is a problem with peripheral devices, contact the device manufacturer.
•Theproductmaygetdamaged.

Handledevicesandpartsofthemachinewithcare.
•Theproductmaygetdamaged.

Donotdropanypartordeviceofthemachinewhiledisassemblingit.
- Ifdropped, it may be damaged and cause an injury.

WARNING

Disposeofthedesiccatingagentandplasticwrapproperly.
• Thedesiccatingagentandplasticwrapmaycausesuffocation.
Donotusethemachineindampplaceslikealaundryroomorbathroom.
• Moisturemaycauseaglitchorelectricshock.
- Pleaseusethemachinewithintheappropriatetemperaturerange(50°F to 95°F)andhumidityrange(20%RHto80%RH).

CleanthePCwithaproperagentanddryitcompletelybeforeusingitagain.
- If the PC is wet while used, an electric shock or fire may occur.
Whenlightningflashesinyourarea, disconnect the power, wired LAN and other connections.
•Anelectricshockorfiremayoccur.

Donotleaveacuporothercontainersfilledwithwaterysubstancenearthe PC.
•InthecasethatliquidgoesinsidethePC,afireorelectricshockmayoccur.
If you have droppedordamaged the PC, disconnect the power and contact the localservice center for as safety check.
•IfadamagedPCisusedcontinuously,anelectricshockorfiremayoccur.
DonotputalitcandleorlivecigaretteonthePC.
•Afiremayoccur.

If you detectorsmellsmoke from the PC, stop use immediately and disconnect the powers source before contacting your localservice center.
•Afiremayoccur.

AstheACadaptercanbehot, donottouchitwithbareskinwhileusingit.
•Extendedperiodofexposuremaycauseburn.

ThebottomofthePCgetshotwhenthesystemisinoperation.Donot touchorputitonyourlap.
• Extended period of exposure may cause burn.

DonotplayPCgamesexcessively.
- PlayingaPCgameforanextendedperiodoftimemaycauseamental disorder.Itmayalsoinflictphysicalimpairmentsontheelderlyandchildren.
 | DonotputyourfingeroranobjectintoPCports. Aninjuryorelectricshockmayoccur. |
 | Askoneofourengineerstorunasafetycheckafteryourcomputerhasbeen repaired. Otherwise,anelectricshockorfiremayoccur. |
 | Forminors,werecommendaprogramthatblocksaccesstoillegalor pornographicwebsites. Minors'exposuretoadult-onlycontentsmayinflictpsychologicalinstabilityor eventrauma.Takeextraprecautionforyourchildrenifthewholefamilyis usingthismachine. |
 | Keepthemachineawayfromheat-emittingdevicessuchasaheater. Theproductmaygetdeformedorcatchonfire. |
 | Preventchildrenfromthrustingtheirfingerintotheopticaldiskdrive(CD/DVD/Blu-ray)tray. Thefingermaybestuckinthetrayandinjured. |
 | Donotblocktheventilationholewithanyobject. Otherwise,anelectricshockmayoccur. |
 | WhenupgradingyourPC,turnoffthepoweranddisconnectthepower cable,battery,andLAN. Thereisariskofelectricshockorfireandtheproductmaybedamaged. |
 | WhenyouupgradethePC,ensurethatchildrenwillnotswallowanyparts includingbolts. Ifachildswallowsanut,heorshemaysuffocate. Inthatcase,seekemergencyhelpimmediately. |
 | Donotdisassembleormodifythemachinearbitrarily. Thereisariskofelectricshockandtheproductmaybenolongercoveredby thewarranty. |
If you dissemble the PC, connect the power after reassembly is done.
- Thereisariskofelectricshockorproductdamage,ifyoutouchthe disassembledPC.

Donotputinmetalitemssuchascoins,hairpinorotherironsor inflammablessuchaspaperormatches.Especially,ensurethatchildrenwill notdoso.
• Thereisariskofproductdamage,fire,orelectricshock.
- Ifanyforeignsubstancegetsintheproduct,unplugtheproductandcontact thelocalservicecenter.
ProductStorage/TransportationPrecautions

CAUTION

Beforecarryingthemachine,turnoffthepoweranddisconnectallthe cables.
- Otherwise, you may trip over the wire, damaging the PC and sustaining an injury.
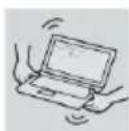
DonotcarrythemachinewiththeLCDopen.
•Otherwise,theproductmaygetdamaged.

Protectthemachinefromanyshockwhilecarryingit.
•Systemdamageoraninjurymayresult.
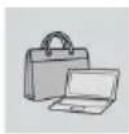
Carrytheproductinabagdesignedforit.
- Carryingitinanothertypeofbagmayresultinproductdamage.
DonotputanyheavyobjectonthePC.
- Thereistheriskofmalfunction.Iftheobjectweretofall,itmaycausean injuryordamagethemachine.

WARNING

Duringairtravel, followthedirectionsofflightattendants.
• Using the PC during flight may cause an aircraft accident.

Whenleavingthemachineinacar, avoidexposuretodirectsunlight.
•Theproductmaygetdeformedorcatchonfireduetoatemperaturerise.

DonotputanyheavyobjectonthepowercableandACadapter,andavoid damagefromimpacts.
•Amalfunctionorfiremayoccur.
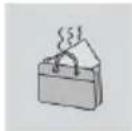
Donotleavethepowered-onPCinaspacewithoutenoughventilation(i.e. bags)foranextendedorrepeatedtime.
•Thebatterymayoverheatandcauseafire.
BatteryandACAdapterPrecautions

WARNING

When the PC is not used for an extended period of time, keep the battery level about 50%.
- Donotleavetheproductwithdischargedbatteryforanextendedperiodof time.ltmaydamagethebattery.

Chargethebatteryonlywiththeprovidedinstrument.
- Otherwise, the battery may be damaged presenting a risk of fire.

Donotthrowwordisassemblethebattery.
•Theresultingdamagemaycauseaninjury,explosion,orfire.

UsebatteriescertifiedandacknowledgedbyLGElectronicsInc.
- Otherwise,anexplosionorfiremayoccur.
Preventthebatteryfrombeingincontactwithanymetallicobjectlikeacar ignitionkeyorapaperclip.
- Otherwise, this may caused damage to the battery, a fire or burnt out to overheat in the battery.
Keepthebatteryawayfromheat.
• Otherwise, an explosion or fire may occur.

Donotshort-circuitthebattery.
- Otherwise, it may explode.

Donotdisposeofaspentorbackup(standby)batteryarbitrarily.
- Itmayexplodeorcauseafire. - Disposalmethodsmaydifferbycountryandregion.Disposeofspentbatteries inaccordancewiththelawsandsafetyrulesofthecountryandregionyou residein.

If you find leakage or smell bad odor from the battery, remove the battery and contact the local service center.
•Itmayexplodeorcauseafire.
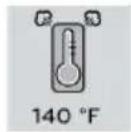
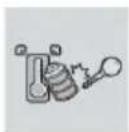
Donotstoreinplaceswithtemperaturesabove140°Fandhighhumidity(in carsorsaunas).
•Itmayexplodeorcauseafire.

Keepthebatteryoutofthereachofchildrenorpets.
- Ifdamaged, it may cause an injury.

Keepthebatteryfrombeingpiercedbyasharpobjectorchewedbypets.
•Itmayexplodeorcauseafire.

Donotputthebatteryinwater.
• Otherwise, the battery may be damaged to explode.

DonotusethePContopofcarpet,blanketorbed.Also,donotputthe adapterundertheblanket.
- This may cause amalfunction, fireorburnduetooverheatinthePCand adapter.
Readthebatteryusageprecautionscarefullybeforeuse.
- Keep the battery at room temperature. LG Easy Guide Refer to the Tip. Using aBatteryintheinstallationguidetostorethebatteryproperly.
Connectthepowerplugproperlybypushingittotheend.
- Ifacontactfailureoccurs, itmaycauseproductdamageorfire.

DonotbendthepowercableforACadaptertoomuchorgetstampedbya sharpobject.
• Thewiresinsidethecablemaybreakandcauseelectricshockorfire.

Donotuselooseplugsordamagedpowercords.
•Anelectricshockorfiremayoccur.
Donottouchthepowercordwithyourhandswet.
• Otherwise, an electric shock may occur.

Pulltheplug, notthecord, todisconnect the AC adapter and power jack.
• Otherwise, afireorproductdamagemayoccur.

Operatetheproductatthepropervoltage.
• Excessivevoltagemayresultindamageontheproduct,electricshockorfire.

Usepoweroutletswithanearthpininstalledandpropersupplyofrated electricity.
•Anelectricleakagemaycauseanelectricshockorfire.
• Theshapeofthepowercordandoutletmaydifferbycountryandregion.
In the case of strangenoise from the chordor plug, disconnect the power cord from the outlet immediately and contact the service center.
•Afireorelectricshockmayoccur.

Usethepowersupply/adapterprovidedwiththeproductandnever disassembletheproduct.
- Usingadifferentproductordisassemblingitmaycauseanelectricshockor fire.

AlwayskeeptheACadapterandpoweroutletclean.
•Afiremayoccur.

Keepchildrenandpetsfromdamagingthepowercord.
•Itmaycauseafireoranelectricshock.
DisconnectthePCcompletelybeforecleaningit.
• Otherwise, an electric shock or impairment may occur.

If the power/AC adapter or the product is soaked, disconnect the battery, power/AC adapter, and all other lines before contacting the local service center.
•Anelectricshockorfiremayoccur.

Ensure that the battery pack is locked to the machine after installation.
• Otherwise, the battery may be damaged.
OtherSafetyPrecautions

CAUTION
Handlethemachinewithcaretopreventlossofdatafromthestorage device(HDD,SSD,eMMC).
- Sincethestoragedeviceisfragile,youneedtobackupyourimportantdata frequently.
- Themanufacturerisnotresponsibleforanystoragedevicedatalosscausedby auser'smistake.

Damagetothestoragedevice(HDD,SSD,eMMC)anddatalossmayoccur when:
- Externalshocksareinflictedonthemachinewhiledisassemblingorinstallingit.
- Themachineisreset(i.e.restarted)orturnedonagainafterapoweroutage whilethestoragedeviceisoperating.
•ThePCisinfectedwithavirus,taintingthedatairrecoverably. - Abruptturning-offofthePCcandamagethePC.
- If the product is moved, shakenorexposed to external shock while the storage device is running, filed damage or bad sectors may occur.

Tominimizedatalossresultingfromstoragedevicedamage(HDD,SSD, eMMC),frequentlybackupimportantdata.
• Themanufacturerisnotresponsibleforanydataloss.

Wedonotrefundorreplaceaproductthatmalfunctionsduetothe installationoruseofanoperatingsystemotherthantheoneprovidedbyLG ElectronicsInc.
- Somesoftwareapplicationsmaynotworkproperlyinotheroperatingsystems. Suchmalfunctionsarenotcoveredbythewarranty.
ENERGYSTAR®
ENERGYSTAR®

ENERGYSTAR® Specifications
• LGElectronicsInc.participatesinENERGYSTAR ^® and the energy efficiency of this product complies with the specifications of ENERGYSTAR ^® .
- ENERGYSTAR ® isasetofregulationsthatencouragesmanufacturersof electronicdevicestocreatemoreenergyefficientproducts.
•Theenergyconsumptionofthisproductwasdecreasedalongwiththecost.Also,ithelpspreservenaturalresources.
•ThisPCincludesthefollowingpowermanagementfunctions.
-Turnoffthedisplay:Whenyoudon'tusethePCforupto15minutes.
-Sleepafter:Whenyoudon'tusethePCforupto30minutes.
• Toleavesleepmode, clickamousebutton or press any key on the keyboard.
PowerManagementOptions
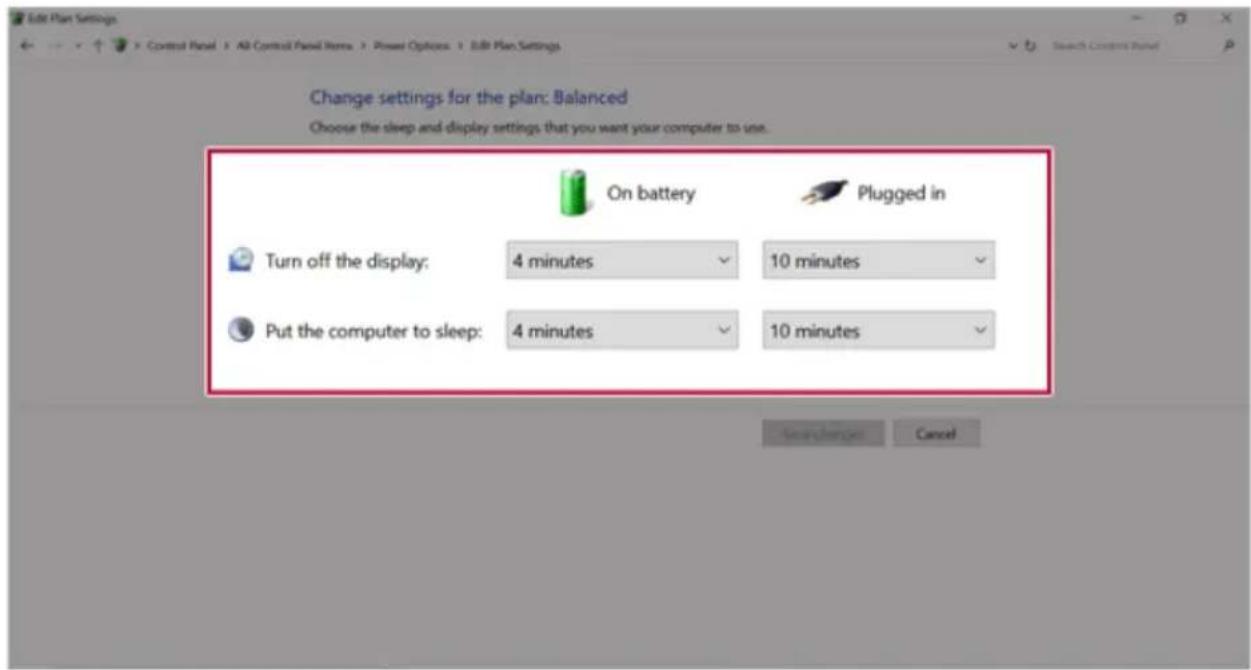
The powermanagement option of this PC is configured as follows.

TIP
ThesettingsofthepowermanagementoptionsmaybechangeduponWindowsupdate.
text_image
Edit Plan Settings Control Panel > All Control Panel Items > Power Options > Edit Plan Settings Change settings for the plan: Balanced Choose the sleep and display settings that you want your computer to use. On battery Plugged in Turn off the display: 4 minutes 10 minutes Put the computer to sleep: 4 minutes 10 minutes Save Plan... Cancel- Turn off the display: Turns off the screen when you don't use the PC for a set period of time.
- Put the computer to sleep: Switches to the Sleep mode when you don't use the PC for a set periodoftime.
RegulatoryNotices
European Union Notice

[ENGLISH]
Hereby, LG Electronics declares that the radio equipment type PC is in compliance with Directive 2014/53/EU. The full text of the EU declaration of conformity is available at the following internet address:
http://www.lg.com/global/support/cedoc/cedoc#
The use of the 5150 – 5350 MHz band is restricted to indoor use only. This restriction exists in the countries Spain (ES), Portugal (PT), United Kingdom (UK), Poland (PL), Italy (IT), Germany (DE).
LG Electronics European Shared Service Center B.V. Krijgsman 1 1186 DM Amstelveen The Netherlands
[ESPAÑOL]
LG Electronics European Shared Service Center B.V.
Krijgsman 1
1186 DM Amstelveen
Holandia
[ITALIANO]
LG Electronics European Shared Service Center B.V.
Krijgsman 1
1186 DM Amstelveen
Paesi Bassi
[DEUTSCH]
LG Electronics European Shared Service Center B.V.
Krijgsman 1
1186 DM Amstelveen
Niederlande
CE RF Radiation Exposure Statement:
Caution This equipment complies with European RF radiation exposure limits for SAR (Specific Absorption Rate). This transmitter must not be co-located or operating in conjunction with any other antenna or transmitter.
External Power Supply Information
| (1) | (2) | (3) | (4) | (5) | (6) | (7) | (8) | (9) | (10) |
| Manufacturer's name or trade mark, commercial registration number and address | Model identifier | Input voltage V(B) | Input AC frequency Hz(Tu) | Output voltage V(B) | Output current A | Output power W(BT) | Average active efficiency % | Efficiency at low load (10 %) % | No-load power consumption W(BT) |
| Manufacturer; LG Electronics Inc. Commercial registration number; 107-86-14075 Address; LG Twin Towers, 128 Yeoui-daero, Yeongdeungpo-gu, Seoul, 07336, Korea | ADS-48MS-19-2 19048E | 100-240 | 50-60 | 19.0 | 2.53 | 48.07 | 89.0 | 83.4 | 0.07 |
| English | German | Italian | Polish | Protuguese | Spanish | |
| (1) | Manufacturer's name or trade mark, commercial registration number and address | Name oder Handelsmarke des Herstellers, Handelsregisternummer und Anschrifte | Nome o marchio del fabbricante, numero di iscrizione nel registro delle imprese e indirizzo del fabbricante | Nazwa lub znak towarowy producenta, numer rejestru handlowego i adres | Marca comercial ou nome, número de registo comercial e endereço do fabricante | Nombre o marca, número del registro mercantil y dirección del fabricante |
| (2) | Model identifier | Modellkennung | Identificativo del modello | Identyfikator modelu | Identificador do modelo | Identificador del modelo |
| (3) | Input voltage V(B) | Eingangsspannung | Tensione di ingresso | Napięcie wejściowe | Tensão de entrada | Tensión de entrada |
| (4) | Input AC frequency Hz(Γμ) | Eingangswechselstrom-fre-quenz | Frequenza di ingresso CA | Wejściowa częstotliwość prądu przemiennego | Frequência da alimentação de CA | Frecuencia de la CA de entrada |
| (5) | Output voltage V(B) | Ausgangsspannung | Tensione di uscita | Napięcie wyjściowe | Tensão de saída | Tensión de salida |
| (6) | Output current A | Ausgangsstrom | Corrente di uscita | Prąd wyjściowy | Corrente de saída | Intensidad de salida |
| (7) | Output power W(Bτ) | Ausgangsleistung | Potenza di uscita | Moc wyjściowa | Potência de saída | Potencia de salida |
| (8) | Average active efficiency % | Durchschnittliche Effizienz im Betrieb | Rendimento medio in modo attivo | Średnia sprawność podczas pracy | Eficiência média no modo ativo | Eficiencia media en activo |
| (9) | Efficiency at low load (10 %) % | Effizienz bei geringer Last (10 %) | Rendimento a basso carico (10 %) | Sprawność przy niskim obciążeniu (10 %) | Eficiência a carga baixa (10%) | Eficiencia a baja carga (10 %). |
| (10) | No-load power consumption W(Bτ) | Leistungsaufnahme bei Nulllast | Potenza assorbita nella condizione a vuoto | Zużycie energii w stanie bez obciążenia | Consumo energético em vazio | Consumo eléctrico en vacío |
Australia/New Zealand Notice
Exposure to radio frequency energy
Radio wave exposure and Specific Absorption Rate (SAR) information
This product has been designed to comply with applicable safety requirements for exposure to radio waves. These requirements are based on scientific guidelines that include safety margins designed to assure the safety of all persons, regardless of age and health
- The equipment complies with the RF Exposure Requirement 1999/519/EC, Council Recommendation of 12 July 1999 on the limitation of exposure of the general public to electromagnetic fields from 0 Hz to 300 GHz.
- The SAR limit recommended by the International Commission on Non-Ionizing Radiation Protection (ICNIRP) is 2 W/kg averaged over 10g of tissue.
• The highest SAR value for this model on the body is less than 2W/kg (10g)
Brazil Notice
If the backup battery is incorrectly replaced, there is danger of explosion.
The lithium battery contains lithium and can explode if it is not properly handled or disposed of replace only with a battery of the type recommended by LG
Australia Notice
- The appliance is not intended for use by young children or infirm persons without supervision
- Young Children should be supervised to ensure that do not play with appliance
- If the appliance is supplied from a cord extension set or an electrical portable outlet device.
- The cord extension set on electrical portable outlet device must be positioned so that it is not subject to splashing or ingress of moisture
USA
FCC Notice
(For USA)
This equipment has been tested and found to comply with the limits for a Class B digital device, pursuant to Part 15 of the FCC Rules. These limits are designed to provide reasonable protection against harmful interference in a residential installation. This equipment generates, uses, and can radiate radio frequency energy and, if not installed and used in accordance with the instructions, may cause harmful interference to radio communications. However, there is no guarantee that interference will not occur in a particular installation. If this equipment does cause harmful interference to radio or television reception, which can be determined by turning the equipment off and on, the user is encouraged to try to correct the interference by one or more of the following measures:
- Reorient or relocate the receiving antenna.
- Increase the separation between the equipment and the receiver.
- Connect the equipment to an outlet on a circuit different from that to which the receiver is connected.
- Consult the dealer or an experienced radio/TV technician for help.
This device complies with part 15 of the FCC Rules. Operation is subject to the following two conditions: (1) this device may not cause harmful interference and (2) this device must accept any interference received, including interference that may cause undesired operation. Any changes or modifications in construction of this device which are not expressly approved by the party responsible for compliance could void the user's authority to operate the equipment.
FCC Radio Frequency Interference Requirements (for UNII devices)
High power radars are allocated as primary users of the 5.25 to 5.35 GHz and 5.65 to 5.85 GHz bands. These radar stations can cause interference with and/or damage this device. This device cannot be co-located with any other transmitter.
FCC/IC Radio Frequency Exposure
The available scientific evidence does not show that any health problems are associated with using low power wireless devices. There is no proof, however, that these low power wireless devices are absolutely safe. Low power Wireless devices emit low levels of radio frequency energy (RF) in the microwave range while being used. Whereas high levels of RF can produce health effects (by heating tissue), exposure to low level RF that does not produce heating effects causes no known adverse health effects. Many studies of low level RF exposures have not found any biological effects. Some studies have suggested that some biological effects might occur, but such findings have not been confirmed by additional research. This device have been tested and found to comply with FCC/IC radiation exposure limits set forth for an uncontrolled environment and meets the FCC radio frequency (RF) Exposure Guidelines in Supplement C to OET65 and RSS-102 of the IC radio frequency (RF) Exposure rules(<1.6W/kg).
Supplier's Declaration of Conformity
| Trade Name | LG |
| Responsible Party | LG Electronics USA, Inc. |
| Address | 1000 Sylvan Ave Englewood Cliffs,NJ 07632 |
| Telephone | (201)266-2215 |
CANADA
Industry Canada Statement (For Canada)
[For having wireless function (WLAN, Bluetooth,...)]
This device contains licence-exempt transmitter(s)/receiver(s) that comply with Innovation, Science and Economic Development Canada's licence-exempt RSS(s). Operation is subject to the following two conditions:
(1) This device may not cause interference.
(2) This device must accept any interference, including interference that may cause undesired operation of the device.
FCC/IC Radio Frequency Exposure
The available scientific evidence does not show that any health problems are associated with using low power wireless devices. There is no proof, however, that these low power wireless devices are absolutely safe.
Low power Wireless devices emit low levels of radio frequency energy (RF) in the microwave range while being used. Whereas high levels of RF can produce health effects (by heating tissue), exposure to low level RF that does not produce heating effects causes no known adverse health effects. Many studies of low level RF exposures have not found any biological effects. Some studies have suggested that some biological effects might occur, but such findings have not been confirmed by additional research. This device have been tested and found to comply with FCC/IC radiation exposure limits set forth for an uncontrolled environment and meets the FCC radio frequency (RF) Exposure Guidelines in Supplement C to OET65 and RSS-102 of the IC radio frequency (RF) Exposure rules(<1.6W/kg).
WARNING
[For product having the wireless function using 5 GHz frequency bands]
i. the device for operation in the band 5150–5250 MHz is only for indoor use to reduce the potential for harmful interference to co-channel mobile satellite systems; ii. for devices with detachable antenna(s), the maximum antenna gain permitted for devices in the bands 5250-5350 MHz and 5470-5725 MHz shall be such that the equipment still complies with the e.i.r.p. limit; iii. for devices with detachable antenna(s), the maximum antenna gain permitted for devices in the band 5725-5850 MHz shall be such that the equipment still complies with the e.i.r.p. limits as appropriate; and iv. [for devices operating in the band 5250-5350 MHz having an e.i.r.p. greater than 200 mW] antenna type(s), antenna models(s), and worst-case tilt angle(s) necessary to remain compliant with the e.i.r.p. elevation mask requirement set forth in section 6.2.2.3 of RSS-247 shall be clearly indicated.
Users should also be advised that high-power radars are allocated as primary users (i.e. priority users) of the bands 5250-5350 MHz and 5650-5850 MHz and that these radars could cause interference and/or damage to LE-LAN devices.
Information for Environmental Preservation
[ENGLISH]
Information for Environmental Preservation
LGE announced the 'LG Declaration for a Cleaner Environment' in 1994, and this ideal has served as a guiding managerial principle ever since. The Declaration is a foundation that has allowed us to undertake environmentally friendly activities in careful consideration of economic, environmental, and social aspects.
We promote activities for environmental preservation, and we specifically develop our products to embrace the concept of environment-friendly. We minimize the hazardous materials contained in our products. For example, there is no cadmium to be found in our product.
Information for recycling
This product may contain parts which could be hazardous to the environment. It is important that this product be recycled after use.
LGE handles all waste product through an environmentally acceptable recycling method. There are several take-back and recycling systems currently in operation worldwide. Many parts will be reused and recycled, while harmful substances and heavy metals are treated by an environmentally friendly method.
If you want to find out more information about our recycling program, please contact your local LG vendor or a corporate representative of LG.
We set our vision and policies on a cleaner world by selecting the issue of the global environment as a task for corporate improvement. Please visit our website for more information about our 'green' policies. http://www.lg.com/global/sustainability/environment/take-back-recycling.jsp
[DEUTSCH]
http://www.lg.com/global/sustainability/environment/take-back-recycling.jsp
[ESPAÑOL]
http://www.lg.com/global/sustainability/environment/take-back-recycling.jsp
[PORTUGUÊS]
http://www.lg.com/global/sustainability/environment/take-back-recycling.jsp
[NEDERLANDS]
http://www.lg.com/global/sustainability/environment/take-back-recycling.jsp
[РУССКИЙ]
http://www.lg.com/global/sustainability/environment/take-back-recycling.jsp
UKRAINE only
Ukraine Restriction of Hazardous Substances
The equipment complies with requirements of the Technical Regulation, in terms of restrictions for the use of certain dangerous substances in electrical and electronic equipment.
GREEN MARK (for Japan)

natural_image
Green icon depicting two hands shaking, enclosed in a rounded rectangle (no text or symbols)http://www.lg.com/jp/eco/j-moss
PACKING INFORMATION (CUSTOMS UNION)
Русский

natural_image
Simple line drawing of a triangular recycling symbol with arrows indicating direction (no text or labels)natural_image
Simple line drawing of a triangular recycling symbol with three curved arrows forming a loop (no text or labels)Disposal of your old appliance
1 This crossed-out wheeled bin symbol indicates that waste electrical and electronic products (WEEE) should be disposed of separately from the municipal waste stream.
2 Old electrical products can contain hazardous substances so correct disposal of your old appliance will help prevent potential negative consequences for the environment and human health. Your old appliance may contain reusable parts that could be used to repair other products, and other valuable materials that can be recycled to conserve limited resources.
3 You can take your appliance either to the shop where you purchased the product, or contact your local government waste office for details of your nearest authorised WEEE collection point. For the most up to date information for your country please see www.lg.com/global/recycling
ITALIANO
Disposal of your old appliance (as per e-waste Rules)
-
When this crossed out wheeled bin symbol is depicted on the product and its operator's manual, it means the product is covered by the e-waste Management and Handling Rules, 2011 and are meant to be recycled, dismantled, refurbished or disposed off.
-
Dos
a. The product is required to be handed over only to the authorized recycler for disposal. b. Keep the product in isolated area, after it becomes non-functional/un-repairable so as to prevent its accidental breakage.
Don't
a. The product should not be opened by the user himself/herself, but only by authorized service personnel.
b. The product is not meant for re-sale to any unauthorized agencies/scrap dealer/kabariwalah.
c. The product is not meant for mixing into household waste stream.
d. Do not keep any replaced spare part(s) from the product in exposed area.
-
Any disposal through unauthorized agencies/person will attract action under Environment (Protection) Act 1986.
-
This product is complied with the requirement of Hazardous Substances as specified under Rule 13 (1) & (2) of the E-Waste (Management & Handling) Rules, 2011.
-
To locate a nearest collection centre or call for pick-up (limited area only) for disposal of this appliance, please contact Toll Free No. 1800-315-9999 / 1800-180-9999 for details. All collection centre and pick up facilities are done by third parties with LG Electronics India Pvt. Ltd. Merely as a facilitator. For more detailed information, please visit: http://www.lqe.com/in.
- Plug and connector of the power supply cord
- Output jack of Power supply
- Main Battery Pack
LG Take-back & Recycling Policy (For USA)
LG Electronics offers a customized e-waste take-back & recycling service that meets local needs and requirements in the countries where e-waste regulations are in place, and also provides product take-back & recycling service voluntarily in some regions. LG Electronics evaluates products' recyclability at the design step selectively, with the goal of improving recyclability where practicable. Through these activities, LG Electronics seeks to contribute to conserving natural resources and protecting the environment. For more information, please visit our global site at https://www.lg.com/global/recycling
BATTERY

ENGLISH
1 This symbol may be combined with chemical symbols for mercury(Hg), cadmium(Cd) or lead(Pb) if the battery Contains more than 0.0005% of mercury, 0.002% of cadmium or 0.004% of lead.
2 All batteries/accumulators should be disposed separately from the municipal waste stream via designated collection facilities appointed by the government or the local authorities.
3 The correct disposal of Your old batteries/accumulators will help to prevent potential negative consequences for the environment, animal and human health.
4 For more detailed information about disposal of Your old batteries/accumulators, please contact Your city office, waste disposal service or the shop where You purchased the product. (http://www.lg.com/global/sustainability/environment/take-back-recycling/global-network-europe)
FRANÇAIS
Battery take-back information
1) US
In case rechargeable battery is included in this product, the entire device should be recycled in compliance with Lithium-Ion battery recycling standards because of the internal battery. To dispose of properly, call (800) 822-8837 or visit www.call2recycle.org.
2) Canada
ENGLISH: In case rechargeable battery is included in this product, the rechargeable battery should be recycled in compliance with Lithium-Ion battery recycling standards. To dispose of properly, call 1.888.224.9764 or visit www.call2recycle.ca.
Removal of waste batteries and accumulators (Product with embedded battery ONLY)
In case this product contains a battery incorporated within the product which cannot be readily removed by end-users, LG recommends that only qualified professionals remove the battery, either for replacement or for recycling at the end of this product's working life. To prevent damage to the product, and for their own safety, users should not attempt to remove the battery and should contact LG Service Helpline, or other independent service providers for advice.
Removal of the battery will involve dismantling of the product case, disconnection of the electrical cables/contacts, and careful extraction of the battery cell using specialized tools. If you need the instructions for qualified professionals on how to remove the battery safely, please visit http://www.lge.com/global/sustainability/environment/take-back-recycling
[DEUTSCH]
PowerSupplyandEnvironments
| ACAdapter(FreeVoltage) | PowerRating:48WInput:AC100Vto240V,1.5A50/60HzOutput:DC19V,2.53A |
| Battery | LithiumlonbatteryChargingHours:3.0hoursCharginghoursmaybelongerifthebatteryisnotusedforalong timeorthesystemison.Whentemperatureisoutsidetheoperatingtemperature specification,thebatterymaynotbechargedorcharginghours maybelonger.Operatingtemperaturemaybedifferentfromtheactualroom temperature. |
| OperatingandStorage Conditions | OperatingTemperature:50°Fto95°FOperatingHumidity:20%RHto80%RHSstorageTemperature:23°Fto104°FSstorageHumidity:5%RHto90%RH |
PowerConsumption
Powerconsumptionofthisproductduringoperationstandby,sleepmode,andmanualoffmodes maydifferdependingontheproductspecificationsandtheadapterype.Evenwhenthesystem isturnedoff,itconsumesaminuteamountofpower,ifsupplied.Tocutoffthepowersupply completely,disconnectthepowercordfromthepoweroutlet.
UsingWindows10
StartMenu
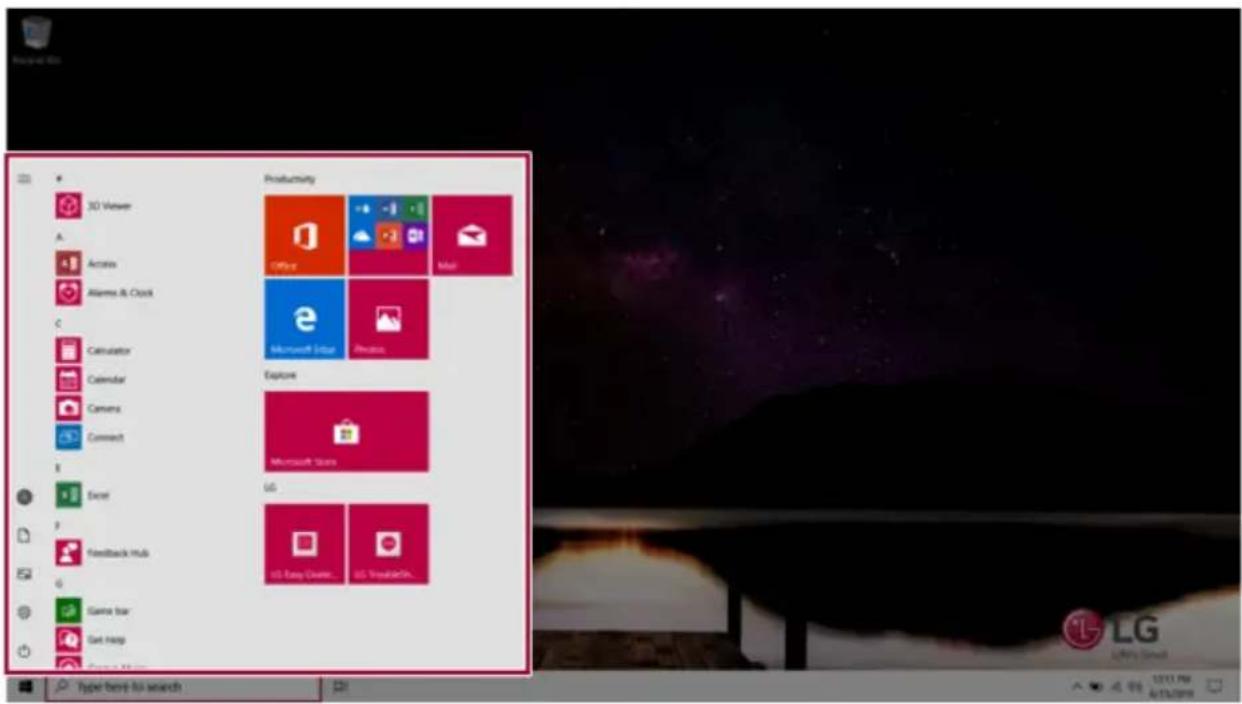
ANewStartMenu
TheStartmenuinWindows10hasbeenchangedsoyoucanuseWindowsquicklyandeasily.

text_image
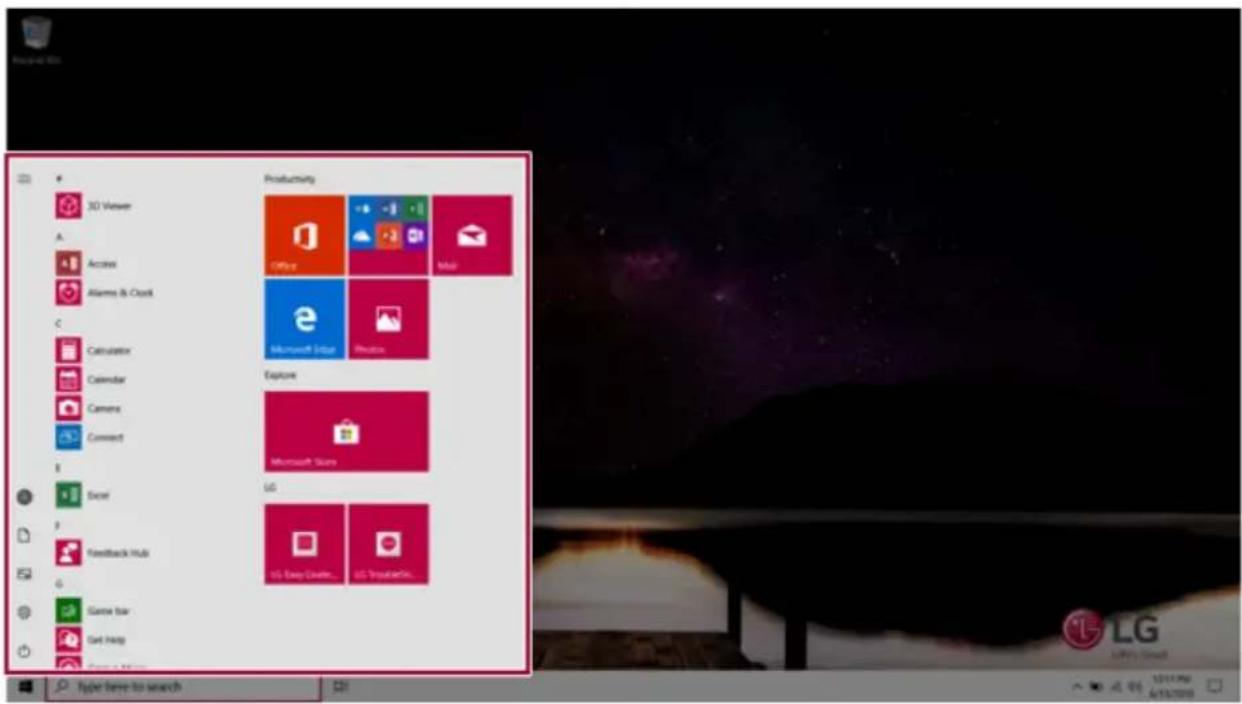
Productivity Office Microsoft Edge Ponce Explore Microsoft Store US US Easy Store... US Reputable...Pressthe[]buttoninthelower-leftcornerofthescreentodisplaytheStartmenu.

TIP
Pressthe[ ]keyor[Ctrl]+[Esc]todisplaytheStartmenu.
text_image
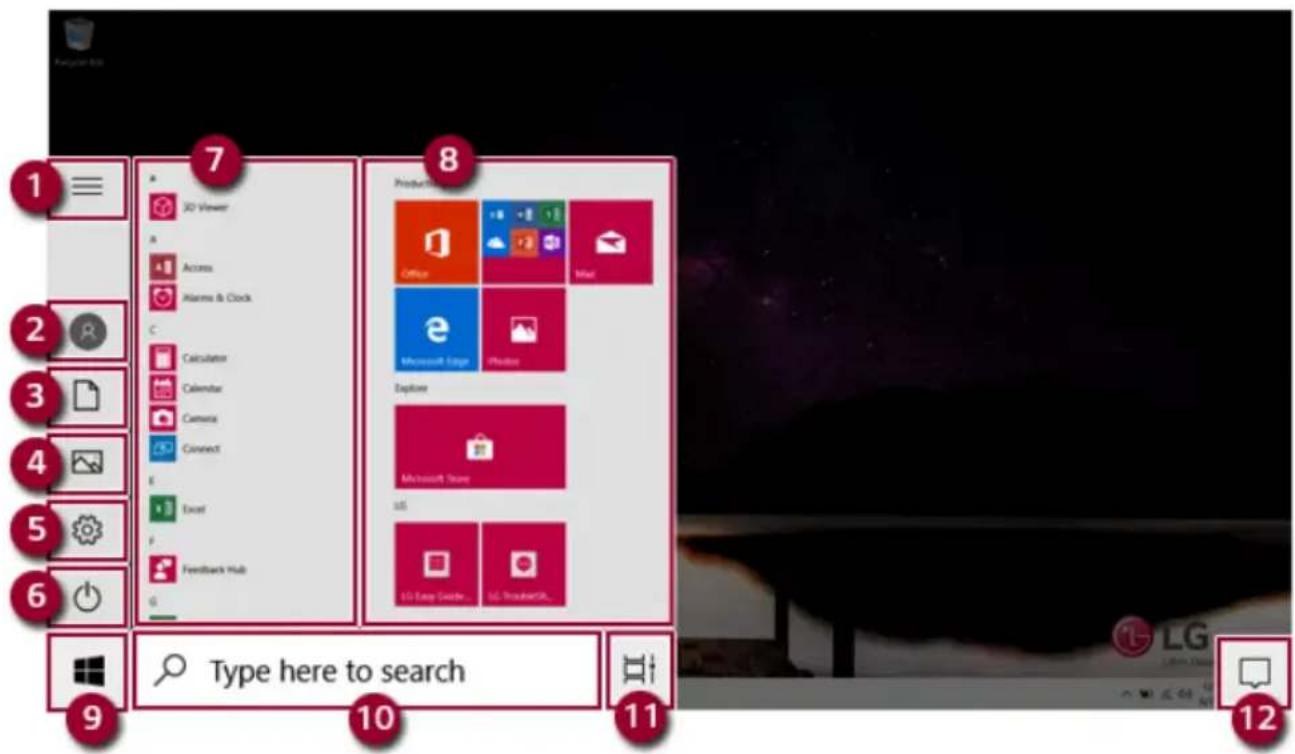
1 2 3 4 5 6 7 8 9 Type here to search 10 11 121 Expand: Displaysthenamesofallmenuitems.
2 User Account: Displays the current user's information. You can use functions such as Change AccountSettings, LockorLogout.
3Document:OpensthedefaultdocumentfolderinWindows.
4Pictures:OpensthedefaultphotofolderinWindows.
5 Settings: You can set up the system including the network settings.
6 Power: Sleep, System Shutdown, and Restart menus are available.
7 AppList: Displaystheapplist.
8 App Tile: Apps added to the Start menu are displayed in tile format.
9StartButton: Opensorclose the Startmenu.
10 Windows Search: Searches for the text entered by the user in My Items (system) or the Internet.
11 Task View: You can add a Desktop screen or switch to the screen to display the history of recent PCusage.
12 Action Center: You can view the system-related notification messages and change PC settings.

- Press[] + [X], and then the [] button pop-up menu appears. You can us the pop-up menutoeasily accesst heshort cut such as Windows Explorer, Search, System Shutdown, and Desktop.
DesktopAppsandWindowsApps
The Desktopapps remain unchanged from the previous Windows apps, but Windows apps have been changed to include various functions.
TheWindowsappsprovideeasy-to-usemenusaccordingtothewindowsizeandavarietyof convenientfunctionssuchasUpdateandAlarm.
UsingApps
RunningandExitingApps
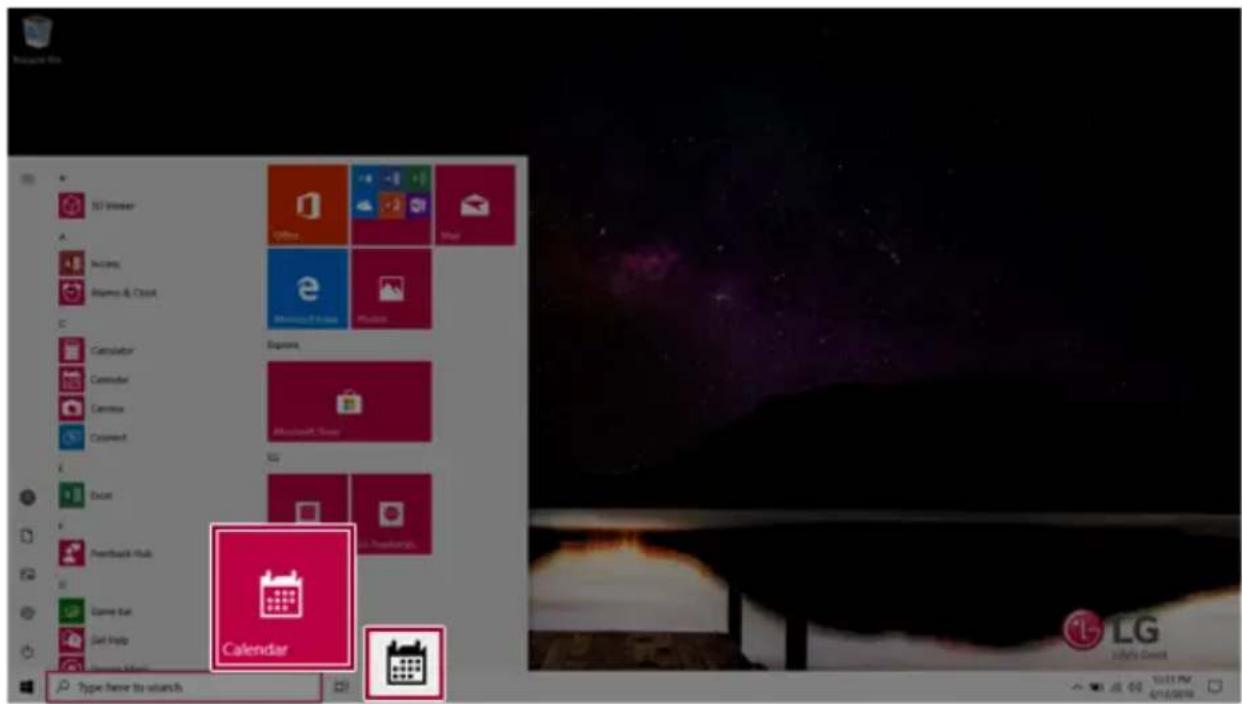
RunappsthatwerenotaddedtotheStartmenuorappsthatwereinstalledonthesystemusingthe followingmethod:
1Pressthe[

]buttonandselectandruntheappyouwantfromtheapplist.

Pressthe[

]keyor[Ctrl]+[Esc]todisplaytheStartmenu.

text_image
Calendar Type here to search2Toexitanapp,pressthe[]buttononthetopoftheappscreen.
DeletingApps
YoucandeleteappsfromtheStartmenutilesortheapplist.

ThebasicWindowsappsthatarerequiredmaynotbedeleted.
1 Clickthe[

]buttontodisplaytheStartmenu.

TIP
Pressthe[ ]keyor[Ctrl]+[Esc]todisplaytheStartmenu.
text_image
3D Viewer Access Alarms & Clock Calculator Calendar Camera Connect Screw Feedback Hub Game Bar Get Help Productivity Office Microsoft Edge Oracle Explore Microsoft Store UG US Easy Discover... US OutlookTo... Hyper have to search2 Go to the Start menu app tiles or the app list and right-click the app you wish to delete.

text_image
Calendar Pin to Start More Uninstall3 Whenthepop-upmenuappears, select[Uninstall].

text_image
Pin to Start More Uninstall
TIP
If you are deleting a desktop app, the [Programs and Features] window appears. Right-click the app you wish to delete and press the [Uninstall/Change] button.
4 When prompted to confirm the deletion, click the [Uninstall] button to delete the app.
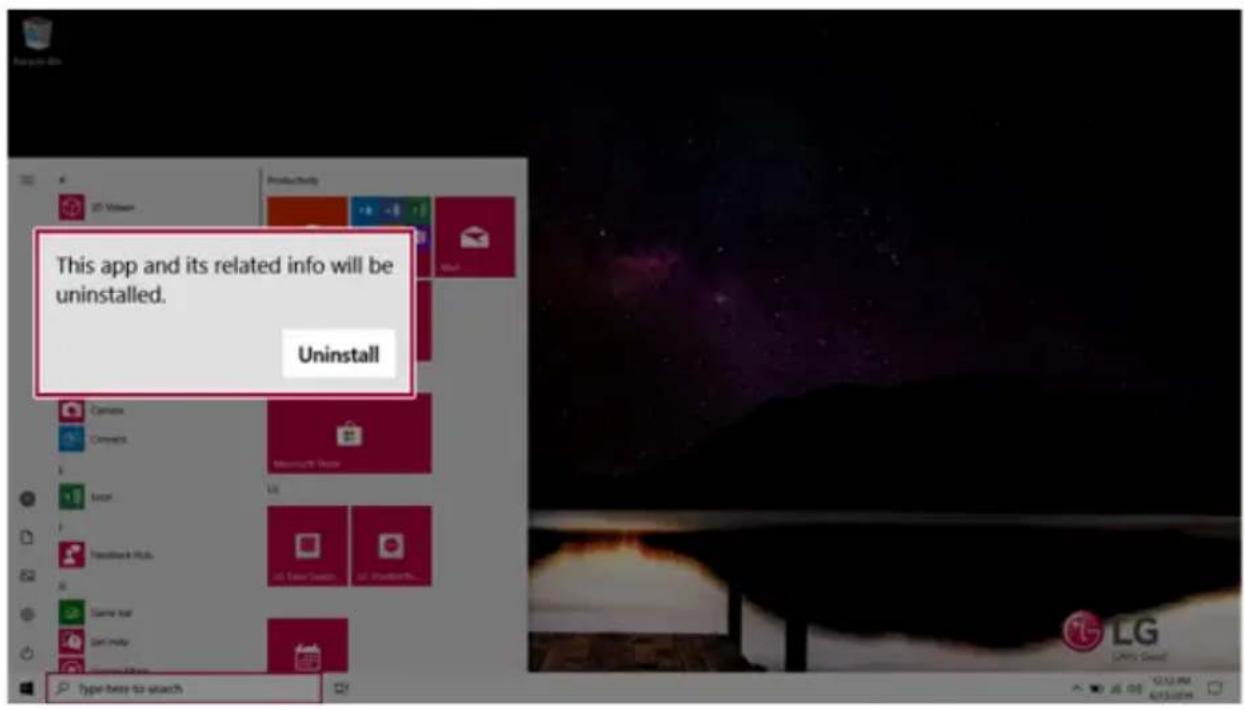
text_image
This app and its related info will be uninstalled. UninstallAddingAppstoStartMenu/Taskbar
YoucanaddfrequentlyusedappsontheStartmenuandtaskbarforeasyandquickaccess.
1Pressthe[

]buttontodisplaytheStartmenu.

TIP
Pressthe[ ]keyor[Ctrl]+[Esc]todisplaytheStartmenu.
text_image
3D Viewer A Arcass Alarms & Clock C Calculator Calendar Camera Connect E Excel P Feedback Hub G Game bar Get Help Productivity Office Mail Microsoft Edge Physics Explore Microsoft Store UG US Easy Discover... US ThinkerSh... Hyper band-list search2 Right-click the app you want from the app list, and then click [Pin to Start] or [More] > [Pin to Taskbar].

text_image
Pin to Start More Uninstall Pin to taskbar App settings Rate and review Share3 TheselectedappisaddedtotheStartmenuortaskbar.
text_image
TST Viewer Access Biosys & Cloud Calculator Calculator Camera Command Excel Feedback Hub Save Bar Get Help Type: have to starch Calendar LG Liberty DirectTogglingandAddingApps/Desktops
InWindows10,youcantoggletherunningappseasilyandquickly,andadddesktopstousethemlike multiplePCs.

TIP
Foranappthatdoesnotallowmultitasking,youmaybeswitchedtothedesktopwheretheapp wasexecuted,oryoumayhaveanerrormessage.
1 Inthetaskbar, press[].

text_image
Screenshot of a computer interface showing a dark screen with purple starry background and LG logo, with Chinese UI elements including 'Type here to search' and 'Hi'.2 The screen to switch between apps and desktops appears and the running apps are displayed in the preview.
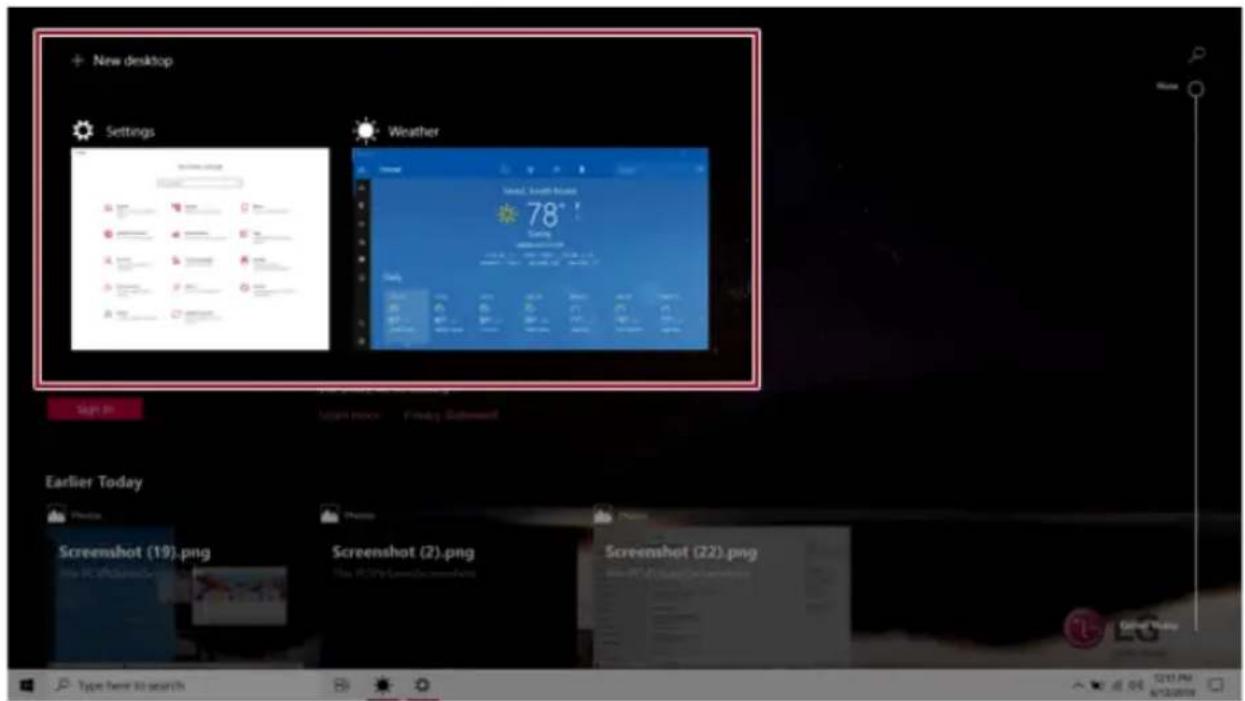
text_image
New desktop Settings Weather 78° Morning Early Today Screenshot Screenshot (19).png Screenshot (2).png Screenshot (22).png New PC/PC/Video/Video/Video Type here to search
TIP
Pressthe[

]buttonofanappinthepreviewtoexittheapp.
YoucanusethetimelinedisplayedontheDesktopscreentocheckthehistoryofPCusage.
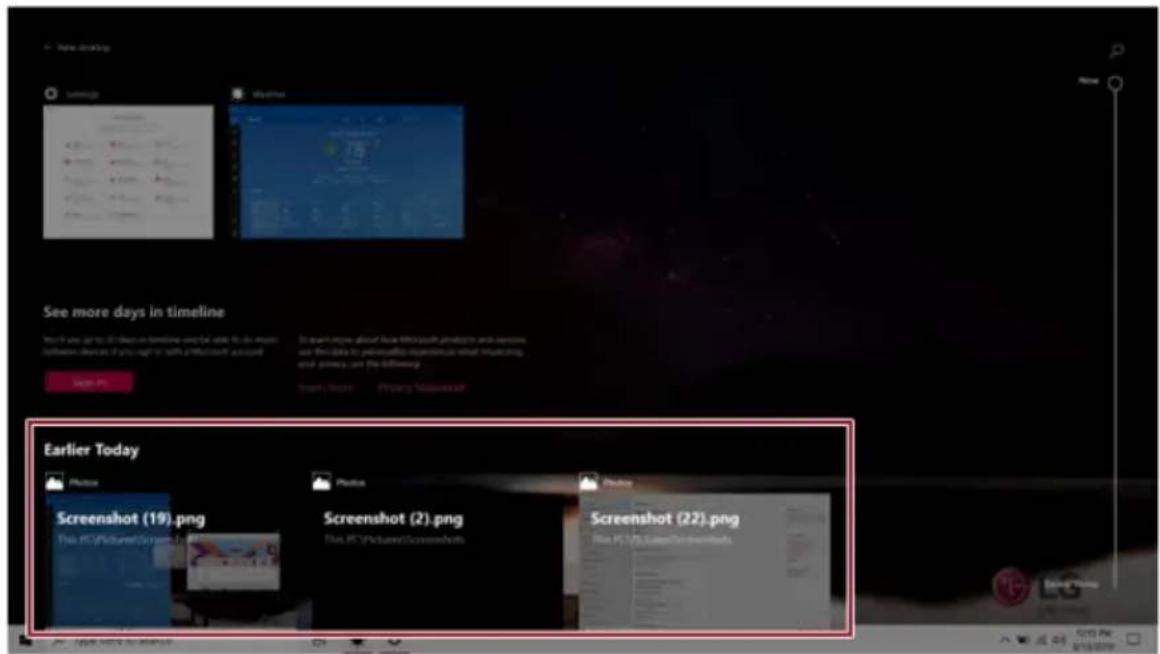
text_image
See more days in timeline Earlier Today Photos Screenshot (19).png Photos Screenshot (2).png Photos Screenshot (22).png3Clickthe[NewDesktop]tile.
![LG 15Z90NRAAS9U1 - 3Clickthe[NewDesktop]tile. - 1](/content/2026/06/1193501/images/aea232dfbcc282828f3d81b03f0a2295c2f3a4b058d9ce2732502d8e66d81078.jpg)
text_image
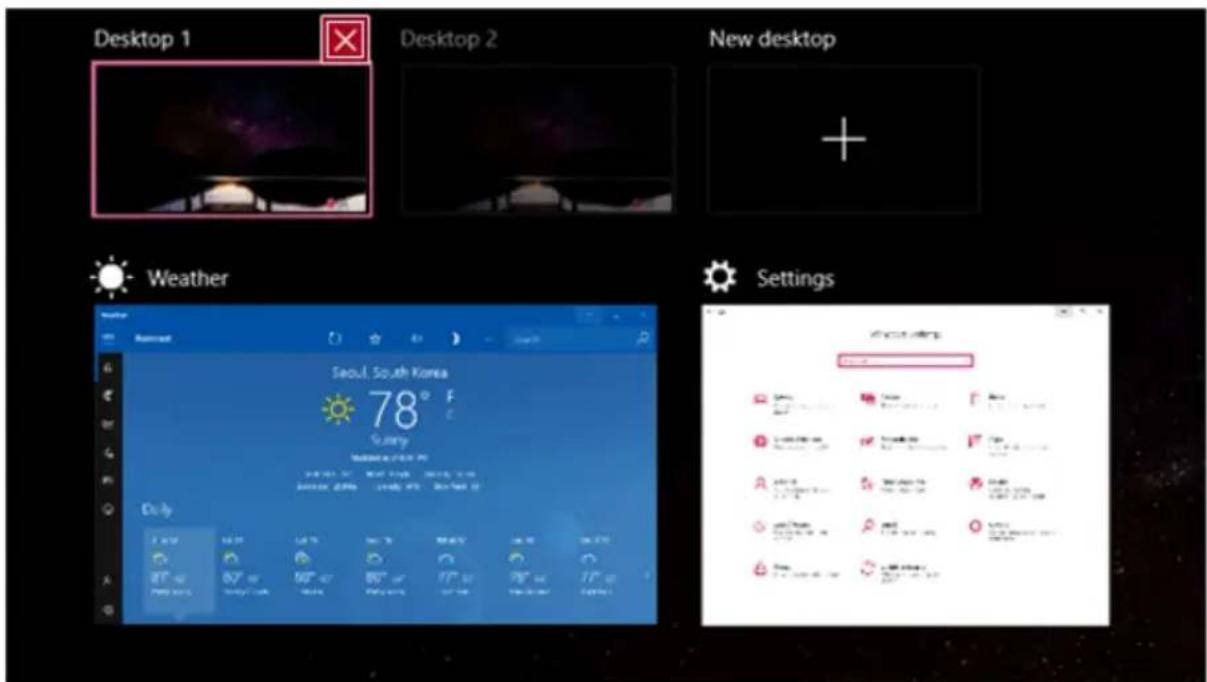
+ New desktop See more days in timeline This is now up to 30 days in timelines and the date for this time between services if you begin with a Microsoft® accurately. Sign it Is there's notice about how Microsoft products and services use this data to personalise experience, while responding your privacy, or the following: Learn to play Primary Statement Earlier Today Screenshot (19).png Screenshot (2).png Screenshot (22).png Type here to search New desktop 6/15/20094 [Desktop 1] and [Desktop 2] are created.
![LG 15Z90NRAAS9U1 - [Desktop 1] and [Desktop 2] are created. - 1](/content/2026/06/1193501/images/446a610ad38ef3fc253221669dbc2efa69c0da16930d91b4e03b710e7bdda5b9.jpg)
text_image
Desktop 1 Desktop 2 See more days in timeline This is later up to 30 days on timeline and for use to do mouse inferences - On the day, it's again to add a Microsoft account. Sign in: Earlier Today Screenshot Screenshot (19).png Screenshot (2).png Screenshot (22).png Type: help to search Screenshot (19).png Screenshot (2).png Screenshot (22).png5Selectanappinthepreviewordesktop.
![LG 15Z90NRAAS9U1 - [Desktop 1] and [Desktop 2] are created. - 2](/content/2026/06/1193501/images/114086d307246307758906742b9672066724642acba2193717b6cb9f86e5e73e.jpg)
text_image
Desktop 1 Desktop 2 New desktop + Earlier Today Photos Photos Screenshot (19).png This PC\Pictures\Screenshots Screenshot (2).png This PC\Pictures\Screenshots6 Thescreenistoggledtotheselectedappordesktop.
![LG 15Z90NRAAS9U1 - [Desktop 1] and [Desktop 2] are created. - 3](/content/2026/06/1193501/images/0aaadfcf10bbca20de28b65e4ec32711e649fc8f141c4fd5a97d716a681b04f4.jpg)
TIP
Pressthe[

]buttonintheapppreviewtoexittheapp.

text_image
Develop 1 Develop 2 New StartUp Weather 78° Settings View the Details Details Details Details Details Details Details Details Details Details Details Details Details Details Details Details Details Details Details Details Details Details Details Details Details Details Details Details Details Details Details Details Details Details Details Details Details Details Details Details Details Details Details Details Details Details Details Details Details Details Enter Enter Enter Enter Enter Enter Enter Enter Enter Enter Enter Enter Enter Enter Enter Enter Enter Enter Enter Enter Enter Enter Enter Enter Enter Enter Enter Enter Enter Enter Enter Enter Enter Enter Enter Enter Enter Enter Enter Enter Enter Enter Enter Enter Enter Enter Enter Enter Enter Enter ExitInthedesktoppreview, press the [] buttonodeletethedesktopandmoverunningapps toanotherdesktop.
Usetheshortcutkeystoquicklytogglebetweenappsanddesktops.
| ShortcutKeys | Description |
| [Alt]+[Tab]Holddownthe | [Alt]keyandpressthe[Tab]keytoviewtherunningapps inthepreview. Press[Tab]repeatedlytoselecttheappyouwishtoswitchtoandthen releasethe[Alt]key. |
| [Alt]+[Ctrl]+[Tab] | Therunningappsonthescreenaredisplayedinthepreview. Selectandswitchtoanapp. |
 +[Tab] +[Tab] | Ifthedesktopogglingscreenappears,selectanappordesktopyouwish toswitchto. |
SplittingtheAppScreen
InWindows10,youcaneasilyadjustwindowsizesandsplitwindowsifnecessary.

TIP
Someappsthatcannotadjustthewindowsizedonotsupportthescreensplit.
FullScreen
1 Drag and drop an app to the top end of the screen to change the app to the full screen size.
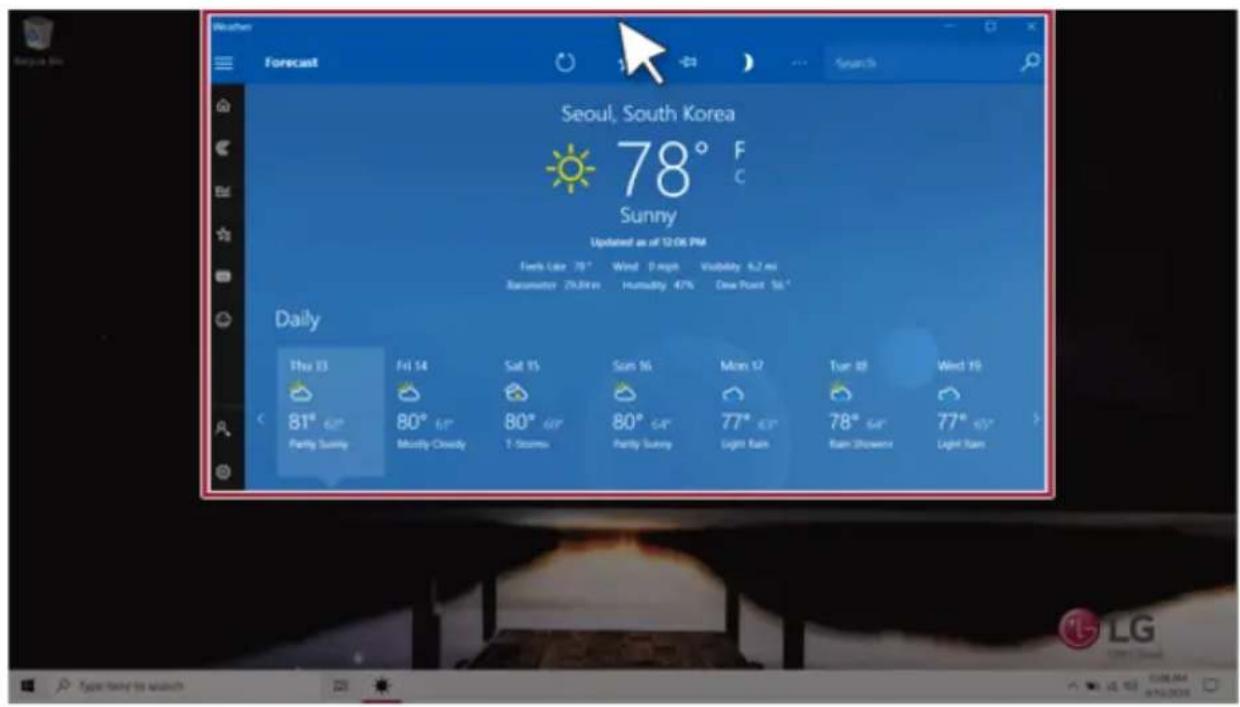
text_image
Weather Forecast Search Seoul, South Korea 78° F Sunny Updated as of 12-06 PM Fork Lake 79° Wind 0 mph Volatility 6.2 ms Rainwater 25,000 m Humidity 47% Dew Point 56 ° Daily Thu 13 Fri 14 Sat 15 Sun 16 Mon 17 Tur 18 Wed 19 < 81° 60° 80° 61° 80° 60° 80° 64° 77° 63° 78° 64° 77° 63° > Partly Sunny Mostly Cloudy T Storms Parly Sunny Light Rain Rain Shower Light Rain Type: Wind to switch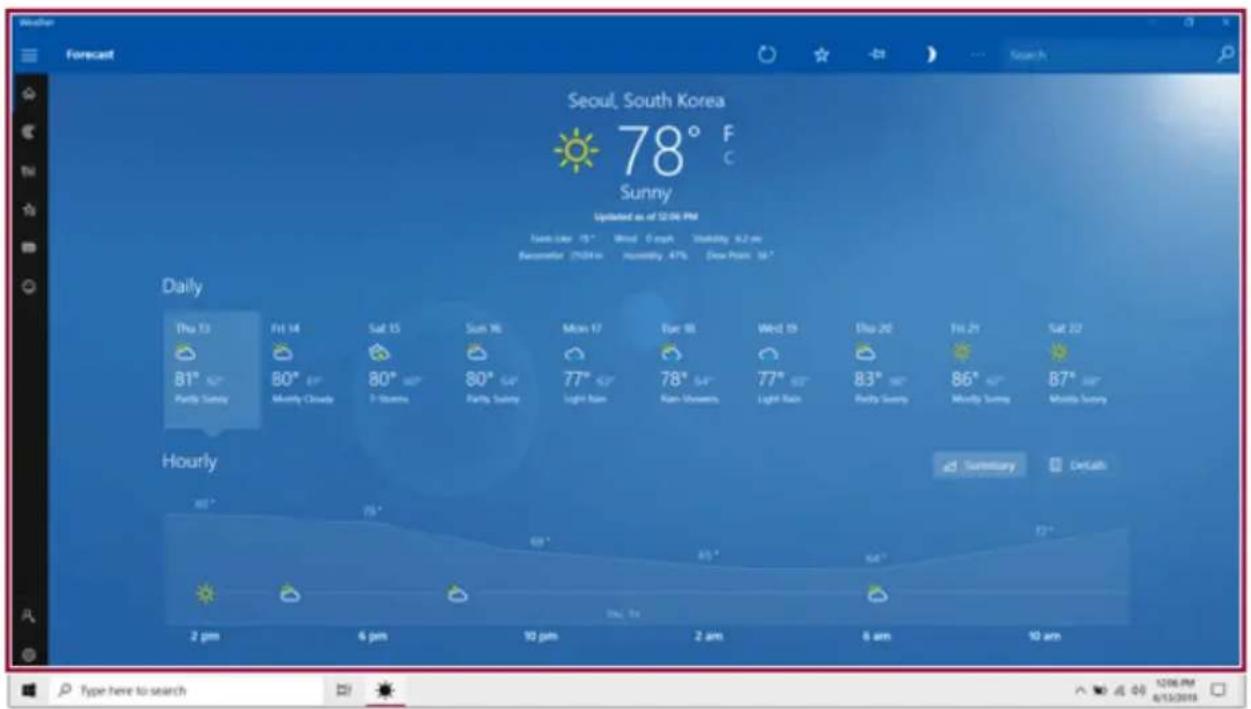
text_image
Weather Forecast Seoul, South Korea 78° F Sunny Updated as of 12/06 PM Daily Thu 13 81° Partly Sunny Fri 14 80° Monthly Cloudy Sat 15 80° 7 Storms Sun 16 80° Partly Sunny Moon 17 77° Light Rain Tue 18 78° Rain Storms Wed 19 77° Light Rain Thu 20 83° Partly Sunny Fri 21 86° Monthly Sunny Sat 22 Hourly 80° 2 pm 6 pm 10 pm 2 am 6 am 10 am 2 hrs Day 0x Sun 0x Sun 10x Sun 15x Sun 20x Sun 25x Sun 30x Sun 35x Sun 40x Sun 45x Sun 50x Sun 55x Sun 60x Sun 65x Sun 70x Sun 75x Sun 80x Sun 85x Sun 90x Sun 95x Sun 100x Sun 105x Sun 110x Sun 115x Sun 120x Sun 125x Sun 130x Sun 135x Sun 140x Sun 145x Sun 150x Sun 155x Sun 160x Sun 165x Sun 170x Sun 175x Sun 180x Sun 185x Sun 190x Sun 195x Sun 200x Sun 205x Sun 210x Sun 215x Sun 220x2Draganddroptheappagaintoadifferentlocationtoreturntoitsoriginalsize.
ScreenSplitintoTwo
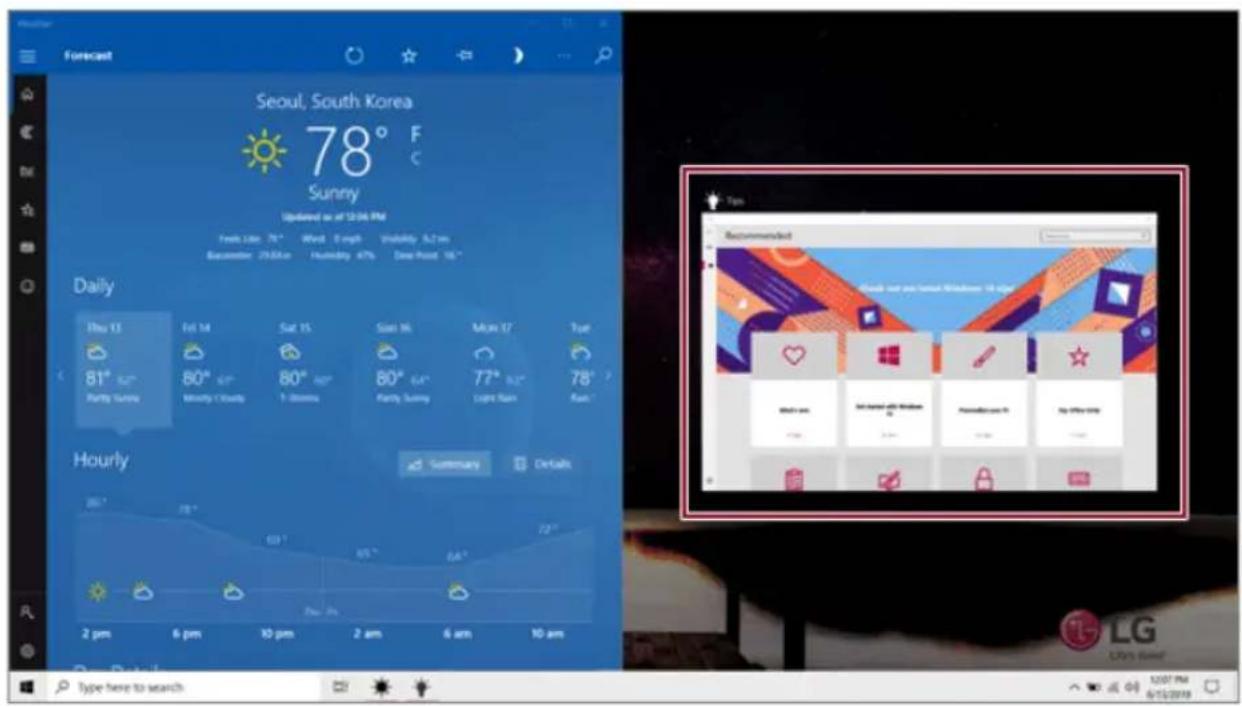
1 Draganddropanapptotherightendorlefttendtoreducethesizebyhalf.

Thescreenissplitaccordingtotheguideline.

text_image
Seoul, South Korea 78° F Sunny Upgraded as at 10:00 PM Daily Thu 13 Fri 14 Sat 15 Sun 16 Mon 17 Tue 81° Feb Monday Chngy 80° May 9 July 80° Sep 77° Dec Light Rain 78° Jan Parry Sump Mostly Chngy 1 July Parry Sump Light Rain
text_image
Forecast Seoul, South Korea 78° F Sunny Optioned as of 12/06 PM Finds: Ear 35° Wind: 0.4GHz Volatility: 4.2 m Weather: 2004-06 Humidity: 47% Grey Power: 18° Daily Thu 13 Fri 14 Sat 15 Sun 16 Mon 17 Tue 81° 62° 80° 61° 80° 50° 80° 64° 77° 53° 78° Partly Sunny Mostly Cloudy 7 hours Sun Sun Light Sun Rain Hourly 80° 78° 69° 65° 64° 72° 2 pm 6 pm 10 pm 2 am 6 am 10 am Summary Details
text_image
Recommended Check just our internet Windows 16.75pc minutes now 8:30 minutes at windows minutes.com log office.com LG LPG Server
text_image
type here to search 12/07/09 4/13/20192Selectarunningappdisplayedinthepreviewonthesplitscreen.
text_image
Forecast Seoul, South Korea 78° F Sunny Updated as of 12/04 PM Daily Thu 13 Fri 14 Sat 15 Sun 16 Mon 17 Tue 81° Aug 80° Sep 80° Oct 80° Nov 77° Dec 78° Parry Swing Monthly Cloud 1 Storms Parry Swing Light Ram Raw Hourly 2 pm 6 pm 10 pm 2 am 6 am 10 am Recommended Today can you notice Windows 16 days Let's go to the next Windows 16 days So on your home Use your home to Windows 16 Use your home to LG LG's home! Type here to search 12/07 PM 6/15/2019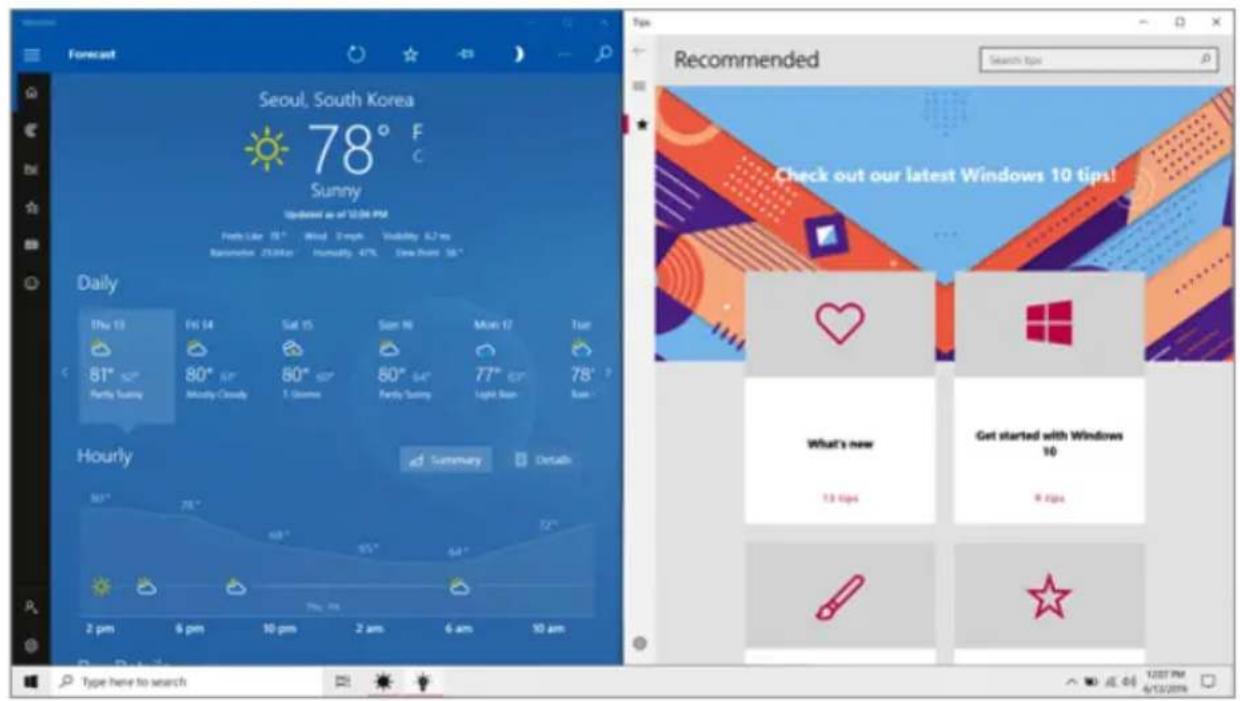
text_image
Forecast Seoul, South Korea 78° F Sunny Updated as of 12/06 PM Finds like 18° Wind Smooth Visibility 6.2 ms Rainbow 253Koz Humidity 47% Draw From 56 ° Daily Thu 13 Fri 14 Sat 15 Sun 16 Mon 17 Tue 81° 80° 80° 80° 80° 77° 78° Partly Sunny Monthly Cloudy 1 Games Partly Sunny Light Sun Base Hourly Summary Details 2 pm 6 pm 10 pm 2 am 6 am 10 am Type here to search Recommended Search tips Check out our latest Windows 10 tips! What's new 13 tips Get started with Windows 10 8 tips3Draganddroptheappagaintoadifferentlocationtoreturntoitsoriginalsize.
ScreenSplitintoFour
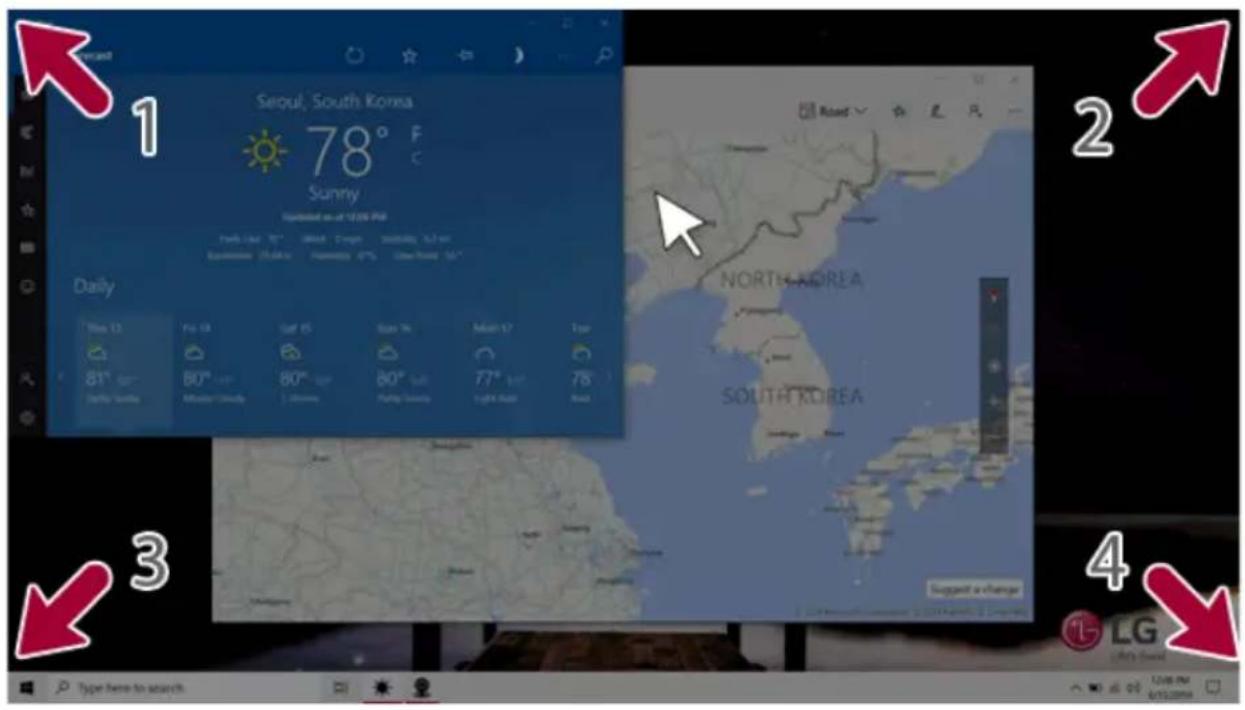
1 Draganddropanapptotheleftcornertoreducetheappto1/4sizeofthescreen.

TIP
Thescreenissplitaccordingtotheguideline.

text_image
Forecast Seoul, South Korea 78° F Sunny Weathered as of 12/06 PM Today: 15" About 3 hours Sunday 9.2 pm Sacramento 25.04 m Showtime 47% Other Project 50 ° Daily Thu 15 Fri 14 Sat 15 Sun 16 Mon 17 Tue 61° 60° 80° 60° 80° 77° 78° Partly Sunny Monthly Cloudy 1 season Parly Sunny Light Rain Again LG Life's Good Type here to search2Youcanusethismethodtoplaceuptofourappsonthescreen.
text_image
1 Seoul, South Korea 78° F Sunny Turbished as at 12:09 PM Daily Time: 12 Fri: 13 Sat: 15 Sun: 16 Day: 17 Tue 81° Sat 80° Sat 80° Sun 80° Sun 77° Sat 78° Sun NORTH KOREA SOUTH KOREA Support a change 4 LG Type here to search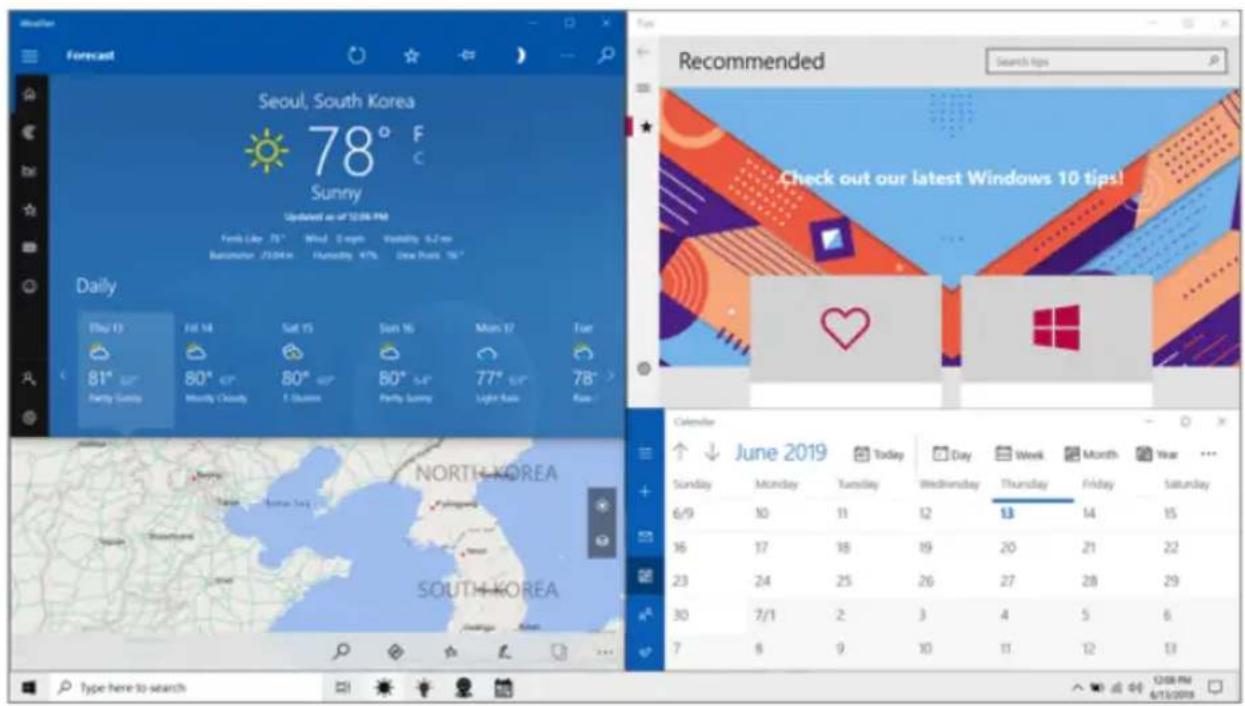
text_image
Forecast Seoul, South Korea 78° F Sunny Updated as of 12/04 PM Funds Like 75° Wind Depth Volatility 6.2 rev Barometer /230Km Humidity 47% New Hours '16" Daily Play 13 Fri 14 Sat 15 Sun 16 Mon 17 Far 81° 80° 80° 80° 77° 78° Parry Sunny Monthly Cloudy F Quakers Parly Sunny Light Loss Real Recommended Check out our latest Windows 10 tips! Calendar ↑ ↓ June 2019 Today Day Week Month Year ... Sunday Monday Tuesday Wednesday Thursday Friday Saturday 6/9 10 11 12 13 14 15 16 17 18 19 20 21 22 23 24 25 26 27 28 29 30 7/1 2 3 4 5 6 7 8 9 10 11 12 13 Type here to search CDS PM 6/10/20193Draganddroptheappagaintoadifferentlocationtoreturntoitsoriginalsize.
UsingtheStore
YoucanpurchaseappsorgetfreeappsfromWindowsStore.

TIP
Ifalocalaccountisbeingused,awindowtoswitchtoaMicrosoftaccountappearswhileusing WindowsStore.Followtheinstructionsonthescreentoswitchthelocalaccounttoa Microsoftaccount.
Youcanalsodosobyselecting[Startmenu]>[Account]>[ChangeAccountSettings]. IfyouswitchtoaMicrosoftaccount,yourPCsettings(background,usersettings,etc.)maybe changedtotheprevioussettings.
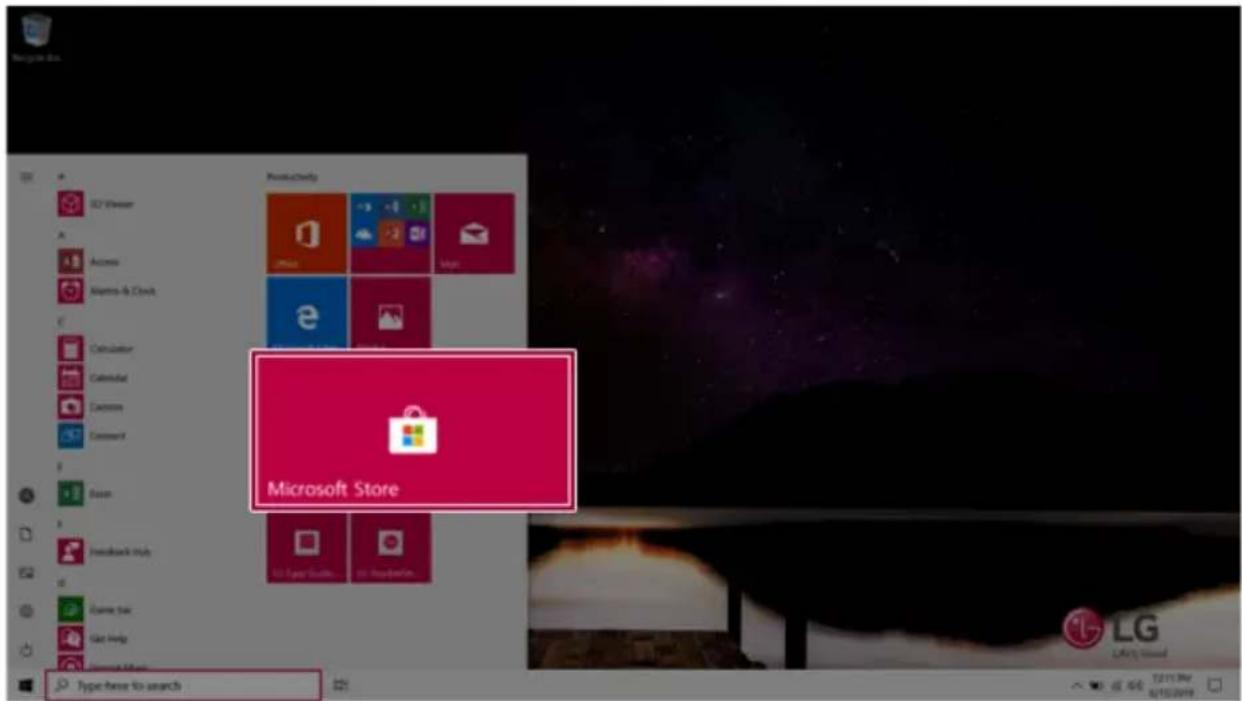
1 Press the [ ] button to move to the Start menu and select the [Microsoft Store] tile.

TIP
Pressthe[ ]keyor[Ctrl]+[Esc]todisplaytheStartmenu.
text_image
Microsoft Store Type here to search2 Select the app or use the search function on the store screen to install the desired app.
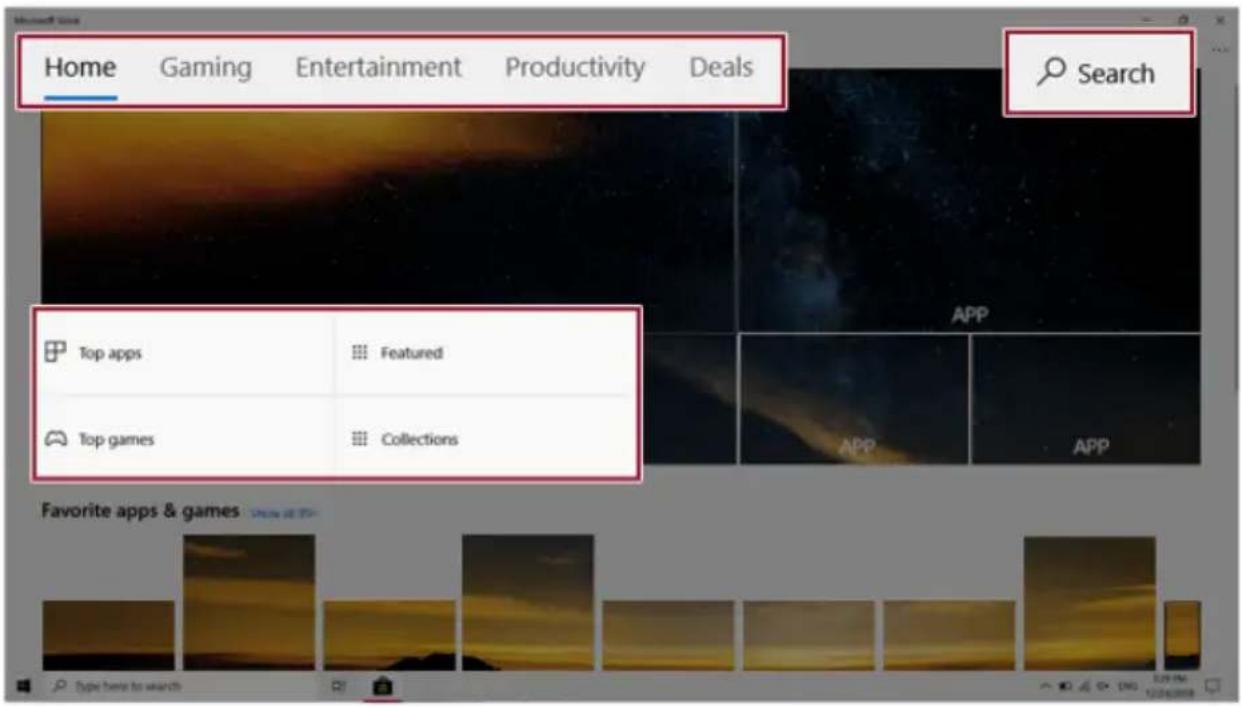
text_image
Home Gaming Entertainment Productivity Deals Search Top apps Featured Top games Collections Favorite apps & gamesSwitchingtoTabletMode
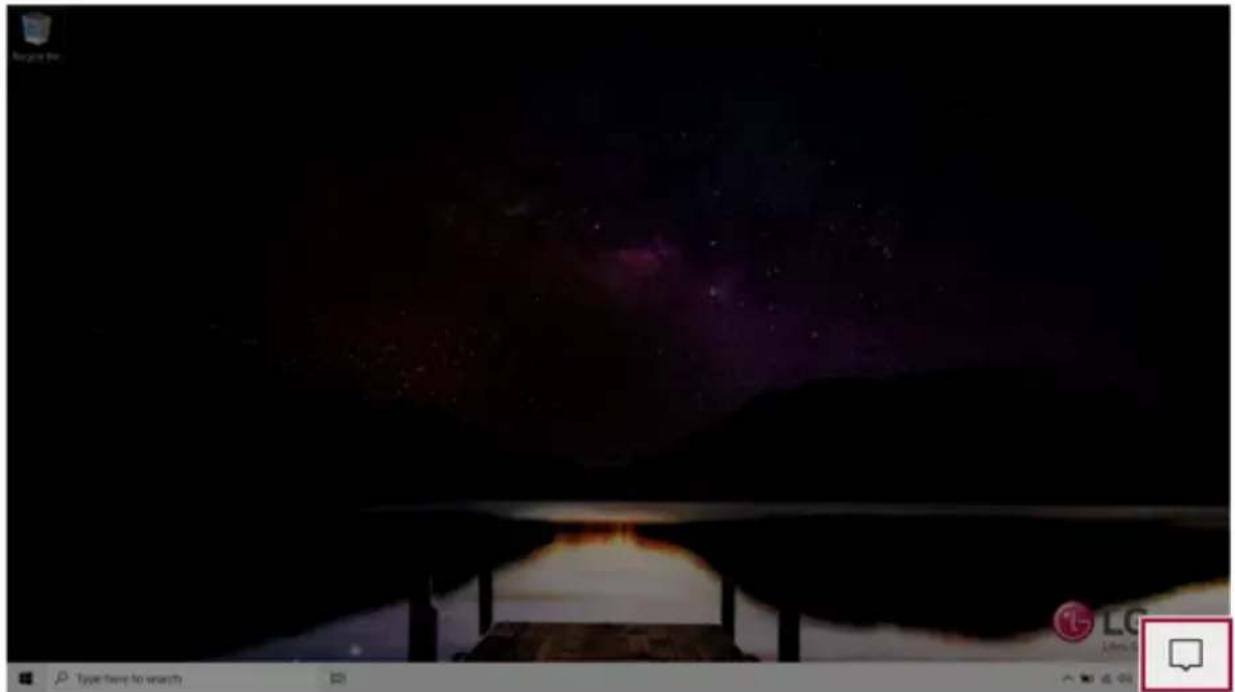
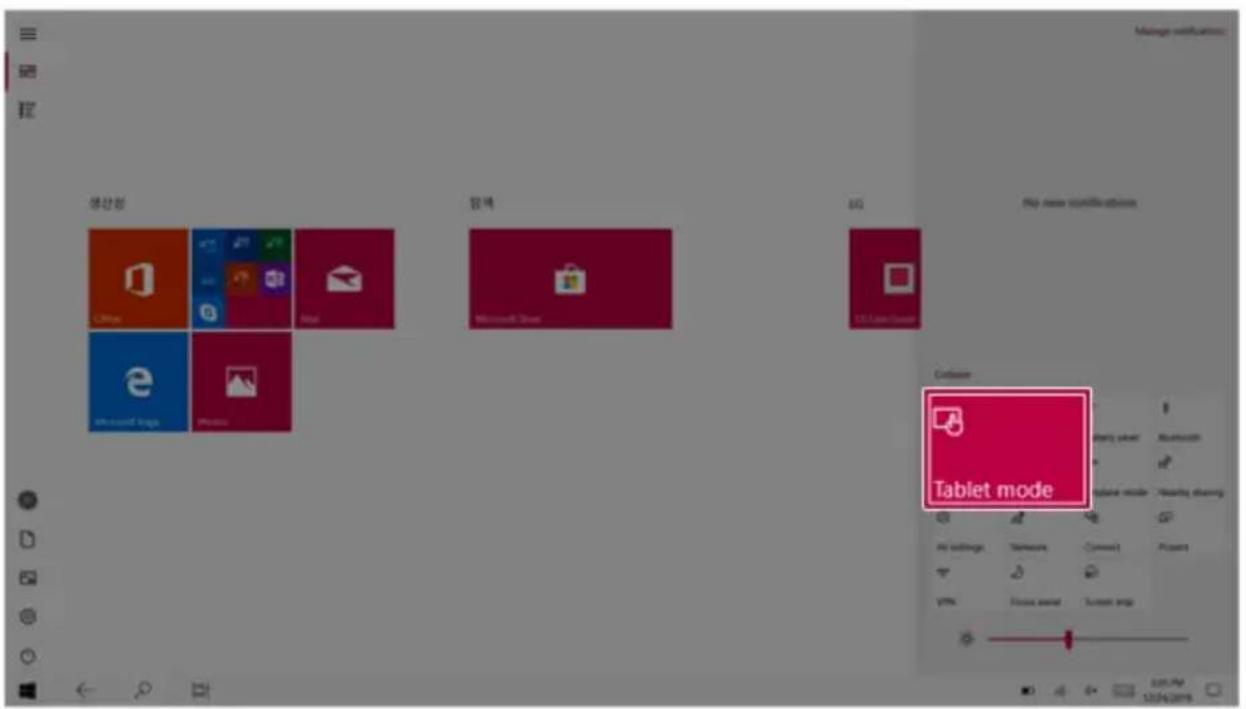
If you are using WindowsonatabletPC, you can easily switch to the tablet mode.
1 PresstheActionCenter[

]iconontherightsideofthetaskbar.
natural_image
Dark scene with silhouetted figures and a starry sky background (no visible text or symbols)2Select[TabletMode]toswitchWindowstotabletmode.

text_image
Tablet mode3Select[TabletMode]againodeactivatethemode.
text_image
생산점 Office e Microsoft logo Photon 원크 MS Mac OS Server OS File name significance Session Tablet mode File settings Tensions Connections View Power screen Screen rings 120.764 12/04/2015UnlockingtheScreen
If the PC is not used for an extended period, it goes into a locked state.
When the PC is used again, a lock screen appears for security purposes and may be unlocked by using the following method.
1 From the lock screen, press any key on the keyboard or drag up while you click and hold the mouse button.

text_image
12:25 Friday, October 42 Whentheloginwindowappears, enter the password and click [Enter]. (If nopasswordisset, press the login button to immediately unlock the screen.)
SettingthePC
Windows10 supports various functions so that the user can change the PC setting easily and quickly.
UsingActionCenter
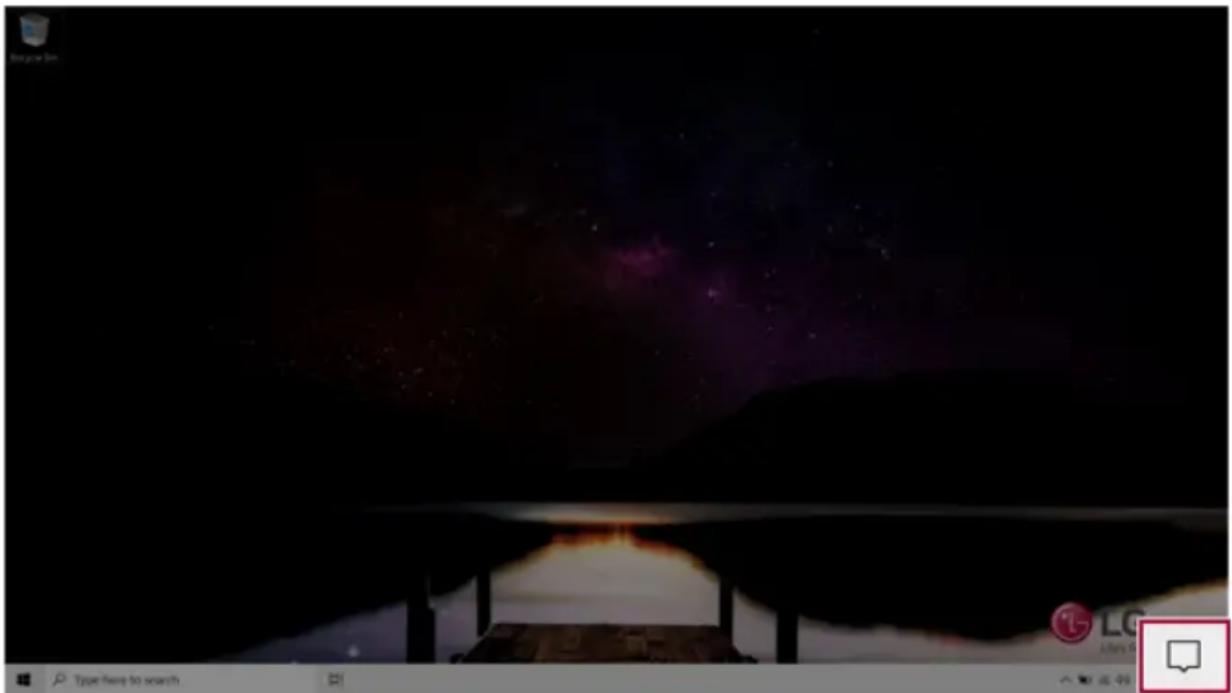
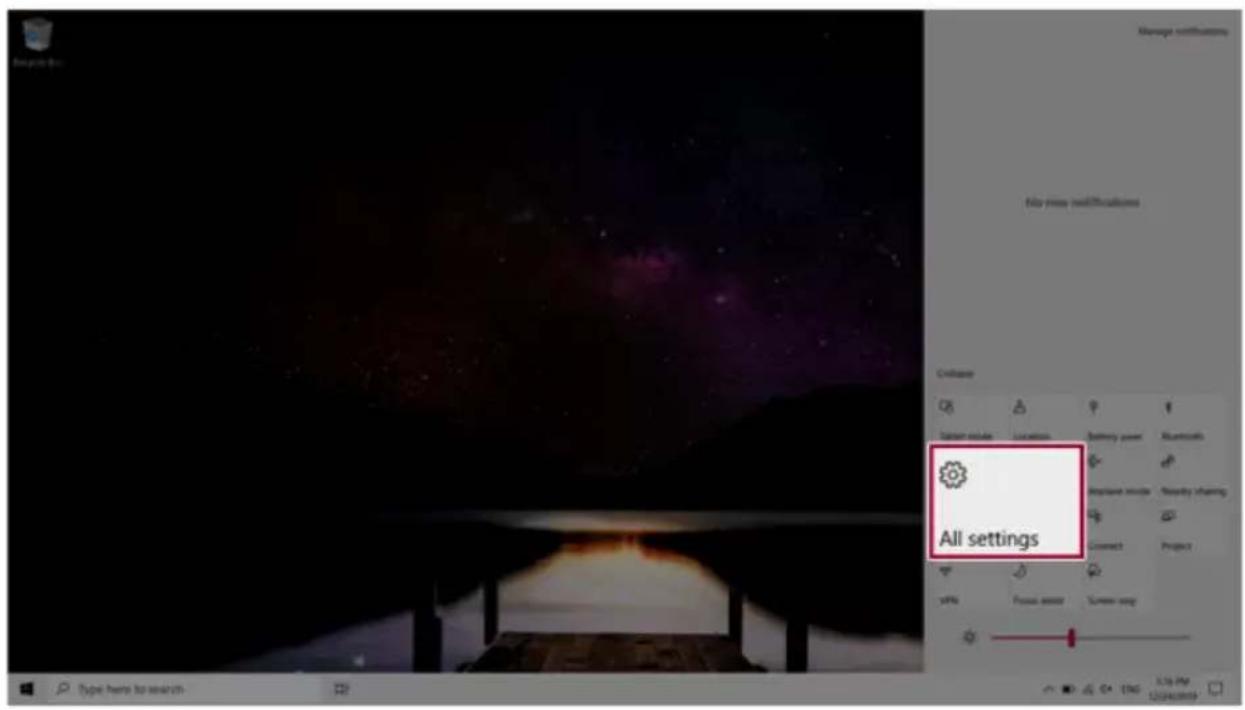
YoucanusetheActionCentertoeasilychangethesettingsfortabletmode,display,mediaconnection andnetworksettings.
The function supported by the Action Center may differ depending on the model.
1 PresstheActionCenter[

]iconontherightsideofthetaskbar.
text_image
Screenshot of a game interface showing a dark scene with purple starry background and Chinese UI elements including 'Type here to search' and 'LG'.2ChangethePCsettingsasneeded.

TIP
Ifthetiledoesnotappear,pressthe[Expand]menu.

CAUTION
Using the Reader Mode and the Night light at the same time can cause color distortion. If color distortion occurs, deactivate the Reader Mode or the Night light.

text_image
Collapse Tablet mode Location Battery saver Bluetooth Night light Mobile hotspot Airplane mode Nearby sharing All settings Network Connect Project VPN Focus assist Screen snip3 To change the detailed settings of the PC, press the [All Settings] tile.
text_image
All settings System module Location Battery power Alumatics Display mode Security sharing Connect Project y/yo Focus asset Screen way Type here to search 12/04/2009UsingtheStartMenu
1 Pressthe[

]buttonandselectthe[Settings]menu.

text_image
Mac OS X OS Viewer Windows Windows & Clock C++ C++ C++ C++ C++ C++ C++ C++ C++ C++ C++ C++ C++ C++ C++ C++ C++ C++ C++ C++ C++ C++ C++ C++ C++ C++ C++ C++ C++ C++ C++ C++ C++ C++ C++ C++ C++ C++ C++ C++ C++ C++ C++ C++ C++ C++ C++ C++ C++ C++ C++ C++ C++ C++.+, + - - + - - + - - + - - + - - + - - + - - + - - + - - + - - + - - + - - + - - + - - + - - + - - + - - + - - + - - + - - + - - + - - + - - + - - + - - + - - + - - + - - + - - + - - + - - + - - + - - + - - + 100% / 100% + 100% / 100% + 100% / 100% + 100% / 100% + 100% / 100% + 100% / 100% + 100% / 100% + 100% / 100% + 100% / 100% + 1.5% / 1.5% + 1.5% / 1.5% + 1.5% / 1.5% + 1.5% / 1.5% + 1.5% / 1.5% + 1.5% / 1.5% + 1.5% / 1.5% + 1.5% / 1.5% + 1.5% / 1.5% + 2.5% / 2.5% + 2.5% / 2.5% + 2.5% / 2.5% + 2.5% / 2.5% + 2.5% / 2.5% + 2.5% / 2.5% + 2.5% / 2.5% + 2.5% / 2.5% + 2.5% / 2.5% + Type file to search2 When the screen for PC's detailed settings appears, select and change the settings as needed.
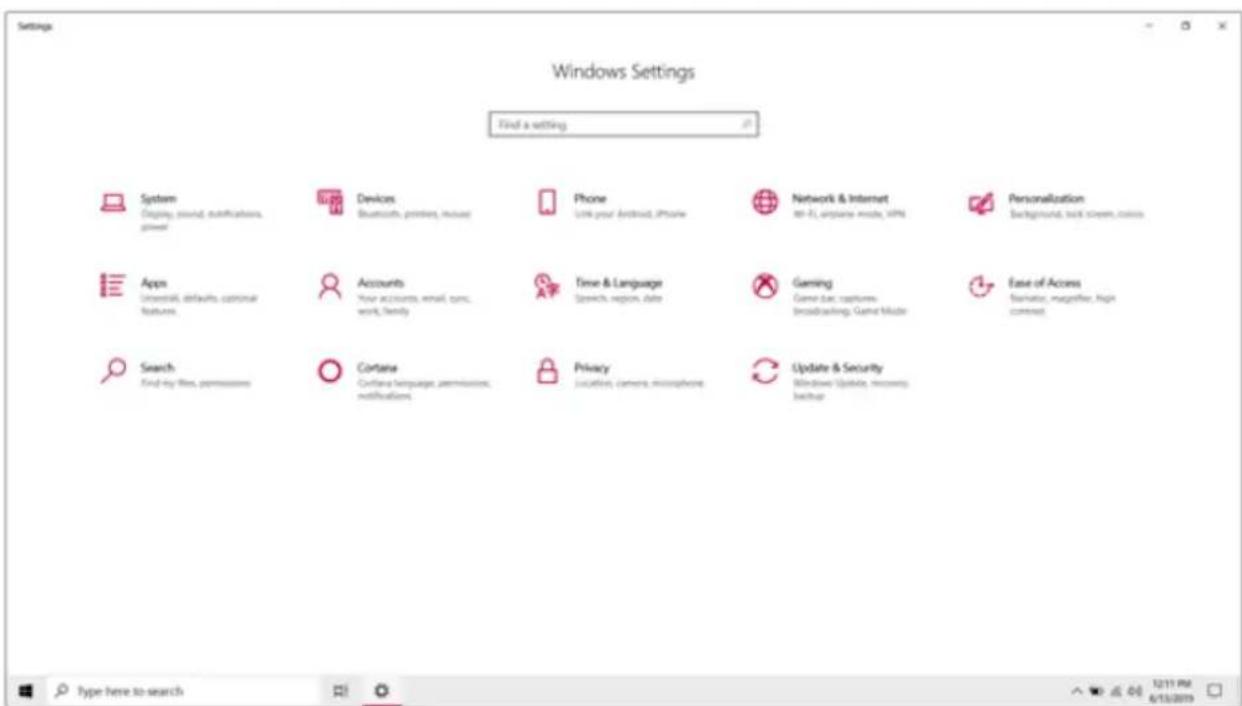
text_image
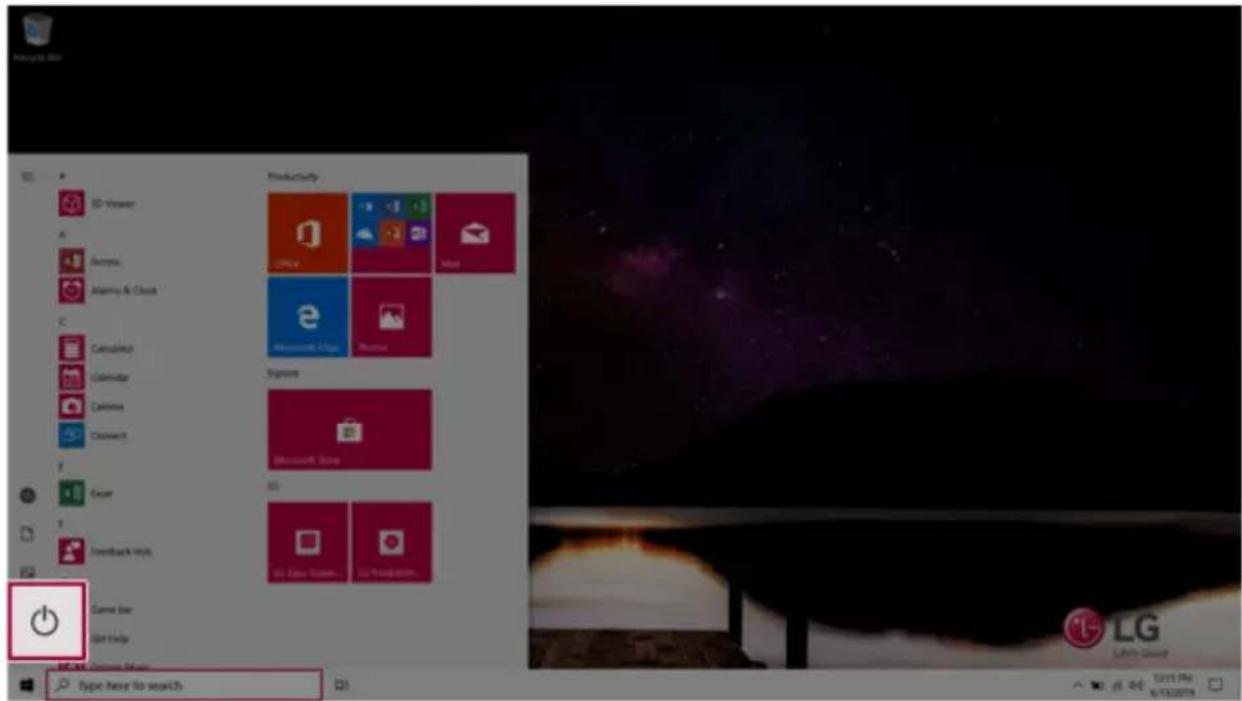
Settings Windows Settings Find a setting. System Display, sound, notifications, power Devices Braucorns, printers, mouse Phone Link your Android, iPhone Network & Internet 80-21, upplains mode, VPN Personalization Background, text screen, coins Apps Universal, defaults, common features Accounts Your accounts, email, ads, work, family Time & Language Speech region, date Gaming Game bus: captures, broadcasting, Game Macs Ease of Access Navigator, navigator, High connect Search Find by files, permissions Cartane Carroll language, permissions, notifications Privacy Locations, camera, microphone Update & Security Windows Update, Reports backup Type here to searchWindowsShutdownOption
InWindows10,youcanusetheWindowsshutdownoptionbyfollowingthesesteps:
1 Clickthe[

]buttonandselectthe[Power]menu.

Pressthe[

]keyor[Ctrl]+[Esc]todisplaytheStartmenu.
text_image
Productivity Office Moss Microsoft Atlas Windows Signee Microsoft Store LG Display System... LG Production... type here to search LG Lith's Crowd2SelectaWindowsshutdownoption.

OntheDesktopscreen,press[Alt]+[F4]tousetheWindowsshutdownoption.
(Pressing[Alt]+[F4]onarunningappmayendtheapp.)
UsingthePC
UsinganACAdapterandaBattery
ConnecttheACadaptertopowerandchargetheproduct.

TIP
The powercable and the AC adapter typemaydifferper model type and country and there is nodifference infunctionality.
Thisproducthasabuilt-inbatterypack.
Theinternalbatteryshouldnotbearbitrarilydisassembledorreplaced.Arbitrarily disassemblingtheproductmayvoidthewarranty.
If you need to disassemble or replace the battery, please visit the designated LG Electronics Service Center.
Wechargeafeeforremovingorreplacingthebattery.
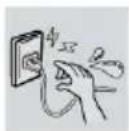
UsinganACAdapter
TheACAdaptercanbeusedfrom100Vto240V.
1 ConnecttheACadaptertoapoweroutlet.
2ConnecttheACadaptertothePC.
3AdjusttheLCDtothemostcomfortableangle.
4PressthePC'spowerbuttontoturnonthesystem.

CAUTION
DonotleavealiquidcontaineronthePC.
• Thesystemmaybeshort-circuitedanddamaged.

WARNING
PleaseuseanACadaptercertifiedbyLGElectronicsInc.
• Uncertified batteries may explode.
- Itmaycauseaprobleminbatterychargingorsystemoperation.
WhenyouuseanACadapter, followthebelowdirections.
- 140°Formorehigh-humidityspaces,forexample,insidecarsorsaunas,shouldbe avoidedwhenyouuseorstoreit.
- DonotdisassembleormodifytheACadapter.
• DonottwisttheACadapterplug. - WhenyouconnecttheACadapter, donotforcefullypushtheplug.
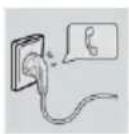
CheckingtheBatteryState
1 ConnecttheACadaptertothepowerportinthePC.
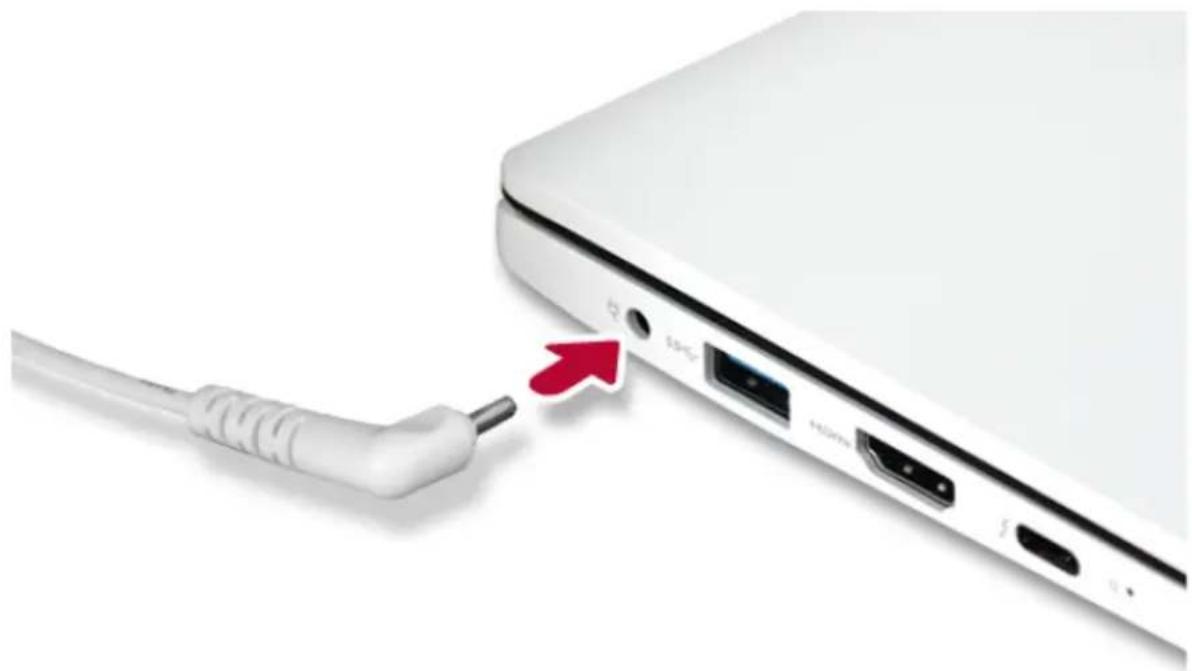
natural_image
Close-up of a white USB cable with a red arrow pointing to a device tip, showing ports and connectors (no text or symbols visible)20pentheLCDandcheckthechargingstate.
WhentheACadapterlampisblinking,chargeitfullywiththeACadapterbeforeusingit.

natural_image
White laptop with black screen and keyboard, next to a small inset showing a close-up of a black circular button labeled '电源' (power switch) on a white surface.
CAUTION
UsebatteriescertifiedandacknowledgedbyLGElectronicsInc.
• Uncertified batteries may explode.

WARNING
The battery may exploded due to excessive heat, causing fire. For safe and efficient use of battery, follow the below directions.
- Donotshort-circuitthebattery.
- Keepthebatteryoutofreachofchildren.
- A visible swelling of the battery pack indicates a possible danger. When this occurs, contact yourlocalvendororservicecenterimmediately.
• Useonlyacertifiedanddesignatedrecharger. - Keepthebatterypackawayfromheat.(Neverputitinamicrowave.)
- Donotleaveinsideacarunderthesummerheat.
- Donotleaveoruseatahotandhumidplacelikeasauna.
- Donotusethemachineplacedonaheatingblanketorotherheatreservingmaterials.
- Donotleavethemachineturnedoninsideaclosedspace.
- Make sure that the power ports are not touched by any metallic objects like a key, coin, necklace,andwatch.
- Useonlyalithiumsecondarybatterycertifiedandguaranteedbymobiledevice manufactures.
- Donotdisassembleormodifythebattery.Donotcompressorpiercethebattery.
- Do not apply shock to the battery. For example, do not drop the battery from a high place.
- Keeptheroomtemperaturebetween23°Fand104°F.DonotexposethePCtoheat hotterthan140°F.
- Keepthemachinedry.
- Do not discard the battery arbitrarily as you are requested to follow the local procedure for discarding the battery.
• Before using this machine, read this guide carefully.

TIP
WhenthePCisnotusedforanextendedperiodoftime, refertothefollowing:
- Check the battery charge level on a regular basis and keep it at 50 %. This allows you to extend the battery life.
- If the battery is left fully charged for an extended period of time, the battery capacity and batteryrunningtimemaybereduced.
- If the battery is left fully discharged for an extended period of time, it may become over-discharged and cannot be charged again.
Formoreefficientuseofthebattery,readthefollowingcarefully.
•Thebatteryrunslownaturallyevenifitiskeptunused.
- To increase battery lifespan, use the battery for a while before charging it rather than keeping the battery completely charged.
- If you don't use the product for a long time with the battery completely charged, the batterylifespanmaydecrease.
The battery capacity may be changed due to chemical reactions during charge and discharge.
- LG Notebook frequently checks the charge level of its battery based on usage conditions, and then calculates and correctly indicate the actual remaining level of the battery.
• The battery is wearable goods and thus the lifespan may become shorter with use. The battery running time may also become shorter accordingly. - When the battery is fully charged, the machine stops recharging. It resumes recharging when the battery chargerated drops below 95%. This features securesthesafe and efficient use of the battery.
- When the temperature of the battery drops below 50 °F, it is charged in a low current to protectthebatterycells.Inthiscase,chargingtimemaystretchtoupto32hours.
Ifyouusethesystematalowtemperature, refertothefollowing:
•The battery capacity may be reduced depending on the chemical characteristics of the battery and the system may not be turned on after it. Freezessoritisturned off.
- If the system freezes or if it is not turned on, connect the AC adapter to the system and charge the battery fully before use.
- If there is any error in the indication of the battery capacity, charge and discharge the batterytwoorthreetimesatroomtemperaturetoreturntothenormaloperation.
OperationStatusLamps

text_image
1 Caps Lock 4 F5 5 F9 7 2 31 ACAdapterLamp
•On:TheACadapterisconnected.
•Off:TheACadapterisnotconnected.
If you try to turn on the system that has entered the Hibernatemode or been turned off after a low-battery alarm, the system will not be turned on but the lamp will blink three times. If this is the case, connect the AC adapter and charge the battery sufficiently before using it.
2Powerlamp(amodelwithfingerprintrecognitionsystem)
•On:ThesystemisonandrunningbytheACadapterorbattery.
•Off:WhenthesystemisturnedofforinHibernatemode
•Blinking: Thesystemisinthestandbymode.
3Powerlamp(amodelwithoutfingerprintrecognitionsystem)
•On:ThesystemisonandrunningbytheACadapterorbattery.
•Off:WhenthesystemisturnedofforinHibernatemode
• Blinking: Thesystemisinthestandbymode.
4CapsLockLamp
•On:WhentheCapsLockisactivated
•Off:WhentheCapsLockisdeactivated
5TouchpadLamp
•On:Whenthetouchpadisactivated
•Off:Whenthetouchpadisdeactivated
6ReaderModeLamp
•On:WhentheReaderModeisactivated
-Off:WhentheReaderModeisdeactivated
7WebcamOperationStatusLamp
•On:Whenthewebcamisoperating
•Off:Whenthewebcamisnotoperating
Keyboard
Thekeyboardallowstheusertoinputdataorgivecommands.
Thekeyboardmaydifferinappearanceandcolordependingonyourcountry.

CAUTION
- Spillingawaterysubstancelikecoffeeorjuiceonthekeyboardmaycauseafault, malfunction,orelectricshock.
- Someofthekeysmaynotworkproperlywhenyouuseseveralkeysatthesametime whileplayingaPCgame.
- Please change the key combination settings according to the combinations necessary for thegameplayoruseanexternalkeyboarddedicatedforgameplay.
UsingHotKeys
YoucanusethehotkeysshownbelowtousethePCconveniently.
| Fn+F1 | ExecutesLGControlCenter |
| Fn+F2 | DecreasesLCDbrightness,whichcanhaveelevendifferentlevels. |
| Fn+F3 | IncreasesLCDbrightness,whichcanhaveelevendifferentlevels. |
| Fn+F4 | RunsthemodedefinedinWindowsSleepMode.(Example:StandbyMode,HibernateMode) |
| Fn+F5 | Everytimeyoupress[Fn]+[F5],themodeswitchesbetweenTouchpadOff(touchpadisdisabled)andTouchpadOn(touchpadisenabled).TosetTouchpadAuto(touchpadisdisabledwhenanexternalUSBmouseisinserted),pressthe[  buttonanddisable[Leavetouchpadonwhenamouseisconnected]under[Settings]>[Devices]>[Touchpad].Everytimeyoupress[Fn]+[F5],themodeswitchesbetweenTouchpadOffandTouchpadAuto.TIPSinceittakesabout1 to2secondstoinitializeafterswitchingtothetouchpadfunction,werecommendyoutousethedeviceafterinitializationiscompleted. buttonanddisable[Leavetouchpadonwhenamouseisconnected]under[Settings]>[Devices]>[Touchpad].Everytimeyoupress[Fn]+[F5],themodeswitchesbetweenTouchpadOffandTouchpadAuto.TIPSinceittakesabout1 to2secondstoinitializeafterswitchingtothetouchpadfunction,werecommendyoutousethedeviceafterinitializationiscompleted. |
| Fn+F6 | AirplaneModeON/OFF(WirelessLANandBluetoothOFF/ON) |
| Fn+F7 | Switchesbetweenmonitorandprojector. |
| Fn+F8 | ChangingKeyboardBacklightMode |
| Fn+F9 | SwitchingtoReaderMode. |
| Fn+F10Mute | |
| Fn+F11 | Turnsdownthevolume. |
| Fn+F12 | Turnsupthevolume. |
| Fn+PrtSc | WorksastheScrollLock[ScrLk]key. |
| Fn+Ctrl | Worksasthe[Pop-upWindow]key. |
| Fn+◀ | Worksasthe[Home]key. |
| Fn+▶ | Worksasthe[End]key. |
| Fn+▲ | Worksasthe[PageUp]key. |
| Fn+▼ | Worksasthe[PageDown]key. |
ShortcutKeys

TIP
- Tochangetheinputmodetemporarily,youcanpressthe[Shift]keytogetherwiththe letteryouwanttoenter.Bydoingso,youcanenteranuppercaseletterwhentheCaps Lockkeyisnotpressedandalowercaseletterwhenitispressed.
TouseWindowsmoreconveniently,rememberthefollowingWindowskeycombinations:

Displaysaninputwindowforprogramexecution.

Displaystherunningdesktopinthepreview.

Minimizesthecurrentwindow.
KeyboardBacklight
YoucansettheKeyboardBacklightfunctiontousetheproductinadarkenvironment.
The figureshereinaresubjecttochangewithoutpriornotice.

OPTION
ThisonlyappliestotheproductsthathavetheKeyboardBacklightfunction.
ConfiguringKeyboardBacklight

TIP
You can use hot keys to use the Keyboard Backlight function more conveniently.
• Each time you press the [Fn] + [F8] keys, the status changes to KBD Backlight Off, KBD BacklightLow, and then KBDBacklightHighinthespecified order.
1 Select the [ ] button > [LG Software] to run [LG Control Center].
2 On the LG Control Center screen, select the [System Settings] menu.

text_image
LG Control Center LG Control Center System Settings > Configures various computer functions. Energy Star ENERGY STAR Screen Sound Network Hardware Power Management > Sets the Power Mode of the computer: Set USB-C™ Charging Battery State Windows Security > Configures the User Account and Firewall option. Enable Firewall User Account Setting Instant Booting Set up so that the system will automatically boot up, when you open up the notebook computer. System Information Operating Microsoft Windows 10 System 64-bit Processor Intel(R) Core(TM) i7-1065G7 CPU @ 1.30GHz View More3 GotoKeyboardBacklightandselectyourdesiredoptions.
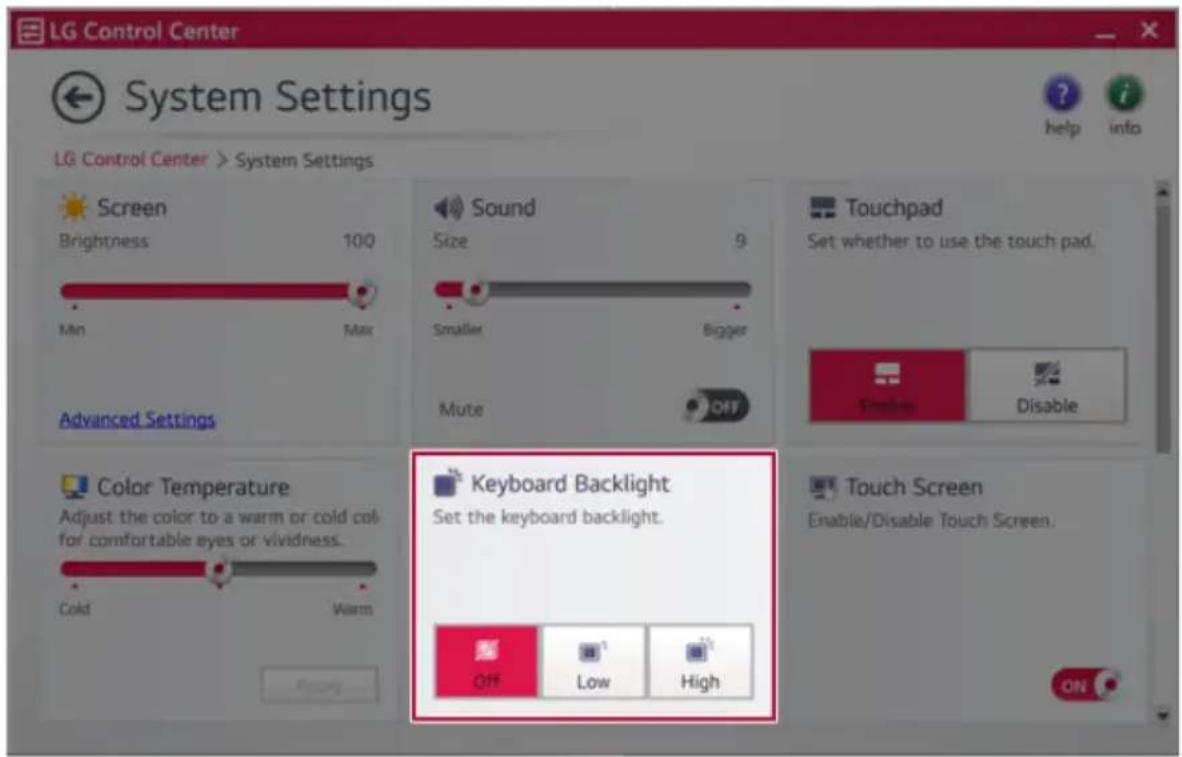
text_image
LG Control Center System Settings LG Control Center > System Settings Screen Brightness 100 Min Max Advanced Settings Sound Size 9 Smaller Bigger Mute OFF Touchpad Set whether to use the touch pad. Enable Disable Color Temperature Adjust the color to a warm or cold col for comfortable eyes or vividness. Cold Warm Keyboard Backlight Set the keyboard backlight. OFF Low High Touch Screen Enable/Disable Touch Screen. ONAdjustingScreenBrightnessandVolume
LGPCallowsyoutousethehotkeystoeasilyadjustthescreenbrightnessandvolume.

TIP
According to the model type, a button for volume control (mute, volume up/down, DTS, etc.) may be available.
| FunctionHotKeysDescription | ||
| Screen Brightness | [Fn]+[F2],[F3]Pressthe | [F2]keytodarkenthescreenorthe[F3]keyto brightenit.PresstheActionCenter[ ]iconontherightsideoftaskbartoruntheActionCenter.Thenmovethescreen brightnessbartoadjustthescreenbrightness. |
| Volume | [Fn]+[F11],[F12]Pressthe | [F11]keytolowerthevolumeor[F12]keyto increasethevolume.Pressthe[ ]iconontherightsideofthetaskbarto adjustthevolume. |
| Mute | [Fn]+[F10] | Pressthebuttontoturnonoroffthemutefeature.Pressthe[ ]iconontherightsideofthetaskbarto mutethesound. |
HearingProtectionFeature
The product is equipped with a hearing protection feature to protect your ears from pressurized sound while using earphones or headphones.
Thefeatureissettooffbydefaultandcanbemanuallyturnedonasfollows:
1Pressthe[

]>[SmartAudio2]buttontoexecuteSMARTAudio.

TIP
Thefeaturemaytakeafewminutesifitisthefirsttime.
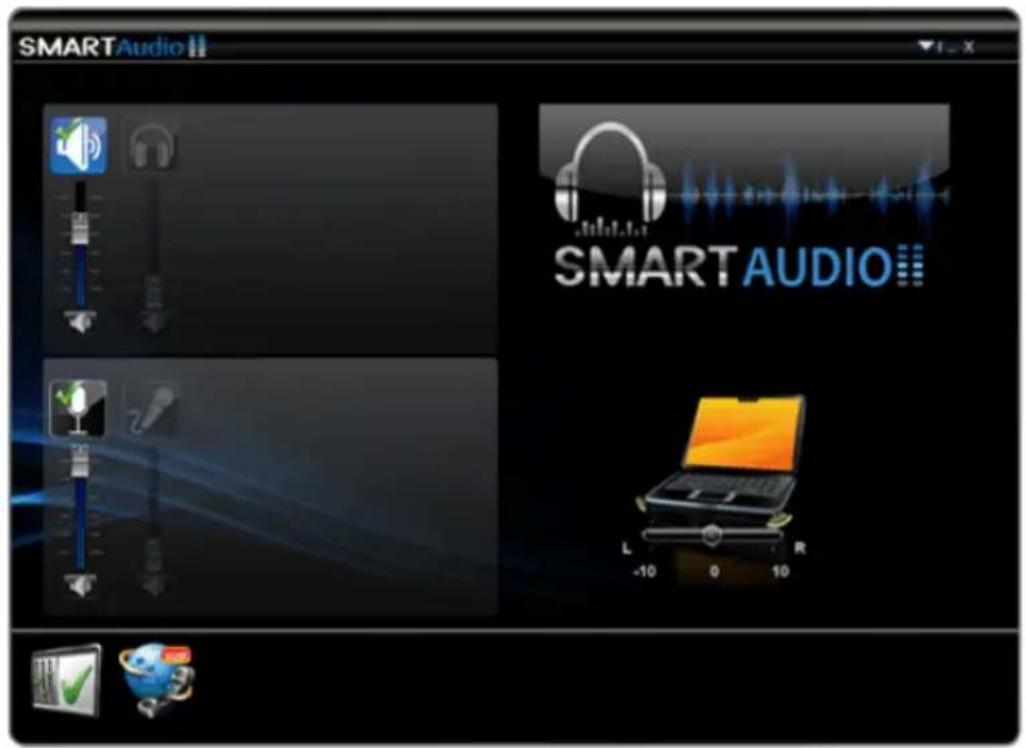
text_image
SMARTAudio SMART AUDIO L -10 0 102 The on-screen picture turns to a headphone icon when you connect a headphone or earphones.
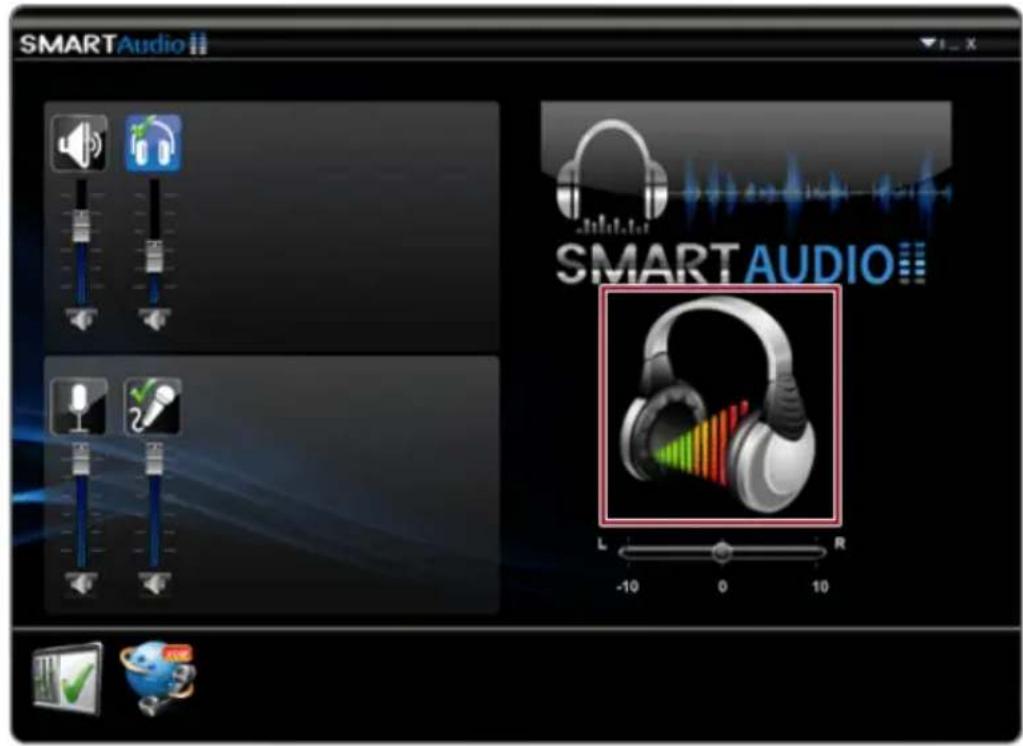
text_image
SMARTAudio SMARTAUDIO L -10 0 103ToggleHearingProtectionFeatureonandoffbypassingtheheadphoneicon.
•HearingProtectionFeatureOn

text_image
SMARTAudio SMART AUDIO•HearingProtectionFeatureOff

text_image
SMARTAudio SMART AUDIO
TIP
Awarningmessage will bed displayed if the volume is high while this feature is on.
UsingtheTouchpad
The built-intouchpad provides the same functionality as an external mouse. You can use the touchpad and USB mice simultaneously.

text_image
1 2 31 Touchpad
- Movesthecursor.
2Leftbutton
•Usetoselectorexecuteprograms.
3Rightbutton
• Functionsastherightbuttonofamouseinmostcases. However, theusagemaydiffer dependingonprograms.

TIP
Thescrollfunctionisprovidedasageesture.PleaserefertotheTouchpadGesturesectionofthis document.
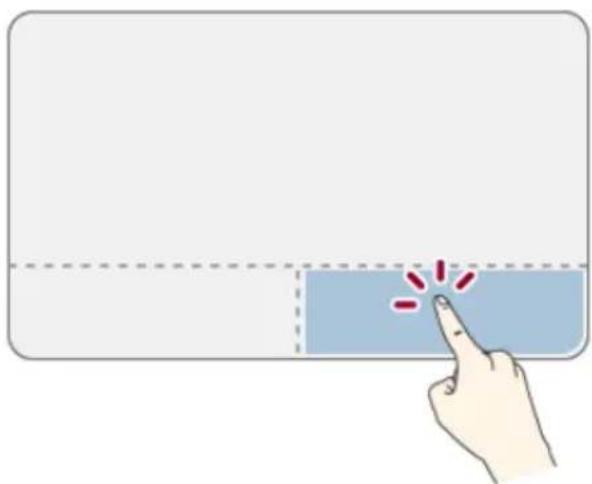
PrecautionsforUsingtheTouchpad
- If you are using a touchpad, use the area marked with a red line shown below. Touching an edgeorborderofthetouchpadmaynotwork.(Thefunctioningtouchareamaydiffer dependingontheproduct.)

natural_image
Solid pink rectangle with a dashed centerline and corner border (no text or symbols)MovingtheCursor(Pointer)ontheScreen
Placeafingeronthetouchpadandglidethefinger.

natural_image
Hand pointing upward with a wavy line drawing of the number 2 (no text or symbols present)Click(Select)
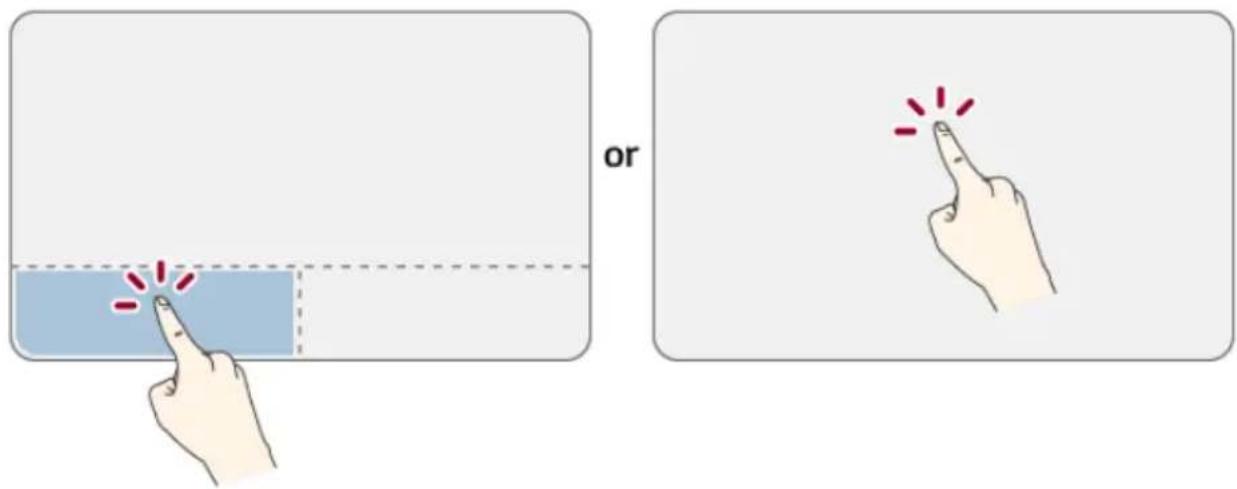
Pressandreleasetheleftbuttonswiftlywithafinger.(Ortapthetouchpadonce.)
Dothis,forexample,toselectamenuoriconandtoplacethecursortotypeonawordprocessorfile.
text_image
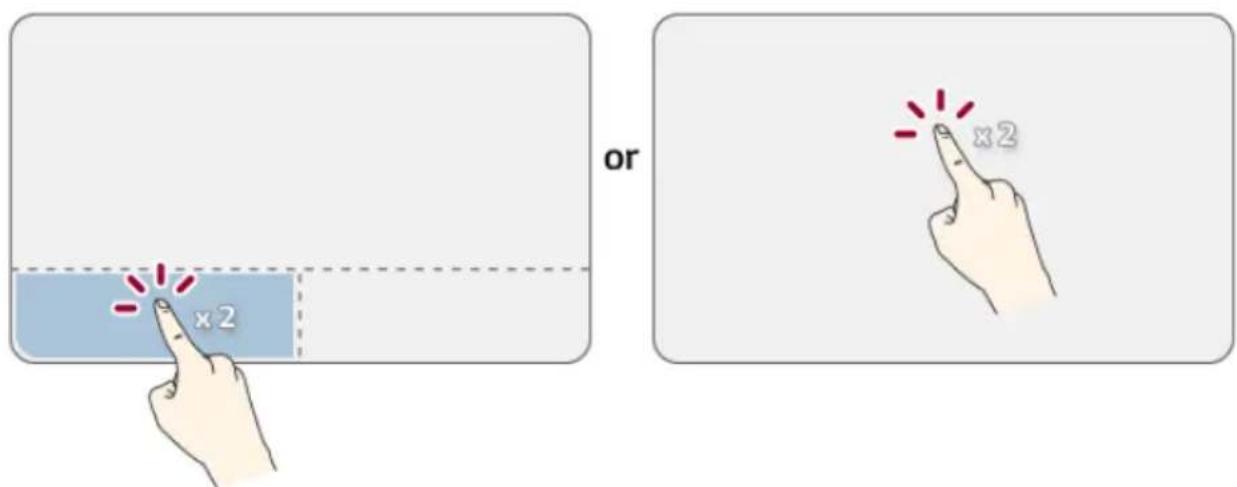
orDouble-click(Execute)
Presstheleftbuttontwiceconsecutivelyandreleasethebutton.(Ortapthetouchpadtwice.)
Dothis,forexample,torunaprogramafterselectingitsexecutionfile(oricon).
text_image
or x2 x2
CAUTION
NotesonUsingtheTouchpad
- Do not use a sharp object such as a pen on the pad nor peel the cover. It may cause an impairment.
- Donotplacemorethanonefinger, and donotuse while wearing a glove or when the handis wet. The Touchpad will not work properly. Oilordirt at the fingertip can also cause an impairment.
- Thetouchpadissensitive.Donotimposeexcessiveforceormaintainanuncomfortable position.Otherwise,itmayresultinafingerorwristinjury.
Rightbutton
Pressandreleasetherightbuttonswiftly.
Functionsastherightbuttonofamouse,buttheusagemaydifferdependingonprograms.
natural_image
Hand pointing at a blue button with red dots, no text or symbols presentDrag&Drop
Todrag, click and hold an icon, and move it to another location.
Todrop, releasethedraggediconinthelocationyouwant.
To move a file icon to another folder or to Recycle Bin, place the cursor (or the pointer) on the icon, pressandholdtheleftbutton, and glideanotherfingeronthetouchpaduntiltheiconreachesthe aimedlocation. Afterreachingthedestination, releasetheleftbutton.

text_image
21 Drag
•Glideonefingeronthepadwithanotherfingerpressingandholdingtheleftbutton.
2Drop
- Release the left button to drop it into the Recycle Bin. (By using this, you can drop a file into the RecycleBinatwill.)
ClickLock
Whenactivated, this feature allows you to drag scroll without pressing and holding the left button.
1 Clickthe[

]buttonandselectthe[Settings]menu.

Pressthe[

]keyor[Ctrl]+[Esc]todisplaytheStartmenu.
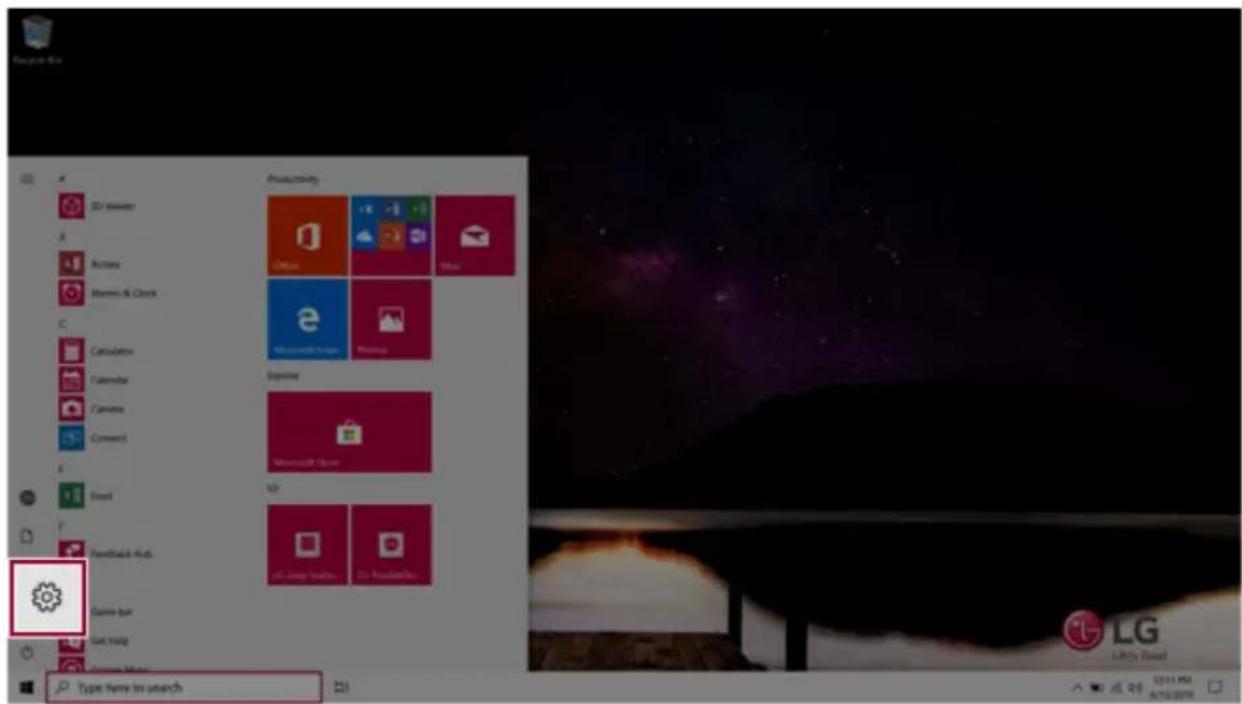
text_image
Macintosh Productivity Office Microsoft Teams Express Microsoft Teams LG Liberty Sweet Type New to search2 Whenthe[Settings]screenappears,select[Devices].
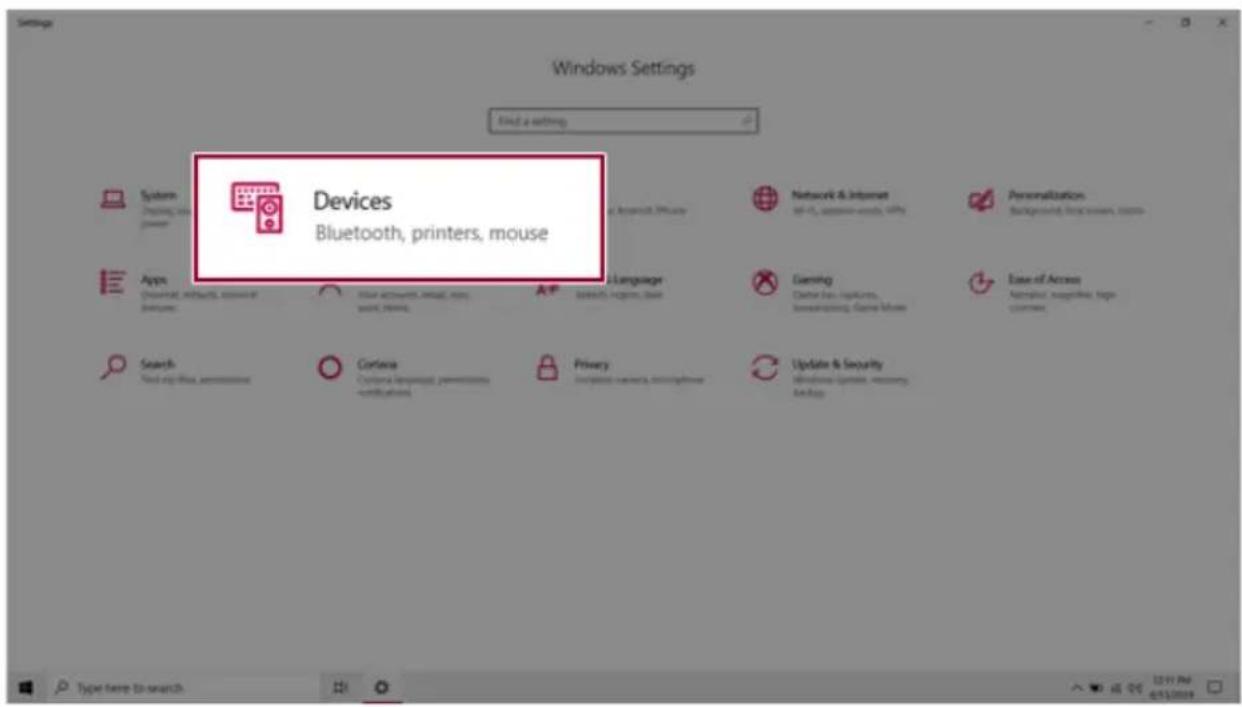
text_image
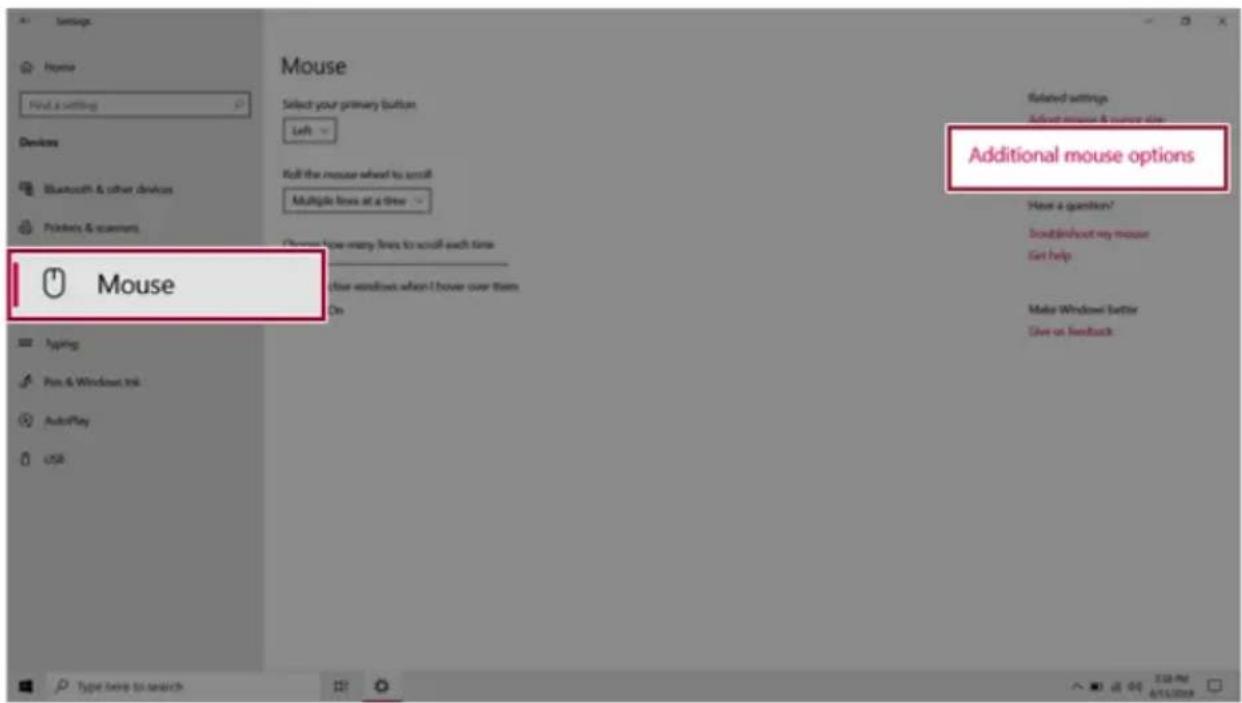
Windows Settings Find a setting Devices Bluetooth, printers, mouse Systems Playing, or power Apps Universal, wireless, account of dvntures Search Find any files, permissions Criteria Criteria language permissions - certifications Privacy Importing security, secure software Network & Internet 46.0, access to words, WiFi Personalization Background, top users, controls Language Earning Center for applications, systeming, Game Jobs Ease of Access Application, logarithics, top customers Update & Security Windows Update, recovery Backup Type here to search3Select[Mouse]>[AdditionalMouseOptions].
text_image
Settings Home Find & setting Devices Bluetooth & other devices Printers & scanners Mouse Mouse Select your primary button Left Roll the mouse wheel to scroll Multiple lines at a time Choose how many lines to scroll each time Clear windows when I hover over them On Type help to search Related settings Select mouse & mouse size Additional mouse options Have a question? Troubleshoot my mouse Get help Make Windows Better Give us feedback4When[MouseProperties]screenappears,select[TurnonClickLock].
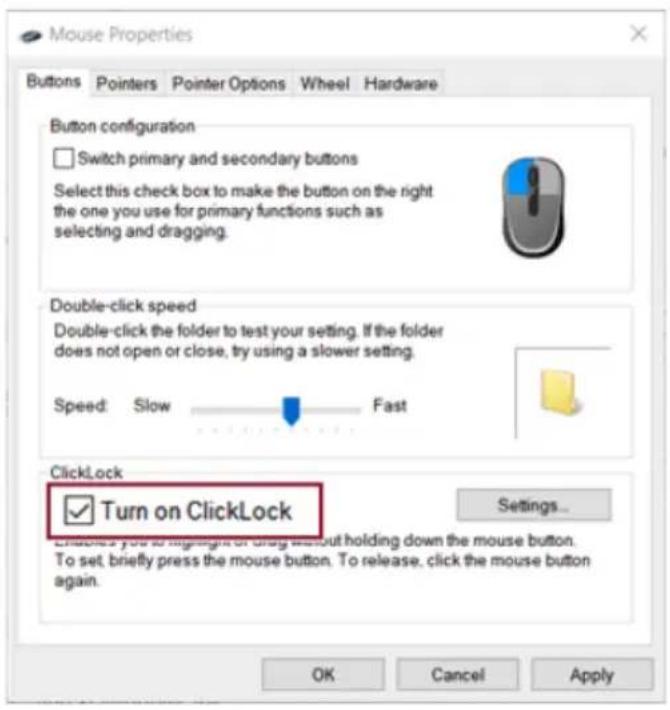
text_image
Mouse Properties Buttons Pointers Pointer Options Wheel Hardware Button configuration Switch primary and secondary buttons Select this check box to make the button on the right the one you use for primary functions such as selecting and dragging. Double-click speed Double-click the folder to test your setting. If the folder does not open or close, try using a slower setting. Speed: Slow Fast ClickLock Turn on ClickLock Settings... Enacted you to highlight or drag without holding down the mouse button. To set, briefly press the mouse button. To release, click the mouse button again. OK Cancel Apply5Press[Settings]tosethetimefortheClickLock.

text_image
Mouse Properties Buttons Pointers Pointer Options Wheel Hardware Button configuration Switch primary and secondary buttons Select this check box to make the button on the right the one you use for primary functions such as selecting and dragging. Double-click speed Double-click the folder to test your setting. If the folder does not open or close, try using a slower setting. Speed: Slow Fast ClickLock Turn on ClickLock Settings... Adjust how long you need to hold down a mouse or trackball button before your click is "locked." Short Long OK Cancel OK Cancel6 Press the left button of the touchpad and release it to change the button into the pressed state.
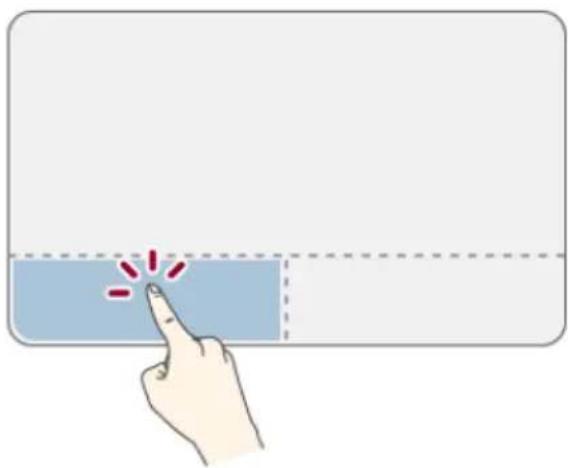
natural_image
Hand pointing at a blue button with red exclamation marks (no text or symbols)7Moveonthetouchpadtousethedrag/scrollfeature.

text_image
28PresstheleftmousebuttontoturnofftheClickLock.
TouchpadGesture
ThetouchpadgesturefeatureallowsyoutouseWindowsprogramsmoreeasilybyutilizingmulti-touchfunctions.
Windows10TouchpadGesturesallowyoutousethePCmoreeasily.
Thetouchpadgesturefeaturemaynotbesupportedinsomemodels.
- Placetwofingersonthetouchpadandmoveup/down/left/righttoscrollthescreen.
(Itoperatesonlyonanapporscreenwhichscrollingisavailable.)
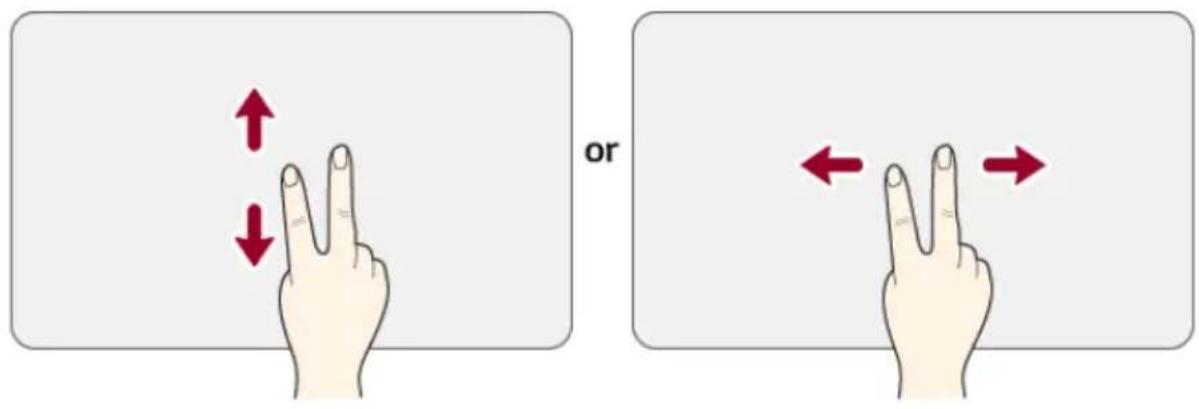
text_image
or- Placetwofingersonthetouchpadandwidenornarrowthemtozoomoutorin.

text_image
orSettingTouchpad
Youcanchangethetouchpadfeaturesorenable/disablethegesturefeature.
The figures herein may differ by language selection and a subject to changewithout prior notice.
1 Clickthe[

]buttonandselectthe[Settings]menu.

TIP
Pressthe[

]keyor[Ctrl]+[Esc]todisplaytheStartmenu.
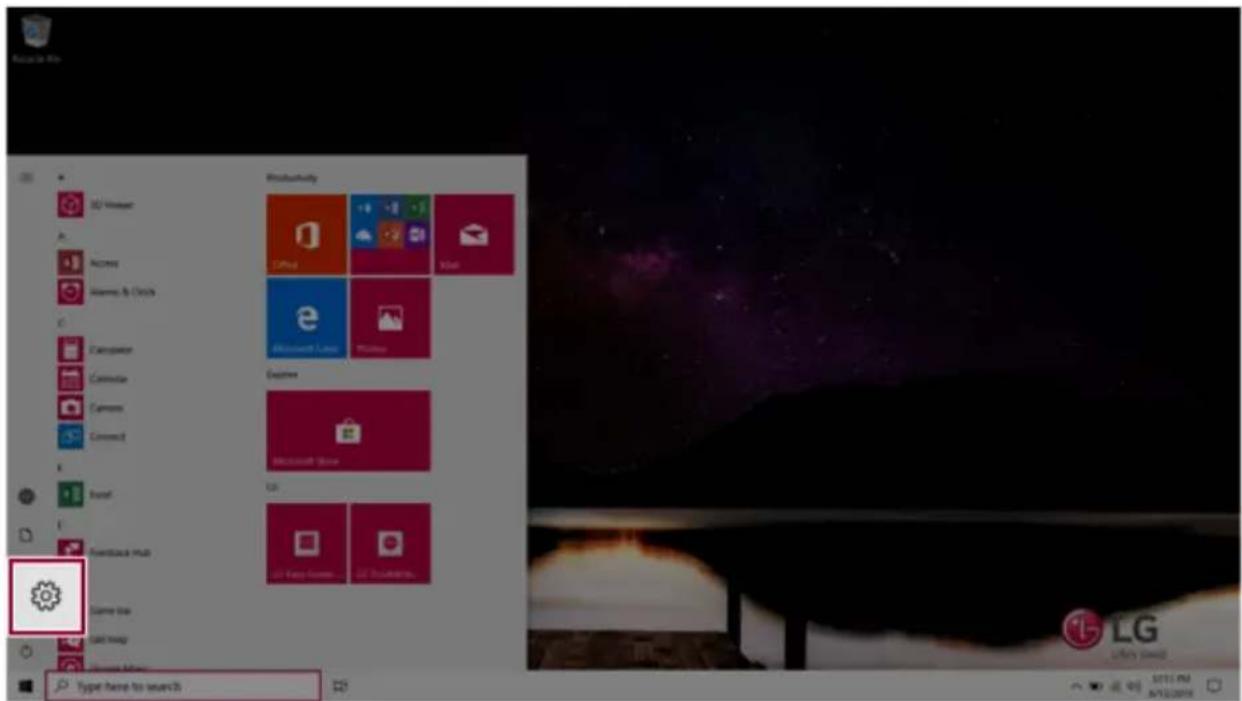
text_image
Mac OS X OS Finder Access Windows & Clocks Calculator Calculator Camera Connect Install Forwardset Hub Same Top Take Help My Home Type here to search Productivity Office Microsoft Linux Google Explore Microsoft Store UG UG Easy Store... LG Lucky zoom SATE PM APR20192Whenthe[Settings]screenappears,select[Devices].

text_image
Windows Settings King a setting Devices Bluetooth, printers, mouse Systems Bluetooth, printers Windows Apps Download, network, approved Bathes Search Find up the permission Centara Configure language comprehension certifications Privacy Location: Learning, navigation Network & Internet http://www.ets.com/ Language Language Region, Java Gaming General Use - Applicates, system-priming - Server Provider Update & Security Information, Open, recovery, 建设和3Changethesettingsasneededonthe[Touchpad]menu.
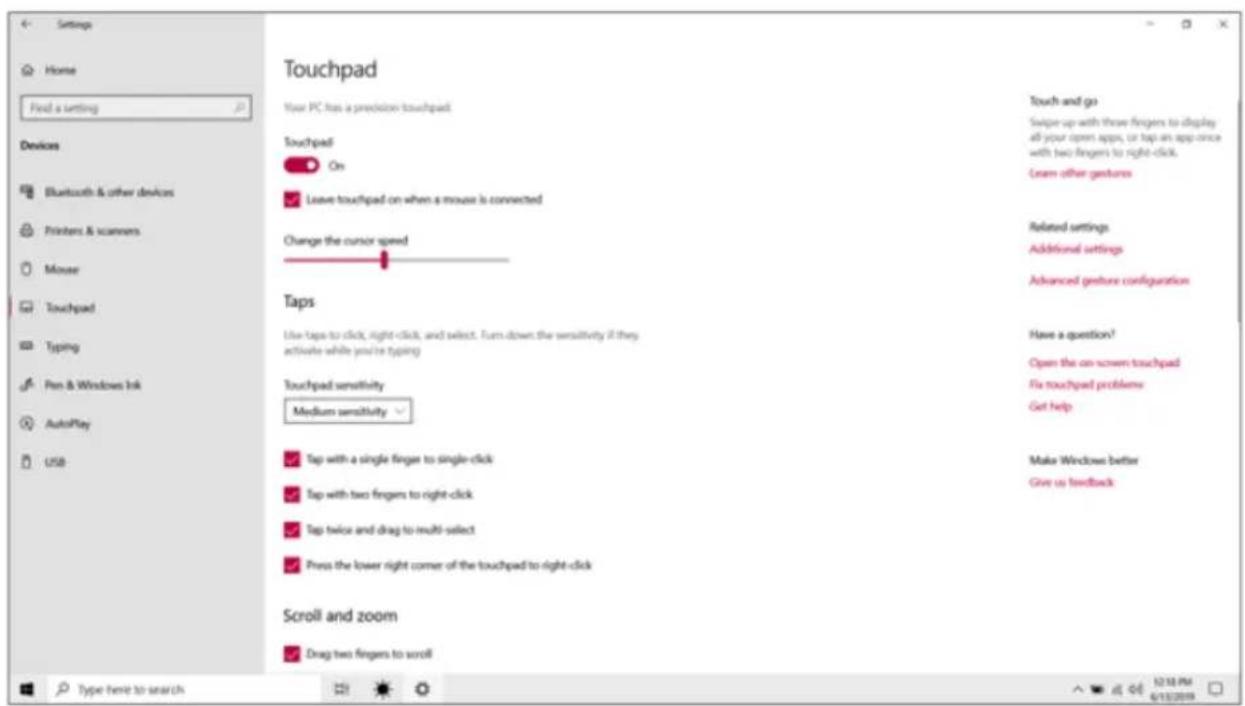
text_image
Settings Home Find a setting Devices Bluetooth & other devices Printers & scanners Mouse Touchpad Typing Pen & Windows Ink AutoPlay USB Touchpad Your PC has a precision touchpad: Touchpad On Leave touchpad on when a mouse is connected Change the cursor speed Taps Live taps to click, right-click, and select. Turn down the sensitivity if they activate while you're typing Touchpad sensitivity Medium sensitivity Tap with a single finger to single-click Tap with two fingers to right-click Tap twice and drag to multi-select Press the lower right corner of the touchpad to right-click Scroll and zoom Drag two fingers to scroll Touch and go Swipe up with three fingers to display all your open apps, or tap an app once with two fingers to right-click. Learn other gestures Related settings Additional settings Advanced gesture configuration Have a question? Open the on-screen touchpad Fix touchpad problems Get help Make Windows better Give us feedback Type here to searchUsingTouchPanel
UsethetouchpanelforafasterandmoreconvenientuseofthePC.AllgesturesprovidedbyWindows 10canbeused.
FormoredetailsabouttheWindows10gestures,refertoWindowshelp.

OPTION
Thisappliesonlytomodelsequippedwithatouchpanel.
BasicUsage
1 Touching Once: Touch the panel once to use as left mouse button.

text_image
Recycle2 Touching Twice: Touch the panel twice to use as double-click.

text_image
Recycle Bin File Home Share View Manage Recycle Bin Tools Recycle Bin Search Recycle Bin Quick access Desktop Downloads Documents Pictures Music Videos OneDrive This PC Network Name Original Location This folder is empty. 0 items3 Drag: After touching the start point, finger movement can be used instead of the mouse.

text_image
Recycle Bin4 Touching Longer: Touch the panel for a longer time to use as right mouse button.

text_image
Open Recycle Bin Create shortcut Rename PropertiesUsingtheTouchKeyboard
1 Right-click the task bar and select [Show touch keyboard button].
2Presstheicon[

]onthebottomrightofthetaskbartodisplaythe[Keyboard]screen.
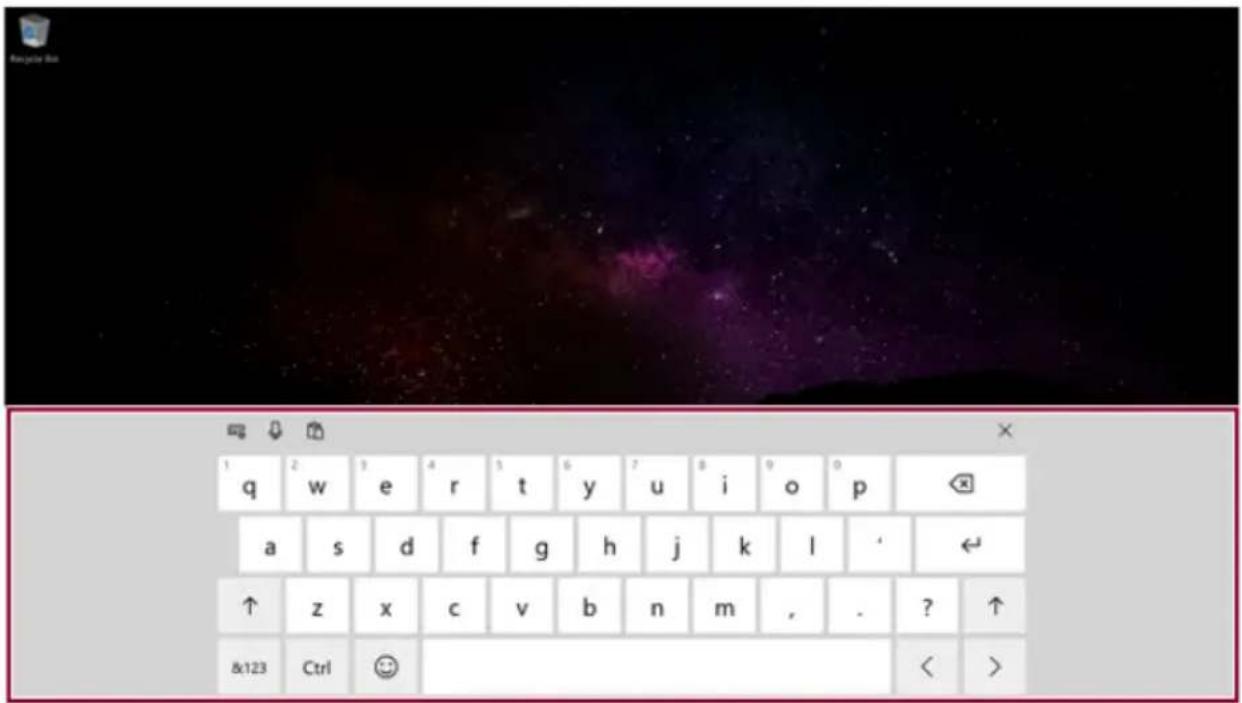
text_image
1 q w e r t y u i o p a s d f g h j k l ' ← ↑ z x c v b n m , . ? ↑ &123 Ctrl < >ConnectingtoExternalDisplay
ConnectingtotheHDMIPort
HDMlisahigh-speedmultimediainterfacethatcantransferuncompressedfulldigitalaudioandvideo signals.
Insomemodels, DTSAudiomaynotworkwhenyouuseHDMI.

TIP
EnsurethemonitorpowerisoffbeforeconnectingtheexternalmonitortothePC.
1 Connect the HDMI cable to the PC and the external device (TV, monitor) that supports HDMI.
2 HDMI port transfers both video and audio simultaneously. Hence, there is no need for a separate audioconnection.

text_image
HOMI3 On the PC, press [Fn] + [F7] to display monitor (projector) toggling screen. Select the desired screenoutput.

TIP
- Everytime[] + [P] keysarepressed, thescreenoutputoptionchanges. Release the keystodisplay theselectedscreenoutput.

CAUTION
- If you do not set Speaker as the default value after disconnecting the HDMI cable, the systemmaynotproduceanysound.
• If a program was running already, you must exit and restart the program to produce sound.
ConnectingtoWirelessDisplay
ThewirelessdisplayfeatureconnectsthePCscreenandsoundtoadisplay(TV,projector,etc.).

OPTION
- Tousethewirelessdisplayfeature, thedisplaydevicemustsupportthisfeature.
• To connect to the display device that does not support wireless display, you must separately purchase a wireless display connection device.
- Once the wireless display connection is established, no additional procedures and searching are necessary then next time you try to connect.
ConnectingtoWirelessDisplay
1 PresstheActionCenter[]iconontherightsideofthetaskbar.
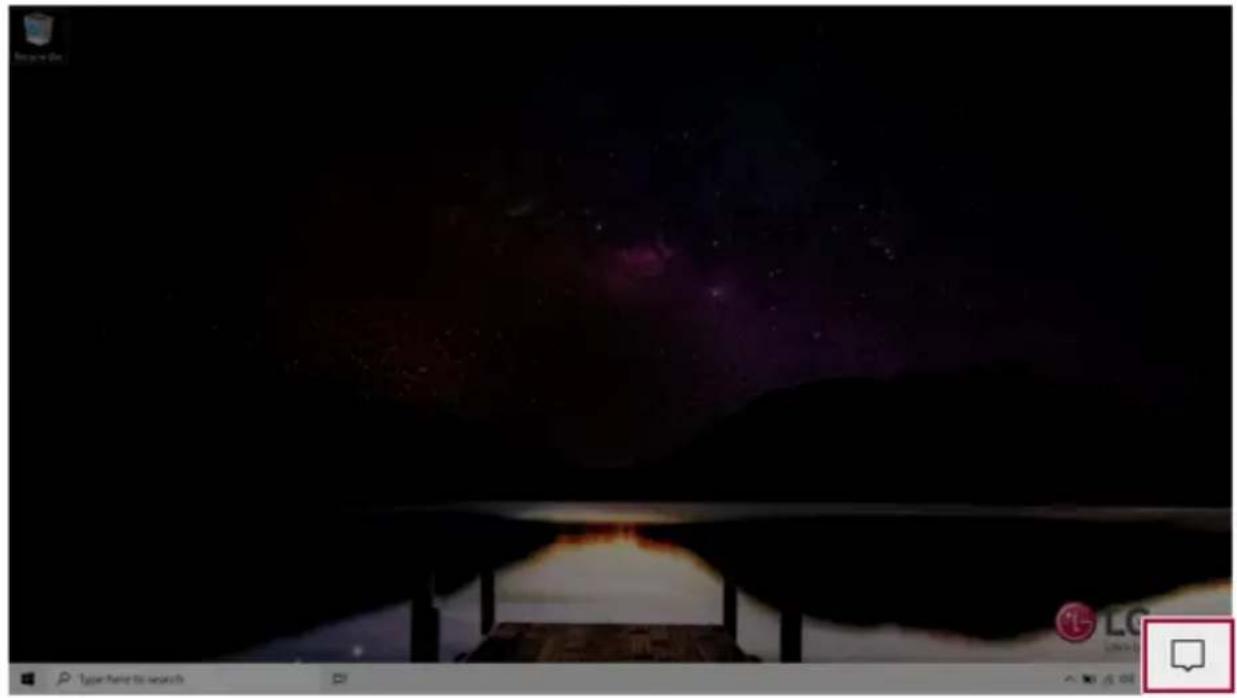
text_image
Screenshot of a computer desktop with a dark screen displaying a starry night sky and a red speech bubble icon at the bottom.2 When the Action Center screen appears, press the [Connect] tile.

Ifthetiledoesnotappear,pressthe[Expand]menu.
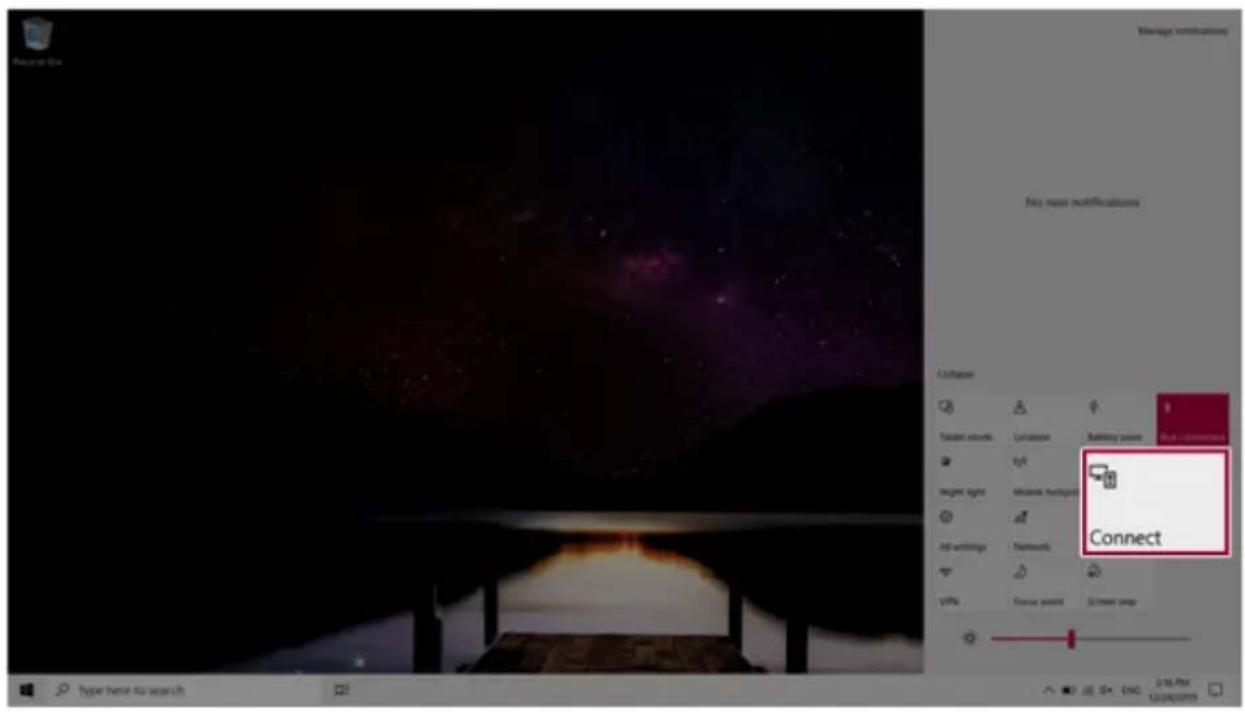
text_image
Manage instructions File name notifications Cohorter Target assets: Location Battery point High Connectivity Height size Module viewport All settings Networks Connect VIPS Focus point Screen swap Type here to search3Searchforwirelessdisplaydevicesintheproximity.

text_image
For your Bits CONNECT Searching for wireless display and audio devices Where is my device? Search LG Display Projecting to this PC Find other types of devices Type here to search 12:25 PM 6/13/20194 Once the wireless display device is connected, it outputs the PC screen and its sound.

text_image
Connect Disconnect first, and then the search will begin Where is my device? Search UG Connected music Disconnect Projecting to this PC. Find other types of devices Type here to searchConnectinganExternalUSB-C™(Thunderbolt™)Device
TheUSB-CTM portmounted on this product supports USB3.1 Gen2 standards.
UsetheUSB-CTM porttoconnectUSBdevicesortooutputascreentoanexternaldisplay.
ConnectingaUSBDevice
IfaUSBdeviceisconnectedtoaUSB-CTMport,theportworksasanordinaryUSBport.

TIP
TouseaconventionalUSBdevice,aseparateconversionadaptersshouldbeused.
(Conversionadaptersmaybepurchasedseparately.)
OutputtingtoanExternalDisplay
By connecting a display that supports USB-C™ Alternate Mode, you can use the USB-C™ port to outputascreentoanexternaldisplay.

TIP
TheAlternatemodeallowsyoutousetheDP(DisplayPort)andHDMIoutputsthroughthe USB-C™port.
WesupportDP(DisplayPort)interfacestandards.

CAUTION
YoumustuseacablethatsupportsAlternateModetooutputascreentoanotherdisplay.
If you use USB-C™ accessories (cables, interface adapters, etc.) that are used for other products, you may have compatibility problems (noscreenoutputoramalfunction).
ConnectingaThunderbolt™Device
YoucanconnecttotheUSB-C™portanexternaldisplayorahigh-performedatadevicethat supporttheThunderbolt™specifications.
Depending on the specifications of the device connected to the USB-C ^™ port, it acts as a USB 3.1 or Thunderbolt ^™ device.

TIP
The Thunderbolt™ cable is not provided with the product. Makes sure that you use a certified cable.
Somefunctionsmaynotbeavailabledependingontheproduct.Formoreinformation,referto theusermanualprovidedwiththedevicetobeconnected.
ConnectingtwonotebookPCsthatsupportThunderbolt™
UseThunderbolt™toconnecttwoPCseasilyandquicklyandsendandreceivedatabetweenthem.
1 Pressthe[]buttonandselectthe[Settings]menu.

TIP
Pressthe[

]keyor[Ctrl]+[Esc]todisplaytheStartmenu.

text_image
Productivity IO Viewer Access Alstema & Clock Calculator Calendar Extra Consent Done Feedback Hub Sleep Bar Salt Htop Type here to search2 Select [Network & Internet] > [Status] > [Network and Sharing Center] > [Change advanced sharingsettings].
3Enable[Changesharingoptionsfordifferentnetworkprofiles]andsavethechanges.

text_image
Advanced sharing settings Control Panel > All Control Panel Items > Network and Sharing Center > Advanced sharing settings Change sharing options for different network profiles Windows creates a separate network profile for each network you use. You can choose specific options for each profile. Private (current profile) Guest or Public Network discovery When network discovery is on, this computer can see other network computers and devices and is Turn on network discovery File and printer sharing When file and printer sharing is on, file and printers that you have shared from this computer can Turn on file and printer sharing Turn off file and printer sharing All Networks Save changes Cancel4UsetheThunderbolt™cabletoconnecttwonotebookPCs.
5 A while later, an icon of the connected computer appears on the desktops of the two notebook PCs.

text_image
DESKTOP-2Q 9OBIA6 Double-click the connected computericonto open the authentications screen.
7 Input the username and password to connect to the other PC.
TIP
If there is noshared folder in the connected PC, nothing may appear on the screen.
UsingUSB-C™(Thunderbolt™)ChargingFunction
YoucanconnectaUSB-C™devicetochargeanotebookPCbatteryorotherexternaldevices.
- To charge a notebook PC battery, the external device (USB PD Charger, notebook PC, etc.) should support USB Power Delivery 10W(5V/2A) or higher profile.
- The external devices that use the USB-C™ port can be charged at 10 W (5 V / 2 A), 15 W (5 V / 3 A), and 18W(9V/2A).
- USB PD (Power Delivery) supports charging at 15 W (5 V / 3 A) or 18 W (9 V / 2 A) when connected, whereas regular USB devices support general charging at 10 W (5 V / 2 A).
- When the remaining battery capacity of the notebook PC falls below 10 %, both USB PD and regularUSBdevicesupportchargingat10W(5V/2A)only.
• Always-On Charging is supported only with USB-C™ ports, but not with the regular USB ports. - If you connect an AC adapter while the notebook PC is being used to charge an external device, it may takemoretimetochargethenotebookPC.
UsingtheChargingFunction
LGControlCentercanbeusedtosetoneofthethreechargingfunctions:Automatic,Sinkand Source.

TIP
ForinformationonhowtouseLGControlCenter,referto[UsingSoftware]>[]
1 Automatic
The operation mode is automatically selected depending on the charges settings of the connected device.
- When the connected device is set to Automatic (charging thenotebook PC or a connected device). Charging thenotebook PC by using themobile phone is not supported.)

text_image
Diagram showing three devices: a laptop, a smartphone with a lightning bolt symbol indicating speed, and a separate laptop with red arrows.- WhentheconnecteddeviceissettoSource(thenotebookPCischarged.)

text_image
Diagram showing three devices: a laptop connected to a USB PD charger, with a lightning bolt symbol indicating charging.- When the connected device is set to Sink (the connected device is charged.)
text_image
Diagram showing a laptop connected to a smartphone via a battery symbol, illustrating wireless communication or data transfer.2Sink
TheconnecteddeviceisusedtochargethenotebookPC.
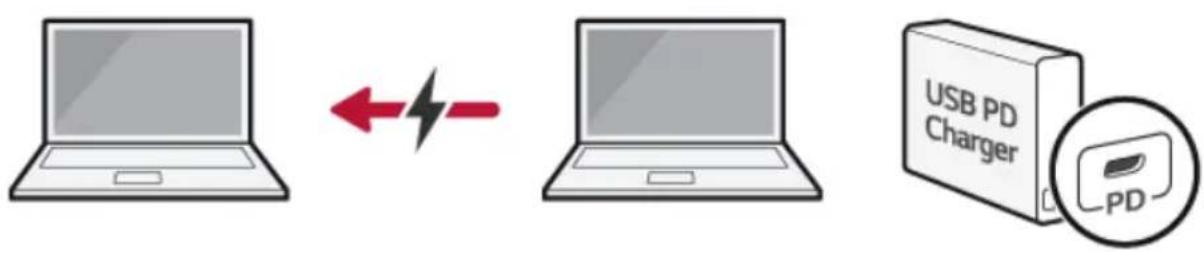
text_image
USB PD Charger PD
TIP
If the connected device is set to Sink, the charging function does not work.
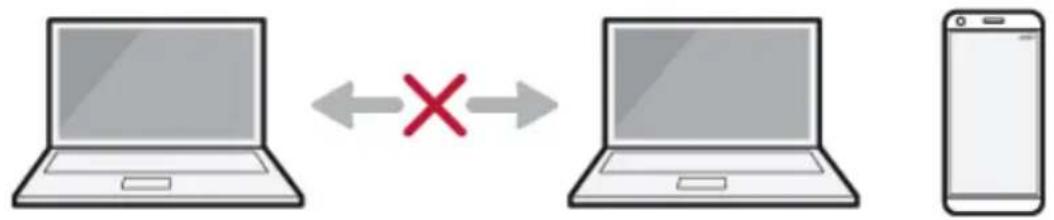
text_image
Diagram showing a laptop and smartphone connected by a red X symbol, indicating bidirectional communication or exchange.3Source
ThenotebookPCisusedtochargetheconnecteddevice.
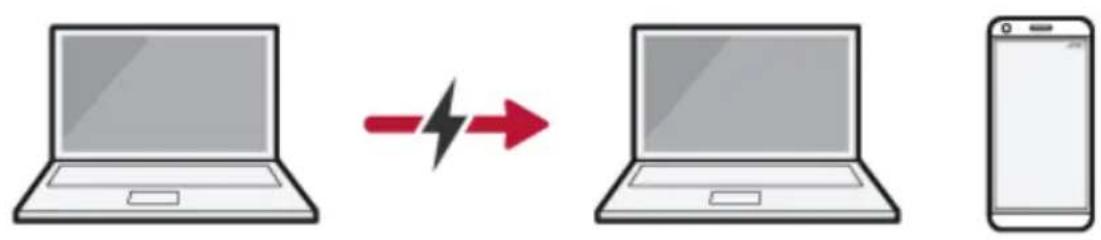

TIP
If the connected device is set to Source, the charging function does not work.
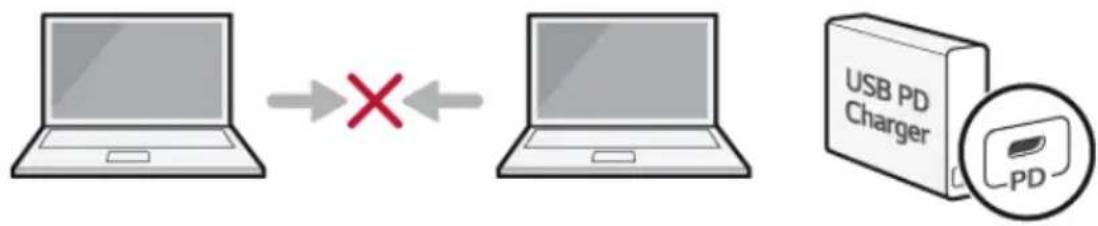

TIP
ThechargingstatusoftheexternaldevicebeingchargedisnotdisplayedonthenotebookPC. Ifyouconnectedasmartphone,youshouldselect"Chargemobilephone"onthesmartphone screentochargethephonebattery.

CAUTION
When you set the charging function for a USB-CTM port in LG Control Center, beware of the following:
- If you changed the charge setting, it is recommended that you remove the USB-C™ cable andre-connectit.
- If you restart the system to turn off the power, the charges setting is changed to [Automatic].
- If the charge setting is set to [Sink], some of the devices connected to the USB-C™ port maynotworkproperly.
•Always-OnChargingonlysupportstheON(automatic)andOFFoptions. - If the power consumption of the notebook PC is larger than the powers supply from the external device, the battery may be consumed gradually.
Bluetooth
Bluetoothallowstheusertoaccesswirelesslyvariousdevicessuchascamera,cellphone,headset,
printer,andGPSreceiverthatsupportBluetooth

.Itcanalsoestablishanetworkandexchangedata
withotherBluetooth ✪ -enabledPCorsmartphone.

OPTION
TheBluetoothdeviceisoptional, anditmaynotbeavailableinsomemodels.
The figures herein may differ by language selection and a subject to changewithout prior notice.
FordetailsonconnectingaBluetoothdevice, refertotheusermanual that camewith the Bluetooth device.
1 Clickthe[]buttonandselectthe[Settings]menu.

TIP
Pressthe[

]keyor[Ctrl]+[Esc]todisplaytheStartmenu.

text_image
Productivity Office e Microsoft Excel Visuals Capture Microsoft Excel to L2.1.0.00000000000000000000000000000000000000000000000000000000000000000000000000000000000000 Type Master No-Search2 Whenthe[Settings]screenappears,select[Devices].
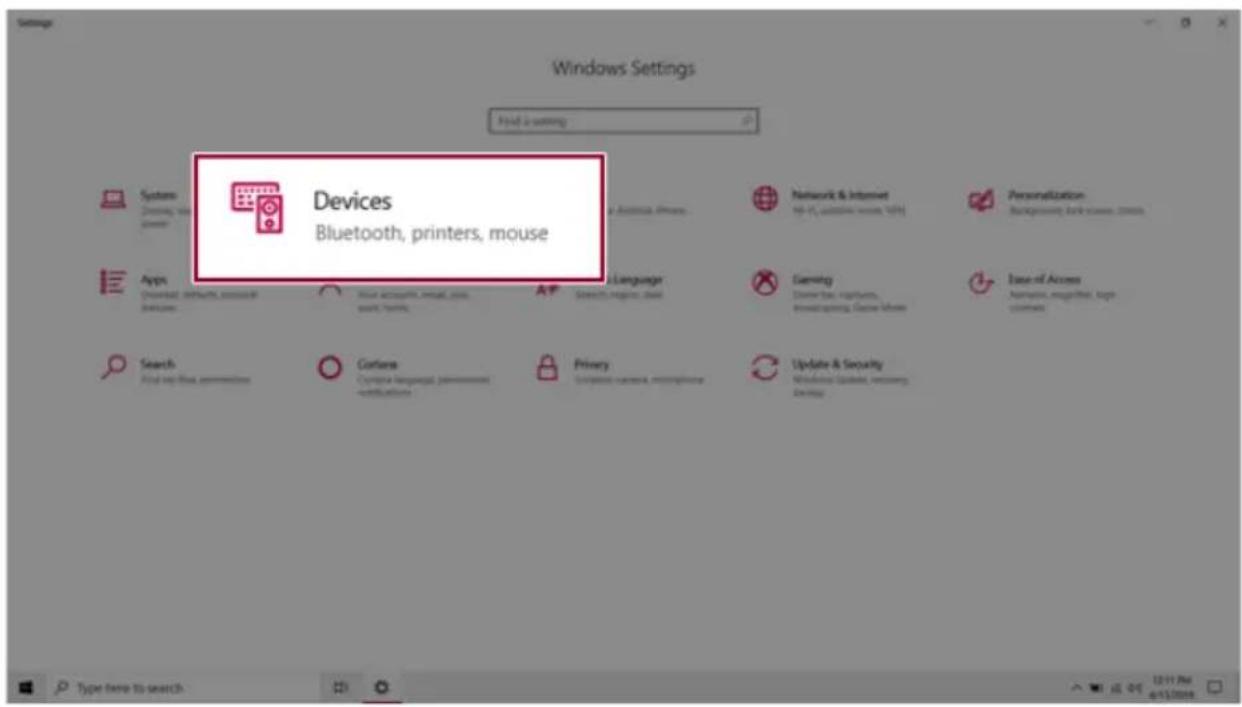
text_image
Windows Settings Find a setting Devices Bluetooth, printers, mouse Systems Dining, via power Apps Download, network, resource dynamics Search Find up file permission Formats Custom language permission - certifications Privacy Configure camera, microphone Network & Internet 96.4V, wireless, wireless, WiFi Personalization Background, basic services, clients Language Gaming Device bus, hospitals, investigating, Game Linux Ease of Access Application, smart tool, top customers Update & Security Windows Update, recovery Design Type here to search3 Select [Bluetooth & other devices] > [Add Bluetooth or other device] > [Bluetooth] to search forBluetoothdevices.

text_image
Settings Home Find a setting Devices Bluetooth & other devices + Add Bluetooth or other device Bluetooth On Now discoverable as "DESKTOP-ENDOKK4" Show notifications to connect using Swift Pair When selected, you can connect to supported Bluetooth devices quickly when they're close by and in pairing mode. Printers & scanners Mouse Touchpad Typing Pen & Windows Ink
text_image
Add a device Choose the kind of device you want to add. Bluetooth Mice, keyboards, pens, or audio and other kinds of Bluetooth devices Wireless display or dock Wireless monitors, TVs, or PCs that use Miracast, or wireless docks Everything else Xbox controllers with Wireless Adapter, DLNA, and more Cancel4Selectadevicetoconnectto.
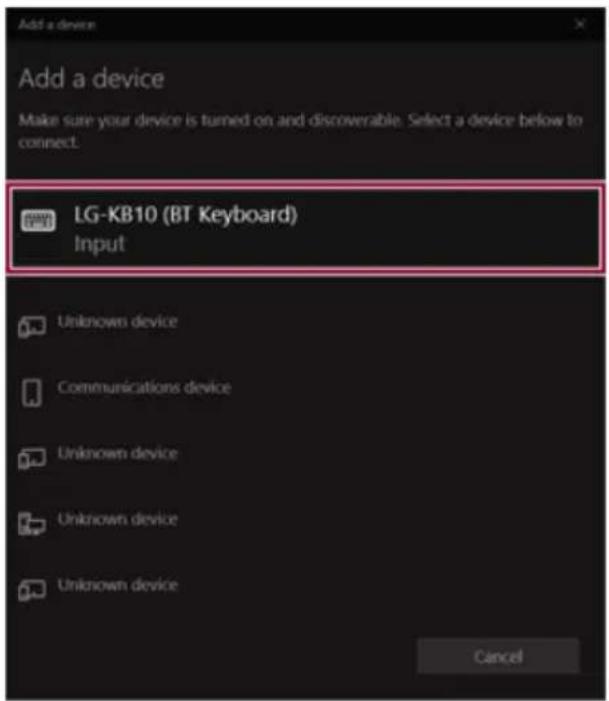
text_image
Add a device Add a device Make sure your device is turned on and discoverable. Select a device below to connect. LG-KB10 (BT Keyboard) Input Unknown device Communications device Unknown device Unknown device Unknown device Cancel5CompletetheBluetoothconnectionasdirected.
WiredLAN
LANisthenetworkenvironmentthatuserscanconnecttobyusingacabletoconnecttotheir internetprovidersorthecompany'snetwork.
UsingWiredLAN
LANisinstalledwithanautomaticIP(DHCP)asdefaultvalue.
PleaserefertothefollowinginstructionsfordetailsonsettingupanautomaticIP(DHCP)ormanual IP.
1 ConnecttheLANadaptertotheUSB-C™portonthePC.

TIP
TherecommendednetworkcablefortheoptimalnetworkenvironmentisCAT5orhigher. Thenetwork(LAN)cablemaybeconnectedwhentheLANadapterisused.

natural_image
Close-up of a laptop edge with USB cable and port ports, showing a red arrow pointing to the next port (no text or symbols visible)2ConnectthewiredLANcabletotheLANport.

natural_image
Close-up of a laptop edge with USB cable and network port, showing connection point with red arrow (no text or symbols)3Pressthe[

]buttonandselectthe[Settings]menu.

Pressthe[ ]keyor[Ctrl]+[Esc]todisplaytheStartmenu.

text_image
My job file Productivity Office Microsoft Excel Microsoft Excel Microsoft Excel Microsoft Excel LG LG's Game Type Items to search4 Select [Network & Internet] > [Status] > [Change adapter options].

text_image
Windows Settings Initial settings Network & Internet Wi-Fi, airplane mode, VPN System Desktop, social security process Devices Bluetooths present server Phone Connect Back Applications 3.0x 2.0x 1.0x 0.5x Apps Download networks, resource expenses Accounts Your accounts, email, own assets, family Time & Long Search High Level Construction, repair, constructing, Game Chain Application, adapter, top customers Search Finding the permission Content Custom language permissions certificates Privacy Accessories, privacy, authentication Update & Security Windows: Windows, macOS, Windows Service
text_image
Settings Home Find a setting Network & Internet Status Wi-Fi Othernet Clad-up VMU Airplane mode Mobile listening Data logger Proxy Status Network status Ethernet You're connected to the internet If you have a limited data plan, you can make this network a network connection or change other properties. Change connection properties Show available networks. Change your network settings Change adapter options View network adapters and change connection settings. Network trigger/encoder Diagnosis and the network problems. View your network properties Windows Forward Network and Sharing Centre Network root Type here to search Have a question? Designed network connection issues Update network adapter or drivers Find your IP address Call Help. Make Windows better Give up feedback5 Right-click [Ethernet] and select the [Properties] menu.

text_image
Network Connections Control Panel > All Control Panel Items > Network Connections > Organize Disable this network device Diagnose this connection Rename this connection View status of this connection Bluetooth Network Connection Not connected Ethernet PC Realtek L Disable Status Diagnose Bridge Connections Create Shortcut Delete Rename Wi-Fi Net(R) Dual Band Wireless... Properties6 Select [Internet Protocol Version 4 (TCP/IPv4)] and then click [Properties].

text_image
Ethernet 2 Properties Networking Sharing Connect using: Realtek USB FE Family Controller #2 Configure... This connection uses the following items: Client for Microsoft Networks File and Printer Sharing for Microsoft Networks GoS Packet Scheduler Internet Protocol Version 4 (TCP/IPv4) Link-Layer Topology Discovery Mapper I/O Driver Microsoft Network Adapter Multiplexor Protocol Install... Uninstall Properties Description Transmission Control Protocol/Internet Protocol. The default wide area network protocol that provides communication across diverse interconnected networks. OK Cancel7 To use an automatic IP(DHCP), select [Obtain an IP address automatically]. If you wish to use a staticIP, select[UsethefollowingIPaddress]toentertheaddress.
ContactthenetworkserviceprovideroradministratortouseastaticIP.

text_image
Internet Protocol Version 4 (TCP/IPv4) Properties General Alternate Configuration You can get IP settings assigned automatically if your network supports this capability. Otherwise, you need to ask your network administrator for the appropriate IP settings. ● Obtain an IP address automatically ○ Use the following IP address: IP address: ... Subnet mask: ... Default gateway: ... ● Obtain DNS server address automatically ○ Use the following DNS server addresses: Preferred DNS server: ... Alternate DNS server: ... □ Validate settings upon exit Advanced... OK Cancel8Press[OK]tocompletethenetworksetup.
9ClicktheWebBrowsericontocheckwhethertheInternetisoperatingnormally.
WirelessLAN
Thewirelessnetwork(WirelessLAN)isthenetworkenvironmentthatconnectsaPCwiththeinternet providerorcompanynetworkthroughanAccessPoint(wirelessorregularrouter).
TurningOn/OffAirplaneMode
PriortousingthewirelessLAN,press[Fn]+[F6]toturnoffAirplaneMode.
Pressing [Fn] + [F6] keys will turn on or off the Airplane Mode. If you are not going to use the productforawhile,keeptheAirplaneModeturnedontoreducethebatterypowerconsumption.
UsingtheWirelessLAN
IfanAccessPoint(wiredorwirelessrouter)isinthevicinityofthePC,thewirelessLANcaneasilybe accessed.
During thesearchforawirelessnetwork(WirelessLAN), variousAccessPointsmaybefound according to the location where the PC is used.
Incasetherearenoaccessiblewirelessnetworks(WirelessLAN)nearthePC,noAccessPoints maybefound.
ApasswordprotectedAccessPointcannotbeaccessedwithoutthecorrectpassword.
1 PresstheActionCenter[

]iconontherightsideofthetaskbar.

natural_image
Dark scene with a glowing purple starry sky and a small icon in the corner (no readable text or symbols)2 Press the [Network] tile to search for a nearby Access Point.
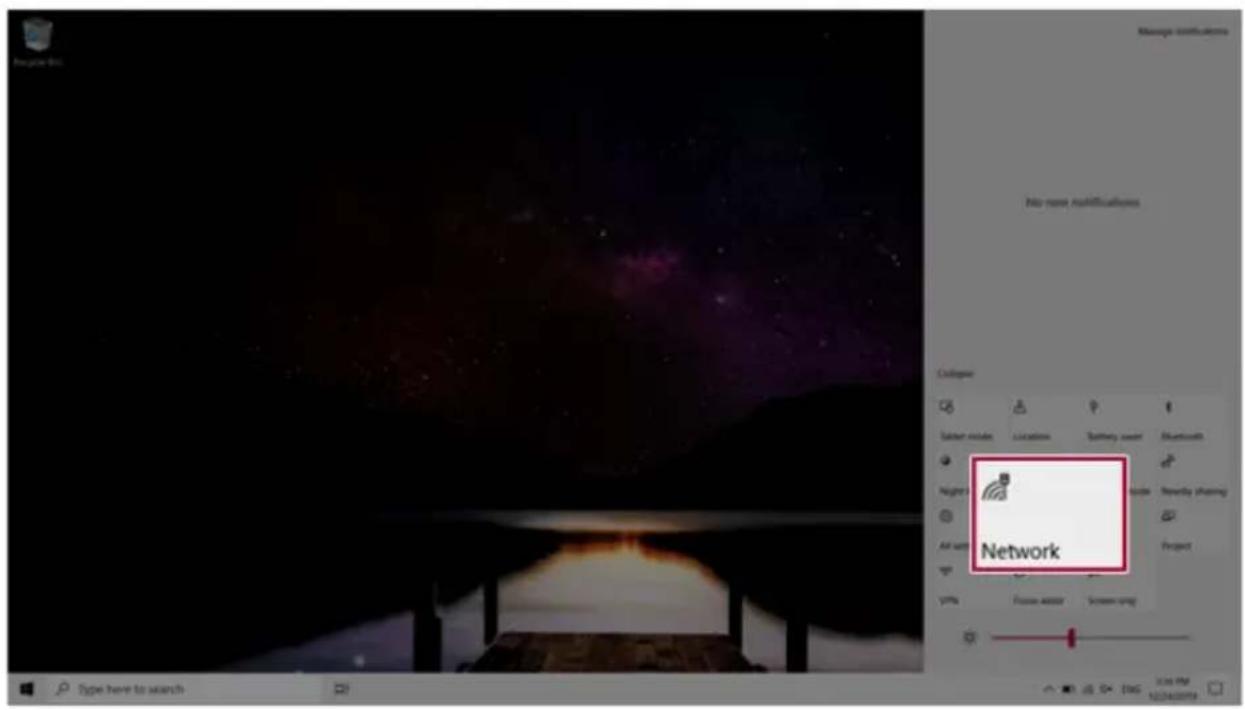
text_image
Manage instructions No name modifications C:\lograr Satier node Location Battery user Bluetooth Night Air unit Network Video Newday sharing Project VPS Focus asset Screen setup Type here to switch Add VM 12/24/2023
text_image
PC Secured PC_5 Secured DIRECT Secured AS Secured soundbar3.5G Secured DIRECT-49 Secured DIRECT-4190 Secured Network & Internet settings Change settings, such as enabling a connection enabled. URL: Airplane mode: Mode without
TIP
IfWi-Fiisturnedoff, pressthe[Wi-Fi]tile.

text_image
Wi-Fi Turned off Turn Wi-Fi back on Manually Network & Internet settings as making a connection metered. Wi-Fi3SelecttheAccessPointyouwanttoconnecttoandpress[Connect].
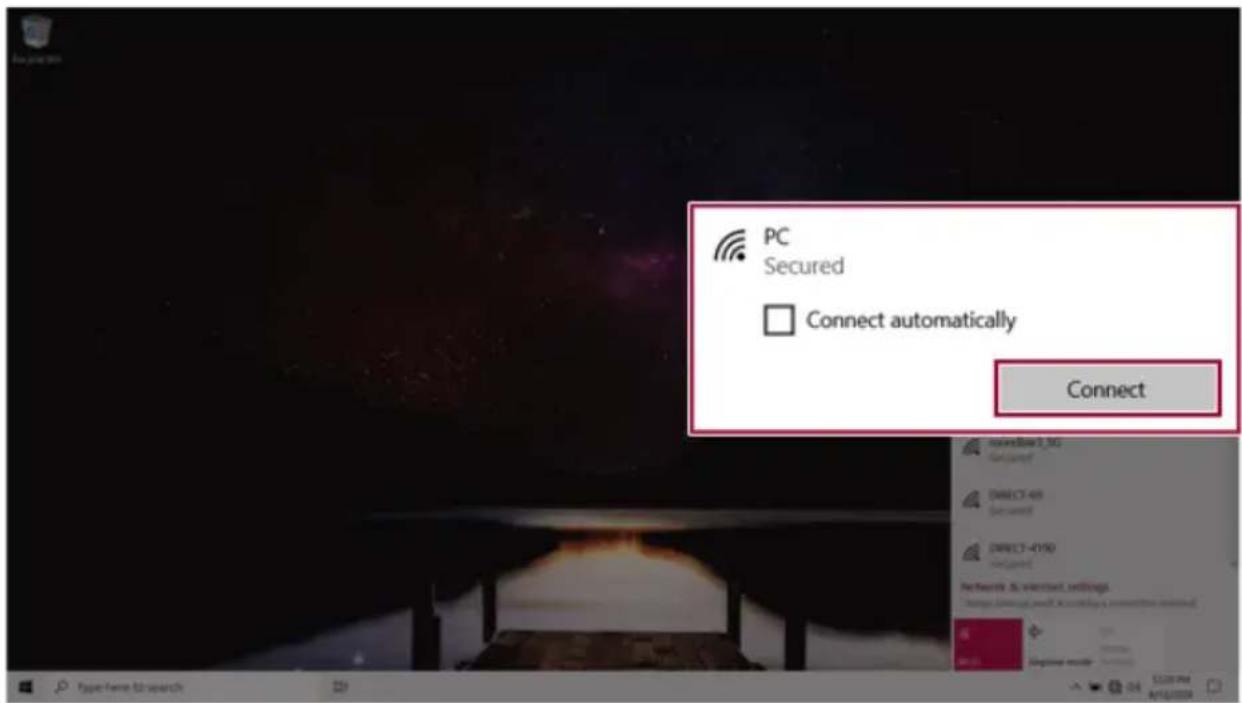
text_image
PC Secured Connect automatically Connect4Ifaconnectionisestablished,[Connected]appearsbelowtheAccessPointname.
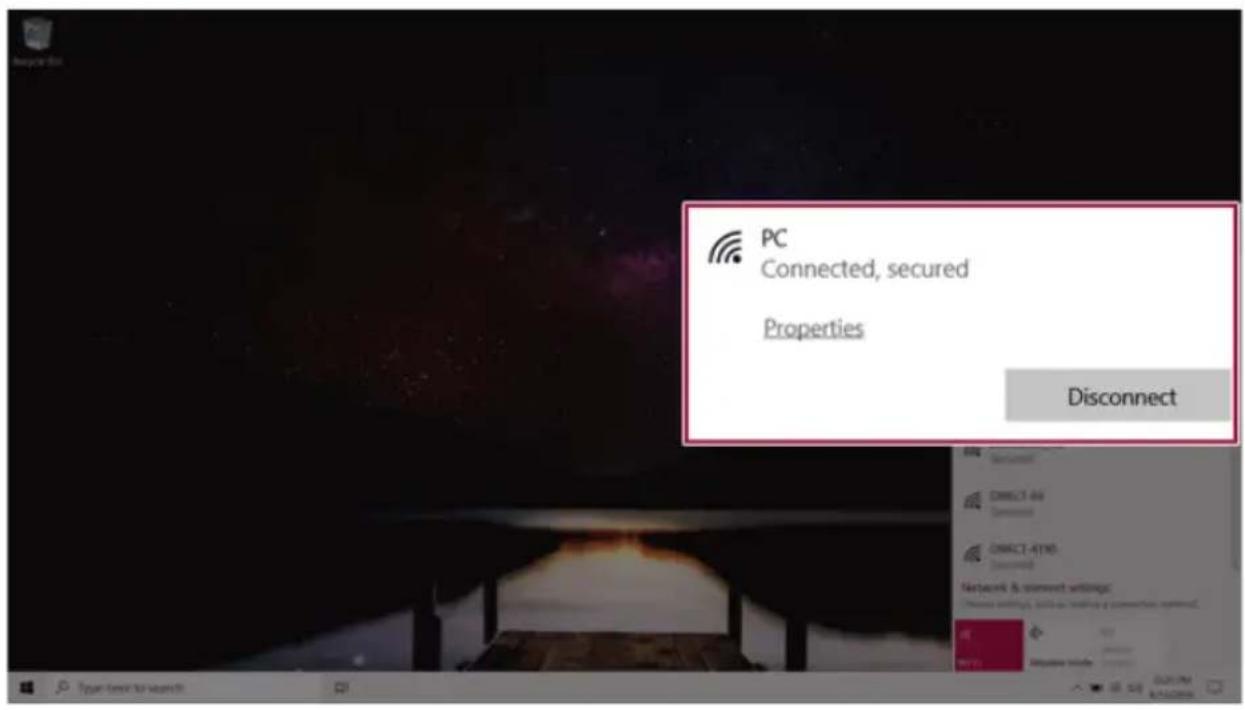
text_image
PC Connected, secured Properties Disconnect5ClicktheWebBrowsericontocheckwhethertheInternetisoperatingnormally.
UsingaWired/WirelessRouter
Awireless/regularrouterconnectsseveralPCsandmobiledevicestooneinternetlineandenables theuseofinternetandthenetwork.
Awireless/regularrouterhastobeboughtseparately. Refertothemanualprovidedbythe manufacturerforinstructions.
ConnectingaWirelessorRegularRouter
Ifoneinternetlineisusedwithawired/wirelessrouterandseveraldevicesareconnected,thismay resultinaslowerconnection.
IncaseofawirelessLAN,itisrecommendedtochangethenetworknameandsecuritysettingsfora moresecureconnection.
Networkspeedcandifferaccordingtooperationenvironmentandspecifications.
1 Connect the internet cable of the modem that was provided by your internet provider to the router's WANport.
2 Connect all devices (PC, IPTV, internet phone, etc.) with a LAN cable to LAN ports 1 to 4 of the router.
ThenumberofLANportscanvaryforeachroutermodel.
3 Please refer to the manual provided by the router manufacturer for setup of the network and internet.
UFS/MicroSDSlot
CheckingAvailableMemoryCard
ThismodelsupportsUFSandMicroSDmemorycards.
•Directlyapplicablememorycards

text_image
UFS CardUFS
text_image
micro HC®micro SD
MountingandUsingMemoryCard
ThisproductsupportsoneUFS/MicroSDslot.
Make sure that the insertion direction of the memory card is correct and push it in until the UFS or MicroSDmemorycardisfullyseated.

text_image
UFS Card MGO®
TIP
- When the memory card is formatted, the data stored in the memory card will be deleted. Checkwhetherthereareimportantdatabeforeformattingthememorystick.
- To format a memory card, right-click the memory card drive and select Format. When the Formatwindowappears, pressStarttocontinue.
- If the write protection tab of memory card is locked, the user cannot format the memory sticknorwriteordeletethedata.
- UFS and Micro SD memory cards can be used only as data storage devices and do not support the copyright protection feature.
RemovingMemoryCard
Pushthecardwithyourfingertomakethecardspringoutoftheslot.Removethememorycard.

TIP
Tosafelyremoveamemorycard:
The figures herein may differ by language selection and a subject to changewithout prior notice.
1 Click Safely Remove Hardware and other Media icon on the right side of the taskbar.

text_image
Screenshot of a desktop taskbar with a highlighted folder icon and date/time display showing 12:15 PM on June 13, 2019.2 Select Remove Multi-Card USB Device to safely remove hardware.
UsingSoftware
LGControlCenter
LG Control Center is a software that helps you change PC Settings, Power Settings, Windows Security Settings, etc. as well as check current system information.

TIP
The menus displayed in LG Control Center and its supported functions may differ depending on the model.
The figureshereinaresubjecttochangewithoutpriornotice.
RunningLGControlCenter
Selectthe[

button>[LGSoftware]torun[LGControlCenter].

text_image
LG Control Center LG Control Center System Settings > Configures various computer functions. ENERGY STAR Screen Sound Network Hardware Power Management > Sets the Power Mode of the computer. Set USB-C™ Charging Battery State Instant Booting Set up so that the system will automatically boot up, when you open up the notebook computer. Windows Security > Configures the User Account and Firewall option. Enable Firewall User Account Setting System Information Operating Microsoft Windows 10 System 64-bit Processor Intel(R) Core(TM) i7-1065G7 CPU @ 1.30GHz View More1 Minimize/Exit Button: Minimizes the size of the window, or exits the software.
2 help/info Button: Runs Help or displays information about the software.
3 System Settings: Sets the device settings such as the screen brightness, sound, and external display.
4 Power Management: Sets the USB-C™ charging function, battery status and battery life extensionfunction.
5 Windows Security: Sets User Account Control settings and Firewall settings.
6 Instant Booting: You can set the system to automatically boot whenever you open the notebook PC.
7 System Information: Displays the PC OS in use, processor information and other system information.
SystemSettingsScreen
YoucanusethisccreentoconfigurevariousdevicesinyourPC.

text_image
LG Control Center System Settings 1 Screen Brightness 100 Min Max Advanced Settings 2 Sound Size 9 Smaller Bigger Mute OFF 3 Touchpad Set whether to use the touch pad. Enable Disable 4 Color Temperature Adjust the color to a warm or cold col- for comfortable eyes or vividness. Cold Warm Apply 5 Keyboard Backlight Set the keyboard backlight. OFF Low High 6 Touch Screen Enable/Disable Touch Screen. ON 7 External Display PC screen Only 8 Hotkey mode setting Enable settings to use Hotkey without 'Fn' key. Not Use Use 9 Airplane Mode Enable/Disable Airplane mode. OFF 10 Silent Mode Fan Mode is set to Silent. (This may slow down the system.) OFF1 Screen: Allows you to adjust the system brightness. (This function is not supported in a model that does not provide the brightness settings in Windows.)
2 Sound: Allows you to adjust the volume of the sound or use the mute function.
3Touchpad: Allowsyoutosetwhethertousethetouchpad.
4 Color Temperature: The screen color can be set to cold(with a bluish tint) or warm(with a reddish tint).
5 Keyboard Backlight: Allows you to configure the Keyboard backlight.
6 Touch Screen: Allows you to set whether to use the touch screen.
7 External Display: Allows you to configure the connection mode of an external display connected tothePC.
8 Hotkey mode setting: Allows you to set the hot keys so that you can use them without pressing theFnkey.
9 Airplane Mode: Allows you to set the Airplane Mode. (It turns off the wireless LAN).
10SilentMode: Allowsyoutosetthefantothesilentmode.
PowerManagementScreen
YoucancheckorchangethesettingsrelatedtoPCUSB-C™portorbattery.

text_image
LG Control Center Power Management LG Control Center > Power Management 1 Set USB-CTM Charging Set Always-On Charging Sets the Always-On Charging function so that you can charge an external device even when the PC is turned off. 2 Battery State Check the remaining battery life and display when to replace the battery. (It is normal for the charging capacity to reduce overtime.) Max Normal Battery running time is normal. 3 Extend Battery Life Lower the charging capacity of the battery to 80% to extend the battery life. Automatic Sink Source OFF OFF1 SetUSB-C™Charging
- Set Always-On Charging: Allows you to set the USB port so that you can perform charging usingtheUSB-C™portevenwhenthePCisturnedoff.
- Set Charging Function: Sets the charging function for a USB-C™ port (Automatic, Sink, or Source).
2 Battery State: Allows you to measure the battery lifespan so that you can replace it timely.
3 Extend Battery Life: Allows you to increase the battery lifespan by lowering the battery charging level to 80% of the battery capacity.
WindowsSecurityScreen
YoucanchangetheUserAccountControlandfirewallsettingsinWindows.

text_image
LG Control Center Windows Security LG Control Center > Windows Security 1 User Account Control Settings User Account Control helps prevent your computer from being affected by harmful programs. • Always notify Notify me only when apps try to make changes to my computer (default). • Don't notify me when I make changes to Windows settings. • Never notify Apply 2 Firewall Settings to prevent hackers or malware from accessing the PC through the network and internet. Advanced Settings ON1 User Account Control Settings: Allows you to change the User Account Control settings in Windows.
2 Firewall: Turns on/off the Windows firewall. (It may not work if other vaccine software is installed inthePC.)
InstantBooting
YoucansetthesystemtoautomaticallybootwheneveryouopenthenotebookPC.
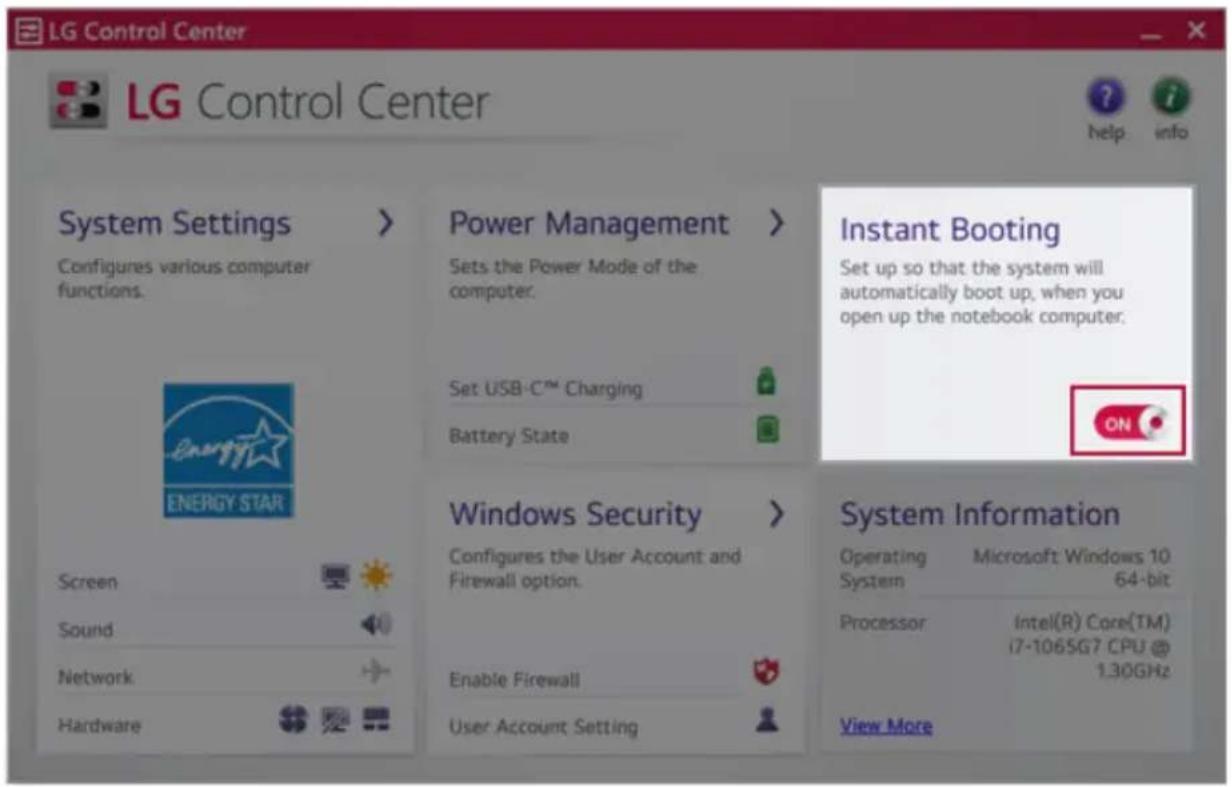
text_image
LG Control Center LG Control Center System Settings > Configures various computer functions. Energy Star ENERGY STAR Screen Sound Network Hardware Power Management > Sets the Power Mode of the computer. Set USB-C™ Charging Battery State Windows Security > Configures the User Account and Firewall option. Enable Firewall User Account Setting Instant Booting Set up so that the system will automatically boot up, when you open up the notebook computer. ON System Information Operating Microsoft Windows 10 System 64-bit Processor Intel(R) Core(TM) i7-1065G7 CPU @ 1.30GHz View MoreFAQ
Q: Batterystatusdisplays "Warning".
- The battery is a consumable item and its lifespan may decrease depending on the usage frequency and environment. It is recommended that you visit the LGElectronicsservicecentertohavethe battery replaced.
LGUpdateCenter
LGUpdateCenterallowsyoutoinstallvariousPCdrivers,applicationseasily.

TIP
It may not work properly depending on user preferences (security tools, etc.) and then network status.
You can use the LG Update Center to quickly install the latest drivers, or reinstall any deleted drivers.
UseLGUpdateCentertokeepyoursystemcurrentandoptimized.
The figureshereinaresubjecttochangewithoutpriornotice.
RunningLGUpdateCenter
Selectthe[

button>[LGSoftware]torun[LGUpdateCenter].
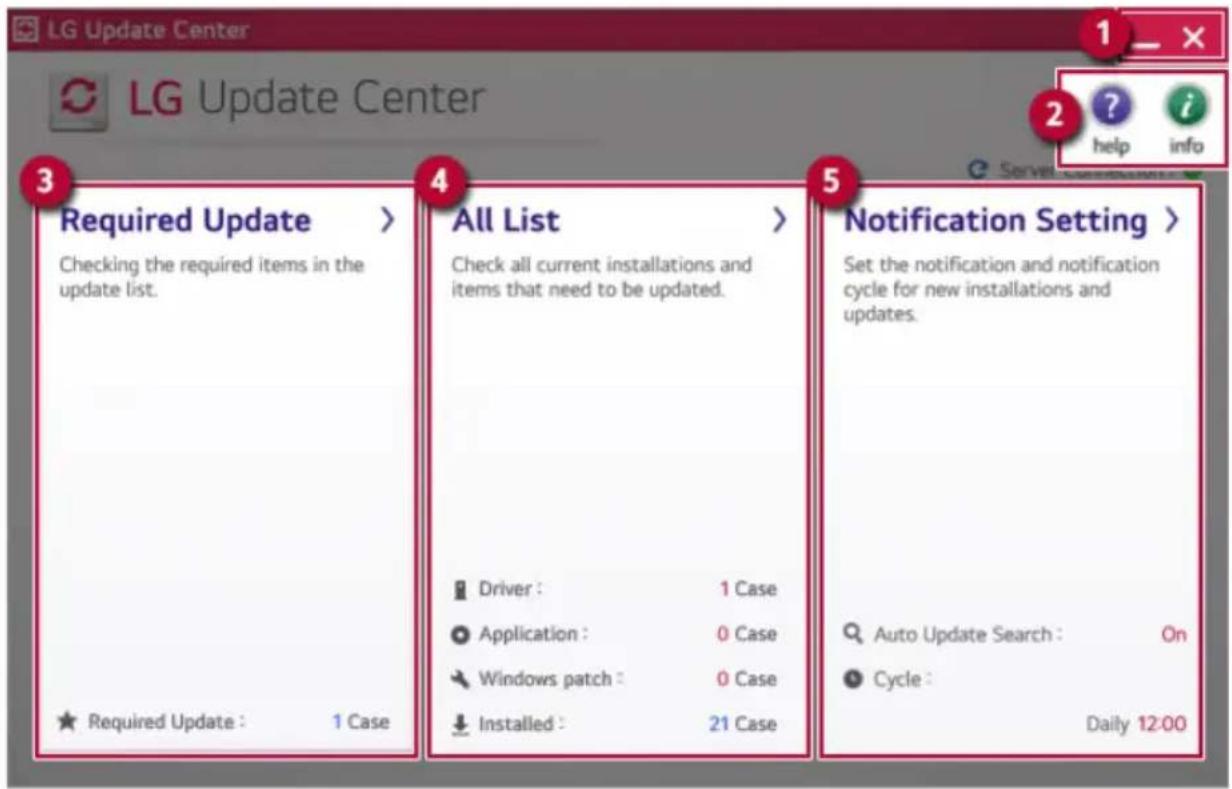
text_image
LG Update Center LG Update Center 3 Required Update > Checking the required items in the update list. ★ Required Update : 1 Case 4 All List > Check all current installations and items that need to be updated. Driver : 1 Case Application : 0 Case Windows patch : 0 Case Installed : 21 Case 5 Notification Setting > Set the notification and notification cycle for new installations and updates. Auto Update Search : On Cycle : Daily 12:001 Minimize/Exit Button: Minimizes the size of the window, or exits the software.
2 help/info Button: Runs Help or displays information about the software.
3 Required Update: Installs critical items that must be applied to the system.
4 All List: Displays and installs all required items for the system.
5 Notification Setting: Sets up notifications for online updates for installed items.
RequiredUpdate
Youcaninstallessentialupdatesanddriversthatarenecessaryforthesystem.
1 Selectthe[RequiredUpdate]menu.
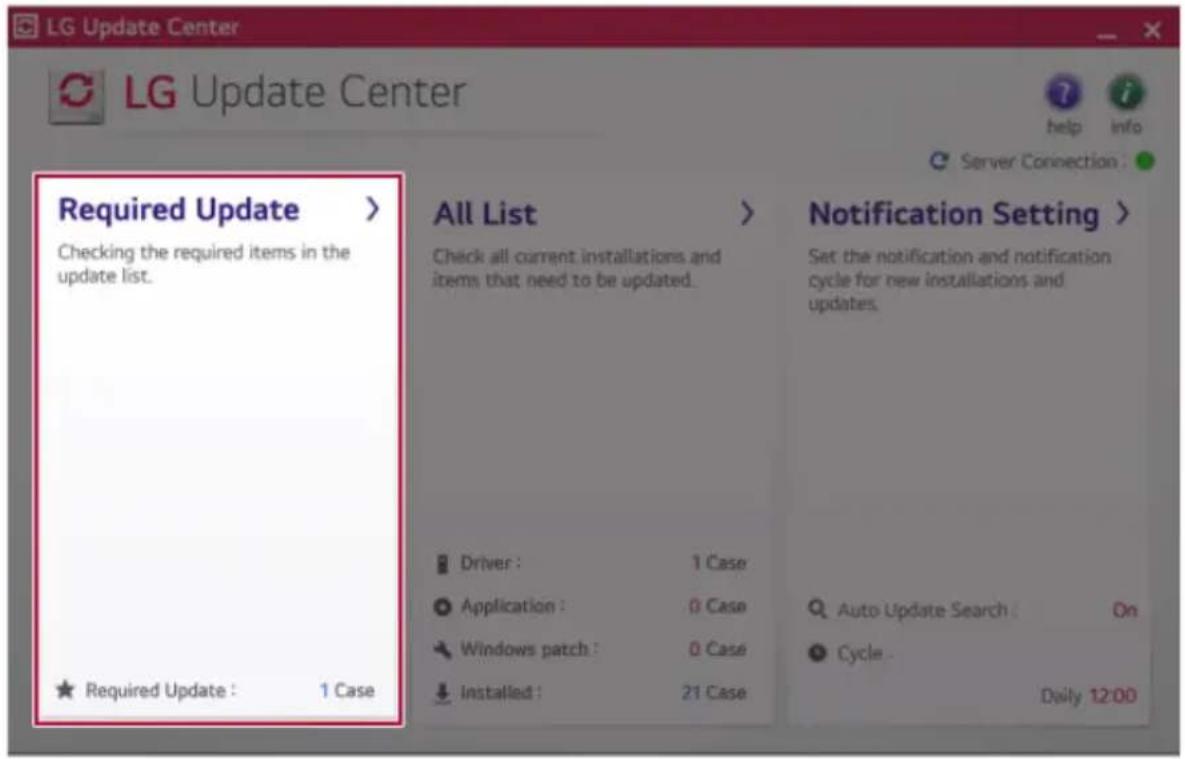
text_image
LG Update Center LG Update Center help info Server Connection : Required Update > Checking the required items in the update list. ★ Required Update : 1 Case All List > Check all current installations and items that need to be updated. Driver : 1 Case Application : 0 Case Windows patch : 0 Case Installed : 21 Case Notification Setting > Set the notification and notification cycle for new installations and updates. Auto Update Search : On Cycle . Daily 12:002 When the Required Update list appears, select the updates to install and press the [Installation] button.
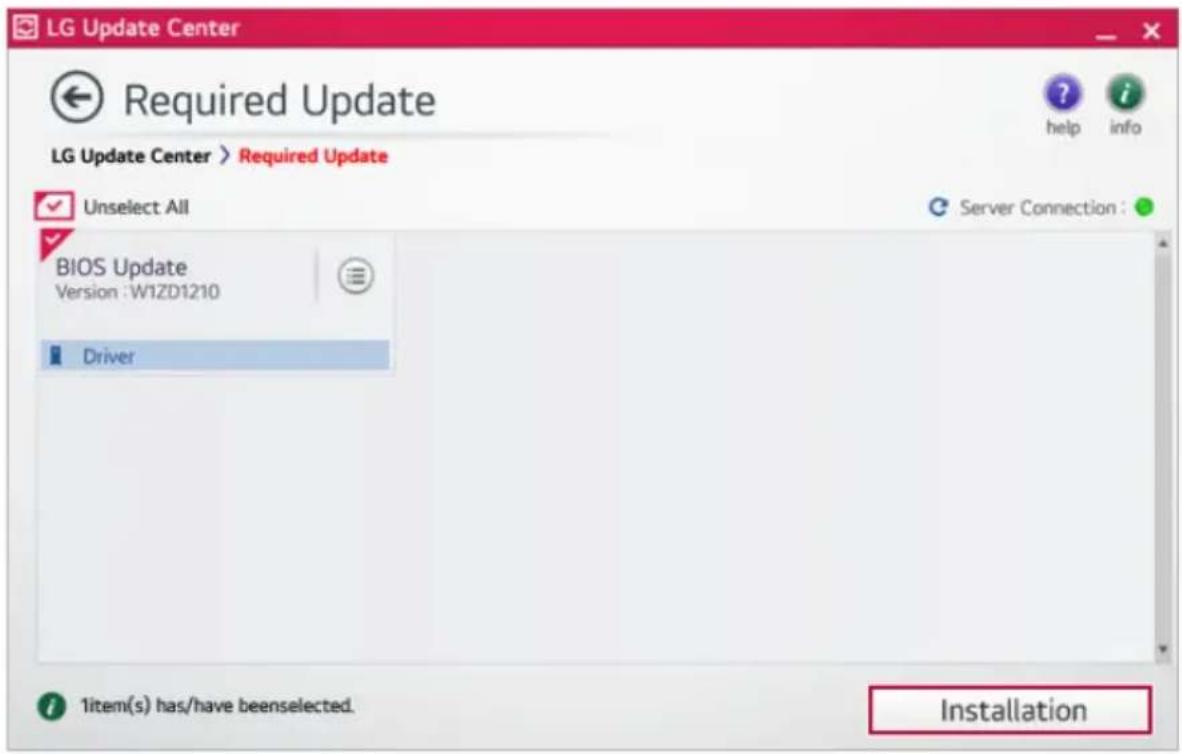
text_image
LG Update Center Required Update LG Update Center > Required Update Unselect All BIOS Update Version : W1ZD1210 Driver Server Connection : 1item(s) has/have beenselected. Installation
TIP
Allitemsareselectedbydefault.
AllList
Youcaninstallallupdatesanddriversthatcanbeinstalledinthesystem.
1 Selectthe[AllList]>[Updateneeded]menuitem.
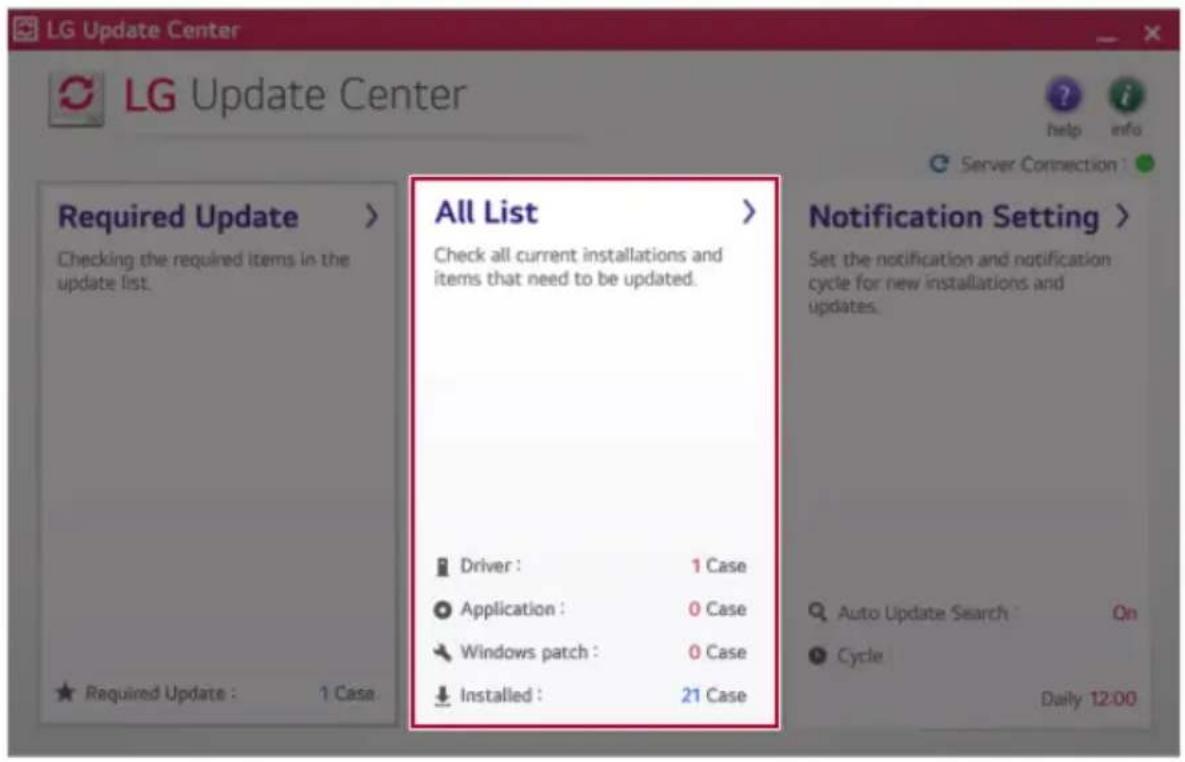
text_image
LG Update Center LG Update Center ? help info Server Connection Required Update > Checking the required items in the update list. All List > Check all current installations and items that need to be updated. Driver : 1 Case Application : 0 Case Windows patch : 0 Case Installed : 21 Case Requirement Update : 1 Case. Notification Setting > Set the notification and notification cycle for new installations and updates. Auto Update Search On Cycle Daily 12:002Selecttheupdatestoinstallandpressthe[Installation]button.
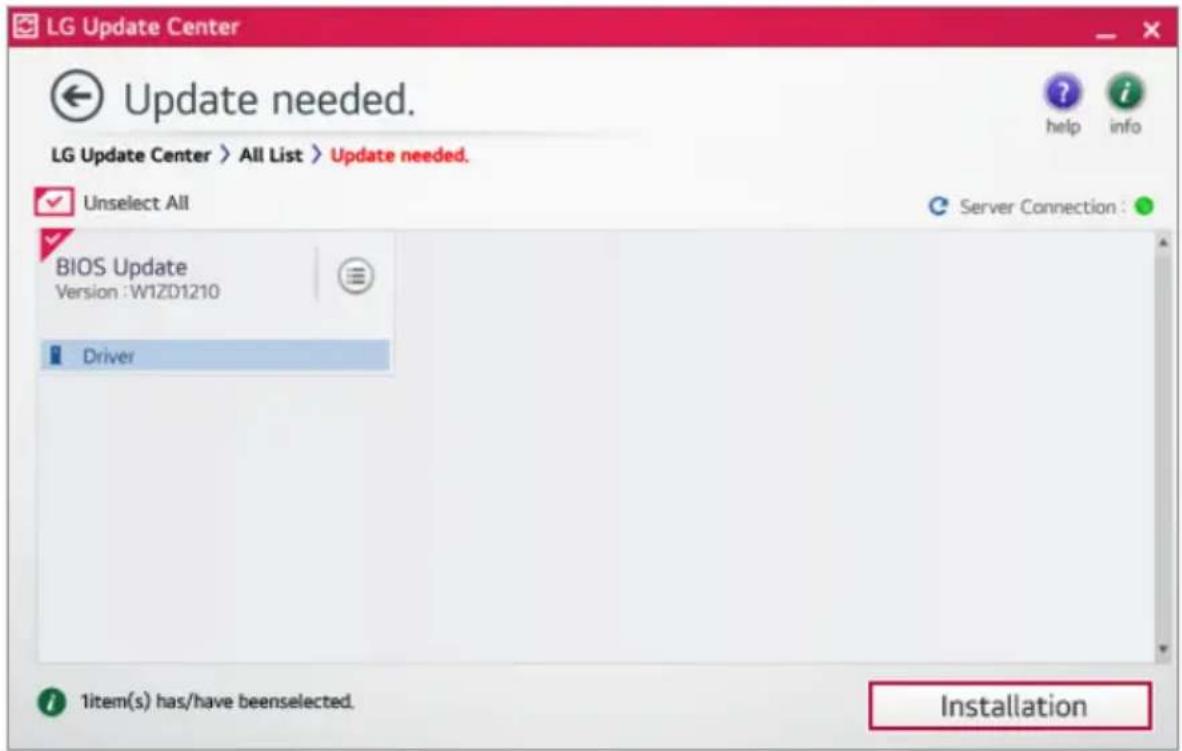
text_image
LG Update Center Update needed. LG Update Center > All List > Update needed. Unselect All BIOS Update Version :W1ZD1210 Driver 1item(s) has/have beenselected. Server Connection : Installation
TIP
Allitemsareselectedbydefault.
NotificationSetting
Youcancheckthecriticalupdatestosetwhethertodisplaythenotificationsforupdateinstallation.

TIP
TheAutoUpdateSearchfunctionissetto[ON]bydefault.Ifyousetitto[OFF],the notificationsarenotdisplayed.
1 Selectthe[NotificationSetting]menu.

text_image
LG Update Center LG Update Center Server Connection : Required Update > Checking the required items in the update list. All List > Check all current installations and items that need to be updated. Driver : 1 Case Application : 0 Case Windows patch : 0 Case Installed : 21 Case Required Update : 1 Case Notification Setting > Set the notification and notification cycle for new installations and updates. Auto Update Search : On Cycle : Daily 12:002Set[AutoUpdateSearch]to[ON]or[OFF].

text_image
LG Update Center Notification Settings LG Update Center > Notification Settings Auto Update Search Use the Notification feature to check for required update installation: ON Cycle Daily 12:00 Date: 2019Year 9Month 17Day 12:00 Notification List Setup Choose to turn on/off the Update Notification function by items. Exceptions to Notification : 0 Case3Setthe[Cycle].

text_image
LG Update Center Notification Settings LG Update Center > Notification Settings Auto Update Search Use the Notification feature to check for required update installation. ON Cycle Daily 12:00 Date: 2019Year 9Month 17Day 12:00 Notification List Setup Choose to turn on/off the Update Notification function by items. Exceptions to Notification : 0 Case4Select[NotificationListSetup]menutoturnon/offthenotificationforeachitem.
FAQ
Q:Isthereawaythatlcaninstallthedriversandapplicationseasily?
- You can select [Required Update] or [All List] menu in LG Update Center to automatically install the drivers and applications that you want.
Q: Theserverconnectionstatusisnotdisplayedintheprogram.
- CheckifyourPCisproperlyconnectedtothewiredorwirelessLAN.
- CheckifInternetconnectionworksproperly.
Q:Iwanttohidetheupdatenotifications.
- Selectthe[NotificationSetting]menuandsetthe[AutoUpdateSearch]to[OFF].
- Select[NotificationListSetup]menutoturnon/offthenotificationforeachitem.
Q: Howcanlupdatetheitemsthatareexcludedfromthenotificationlist?
- You can also install the items that are excluded from the notification list by using the [Required Update]or[AllList]menu.
LGReaderMode
LG Reader Mode prevents the users from eyestrain and helps them to read the PC screen comfortably bydisplayingthescreenjustlikeaprintedpaper.
UsingLGReaderMode

CAUTION
Using the Reader Mode and the Night light at the same time can cause color distortion. When youusetheReaderMode,turnofftheNightlight.
- Press the [ ] icon to the right of the taskbar to run the Action Center and press the [Nightlight]tiletoturnon/offtheNightlight.

TIP
YoucanusehotkeystousetheReaderModefunctionmoreconveniently.
- Press the [Fn] + [F9] keys to switch the PC screen to reader mode. Press them again to turnoffreadermode.
1Pressthe[

]icononthetaskbar.

text_image
R LG Life's Good 12:06 PM 6/13/20192 If you select the [Reader Mode On] menu item, the PC screen switches to Reader Mode.
TIP
Select[ReaderModeOff]toturnoffthereadermode.

text_image
Program Information Reader Mode On Reader Mode Off Advanced Settings LG Life's Good 12:06 PM 6/13/2019UsingAdvancedSettings
1 Clicktheicon[

]ontherightofthetaskbarandselectthe[AdvancedSettings]menuitem.

TIP
The[AdvancedSettings]menuisactivatedwhenReaderModeison.
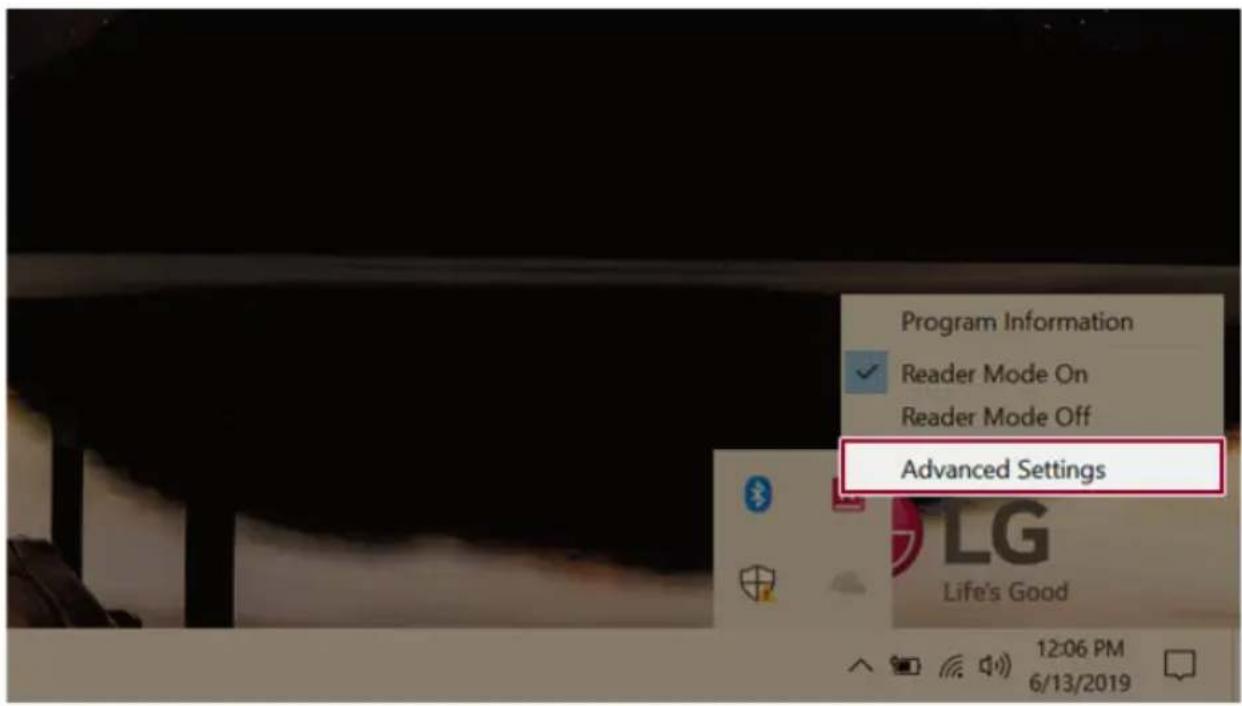
text_image
Program Information Reader Mode On Reader Mode Off Advanced Settings LG Life's Good 12:06 PM 6/13/20192 The [Advanced Settings] windows appears.
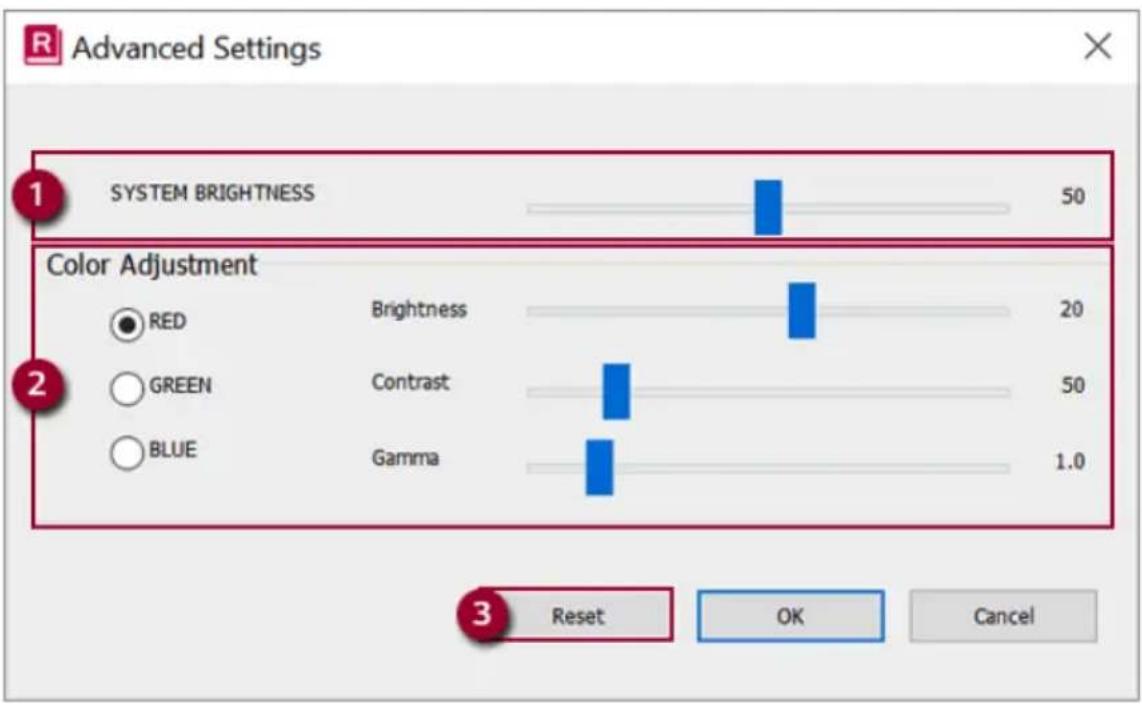
text_image
R Advanced Settings 1 SYSTEM BRIGHTNESS 50 Color Adjustment RED Brightness 20 GREEN Contrast 50 BLUE Gamma 1.0 3 Reset OK CancelaSystemBrightness:Systembrightnesscanbeadjusted.
b Color Adjustment: Color and its brightness, contrast and gamma can be adjusted.
cReset:Settingsareresettothedefaultsettings.
DTS:XUltra
DTS:X Ultra provides rich, sonorous sound when you listen to music, watch videos or play games in the PC.
DTS:XUltramaynotbeapplieddependingonthemodel.
The figureshereinaresubjecttochangewithoutpriornotice.
RunningProgramDTS:XUltra
1Pressthe[

]buttontoexecute[DTS:XUltra].
2 The default is Internal Speakers Mode, and it works in Headphones Mode when the earphone is connected.
DTS:XUltraTour
text_image
Graphic EQ Content Mode Automatic Music Voice Movies Strategy RPG Shooter Custom Audio 1 Device Generic Over-Ear Headphones Headphones 9 Personalized EQ Set Up Now1 Power:DTS:XUltraTurnsthepoweron/off.
2 Automatic: Provides an environment that is automatically optimized for the running application.
3Music:Providesanoptimizedenvironmentformusicplayback.
4Voice:Providesanoptimizedenvironmentforvoice playback.
5 Movies: Provides an optimized environment for movie playback.
6 Strategy, RPG and Shooter: Provides an optimized environment for each game.
7 Custom Audio: Selects the spatial model and adjusts the expansion power, and it is optimized for each setting.
8 Device: Allows you to select the connected earphone/headphone. (Provides headphone mode only)
9 Personalized EQ: Sets an equalizer optimized for your personal hearing. (Provides headphone modeonly)
10GraphicEQ:Setstheequalizer.

TIP
If you want to remove AudioDriver or DTS: XUltra, remove [DTS: XUltra] and [Synaptics SmartAudioHDAudioDriver] in the orders specified and restart the system.
If you want to install AudioDriver or DTS: XUltra, remove [DTS: XUltra] and [Synaptics SmartAudioHDAudioDriver] in the orders specified and install [Synaptics SmartAudioHD AudioDriver]. Then restart and install [DTS: XUltra].
- If you donot remove or install them in the orders specified, an error may occur.
LGPowerManager
LG Power Manager allows you to configure the power settings according to the usage environment to manage the battery efficiently.

TIP
LGPowerManagerisprovidedwiththeUWPappenditcanbedownloadedagainonthe
MicrosoftStoreifitisdeleted.Ifyouwanttodownloadthefilesagain,connecttothe
MicrosoftStore, searchforLGPowerManagerandinstallthem.
The figureshereinaresubjecttochangewithoutpriornotice.
UsingLGPowerManager
Clickthe[

]buttontolaunch[LGPowerManager].

TIP
Double-clickthe[

iconontherightsideofthetaskbartostartthe[LGPowerManager].

text_image
Screenshot of a desktop application showing a red button labeled 'G' with icons and status bar at bottom
text_image
LG Power Manager 94% Battery in use Battery Management Settings 1 2 5 User Hibernate Mode > Display Off Time 4minutes. Duration until Hibernate 4minutes. 6 Battery Use per App > -Apps using a lot of battery power (for the past 24 hours) Windows Explorer LG Control Center Console Window Host1 Helpbutton: Display the Helpmenu.
2 Minimize/Maximize/Exit button: Allows you to minimize or maximize the window or exit the program.
3 Battery Status: Displays the battery level and battery usage status including power connection.
4 Battery Management Settings: Allows you to set a window theme to Dark Mode or set the notificationfunctionforbatterystatus.
5 User Hibernate Mode: Allows you to create a user mode and configure the detailed settings such asDisplayOffTimeandDurationuntilHibernate.
6 Battery Use per App: Allows you to check the battery use of a running app. The actual content may differ depending on the Windows OS version and usage environment. For more detailed information, click themenu.

TIP
LGPowerManagerissettorunautomaticallywhenrunningWindows.
YoucanchangetheAutorunsettingsbyright-clickingthe[ ]iconontherightsideofthe taskbarandselectingthe[RunautomaticallywhenstartingtheWindows]menu.

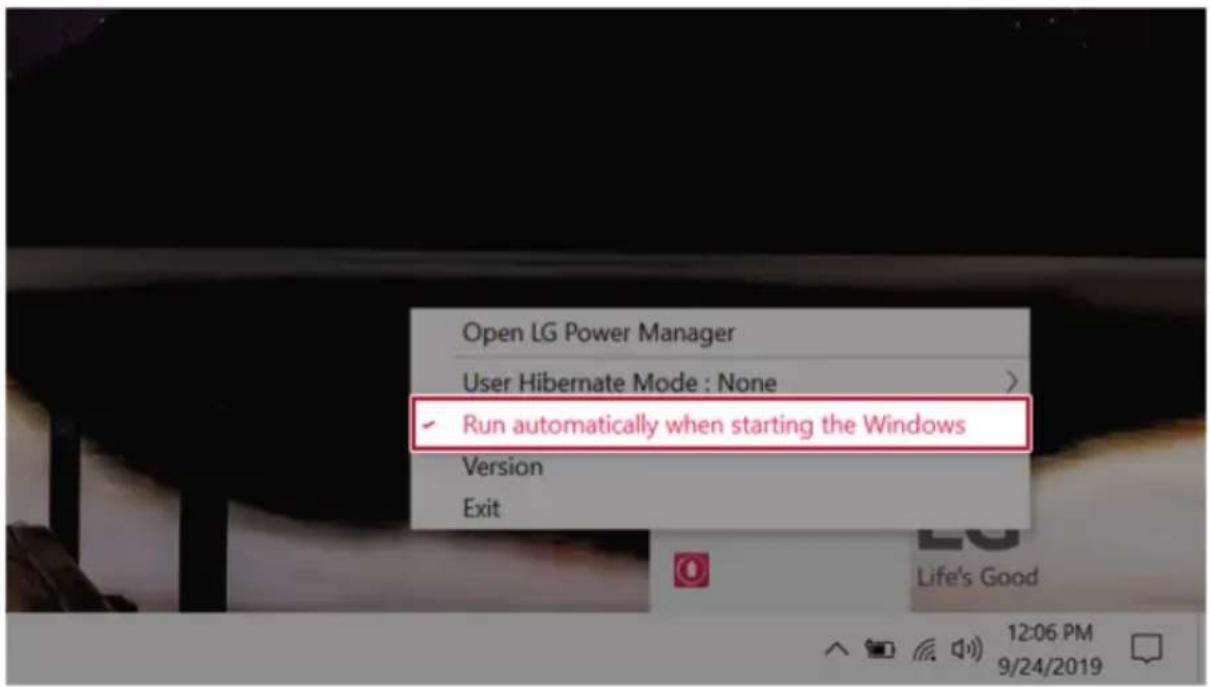
text_image
Open LG Power Manager User Hibernate Mode : None > ✓ Run automatically when starting the Windows Version ExitRestoringtheSystem
RestoringtheSystem
If the system has an error, you can use Windows 10's recovery function to recover or restore the system to its initial pre-purchase state.

CAUTION
If you have deleted therestoration data in the protected area of the disk, or have arbitrarily installed another operating system, therestore function may not work.
Torecoverthesystem,theACadaptermustbeconnected.
1 Clickthe[]buttonandselectthe[Settings]menu.

text_image
Productivity GOO Mai e Praiser Microsoft Store GO GO Free Server GO Proctor LG Slyh Road Type: Store To starch2Whenthe[Settings]screenappears,select[Update&Security].

text_image
Windows Settings Find a setting Systems Database, saving, qualification, power Devices Business, providers, server Phone Use your Account, drive Network & Internet 16:17, wireless, wireless, WiFi Personalization Background, text, server, cloud Apps Download, network, virtual, devices Accounts Use accounts, wireless, wireless, wireless Time & Language Search, remote, real Earning Green-to-Greenflow, Improving Game Make Ease of Access Newuser, upgraded, high customers Search Find up this permission Cortara Compute language authentication Privacy Use phones, camera, email Update & Security Windows Update, recovery, backup3 Select the [Recovery] menu and press [Get started] in the Reset this PC menu.
text_image
Settings Home Find a setting Update & Security Windows Update Delivery Optimization Windows Security Backup Recovery Reset this PC If your PC isn't running well, resetting it might help. This lets you choose to keep your personal files or remove them, and then reinstalls Windows. Get started Start up from a device or disk (such as a USB drive or DVD), change your PC's firmware settings, change Windows startup settings, or restore Windows from a system image. This will restart your PC. Restart now More recovery options Learn how to start fresh with a clean installation of Windows4 If the following option screen appears, select a desired option to proceed with recovery.
text_image
Reset this PC Choose an option Keep my files Removes apps and settings, but keeps your personal files. Remove everything Removes all of your personal files, apps, and settings. CancelKeepMyFiles
Itremovestheappsandtheirsettingswithoutlossofpersonalfiles.
1 Select[Keepmyfiles].

text_image
Reset this PC Choose an option Keep my files Removes apps and settings, but keeps your personal files. Remove everything Removes all of your personal files, apps, and settings. Cancel2Checkthecurrentsettings.

text_image
Reset this PC Additional settings Current settings: • Restore apps and settings which came with this PC Change settings Get help Back Next Cancel3 If you need to change the settings, press [Change settings] and press the [Confirm] button.
text_image
Reset this PC Additional settings Current settings: • Restore apps and settings which came with this PC Change settings Get help Back Next Cancel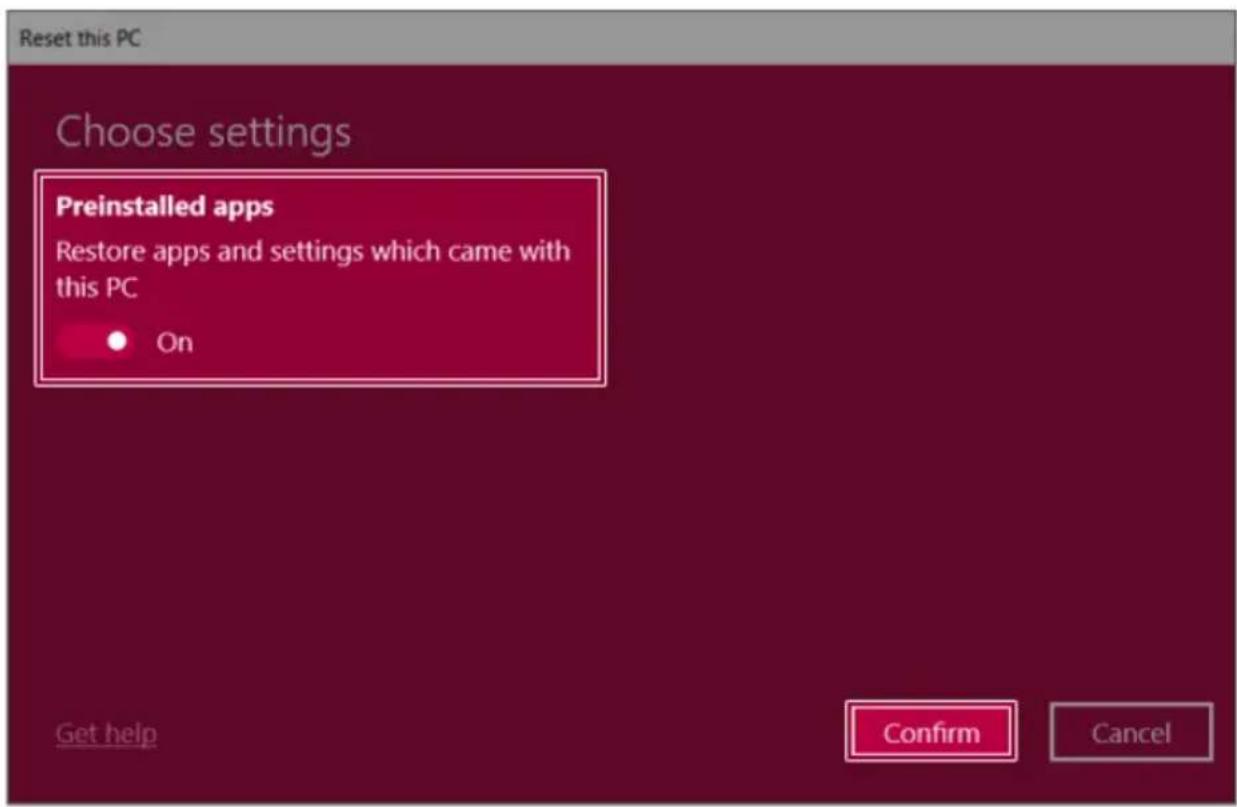
text_image
Reset this PC Choose settings Preinstalled apps Restore apps and settings which came with this PC ● On Get help Confirm Cancel4Press[Next]toproceedwithininstallationasguided.

text_image
Reset this PC Additional settings Current settings: • Restore apps and settings which came with this PC Change settings Get help Back Next CancelRemoveeverythings
Removesallitemsfromthesystemandrestorethesystemtoitsinitialpre-purchasestate.

CAUTION
Alldataislostduringtheinitialization,soyoumustbackupallcriticaldatainadvance. Itmaytakeabout5hoursorlongerdependingonthesystemconditions.
1 Select[Removeeverything].
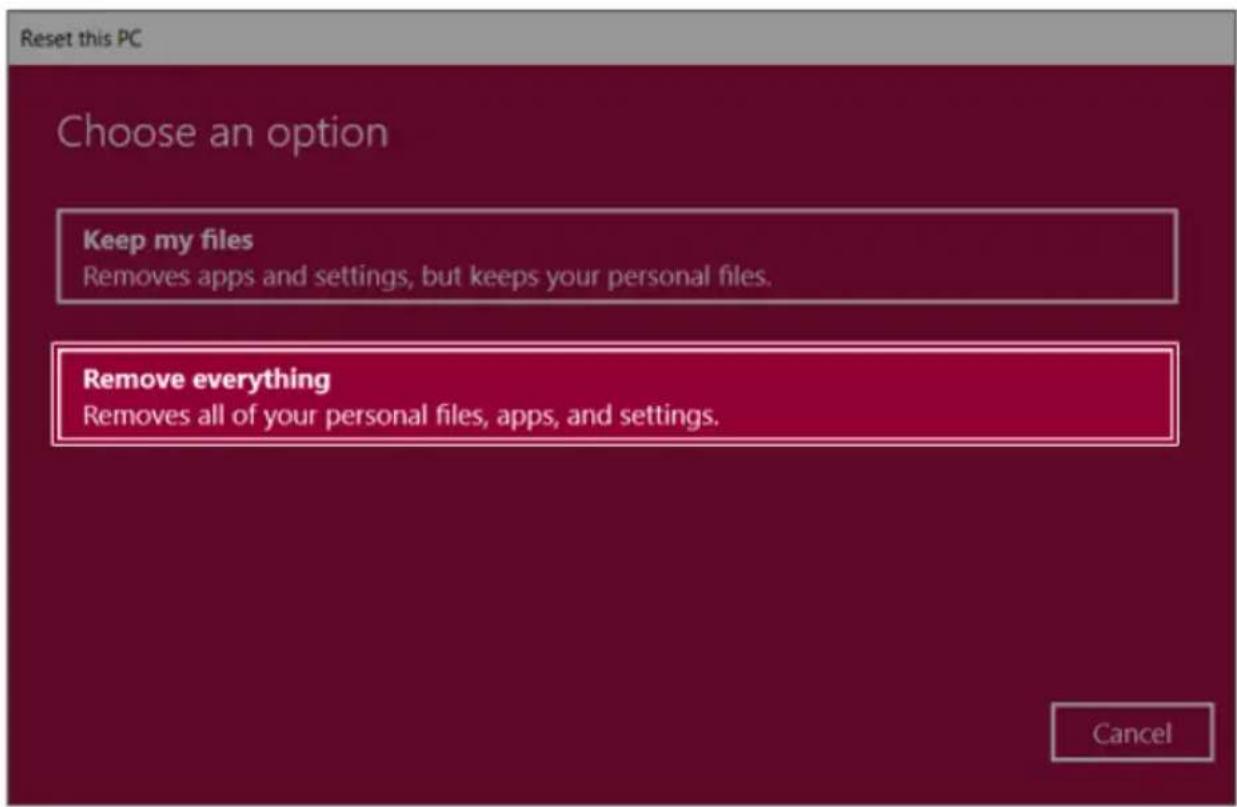
text_image
Reset this PC Choose an option Keep my files Removes apps and settings, but keeps your personal files. Remove everything Removes all of your personal files, apps, and settings. Cancel2Check the current settings.

text_image
Reset this PC Additional settings Current settings: • Just remove your files. This is quicker, but less secure • Remove all files only from the drive where Windows is installed • Remove provisioning packages that let your PC use workplace resources Change settings Get help Back Next Cancel3 If you need to change the settings, press [Change settings] and press the [Confirm] button.

text_image
Reset this PC Additional settings Current settings: • Just remove your files. This is quicker, but less secure • Remove all files only from the drive where Windows is installed • Remove provisioning packages that let your PC use workplace resources Change settings Get help Back Next Cancel
text_image
Reset this PC Choose settings Data erasure Just remove your files. This is quicker, but less secure Off Data drives Remove all files only from the drive where Windows is installed Off Workplace resources Remove provisioning packages that let your PC use workplace resources Off Get help Confirm Cancel4Press[Next]toproceedwithininstallationasguided.

text_image
Reset this PC Additional settings Current settings: • Just remove your files. This is quicker, but less secure • Remove all files only from the drive where Windows is installed • Remove provisioning packages that let your PC use workplace resources Change settings Get help Back Next CancelSetupandUpgrade
InstallingtheDriver
The figures herein may differ by language selection and a subject to changewithout prior notice.
UsingLGUpdateCentertoinstalltheDriver
1 Selectthe[

button>[LGSoftware]torun[LGUpdateCenter].

text_image
LG Update Center LG Update Center Server Connection : Required Update > Checking the required items in the update list. ★ Required Update : 1 Case All List > Check all current installations and items that need to be updated. Driver : 1 Case Application : 0 Case Windows patch : 0 Case Installed : 21 Case Notification Setting > Set the notification and notification cycle for new installations and updates. Auto Update Search : On Cycle : Daily 12:002 Select [Required Update] or [All List] to install the driver.

TIP
You can use the LG Update Center to quickly install the latest drivers, or reinstall any deleted drivers.
UseLGUpdateCentertokeepyoursystemcurrentandoptimized.
HowtoDownloadLGUpdateCenter
You can install LG Update Center by downloading it from the LG Electronics Website (www.lg.com).
StartingSystemSetup
SystemsetupmeansstoringthehardwareconfigurationinformationofthePCintheflashmemory. Throughsystemsetup,thePCretrievesvariousinformationincludingcurrentdateandtime,memory capacity,andharddiskcapacityandtype.
Yousetupthesystemwhenyousetpasswords,changethebootorder,andaddnewperipheraldevices tothemachine.
ItemsdisplayedontheSetupscreenmaydifferbymodeltypeandspecification.
•RefertoSettingthePassword.
•RefertoChangingorDeletingthePassword.
•RefertoRestoringtheFactoryDefaultSettings.

TIP
Tousethesystemsetup(F2),bootingdeviceselection(F10),youneedtorestartthesystem (click[Restart]inthesystempowermenu)andthenimmediatelypressthecorresponding functionkeyduetothefastbootingspeed.

CAUTION
- Donotchangethesisystemsetupunlessnecessary.Incorrectsystemsetupmaycause errorsduringsystemoperation.Usecautionwhenchangingthesystemsetup.
- For performance improvement, the system setup menu configuration and the initial setup statusmaybechangedandmaybecomedifferentfromimagesincludedintheuser manual.
1 Rebootthesystemandpress[F2].

text_image
LG Life's Good2Inafewmoments,thesystemsetupscreenappears.

text_image
Phoenix SecureCore Technology Setup Main Advanced Security Boot Exit System Date [09/26/2017] System Time [12:00:00] ► System Information Item Specific Help view or set system date. F1 Help ↑↓ Select Item +/- Change Values F9 Setup Defaults ESC Exit ↔ Select Menu Enter Select ► Sub-Menu F10 Save and ExitKeysUsedinSystemSetup
| KeysFunction | |
| Enter | Selectsthecurrentitem. |
| Esc | Todeselectthecurrentitemortomovetothepreviousscreen. |
| ▲,▼,◄,►(Arrow keys) | Movesthecursorup,down,left,andright. |
| +,- | Increasesordecreasestheitemvalue. |
| F10 | Savesthenewsettingsorexitsthesystemsetup. |
SettingthePassword
ThisprocessistosetapasswordsothatotherpeoplecannotusethePCorchangethesettings.
Theusercanetapasswordwhilebootingthesystemorsettingupthesystem.
Themodelintheexamplecandifferfromactualmodelsandissubjecttochangeforperformance improvements,withoutpriornotice.

CAUTION
- Withouttheregisteredpassword,accesstothesystemwillbedenied.Writedownand keepthepasswordinasafeplace.
SetSupervisorPassword
ThepasswordpreventsunauthorizedpeoplefromaccessingthePC.Bydefault,nopasswordissetfor themachine.IfanunauthorizedpersonchangesthepasswordintheSystemSetup,youwillbeunable toaccessthesystem.
1 After opening the system setup screen, use the arrow keys to move to [Security].
2 When the Security item appears, select [Set Supervisor Password] using the arrow keys, and thenpressthe[Enter]key.
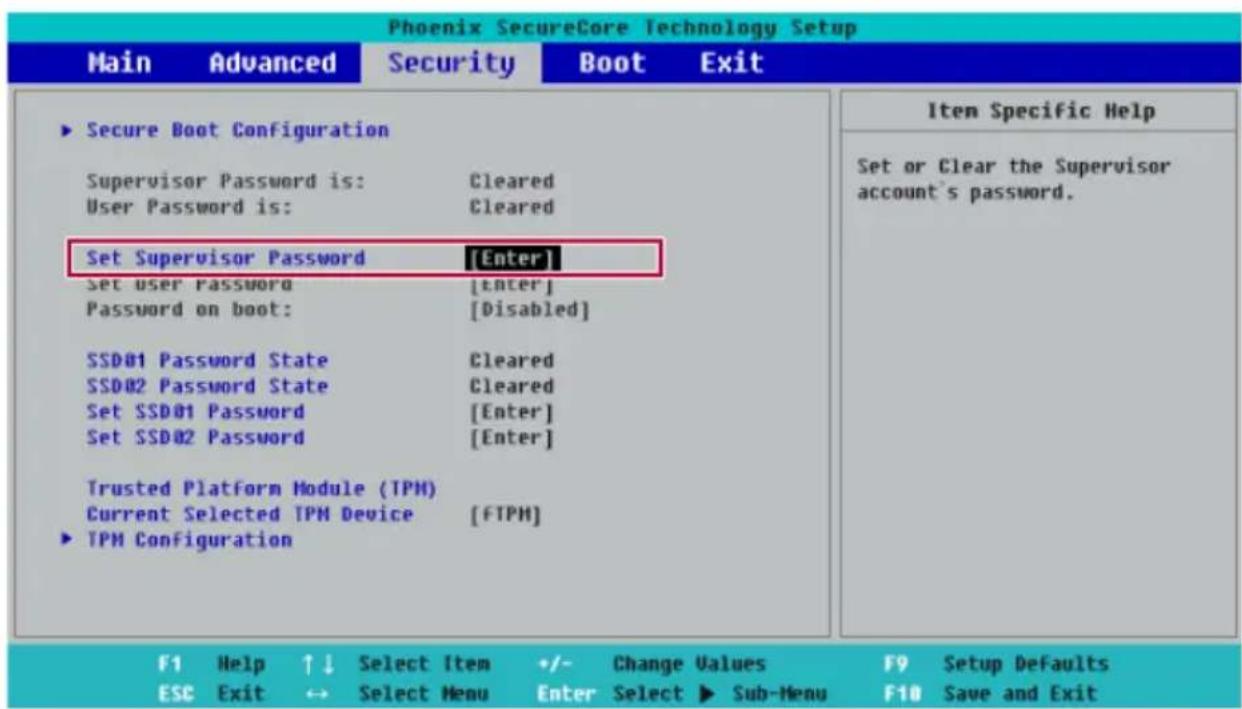
text_image
Phoenix SecureCore Technology Setup Main Advanced Security Boot Exit ► Secure Boot Configuration Supervisor Password is: Cleared User Password is: Cleared Set Supervisor Password [Enter] Set user password [enter] Password on boot: [Disabled] SSD01 Password State Cleared SSD02 Password State Cleared Set SSD01 Password [Enter] Set SSD02 Password [Enter] Trusted Platform Module (TPM) Current Selected TPM Device [FTPM] ► TPM Configuration Item Specific Help Set or Clear the Supervisor account's password. F1 Help ↑↓ Select Item +/- Change Values F9 Setup Defaults ESC Exit ↔ Select Menu Enter Select ► Sub-Menu F10 Save and Exit3 When the Set Supervisor Password setting screen appears, enter the password and press the [Enter]key.Thepasswordshouldnotexceed8charactersandshouldconsistofEnglishletters(A-Z),numbers(0-9),andspecialcharactersoracombinationofthem.
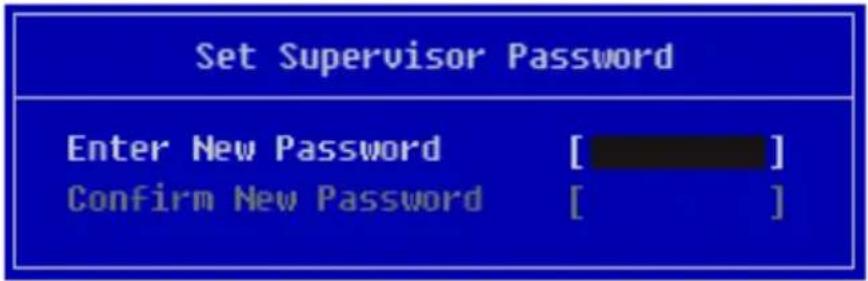
text_image
Set Supervisor Password Enter New Password [ ] Confirm New Password [ ]4 WhentheNoticescreenappears, pressthe[Enter]key.
| Notice |
| Changes have been saved. [OK] |
5 Tosavethechangesinthesystemsetup, press[F10].
6 When the Setup Confirmation screen appears, check [Yes] and press the [Enter] key. The PC will restart.
| Setup Confirmation | |
| Save configuration changes and exit now? [Yes] | [No] |

TIP
- With Supervisor Password, you are authorized to set all items in the System Setup and tosetPasswordonboot.IncaseotherpeoplealsousethePC,itisrecommendedtoset theSetUserPassword.
SetUserPassword
The password set by the Set User Password process is lower in level than that set by the [Set Supervisor Password] process, and so the user can use the [Set User Password] only after setting a passwordinthe[SetSupervisorPassword]menu.
1 After opening the system setup screen, use the arrow keys to move to [Security].
2 When the Security item appears, press the [Enter] button in the [Set User Password] menu.

text_image
Phoenix SecureCore Technology Setup Main Advanced Security Boot Exit ► Secure Boot Configuration Supervisor Password is: Set User Password is: Cleared Set Supervisor Password [Enter] Set User Password [Enter] Password on boot: [Disabled] SSD01 Password State Cleared SSD02 Password State Cleared Set SSD01 Password [Enter] Set SSD02 Password [Enter] Trusted Platform Module (TPM) Current Selected TPM Device [FTPM] ► TPM Configuration Item Specific Help Set or Clear the User account's password. F1 Help ↑↓ Select Item +/- Change Values F9 Setup Defaults ESC Exit ↔ Select Menu Enter Select ► Sub-Menu F10 Save and Exit3 When the Set User Password setting screen appears, enter the password and press the [Enter] key. The password should not exceed 8 characters and should consist of English letters (A-Z), numbers (0-9), and special characters or combinations of them.

text_image
Set User Password Enter New Password [ ] Confirm New Password [ ]4 WhentheNoticescreenappears, pressthe[Enter]key.
| Notice |
| Changes have been saved. [OK] |
5 Tosavethechangesinthesystemsetup, press[F10].
6 When the Setup Confirmation screen appears, check [Yes] and press the [Enter] key. The PC will restart.
| Setup Confirmation | |
| Save configuration changes and exit now? [Yes] | [No] |

TIP
- [User Password] allows limited access to the items in the System Setup compared to the [SupervisorPassword] item.
Passwordonboot
Password on boot protects the system by requesting [Set Supervisor Password] or [Set User Password] duringbootup.
1 After opening the system setup screen, use the arrow keys to move to [Security].
2 When the Security item appears, set a password for [Set Supervisor Password] or passwords for both[SetSupervisorPassword]and[SetUserPassword].
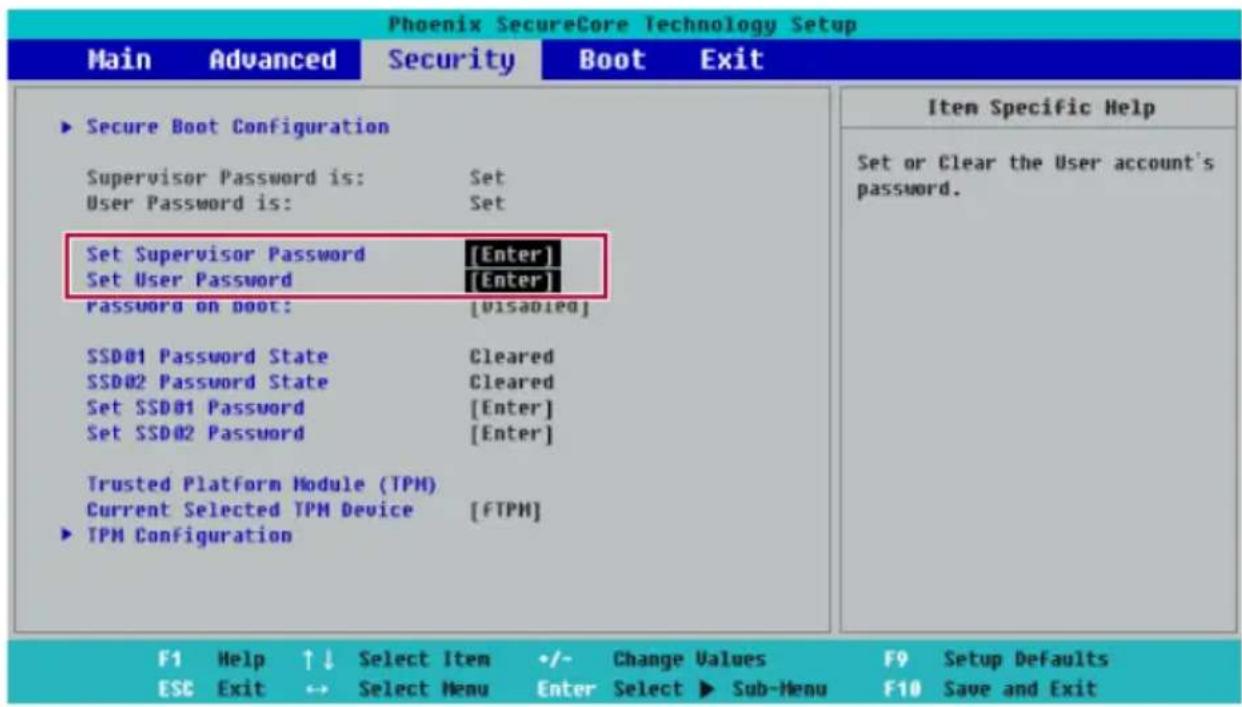
text_image
Phoenix SecureCore Technology Setup Main Advanced Security Boot Exit ► Secure Boot Configuration Supervisor Password is: Set User Password is: Set Set Supervisor Password [Enter] Set User Password [Enter] Password on boot: [Disabled] SSD01 Password State Cleared SSD02 Password State Cleared Set SSD01 Password [Enter] Set SSD02 Password [Enter] Trusted Platform Module (TPM) Current Selected TPM Device [FTPM] ► TPM Configuration Item Specific Help Set or Clear the User account's password. F1 Help ↑↓ Select Item +/- Change Values F9 Setup Defaults ESC Exit → Select Menu Enter Select ► Sub-Menu F10 Save and Exit3 The popup screen will show up, after selecting [Password on boot] and press [Enter]. After selecting [Enabled] and press [Enter], [Password on boot] will be complete.
| Phoenix SecureCore Technology Setup | ||||
| Main Advanced Security Boot Exit | ||||
| Secure Boot Configuration Supervisor Password is: Set User Password is: Set Set Supervisor Password [Enter] Set User Password [Enter] Password on boot: [Enabled] | Item Specific Help Enable/Disable User Authentication Prompt on boot. | |||
| SSD01 Password State Cleared SSD02 Password State Cleared Set SSD01 Password [Enter] Set SSD02 Password [Enter] | ||||
| Trusted Platform Module (TPM) Current Selected TPM Device [FTPM] TPM Configuration | ||||
| F1 Help ↑↓ Select Item +/- Change Values F9 Setup Defaults ESC Exit ↔ Select Menu Enter Select ▶ Sub-Menu F10 Save and Exit | ||||
SetSSDPassword/NVMe™Password

TIP
SomemodelsinstalledwithNVMe™maynotsupportthepasswordsettings.
Depending on the model, the menu name may be displayed as SSD Password, NVMe™ Password, etc.
For a model equipped with two SSD or NVMe™ devices, the menu name may be displayed as SSD01,SSD02,NVMe™1,NVMe™2,etc.
SSD Or, for a model equipped with two NVMe™ devices, you can set a password for each device. If both passwords are set, the password input window appears twice during the booting process.
The password input windows appear according to the [Boot Priority order] in the [Boot] menu.
1 After opening the system setup screen, use the arrow keys to move to [Security].
2 When the Security item appears, select [Set SSD01 Password] using the arrow keys and press the[Enter]key.
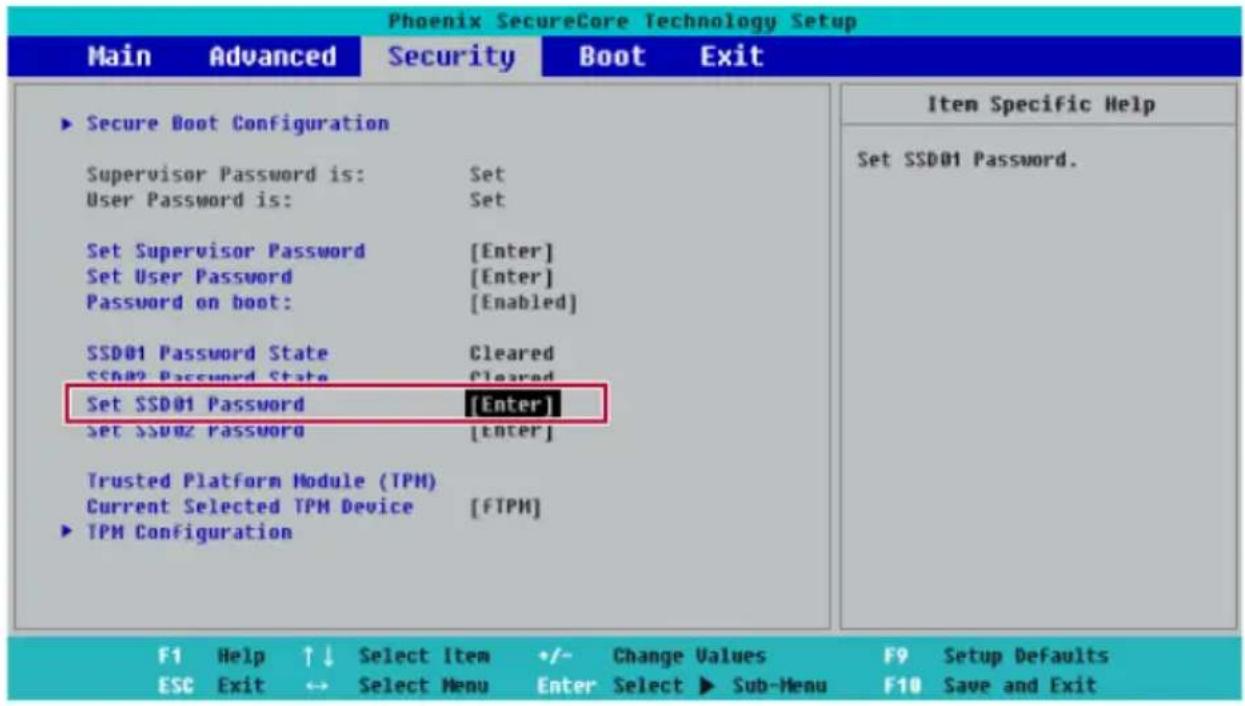
text_image
Phoenix SecureCore Technology Setup Main Advanced Security Boot Exit ► Secure Boot Configuration Supervisor Password is: Set User Password is: Set Set Supervisor Password [Enter] Set User Password [Enter] Password on boot: [Enabled] SSD01 Password State Cleared SSD02 Password State Cleared Set SSD01 Password [Enter] Set SSD02 Password [Enter] Trusted Platform Module (TPM) Current Selected TPM Device [FTPM] ► TPM Configuration Item Specific Help Set SSD01 Password. F1 Help ↑↓ Select Item +/- Change Values F9 Setup Defaults ESC Exit ↔ Select Menu Enter Select ► Sub-Menu F10 Save and Exit3 When the Set SSD01 Password setting screen appears, enter the password and press the [Enter]key.Thepasswordshouldnotexceed8charactersandshouldconsistofEnglishletters(A-Z),numbers(0-9),andspecialcharactersoracombinationofthem.

text_image
XXXXXXXXXX-XXXXX Enter New Password [ ] Confirm New Password [ ]4 When the Notices screen appears, press the [Enter] key.
Notice
Please power off and restart!

5 Tosavethechangesinthesystemsetup, press[F10].
6 When the Setup Confirmation screen appears, check [Yes] and press the [Enter] key. The PC will restart.
Setup Confirmation
Save configuration changes and exit now?

[No]

CAUTION
If you forgot SSD Password / NVMe™ Password, you cannot restore the SSD/NVMe™.
- The replacement of SSD/NVMe™ due to a forgotten SSD Password / NVMe™ Password is notcovered by warranty.
ChangingorDeletingthePassword
Youcandeleteorchangethepasswordonlyafterenteringthecurrentpassword.
Themodelintheexamplecandifferfromactualmodelsandissubjecttochangeforperformance improvements,withoutpriornotice.
ChangingthePassword
1 ExecuteSystemSetup, enter the password, and click [Enter].

text_image
Password [ ]2 Changethepasswordinthesamewayassettingone.
DeletingthePassword
1 ExecuteSystemSetup, enter the password, and press[Enter].

text_image
Password [ ]2 After moving [Security] by using the arrow keys from the setup start screen, click [Set Supervisor Password] and press[Enter].

text_image
Phoenix SecureCore Technology Setup Main Advanced Security Boot Exit ► Secure Boot Configuration Supervisor Password is: Set User Password is: Cleared Set Supervisor Password [Enter] Set user password [Enter] Password on boot: [Disabled] SSD01 Password State Cleared SSD02 Password State Cleared Set SSD01 Password [Enter] Set SSD02 Password [Enter] Trusted Platform Module (TPM) Current Selected TPM Device [FTPM] ► TPM Configuration Item Specific Help Set or Clear the Supervisor account's password. F1 Help ↑↓ Select Item +/- Change Values F9 Setup Defaults ESC Exit ↔ Select Menu Enter Select ► Sub-Menu F10 Save and Exit3 When the Set Supervisor Password setting screen appears, enter the current password in [Enter CurrentPassword].
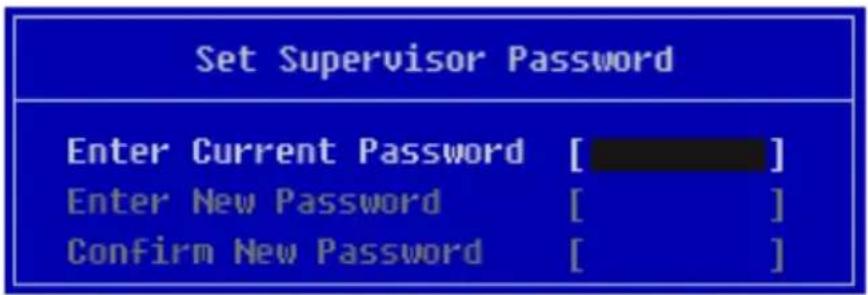
text_image
Set Supervisor Password Enter Current Password [ ] Enter New Password [ ] Confirm New Password [ ]4 Press [Enter] in [Enter New Password] and [Confirm New Password]

text_image
Set Supervisor Password Enter Current Password [****] Enter New Password [ ] Confirm New Password [ ]5 When the Notice screen appears, press the [Enter] key.
| Notice |
| Changes have been saved. [OK] |
6 Tosavethechangesinthesystemsetup, press[F10].
7 When the Setup Confirmation screen appears, check [Yes] and press the [Enter] key. The PC will restart.
| Setup Confirmation |
| Save configuration changes and exit now? [Yes] [No] |
DeletingthePassword(SetSSDPassword/SetNVMe™Password)
1 ExecuteSystemSetup, enter the password, and press[Enter].

text_image
Password [ ]2 After moving [Security] by using the arrow keys from the setup start screen, click [Set SSD01 Password] and press[Enter].

TIP
Depending on the model, the menu name may be displayed as SSD Password, NVMe™ Password, etc.
For a model equipped with two SSD, NVMe™ devices, the menu name may be displayed as SSD01, SSD02, NVMe™1, NVMe™2, etc.
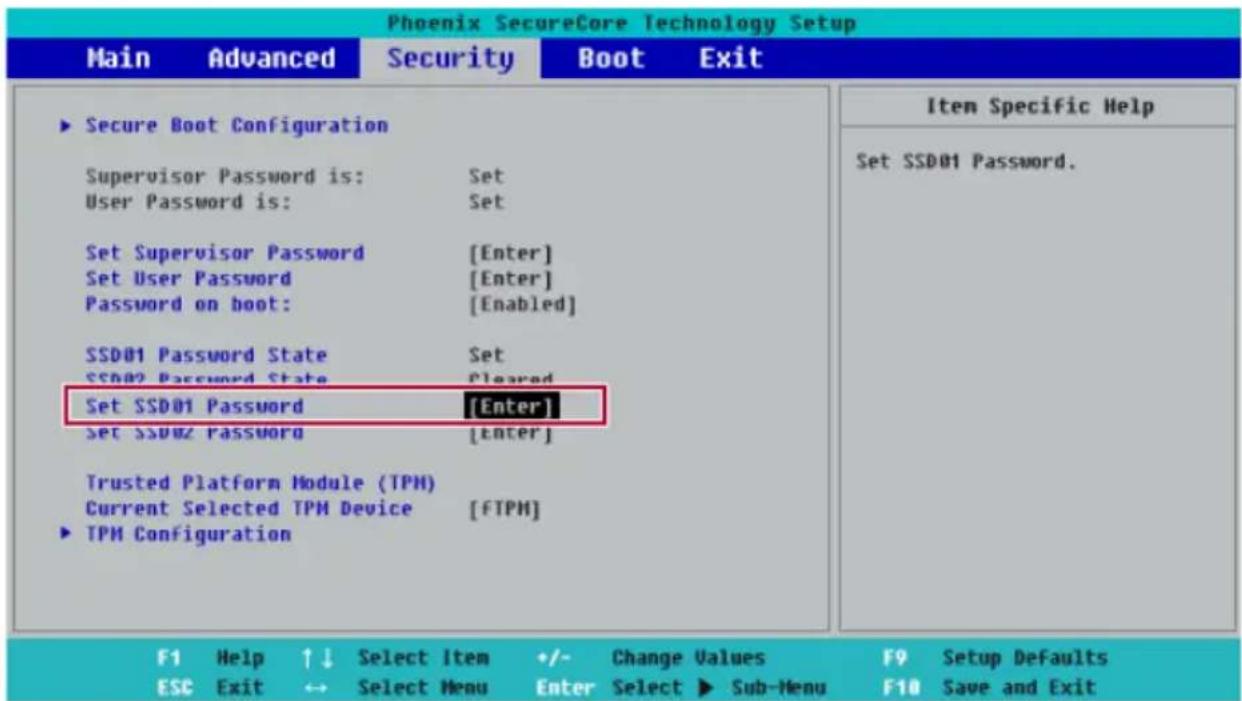
text_image
Phoenix SecureCore Technology Setup Main Advanced Security Boot Exit ► Secure Boot Configuration Supervisor Password is: Set User Password is: Set Set Supervisor Password [Enter] Set User Password [Enter] Password on boot: [Enabled] SSD01 Password State Set SSD02 Password State Cleared Set SSD01 Password [Enter] Set SSD02 password [Enter] Trusted Platform Module (TPM) Current Selected TPM Device [FTPM] ► TPM Configuration Item Specific Help Set SSD01 Password. F1 Help ↑↓ Select Item +/- Change Values F9 Setup Defaults ESC Exit ↔ Select Menu Enter Select ► Sub-Menu F10 Save and Exit3 When the Set SSD01 Password setting screen appears, enter the current password in [Enter CurrentPassword].
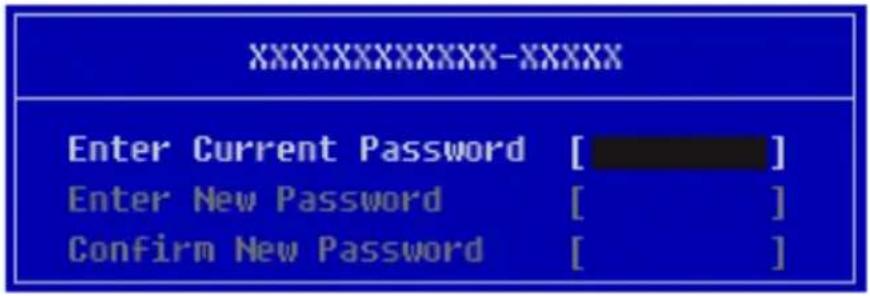
text_image
XXXXXXXXXX-XXXXX Enter Current Password [ ] Enter New Password [ ] Confirm New Password [ ]4 Press [Enter] in [Enter New Password] and [Confirm New Password].
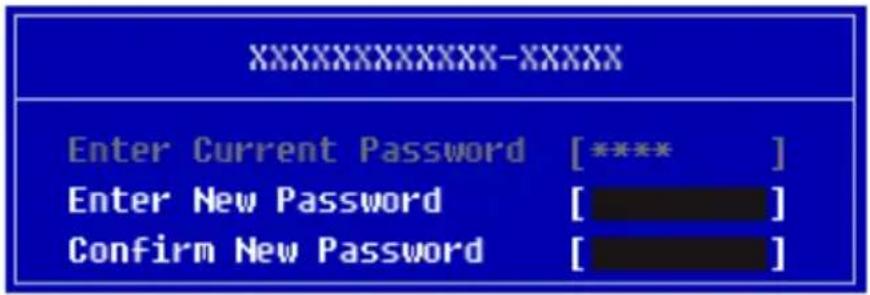
text_image
XXXXXXXXXX-XXXXX Enter Current Password [****] Enter New Password [ ] Confirm New Password [ ]5WhentheNoticescreenappears,pressthe[Enter]key.
| Notice |
| Please power off and restart! [OK] |
6 Tosavethechangesinthesystemsetup, press[F10].
7 When the Setup Confirmation screen appears, check [Yes] and press the [Enter] key. The PC will restart.
Setup Confirmation
Save configuration changes and exit now?
[Yes]
[No]
RestoringtheFactoryDefaultSettings
If you have changed the system setup by mistake, you can restore the default settings.
Themodelintheexamplecandifferfromactualmodelsandissubjecttochangeforperformance improvements,withoutpriornotice.
1 After opening the system setup screen, use the arrow keys to move to [Exit].
2 Click [Load Setup Defaults] by using the arrow keys and pressing [Enter].
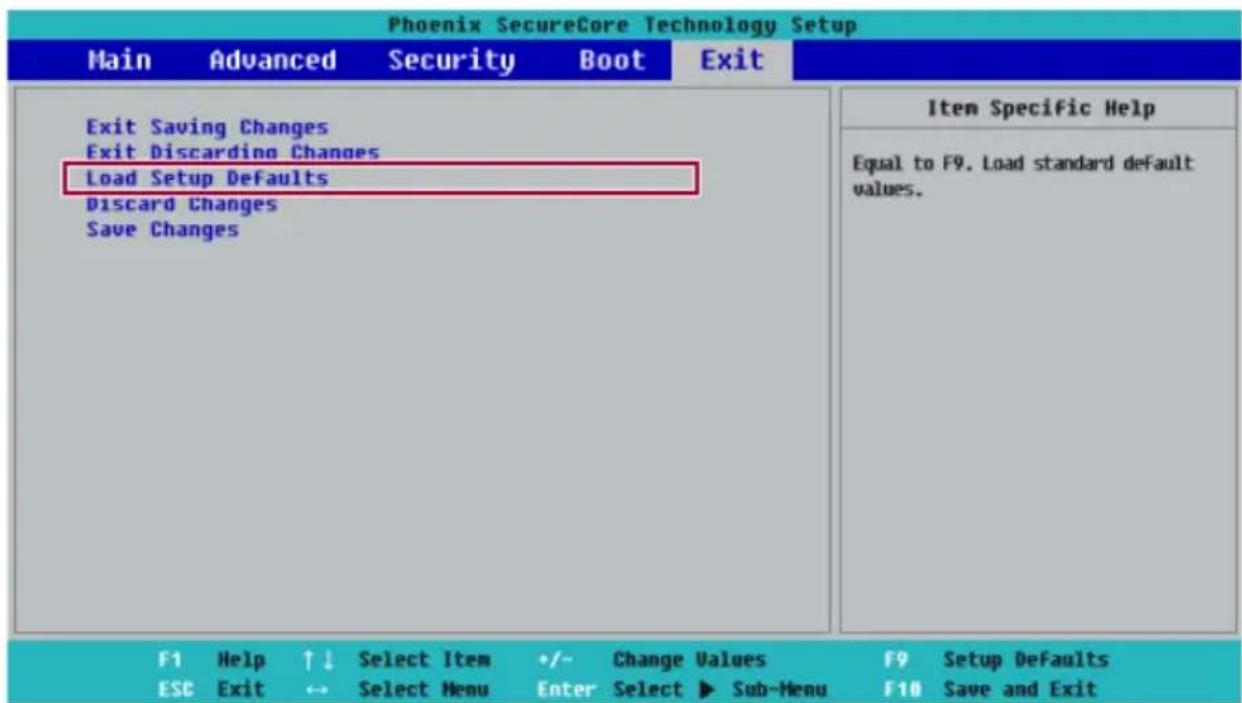
text_image
Phoenix SecureCore Technology Setup Main Advanced Security Boot Exit Exit Saving Changes Exit Discarding Changes Load Setup Defaults Discard Changes Save Changes Item Specific Help Equal to F9. Load standard default values. F1 Help ↑↓ Select Item +/- Change Values F9 Setup Defaults ESC Exit ↔ Select Menu Enter Select ▶ Sub-Menu F10 Save and Exit3 When the Setup Confirmation screen appears, check [Yes] and press the [Enter] key. The settings will beresettothefactorydefault.
| Setup Confirmation | |
| Load default configuration now? [Yes] | [No] |
4 Tosavethechangesinsystemsetup, press[F10].
5 When the Setup Confirmation screen appears, check [Yes] and press the [Enter] key. The PC will restart.
Setup Confirmation
Save configuration changes and exit now?
[Yes]
[No]

TIP
- Whenyoupress[F9],youcanuse[LoadSetupDefaults].
ChangingtheBootOrder
Theusercanchangethebootorderaccordingtohisorherneeds,orselectabootdevice
Themodelintheexamplecandifferfromactualmodelsandissubjecttochangeforperformance improvements,withoutpriornotice.

TIP
Tousethesystemsetup(F2),bootingdeviceselection(F10),youneedtorestartthesystem (click[Restart]inthesystempowermenu)andthenimmediatelypressthecorresponding functionkeyduetothefastbootingspeed.
ChangingtheBootOrder
1 Rebootthesystemandpress[F2].

text_image
LG Life's Good2 Move to the [Boot] menu when the system setup screen appears.
3 Go to [Boot Priority Order] and press [F5] or [F6] to change the booting order.
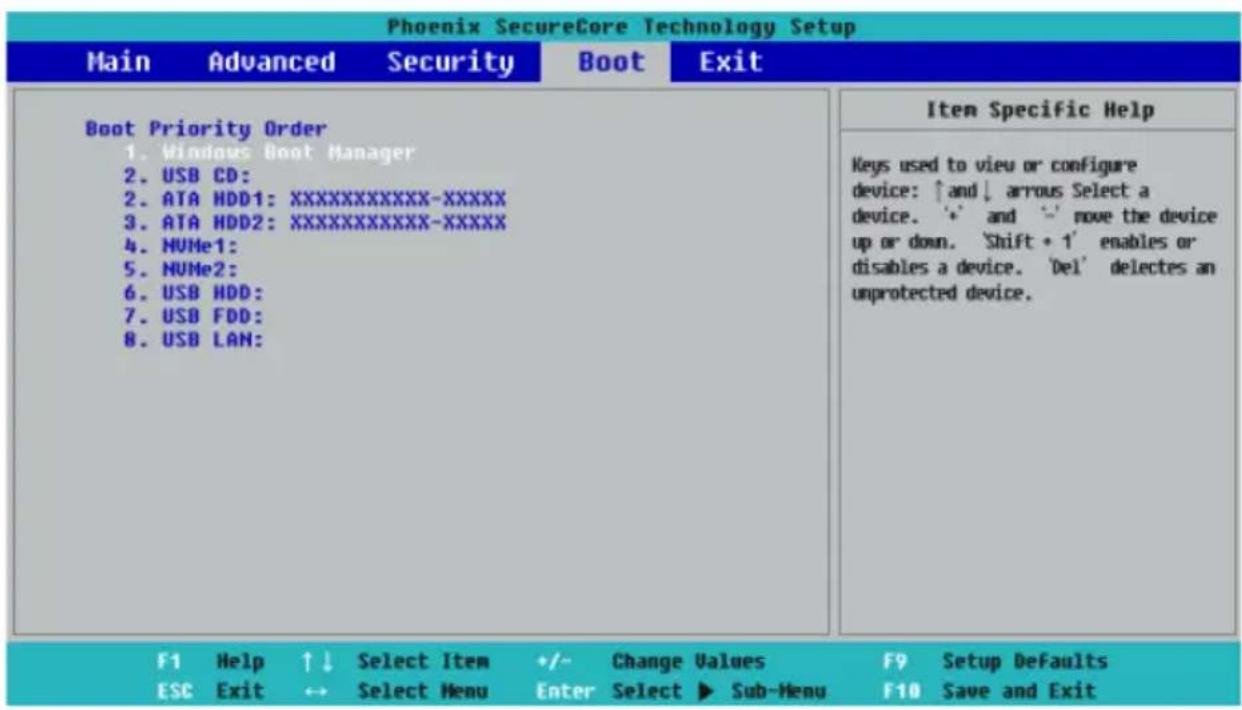
text_image
Phoenix SecureCore Technology Setup Main Advanced Security Boot Exit Boot Priority Order 1. Windows Boot Manager 2. USB CD: 2. ATA HDD1:XXXXXXXXXXXX-XXXXX 3. ATA HDD2:XXXXXXXXXXXX-XXXXX 4. NUMe1: 5. NUMe2: 6. USB HDD: 7. USB FDD: 8. USB LAN: Item Specific Help Keys used to view or configure device: ↑and↓ arrous Select a device. '*' and '-' move the device up or down. 'Shift + 1' enables or disables a device. 'Del' delectes an unprotected device. F1 Help ↑↓ Select Item +/- Change Values F9 Setup Defaults ESC Exit ↔ Select Menu Enter Select ▶ Sub-Menu F10 Save and Exit4 Press the [F10] key, and when the Setup Confirmation screen appears, select [Yes] and press the [Enter] key.
| Setup Confirmation |
| Save configuration changes and exit now? [Yes] [No] |
5Thechangesaresavedandthesystemreboots.
©
3 Bootsusing theselected device.
Windows10AutoScaling
The Windows 10 Auto Scaling feature for user's convenience may partially blur the screen or display someiconsandtextslarger.
RefertothefollowinginformationtochangetheDPIscalingtosuityourneeds.
1Pressthe[

]buttonandselectthe[Settings]menu.

Pressthe[

]keyor[Ctrl]+[Esc]todisplaytheStartmenu.

text_image
Productivity Office Microsoft Office Pageware Microsoft Drive LG LC-Play Console LC-Play Console Type here to search2Select[System] > [Display].
![LG 15Z90NRAAS9U1 - 2Select[System] > [Display]. - 1](/content/2026/06/1193501/images/407e290b759b32836949f34be2be868deb5c73cf888c02ade7255962b7a450fc.jpg)
text_image
Windows Settings Find a setting System Display, sound, notifications, power Phone Use your network, phone Network & Internet 96.12, wireless access, WiFi Personalization Background and security tools Time & Language Service region, disk Gaming Current bus directories, investigating, home links Ease of Access Access, upgraded, high access Search Find up data, passwords Configure Configure temporary notifications certifications Privacy Use your network, voice, monitoring Update & Security Software update, security Security3 Modify the [Change the size of text, apps, and other items] value to change the Auto Scaling settings.
![LG 15Z90NRAAS9U1 - 2Select[System] > [Display]. - 2](/content/2026/06/1193501/images/c6cc26d14dcbed117a35bed540396b0e9a960da0a6e88910fb45a0bb49f59364.jpg)
text_image
Settings Home Find a setting Display Brightness and color Change brightness for the built-in display Night light Off Night light settings Windows HD Color Get a brighter, new installed package or HOC and MSCI devices, games, and layers on this display selected devices. Windows HD Color settings Scale and layout Change the size of text, apps, and other items 150% (Recommended) Display orientation Landscape Multiple displays Sleep better Nights light can help you get to sleep by displaying women's colors at night. Set up multiple windows Change screen brightness For power shifting Adjust Work size Get help Make Windows better Grow as feedback System Display Sound Notifications & actions Focus assist Power & sleep Battery Storage Table mode Multihauling Projecting to this PC Shared experiences Options Rewards Desktop Type here to search![LG 15Z90NRAAS9U1 - 2Select[System] > [Display]. - 3](/content/2026/06/1193501/images/7229fb4236ee584c56c8810918eedf9218493da6bdaa591c4206dd15778f313e.jpg)
TIP
Afterautoscaling,youmayneedtorestartsomeappstoapplythenewscaleandlayout.
UsingInstantBooting
Instant Booting allows the system to boot automatically when the notebook PC cover is opened, so that you can us the system without pressing the power button.
1 Selectthe[

button>[LGSoftware]torun[LGControlCenter].
2 On LG Control Center screen, change the [Instant Booting] setting to [ON].

text_image
LG Control Center LG Control Center System Settings > Configures various computer functions. Energy Star ENERGY STAR Screen Sound Network Hardware Power Management > Sets the Power Mode of the computer. Set USB-C™ Charging Battery State Windows Security > Configures the User Account and Firewall option. Enable Firewall User Account Setting Instant Booting Set up so that the system will automatically boot up, when you open up the notebook computer. ON System Information Operating Microsoft Windows 10 System 64-bit Processor Intel(R) Core(TM) i7-1065G7 CPU @ 1.30GHz View More3ShutdownthesystemandclosethenotebookPCcover.
4 When the cover is opened, the notebook PC turns on and the system starts to boot automatically.
FAQ
UsingInstantBooting
Instant Booting allows the system to boot automatically when the notebook PC cover is opened, so that you can us the system without pressing the power button.
1 Selectthe[

button>[LGSoftware]torun[LGControlCenter].
2 On LG Control Center screen, change the [Instant Booting] setting to [ON].
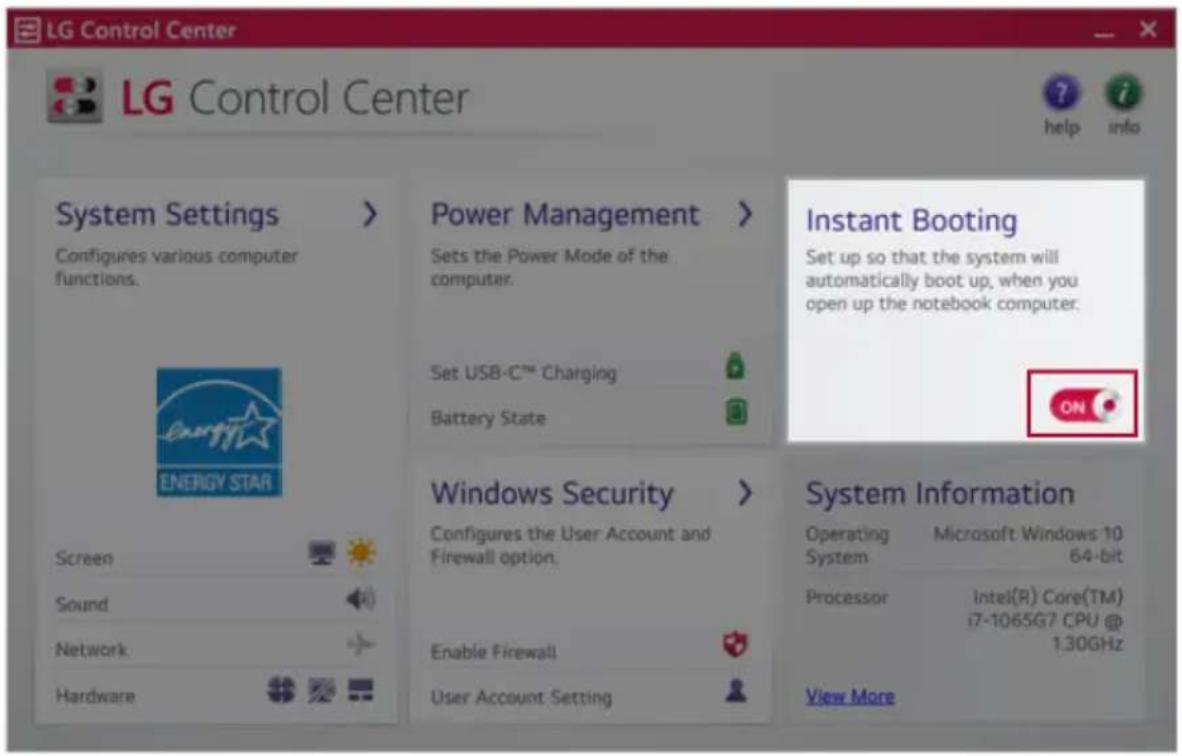
text_image
LG Control Center LG Control Center System Settings > Configures various computer functions. Energy Star ENERGY STAR Screen Sound Network Hardware Power Management > Sets the Power Mode of the computer. Set USB-C™ Charging Battery State Windows Security > Configures the User Account and Firewall option. Enable Firewall User Account Setting Instant Booting Set up so that the system will automatically boot up, when you open up the notebook computer. ON System Information Operating Microsoft Windows 10 System 64-bit Processor Intel(R) Core(TM) i7-1065G7 CPU @ 1.30GHz View More3ShutdownthesystemandclosethenotebookPCcover.
4 When the cover is opened, the notebook PC turns on and the system starts to boot automatically.
Windows10AutoScaling
The Windows 10 Auto Scaling feature for user's convenience may partially blur the screen or display someiconsandtextslarger.
RefertothefollowinginformationtochangetheDPIscalingtosuityourneeds.
1Pressthe[

]buttonandselectthe[Settings]menu.

TIP
Pressthe[

]keyor[Ctrl]+[Esc]todisplaytheStartmenu.

text_image
Productivity Microsoft Drive LGI LG LGI LGI LGI LGI LGI LGI LGI LGI LGI LGI LGI LGI LGI LGI LGI LGI LGI LGI LGI LGI LGI LGI LGI LGI LGI LGI LGI LGI LGI LGI LGI LGI LGI LGI2Select[System] > [Display].

text_image
System Display, sound, notifications, power Phone Everyone Internet Phone Network & Internet http://www.essence.com/ Personalization Background and screen buttons Time & Language Search Engine, Web Gaming Home to access investaining, User Music Ease of Access Resource, image, High Language Search Find any free permission Collapse Custom Language permission notification Privacy Location opening, monitoring Update & Security Windows setup, recovery, setup3 Modify the [Change the size of text, apps, and other items] value to change the Auto Scaling settings.

text_image
Settings Home Send & Settings System Display Sound Notifications & actions Force assist Power & sheep Battery Storage Tablet mode Multidrawing Projecting to His PC Shared experiences Clipboard Remote Desktop Display Brightness and color Change brightness for the built-in-display Night Style Off Night light settings Windows HD Color Get a brightness more allowed package on HDR and WCS address, games and apps on the display selected above. Windows HD Color settings Scale and layout Change the size of text, apps, and other items 150% (Recommended) Display orientation Landscape Multiple display Sleep better Night light can help you get to sleep by displaying summer colors at night. Select Night Light settings for all things up! Have a question? Set up multiple emotions Change screens brightness Is screen Glazing Adjust first size Get help Make Windows better Cover on headback Type here to search
TIP
Afterautoscaling,youmayneedtorestartsomeappstoapplythenewscaleandlayout.
RestoringtheSystem
If the system has an error, you can use Windows 10's recovery function to recover or restore the system to its initial pre-purchase state.

CAUTION
If you have deleted therestoration data in the protected area of the disk, or have arbitrarily installed another operating system, therestore function may not work.
Torecoverthesystem,theACadaptermustbeconnected.
1 Clickthe[]buttonandselectthe[Settings]menu.

text_image
Productivity Office e Microsoft Store Macau Elasticer Microsoft Teams LG LC Type: here to search LG Lg 12/11 PM APP/GOATE2Whenthe[Settings]screenappears,select[Update&Security].
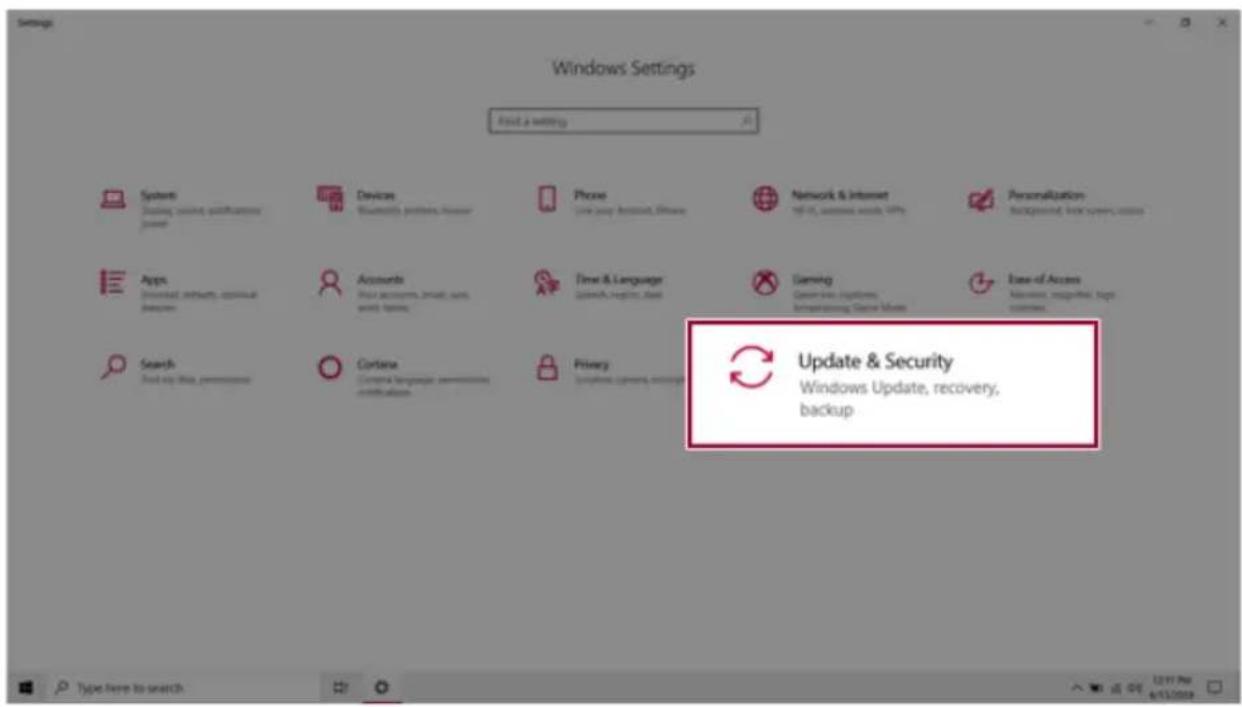
text_image
Windows Settings Find a setting Systems Options, providing specifications power Devices Business functions, power Phone Use your account, drive Network & Internet 16.0% of services, users, users Personalization Background, text, server, users Apps Download, network, virtual davies Accounts Show accounts, virtual, web scales, sharing Time & Language Search, region, web Gaming Connect to platforms, Improving Game Music Ease of Access Remove, reperfired, top customers Search Find up this permission Contexts Compute language permissions certifications Privacy Use phones, opening, sharing Update & Security Windows Update, recovery, backup3 Select the [Recovery] menu and press [Get started] in the Reset this PC menu.

text_image
Settings Home Find a setting Update & Security Windows Update Delivery Optimization Windows Security Backup Recovery Reset this PC If your PC isn't running well, resetting it might help. This lets you choose to keep your personal files or remove them, and then reinstalls Windows. Get started Start up from a device or disk (such as a USB drive or DVD), change your PC's firmware settings, change Windows startup settings, or restore Windows from a system image. This will restart your PC. Restart now More recovery options Learn how to start fresh with a clean installation of Windows.4 If the following option screen appears, select a desired option to proceed with recovery.

text_image
Reset this PC Choose an option Keep my files Removes apps and settings, but keeps your personal files. Remove everything Removes all of your personal files, apps, and settings. CancelKeepMyFiles
Itremovestheappsandtheirsettingswithoutlossofpersonalfiles.
1 Select[Keepmyfiles].
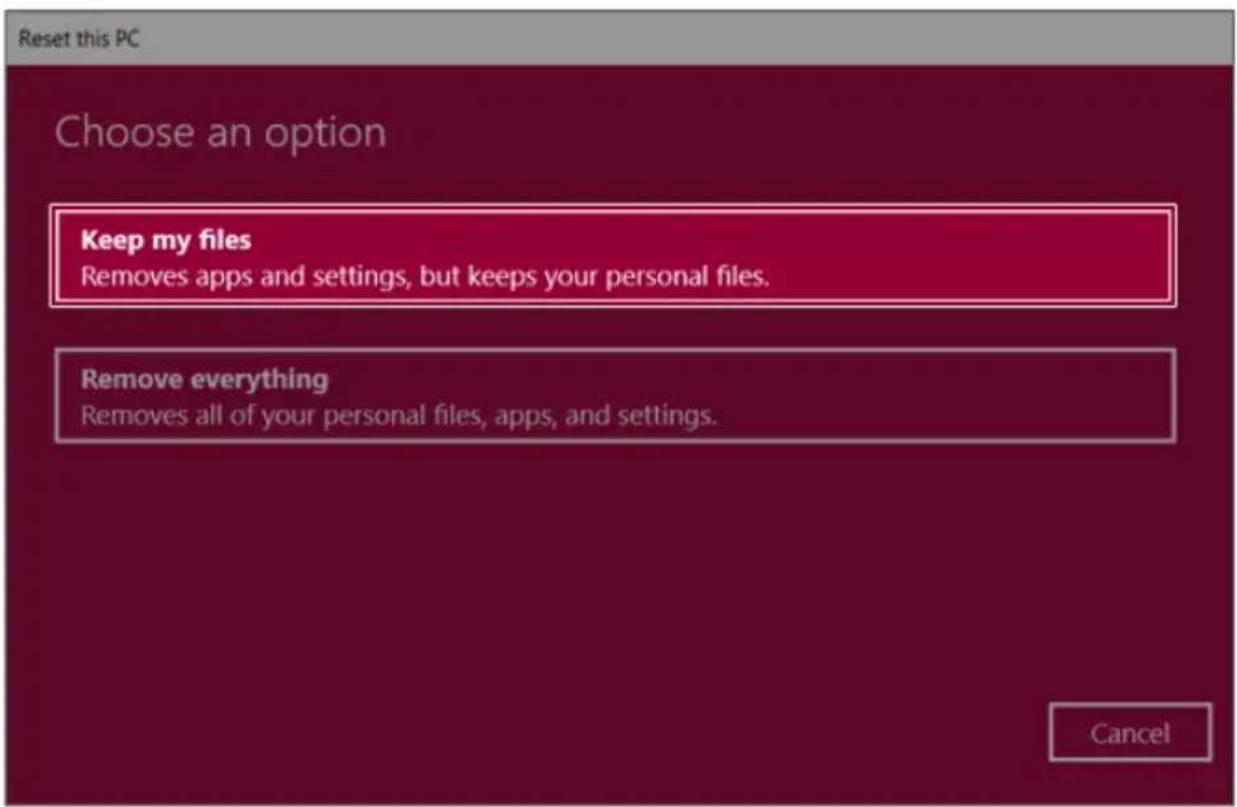
text_image
Reset this PC Choose an option Keep my files Removes apps and settings, but keeps your personal files. Remove everything Removes all of your personal files, apps, and settings. Cancel2Check the current settings.

text_image
Reset this PC Additional settings Current settings: • Restore apps and settings which came with this PC Change settings Get help Back Next Cancel3 If you need to change the settings, press [Change settings] and press the [Confirm] button.

text_image
Reset this PC Additional settings Current settings: • Restore apps and settings which came with this PC Change settings Get help Back Next Cancel
text_image
Reset this PC Choose settings Preinstalled apps Restore apps and settings which came with this PC ● On Get help Confirm Cancel4Press[Next]toproceedwithininstallationasguided.
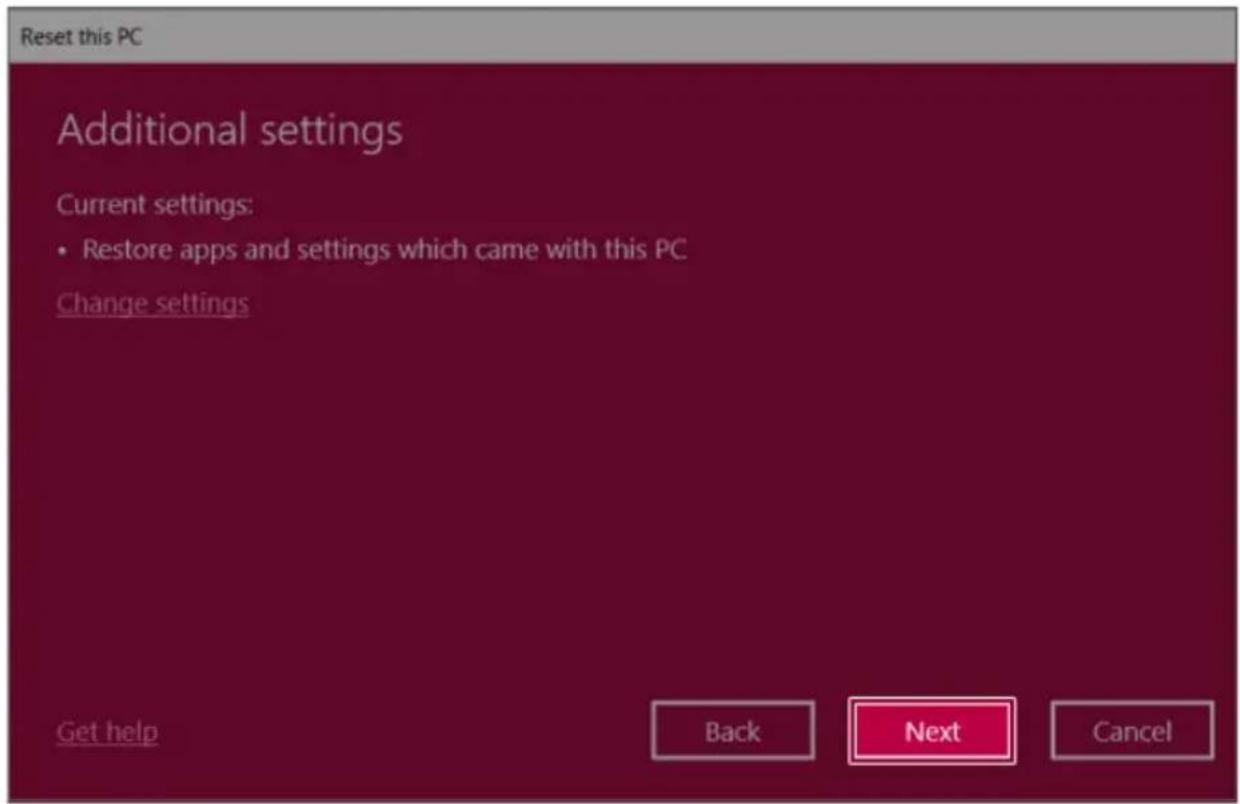
text_image
Reset this PC Additional settings Current settings: • Restore apps and settings which came with this PC Change settings Get help Back Next CancelRemoveeverythings
Removesallitemsfromthesystemandrestorethesystemtoitsinitialpre-purchasestate.

CAUTION
Alldataislostduringtheinitialization,soyoumustbackupallcriticaldatainadvance. Itmaytakeabout5hoursorlongerdependingonthesystemconditions.
1 Select[Removeeverything].

text_image
Reset this PC Choose an option Keep my files Removes apps and settings, but keeps your personal files. Remove everything Removes all of your personal files, apps, and settings. Cancel2Check the current settings.
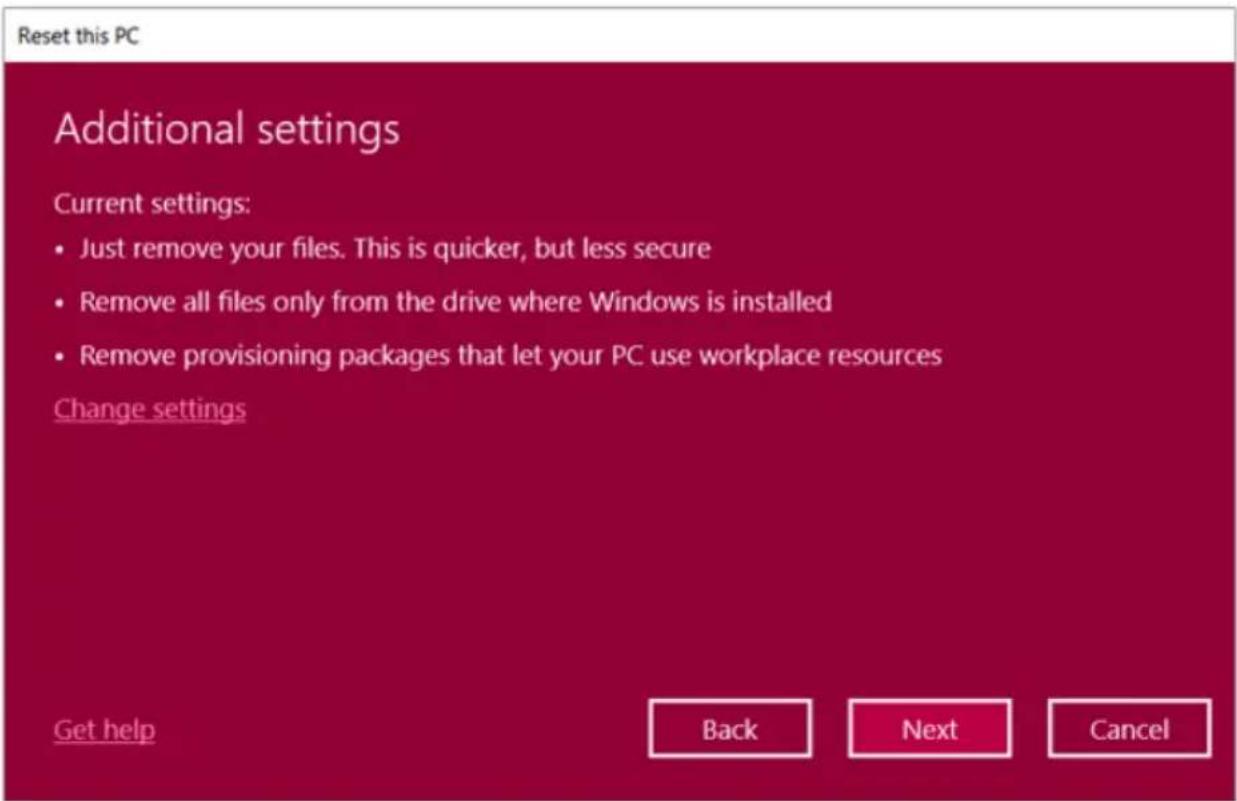
text_image
Reset this PC Additional settings Current settings: • Just remove your files. This is quicker, but less secure • Remove all files only from the drive where Windows is installed • Remove provisioning packages that let your PC use workplace resources Change settings Get help Back Next Cancel3 If you need to change the settings, press [Change settings] and press the [Confirm] button.
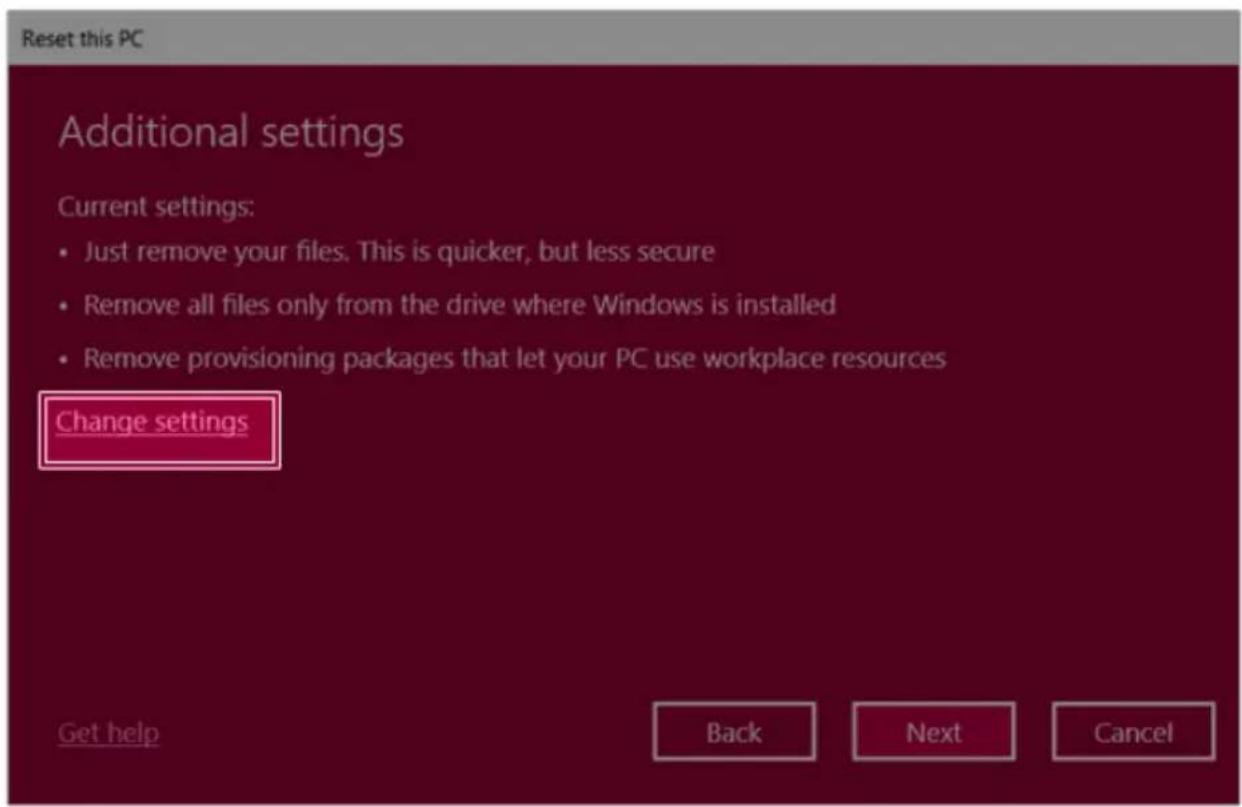
text_image
Reset this PC Additional settings Current settings: • Just remove your files. This is quicker, but less secure • Remove all files only from the drive where Windows is installed • Remove provisioning packages that let your PC use workplace resources Change settings Get help Back Next Cancel
text_image
Reset this PC Choose settings Data erasure Just remove your files. This is quicker, but less secure Off Data drives Remove all files only from the drive where Windows is installed Off Workplace resources Remove provisioning packages that let your PC use workplace resources Off Get help Confirm Cancel4Press[Next]toproceedwithininstallationasguided.
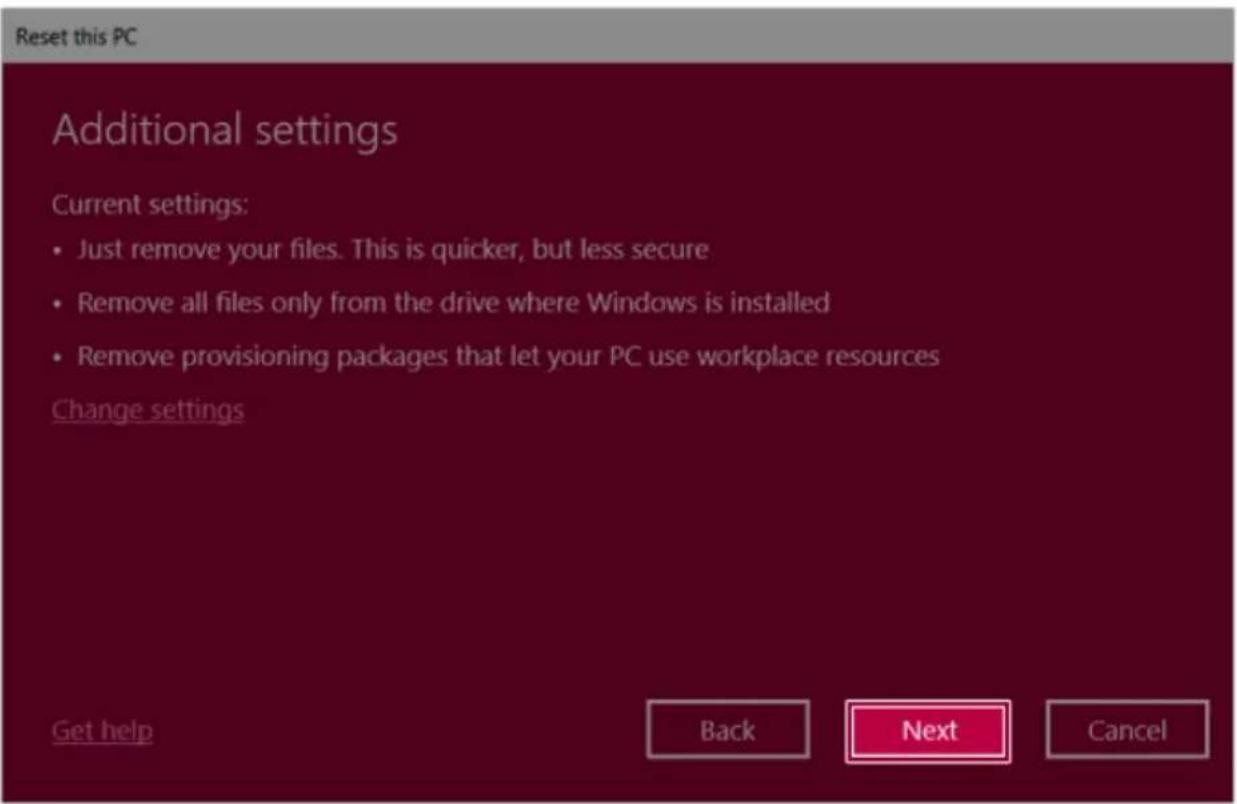
text_image
Reset this PC Additional settings Current settings: • Just remove your files. This is quicker, but less secure • Remove all files only from the drive where Windows is installed • Remove provisioning packages that let your PC use workplace resources Change settings Get help Back Next CancelConnectingtoExternalDisplay
ConnectingtotheHDMIPort
HDMlisahigh-speedmultimediainterfacethatcantransferuncompressedfulldigitalaudioandvideo signals.
Insomemodels, DTSAudiomaynotworkwhenyouuseHDMI.

TIP
EnsurethemonitorpowerisoffbeforeconnectingtheexternalmonitortothePC.
1 Connect the HDMI cable to the PC and the external device (TV, monitor) that supports HDMI.
2 HDMI port transfers both video and audio simultaneously. Hence, there is no need for a separate audioconnection.
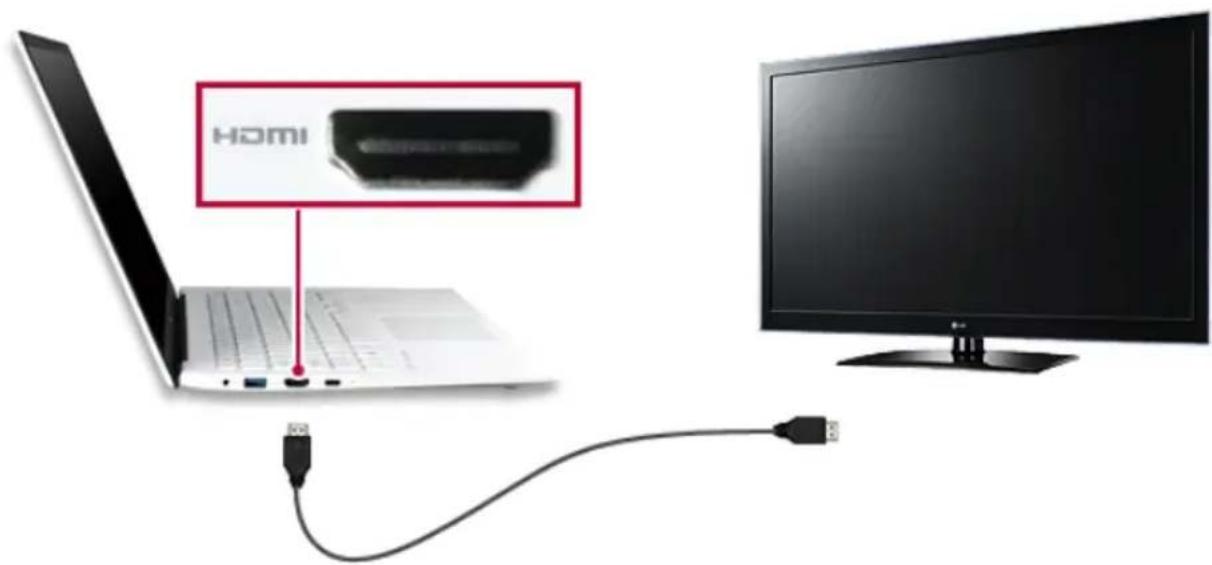
text_image
HOMI3 On the PC, press [Fn] + [F7] to display monitor (projector) toggling screen. Select the desired screenoutput.

TIP
- Everytime[] + [P] keysarepressed, thescreenoutputoptionchanges. Release the keystodisplay theselectedscreenoutput.

CAUTION
- If you do not set Speaker as the default value after disconnecting the HDMI cable, the systemmaynotproduceanysound.
• If a program was running already, you must exit and restart the program to produce sound.
UsingaWired/WirelessRouter
Awireless/regularrouterconnectsseveralPCsandmobiledevicestooneinternetlineandenables theuseofinternetandthenetwork.
Awireless/regularrouterhastobeboughtseparately. Refertothemanualprovidedbythe manufacturerforinstructions.
ConnectingaWirelessorRegularRouter
Ifoneinternetlineisusedwithawired/wirelessrouterandseveraldevicesareconnected,thismay resultinaslowerconnection.
IncaseofawirelessLAN,itisrecommendedtochangethenetworknameandsecuritysettingsfora moresecureconnection.
Networkspeedcandifferaccordingtooperationenvironmentandspecifications.
1 Connect the internet cable of the modem that was provided by your internet provider to the router's WANport.
2 Connect all devices (PC, IPTV, internet phone, etc.) with a LAN cable to LAN ports 1 to 4 of the router.
ThenumberofLANportscanvaryforeachroutermodel.
3 Please refer to the manual provided by the router manufacturer for setup of the network and internet.
WirelessLAN
Thewirelessnetwork(WirelessLAN)isthenetworkenvironmentthatconnectsaPCwiththeinternet providerorcompanynetworkthroughanAccessPoint(wirelessorregularrouter).
TurningOn/OffAirplaneMode
PriortousingthewirelessLAN, press[Fn]+[F6]toturnoffAirplaneMode.
Pressing [Fn] + [F6] keys will turn on or off the Airplane Mode. If you are not going to use the productforwhile, keeptheAirplaneMode turned on toreducethebatterypowerconsumption.
UsingtheWirelessLAN
IfanAccessPoint(wiredorwirelessrouter)isinthevicinityofthePC,thewirelessLANcaneasilybe accessed.
During thesearch for a wireless network (Wireless LAN), various Access Points may be found according to the location where the PC is used.
Incasetherearenoaccessiblewirelessnetworks(WirelessLAN)nearthePC,noAccessPoints maybefound.
ApasswordprotectedAccessPointcannotbeaccessedwithoutthecorrectpassword.
1 PresstheActionCenter[

iconontherightsideofthetaskbar.

natural_image
Dark scene with a glowing purple starry sky and a small icon in the corner (no readable text or symbols)2 Press the [Network] tile to search for a nearby Access Point.
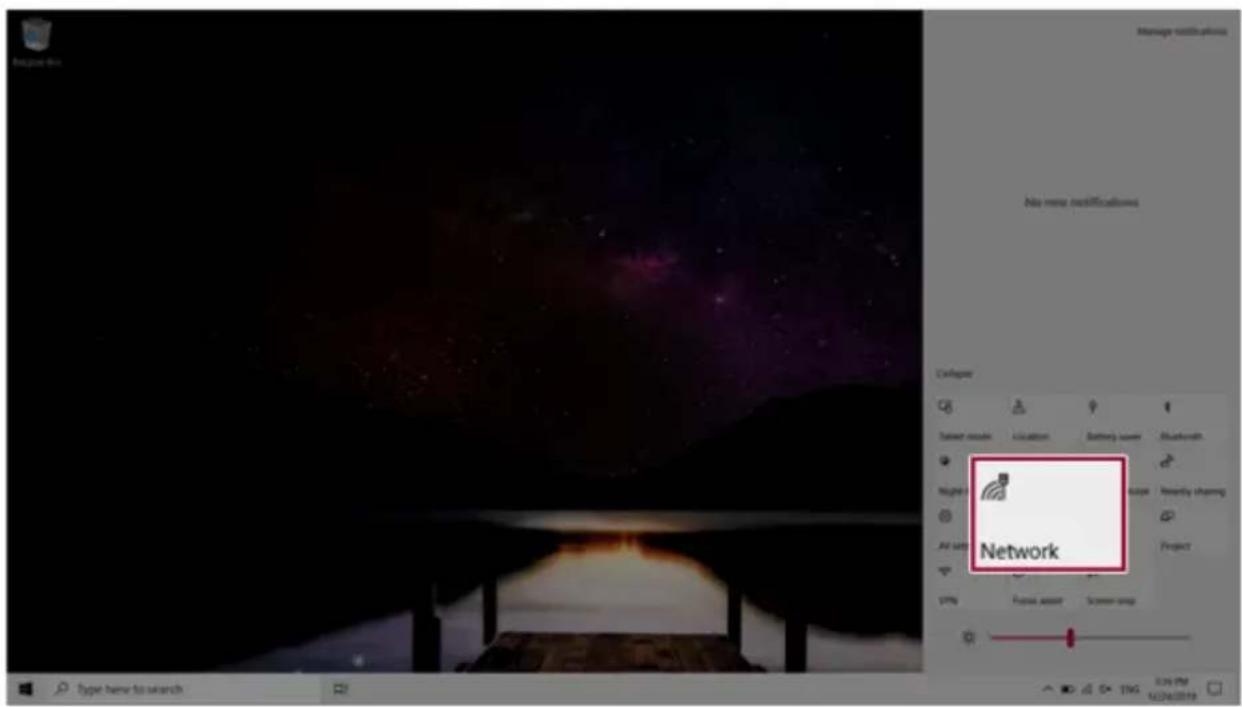
text_image
Manage notifications No more notifications Network
text_image
PC Secured PC_5 Secured DIRECT Secured AS Secured soundbar_5G Secured DIRECT-69 Secured DIRECT-4190 Secured Network & Internet settings Change settings, such as making a connection enabled. OK Cancel Airplane mode: 0.0000 Taper here to launch
TIP
IfWi-Fiisturnedoff,pressthe[Wi-Fi]tile.
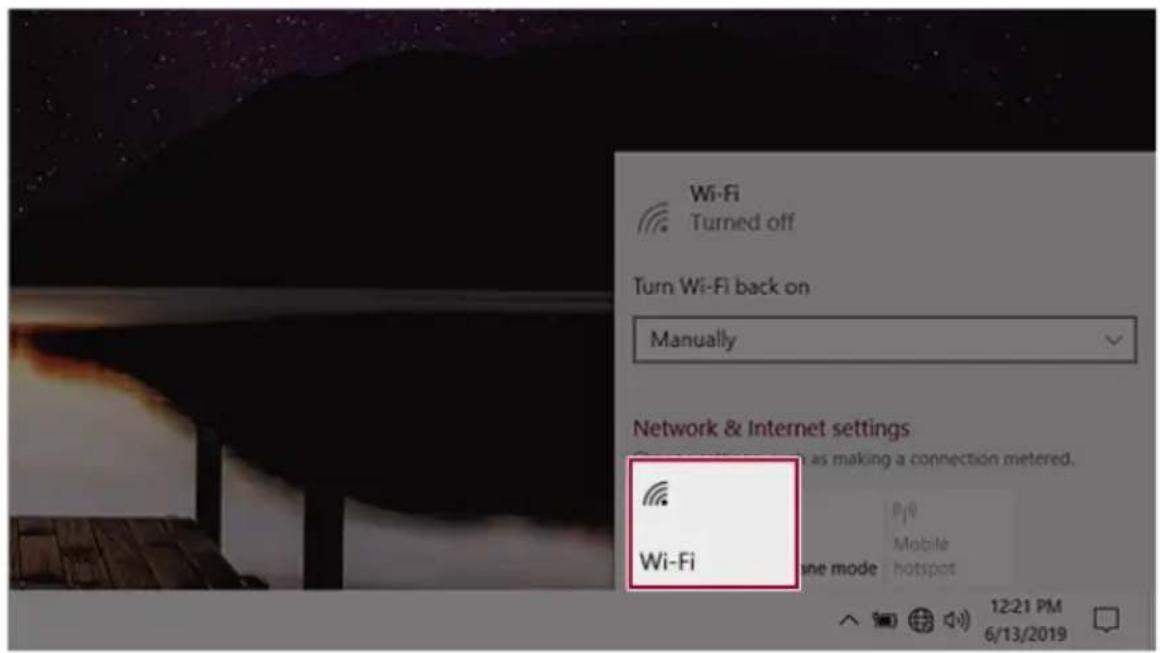
text_image
Wi-Fi Turned off Turn Wi-Fi back on Manually Network & Internet settings Wi-Fi as making a connection metered. Mobile hotspot3SelecttheAccessPointyouwanttoconnecttoandpress[Connect].

text_image
PC Secured Connect automatically Connect4 Ifaconnectionisestablished,[Connected]appearsbelowtheAccessPointname.
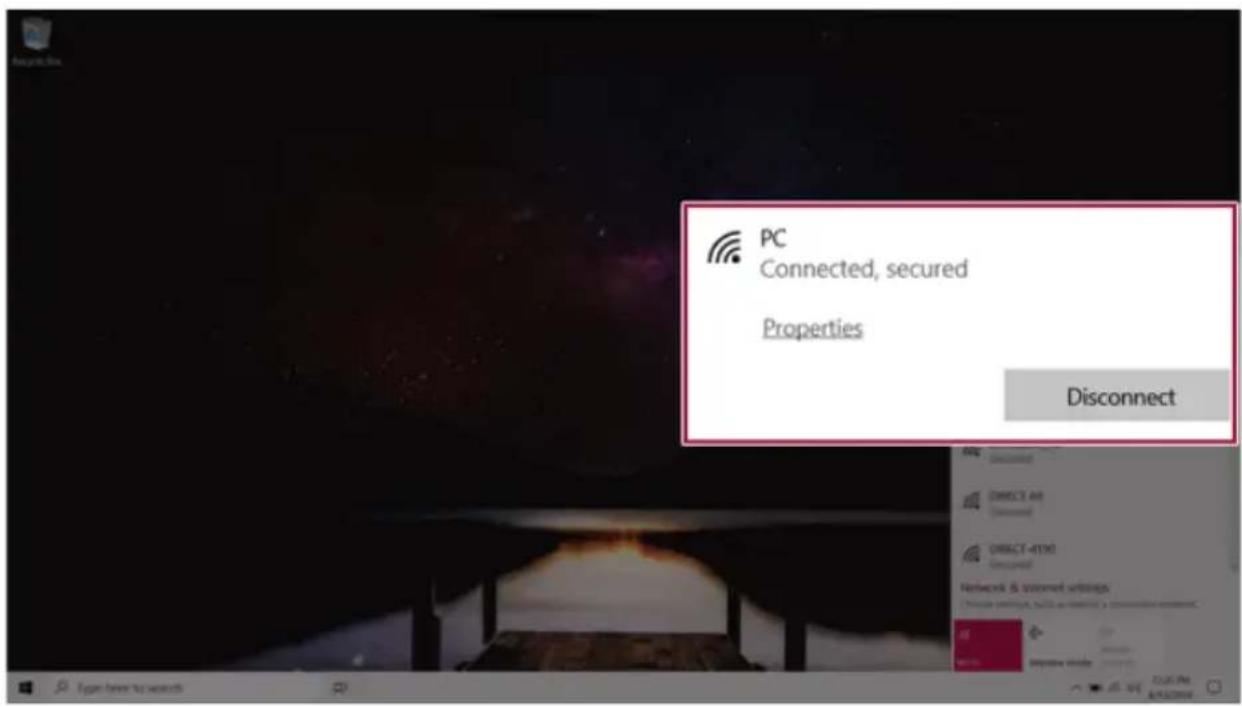
text_image
PC Connected, secured Properties Disconnect5ClicktheWebBrowsericontocheckwhethertheInternetisoperatingnormally.