VUIW518 - Vacuum packaging VIKING - Free user manual and instructions
Find the device manual for free VUIW518 VIKING in PDF.

User questions about VUIW518 VIKING
0 question about this device. Answer the ones you know or ask your own.
Ask a new question about this device
Download the instructions for your Vacuum packaging in PDF format for free! Find your manual VUIW518 - VIKING and take your electronic device back in hand. On this page are published all the documents necessary for the use of your device. VUIW518 by VIKING.
USER MANUAL VUIW518 VIKING
Use and Care / Installation Guide
natural_image
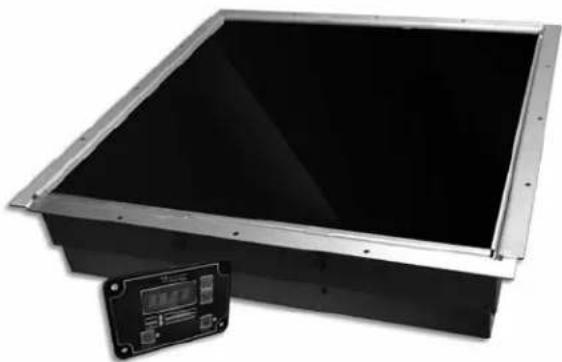
Exterior view of a black rectangular electronic device with a metallic frame and a small digital display panel (no visible text or symbols)Incogneeto Induction Warmer
Congratulations
Congratulations and welcome to the elite world of Viking Range, LLC product ownership. We hope you will enjoy and appreciate the care and attention we have put into every detail of your new, state-of-the-art induction warmer.
Your induction warmer is designed to offer years of reliable performance. This Use and Care Manual will provide you with the information you need to become familiar with your units care and operation.
Your complete satisfaction is our ultimate goal. If you have any questions or comments about this product, please contact the dealer from whom you purchased it, or contact our Consumer Support Center at 1-888-845-4641.
We appreciate your choice and hope that you will again select our products for your other major appliance needs.
For more information about the complete and growing selection of products, contact your dealer or visit us online at vikingrange.com in the US or brigade.ca in Canada
Table of Contents
| Before Installing Your Unit | 2 |
| Warnings & Safety Instructions | 3 |
| Installation | 5 |
| Dimensions | 5 |
| Electrical Requirements | 5 |
| Countertop Preparation | 6 |
| Unit Installation | 7 |
| Using Your Induction Warmer | 8 |
| Care and Maintenance | 13 |
| Troubleshooting | 14 |
| Service & Registration | 15 |
| Warranty | 16 |
Before Installing Your Unit
Every installation site has different electrical wiring. Because many different local codes exist, it is the Owner and Installer's responsibility to comply with those codes. Viking Range, LLC is not responsible for any consequential damages as a result of failure to comply with installation requirements.
- Read all installation instructions carefully before starting installation.
- Remove induction warmer carefully from carton.
- Remove all loose packaging and accessories and save for subsequent shipment or in case of concealed shipping damage.
- It is the responsibility of the installer to comply with all federal, state and local codes.
- Any installation not matching the specifications discussed in this manual automatically voids the product's warranty.
Warnings & Safety Instructions
- Before beginning, please read these instructions completely and carefully.
- DO NOT remove permanently affixed labels, warnings, or plates from the product. This may void the warranty.
- Please observe all local and national codes and ordinances.
- Please ensure that this product is properly grounded.
- The installer must leave these instructions with the consumer who should retain for local inspector's use and for future reference.
- Installation must conform with local codes or, in the absence of codes, the National Electrical Code, ANSI/NFPA-70 – latest edition.
In Canada: Electrical installation must be in accordance with the current CSA C22.1 Canadian Electrical Codes Part 1 and/or local codes.
Your safety and the safety of others is very important.
We have provided many important safety messages in this manual and on your appliance. Always read and obey all safety messages.

This is the safety alert symbol. This symbol alerts you to hazards that can kill or hurt you and others.
All safety messages will be preceded by the safety alert symbol and the word "DANGER," "WARNING" or "CAUTION." These words mean:

DANGER
Hazards or unsafe practices which WILL result in severe personal injury or death

WARNING
Hazards or unsafe practices which COULD result in severe personal injury or death

CAUTION
Hazards or unsafe practices which COULD result in minor personal injury or property damage.
All safety messages will identify the hazard, tell you how to reduce the chance of injury, and tell you what can happen if the instructions are not followed.

WARNING
This appliance shall not be used for space heating. This information is based on safety considerations.

CAUTION

Be sure the electric power is off from the breaker box to the junction box until the induction warmer is installed and ready to operate. The junction box should be connected to a suitable ground.

WARNING

The electrical power to the unit must be shut off while line connections are being made. Failure to do so could result in serious injury or death.

WARNING

FIRE AND ELECTRICAL SHOCK HAZARD
DO NOT use an extension cord with this appliance. Such use may result in fire, electrical shock, or other personal injury.

CAUTION
This appliance is not to be used by persons (including children) with reduced physical, sensory or mental capabilities, or lack of experience and knowledge, unless they have been given supervision or instruction concerning the use of the appliance by a person responsible for their safety. Children should be supervised to ensure that they do not play with the appliance.

WARNING

To Reduce the Risk of Fire:
-DO NOT place any heating or cooking appliance beneath the appliance.
-DO NOT mount over or near any portion of a heating or cooking appliance.
-DO NOT mount over a sink.
-DO NOT store anything directly on top of the appliance surface when the appliance is in operation.
IMPORTANT - Please read, follow, and save all instructions.
- Never immerse the cords, plugs, or appliance in water.
- Supervise carefully when appliance is used near children. Keep children away from appliance when in operation.
- Always unplug appliance immediately after use and allow for cooling time if handling, transporting, or storing.
- Do not use any appliance that has a damaged cord or plug, or one that has malfunctioned or been damaged. Consult the warranty and follow instructions for service.
- Do not use any accessories or attachments that are not recommended by the manufacturer. Use of unapproved accessories may cause injuries and void the warranty.
- The pan on the appliance will heat continuously as long as the power is ON. The pan will be hot and caution should be exercised when working on or near the appliance.
- Do not let the power cord touch hot surfaces or hang over the edge of the counter. Do not move the appliance with electric power is connected. Do not move the appliance while a hot pan or pan containing hot liquids is on top of the appliance.
- To disconnect the appliance, press the Power button and wait for the LED to no longer be illuminated. You may then remove the plug from the outlet.
- Do not use the induction warmer for anything other than its intended use as described in this manual. This unit is designed to heat food and is not intended for laboratory or industrial use.
- Do not put food or unopened cans on the induction warmer surface.
- Do not use aluminum foil on top of the induction warmer.
- Do not use the induction warmer near a faucet, swimming pool, sink, or other areas where water can be found.
- Never store the induction warmer outside or upside down.
- Do not obstruct, block, or alter the air entrance or outlet. Do not stick foreign objects into these openings.
- Do not strike or damage the induction warmer. Do not put the induction warmer in your luggage. Throwing or dropping the induction warmer can damage the internal components or crack the induction warmer, voiding your warranty. If the induction warmer becomes cracked, unplug immediately and do not use.
- This appliance must be grounded. Connect only to a properly grounded outlet. Before operating, read grounding instructions and Electrical Installation Requirements on page 2 of this booklet. Do not use an extension cord.
- Do not overcook food or leave appliance unattended while in use.
- In the unlikely event of a grease fire, smother flame by covering pan with a tight-fitting lid, cookie sheet, or flat tray. DO NOT USE WATER. When the fire is under control, turn off appliance and unplug from wall.
- Use only induction compatible and efficient cookware.
- Keep unit away from other heat sources and allow at least two (2) inches clearance for air circulation at sides, front and rear of the unit. If either the air intake or exhaust outlet is blocked, the internal temperature will rise, causing an error code to occur.
- Never heat an empty pan. It may damage the induction warmer or cookware, and overheat the unit. When overheating occurs, an error code will flash on the display and the induction warmer will shut itself off automatically. When the internal temperature returns to normal, the induction warmer can be used again.
- Remember to turn the induction warmer off after each use.
- Keep the induction warmer away from gas and electric ranges or open flames. Do not place in the oven. If the ambient air temperature is above 110^ F, the induction warmer may not function properly.
- Be sure to dry off the outside of the pan before use. Water droplets on the outside of the pan may begin to boil and spatter as the pan temperature rises.
- This product may only be serviced by an authorized service agent or by Viking Range, LLC personnel. Do not attempt to open the unit or perform service of any kind. For service information, contact Preferred Customer Service at +1 (888) 845-4641.
Save These Instructions for Future Reference
Installation
Dimensions
| Dimensions | ||
| A 17 | -1/2" 4.5 cm | |
| B 4 | -1/2" 1.8 cm | |
| C 2 | -7/8" 7.4 cm | |
| D 2 | -1/4" 5.7 cm | |
| E 3 | -1/4" 8.3 cm | |
| F 1 | -3/16" 3.0 cm | |
| G 2 | -1/2" 6.3 cm | |
| H 3 | -13/16" 9.7 cm | |
| J 1 | -2.5 cm | |
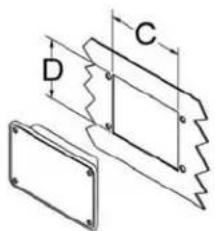
text_image
D C
text_image
E F G H J
text_image
A A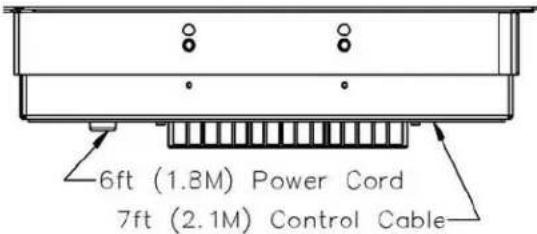
text_image
6ft (1.8M) Power Cord 7ft (2.1M) Control Cable
natural_image
Technical line drawing of a rectangular enclosure with mounting holes and a vertical dimension labeled B (no text or symbols beyond basic geometry)Installation
Electrical Requirements
The induction warmer must be properly grounded. In the event of an electrical short circuit, grounding reduces the risk of electric shock by providing a safe path for the electric current. The induction warmer has a power cord with a 3-prong grounding plug, which must be used in a compatible and properly grounded outlet. It is the owner's responsibility to replace any 2-prong wall outlet with a properly grounded 3-prong wall receptacle.
For your safety, never cut, remove, or disable the electrical (ground) connection from the plug. Never use an adapter plug or an extension cord with the induction warmer.
WARNING


FIRE AND ELECTRICAL SHOCK HAZARD
DO NOT use an extension cord with this appliance. Such use may result in fire, electrical shock, or other personal injury.
WARNING

ELECTRICAL GROUNDING INSTRUCTIONS
This induction warmer must be electrically grounded in accordance with local codes or, in the absence of codes, with the National Electrical Code, ANSI/NFPA-70 – latest edition. FOR PERSONAL SAFETY, THIS APPLIANCE MUST BE PROPERLY GROUNDED.
Mounting Magneeto™ II Control Panel
Determine desired location for control panel on cabinet underneath cooktop. Do not locate control panel on flat cooktop surface. Always mount vertically, not horizontally
Cutout Dimensions

text_image
2-7/8" (7.4 cm) 2-1/4" (5.7 cm)
text_image
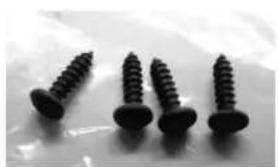
3-13/16" (9.7 cm) 1-3/16" (3.0 cm) 2-1/2" (6.3 cm) 3-1/2" (8.9 cm)Use included screws. Do Not use alternate hardware.
natural_image
Four black screwdrivers arranged on a light surface (no text or symbols visible)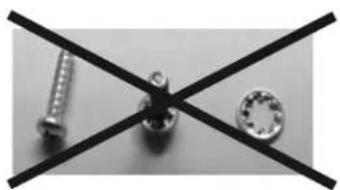
natural_image
Close-up of three mechanical components: a screw, a bolt, and a washer, arranged on intersecting black lines (no text or symbols visible)- Insert Ethernet cable straight into RJ-45 connector
- Strain relieve cable so that connector entry remains straight
- Route and protect cable to prevent damage/pulling from behind/under counter installations/storage

natural_image
Close-up of a black electronic device with a gray cable inserted, showing mounting holes and a small connector (no text or symbols visible)Installation
Countertop Preparation
The Incogneeto™ can be used with natural stone or “engineered stone” (crushed stone and polymer resin composite). It is not recommended for use with “solid surfaces” (all polymer resin).
Important Characteristics Of NATURAL Stone
Stone is a natural material with random natural defects in any given piece. Cracking can occur due to these defects alone. Moreover, cracks can occur when pre-existing weak points are subjected to additional stresses or forces.
Heat differentials that cause one portion of the stone to try to expand while other portions try to remain fixed, will cause excess stress.
This localized heating can come from a number of sources:
a. Heat lamps above the stone
b. Heat generated by equipment below the stone
c. Heat from hot items placed on top of the stone
In extensive testing, NO NATURAL STONE was found to interfere with the performance of the wireless communications, or absorb excess heat from the electro-magnetic induction waves associated with its Incogneeto™ and Magneeto™ II equipment.
Design Considerations When Using Incogneeto™ with NATURAL STONE
Any temperature gain that occurs inside the cabinet where an Incogneeto™ is mounted contributes to heating the stone. Keeping the inside of the cabinets as close to room temperature as possible will therefore reduce stress on the stone. Cabinets with poor or insufficient ventilation will increase the stress on the stone. Tensile strength of natural stone is proportionately linear with thickness: 3/4" (2.0cm) stone is 1/3rd thinner than 1-1/4" (3.0cm) stone, so that resistance to cracking is also reduced by 1/3. Applications with prolonged intensive use are better served with 30mm stone above Incogneeto™ units. 1-1/4" (3.0cm) thick natural stone dissipates heat much better than 3/4" (2.0cm), resulting in lower maximum temperatures. For prolonged intensive use applications, thicker stone is more durable. The stone is not generally heated by the induction waves, but some heating will occur from radiation back from a hot pan. The stone around the portion that is heated from radiation provides the mechanical strength "buffer" to help prevent fractures. Allowing as much stone around the edge of the Incogneeto™ as possible will improve the strength of the whole system.
Best Practices Design Guidelines for Installation Under NATURAL STONE
It is recommended that natural stone over the Incogneeto™ be 1-1/4" (30mm) thick in high use applications. Synthetic or "engineered stone" at 3/4" (2.cmm) is perfectly acceptable over the Incogneeto™ in all applications. (Note: 3/4" [2.0cm] tops in any material also require plywood substrate.) It is further recommended that cabinets be built with sufficient ventilation to keep the interior compartment as close to room temperature as possible. At least 8" of additional stone surface should be allowed from the edge of the Incogneeto™ location to the final edge of any piece of natural stone. This requirement is NOT necessary for use with engineered stone. Extra care should be taken to not have a mechanical seam in the cabinet support above or close to the Incogneeto™.
General Guidelines
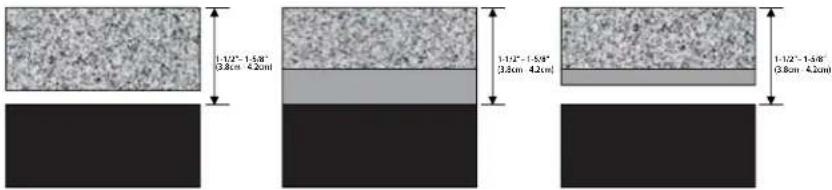
Note: With engineered stone, none of these extra guidelines apply, as it is a much more uniform and generally stronger material. Heat lamps should not be used above any Incogneeto™ units, unless they are interlocked to prevent heating when a pan is not present, or damage to the disk may occur. Installation is only recommended under three countertop configurations: 1-1/4" (3.0cm) stone, with 1/2" (1.2cm) substrate; or 1-1/4" (3.0cm) stone with 3/4" (2.0cm) plywood strips; or 3/4" (2.0cm) stone with 3/4" (2.0cm) substrate.
The combined thickness of stone, wood and any air gap MUST BE WITHIN A RANGE OF 1-1/2" to 1-5/8"
(3.8cm to 4.2cm). Too far away, communications between the Magneeto II disk and Incogneeto may fail, and/or insufficient thermal energy will be delivered to the pan. Too close and too much energy could be delivered resulting in damage the electronics in the Magneeto II disk. Metals should NOT be used in any part of the countertop construction directly above an installed Incogneeto unit, although trace metals in the stone or engineered stone ARE permissible. Metals in cabinet construction may heat and / or interfere with communication between the Magneeto II and Incogneeto.
text_image
1-1/2" - 1.58" 3.8cm + 4.2cm 1-1/2" - 1.58" 3.8cm + 4.2cm 1-1/2" - 1.58" 3.8cm + 4.2cmInstallation
Mounting the Unit
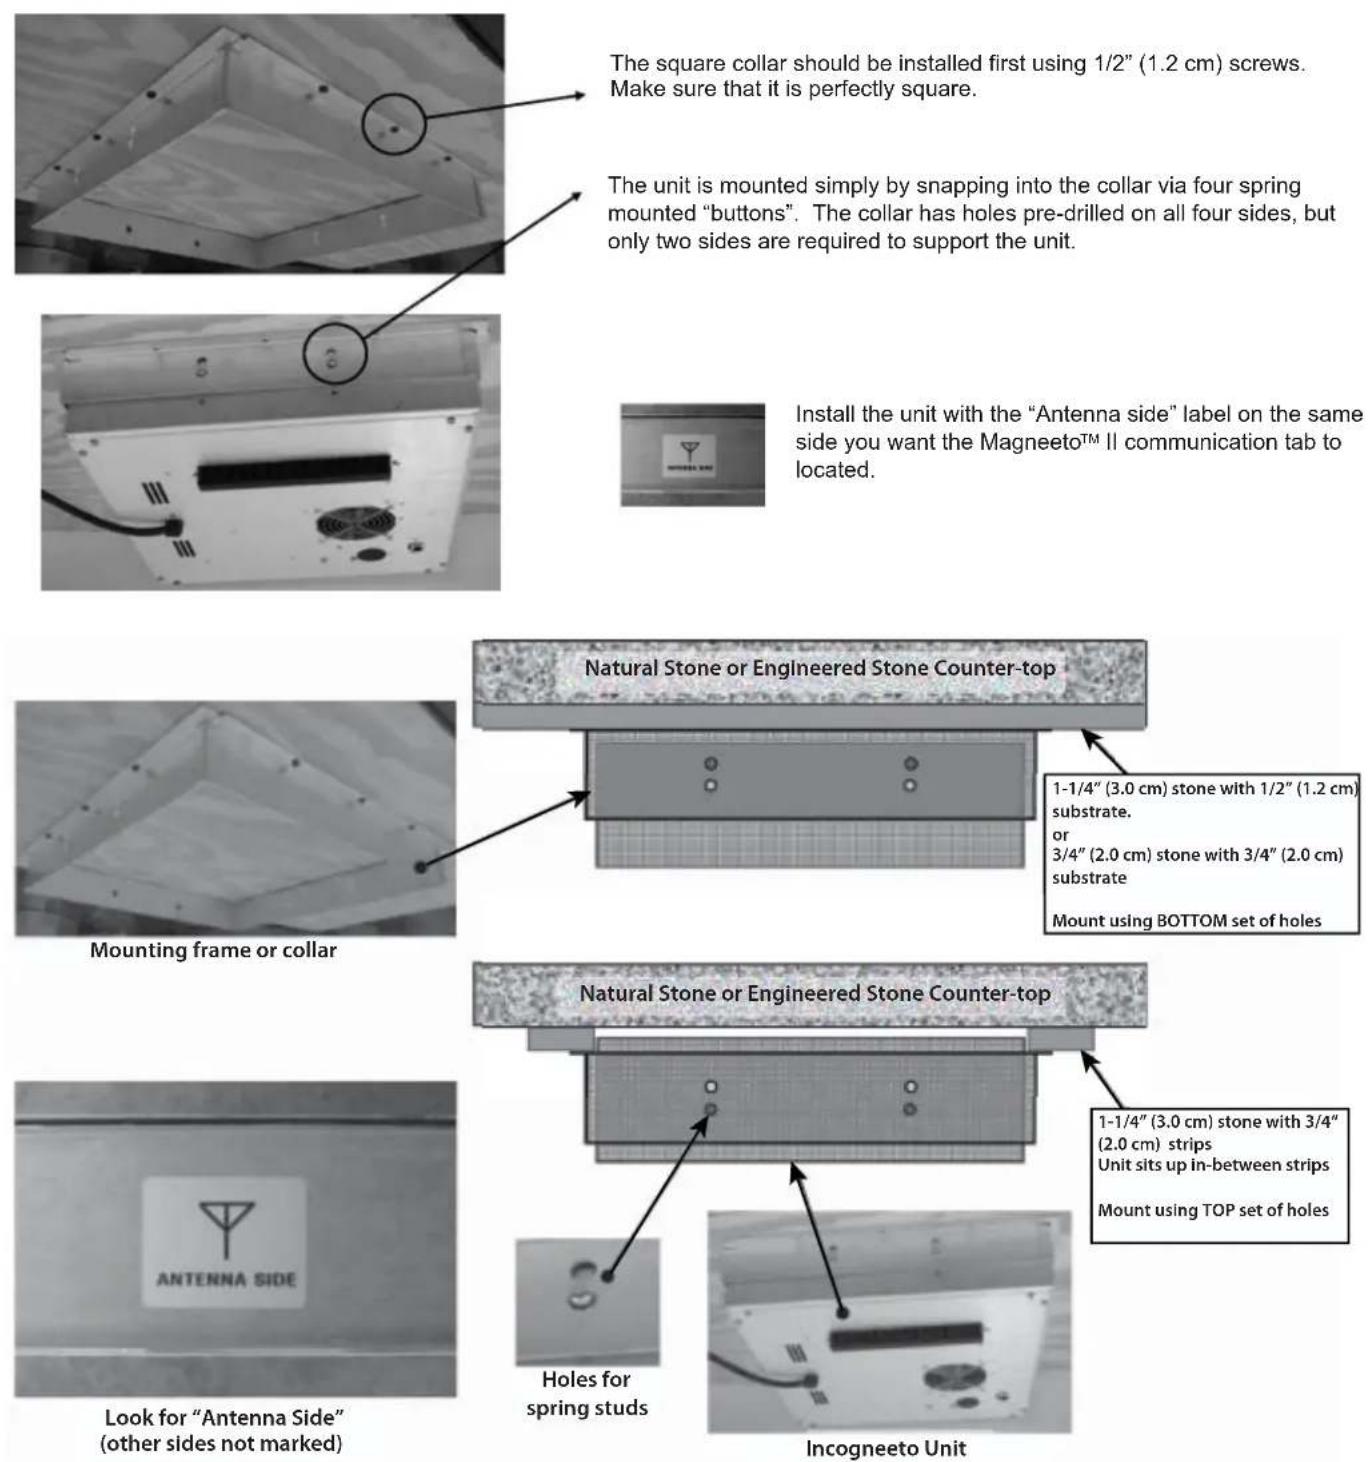
The square collar should be installed first using 1/2" (1.2 cm) screws. Make sure that it is perfectly square.
The unit is mounted simply by snapping into the collar via four spring mounted "buttons". The collar has holes pre-drilled on all four sides, but only two sides are required to support the unit.
Install the unit with the "Antenna side" label on the same side you want the Magneeto™ II communication tab to located.
Installation
Side

text_image
Top "6 o'clock" "3 o'clock"In all cases, the Magneeto™ II wireless communicator tab must sit over the antenna side of the unit installed under the counter.
The antenna runs the whole length of the unit, so that the Magneeto™ II can be used in the "6 o'clock" or "3 o'clock" positions.
Island

text_image
Guest Side Server Side Top views Flush With A Wall Server & Guest Side "3 o'clock" (ideal position) "6 o'clock" Mount Magne Magne o'clock not the distracMount units on Collar with Antenna Side on Guest Side.
Magneeto™ II wireless communicator must be above the Antenna Side. Magneeto™ II can be used with the LED Indicator in the "3 o'clock" or "6 o'clock" position, but ideally in the "6 O'clock" position facing the servers and not the guests. Servers can see that the system is working and guests are not distracted by the lights.
Mount units on Collar with Antenna Side against the wall.
Magneeto™ II wireless communicator must be above the Antenna Side. Magneeto™ II can be used with the LED Indicator in the "3 o'clock" or "6 o'clock" position. The "3 o'clock" position avoids the lights shining directly at seated guests, but servers can see that the system is working.
The Incogneeto units can be mounted side be side with NO additional cooling clearance needed. However, the serving vessel on top can be the limiting factor for side-by-side installation, particularly if a chafer with a spoon holder is used.
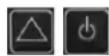
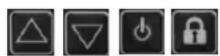
User Buttons
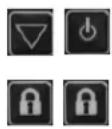
Power button - Use this button to turn the unit on and off. A green LED will indicate when the unit is on.
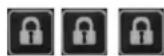
Lock button - Use this button to prevent users from adjusting settings. Pressing this button three times will lock the unit. When the unit is locked, the only button that will continue to work is the Power button. To unlock the unit, press the Lock button three times. The red LED to the right of the button will indicate when the unit is locked.
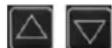
Up and Down Arrows - These buttons allow you to quickly set the temperature.
Alphanumeric display - Displays holding temperature (Fahrenheit or Celsius) and error code information


General Operation
Plug the induction warmer into a grounded, single-phase receptacle. Models will run on 100-120VAC drawing a maximum of 650W. Voltages below 120VAC can result in less than rated power and slower heating times. This appliance is designed for holding food products only.
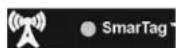
This unit is equipped with SmarTag ^™ technology, using WIRELESS COMMUNICATOR to provide precise temperature control.
Note: For proper operation, an independent, dedicated circuit should be used for up to 3 units installed on a 15A (120VAC) circuit or 4 units installed on a 20A (120VAC) circuit.
To operate this induction warmer unit:
- Press the Power button to turn the unit on. The green LED next to the power button will illuminate.
- Place a Magneeto™ II trivet on the countertop and position it over top of the unit until the LED begins flashing and the SmarTag™ LED illuminates.
- Place an induction compatible cookware/bakeware on the top of the trivet. To ensure contact with the temperature sensor on the Magneeto™ II trivet, the cookware/bakeware must have a flat bottom. The Pan Detect LED will illuminate.
Make sure the cookware/bakeware is covering the temperature sensor on the Magneeto™ II, but do not cover the WIRELESS COMMUNICATOR tab. The unit will start at 80°F, or the last entered temperature. Press the Up and Down Arrows to select desired temperature from the preset choices.
• Fahrenheit Settings (150-190 degrees): 150, 160, 175, 190,
• Celsius Settings (65-85 degrees): 65, 70, 80, 85
- Once you have chosen your preferred temperature, the unit will begin to heat the cookware/bakeware. The letter F or C will flash when the cookware is heating. When the cookware/bakeware has reached the set temperature, the letter F or C will remain solid on the display.
- To lock the controls, press the Lock button three times (the red LED to the right of the lock button will illuminate to indicate the unit is locked). This will prevent temperature settings from being changed. The Power button will continue to function while locked. To unlock the controls, press the lock button three more times.
- When you are finished using the unit, press the Power button. The green Power LED will go out. Remove the cookware/bakeware from the unit.

text_image
POWER TRANSFORM TRANSFORM LOCK


Programming Magneeto™ II
- Starting with the unit off, hold the Down Arrow while pressing the Power button.
- The display will start with the text "CLR." Use this to clear the tag (the unit will no longer enter auto mode). Otherwise, use the Up and Down Arrows to select a temperature.
- To set the tag, press the Lock Button twice. The display will read "TAG SET."
- Repeat if necessary with other Magneeto™ IIs.
Magneeto™ II Operation
- With the unit turned on, place Magneeto™ II on countertop in expected vicinity of unit (ribbed side down). Slowly slide the Magneeto™ II around until the red light flashes.
- Placement where the light flashes brightest is the optimum position.
- Place induction compatible cookware/bakeware on top of Magneeto™ II for warming. Make sure the cookware/bakeware covers the temperature sensor, but do not cover the wireless communicator tab with the cookware. Locating may also be performed with the cookware/bakeware already on the Magneeto™ II.
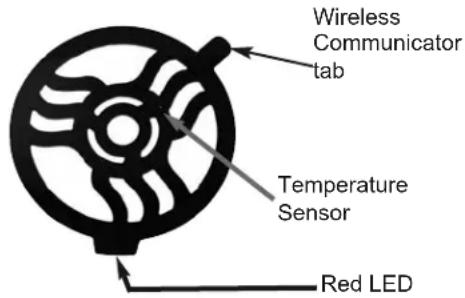
text_image
Wireless Communicator tab Temperature Sensor Red LEDChange Temperature Scale
Starting with the unit off, hold down the Up Arrow while pressing the Power button. Then use the Down Arrow to select the desired scale. Powering the unit off completes the selection.
Note: if a button is not pressed for more than five minutes, the unit will power off keeping the previously set temperature scale.
Change Temperature Options (Short/Long)
Starting with the unit off, hold down both the Up and Down Arrows and press the Power button. Use the arrows to select "NUM" and press the Lock button. Use the arrows again to select "PART" or "FULL" for the partial or full set of temperatures. Press the Power button to set the value
Timer Operation
- To enable/disable the timer feature, see "Setting the Timer" below.
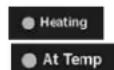
- If the timer is enabled, the timer will start counting when a pan is placed on the unit and the Heating or At Temp LED will turn on.
- The timer will count up to the preset interval (in minutes). When the interval is reached, the unit will start to beep once per second to alert the operator and flash "DonE" on the display. The unit will continue to maintain the temperature of the pan when the timer is expired.
- The timer is reset when the pan is removed from the unit and the Heating or At Temp LED turns off. The next time a pan is placed on the unit the timer will start again from the beginning.
- To view the elapsed time from when the pan was placed on the unit, press the Lock button once. This will display the time (in minutes) from when the pan was placed on the unit for 5 seconds. After 5 seconds the normal temperature display will return.


Using Your Induction Warmer
Setting the Timer
The Incogneeto units are equipped with a timer alarm that can be set to alert the operator when a pan has been on the unit for a period of time up to 240 minutes (4 hours).
To enable/disable the timer:
- Starting with the unit off, hold the Down Arrow while pressing the Power Button.
- Release the buttons when the display comes on. Use the Up and Down Arrows to toggle through the options until "t En" is shown on the display. Press the Lock Button once to select the enable option.
- Press the Up and Down arrows to toggle between the two setting options "on" and "off." When the desired option is displayed, press the Lock Button once to enter this option. The display will flash three times to indicate the option has been saved.
- Press the Power Button to exit this mode.
To set the timer interval:
- Starting with the unit off, hold the Down Arrow while pressing the Power Button.
- Release the buttons when the display comes on. Use the Up and Down Arrows to toggle through the options until "t Int" is shown on the display. Press the Lock Button to select the interval option.
- Press the Up and Down Arrows to increase or decrease the amount of time desired for the timer interval. When the desired time (displayed in minutes) is shown, press the Lock Button to enter this option. The display will flash three times to indicate the option has been saved.
- Press the Power Button to exit this mode.

natural_image
Grid of black square buttons with white symbols including play, rotate, lock, and power (no text or labels)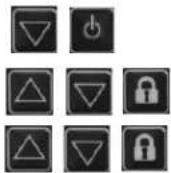

Cooking Tips
The Magneeto™ II wireless communicator tab must no tbe covered by the dish. This will prevent proper communications.
If a large pan must be used, then it is okay to cover the red LED, but NOT the wireless communicator tab.
The pan must be in contact with the Temperature Sensor. Overheating the pan can result, which may cause terminal damage to the Magneeto™ II.
If a small pan must be used, then it must be in contact with the Temperature Sensor.

text_image
Side Top ✓ × ✓ Side Top ✓ × ✓Care and Maintenance
Incongnito Induction warmer Unit
Your induction warmer is easy to keep clean. Be sure to follow these easy instructions:
- Turn the unit OFF and remove the plug from any power outlets prior to cleaning.
- Never immerse the induction warmer in water or put in in the dishwasher.
Cleaning:
- When needed, clean with a mild soap or detergent.
- Do not place in the dishwasher.
Care and Cautions:
- The induction unit antenna is located in the back of the unit. The wireless communicator tab must be positioned over the antenna.
- Use the Magneeto™ II ONLY with Incogneeto induction warmers and series 650 watt wireless communicator induction units. DO NOT use the Magneeto™ II with any other induction appliance, as it may be damaged.
- Pan bottom size should be between 7" and 12" (17.8-30.5 cm) in diameter. The dish/pan bottom must be flat and in contact with the temperature sensor dome or overheating will result.
- Some upward bowing of the Magneeto™ II when hot and a cookware/bakeware is removed is normal and will disappear with cooling or when a cookware/bakeware is placed on top.
- Do not significantly bend or twist the Magneeto™ II as damage may result.
To clean the control panels:
- Control panels should only be cleaned with a damp cloth.
- CAUTION: Control panels are NOT water tight. Exposure to water spray may cause control panel failures. DO NOT use power wash or hose down.

natural_image
Crossed black lines forming a stylized shape resembling a broom or tool (no text or symbols)Troubleshooting
In the event of a possible malfunction, your induction warmer will display an error code on the alphanumeric display. Some models will beep a specific number of times, indicated by the error and flash the lights on the control box. Please consult the following table when encountering an error code.
To reset error conditions, remove the pan from the unit and press the Power button, or unplug the unit.
| Error | Error Cause Displayed Message Troubleshooting | ||
| 1 | Broken Temperature Sensor | E-01 Service required | |
| 3 | Over current (peak) E-03 | Try different cookware. Service may be required. | |
| 6 | High line voltage E-06 | To reset, unplug unit, wait 5 seconds, and plug in again. If problem persists, have an electrician monitor the line voltage. | |
| 7 | Hardware failure E-07 Service required. | ||
| 8 | Zero cross failure E-08 | Turn unit off, then on. Plug unit into outlet on different circuit breaker. If problem persists, service is required on device | |
| 10 | MagneetoTM II RTD Failure | E-10 | MagneetoTM II needs repair. Service needed for MagneetoTM II. |
| 11 | Tag communication | E-11 | Ensure the wireless communicator tab on the pan is properly located. |
| 12 | Wireless communicator reader failure | E-12 Service required. | |
| 13 | User interface error E-13 | Check control panel connection, cycle power. Service required | |
| 16 | Critical error E-16 Service required. | ||
| Symptom Probable | Cause Possible Solution | |
| No power(No lights or fan noise) | Unit unpluggedNo power to receptacle | Plug unit into appropriate receptacleMake sure that receptacle is energizedCheck wall switchesCheck circuit breakerPlug a different electronic device into the receptacle to make sure that power is present |
| Pan does not heat | Pan is not induction efficientPan not centered | Use induction efficient panCenter pan |
| Induction warmer suddenly stops heating | Possible power brown outCircuit shared with another electrical deviceSafety shut-off engaged | Assure proper voltage/power levelsMake sure the induction warmer is not sharing a circuit with other electrical devicesThe safety shut-off will engage if an empty pan is left on the induction warmer surface while the unit is working at full power. Make sure that the induction warmer surface is clear. Wait 15-20 minutes for the unit to reset. |
| Pan does not get hot enough even though power levels are set to maximum - induction efficient pan in use | Extension cord in useCircuit shared with another electrical device | DO NOT use extension cords. Extension cords may affect the power levels reaching the appliance.Make sure that the induction warmer is not sharing a circuit with other electrical devices. |
| Pan heats unevenly, does not maintain heat level, or overheats | Pan is not induction efficientPan bottom may not be flat enoughPan not centeredPan diameter is less than 7" or more than 12" | Use induction efficient panUse flatter panCenter panUse an induction efficient pan that is between 7"-12" (17.8-30.5cm) in diameter |
Service Information
If service is required, call your dealer or authorized service agency. The name of the authorized service agency can be obtained from the dealer or distributor in your area.
Have the following information readily available:
- Model number
- Serial number
- Date purchased
• Name of dealer from whom purchased
Clearly describe the problem that you are having. If you are unable to obtain the name of an authorized service agency, or if you continue to have service problems, contact Viking Range at (888) 845-4641 or write to:
VIKING RANGE, LLC
PREFERRED SERVICE
111 Front Street
Greenwood, Mississippi 38930 USA
The serial number and model number for your oven is located on the identification plate mounted on the top left side of the oven door opening under the control panel.
Record the information indicated below. You will need it if service is ever required. The model and serial number for your induction warmer can be found by looking under the unit.
Model No. ____ Serial No. ____
Date of Purchase Date Installed
Dealer's Name ____
Address ____ ____
If service requires installation of parts, use only authorized parts to insure protection under the warranty.
Keep this manual for future reference.
BUILT-IN INDUCTION WARMER WARRANTY ONE YEAR FULL WARRANTY
Built-in induction warmers and all of their component parts, except as detailed below*†, are warranted to be free from defective materials or workmanship in normal residential use for a period of one (1) year from the date of original retail purchase. Viking Range, LLC, warrantor, agrees to repair or replace, at its option, any part which fails or is found to be defective during the warranty period.
*FULL NINETY (90) DAY COSMETIC WARRANTY: Product is warranted to be free from cosmetic defects in materials or workmanship (such as scratches on stainless steel, paint/porcelain blemishes, etc.) for a period of ninety (90) days from the date of original retail purchase or closing date for new construction, whichever period is longer. Any defects must be reported to the selling dealer within ninety (90) days from date of original retail purchase. Viking Range, LLC uses high quality processes and materials available to produce all color finishes. However, slight color variation may be noticed because of the inherent differences in painted parts and porcelain parts as well as differences in kitchen lighting, product locations, and other factors. Therefore, this warranty does not apply to color variation attributable to such factors.
†FULL NINETY (90) DAY WARRANTY IN “RESIDENTIAL PLUS” APPLICATIONS: This full warranty applies to applications where use of the product extends beyond normal residential use, but the warranty period for products used in such applications is ninety (90) days. Examples of applications covered by this warranty are bed and breakfasts, fire stations, private clubs, churches, yachts, etc. Under this “Residential Plus” warranty, the product, its components and accessories are warranted to be free from defective material or workmanship for a period of ninety (90) days from the date of original retail purchase. This warranty excludes use of the product in all commercial locations such as restaurants, food service locations and institutional food service locations.
TERMS AND CONDITIONS
This warranty extends to the original purchaser of the product warranted hereunder and to each transferee owner of the product during the term of the warranty and applies to products purchased and located in the United States, Canada, Mexico, and the Caribbean (excluding Cuba, Dominican Republic, and Haiti). Products must be purchased in the country where service is requested. If the product or one of its component parts contains a defect or malfunction during the full warranty period after a reasonable number of attempts by the warrantor to remedy the defect or malfunction, the owner is entitled to either a refund or replacement of the product or its component part or parts. Replacement of a component part includes its free installation, except as specified under the limited warranty. Under the terms of this warranty, service must be performed by a factory authorized Viking Range, LLC service agent or representative. Service will be provided during normal business hours, and labor performed at overtime or premium rates shall not be covered by this warranty.
Owner shall be responsible for proper installation, providing reasonable and necessary maintenance, providing proof of purchase upon request, and making the appliance reasonably accessible for service. The return of the Owner Registration Card is not a condition of warranty coverage. You should, however, return the Owner Registration Card so that Viking Range, LLC can contact you should any question of safety arise which could affect you.
This warranty gives you specific legal rights, and you may also have other rights which may vary from jurisdiction to jurisdiction.
WHAT IS NOT COVERED BY THIS WARRANTY: This warranty shall not apply to damage resulting from abuse, failure to provide reasonable and necessary maintenance, accident, delivery, negligence, natural disaster, loss of electrical power to the product for any reason, alteration, outdoor use, improper installation, improper operation, or repair or service of the product by anyone other than an authorized Viking Range, LLC service agency or representative. This warranty does not apply to commercial usage.
LIMITATION OF REMEDIES AND DURATION OF IMPLIED WARRANTY OWNER'S SOLE AND EXCLUSIVE REMEDY FOR A CLAIM OF ANY KIND WITH RESPECT TO THIS PRODUCT SHALL BE THE REMEDIES SET FORTH ABOVE. VIKING RANGE, LLC IS NOT RESPONSIBLE FOR CONSEQUENTIAL OR INCIDENTAL DAMAGE, INCLUDING BUT NOT LIMITED TO FOOD OR MEDICINE LOSS, DUE TO PRODUCT FAILURE, WHETHER ARISING OUT OF BREACH OF WARRANTY, BREACH OF CONTRACT OR OTHERWISE. Some jurisdictions do not allow the exclusion or limitation of incidental or consequential damages, so the above limitation or exclusions may not apply to you. Any implied warranties of merchantability or fitness for a particular purpose applicable to this product are limited in duration to the period of coverage of the applicable express written limited warranties set forth above. Some states do not allow limitations on how long an implied warranty lasts, so the above limitation may not apply to you.
WARRANTY SERVICE
To obtain warranty service, contact an authorized Viking Range, LLC service agent, or Viking Range, LLC, 111 Front Street, Greenwood, Mississippi 38930, (888) 845-4641. Provide model and serial number and date of original purchase or closing date for a new construction. For the name of your nearest authorized Viking Range, LLC service agency, call Viking Range, LLC. IMPORTANT: Retain proof of original purchase to establish warranty period.
Specifications subject to change without notice.
VIKING RANGE, LLC
111 Front Street
Greenwood, Mississippi 38930 USA
(662) 455-1200
For more product information, call 1-888-845-4641 or visit our web site at vikingrange.com in the US or brigade.ca in Canada