SFA12620ON - Vacuum Cleaner SWAN - Free user manual and instructions
Find the device manual for free SFA12620ON SWAN in PDF.

User questions about SFA12620ON SWAN
0 question about this device. Answer the ones you know or ask your own.
Ask a new question about this device
Download the instructions for your Vacuum Cleaner in PDF format for free! Find your manual SFA12620ON - SWAN and take your electronic device back in hand. On this page are published all the documents necessary for the use of your device. SFA12620ON by SWAN.
USER MANUAL SFA12620ON SWAN
Swan Retro designed for life
designed for life

natural_image
Close-up of a modern office desk fan with metal mesh grille and a white base (no visible text or symbols)Retro 12" (30cm) Desk Fan
Model: SFA12620 (all colours)
Help line
0333 220 6050
v2.0

IMPORTANT INFORMATION - RETAIN FOR FUTURE USE
When using any electrical appliance, basic safety precautions should always be followed including the following:
• Always ensure that the voltage on the rating label corresponds to the mains voltage in your home
- Incorrect operation and improper use can damage the appliance and cause injury to the user.
- This appliance can be used by children aged from 8 years and above if they have been given supervision or instruction concerning use of the appliance in a safe way and if they understand the hazards involved. Cleaning and user maintenance shall not be made by children unless they are older than 8 and supervised. Keep the appliance and its cord out of reach of children aged less than 8 years. Check the power cord and plug regularly for any damage. If the cord or the plug is damaged, it must be replaced by the manufacturer or qualified person in order to avoid an electrical hazard.
- Appliances can be used by persons with reduced physical, sensory or mental capabilities or lack of experience and knowledge if they have been given supervision or instruction concerning use of the appliance in a safe way and understand the hazards involved.
- Do not use the appliance if it has been dropped or damaged in any way. In case of damage, take the unit in for examination and/or repair by an authorised service agent.
- Never immerse the unit in water or any other liquid for
2
Swan

IMPORTANT INFORMATION - RETAIN FOR FUTURE USE
cleaning purposes.
- Remove the plug from the socket by gripping the plug. Do not pull on the cord to disconnect the appliance from the mains. Always unplug the unit when not in use, before cleaning or when adding or removing parts.
- The use of accessory attachments that are not recommended or supplied by the manufacturer may result in injuries, fire or electric shock.
- Do not let the cord hang over the edge of a table or counter. Ensure that the cord is not in a position where it can be pulled on inadvertently.
- Do not allow the cord to touch hot surfaces and do not place on or near a hot gas or electric burner or in a heated oven.
- Do not use the appliance on a gas or electric cooking top or over or near an open flame.
- Use of an extension cord with this appliance is not recommended. However, if it is necessary to use an extension lead, ensure that the lead is suited to the power consumption of the appliance to avoid overheating of extension cord, appliance or plug point. Do not place the extension cord in a position where it can be pulled on by children or animals or tripped over.
- This appliance is not suitable for outdoor use. Do not use the appliance for anything other than its intended use.
- Do not carry the appliance by the power cord.
- Do not leave the appliance unattended during use. Always unplug the unit when not in use or before cleaning.
• Always operate the appliance on a smooth, even, stable

IMPORTANT INFORMATION - RETAIN FOR FUTURE USE
surface. Do not place the unit on a hot surface.
- Ensure that the unit is switched off after use.
- The manufacturer does not accept responsibility for any damage or injury caused by improper or incorrect use, or for repairs carried out by unauthorised personnel.
- In case of technical problems, switch off the product and do not attempt to repair it yourself. Return the appliance to an authorised service facility for examination, adjustment or repair. Always insist on the use of original spare parts. Failure to comply with the above mentions precautions and instructions, could affect the safe operation of this product.
- Your appliance must never be switched on through an external timer or any kind of separate remote control system
- This appliance is intended to be used in household and similar applications such as: staff kitchen areas, in shops, offices and other working environments; farm houses; by clients in hotels, motels and other residential type environments; bed and breakfast type environments.
- Keep loose clothing and hair away from the fan

WHAT'S IN THE BOX

text_image
Rear Grille Base Fan Blade Motor assembly Fan Nut Base Screw remove before assembly Front Grille Grille Screw & Nut in small bag taped to grilleRemove all items from the packaging and check they are all present as shown in the above image. Please note: the Grille Screw & Nut is in a small bag that is taped to the grille so it doesn't get lost in the box!
Please note: you are going to need a Phillips screw driver.

natural_image
Close-up of hands operating a black circular device with a white lid, labeled 'ASSEMBLY' in the top-left corner (no other text or symbols visible)Fit the base to the Motor Assembly using the Base Screw. It only needs to be hand tight.
natural_image
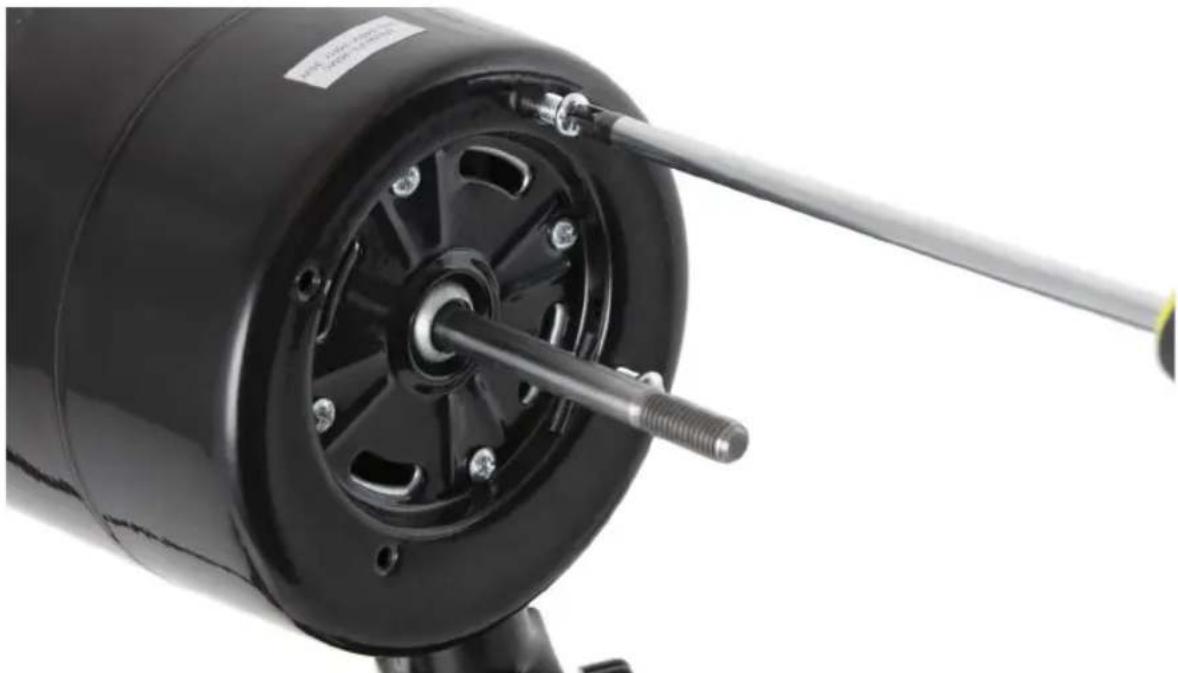
Close-up of a black electric motor with a screw and shaft, showing no visible text or symbols.Use a Phillips screwdriver to remove the 4 screws from the motor unit. Set them aside so they don't get lost.

ASSEMBLY
text_image
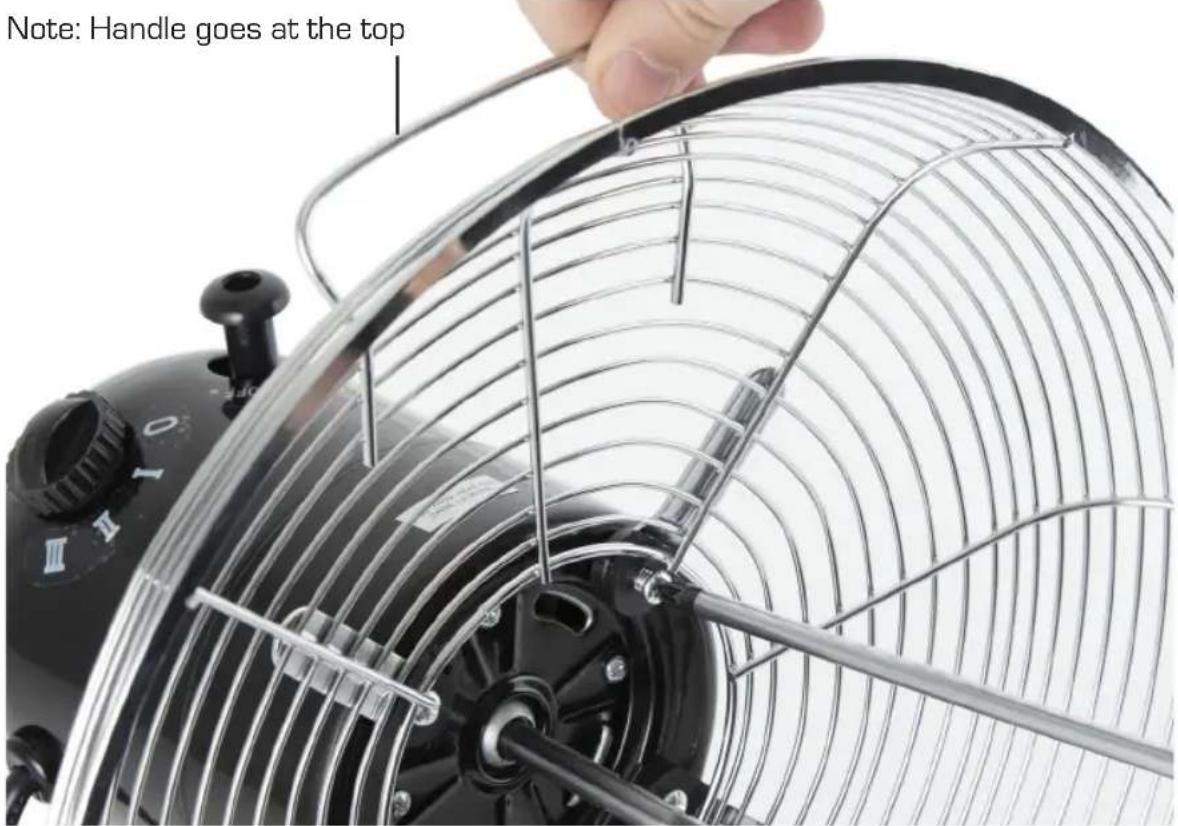
Note: Handle goes at the topOffer the Rear Grille up to the motor unit. Ensure the handle is at the top. Refit the 4 screws to secure the Rear Grille.

text_image
Note alignment!Fit the fan blade over the motor shaft. Make sure the notch in the fan aligns with the peg on the motor shaft. Fit the Fan Nut to secure the blade. Note: turn ANTI-CLOCKWISE to tighten it.

ASSEMBLY
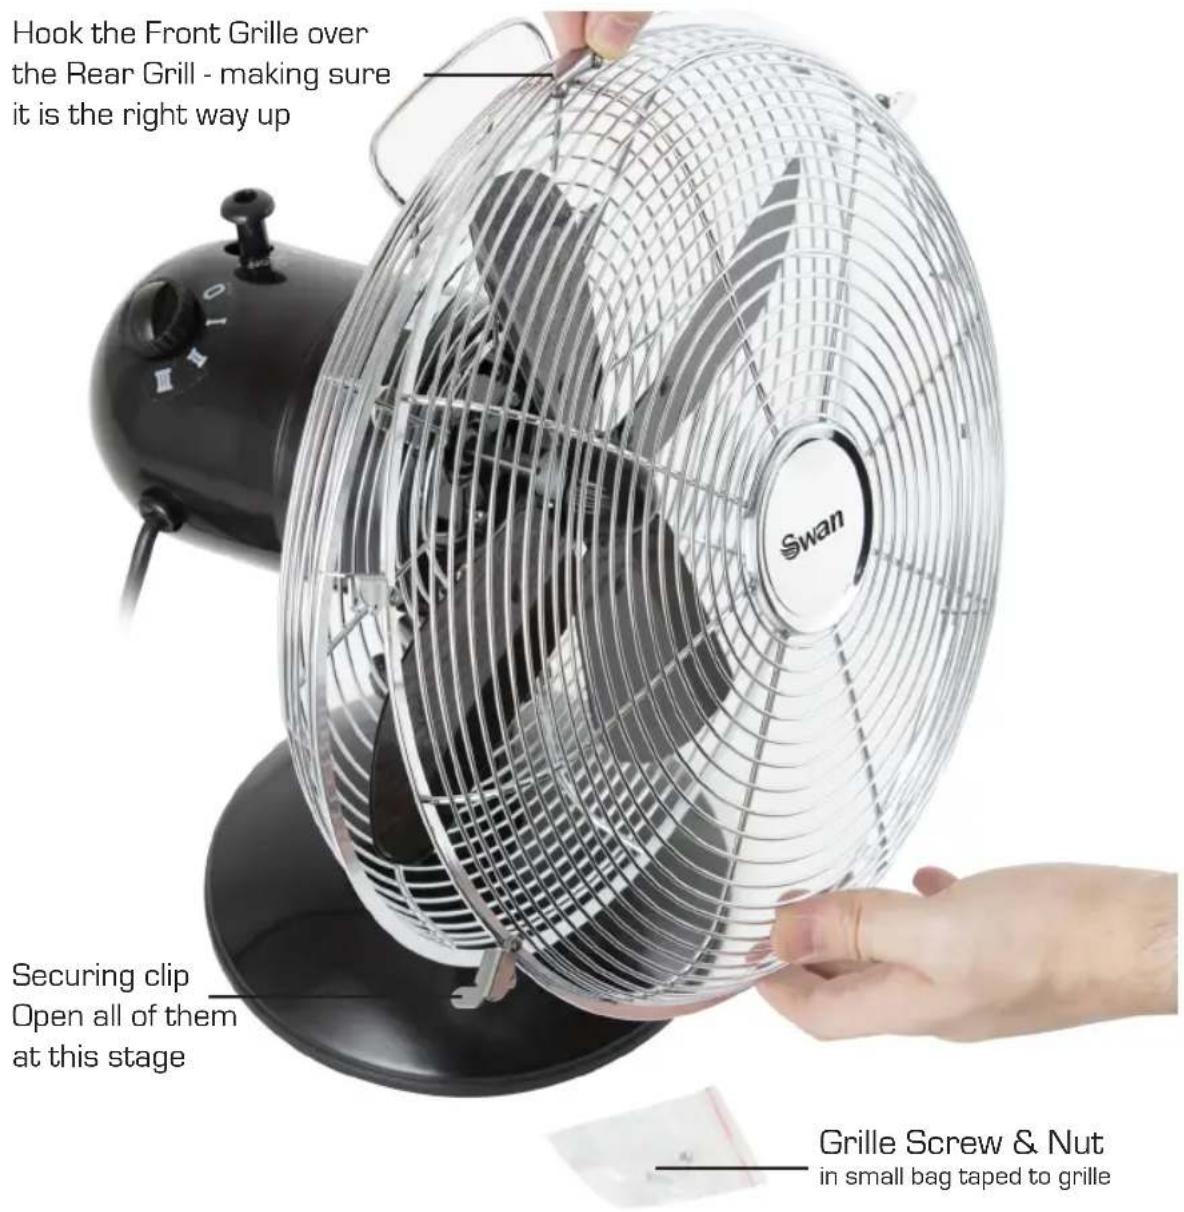
Hook the Front Grille over the Rear Grill - making sure it is the right way up
Securing clip Open all of them at this stage
text_image
Hook the Front Grille over the Rear Grill - making sure it is the right way up Swan Securing clip Open all of them at this stage Grille Screw & Nut in small bag taped to grilleOpen all the securing clips on the Front Grille. There is a hook at the top of the Front Grille. This hooks over the Rear Grille. This helps to keep the Front Grille the right way up. You can also use the Swan logo as a guide.
At the bottom of the Front Grille, there is a small hole. This needs to line up with a corresponding hole in the Rear Grille.

text_image
ASSEMBLYFit the Grille Screw & Nut and tighten, as shown above. It's a bit fiddly but safety regulations say there has to the a screw and nut there!

natural_image
Close-up of a hand adjusting a metal wire mesh fan (no text or symbols visible)Finally, press the grille securing clips into place. This will keep the front and rear grilles together. Now you are good to go!

HOW TO USE
- Turn the speed control to selected speeds: 0 (off) and 1 (slow), 2 (medium), 3 (fast)
- Set the tilt angle by adjusting the fan head accordingly.
- You can tighten/loosen the screw on the neck of the fan to lock the tilt angle
- Never touch the blades with hands or any object. Keep long hair away from the fan blades
- There is an oscillation control on top of the fan motor. Press down to make the fan sweep left and right. Lift up to stop the oscillation motion.

CLEANING & MAINTENANCE
Your fan requires little maintenance and contains no user serviceable parts. Do not attempt to dismantle the unit yourself. The fan is permanently lubricated and will not require additional lubrication.
Cleaning:
• Always unplug the fan from the mains outlet before cleaning.
- The fan can be cleaned with a soft dry cloth. Deposits of dust can be removed by using a vacuum cleaner, ensuring that the air vents and grilles remain free from dust to prevent overheating.
- Important: Do not allow water to run into the interior of the fan, as this can cause an electric shock.
- Do not use abrasive cleaners or chemical agents to clean the product.
- When not in use, store the fan in it's retail box.

TECHNICAL DATA
Description: RETRO 12" (30cm) DESK FAN
Model: SFA12620 (all colours)
Input Voltage: 220-240V \~ 50Hz 35 Watts

10


WARRANTY
This product is guaranteed for 2 years from the date of original purchase. If any defect arises due to faulty materials of workmanship the faulty products must be returned to the place of purchase. Refunds or replacement is at the discretion of the store.
The following conditions apply:
- The product must be returned to the retailer with proof of purchase.
- The product must be installed and used in accordance with the instructions contained in this instruction guide.
- It must be used only for domestic purposes.
- It does not cover wear and tear, damage, misuse or consumable parts.
- Swan Products Ltd has limited liability for incidental or consequential loss or damage.
• This guarantee is valid in the UK and Eire Only.

BS PLUG
The wires in the mains lead are coloured in accordance with the following code:
BLUE NEUTRAL
BROWN LIVE
GREEN/YELLOW EARTH
As the colours of the wire in the mains lead of this appliance may not correspond with the colour markings identifying the terminals on your plug, proceed as follows:
The wire which is coloured BLUE must be connected to the terminal which is marked with the letter N or coloured black. The wire which is coloured BROWN must be connected to the terminal which is marked with the letter L or coloured red. The wire which is coloured GREEN/YELLOW must be connected to the terminal which is marked with the letter E or (earth symbol) and is coloured GREEN or GREEN/YELLOW.
WARNING: THIS APPLIANCE MUST BE EARTHED

DISPOSAL OF UNIT
Appliances bearing the symbol shown here may not be disposed of in domestic rubbish. You are required to dispose of old electrical and electronic appliances like this separately. Please visit www.recycle-more.co.uk or www.recyclenow.co.uk for access to information about the recycling of electrical items. Please visit www.weeeireland.ie for access to information about the recycling of electrical items purchased in Ireland. The WEEE directive, introduced in
August 2006, states that all electrical items must be recycled, rather than taken to landfill. Please arrange to take this appliance to your local Civic Amenity site for recycling, once it has reached the end of its life.

natural_image
Stylized white and gray swan logo design on black background (no text or symbols)www.swan-brand.co.uk

Scan this QR code to hear about our story

We love what we do

we're proud of our quality

Find us on Facebook
* on selected products
Copyright © Swan Products Ltd. PO Box 3117, Stoke-on-Trent ST4 9GD