PMM1584S - Washing machine Profilo - Free user manual and instructions
Find the device manual for free PMM1584S Profilo in PDF.

User questions about PMM1584S Profilo
0 question about this device. Answer the ones you know or ask your own.
Ask a new question about this device
Download the instructions for your Washing machine in PDF format for free! Find your manual PMM1584S - Profilo and take your electronic device back in hand. On this page are published all the documents necessary for the use of your device. PMM1584S by Profilo.
USER MANUAL PMM1584S Profilo
1. Get back on a bar for the following described text: 2. The manuscript was published by the University of California, 1980.
1. Quaker - 7000000000 2. Quaker 1000000000 3. Quaker 1500000000 4. Quaker 200000000 5. Quaker 250000000 6. Quaker 300000000 7. Quaker 350000000 8. Quaker 400000000 9. Quaker 450000000

The following information will be obtained from the results of the research and development of the research
BSI By Awarded See, We See A.S.
[Unreadable]
3421. 2019 (note: TURB)
1. Quaker - 7000000000 2. Quaker 1000000000 3. Quaker 1500000000 4. Quaker 200000000 5. Quaker 250000000 6. Quaker 300000000 7. Quaker 350000000 8. Quaker 400000000 9. Quaker 450000000
PROFILO
[Unreadable]
www.csc10.com
PMM1584S
KIYMA MAIGNES meat minocr
PROFiLO
natural_image
White stainless steel kitchen grater with a side-mounted blade and control panel (no visible text or symbols)1584S
TR KUL ANIM KII AVUZU KIYMA MAKİNESI
EN USER MANUAL MEAT MINCER
6-5
20-19
PMM1584S
KOYMA MAKINESI meat mincer
PROFiLO
natural_image
White kitchen scale with food items on a white plate (no visible text or symbols)PROFILO
The image is too blurry to recognize any text content.
A

B
C
D

E
F
G
H
TR
Rogerli Müperimiz!
Cronen sejeljenja, che oder a P3501 Ole, den man sakely pakni. Er amet, sunda je drist in, uden or al P3501 Ole, bratisen kubramsoni bupje eder. Maserar, spillo suor litoraroringa. Kakran, kukran cibat. Ucrt. Cunl givid Ibrudens iu la rolo de, lure de mok, ues, kutans sedyen.
Garcia, 2016, the production of the organic fertilizer in the U.S.
A. 10.1.2017.1.14: 13:56:19 B. 10.1.2017.1.15: 13:56:19 C. 10.1.2017.1.16: 13:56:19 D. 10.1.2017.1.17: 13:56:19 E. 10.1.2017.1.18: 13:56:19 F. 10.1.2017.1.19: 13:56:19 G. 10.1.2017.1.20: 13:56:19
KUÇUK EV ALETLERİ
GARANTI
Cajir Yürarin Marmel
M1766
| Item | Name of the name of the item | Size | Mpa |
| 1. | A. B. C. D. E. F. G. H. I. J. K. L. M. N. O. P. Q. R. S. T. U. V. W. X. Y. Z. A. B. C. D. E. F. G. H. I. J. K. L. M. N. O. P. Q. R. S. T. U. V. W. X. Y. Z. A. B. C. D. E. F. G. H. I. J. K. L. M. N. O. P. Q. R. S. T. U. V. W. X. Z. A. B. C. D. E. F. G. H. I. J. K. L. M. N. O. P. Q. R. S. T. U. V. W. X. Y. Z. A. B. C. D. E. F. G. H. I. J. K. L. M. N. O. P. Q. R. S. T. U. V. V. W. X. Y. Z. A. B. C. D. E. F. G. H. I. J. K. L. M. N. O. P. Q. R. S. T. U. V. W. X. Y. Z. A. B. C. D. E. F. G. H. I. J. K. L. M. N. O. P. Q. R. T. U. V. W. X. Y. Z. A. B. C. D. E. F. G. H. I. J. K. L. M. N. O. P. Q. R. S. T. U. V. W. X. Y. Z. A. B. C. D. E. F. G. H. I. J. K. L. M. N. O. P. R. S. T. U. V. W. X. Y. Z. A. B. C. D. E. F. G. H. I. J. K. L. M. N. O. P. Q. R. S. T. U. V. W. X. Y. Z. A. B. C. D. E. F. G. H. I. J. K. L. M. N.O. P. Q. R. S. T. U. V. W. X. Y. Z. A. B. C. D. E. F. G. H. I. J. K. L. M. N. O. P. Q. R. S. T. U. V. W. X. Y. Z. A. B. C. D. E. F. G. H. I. J. K. L. N. M. O. P. Q. R. S. T. U. V. W. X. Y. Z. A. B. C. D. E. F. G. H. I. J. K. L. M. N. O. P. Q. R. S. T. U. V. W. X. Y. Z. A. B. C. D. E. F. G. H. I. J. K. T. M. N. O. P. Q. R. S. T. U. V. W. X. Y. Z. A. B. C. D. E. F. G. H. I. J. K. L. M. N. O. P. Q. R. S. T. U. V. W. X. Y. Z. A. B. C. D. E. F. G. H. I.J. K. L. M. N. O. P. Q. R. S. T. U. V. W. X. Y. Z. A. B. C. D. E. F. G. H. I. J. K. L. M. N. O. P. Q. R. S. T. U. V. W. X. Y. Z. A. B. C. D. E. F. G. G. H. I. J. K. L. M. N. O. P. Q. R. S. T. U. V. W. X. Y. Z. A. B. C. D. E. F. G. G. H. I. J. K. L. M. N. O. P. Q. R. S. T. U. V. W. X. Y. Z. A. B. G. D. E. F. G. G. H. I. J. K. L. M. N. O. P. Q. R. S. T. U. V. W. X. Y. Z. A. B. C. D. E. F. G. G. H. I. J. K. L. M. N. O. P. Q. R. S. T. U. V. W. X.Y. Z. A. B. C. D. E. F. G. G. H. I. J. K. L. M. N. O. P. Q. R. S. T. U. V. W. X. Y. Z. A. B. C. D. E. F. G. G. H. I. J. K. L. M. N. O. P. Q. R. S. T.U. V. W. X. Y. Z. A. B. C. D. E. F. G. G. H. I. J. K. L. M. N. O. P. Q. R. S. T. U. V. W. X. Y. Z. A. B. C. D. E. F. G. G. H. I.J. K. L. M. N. O. P. Q. R. S. T. U. V. W. X. Y. Z. A. B. C. D. E. F. G. G. H. I.J. K. L. M. N. O. P. Q. R. S. T. U. V. W. X. Y. Z. A. B. C. D. E. F. G, G.H.I.E.M.B.L.C.D.F.G.P.C.S.V.R.A.T.N.B.C.F.S.V.(2013) 10:15-10:15 (2013) 10:15-10:15 (2013) 10:15-10:15 (2013) 10:15-10:15 (2013) 10:15-10:15 (2013) 10:15-10:15 (2013) 10:20-10:20 (2013) 10:20-10:20 (2013) 10:20-10:20 (2013) 10:20-10:20 (2013) 10:20-10:20 (2013) 10:20-10:20 (2013) 10 :20-10:20 (2013) 10 :20-10:20 (2013) 10 :20-10:20 (2013) 10 :20-10:20 (2013) 10 :20-10:20 (2013) 10 :20-10:20 (1999) 10 :20-10:20 (2013) 10 :20-10:20 (2013) 10 :20-10:20 (2013) 10 :20-10:20 (2013) 10 :20-10:20 (2013) 10 :20-11:20 (2013) 10 :20-11:20 (2013) 10 :20-11:20 (2013) 10 :20-11:20 (2013) 10 :20-11:20 (2013) 10 :20-11:20 (2013)10 :20-11:20 (2013) 10 :20-11:20 (2013) 10 :20-11:20 (2013) 10 :20-11:20 (2013) 10 :20-11:20 (2013) 10 :20-11:19 (2013) 10 :20-11:19 (2013) 10 :20-11:19 (2013) 10 :20-11:19 (2013) 10 :20-11:19 (2013) 10 :20-11:19 (2013) 10:20-11:19 (2013) 10 :20-11:19 (2013) 10 :20-11:19 (2013) 10 :20-11:19 (2013) 10 :20-11:19 (2013) 10 :20-11:19 (1999) 10 :20-11:19 (2013) 10 :20-11:19 (2013) 10 :20-11:19 (2013) 10 :20-11:19 (2013) 10 :20-11:19 (2013) 10 :20-10:19 (2013) 10 :20-10:19 (2013) 10 :20-10:19 (2013) 10 :20-10:19 (2013) 10 :20-10:19 (2013) 10 :20-10:19 (2013)10 :20-10:19 (2013) 10 :20-10:19 (2013) 10 :20-10:19 (2013) 10 :20-10:19 (2013) 10 :20-10:19 (2013) 10 :20-10:20 (2013) 10 :20-10:20 (2013) 10 :20-10:20 (2013) 10 :20-10:20 (2013) 10 :20-10:20 (2013) 10:20-10:20 (2013) 10 :20-10:20 (2013) 10 :20-10:20 (2013) 10 :20-10:20 (2013) 10 :20-10:20 (1999) 10 :20-10:20 (1999) 10 :20-10:20 (1999) 10 :20-10:20 (1999) 10 :20-10:20 (1999) 10 :20-10:20 (1999) 10 :20-11:20 (2013) 10 :20-11:20 (2013) 10 :20-11:20 (2013) 10 :20-11:20 (2013) 10 :20-11:20 (2013) 10 :20-10:20 (2013) 10 :20-10:20 (2013) 10 :20-10:20 (2013) 10 :20-10:20 (2013) 10 :20-10:20 (2013)10 :20-10:20 (2013) 10 :20-10:20 (2013) 10 :20-10:20 (2013) 10 :20-10:20 (2013) 10 :20-10:20 (2013) 10 :20-10:19 (2013) 10 :20-10:19 (2013) 10 :20-10:19 (2013) 10 :20-10:19 (2013) 10 :20-10:19 (2013) 10:20-10:19 (2013) 10 :20-10:19 (2013) 10 :20-10:19 (2013) 10 :20-10:19 (2013) 10 :20-10:19 (2013) 10 :20-10:19 (1999) 10 :20-10:19 (2013) 10 :20-10:19 (2013) 10 :20-10:19 (2013) 10 :20-10:19 (2013) 10 :20-10:19 (2013) 10 :20-11:20 (2013) 10 :20-11:20 (2013) 10 :20-11:20 (2013) 10 :20-11:20 (2013) 10 :20-11:20 (2013) 10:20-11:20 (2013) 10 :20-11:20 (2013) 10 :20-11:20 (2013) 10 :20-11:20 (2013) 10 :20-11:20 (2013) 10 :20-11:20 (1999) 10 :20-11:20 (1999) 10 :20-11:20 (1999) 10 :20-11:20 (1999) 10 :20-11:20 (1999) 10 :20-11:20 (1999) 10 :20-10:20 (2013) 10 :20-10:20 (2013) 10 :20-10:20 (2013) 10 :20-10:20 (2013) 10 :20-10:20 (2013)10 :20-10 : 1999 10 :20-10 : 1999 10 :20-10 : 1999 10 :20-10 : 1999 10 :20-10 : 1999 10 :20-10 : 1999 10 :20-10 : 1999 10 :20-10 :47777777777777777777777777777777777777777777777777777777777777777777777777777777777777777777777777777888888888888888888888888888888888888888888888888888888888888888888888888888888888888888888888888888898888888888888888888888888888888888888888888888888888888888888888888888888888888888888888888888888886888888888888888888888888888888888888888888888888888888888888888888888888888888888888888888888888888 |
单位:元
Congratulations on your choice of our appliance, and welcome among the users of PROFiLO products.
In order to achieve best possible results we recommend using exclusively original PROFiLO accessories. They have been specially designed for this product.
Please read this user manual carefully. Pay special attention to important safety instructions. Keep this user manual for future reference.
Safety instructions and instructions concerning the proper use of the appliance
Before starting to use the appliance, become familiar with the whole content of this user manual.
Make sure that you understand the instructions given below.

DANGER! / WARNING! Risk of injury
- Do not operate the appliance when the power cord is damaged or the housing shows visible damage.
- If the non-detachable power cord is damaged, it should be replaced by the manufacturer or at specialist service centre or by a qualified person in order to avoid any hazards.
- The appliance may only be repaired by qualified service personnel. Improper servicing may cause a serious hazard to the user. In case of defects contact PROFiLO specialist service centre.
- Take special care when operating the appliance in the presence of children.
- Turn off and unplug the appliance before replacing accessories or approaching its movable parts.
• Always unplug the appliance from the electrical outlet when it is left unattended and before assembling, disassembling and cleaning.
- This product is not intended for use by children. Keep the appliance and the power cable out of reach of children.
- Appliances can be used by persons with reduced physical, sensory or mental capabilities or lack of experience and knowledge if they have been given supervision or instruction concerning use of the appliance in a safe way and understand the hazards involved.
• Children shall not play with the appliance.
- The appliance must only be used with the feeder tray.

WARNING! Risk of property damage
Do not disconnect the plug from the socket by pulling the power cord.
Always plug the appliance to the mains (AC only) with voltage corresponding to that indicated on the rating plate.
Do not expose the appliance to temperatures above 60°C. The appliance can be damaged.
Use the pusher only when pushing the food. Using objects other than the pusher may cause damage to the mincer and the motor.
Do not overload the appliance with too much product or by pushing too hard with the pusher.
Carefully assemble the mincer unit, as the improper assembly results in poor mincing quality and may cause the knife and the screen to blunt. Replace the blunt cutter or screen with the new ones.
Do not obstruct the ventilation openings in the housing during operation.
Do not place the appliance on a soft surface.
Do not immerse the appliance drive unit in water and do not wash it under running water.
Do not wash accessories when mounted on the drive unit. Do not use abrasive cleaning agents such as emulsions, creams, pastes, etc. for cleaning the appliance housing. They may remove graphical symbols, such as scales, markings, warning signs, etc.

Information on the product and hints on its use
Unplug the appliance after you finish using it. Put away the cord, pushing it gently through the opening and place the plug in the compartment.
If the appliance cannot be switched on, bring it to a service centre.
Separate the meat to be minced from bones, sinews, gristles and veins.
Cut large portions of the product into smaller pieces before mincing.
Do not grind dry poppy seed. The poppy seed must be scalded and soaked for dozen or so hours before mincing.
Use a soft brush for cleaning the metal parts.
Do not wash the metal parts in dishwashers. Abrasive detergents used in dishwashers may cause the metal parts to become dark. Wash them manually using traditional washing-up liquids.
Technical parameters
The technical parameters are indicated on the rating label.
Permissible duration of uninterrupted operation 15 minutes. Break before the next use 30 minutes.
Noise level ( L_WA ) 77 dB/A.
The appliance features double electrical insulation (Class II) and does not require grounding ☐
PROFiLO mincers fulfill the requirements of the existing norms.
The appliance is in conformity with the requirements of the directives:
-Low voltage appliance (LVD) - 2006/95/EC.
–Electromagnetic compatibility (EMC) – 2004/108/EC.
The appliance was marked by the CE sign on the rating label.
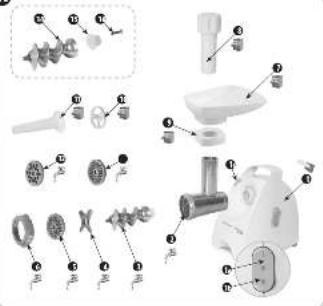
Description

The food mincer consists of:
1 Mincer motor – each motor is adapted to install each PROFiLO mincing unit and shredder.
1a On/Off button
1b "Reverse" switch
1c Lock button
The mincer unit consists of:
2 Mincer body
3 Scroll with clutch
4 Double-side cutter
5 Mincer screen with 4 mm openings
6 Ring nut
7 Shredder bowl
8 Pusher
9 Adaptor
And additional accessories:
10 Base plate
11 Sausage filler nozzle
12 Mincer screen with 8 mm openings
13 Mincer screen with 2,7 mm openings
Mechanical safety device for the motor

14 Scroll
15 Clutch
16 Screw M5x20
The mincer is equipped with a mechanical safeguard, which protects the motor against damage – the teeth in the clutch break when the mincer is overloaded (e.g. when bones get inside).
Replace the damaged clutch:
twist off the screw (16) from the scroll with the damaged clutch,
remove the damaged clutch (15),
attach the new clutch and tighten it with the screw (16).
"Reverse" function
The motor has a special function allowing to temporarily change the direction of the scroll. It is used if mincing is limited and/or if there is too much product in the mincer body (the scroll does not take the product). Press the "R" switch for a short period of time, the product will be removed from the inside of the mincer body. Press the "I" button once again to continue operation.
If the scroll is still blocked by the excess of product, use the "R" switch once again, remove the product from the mincer body and next remove product parts which make it difficult to mince (e.g. sinews, etc.).
In some cases it is necessary to dismantle the mincer body and remove the above-mentioned obstacles.
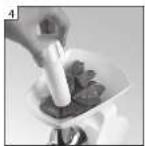
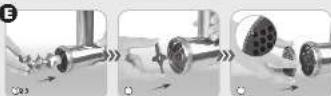
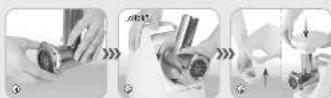
Working with the mincer unit

Insert the following parts into the mincer body (2):
① Insert the scroll (3) with the coupling facing inside.
② Fit the knife (4) onto the pin of the scroll (3).
③ Place the screen (e.g. 5) over the knife so that the protrusion in the mincer body will fit into the groove in the circumference of the screen.
④ Tightly fit all the elements of the mincer unit.
⑤ Fit the assembled mincer unit onto the drive unit (1) and turn it until you hear a click of the lock. It means that the body has been properly installed.
⑥ Insert the adaptor (9) into the bowl (7). Mount the bowl and the adaptor on the mincing chamber (2).
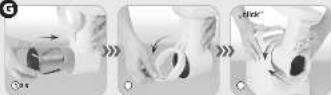
Preparing the appliance for operation and switching on the appliance

Take out a sufficient length of the supply cord and the appropriate accessories from the compartment.
① Place the motor (1) near the socket, on a hard, stable surface. Do not cover the ventilation openings of the housing.
Open the compartment on the back of the housing and take out an appropriate screen (Fig. C).
A screen with 4 mm openings is installed in the mincer body as a standard.
Wash all accessories thoroughly before the initial use.
Assemble the appropriate accessories and install them on the motor.
② Plug in the appliance.
③ Switch on the appliance using the "I" switch (1a) (the appliance starts to operate after about 2 seconds).
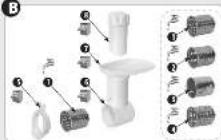
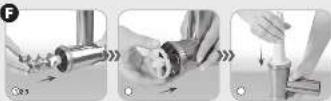
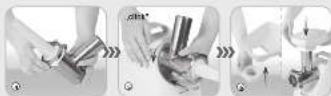
Operation with the sausage filler nozzle

Insert the following parts into the mincer body (2):
① Insert the scroll (3) with the coupling facing inside.
② Fit the insert (10) onto the pin of the scroll (3).
③ Fit the sausage stuffing tube (11).
④ Tightly fit all the elements with the threaded ring (6).
⑤ Fit the assembled mincer unit onto the drive unit (1) and turn it until you hear a click of the lock.
⑥ Insert the adaptor (9) into the bowl (7). Mount the bowl and the adaptor on the mincing chamber (2).
Soak the casing for about 10 minutes before fitting.
Fit the wet casing on the sausage filler nozzle.
Make sure the not to block the ventilation openings on the nozzle.
The meat cannot be "too thin". A large liquid content may cause its leakage to the inside of the mincer.
Shredder

① Fine grating disc
2 Coarse grating disc
3 Slicing disc
4 Pureeing disc
5 Locking tab
6 Body
7 Tray
8 Pusher

Remove the adaptor when using the shredder.
The shredder is equipped with two grating discs for fine (1) and coarse (2) grates (cheese, carrot, celery, cooked beetroots etc.). The slicing disc (3) is used to slice vegetables (potatoes, cucumbers, onions, etc.). The purée disc (4) is used to purée potatoes, beetroots, fruits, etc.
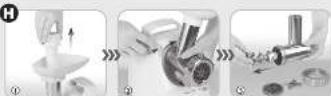
WORKING WITH THE SHREDDER

① Pull the locking tab (5) and place one of the discs with the clutch facing the inside of the body.
② Snap the tab shut (5).
③ Assemble the shredder body (6) in the same way as the mincer body.
Cut larger products into pieces.
Do not grind soft fruits with hard stones.
Switch off and unplug the appliance after operation.
Remove the remaining products from the inside of the disc or body using a wooden spoon.
The blades of the discs do to require renovation.
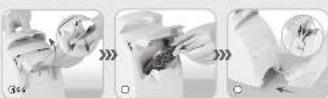
After operation

Switch off and unplug the appliance.
① Remove the pusher (8) and remove the shredder bowl with an adaptor from the mincer body (disassemble the adapter in the reverse order in which it was assembled) or the shredder tray off the shredder chamber.
② Press the lock button, turn the mincing unit, the shredder body to the right and remove it.
③ Dismantle the elements of the mincing unit, the body with the sausage filler nozzle or the shredder.
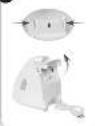
Store the clean and dry screens in the compartment. In order to do so:
④ Open the compartment on the back of the housing.
Press the compartment lock on both sides and pull (as shown earlier).
⑤ Store up to two screens and close the compartment and the back lid.
⑥ Put away the cord, pushing it gently through the opening.
Place the plug in the compartment.
Cleaning and maintenance
Wipe the motor with a damp cloth with dishwashing liquid.
Wash plastic elements in warm soapy water or in the dishwasher according to the denotations.
Wash metal elements in hot soapy water.
Dry all elements thoroughly.
Grease the screens and cutter with cooking oil to protect from rusting.
Assemble dry elements of the mincer body or the shredder.
Ecology – Environment protection
Each user can protect the natural environment. It is neither difficult nor expensive.
In order to do it: put the cardboard packing into recycling paper container; put the polyethylene (PE) bags into container for plastic.
When worn out, dispose the appliance to particular disposal centre, because of the dangerous elements of this appliance, which can be hazardous for natural environment.

Do not dispose into the domestic waste disposal!!!
The manufacturer does not accept any liability for any damages resulting from unintended use or inappropriate handling.
The manufacturer reserves his rights for modifying the product any time in order to adjust it to law regulations, norms, directives, or due to construction, trade aesthetic or other reasons, without notifying it in advance.