TFTV6044FHD - Television Palsonic - Free user manual and instructions
Find the device manual for free TFTV6044FHD Palsonic in PDF.


| Product Type | LCD TV with DVD Combo |
| Screen Size | 60 cm (23.6 inches) |
| Display Resolution | 1920 x 1080 (Full HD) |
| Aspect Ratio | 16:9 |
| Response Time | 5 ms |
| Tuner | DVB-T (digital terrestrial) + Analog |
| DVD Player | Built-in, supports DVD playback |
| HDMI Input | 1 |
| Component Input (YPbPr) | 1 |
| Composite AV Input | 1 |
| VGA Input | 1 |
| USB Port | 1 (for media playback and PVR) |
| Coaxial Digital Audio Output | 1 |
| Headphone Output | 1 |
| Speaker Power | 2 x 2.5W |
| Power Consumption | 55W |
| Dimensions (with stand) | 438 x 585 x 210 mm (H x W x D) |
| Packaging Dimensions | 508 x 660 x 175 mm |
| Gross Weight | 6.4 kg |
| OSD Languages | English, Spanish, French, German, Portuguese, Italian |
| PVR Recording | Yes (via USB, time shift and schedule) |
| Media Playback | Photo, Music, Movie, Text from USB |
| Remote Control | Included with batteries |
| Safety Features | Grounded plug, auto standby, key lock, parental lock |
Frequently Asked Questions - TFTV6044FHD Palsonic
User questions about TFTV6044FHD Palsonic
0 question about this device. Answer the ones you know or ask your own.
Ask a new question about this device
Download the instructions for your Television in PDF format for free! Find your manual TFTV6044FHD - Palsonic and take your electronic device back in hand. On this page are published all the documents necessary for the use of your device. TFTV6044FHD by Palsonic.
USER MANUAL TFTV6044FHD Palsonic
The AUSTRALIAN Company
User's Manual
TFTV6044FHD
60cm (23.6") LCD TV / DVD Combo with DVB-T

natural_image
Large television displaying a skier in action on a snowy mountain slope (no visible text or symbols)











Important Safety Information
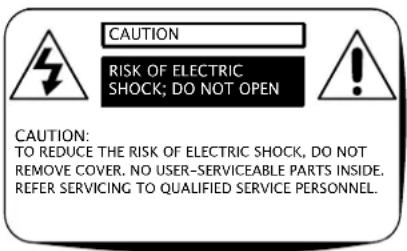
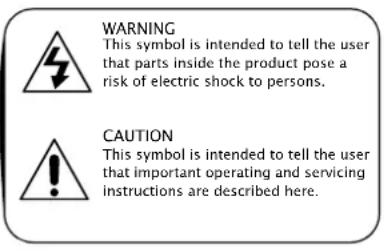
Grounded information
This apparatus must be grounded. To ensure safe operation, the grounded plug must be inserted only into a standard grounded power outlet which is effectively grounded through normal household wiring. Extension cords used with the equipment could be hazardous. The face that the equipment operates satisfactorily only means it is grounded, but the installation may not necessarily be safe. For your safety, if in any doubt about the effective grounding of the equipment or power outlet, please consult qualified service personnel.
WARNING: TO REDUCE THE RISK OF FIRE OR ELECTRIC, DO NOT EXPOSE THIS APPLIANCE TO RAIN OR MOISTURE. TO AVOID ELECTRIC SHOCK, INSERT THE PLUG FULLY INTO THE POWER OUTLET.
Product disposal
Do not dispose of the TV with general household waste. The LCD screen contains a small amount of liquid crystal and mercury. For disposal or recycling information, please contact your local authorities.
Safety precautions
Please read all of these instructions before you operate your television and save these instructions for later use. This unit has been engineered and manufactured to ensure your personal safety, however, improper use can result in electric shock or fire hazard. In order not to defeat the safeguards incorporated in this equipment, please observe the following basic rules for its installation, use and servicing.
- Unplug this television equipment from the wall outlet before cleaning.
- Do not use liquid cleaners or aerosol cleaners. Use a soft cloth moistened with water for cleaning.
- Use only the attachments recommended by the television equipment manufacturer.
- Do not use this television equipment near water, for example, near a bath tub, washbowl, kitchen sink or laundry tub, in a wet basement, or near a swimming pool.
- Do not place this equipment on an unstable surface, stand, or cart. The television equipment may fall, causing serious injury to a child or an adult, and seriously damage the equipment.
- When carrying the TV, hold it under the main unit. Do not carry the TV by its spesakers, Both the base and the speakers could come off, causing you to drop the TV, possibly resulting in damage to the TV or causing injury.
- Television equipment and cart combination should be moved with care. Quick stops, excessive force, and uneven surfaces when moving may cause the equipment and cart combination to overturn.
- Shelf mounting should follow the manufacturer's instructions, and should use a mounting kit approved by the manufacturer.
-
Slots and openings in the cabinet and the back or bottom are provided for ventilation. To ensure reliable operation of the television equipment and to protect it from overheating, these openings must not be blocked or covered. This television equipment should not be placed in an enclosed installation such as a bookcase unless proper ventilation is provided.
-
The openings should never be covered with a cloth or other material, and the bottom openings should not be blocked by placing near or over a radiator or heat source.
- This television equipment should be operated only from type of power source indicated on the marking label. If you are not sure of the type of power supplied to your home, consult your television dealer or local power company.
- As a safety feature, this television equipment is equipped with a grounded power plug, if the plug does not fit in your power outlet, contact your electrician. Do not modify the plug and defeat this safety feature.
- Do not allow anything to rest on the power cord. Do not locate this television equipment where the cord may be damaged due to lightning and power-line surges.
- Follow all warnings and instructions marked on the television equipment.
- If an outdoor antenna is connected to the television equipment, be sure the antenna system is grounded so as to provide some protection against voltage surges and static charges.
- For added protection or this television equipment during a lightning storm, or when it is left unattended and unused for long periods of time, unplug it from the wall outlet and disconnect the antenna. This will prevent damage to the equipment due to lightning and power-line surges.
- An outdoor antenna system should not be located in the vicinity of overhead power lines or other electric light or power circuits, or where it can fall into such power lines or circuits. When installing an outdoor antenna system, extreme care should be taken to keep from touching such power lines or circuits as contacting with them could be fatal.
- The mains plug or the appliance coupler is used as the disconnect device, the disconnect device shall remain readily operable. The mains plug is connected with the electrical outlet with safety grounded wire.
- Do not over load wall outlets and extension cords as this can result in fire or electric shock.
- Never push objects of any kind into this television equipment through cabinet slots as they may touch dangerous voltage points or result in short-circuits of internal parts. This could result in a fire or electric shock. Never spill any kind of liquid on the television equipment.
- Do not attempt to survive the television equipment by yourself because opening or removing covers may expose you to dangerous voltage or other hazard. Refer all servicing to qualified service personnel.
- Unplug this television equipment from the wall outlet and refer servicing to qualified service personnel under the following conditions:
— When the power cord or plug is damaged or frayed.
— If liquid has been spilled into the television equipment.
— If the television equipment does not operate according to the operating instructions, please just covered by the operating instruction because improper adjustment of other controls may and will often require extensive work by a qualified technician to restore the television equipment to normal state.
— If the television equipment has been dropped or damaged.
— When the television comes about a distinct change in performance
—this indicates sa need for service. - Up on completion of any service or repairs to this television equipment, ask the service technician to perform routine safety checks to determine that the television is in safe operating condition.
- When replacement parts are repaired, make sure that the service technician has used replacement parts specified by the manufacturer that have the same characteristics as the original part.
Unauthorized substitutions may result in fire, electric shock, or other hazards. - Note to CATV system installer: This note is to remind the CATV system installers that the cable ground shall be connected to the grounding system of the building, as close to the point of cable entry practical.
CAUTION: If the set is not going to be used for a long period, such as during a vacation, remove the plug from the wall outlet to economise power. (If the TV set is plugged in, a slight current still flows, even the power button is in OFF position.)
Handling the LCD screen
- Direct sunlight on the LCD screen can cause damage to the screen. Take care when you are placing the television near a window.
- Do not push or scratch the LCD screen. Do not place heavy objects on the LCD screen. Those may cause the screen to lose conformity or cause LCD panel to malfunction.
- If the TV is used in a cold place, fuzzy image may appear on the screen. This is not a malfunction. The screen will be normal as its temperature rises to the normal operating level.
- If a still picture is displayed for a long period of time on the television screen, ghosting may occur for a while. The ghosting will eventually disappear.
- Displaying a static image for a long period of time on the television screen may cause burn in.
- If the LCD panel becomes warm during operation, this is normal and not a malfunction.
Handling of broken glass and liquid crystal leakage
If the LCD panel is damaged, crystalline liquid leakage may occur, or scattered broken glass may result. Do not touch broken glass or crystalline liquid (which is toxic) with bare hands that have cuts or skin irritation as poisoning any result. If any crystalline liquid gets into mouth or eyes, rinse thoroughly with clean water and consult your doctor.
IMPORTANT NOTICE
This product composes up to 6.0 million cells and a few cell defects may occur in the manufacture of the panel. Several dead pixel (allow up to 2 bright or 2 dark pixels) on the panel are deemed acceptable by the industry standards. In line with manufacturers and would not mean that the panel is faulty. Dead pixels panels with 6 pixels or more within 12 month period, Palsonic Corporation Pty Ltd. complies with industry standard and reserves the right to repair the unit and non-refundable. We hope you will understand that the prouduct that corresponds to this standard is regarded as acceptable.
Table of Content
Overview of the LCD TV.... 1
Features....1
Opening the packing....1
Product Components....2
Front View....2
Rear View....3
Remote Control....4
EPG (only available in DTV mode) 6
Using the OSD Menu 7
Channel Adjustment....7
Picture Adjustment....9
Sound Adjustment....10
Time Adjustment.... 11
Lock Adjustment.... 12
Hotel Adjustment.... 13
Setup Adjustment....14
PC Mode....15
Recording Function.... 16
Media Operation....18
Photo....18
Music....20
Movie....21
Text....23
DVD Operation....25
DVD Setup Menu's 25
Specifications....27
Troubleshooting....28
Overview of the LCD TV
Congratulations on purchasing the LCD Television. This product has been designed to provide you with a variety of audio and video experience. This monitor enables you to watch broadcast, cable television, channels, connect a VCR, or DVD player to watch your favorite movies or connect a computer to use the display as a monitor. The television is equipped with convenient control buttons and a handy remote control to let you adjust the television settings and customize the television preferences through an easy-to -use on screen menu system.
Features
Enjoy the versatility of your LCD TV with its wide variety of features:
•Color active matrix TFT LCD TV with remote control
•Safe, sturdy construction
•Maximum resolution: 23.6" 1920 x 1080
•Audio / Video support:
—HDMI input
—RF input
—YPbPr input
—PC input
—PC Audio input
—AV input
—Earphone
—Coaxial output
—USB
•On-Screen Display (OSD) menu system
•Built-in 2 speakers
Opening the packing
The following section describes the various components of the LCD TV. Please take a few moments to familiarize yourself with the product and control panel before using it. When you unpack this LCD TV, make sure the box contains the following items:
● LCD Color Television
● Remote Control (with batteries)
● Power Cord
- User Manual
● Warranty Card
● Quick Start Guide
● Stand
● Stand Screws ( QTY2)
If any of these items appears to be missing or damaged, please contact your vendor or authorised service personnel for assistance.
Product Components
Front view

① OPEN
Eject a DVD disc (only available in TV with DVD player).
② PLAY
Play a DVD disc (only available in TV with DVD player).
③ INPUT
Switch the input sources.
④ MENU
Press the button to enter On Screen Display (OSD).
⑤ CH+/-
Increase or decrease channel numbers.
⑥ VOL+/-
Increase or decrease the volume.
⑦ POWER
Turn the TV ON or OFF to Standby.
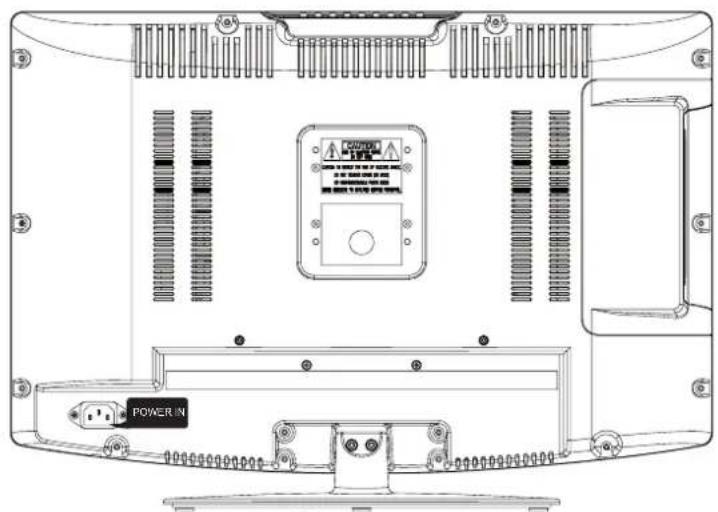
Rear View
natural_image
Technical line drawing of a computer monitor rear panel with ventilation grilles and power button (no text or symbols)
A
① POWER IN
Insert power plug during initial setup.
② USB
Connect to USB device such as USB Drive, Portable Hard Drive etc.
③ HDMI IN
Connect to the HDMI enabled devices.
④ PC IN
Connect to the VGA output of your device.
⑤ PC AUDIO IN
Connect to the audio output from your PC or portable computer.
6 CVBS
Connect to video receiver.
⑦ YPbPr
Connect to the component output of A/V device.
⑧ L / R Audio
Connect to audio receiver.
⑨ RF IN
Connect to the antenna or to wall plate antenna connection for local TV.
⑩ EARPHONE OUT
Connect to the EARPHONE or other audio output device.
⑪ COAXIAL OUT
Connect audio input to your AV device.
Remote Control
Notes:
- If direct sunlight shine directly on the remote sensor, the remote control's operation may be unstable, and the effective range will be reduced.
- Do not hit or violently shake the remote control.
- Never expose the remote control to high temperature or humidity.
- If the remote is not used for an extended period of time, remove the batteries to prevent damage or injury from possible battery leakage.
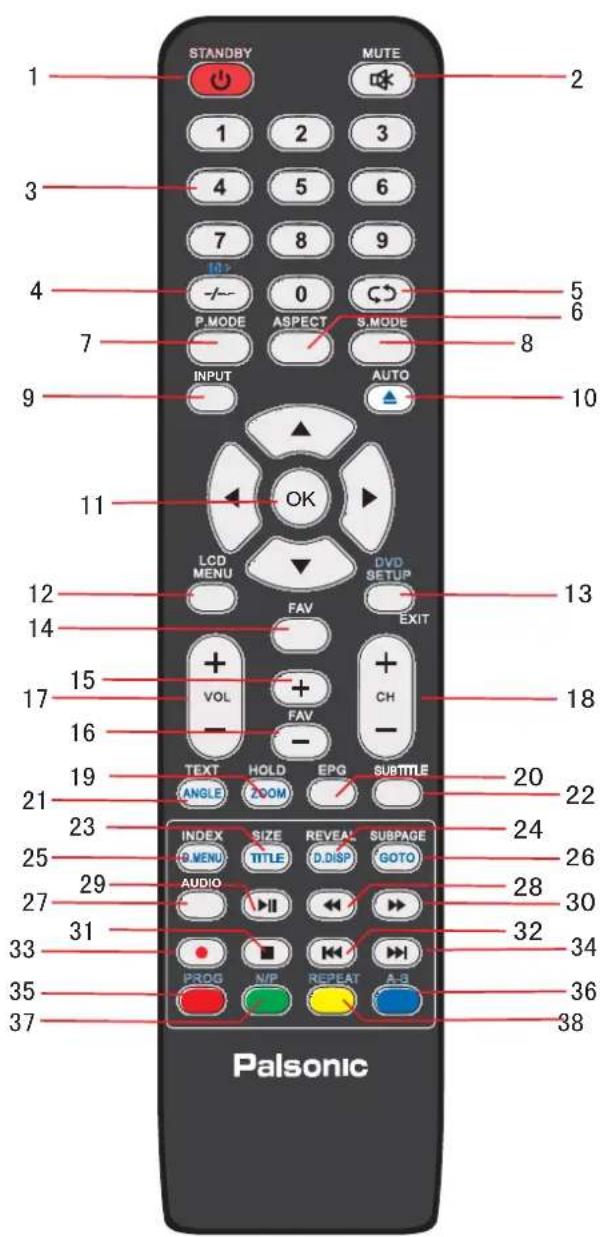
| BUTTON | FUNCTIONS |
| 1. STANDBY Turn the TV ON or OFF to Standby. | |
| 2. MUTE Disable the audio output. | |
| 3. NUMBE KEYS Press number keys to enter channel numbers. | |
| 4. -/-- / 10+ | Search the channels what the user needs with number 0 to number 99. / Press to show the DVD program in DVD mode. |
| 5. RETURN Switch to the previously viewed channel. | |
| 6. ASPECT Switch the screen ratio: Auto, 4:3, 16:9, zoom1, zoom2. | |
| 7. P.MODE | Press the button to select the picture mode: dynamic, standard, mild or personal. |
| 8. S.MODE | Press the button to select the sound mode: standard, music, movie, sports or personal. |
| 9. INPUT | Open the source menu to select the input source. |
| 10. AUTO /▲ | Press to adjust automatically in VGA mode. / Eject or Play DVD disc. |
| 11. OK / ▲▼ / ◀▶ | Confirmation button. / Select the OSD menu option. |
| 12. LCD MENU Enter or Exit the OSD menu. | |
| 13. EXIT/DVD SETUP | Exit the current menu or on screen display. / Set parameters of DVD mode. |
| 14. FAV | Press the button to display favorite programme list. |
| 15. FAV + | Switch to higher channel number programme in the favorite list. |
| 16. FAV - | Switch to lower channel number programme in the favorite list. |
| 17. VOL +/- Press +/- button to control the volume up or down. | |
| 18. CH +/- Press +/- button to switch the channels. | |
| 19 HOLD / ZOOM | Hold freeze the current Teletext page on the screen. / Select picture size in DVD mode. |
| 20. EPG | Press to display electronic program guide menu. |
| 21. TEXT / ANGLE | Start the Teletext mode. / Select viewing angle on DVD. |
| 22. SUBTITLE | Open Subtitle menu for subtitle selection. |
| 23. SIZE / TITLE | You can change the picture size in the Teletext mode. / Display DVD title information. |
| 24. REVEAL / D.DISP | Display or remove the content that is hidden in Teletext mode. / Show DVD disc information. |
| 25. INDEX / D.MENU | Display a list and information about the Teletext pages. / Select DVD disc contents menu. |
| 26. SUBPAGE / GOTO | Display the submenu of the Teletext mode. / Allow you to set the GOTO position on DVD discs. |
| 27. AUDIO Select an audio source for the current programme. | |
| 28. ◀◀ | Press to scan in reverse. |
| 29. ▶▶ | Press to play or stop the current program. |
| 30. ▶▶ | Press to scan in forward. |
| 31. ■ | Press the button to stop the current program. |
| 32. ◀◀◀ | To play the previous chapter, title or track. |
| 33. ● | Press to start recording. |
| 34. ▶▶▶ | To play the next chapter, title or track. |
| 35. PROG Fast text mode button. Select button in PVR mode. | |
| 36. A-B | Select the points of repeat in DVD mode. |
| 37. N/P | Switch NTSC mode or PAL mode. |
| 38. REPEAT Set repeat points. | |
EPG (only available in DTV mode)
Press the EPG on the remote control to enter EPG menu.

Press the RED button to enter the submenu. You can choose the time of the appointment to record you want.
Press the GREEN button to display the detail information about the program.
Press the YELLOW button to display the schedule list that you can see the settings you have done before.
Press the BLUE button to set the time you want to remind the program you want to see.
Press EPG button or EXIT button to exit.
Select Input Source
Press the INPUT button to select input source, press ▲/▼ to select the input source and then press OK button to enter.

Using the OSD Menu
The On-Screen Display (OSD) menu system provides a quick and simple method to adjust LCD TV base setting. OSD menu can be viewed using both the remote control and the control buttons on the front panel.
Note: In order to save the energy, you'd better make the settings of "Picture Mode" and "Sound Mode" as "Standard".
Channel Adjustment
Press MENU button to display the main menu.
Press ◀/▶ button to select CHANNEL in the main menu.

- Press ▲/▼ button to select the option that you want to adjust in the CHANNEL menu.
- Press OK button to enter.
- After finishing your adjustment, press MENU button to save and return back to the previous menu.
Auto Tuning
Press ▲/▼ button to select Auto Tuning, then press ◀/▶ button to start auto search.
ATV Manual Tuning
Press ▲/▼ button to select AV Manual Tuning, then press OK button to enter sub-menu.
Press ◀/▶ button to select channel number you want to store.
Press ▲/▼ button to select Color System. Press ◀/▶ button to select option you want.
Press ▲/▼ button to select Sound System. Press ◀/▶ button to select option you want.
Press ▲/▼ button to select Fine-Tune. Press ◀/▶ button to adjust a suitable tune that make you watch comfortably.
After changes settings of the OSD menus, the new settings are confirmed automatically when OSD picture vanish, even did not press the menu to exit the OSD system.
Press ▲/▼ button to select AFC. Press ◀/▶ button to select ON or OFF. Press ▲/▼ button to select search, then press OK button to start tuning.


DTV Manual Tuning
Press ▲/▼ button to select DTV Manual Tuning, then press OK button to enter sub-menu.
Press ◀/▶ button to select channel, then press OK button to search program.
Program Edit
Press ▲/▼ button to select Program Edit, then press OK button to enter submenu.
Under ATV Mode
This option has five functions.
Use Red button to delete the current channel.
Use Green button to rename the current channel.
Use Yellow button and the ▲/▼ arrow button to move the current channel.
Use Blue button to skip the current channel.
Use FAV button to set the current channel for favour.
Under DTV Mode
This option has three functions.
Use Red button to delete the current channel.
Use Blue button to skip the current channel.
Use FAV button to set the current channel for favour.


Signal Information (Under DTV Mode)
Press ▲/▼ button to select Signal Information, then press OK button to display information of channel you are watching.
Picture Adjustment
Press MENU button to display the main menu.
Press ◀/▶ button to select PICTURE in the main menu.

- Press ▲/▼ button to select the option that you want to adjust in the PICTURE menu.
- Press OK button to enter.
- After finishing your adjustment, press MENU button to save and return back to the previous menu.
Picture Mode
Press ▲/▼ button to select Picture Mode, then press OK button to enter submenu.
Press ▲/▼ button to select between Dynamic, Standard,Mild and Personal. You can change the value of contrast, brightness, colour and sharpness when personal mode is selected.
TIP: You can press P.MODE button on the remote control to change the Picture Mode directly.
Contrast/Brightness/Color/Tint/Sharpness
Press ▲/▼ button to select option, then press OK button to enter submenu. Press ◀/▶ button to adjust.
NOTE:
Contrast: This item can adjust the highlight intensity of the picture, but the shadow of the picture is invariable.
Brightness: This item can adjust the optical fiber output of the entire picture, it will effect the dark region of the picture.
Colour: This item can adjust the saturation of the colour based on your preference.
Tint: This item may use in compensating color changed with the transmission in the NTSC code.
Sharpness: This item can adjust the peaking in the detail of the picture.
Colour Temp: This item can adjust the white balance of the image according to your preference.
COLD increase the blue tone in white.
NORMAL stay at average.
WARM increase the red tone in white.
Noise Reduction: This item can reduce the image signal noise.
Sound Adjustment
Press MENU button to display the main menu.
Press ◀/▶ button to select SOUND in the main menu.

- Press ▲/▼ button to select the option that you want to adjust in the SOUND menu.
- Press OK button to enter or adjust.
- After finishing your adjustment, press MENU button to save and return back to the previous menu.
Sound Mode
Press ▲/▼ button to select Sound Mode, then press OK button to enter submenu. Press ▲/▼ button to select between Standard, Music, Movie, Sports, Personal. You can change the value of Treble and Bass when Personal mode is selected.
TIP: You can press S.MODE button on the remote control to change the Sound Mode directly.
Treble/Bass/Balance
Press ▲/▼ button to select option, then press OK button to enter submenu. Press ◀/▶ button to adjust.
Auto Volume
Press ▲/▼ button to select Auto Volume, then press OK button to select On or Off.
SPDIF MODE
Press ▲/▼ button to select SPDIF MODE, then press OK button to select Off, PCM or Auto.
AD Switch ( For DTV Mode )
Press ▲/▼ button to select AD Switch, then press OK button to enter submenu. Press ◀/► button to select On or Off. Press ▲/▼ button to select AD Volume, then press ◀/► button to adjust volume.
TIP: AD is short for Audio Description. When you select On, it can help the Visual Impaired by the assisted audio track that use the voice to describe the picture.
NOTE:
Balance: This item can adjust the volume output from left or right speaker.
Auto Volume: This item is for reducing the difference between channel and program's volume automatically. This function will also reduce the fluctuation of the sound.
Time Adjustment
Press MENU button to display the main menu.
Press ◀/▶ button to select TIME in the main menu.

- Press ▲/▼ button to select the option that you want to adjust in the TIME menu.
- Press OK button to enter submenu.
- After finishing your adjustment, press MENU button to save and return back to the previous menu.
Sleep Timer
Press ▲/▼ button to select Sleep Timer, then press OK button to enter submenu.
Press ▲/▼ button to select Auto Standby, then press OK button to set the time to turn off the TV: Off, 3H, 4H, 5H ( H stands for Hour ).
OSD Timer
Press ▲/▼ button to select OSD Timer, then press OK button to enter submenu.
Press ▲/▼ button to select ( Available options are: 5s, 10s 15s, 20s, 25s, 30s ).
TIP: If the remote control does not operate, it will close down automatically. If you do any operation, it will reset the time.
NOTE:
The Clock will change with the area which you have selected in the Time Zone.
Lock Adjustment
Press MENU button to display the main menu.
Press ◀/▶ button to select LOCK in the main menu.
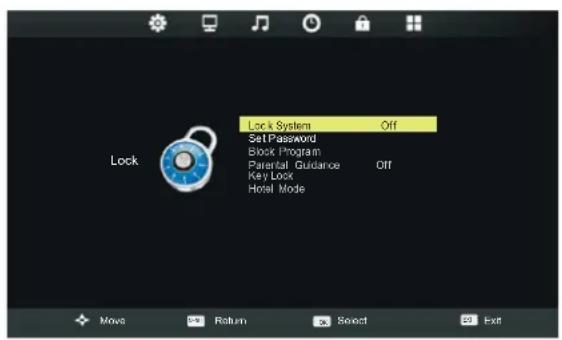
- Press ▲/▼ button to select the option that you want to adjust in the LOCK menu.
- Press ◀/▶ button to enter or adjust.
- After finishing your adjustment, press MENU button to save and return back to the previous menu.
Lock System
Press ▲/▼ button to select Lock System, then press OK button and enter password to unlock following settings. Press ◀/▶ button to turn On or Off Lock System. ( Default password is '0000')
Set Password
Press ▲/▼ button to select Set Password, then press OK button to enter sub-menu to set new password.
Block Program
Press ▲/▼ button to select Block Program, then press OK button to enter submenu.
Press ▲/▼ button to select the program you want to lock, then press green button on your remote control. ( Press green button to unlock ).
Press OK button to save setting and MENU button to go back to the previous menu.
Parental Guidance
Press ▲/▼ button to select Parental Guidance, then press OK button to enter submenu to select. ( Available options are: ALL, G, PG, M, MA ,AV, R, No Block)
Key Lock
Press ▲/▼ button to select Key Lock, then press ◀/▶ button to select Off or On. When Key Lock's statue is on, you can't use the key panel button.
Hotel Mode
Press ▲/▼ button to select Hotel Mode, then press OK button to enter.(only available in hotel.)
Hotel Adjustment
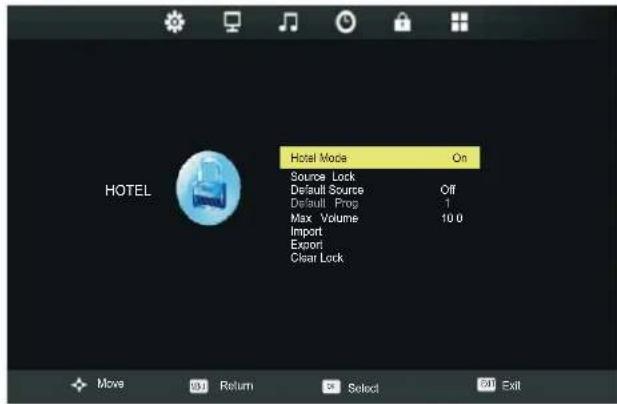
Hotel Mode
Press ▲/▼ button to select Hotel Mode, then press ◀/► button to select On or Off.
Source Lock
Press ▲/▼ button to select Source Lock, press OK button to enter the submenu.then press ▲/▼ button to select source you want to lock, press ◀/► button to select Off or On.
Default Source
Press ▲/▼ button to select Default Source, press OK button to enter the submenu.then press ▲/▼ button to select source you want when TV turns On. If you select Off, the default source will be the last source you watch before you turn off the TV.
Default Prog
Press ▲/▼ button to select Default Prog, then press ◀/▶ button to select program you want when TV turns on. Only when you select ATV as the Default Source, you can then select the Boot Channel. If you select "Off", the default program will be the last channel you watch before you turn off the TV.
Max Volume
Press ▲/▼ button to select Max Volume, then press ◀/▶ button to adjust. After set the Max Volume, the volume can't be adjusted above the Max Volume.
Import
Press ▲/▼ button to select Import, then press OK button to import the file before, you have connected a USB.
Database Export
Press ▲/▼ button to select Export, then press OK button to export the file before, you have connected a USB.
Clear Lock
Press ▲/▼ button to select Clear Lock, then press OK button to clear the setting you have done before.
Setup Adjustment
Press MENU button to display the main menu.
Press ◀/▶ button to select SETUP in the main menu.

- Press ▲/▼ button to select the option that you want to adjust in the SETUP menu.
- Press ◀/▶ button to adjust.
- After finishing your adjustment, press MENU button to save and return back to the previous menu.
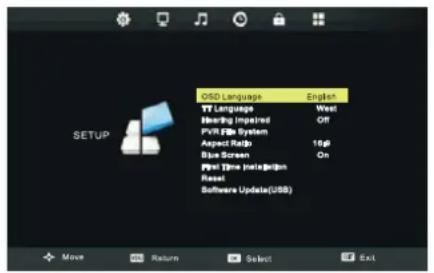
OSD Language
Press ▲/▼ button to select OSD Language, then press OK button to enter submenu. Press ▲/▼/◄/► button to select OSD Language, delfault setting is English.
TT Language
Press ▲/▼ button to select TT Language, then press OK button to enter. Press ▲/▼ button to select: West, East, Russian, Arabic, Farsi.
Hearing Impaired
Press ▲/▼ button to select Hearing Impaired, then press OK button to select On or Off.
PVR File System
Press ▲/▼ button to select PVR File System, then press OK button to enter submenu. Press ▲/▼ button to select Check PVR File System, then press OK button to enter. Then it will check the USB device.
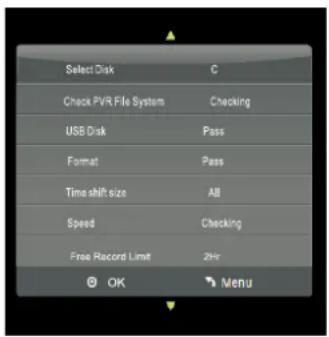
Aspect Ratio
Press ▲/▼ button to select Aspect Ratio, then press OK button to enter submenu. Press ▲/▼ button to select aspect ratio. ( Available options are: Auto, 4:3, 16:9, Zoom1, Zoom2 ).
Blue Screen
Press ▲/▼ button to select Blue Screen, then press OK button to select On or Off.
First Time Installation
Press ▲/▼ button to select First Time Installation, then press OK button to set relevant options including OSD language, country and tuning.
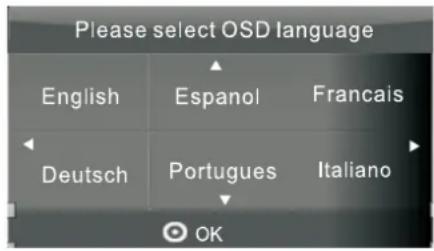


Reset
Press ▲/▼ button to select Reset, then press OK button to enter a dialogue. Press ◀ button selecting Yes to reset to default settings.
Software Update (USB)
Press ▲/▼ button to select Software Update (USB), then press OK button to update software using USB.
PC Mode
Press INPUT button and press ▲/▼ button to select PC Mode, then press OK button to enter. Press AUTO button to adjust the screen.

Recording Function
Connect a USB storage device when TV is in DTV mode. Press MENU button to display the main menu. Press ◀/▶ button to select SETUP in the main menu.
Press ▲/▼ button to select PVR File System, then press OK button to enter submenu. Press ▲/▼ button to select Check PVR File System, then press OK button to start checking the USB device. Do not use the device if anything failed.
Select Disk
Choose the place where the recorded files are located on disk.
Check PVR File System
Check whether the USB storage device connected is compatible and has created file system for recording. If not, the system will creat the file system automatically.
USB Disk
A "Pass" will be displayed if formatting is successful.

Format
To format the USB storage device connected.
Time Shift Size
To display the size of USB storage device for time shift.
Speed
To display the speed supported by the USB storage device connected.
Recording Live DTV
Press ● button on the remote control to record the current program.
Press □ button on the remote control or select STOP on the on-screen menu, then press ◀ Yes to stop recording. It will then return to normal broadcast.

When the storage space is low, a warning message will appear on the screen. Recording will automatically stop and returns to normal broadcast.
Press INDEX button to see the recorded list. Press OK button to playback selected program.
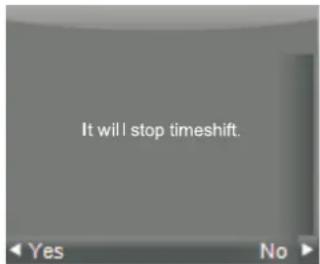
Time Shift
Press 📄 on the remote control when watching DTV, it will pause the image and start recording the program. Press 📄 again to playback.
Press ▪ button on the remote control or select STOP on the on-screen menu, then press ◀ Yes to stop recording. It will return to normal broadcast.
Schedule Recording
Press EPG button on the remote control, and press the Red button to enter the submenu to set the time recording.
Press ▲/▼ to select and set Start Time, End Time.
press ◀/▶ to select Mode once, Mode everyday, Mode weekly.


Note: After setting scheduled recording, the power is not allowed to be cut off during standby.
Media Operation
Note: Before operating Media menu, Plug in USB device, then press INPUT button to set the Input Source to Media.
Press ▲/▼ button to select Media in the Source menu, then press OK button to enter.


Press ◀/▶ button to select between Photo, Music, Movie and Text in the Media menu, then press OK button to enter.
Photo
Press ◀/▶ button to select PHOTO in the main menu, then press OK button to enter.
Press ◀/▶ button to select Return then press OK or press EXIT button to go back to the previous menu.
Press ◀/▶ button to select drive disk you want to watch, then press OK button to enter.
Press ◀/▶ ▲/▼ button to select the file you want to watch in the file selecting menu, then press OK button to display picture.
When highlighting the option you select, the file information will appear on the right and picture will be previewed in the center.
Basic Function (Photo)

Pause
Press ◀/▶ button to select Pause option, press OK to interrupt the picture briefly.

Prev.
Press this button to display the previous picture.

Next
Press this button to display the next picture.

Stop
Press ◀/▶ button to select Stop, press OK to stop.

Repeat All
Press ◀/▶ button to select Repeat Option, press OK to select Repeat none/all/1.

Music
Press ◀/▶ button to select Music, press OK to play background music.
Play list
Press ◀/▶ button to select Play list, press OK to enter.
Info
Press ◀/▶ button to select Info, press OK to enter. You can see the detailed information of the picture.

Rotate
Press ◀/▶ button to select Rotate. You may choose rotate the image clockwise or counter clockwise.

Zoom in/Zoom Out
You can choose to enlarge or reduce the picture.

Move View
If the picture is big enough to surpass the screen, you may use this function to move the picture.
Music
Press ◀/▶ button to select MUSIC in the main menu, then press OK button to enter.

Press ◀/▶ button to select drive disk you want to listen, then press OK button to enter.
Press ◀/▶ button to select Return then press OK or press EXIT button to go back to the previous menu.
Press ◀/▶▲/▼ button to select the file you want to listen in the file selecting menu, then press OK button to play music.
When highlighting the option you select, the file information will appear on the right and music will be previewed in the center.
Basic Function (Music)

Pause
Press ◀/▶ button to select Pause option, press OK to interrupt the music briefly.

FB
Press ◀/▶ button to select FB, press OK to fast rewind the music.
FF
Press ◀/▶ button to select FF, press OK to fast forward the music.
Prev.
Press ◀/▶ button to select Prev., press OK to listen to previous music.

Next
Press ◀/▶ button to select Next, press OK to listen to next music.
Stop
Press ◀/▶ button to select Stop, press OK to stop.
Repeat All
Press ◀/▶ button to select Repeat Option, press OK to select Repeat none/all/1.

MUTE
Press ◀/▶ button to select MUTE, press OK to disable the audio output.

Play list
Press ◀/▶ button to select Play list, press OK to enter.

Info
Press ◀/▶ button to select Info, press OK to enter. You can see the detailed information of the music.

Press ◀/▶ button to select Goto Time, press OK to enter. You can set the music section to start playing.
Movie
Press ◀/▶ button to select MOVIE in the main menu, then press OK button to enter.

Press ◀/▶ button to select drive disk you want to watch, then press OK button to enter.
Press ◀/▶ button to select Return then press OK or press EXIT button to go back to the previous menu.
When highlighting the option you select, the file information will appear on the right and movie will be previewed in the center.
Press OK button to play the selected movie.
Basic Function (Movie)

Pause
Press ◀/▶ button to select Pause option, press OK to interrupt the movie briefly.

FB
Press ◀/▶ button to select FB, press OK to fast rewind the movie.

FF
Press ◀/▶ button to select FF, press OK to fast forward the movie.
Prev.
Press ◀/▶ button to select Prev., press OK to display the previous movie.

Next
Press ◀/▶ button to select Next, press OK to display the next movie.

Stop
Press ◀/▶ button to select Stop, press OK to stop.

Repeat All
Press ◀/▶ button to select Repeat Option, press OK to select Repeat none/all/1.

Set A
Press ◀/▶ button to select Set A, press OK to set a period you want to repeat.

Play list
Press ◀/▶ button to select Play list, press OK to enter.
Info
Press ◀/▶ button to select Info, press OK to enter. You can see the detailed information of the movie.

Slow Forward
Press ◀/▶ button to select Slow Forward, press OK to adjust. You can slow down the movie speed multiply.
Step Forward
Press ◀/▶ button to select Step Forward, press OK to adjust. You can display the movie step by step.
Basic Function (Movie)

Press ◀/▶ button to select Goto Time, press OK to enter. You can set the section to start playing.

Zoom in/Zoom Out You can choose to enlarge or reduce the picture.

Aspect Ratio Press ◀/▶ button to select Arpect Ratio, press OK to enter. Switch display modes: Auto, 4:3, 16:9, zoom1, zoom2.

Move View If the picture is big enough to surpass the screen, you may use this function to move the picture.
Text
Press ◀/▶ button to select TEXT in the main menu, then press OK button to enter. Press ◀/▶ button to select Return then press OK or press EXIT button to go back to the previous menu.

Basic Function ( Text )

Prev.Page
Press ◀/▶ button to select Prev.Page, press OK to display previous page.

Next Page
Press ◀/▶ button to select Next Page, press OK to display next page.

Prev.
Press ◀/▶ button to select Prev., press OK to display the previous text.
Next
Press ◀/▶ button to select Next, press OK to display the next text.
Stop
Press ◀/▶ button to select Stop, press OK to stop.

Music
Press ◀/▶ button to select Music, press OK to play background music.

Play list
Press ◀/▶ button to select Play list, press OK to enter.
Info
Press ◀/▶ button to select Info, press OK to enter. You can see the detailed information of the text.
DVD Operation
To select DVD press the INPUT button and using the ▲/▼ buttons select DVD and press OK. Insert a DVD disc with the label FACING FORWARD. Inserting a disc incorrectly may cause damage to the Laser Optic. Do not place any damaged, dirty or disc not 12cm in diameter into the loader. The mechanism will draw the disc in automatically.
In most cases the DVD title will be displayed together with a disc menu. Select the feature required with the cursor buttons and press Play / Pause. ▶ ||
To Pause play, press the Play / Pause button, press again to continue playing.
To stop playing press ■ Press once to pre stop, if the disc is not removed the player will continue from the “stopped” point, when play is pressed. Pressing STOP again will stop the player.
DVD Setup Menu's
To set the DVD section to your requirements a series of menu's are provided. With no disc in the player, press the DVD SETUP button on the remote control, you will now see menu (Fig 37).
The first item is Language Setup.
Use the ▲/▼ buttons to select the item required and use the
▶ button to select the sub menu. In the sub menu use the
▲/▼ buttons to select the item required and OK to confirm.
OSD
Select the OSD Language (English is default).
Menu
Select the Menu Language.
Audio
Select the Aduio Language.
Subtitle
Select the Subtitle Language.
Encoding
Select the encoding to Western European or Central European.
Screen Setup(Fig 38)
TV Type
- 4:3 PS(4:3 Pan Scan): Choosing this setting if your DVD player is connected to a normal ratio TV. You can fill the movie to the entire screen of yourTV. This might mean that parts of the picture (the left and right edges) won't be seen.
Fig 37
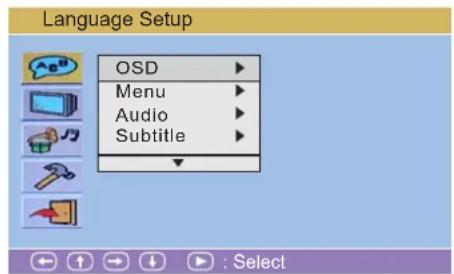
Fig 38
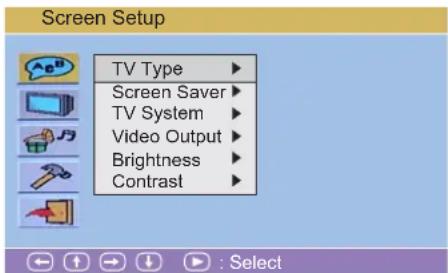
- 4:3 LB(4:3 Letter Box): Choosing this setting if your DVD player is connected to a normal ratio TV. You'll see the movies in their original aspect ratio (height-to-width radio). You'll see the entire frame of the movie, but it will take up a smaller portion of the screen vertically. The movie might appear with black bars at the top and bottom of the screen.
- 16:9: Choose this setting if your DVD player is connected to a wide screen TV. If you choose this setting and you don't have a wide screen TV, the images on the screen may appear distorted due to vertical compression.
Screen Saver
- Set the screen saver to ON or OFF.
TV System
- NTSC: set the output signal to NTSC.
- PAL: set the output signal to PAL.
- AUTO: set the output signal as per default of disc.
Video Output
- Set the video output to CVBS+YUV or YUV P-SCAN.
Brightness
- Select the brightness from Normal, Bright and Soft.
Contrast
- Select the contrast from various levels.
Audio Setup(Fig 39)
Digital Output
- set the audio output from SPDIF/PCM, SPDIF/RAW and Off.
Downmix
- set the downmix to Lo/Ro(Left total/Right total) or Lt/Rt(Left only/Right only).
Custom Setup(Fig 40)
Style
- select the background color of OSD from Style 1, Style 2, Style 3 and Style 4.
Angle Mark
- set the angle mark to ON or OFF.
Default
- Return to factory setup.
Fig 39
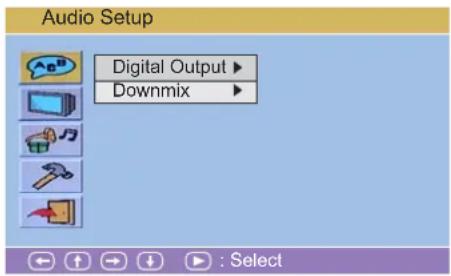
Fig 40

IMPORTANT NOTICE
N.G. Enterprises Pty Ltd ABN 17 000 263 874
1 Joynton Avenue Waterloo, NSW 2017 Australia.
TFTV6044FHD
Instructions to Insert DVD Disc in DVD Play Slot
Telephone (02) 9313 7111 Facsimile (02) 9313 7555 Email info@palsonic.com.au Website www.palsonic.com.au
To operate DVD player on the TFTV6044FHD model, please follow the instructions indicated BELOW
CORRECT INSTRUCTIONS
The mirror side of the DVD must face towards the front of the TV as indicated in the picture below

INCORRECT INSTRUCTIONS
The illustration indicated below with the label facing forward is INCORRECT.

Specifications
Display I/O ports
Active screen size 23.6 inches HDMI input 1
Aspect ratio 16:9 YPbPr input 1
Response time 5ms AV input 1
Revolution 1920*1080 PC Audio input 1
PC input 1
TV Functions
Return √ Earphone 1
Number of channel 100 Coaxial output 1
Standards BG, DK USB 1
Color system PAL, SECAM
AV Other
Progressive scan √ User manual √
Noise reduction √ Dimensions(HWD) 438mm×585mm×210mm
Packing size(HWD) 508mm×660mm×175mm
Audio Gross weight 6.4kg
Speaker 2 Power consumption 55w
Audio power 2.5w+2.5w
Audio mode Standard, Music, Movie,
Sports, Personal
Audio adjustment √
Function
Zoom mode 16:9,4:3,zoom1,zoom2, Auto
Video mode Dynamic, Standard, Mild, Personal
OSD languages English, Espanol, Francais, Deutsch, Portugues, Italiano
No signal auto off Yes
* All specifications are subject to change without notice
Troubleshooting
No power
• Make sure the TV and the power cord are connected correctly.
- Check if you pressed POWER on the remote control unit. If the indicator in the front panel is red, press POWER in the remote control or the front control panel.
LCD TV does not operate
- External influences such as lightning or static electricity may cause improper operation. In this case, operate the unit after first turning on the power, or un plugging the AC cord and plugging it in again after 1 to 2 minutes.
Power is cut off suddenly
- Check if the off timer or sleep timer are set.
- The unit's internal temperature has increased. Remove any objects blocking the vents and clean them to remove dust.
Remote control unit does not operate
- Check if the batteries are inserted with the polarity(+,-)correctly aligned.
- Check if the batteries are discharged. Please replace with new batteries.
• Make sure that you do not use the remote control under strong or fluorescent lighting. - Check if there is a fluorescent light illuminated near the remote control sensor.
- The path of the remote control beam may be blocked; please make sure the path is clear and that remote control is aimed at the remote control sensor in the TV.
Picture is cut off /with side bar screen
- Check if the image position is correct.
- Check if the screen mode adjustments such as picture size are made correctly.
Strange color, light color, or color misalignment
• Is the room too bright? The picture may look dark in a room that is too bright.
- Check the input signal setting.
Palsonic
The AUSTRALIAN Company
Palsonic Customer Service
Telephone (Australia) 1300 657 888
Palsonic Corporation Pty Ltd ABN 34 000 474 108
1 Joynton Avenue, Waterloo NSW 2017 Australia
Telephone (02) 9313 7111 Facsimile (02) 9697 0655
www.palsonic.com.au
- The AUSTRALIAN Company
- User's Manual
- TFTV6044FHD
- 60cm (23.6") LCD TV / DVD Combo with DVB-T
- Important Safety Information
- Grounded information
- Product disposal
- Safety precautions
- Handling the LCD screen
- Handling of broken glass and liquid crystal leakage
- IMPORTANT NOTICE
- Table of Content
- Overview of the LCD TV.... 1
- Product Components....2
- EPG (only available in DTV mode) 6
- Using the OSD Menu 7
- Recording Function.... 16
- Media Operation....18
- DVD Operation....25
- Specifications....27
- Troubleshooting....28
- Overview of the LCD TV
- Features
- Opening the packing
- Product Components
- Front view
- Rear View
- A
- Remote Control
- Notes:
- EPG (only available in DTV mode)
- Using the OSD Menu
- Channel Adjustment
- Auto Tuning
- ATV Manual Tuning
- DTV Manual Tuning
- Program Edit
- Signal Information (Under DTV Mode)
- Picture Adjustment
- Picture Mode
- Contrast/Brightness/Color/Tint/Sharpness
- Sound Adjustment
- Sound Mode
- Treble/Bass/Balance
- Auto Volume
- SPDIF MODE
- AD Switch ( For DTV Mode )
- Time Adjustment
- Sleep Timer
- OSD Timer
- Lock Adjustment
- Lock System
- Set Password
- Block Program
- Parental Guidance
- Key Lock
- Hotel Mode
- Hotel Adjustment
- Source Lock
- Default Source
- Default Prog
- Max Volume
- Import
- Database Export
- Clear Lock
- Setup Adjustment
- OSD Language
- TT Language
- Hearing Impaired
- PVR File System
- Aspect Ratio
- Blue Screen
- First Time Installation
- Reset
- Software Update (USB)
- PC Mode
- Recording Function
- Select Disk
- USB Disk
- Format
- Time Shift Size
- Speed
- Recording Live DTV
- Time Shift
- Schedule Recording
- Media Operation
- Photo
- Basic Function (Photo)
- Stop
- Repeat All
- Music
- Play list
- Info
- Rotate
- Zoom in/Zoom Out
- Move View
- Basic Function (Music)
- MUTE
- Movie
- Basic Function (Movie)
- Text
- Basic Function ( Text )
- DVD Operation
- DVD Setup Menu's
- OSD
- Menu
- Audio
- Subtitle
- Encoding
- Screen Setup(Fig 38)
- TV Type
- Screen Saver
- TV System
- Video Output
- Brightness
- Contrast
- Audio Setup(Fig 39)
- Digital Output
- Downmix
- Custom Setup(Fig 40)
- Style
- Angle Mark
- Default
- Instructions to Insert DVD Disc in DVD Play Slot
- CORRECT INSTRUCTIONS
- INCORRECT INSTRUCTIONS
- Specifications
- Display I/O ports
- TV Functions
- AV Other
- Function
- Troubleshooting
- No power
- LCD TV does not operate
- Power is cut off suddenly
- Remote control unit does not operate
- Picture is cut off /with side bar screen
- Strange color, light color, or color misalignment
- Palsonic
Brand : Palsonic
Model : TFTV6044FHD
Category : Television