TFTV201 - Television Palsonic - Free user manual and instructions
Find the device manual for free TFTV201 Palsonic in PDF.

| Product Type | 20.1" TFT LCD Monitor TV |
| Model | TFTV201 |
| Brand | Palsonic |
| Display Size | 20.1 inches (48 cm) |
| Display Area | 408 mm x 306 mm |
| Max Resolution | VGA 640 x 480 @75Hz |
| Pixel Pitch | 0.6375 mm x 0.6375 mm |
| Display Colors | 16,777,216 (8-bit) |
| Viewing Angle | 120° horizontal / 90° vertical |
| Contrast Ratio | 350:1 (typical) |
| Brightness | 400 cd/m² |
| Horizontal Frequency | 31.5 KHz |
| Vertical Frequency | 60 Hz |
| Dimensions (with speakers) | 654 mm (W) x 463 mm (H) x 67 mm (D) |
| Weight (net) | 12.8 kg |
| Power Supply | DC 15V, 5.3A, 50/60Hz |
| Power Consumption | Operation: 53W, Standby: 3W |
| Inputs | PC Analog RGB, A/V, S-Video, SCART, Component (Y, Cb, Cr) |
| Audio Input | PC Audio, A/V, S-Video, SCART |
| Outputs | Monitor Out, Speaker Output (3W x 2) |
| TV System | PAL/SECAM, NTSC (depending on region) |
| Teletext | Yes (PAL model) |
| Speakers | 3W x 2 |
| Plug & Play | DDC 1/2B |
| Safety Certifications | UL, CSA, FCC, CE, CCIB, EIAJ |
| Cleaning | Unplug before cleaning; use damp cloth; avoid solvents like benzene, acetone, ethyl alcohol |
| Remote Control | 2 AAA batteries, range 7-10m, angle 30° |
| Customer Service | Australia: 1300 657 888 |
Frequently Asked Questions - TFTV201 Palsonic
User questions about TFTV201 Palsonic
0 question about this device. Answer the ones you know or ask your own.
Ask a new question about this device
Download the instructions for your Television in PDF format for free! Find your manual TFTV201 - Palsonic and take your electronic device back in hand. On this page are published all the documents necessary for the use of your device. TFTV201 by Palsonic.
USER MANUAL TFTV201 Palsonic
natural_image
Black-and-white photo of a flat-screen CRT television displaying a beach scene with a person walking on the shore (no visible text or symbols)20.1" TFT LCD Monitor TV
Palsonic Corporation Pty Ltd
1 Joynton Avenue
WATERLOO NSW 201 7 AUSTRALIA
Tel 61 2 93137111 Fax 61 293137555
www.palsonic.com.au
Customer Service - 1300 657 888
Contents
Safety Instructions 3
General safety precautions 4
Parts Description
Front Panel 5
Rear Panel 6
Remote Control Unit 7\~8
MENU TREE 9
Connecting a PC 10
Viewing a PC screen
Initial set PC mode 11
When the picture is unstable 11
Adjusting the Picture settings 12
Adjusting the Sound settings 13
Adjusting the Geometry settings 14
PC Stable Adjustment 15
Connecting to watch TV or VCR
Connecting the Aerial or Cable Television Network 16
Connecting the VCR, DVD or Other External Devices 16
Viewing a TV/VCR screen
Adjusting the Picture Settings 1,2 17\~18
Adjusting the Sound Settings 1,2 19\~20
Channel Memory (PAL System)
Storing the Channel Automatically 21
Storing the Channel Manually 22\~23
Fine Tuning Channel Reception 24
Skipping Unwanted Channels 25
Teletext
Teletext Decoder 26
Displaying Teletext Information 27
Teletext Decoder 27
Other Functions
Sleep 28
Recall 28
Surround 28
Appendix
Power Saver 28
Troubleshooting 29\~30
Specification 31
Display Modes 32
Congratulations on your purchase of this Palsonic Product.
We recommend that you thoroughly read this manual before use to fully enjoy the many functions and excellent features of this set.
Retain this manual in an easily accessible location for future reference.
Safety Instructions
Before connecting the AC power cord to the DC adapter outlet, make sure the voltage designation of the DC adapter corresponds to the local electrical supply.
Never insert anything metallic into the cabinet openings of the Liquid Crystal Display (LCD) monitor: doing so may create the danger of electric shock.
To avoid electric shock, never touch the inside of the LCD monitor. Only a qualified Technician should open the case of the LCD monitor.
Never use your LCD monitor if the power cord has been damaged. Do not allow anything to rest on the power cord, and keep the cord away from areas where people can trip over it.
Be sure to hold the plug, not the cord, when disconnecting the LCD monitor from an electric socket.
Openings in the LCD monitor cabinet are provided for ventilation. To prevent overheating, these openings should not be blocked or covered. Also, avoid using the LCD monitor on a bed, sofa, rug, or other soft surface. Doing so may block the ventilation openings in the bottom of the cabinet. If you put the LCD monitor in a bookcase or some other enclosed space, be sure to provide adequate ventilation. Put your LCD monitor in a location with low humidity and a minimum of dust.
Do not expose the LCD monitor to rain or use it near water (in kitchen, near swimming pool, etc.). If the LCD monitor accidentally gets wet, unplug it and contact an authorised dealer immediately. You can clean the LCD monitor with a damp cloth when necessary, but be sure to unplug the LCD monitor first.
Place the LCD monitor on a solid surface and treat it carefully. The screen is made of thin glass with a plastic front surface and be damaged if dropped, hit or scratched. Do not clean the front panel with keton-type materials (e.g., acetone), ethyl alcohol, toluene, ethylacid, methyl, or chloride - these may damage the panel.
Locate your LCD monitor near an easily accessible AC outlet.

CAUTION
RISK OF ELECTRICAL SHOCK DO NOT OPEN

CAUTION: TO REDUCE THE RISK OF ELECTRICAL SHOCK, DO NOT REMOVE COVER (OR BACK).
NO USER-SERVICEABLE PARTS INSIDE. REFER SERVICING TO QUALIFIED SERVICE PERSONNEL.
General safety precautions
This Monitor has been engineered and manufactured to assure your safety. You can prevent serious electrical shock and other hazards by keeping in mind the following:

Do not place anything heavy, wet or magnetic on the monitor or the power cord. Never cover the ventilation openings with any material and never touch them with metallic or inflammable materials.

natural_image
Cartoon illustration of a computer monitor with angry expression and a small computer monitor nearby (no text or symbols)Avoid operating the monitor in extreme heat, humidity or areas affected by dust. Temperature: 5-35°C Humidity: 30\~80RH

natural_image
Cartoon illustration of a wall-mounted electrical socket connected to a plug, showing a surprised face and a plunger (no text or symbols)Be sure to turn the monitor off before plugging the power cord into the socket. Make sure that the power cord and the other cords are securely and correctly connected.

natural_image
Illustration of a plug with three bulbs and a lightning bolt above, symbolizing electrical hazard (no text or symbols present)Overloaded AC outlets and extension cords are dangerous, as are frayed power cords and broken plugs, which may cause electric shock or fire. Call your service technician for replacement.

natural_image
Cartoon illustration of a computer monitor displaying a sad face with a pointing hand, symbolizing distress or fear (no text or symbols present)Do not use sharp tools such as a pin or a pencil near the monitor, as they may scratch the LCD surface.

natural_image
Cartoon illustration of a computer monitor with a sad face and flying arrows, accompanied by a bottle and a bag (no text or symbols)Do not use a solvent, such as benzene, to clean the monitor, as it will damage the LCD surface.
Parts Description
Front Panel
1. SPEAKER
2. POWER
switches the set off (stand-by mode) and on.
3. MENU
display the main on-screen menu. Exit from sub-menu.
4. SELECT
select input signal or select submenu of the on-screen menus.
5. Volume UP, Volume DOWN
adjust the volume. Also adjust the value of a menu option.
6. CH UP, CH DOWN
change channels. Also used to highlight selections on the on-screen menus.
Accessories

Parts Description
Rear Panel
- VIDEO OUTPUT
- AUDIO OUTPUT
connects to the audio input port of an additional device.
- COMPONENT VIDEO INPUT
Y, Cb, Cr (480i) video signals from DVD.
- VIDEO 2 INPUT
video signal from VCR or similar devices.
- AUDIO 2 INPUT
audio signals from VCR or similar device.
S-Video signal from an S-VHS VCR or laser disc player.
- VIDEO 1 INPUT
video signals from VCR or similar device.
- AUDIO 1 INPUT
audio signals from VCR or similar device.
- SCART (PAL System)
SCART audio/video connector.
- POWER Jack
to input DC power from power outlet.
- PC AUDIO INPUT
connects to the sound-output port of a personal computer.
- PC VIDEO INPUT
used to connect a video signal from a personal computer.
- SPEAKER OUTPUT
To connect speaker.
Remote Control Unit
Inserting the Batteries in the Remote Controller
You must insert or replace the batteries in the remote controller when you:
● Purchase the set.
● Find that the remote controller is no longer operating correctly.

natural_image
Simple line drawing of a curved object with a small arrow pointing to a section (no text or symbols)1 Remove the cover of the remote controller by pressing the symbol and pulling the cover space in the direction of the arrow.

natural_image
Illustration of a mechanical component with a clamped part (no text or symbols)2 Insert 2 batteries (AAA size), Care about the polarities.

natural_image
Diagram of a device handle with an arrow indicating direction (no text or symbols)3 Replace the cover by pushing it in the direction of the arrow.
! You can use your remote controller within a distance of 7\~10m and an angle of 30 degrees from the left and right sides of the remote controller receptor of your monitor.
CAUTION
Danger of explosion if battery is incorrectly replaced.
Replace only with the same or equivalent type recommended by the manufacturer.
Menu Tree

flowchart
graph TD
A["Main Menu"] --> B["PICTURE"]
B --> C["CONTRAST"]
B --> D["BRIGHTNESS"]
B --> E["SHARPNESS (TV/VIDEO mode)"]
B --> F["COLOR TEMP (PC mode)"]
B --> G["COLOR (TV/VIDEO mode)"]
B --> H["TINT (TV/VIDEO mode, NTSC System)"]
A --> I["SOUND"]
I --> J["TREBLE"]
I --> K["BASS"]
I --> L["BALANCE"]
I --> M["S.MODE (PAL System)"]
I --> N["MTS (NTSC System)"]
A --> O["GEOMETRY (PC mode)"]
O --> P["H-POSITION"]
O --> Q["V-POSITION"]
O --> R["AUTO POSITION"]
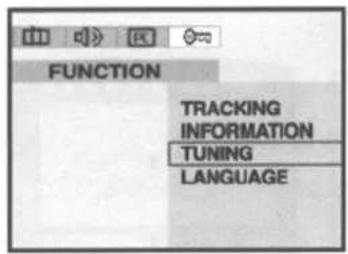
A --> S["FUNCTION (PC mode)"]
S --> T["TRACKING"]
S --> U["INFORMATION (Not available)"]
S --> V["TUNING (Not available)"]
S --> W["LANGUAGE (PAL System)"]
S --> X["FUNCTION (TV mode, PAL System)"]
X --> Y["TRACKING"]
X --> Z["INFORMATION"]
X --> AA["TUNING"]
X --> AB["LANGUAGE"]
A --> AC["SPORT"]
A --> AD["AUTO TUNING"]
A --> AE["MANUAL TUNING"]
A --> AF["FINE TUNING"]
A --> AG["CH SKIP"]
Connecting a PC
flowchart
graph TD
    A["Monitor"] -->|USB| B["Server"]
    B -->|USB| C["Network Interface"]
    C --> D["Device"]
    style A fill:#f9f,stroke:#333
    style B fill:#ccf,stroke:#333
    style C fill:#cfc,stroke:#333
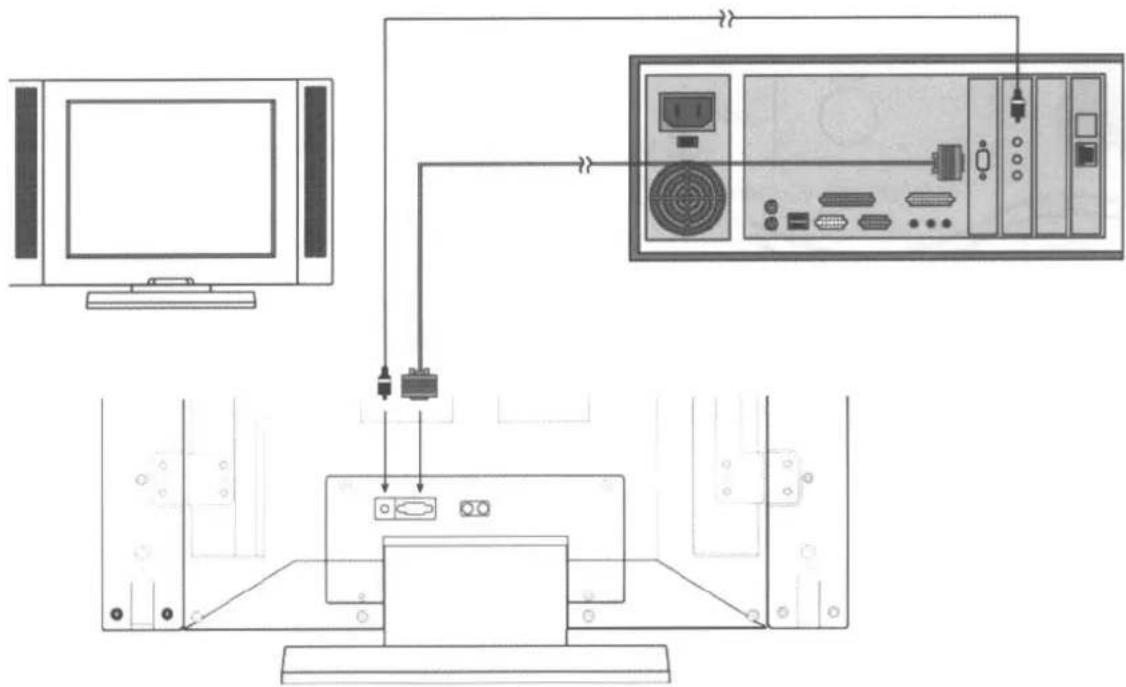
1 Turn off your computer and monitor.
2 Connect a PC D-Sub cable between your PC and PC-VIDEO-IN of the monitor. And then fasten the screws of both sides of the cable.
3 Connect a PC Audio Cable between the Sound Output jack of the sound card on a PC and the PC-AUDIO-IN of the monitor.
4 Connect a DC Power unit cable to the Power jack on the rear of your monitor. And connect a power cable to the DC Power unit before connecting to a power outlet.
5 Power on the computer before turning on the monitor.
Viewing a PC screen
Initial set PC mode
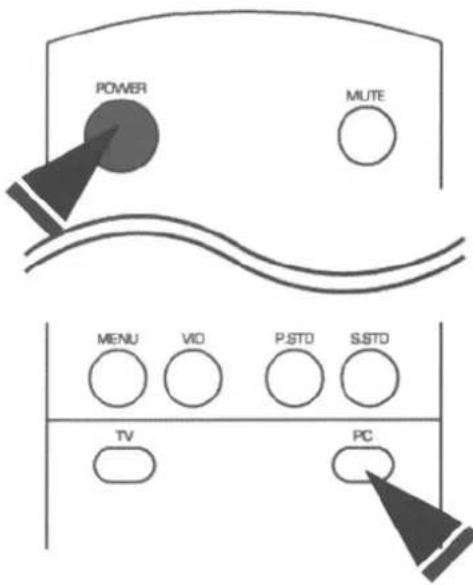
1 Power on your monitor by pressing the POWER button on the main set or on the remote controller.
2 Use the PC button on the remote controller to switch to the PC mode.
Then the PC screen is automatically set.
When a CD-Title runs, the music is output from speakers.
(You can use an external speaker via the Audio Output jack on the rear of the main set.)
When the picture is unstable

1 Press the MENU button and the PICTURE menu is displayed.
2 Use the VOL ◀ or VOL ▶ button to move to the FUNCTION menu.
3 Use the CH ▼ or CH▲ button to move to TRACKING, then press the SEL button. Then, the TRACKING menu will be displayed.
4 Move to AUTO TRACKING, then press the SELECT button. Then, the message "AUTO TRACKING PROCESSING ..." appears on the screen to stabilise the screen.
5 Press the MENU button repeatedly until the menus disappear.
Viewing a PC screen
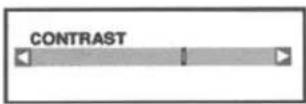
Adjusting the Picture Settings
Your monitor has several settings which allow you to control picture quality:
- CONTRAST, BRIGHTNESS, COLOUR TEMPERATURE

1 Press the MENU button.
Result : The PICTURE menu is displayed.
2 Use the CH ▼ or CH ▲ buttons to select one of the following options:
CONTRAST
BRIGHTNESS
COLOUR TEMPERATURE
3 Press the SEL button.
4 Press the VOL ◀ or VOL ▶ buttons to suit your personal preference.
● CONTRAST:
Adjust the brightness and darkness between objects and back grounds.
● BRIGHTNESS:
Adjust the overall of the screen brighter or darker
● COLOUR TEMPERATURE:
The tone of colour can be changed from reddish white to bluish white.
5 Press the MENU button repeatedly until the menus disappear.
Viewing a PC screen
Adjusting the Sound Settings
The sound settings can be adjusted to suit your personal preference: TREBLE, BASS, BALANCE, S.MODE


1 Press the MENU button. Result: The PICTURE menu is displayed.
2 Use the VOL◀ or VOL ▶ buttons to move the SOUND menu.
3 Use the CH▼or CH▲buttons to select one of the following options: TREBLE BASS BALANCE S.MODE
4 Press the SEL button.
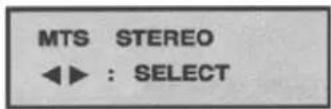
5 Press the VOL◀ or VOL▶ buttons to suit your personal preference. ● S.MODE / MTS : To select STEREO or MONO
6 Press the MENU button repeatedly until the menus disappear.
Viewing a PC screen
Adjusting the Geometry Settings
The geometry settings can be adjusted to centre your viewing screen.
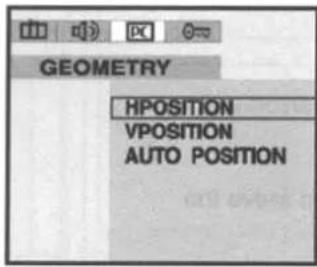
1 Press the MENU button.
Result: The PICTURE menu is displayed.
2 Use the VOL◀, VOL▶ buttons to move the GEOMETRY menu.
3 Use the CH ▼ or CH▲ buttons to select one of the following options:
H-POSITION
V-POSITION
AUTO POSITION
4 Press the SEL button.
5 Press the VOL◀ or VOL ▶ buttons to adjust the position of screen.
- If the position of screen is horizontally off-centred, use H-POSITION.
- If the position of screen is vertically off-centred, use V-POSITION.
Use the AUTO POSITION to position the screen to be horizontally and vertically centred automatically.
6 Press the MENU button repeatedly until the menus disappear.
Viewing a PC screen
PC Stable Adjustment
When the screen is unstable in PC settings, or to make your PC stable by adjusting the Clock and Phase, set the PC in the following sequence:
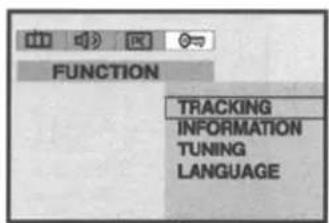
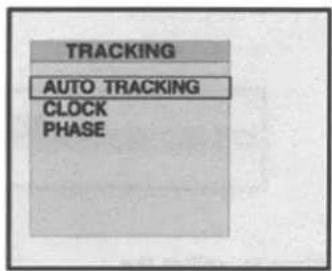
1 Press the MENU button. Result : The PICTURE menu is displayed.
2 Use the VOL◀, VOL▶ buttons to move the FUNCTION menu.
3 Use the CH ▼ button move to TRACKING and then press the SEL button. Result: The TRACKING menu is displayed.
4 Use the CH▼or CH ▲ buttons to select one of the following options: AUTO TRACKING CLOCK PHASE
5 To adjust the.. Press the... AUTO TRACKING SEL button. CLOCK VOL ◀ or VOL ▶ button. PHASE VOL ◀ or VOL ▶ button.

6 - AUTO TRACKING: Automatically optimises the status of screen. This is recommended to perform for new PC. - CLOCK: Adjusts the horizontal size of screen by increasing / decreasing the number of pixels. - PHASE: Sets the focus of screen. Adjusts when some noise exists or the character lines are seen overlapped.
7 Press the MENU button repeatedly until the menus disappear.
Connecting to watch TV or VCR
Connecting the Aerial or Cable Television Network
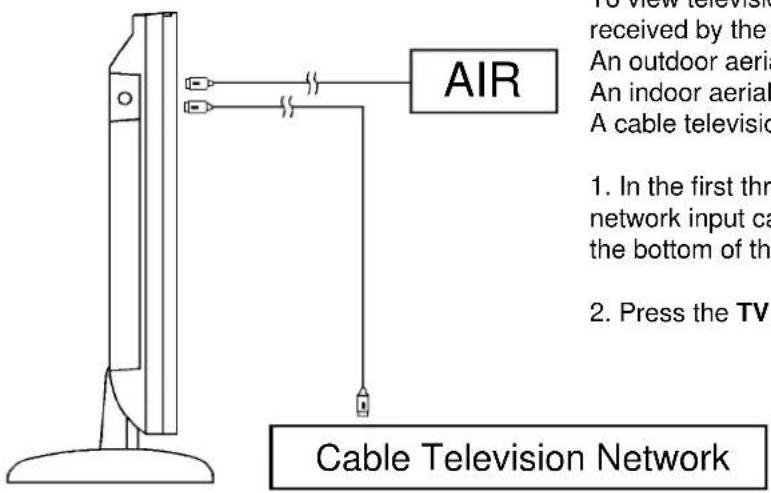
To view television channels correctly, a signal must be received by the set from one of following sources:
An outdoor aerial
An indoor aerial (not recommendable)
A cable television network
-
In the first three cases, connect the aerial or network input cable to the 75 ohm coaxial socket on the bottom of the television.
-
Press the TV mode button on the remote controller.
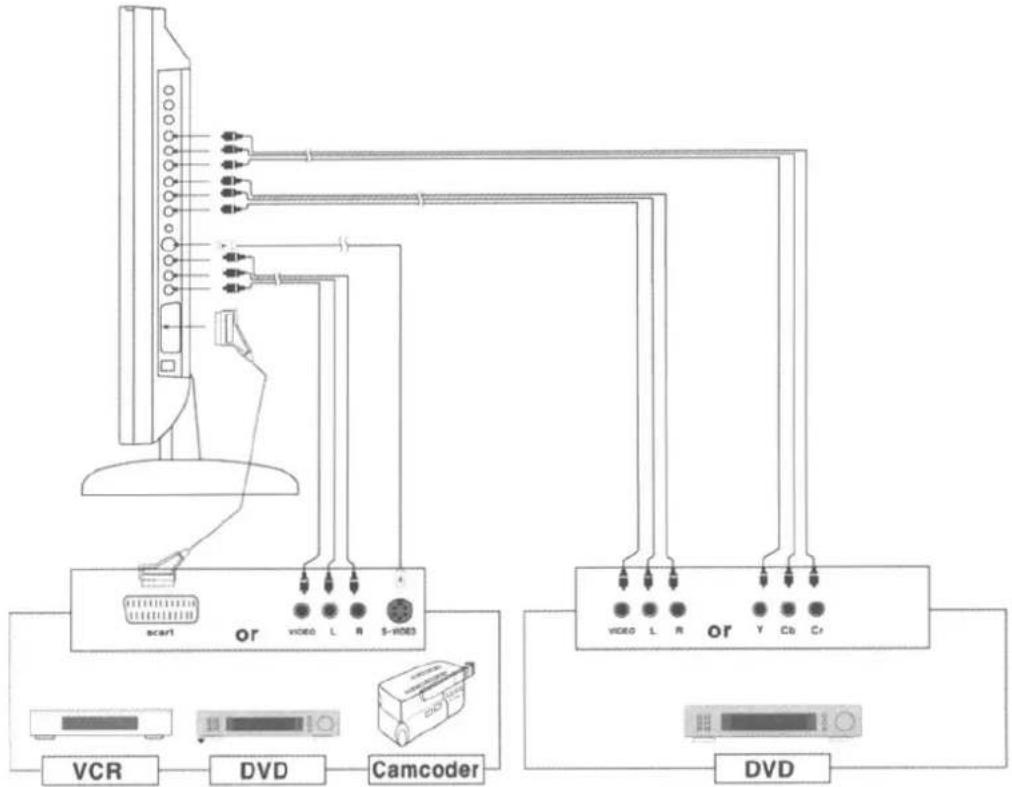
Connecting the VCR, DVD or Other External Devices
- Connect video and audio cable according to the shape and colour of the video / audio cable. (SCART jack, RCA jacks)
- When an external devices is in MONO, the audio connection cable can be connected to either the left and S.MODE/MTS should be set FM MONO/MONO.
- For optimal visual image, use S-VIDEO connector instead of video (yellow) connector.
- If RCA jack is connected together with SCART jack, RCA jack has priority.
Viewing a TV/VCR screen
Adjusting the Picture Settings 1
Your TV have several settings which allow you to control picture quality:
CONTRAST, BRIGHTNESS, SHARPNESS, COLOUR, TINT

1 Press the MENU button. Result: The PICTURE menu is displayed.
2 Use the CH ▼ or CH ▲ buttons to select one of the following options: CONTRAST BRIGHTNESS SHARPNESS COLOUR TINT (NTSC System)

3 Press the SEL button.
4 Press the VOL◀ or VOL▶ buttons to suit your personal preference.
5 Press the MENU button repeatedly until the menus disappear.
Adjusting the Picture Settings 2
By pressing the P.STD button on the remote control, you can sequentially select any one of the four possible preferred analogue picture presets.
Whenever this button is pressed, the mode will be changed as follows.
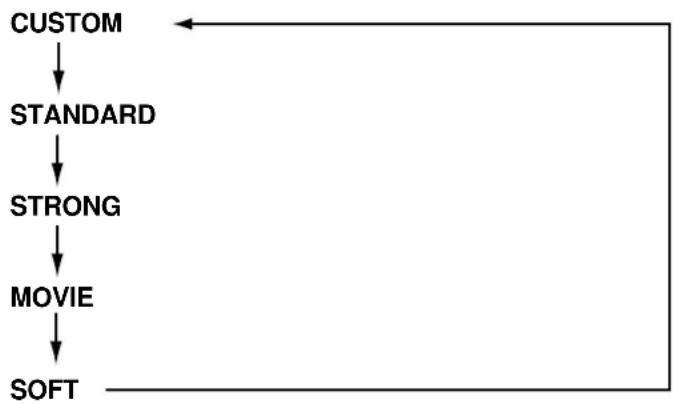
flowchart
graph TD
    A["CUSTOM"] --> B["STANDARD"]
    B --> C["STRONG"]
    C --> D["MOVIE"]
    D --> E["SOFT"]
CUSTOM
Select this mode to view the adjusted picture you want.
STANDARD
Select this mode to view the factory - presetting standard picture.
STRONG
Select this mode to
- view a powerful and clear picture.
- watching in the brighter (daylight) environments.
MOVIE
Select this mode to view a DVD or Video picture.
SOFT
Select this mode
- to emphasise mildness.
- when it is dark around.
- to lessen the fatigue of eyes
Viewing a TV/VCR screen
Adjusting the Sound Settings 1
The sound settings can be adjusted to suit your personal preference:
TREBLE, BASS, BALANCE, S.MODE / MTS

1 Press the MENU button. Result: The PICTURE menu is displayed.
2 Use the VOL◀,VOL▶buttons to move the SOUND menu.
3 Use the CH ▼ or CH▲ buttons to select one of the following options: TREBLE BASS BALANCE S.MODE (PAL System) MTS (NTSC System)
4 Press the SEL button.
5 Press the VOL ◀ or VOL ▶ buttons to suit your personal preference. ● S.MODE : description below (PAL System)

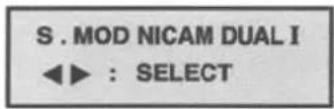

| Type of broadcast | On-screen Indication | |
| NICAM Stereo | Regular broadcast (Standard audio) | Mono (Normal use) |
| Regular + Mono Mono NICAM Mono Nicam (Normal) | ||
| NICAM Stereo Nicam (Normal) | Stereo Mono→Normal | |
| NICAM Dual-I/II | Dual-I Dual-II MonoNicam Nicam (Normal) | |
| A2 Stereo | Regular broadcast (Standard audio) | Mono (Normal use) |
| Bilingual or Dual-I/II | Dual-I Dual-II→ | |
| Stereo | Stereo Mono→(Forced Mono) |
● MTS: To select STEREO, SAP or MONO (NTSC System)
6 Press the MENU button repeatedly until the menus disappear.
Adjusting the Sound Settings 2
By pressing the S.STD button on the remote control, You may get more best sound and change the sound of a suit with a video source.
Whenever this button is pressed, the mode will be changed as follows.
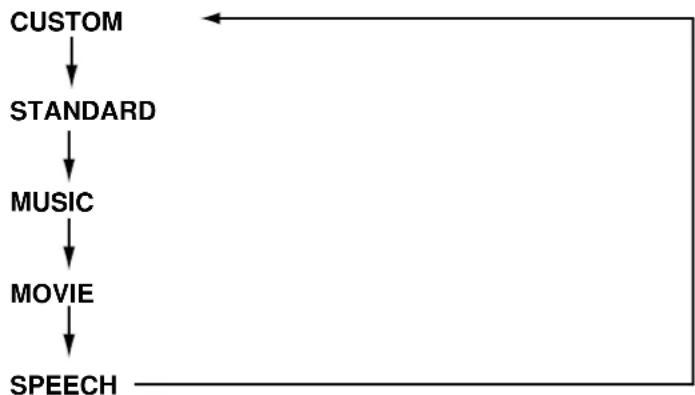
flowchart
graph TD
    A["CUSTOM"] --> B["STANDARD"]
    B --> C["MUSIC"]
    C --> D["MOVIE"]
    D --> E["SPEECH"]
CUSTOM
Select this mode to listen the adjusted sound you want.
STANDARD
Select this mode to listen the factory - presetting standard sound.
MUSIC
Select this mode to listen the music video or the live picture source.
MOVIE
Select this mode to listen the movie sound.
SPEECH
Select this mode to listen the TV news or the TV talk-shows, etc.
Channel Memory (PAL System)
Storing the Channels Automatically
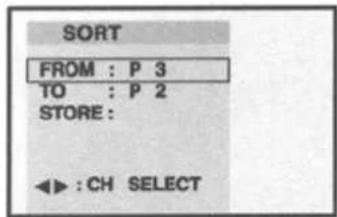
You can scan the frequency ranges available on your television in your country and store all the channels found automatically. The channels are stored in the order in which they appear in the frequency bands. It is possible that the automatically allocated numbers may not correspond to those by which you wish to identify the channels. If this is the case, you can then sort them manually.
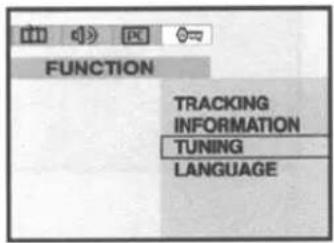
1 Press the MENU button.
Result: The PICTURE menu is displayed.
2 Press the VOL ◀ button to place the selection bar on the FUNCTION menu.
3 Press the CH▼ button to place the selection bar on the TUNING mode.
And press the SEL button.
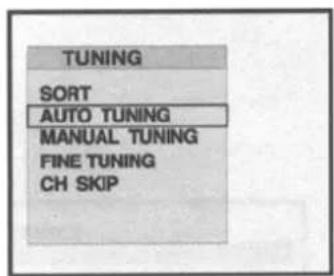
4 Press the CH▼ button to place the selection bar on the AUTO TUNING and press the SEL button.
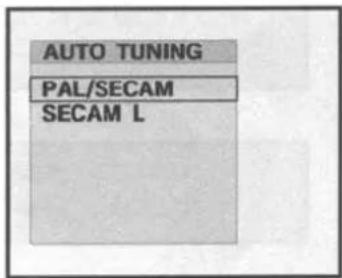
5 Press the CH▼ button, set the broadcasting system. (PAL/ SECAM or SECAM L) and press SEL button.
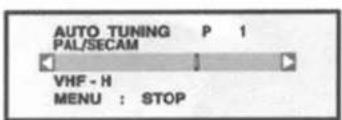
Result: The AUTO TUNING will store found channel automatically. White the AUTO TUNING is progressing, the TV will change channels up to 99. When searching and storing is completed, the SORT menu is displayed. User can exchange favourite channels to preferred channel number.
6 Press the VOL◀ or VOL▶ button until favourite channel is shown.
7 Press the CH▼ button to place the selection bar on the TO option. Press the VOL◀ or VOL▶ until the new number by which you wish to identify the channel is displayed.
8 Press the CH▼ button to place the selection bar on the store. Press the VOL◄ or VOL► button, the channel will stored in memory displaying OK for a moment.
9 When searching and storing is complete, press the MENU button repeatedly until the menus disappear.
Channel Memory (PAL System)
Storing the Channel Manually
When storing channels manually, you can choose:
whether or not store each of the channels found.
The number by which you wish to identify each stored channel.


1 Press the MENU button. Result: The picture menu is displayed.
2 Use the VOL◀ or VOL▶ buttons to move the FUNCTION menu.
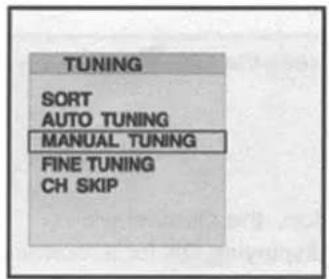
3 Press the CH ▼ or CH ▲ button to select the TUNING option and press the SEL button. Result: The tuning menu is displayed.
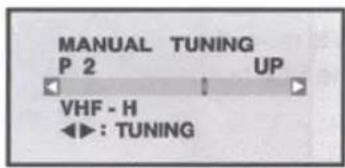
4 Press the CH ▼ or CH ▲ button to move the MANUAL TUNING and press the SEL button.
5 Press the VOL◀ or VOL▶ button repeatedly until the COLOR SYSTEM is best quality. Result: The COLOR SYSTEM is changed.
PAL→SECAM→AUTO
6 Press the CH ▼ button to move the SOUND.
7 Press the VOL ◀ or VOL ▶ button repeatedly until the SOUND SYSTEM is best quality Result: The sound system is changed.
BG → DK → I → L
8 Press the CH ▼ button to move the PR. NO
Channel Memory (PAL System)

9 To assign a program number to the channel, press the VOL ◀ or VOL ▶ button until you find the correct number.
10 Press the CH▼ button to move the SEARCH.
11 Press the VOL◀ or VOL ▶ button to start the search.
12 When the screen is fine tuned, press the CH ▼ button to move the STORE.
13 Press the VOL◀ or VOL▶ button, the channel will automatically stored in memory displaying OK for a moment.
14 Repeat steps 8\~13 for each channel to be stored.
15 When you have finished manual storage, press the MENU button repeatedly to return to normal viewing.
Channel Memory (PAL System)
Fine Tuning Channel Reception
If the reception is clear, you do not fine-tune the channel, as this is done automatically during the search and store operation.
If however the signal is weak or distorted, you may have to fine-tune the channel manually.
1 Press the MENU button. Result: The PICTURE menu is displayed.
2 Use the VOL◀ or VOL▶ buttons to move the FUNCTION menu.

3 Press the CH▼ or CH▲ button to select the TUNING option and press the SEL button. Result: The tuning menu is displayed.
4 Press the CH▼ or CH▲ button to move the FINE TUNING and press the SEL button.

5 When a channel is right viewed by using the VOL◀ or VOL▶ buttons, the Tuning is automatically set.
6 Press the MENU button repeatedly until the menus disappear.
Channel Memory (PAL System)
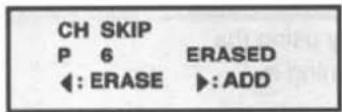
Skipping Unwanted Channels
You can exclude the channels of your choice from the channel scan operation. When you scan through the stored channels, those you have chosen to skip are not displayed.

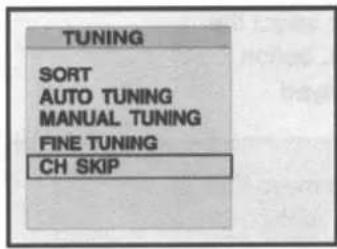
1 Press the MENU button.
2 Use the VOL◀ or VOL ▶ buttons to move the FUNCTION menu.
3 Press the CH ▼ or CH▲ button to select the TUNING option and press the SEL button. Result: The tuning menu is displayed.
4 Press the CH ▼ or CH ▲ button to move the CH SKIP and press the SEL button.
5 Press the CH ▼ or CH ▲ button to select the required channel.
6 To add or erase the desired channel by pressing the VOL◀ or VOL▶
VOL◀ :ERASE, VOL▶ :ADD
7 Press the MENU button repeatedly until the menus disappear.
Teletext
Teletext Decoder

Most television channels carry "teletext", pages of written information that provide information such as :
• Television program tables
- News bulletins
- Weather forecasts
- Sports results
- Subtitles for the hard of hearing
The teletext pages are organised according to six categories:
Part contents
| A | Selected page number. |
| B | Broadcasting station identity. |
| C | Current page number or search status. |
| D | Date and time. |
| E | Text. |
| F | Status information. |
Displaying Teletext Information
You can watch teletext information at any time, but signal reception must be good. Otherwise:
Information may be missing. Some pages may not be displayed.
To activate the teletext mode and display the contents page:
1 Using the (☐) or (☐) button, select the channel providing the teletext service.
2 Press the TTX/MIX (☐) button to activate the teletext mode.
Result: The contents page is displayed. It can be □ redisplayed at any time by pressing the □ INDEX ( ) button.
3 To display the actual broadcast simultaneously with the teletext page, press the TTX/MIX (☐) button.
4 To return to normal viewing, press the TTX OFF(☐)button.

Teletext
Teletext Decoder

Press the numeric buttons on the remote controller to enter the page number directly:
1 Enter the three-digit page number listed in the contents by pressing the corresponding numeric buttons. Result: The current page counter is incremented and the page is then displayed.
2 If the selected page is linked with several secondary pages, the secondary pages are displayed in sequence. To freeze the display on a given page, press the HOLD (☐). Press the HOLD again to resume.
3 Using the various display options:
| To display ... | Press the ... |
| Both teletext information and the normal broadcast | TTX /MIX ( [IMAGE] ) |
| Hidden text(answers to quiz games, for example)The normal screen | REVEAL ( [IMAGE] )REVEAL ( [IMAGE] ) again |
| A secondary page, by entering its 4-digit number | SUB-PAGE ( [IMAGE] ) |
| The next pageThe previous page | PAGE UP ( [IMAGE] )PAGE DOWN ( [IMAGE] ) |
| FLOF / LIST select | FLOF / LIST ( [IMAGE] ) |
| Store STORE ( ) | [IMAGE] |
Other Functions
SLEEP
You don't have to remember to switch the set turn off before you go to sleep.
The sleep timer automatically switches the set to stand-by after the preset time elapses.
For selecting you desired number of minutes, press the SLEEP button several times or
Continuously. OFF will appear on the screen, followed by 10, 20, 30, 60, 90, 120, 150, and 180.
NOTE:
- To view the remaining sleep time, press the SLEEP button once.
- To cancel the sleep time, repeatedly press the SLEEP button until the display SLEEP OFF appears.
- When you switched the set turn off, the set released the preset sleep time.
RECALL
Press RECALL button on the remote control. The number of TV channel or the video mode you are now viewing, will display on the screen.
SURROUND
You can select the special surround effect sound. Press SURROUND button, you may get surround effect sound and will display SURROUND ON, on the screen. If you don't want this effect, press again SURROUND button then you may get normal sound and will display SURROUND OFF.
APPENDIX A: Power Saver
This monitor has a built-in power management system called Power saver. This system saves energy by switching your monitor into a low-power mode when it has not been used for a certain period of time. The available modes are "On", "Stand-by", "Sleep" and "Deep Sleep". Power Saver operates with a VESA DPMS compliant video card installed in your computer You use a software utility installed on your computer to set up this feature. See below table for details.
| S:rate | Normal Operation | Power-Saving Function mode (EPA / ENERGY 2000) | ||
| Standby Mode | Sleep Mode Position A1 | Deep Sleep Mode Position A2 | ||
| Horizontal Sync Vertical Sync Video | Active Active Active | Inactive Active Blanked | Active Inactive Blanked | Inactive Inactive Blanked |
| Power Indicator | Green | Amber | Amber Blinking (0.5 sec interval) | Amber Blinking (1 sec interval) |
| Power Consumption | 30W (Max.) | Less than 3W | Less than 3W | Less than 3W |
NOTE: This monitor automatically returns to normal operation when horizontal and vertical sync return. This occurs when you move the computer's mouse or press a key on the keyboard.
APPENDIX B: Troubleshooting
If you have a problem setting up or using your LCD monitor, you may be able to solve it yourself. Before contacting customer service, try the suggested actions that are appropriate to your problem.
| What you see... | Suggested Actions | Reference |
| Screen is blank and power indicator is off | ·Ensure that the power cord is firmly connected and the LCD monitor is on. | Connecting a PC, page 13. |
| "CHECK CABLE OR SIGNAL" message | ·Ensure that the signal cable is firmly connected to the PC or video sources.·Ensure that the PC or video sources are turned on. | Connecting a PC, TV or VCR, Page 12, 18. |
| "INVALID MODE" message | ·Check the maximum resolution and the frequency of the video adaptor.·Compare these values with the data in the Display Modes Timing Chart. | PC Stable Adjustment, page 19.APPENDIX D: Display Modes page 33. |
| The image is too light or too dark | ·Adjust the Brightness and Contrast. | BRIGHTNESS, page 15, 20. CONTRAST, page 15, 20. |
| Horizontal bars appear to flicker, jitter or shimmer on the image | ·Adjust the Clock function.·Auto Tracking will clear it automatically. | PC Stale Adjustment. page 18. |
| Vertical bars appear to flicker, jitter or shimmer on the image. | ·Adjust the Phase function and then adjust the Clock function.·Auto Tracking will clear it automatically. | |
| Screen is blank and power indicator light is steady amber or blinks every 0.5 or 1 seconds | ·The monitor is using its power management system.·Move the computer's mouse or press a key on the keyboard. | APPENDIX A : Power Saver, page 33. |
| Image is not stable and may appear to vibrate | ·Auto tracking will clear it automatically·Check that the display resolution and frequency from your PC or video board is an available mode for your monitor. On your computer check : Control Panel, Display, Settings | PC Stable Adjustment, page 18. |
| ·Horizontal frequency·Vertical frequency·Maximum refresh rate | 31KHz - 69KHz56Hz - 85Hz1024 x 768 @85Hz | |
| Image is not centred on the screen. | ·Auto Position will set the best position automatically·Adjust the horizontal and vertical position. | AUTO POSITION, page 17.H-POSITION, page 17.V-POSITION, page 17. |
APPENDIX B: Troubleshooting
| Problem | Suggested Actions Reference | |
| No sound | ·Ensure that the audio cable is firmly connected to both the audio-in jack on your monitor and the audio-out jack on your sound card. | Connecting a PC, TV or VCR, page 13, 19. |
| ·Check the volume level | Adjusting the Sound settings, page 16, 21. | |
| Sound level is too low | ·Check the volume level | |
| ·If the volume is still too low after turning the control to its maximum, check the volume control on the computer sound card or software program. | Refer to your computer, sound card or software documentation. | |
| Sound is too high pitched or too low pitched | ·Adjust the Treble and Bass to appropriate level. | Adjusting the Sound Settings, page 16, 22. |
| TV signal is not received | ·Ensure that the antenna cable is firmly connected to the VHF/UHF jack. | Connecting to watch TV or VCR, page 19. |
| ·Check "Channel Memory" and make sure you choose the correct channel system. (PAL Model) | Channel Memory, page 25, 26. | |
| ·Select "Auto Tuning" to configure the channel system automatically. (PAL Model) | ||
| ·Check AIR/CATV is correctly selected on screen display menu. (NTSC Model) | Selecting Broadcast Source, page 29 |
APPENDIX C: Specification
| FUNCTION | MONITOR | TV (PAL System) TV (NTSC System) | |||
| LCD Panel | Type | 20.1" (48cm) TFT LCD | |||
| Display Area | 408 mm x 306 mm | ||||
| Display Colour | 16,777,216 (8-bit) | ||||
| Pixel Pitch | 0.6375 mm x 0.6375 mm | ||||
| Max. Resolution | VGA 640 x 480 (@75Hz) | ||||
| Interface | TTL | ||||
| Viewing Angle | 120 degrees horizontal / 90 degrees vertical | ||||
| Contrast Ratio | 350 : 1 (typical) | ||||
| Brightness | 400cd/m^2 | ||||
| Physical Rotation | +30 degrees Up, -5 degrees Down | ||||
| Horizontal Frequency | 31.5KHz | ||||
| Vertical Frequency | 60Hz | ||||
| Dimension | 513 (W) mm x 463 (H) mm x 67 (D) mm : Without Speakers | ||||
| Dimension | 654 (W) mm x 463 (H) mm x 67 (D) mm : With Speakers | ||||
| Input / Output | Video input PC Analog RGB | A/V, S-Video, SCART Component (Y, Cb, Cr) | A/V, S-Video Component (Y, Cb, Cr) | ||
| Audio Input | PC Audio PC Audio, A/V, S-Video, SCART | PC Audio, A/V, S-Video | |||
| Audio Output | Monitor Out | ||||
| TV Signal | Area | None USA | EU Australia | ||
| Antenna Input | None 75 Coaxial Cable | ||||
| Tuning System | None Programmable Frequency Synthesizer | ||||
| Colour System | None | PAL/SECAM, NTSC | NTSC | ||
| Sound System | None B/G, D/K, I BTSG | ||||
| Tuning Range | VHF Low | None | E2Ch(48.25MHz)~S10Ch(168.25MHz) | 2Ch(55.25MHz)~ECh(145.25MHz) | |
| VHF High None | E5Ch(175.25MHz)~S41Ch(463.25MHz) | FCh(151.25MHz)~W+25Ch(445.25MHz) | |||
| UHF None | E21Ch(471.25MHz)~E69Ch(885.25MHz) | W+26Ch(451.25MHz)~78Ch(855.25MHz) | |||
| Teletext None Teletext Caption, V-CHIP | |||||
| Regulation | Safety | UL, CSA, FCC, CE, CCIB, EIAJ | |||
| EMI | CE, C-Tick | ||||
| Other | Power Output | Stand-by: 3Watt / Operation: 53Watt | |||
| Speaker | 3W x 2EA | ||||
| Plug & Play Level | DDC 1/2B | ||||
| Weight | NET 12.8 Kg/ Gross 15.6 Kg | ||||
| Power Supply | DC 15V, 5.3A, 50/60Hz | ||||
Specification can be changed without prior notice.
APPENDIX D: Display Modes
If the signal from the system equals to the standard signal mode, the screen is adjusted automatically. If the signal from the system doesn't equal to the standard signal mode, adjust the mode with referring to the Video card user guide because the screen might not display or only the power LED might be on. For the display modes listed below, the screen image has been optimised during manufacturing.
| Mode | Resolution | Horizontal Frequency (KHz) | Vertical Frequency (Hz) | Pixel Clock Frequency (MHz) | Sync Polarity (H/V) |
| VGA | 720 x 400 | 31.469 | 70.087 | 28.322 | -/+ |
| 640 x 480 | 31.469 | 59.940 | 25.175 | -/- | |
| 640 x 480 | 37.500 | 75.000 | 31.500 | -/- | |
| 640 x 480 | 43.269 | 85.008 | 36.000 | -/- | |
| SVGA | 800 x 600 | 46.875 | 75.000 | 49.500 | +/+ |
| 800 x 600 | 53.674 | 85.061 | 56.250 | +/+ | |
| XGA | 1024 x 768 | 48.363 | 60.004 | 65.000 | -/- |
| 1024 x 768 | 60.023 | 75.029 | 78.750 | +/+ | |
| 1024 x 768 | 68.677 | 84.997 | 94.500 | +/+ |
PALSONIC CORPORATION PTY LTD
1 JOYNTON AVENUE
WATERLOO NSW 2017 AUSTRALIA
TEL: (02) 9313 7111
FAX: (02) 9313 7555
www.palsonic.com.au
PALSONIC CUSTOMER SERVICE
TELEPHONE
AUSTRALIA: 1300 657 888

- 20.1" TFT LCD Monitor TV
- Contents
- Parts Description
- Viewing a PC screen
- Connecting to watch TV or VCR
- Viewing a TV/VCR screen
- Channel Memory (PAL System)
- Teletext
- Other Functions
- Appendix
- Congratulations on your purchase of this Palsonic Product.
- Safety Instructions
- CAUTION
- General safety precautions
- SPEAKER
- POWER
- MENU
- SELECT
- Volume UP, Volume DOWN
- CH UP, CH DOWN
- Rear Panel
- Remote Control Unit
- Inserting the Batteries in the Remote Controller
- Menu Tree
- Connecting a PC
- Initial set PC mode
- When the picture is unstable
- Adjusting the Picture Settings
- - CONTRAST, BRIGHTNESS, COLOUR TEMPERATURE
- Adjusting the Sound Settings
- Adjusting the Geometry Settings
- PC Stable Adjustment
- Connecting the Aerial or Cable Television Network
- Connecting the VCR, DVD or Other External Devices
- Adjusting the Picture Settings 1
- Adjusting the Picture Settings 2
- CUSTOM
- STANDARD
- STRONG
- MOVIE
- SOFT
- Adjusting the Sound Settings 1
- Adjusting the Sound Settings 2
- MUSIC
- SPEECH
- Storing the Channels Automatically
- Storing the Channel Manually
- Fine Tuning Channel Reception
- Skipping Unwanted Channels
- Teletext Decoder
- Displaying Teletext Information
- SLEEP
- NOTE:
- RECALL
- SURROUND
- APPENDIX A: Power Saver
- APPENDIX B: Troubleshooting
- APPENDIX D: Display Modes
Brand : Palsonic
Model : TFTV201
Category : Television