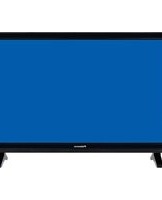
TFTV765 - Television Palsonic - Free user manual and instructions
Find the device manual for free TFTV765 Palsonic in PDF.


| Product Type | LCD TV |
| Brand | Palsonic |
| Model | TFTV765 |
| Screen Size | 76 cm (30 inches) |
| Dimensions (W x H x D) | 932 x 553 x 245 mm |
| Weight | 16.3 kg |
| Power Supply | AC 110-240V, 50/60 Hz (via AC adaptor) |
| Power Consumption | 160 W |
| TV System | PAL-B/G |
| Color System | PAL BG, NTSC Playback |
| Sound Output | 5 W x 2 |
| Maximum PC Resolution | 1280 x 768 @ 60 Hz |
| Input Terminals | Antenna, AV (Composite), S-Video, YCbCr, YPbPr, VGA (PC) |
| Remote Control | Yes, with 2 x AAA batteries |
| Accessories Included | Remote controller, AC power adaptor |
| Elevation Adjustment Range | -5° to +10° |
| Cleaning Instructions | Unplug before cleaning; use a damp cloth only |
| Safety Features | Overload protection, ventilation requirements, anti-tip stability |
| Repairability | Use only manufacturer-specified replacement parts |
Frequently Asked Questions - TFTV765 Palsonic
User questions about TFTV765 Palsonic
0 question about this device. Answer the ones you know or ask your own.
Ask a new question about this device
Download the instructions for your Television in PDF format for free! Find your manual TFTV765 - Palsonic and take your electronic device back in hand. On this page are published all the documents necessary for the use of your device. TFTV765 by Palsonic.
USER MANUAL TFTV765 Palsonic
WATERLOO NSW 2017 AUSTRALIA
TEL: (02) 9313 7111
FAX: (02) 9313 7555
www.palsonic.com.au
PALSONIC CUSTOMER SERVICE
TELEPHONE
AUSTRALIA: 1300 657 888
Congratulations on your purchase of this Palsonic LCD TV.
We recommend that your thoroughly read this manual before use to fully enjoy the many functions and excellent effects of this LCD TV.
Retain this manual in an easily accessible location for future reference.
Note: Screen displays and illustrations in this manual may differ from the actual ones for better visibility.
Contents 1
Important Safety Cautions 2
Identification of controls 4
Front 4
Back 5
Remote control 6
Battery installation 7
Effective remote range 7
Installation 8
Antenna installation/ Adaptor connection .... 8
Connecting video/audio equipment 9
Connecting DVD player and speaker 10
Connecting YPbPr terminals ..... 11
Connecting VGA interface 12
Elevation adjustment 13
Menu introduction 14
Turning On/Off 16
Turning On 16
Turning Off 16
Selecting input signal 16
Channel Preset 17
To enter into CHANNEL SETTING menu 17
Auto Search 17
Manual Search 17
Fine tuning 17
Channel Skipping 18
Channel edit 18
Channel Select 19
Picture Adjustment 20
Sound 21
System Setting 22
To enter into SETUP menu ...... 22
Colour system 22
Sound System 22
Setting OSD Language 22
Setting OSD position 23
Setting OSD Background 23
Seeting ZOOM Mode 23
Timer 24
Use SLP button 24
Use CLK button 24
Adjustment in YPbPr mode ..... 25
To enter into YPbPr mode ..... 25
Adjusting picture 25
Adjusting horizontal/vertical position 25
Adjustment in PC mode 26
To enter into PC mode 26
PC signal format 26
Use AUTO ADJ. button ... 26
Adjusting bright and contrast ..... 27
Adjusting phase and frequency .. 27
Adjusting Colour temperature ..... 27
Trouble Shooting 28
Specifications 29
Important Safety Cautions
When any unusual situation occurs, turn off the power supply at once and remove the plug from the wall outlet. Contact a qualified service department in your local area.


Water and moisture - Do not use this product near water - for example, near a bathtub, washbowl, kitchen sink, or laundry tub, in a wet basement, or near a swimming pool, and the like. Do not use immediately after moving from a low temperature to high temperature environment, as this causes condensation, which may result in fire, electric shock, or other hazards.

natural_image
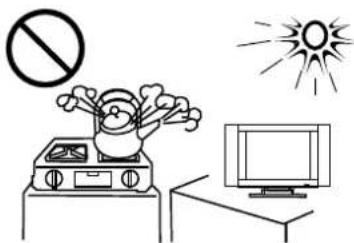
Simple line drawing of a no-smoking sign, a hand holding a car, and a computer monitor (no text or symbols)Heat sources - Keep the product away from heat sources such as radiators heaters, stoves other heat generating products (including amplifiers). requirement of environment temperature; -20°C\~50°C for storage; 0°C\~40°C for working.
The vents and other openings in the cabinet are designed for ventilation. Do not cover or block these vents and openings since insufficient ventilation can cause overheating and/or shorten the life of the product.
Do not place the product on a bed, sofa, rug or other similar surface, since they can block ventilation openings.
This product is not designed for built-in installation; do not place the product in an enclosed place such as a bookcase or rack, unless proper ventilation is provided or the manufacturer's instructions are followed.

Unplug this product from the wall outlet before cleaning. Do not use liquid cleaners or aerosol cleaners. Use a damp cloth for cleaning.

Do not place the product on an unstable trolley, stand, tripod or table. Placing the product on an unstable base can cause the product to fall, resulting in serious personal injuries as well as damage to the product. Use only a trolley, stand, tripod, and bracket or table recommended by the manufacturer or sold with the product.

natural_image
Simple line drawing of a chair, monitor, and prohibition symbol (no text or labels)This TV set can be operated on a power of \~240V 50Hz. You must not use a power supply of any other type.
When relocating the product placed on a trolley, it must be moved with the utmost care. Sudden stops, excessive force and uneven floor surfaces can cause the product to fall from the trolley.
The power cords must be routed properly to prevent people from stepping on them or objects from resting on them. Check the cords at the plugs and product. Power supply cords should be routed so that they are not likely to be walked on or snagged by items placed upon or against them. Pay particular attention to cords at doors, plugs, receptacles, and the point where they exit from the product. If the power cord or the plug is damaged contact a qualified service department for service.
Do not overload wall outlets, extension cords, or convenience receptacles on other equipment as this can result in a risk of fire or electric shock.
High Voltage exists in this TV set. Do not remove the cover. In case the product needs replacement parts, make sure that the service person uses replacement parts specified by the manufacturer, or those with the same characteristics and performance as the original parts. Use of unauthorised parts can result in fire, electric shock and/or other danger.
The LCD panel used in this product is made of glass. Therefore, it can break when the product is dropped or impacted upon by other objects. Be careful not to be injured by broken glass pieces in case the LCD panel breaks.
Don't try to push anything into the cabinet or place any vessel with water on the TV set.
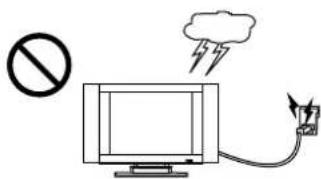
For added protection for this television equipment during a lightning storm, or when it is left unattended and unused for long periods of time, unplug it from the wall outlet and disconnect the antenna. This will prevent damage to the equipment due to lightning and power-line surges.

natural_image
Silhouette of a person holding a diagonal line next to a computer monitor, enclosed in a circle with no text or symbols.
natural_image
Illustration of a hand holding a telephone and a plug with a lightning bolt, symbolizing electrical hazard (no text or symbols present)
natural_image
Simple line drawing of a cable being connected to a computer monitor, with no text or symbols present.
natural_image
Cartoon illustration of a man sitting at a desk watching television (no text or symbols present)
natural_image
Illustration of a megaphone emitting exhaust smoke from a TV, with no text or symbols present.
Identification of controls
Front

Back

Identification of controls (continued)
Remote Control

Please install the batteries before using the remote control unit.
1

Open the battery cover.
2

Install two "AAA" batteries matching the +/- polarities of the battery to the +/- marks.
3
Replace the battery cover.

Notes:
- When the remote control will not be used for a long period of time or when the batteries are worn out, remove the batteries.
- Do not throw the batteries into a fire. Dispose of used batteries in the specified manner.
- Do not drop, dampen or disassemble the remote control.
Effective remote rangeBattery installation


Notes:
• There should be no obstacle between the TV and the transmitter.
- Use the remote control within the effective range as the above figure.
- If the remote control does not work, please check whether the batteries are exhausted or the polarity is wrong.
- When direct sunlight, and incandescent lamp, fluorescent lamp or any other strong light shines on the REMOTE SENSOR of the TV the remote operation may be unstable.
Installation
Antenna installation/Adaptor connection
Before using this equipment, please connect the AC power adaptor correctly.
Optimum reception of colour requires a good signal and will generally mean that an outdoor aerial must be used. The exact type and position of the aerial will depend upon your particular area.

Notes:
Turn off the power firstly when you connect a outdoor antenna to the Antenna input terminal.
When installing an outside antenna system, extreme care should be taken to keep from touching power lines or circuits as contact with them might be fatal.
In thunder and lighting weather, please disconnect the outdoor antenna to avoid thunder/lighting strike.
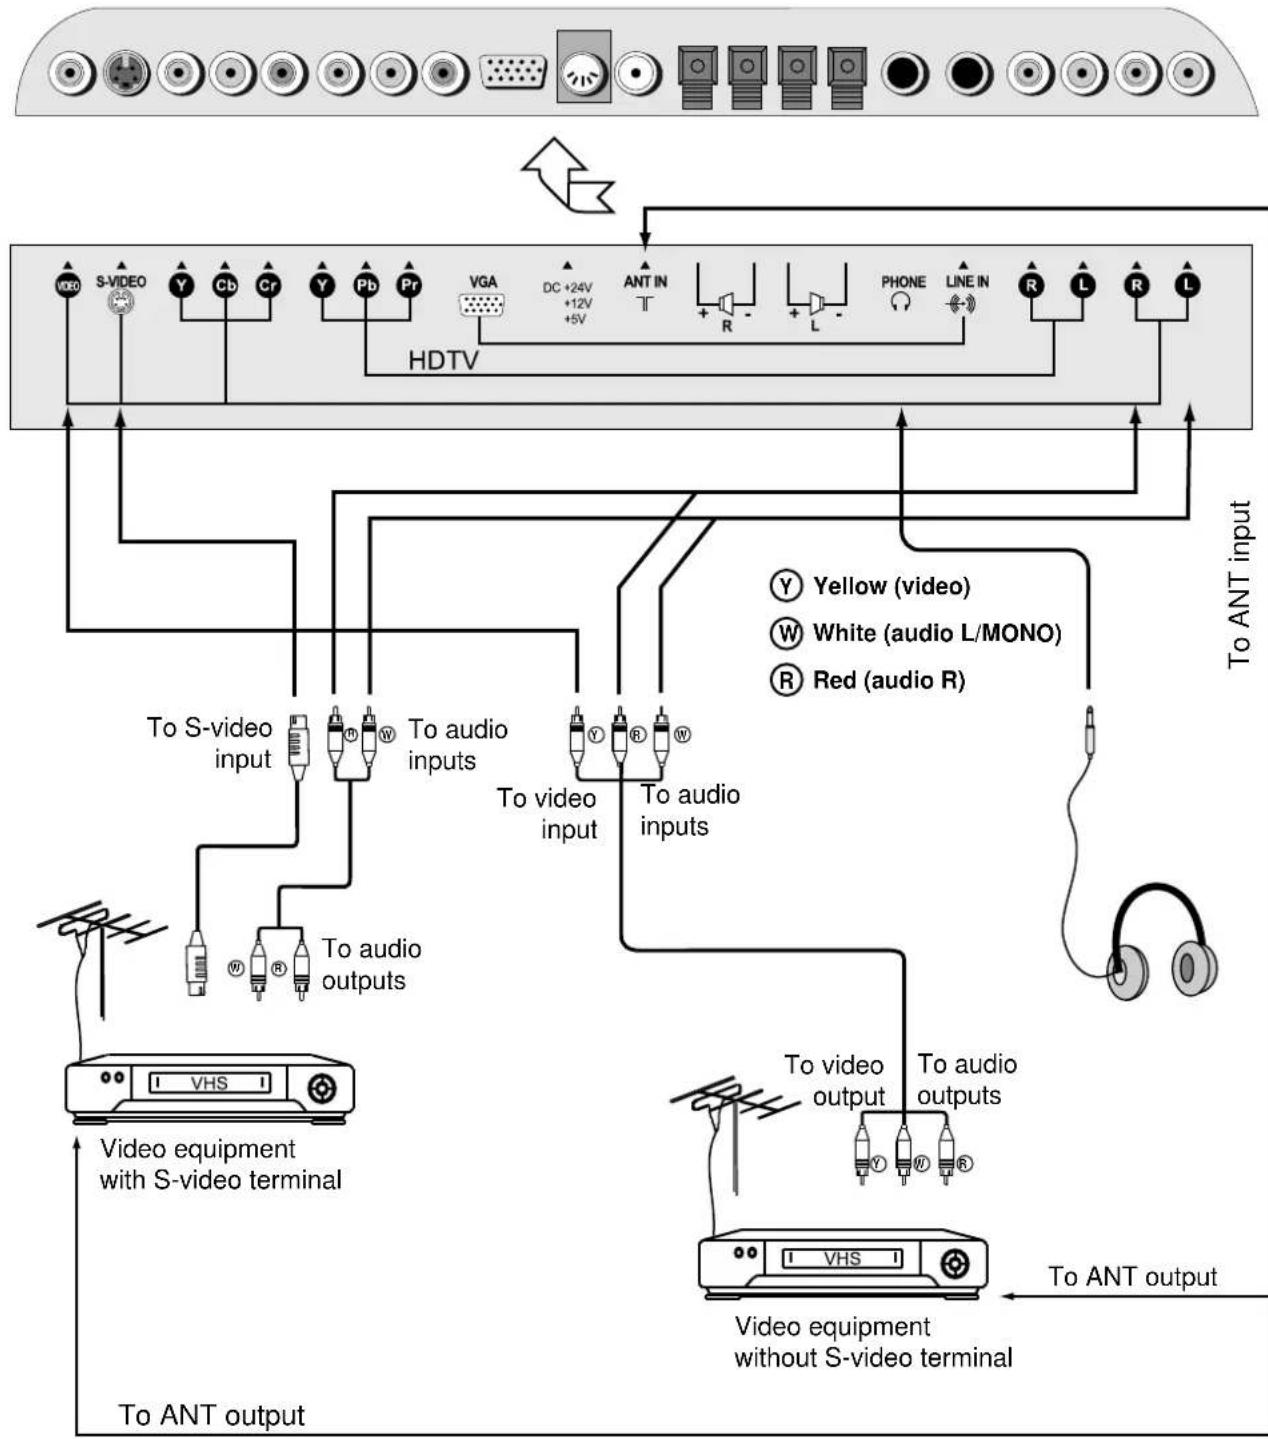
Connecting video/audio equipment
flowchart
graph TD
    A["To ANT output"] --> B["Video equipment with S-video terminal"]
    B --> C["To S-video input"]
    C --> D["To audio outputs"]
    D --> E["To video input"]
    E --> F["To audio inputs"]
    F --> G["To video output"]
    G --> H["Video equipment without S-video terminal"]
    H --> I["To ANT output"]
    J["HDTV"] --> K["VGA"]
    K --> L["DC +24V +12V +5V"]
    L --> M["ANT IN T"]
    M --> N["R"]
    N --> O["L"]
    O --> P["PHONE LINE IN R"]
    P --> Q["L"]
    Q --> R["R"]
    R --> S["L"]
    S --> T["To ANT input"]
    U["Y: Yellow (video)"]
    V["W: White (audio L/MONO)"]
    W["R: Red (audio R)"] --> X["To video input"]
    Y["VHS"] --> Z["Video equipment with S-video terminal"]
Connecting DVD Player and speakers

flowchart
graph TD
    A["Top Panel"] --> B["HDTV"]
    B --> C["To YCbCr inputs"]
    B --> D["To audio inputs"]
    B --> E["To audio outputs"]
    B --> F["DVD Player"]
    C --> G["White (audio L/MONO)"]
    C --> H["Red (audio R, Cr)"]
    C --> I["Green (Y)"]
    C --> J["Blue (Cb)"]
    D --> K["To speaker"]
    E --> L["To speaker"]
    F --> M["To speaker"]
    style A fill:#f9f,stroke:#333
    style B fill:#ccf,stroke:#333
    style C fill:#cfc,stroke:#333
    style D fill:#fcc,stroke:#333
    style E fill:#cff,stroke:#333
    style F fill:#ffc,stroke:#333
    style G fill:#fff,stroke:#333
    style H fill:#fff,stroke:#333
    style I fill:#fff,stroke:#333
    style J fill:#fff,stroke:#333
    style K fill:#fff,stroke:#333
    style L fill:#fff,stroke:#333
    style M fill:#fff,stroke:#333
    style N fill:#fff,stroke:#333
Connecting YPbPr terminals

natural_image
Diagram of a computer monitor panel with various function buttons and indicators (no text or labels)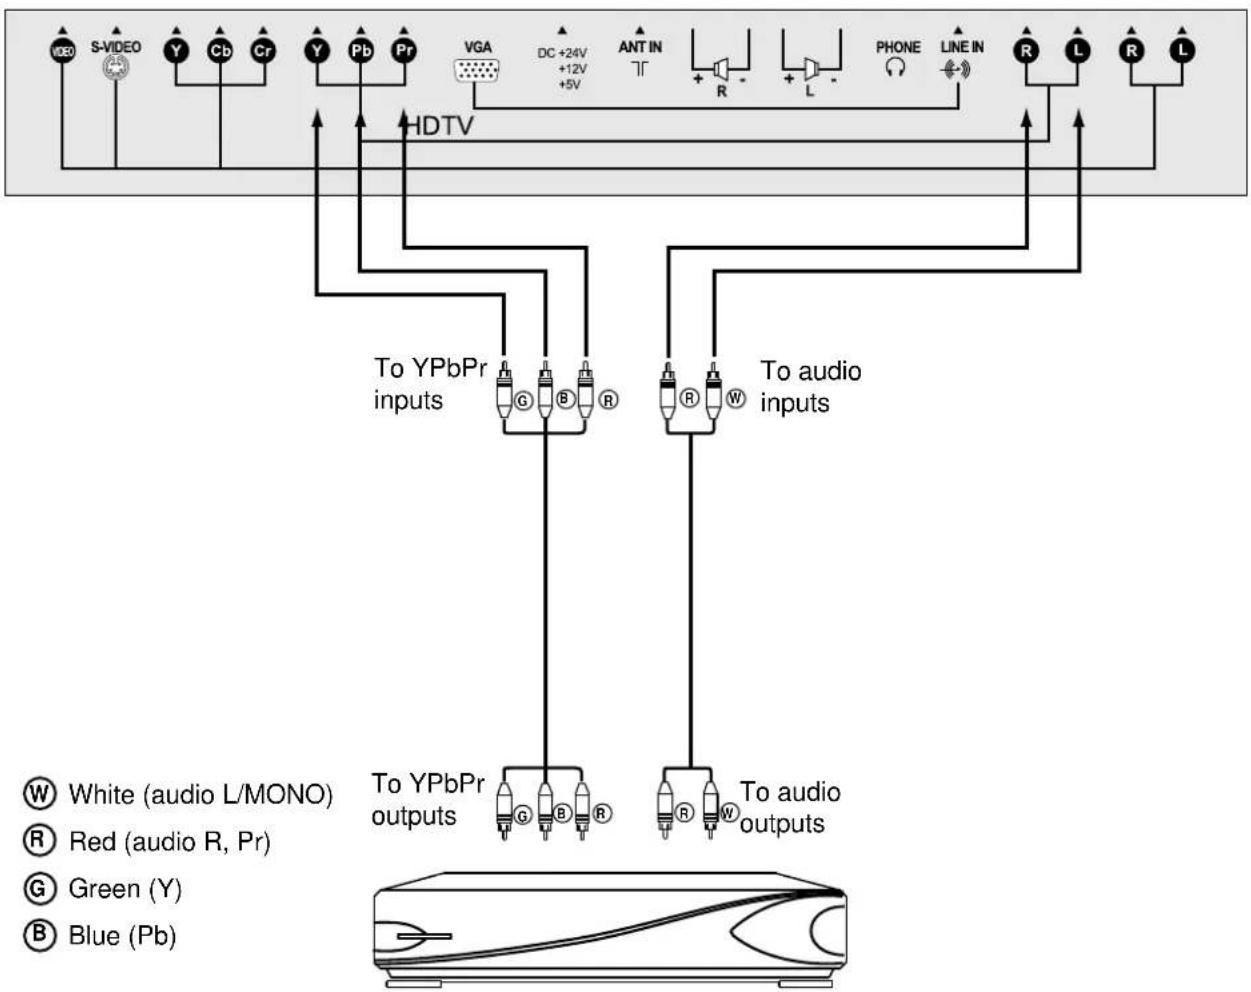
flowchart
graph TD
    A["Video"] --> B["S-VIDEO"]
    B --> C["Y"]
    C --> D["Cb"]
    D --> E["Cr"]
    E --> F["Y"]
    F --> G["Pb"]
    G --> H["Pr"]
    H --> I["VGA"]
    I --> J["DC +24V +12V +5V"]
    J --> K["ANT IN T"]
    K --> L["R"]
    L --> M["L"]
    M --> N["PHONE"]
    N --> O["LINE IN"]
    O --> P["R"]
    P --> Q["L"]
    Q --> R["R"]
    R --> S["L"]
    S --> T["HDTV"]
    T --> U["To YPbPr inputs"]
    U --> V["G"]
    U --> W["B"]
    U --> X["R"]
    U --> Y["W"]
    Y --> Z["To audio inputs"]
    Z --> AA["To YPbPr outputs"]
    AA --> AB["G"]
    AA --> AC["B"]
    AA --> AD["R"]
    AA --> AE["W"]
    AE --> AF["To audio outputs"]
    style A fill:#f9f,stroke:#333
    style B fill:#f9f,stroke:#333
    style C fill:#f9f,stroke:#333
    style D fill:#f9f,stroke:#333
    style E fill:#f9f,stroke:#333
    style F fill:#f9f,stroke:#333
    style G fill:#f9f,stroke:#333
    style H fill:#f9f,stroke:#333
    style I fill:#ccf,stroke:#333
    style J fill:#ccf,stroke:#333
    style K fill:#ccf,stroke:#333
    style L fill:#ccf,stroke:#333
    style M fill:#ccf,stroke:#333
    style N fill:#ccf,stroke:#333
    style O fill:#ccf,stroke:#333
    style P fill:#ccf,stroke:#333
    style Q fill:#ccf,stroke:#333
    style R fill:#ccf,stroke:#333
    style S fill:#ccf,stroke:#333
    style T fill:#ccf,stroke:#333
    style U fill:#ccf,stroke:#333
    style V fill:#ccf,stroke:#333
    style W fill:#ccf,stroke:#333
    style X fill:#ccf,stroke:#333
    style Y fill:#ccf,stroke:#333
    style Z fill:#ccf,stroke:#333
    style AA fill:#ccf,stroke:#333
    style AB fill:#ccf,stroke:#333
    style AC fill:#ccf,stroke:#333
    style AD fill:#ccf,stroke:#333

natural_image
Simple line drawing of a rectangular object with curved internal lines and a small protrusion at the top (no text or symbols)SET TOP BOX (Or other equipment with YPbPr output terminals)
Connecting VGA interface

natural_image
Diagram of a computer monitor with various function buttons and an arrow pointing to one (no text or labels present)
flowchart
graph LR
    A["VIDEO"] --> B["S-VIDEO"]
    B --> C["Y"]
    C --> D["Cb"]
    D --> E["Cr"]
    E --> F["Y"]
    F --> G["Pb"]
    G --> H["Pr"]
    H --> I["VGA"]
    I --> J["DC +24V +12V +5V"]
    J --> K["ANTIN"]
    K --> L["+R"]
    L --> M["L"]
    M --> N["PHONE"]
    N --> O["LINE IN"]
    O --> P["R"]
    P --> Q["L"]
    Q --> R["R"]
    R --> S["L"]

Elevation adjustment
You can adjust the angle of the LCD TV/Monitor as follows.
The elevation can be adjusted from -5^0 to +10^0 .

Menu Introduction
There are four pages of MENU in TV, PC and YPbPr mode. In MENU operations, the CH ▲/▼ buttons are used to select item upwards or downwards; the VOL+/- buttons are used to adjust or confirm selected item.
Press MENU button in TV mode

Press MENU button

Press MENU button

Press MENU button
Press MENU button in PC mode

To adjust picture's brightness and contrast in PC mode. (not affect picture in TV or AV mode)
If the best picture can not be obtained after many times of auto correction, you can adjust these two items to obtain the best picture.
Only when the "Color temp" is set to "User", these three items are adjustable.
To adjust colour temperature between 9300K, 7300K, 6500K, and User.

Press MENU button

When the VGA input signal is nonstandard, adjust these two items until proper picture position is obtained.
To reset to factory settings.

Press MENU button
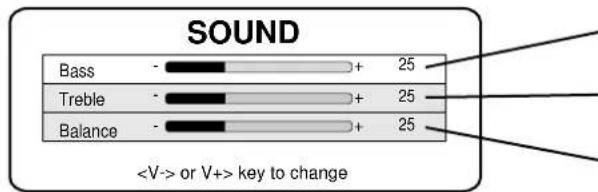
To adjust the Bass.
To adjust the Treble.
To adjust the Balance.

Press MENU button

flowchart
graph TD
    A["SETUP"] --> B["Language"]
    A --> C["OSD position"]
    A --> D["OSD background"]
    B --> E["Eng"]
    C --> F["Upper Left"]
    D --> G["Opaque"]
    style A fill:#f9f,stroke:#333
    note right of A: <V-> or V+> key to change
To select OSD menu language.
To select OSD menu position.
To set OSD background.
Turning On/Off

natural_image
Simple line drawing of a vintage television set with a monitor and antenna icon (no text or symbols)
Turning On
- Insert the output plug of the AC power adaptor into the DC power input of the unit.
- Press the power switch on AC power adaptor and the red indicator lights up, the TV/Monitor is in STANDBY mode.
- Press the POWER button on the unit's control panel or the button ⏻ on the remote control to turn on.
Turning Off
- If you want to turn off the power completely, press the power switch on the AC adaptor.
- If you want to turn off temporarily, press the POWER button on the unit's control panel or the ⏻ button on the remote control, the set goes to STANDBY and the indicator turns to red.
Notes:
This TV set can automatically turn off by:
- When there is no TV signal input for about 15 minutes;
- Sleep timer;
- Off timer.
Selecting input signal
- Press the AV button on the remote control or SOURCE button on the set's panel to select input mode. You can select TV, AV, S-Video, YCbCr, YPbPr or PC.
- If you want to go to TV mode, press AV button repeatedly to select TV mode.
- Press DSP button, the screen display current mode. Press ENTER to cancel OSD.
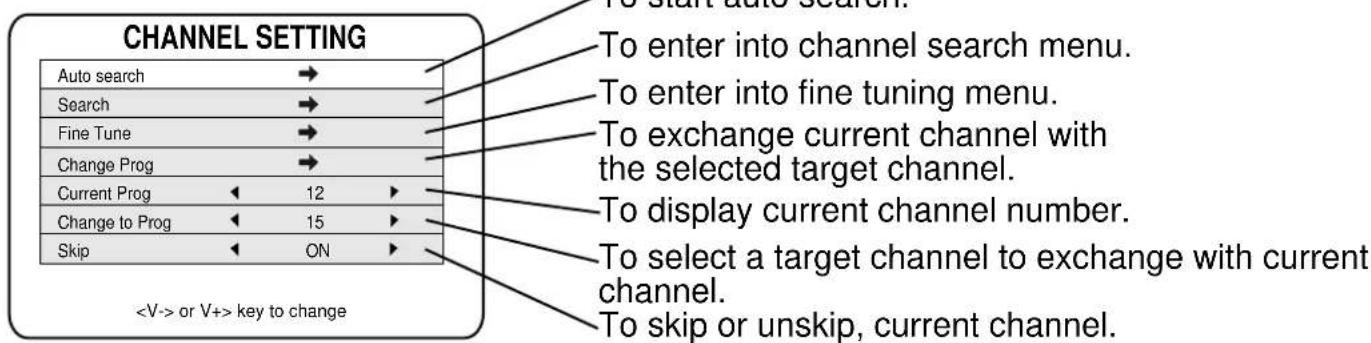
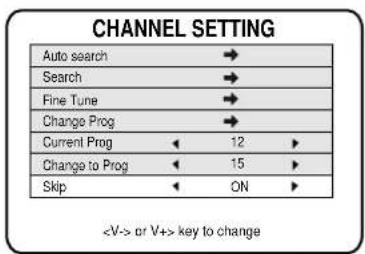
CHANNEL SETTING
| Auto search | → | |
| Search | → | |
| Fine Tune | → | |
| Change Prog | → | |
| Current Prog | ← 12 | ▶ |
| Change to Prog | ← 15 | ▶ |
| Skip | ← ON | ▶ |

To enter into CHANNEL SETTING menu
- Press MENU button repeatedly to display CHANNEL SETTING menu.
- Press CH ▲ or CH ▼ button to select item.
- Press VOL+ or VOL- button to confirm or adjust selected item.
Auto Search
Please enter into CHANNEL SETTING menu and select Auto Search item.
Press VOL- or VOL+ button to start Auto Search and all active programs will be memorised.
During the process of Auto Search, pressing MENU button will stop Auto Search.

Notes:
Please confirm the sound system is correct according to your area before Auto Searching.
Manual Search
Use manual search function if desired channels cannot be preset or if you would like to preset channels to specific position numbers one by one.
Use 0\~9 digit buttons or CH▲/▼buttons to select a position number firstly, then enter into CHANNEL SETTING menu and select Search
item. Press VOL+ button to enter Channel Search sub-menu, then press VOL+ or VOL- to start manual search.
Press MENU button can exit Channel Search sub-menu.
Channel searching.. VHFL 10
Press
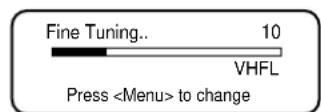
Fine Tuning
In area of inferior broadcast conditions where adjustment is necessary for a better picture and sound, use Fine tuning.
Use 0\~9 digit buttons or CH ▲/▼ buttons to select the desired channel, then enter into
CHANNEL SETTING menu and select Fine tune item. Press VOL+ button to enter into Fine tuning sub-menu, then press and hold VOL+ or VOL- to start Fine tuning.
Channel Preset (continued)
Channel Skipping
You can skip unnecessary channels by using Skip function when you browse program by CH ▲/▼ buttons.
Use 0\~9 digit buttons or CH ▲/▼ buttons to select a unwanted channel firstly, then enter into CHANNEL SETTING menu and select Skip item. Press VOL+/- button to select ON to skip this channel. Now this channel will be skipped when you browse channels with CH ▲/▼ button.
To restore the skipped channel, please select the skipped channel with 0\~9 digit buttons and then enter the CHANNEL SETTING menu, select Skip item and press VOL+/- to set Skip to OFF.
Channel Edit
After Auto Channel Preset, this function is for you to edit the order of programs conveniently according to your favourite.
Please enter into CHANNEL SETTING menu and select Change to Prog item by CH▲/▼ buttons, press VOL+/- button to select a target channel to exchange with current channel. Then select Change Prog item and press VOL+/- to confirm. Now the program in current channel number exchanges with the program in the target channel number.


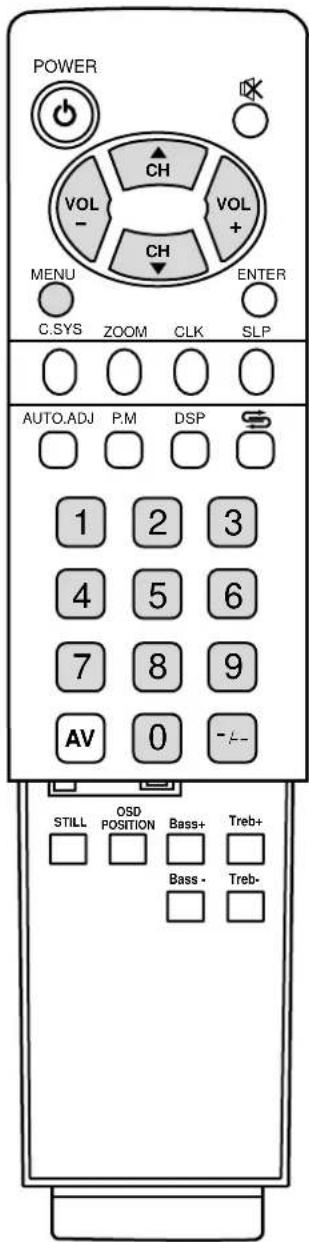
Use 0\~9 digit buttons and -/-- button
◆ Use 0\~9 digit buttons to select one-digit channel number.

◆ To select two-digit channel:

flowchart
graph LR
    A["Press -/-- button repeatedly to display "--"."] --> B["Press 1-9 buttons."]
    B --> C["-1"]
    C --> D["Press 0-9 buttons."]
    D --> E["18"]
◆ To select three-digit channel:

flowchart
graph LR
    A["Press -/-- button repeatedly to display "--"."] --> B["---"]
    B --> C["Press 1-9 buttons."]
    C --> D["--1"]
    D --> E["Press 0-9 buttons."]
    E --> F["Press 0-9 buttons."]
    F --> G["180"]
Using CH ▲/▼ button
Press CH ▲ button, the channel number increases; Press CH ▼ button, the channel number decreases.
Use previous channel button
Press this button to switch between the current channel and previous channel.
Picture Adjustment

Adjusting picture
- Press MENU button to display PICTURE SETTING menu.
- Press CH ▲/▼ button to select item.
- Press VOL+/- button to adjust the selected item.

| Item | VOL- | VOL+ |
| Bright | darker | lighter |
| Contrast | weaker | stronger |
| Saturation | paler | deeper |
| Sharpness | softer | sharper |
| Tint* | purplish | greenish |
* Note: The item Tint is for NTSC only.
The adjusted settings are stored in the User mode.
There are three preset picture modes and one User-set picture mode. Press the P.M button to select a picture mode according to your favourites.
- Press P.M button to select picture mode.
You can quickly select picture mode by P.M button. There are four picture mode: Bright, Standard, Mild and User mode.
Using STILL button
You can still current screen picture by pressing STILL button on the remote. Press this button again to resume.
Using AUTO.ADJ button
When wrong picture identification occurs, you can use AUTO.ADJ button on the remote to obtain a correct picture.

Adjusting Sound
- Press MENU button repeatedly to display SOUND menu.
- Press CH ▲/▼ button to select item.
- Press VOL+/- button to adjust the selected item.
| Item | VOL- | VOL+ |
| Bass | weaker | stronger |
| Treble | weaker | stronger |
| Balance | decreases the right channel | decreases the left channel |
Notes:
You can quickly adjust Bass and Treble by using Bass+/Bass- and Treb+/Treb- buttons on the remote.
Adjusting Volume
You can use VOL+ or VOL- button to adjust volume.
Press VOL+ button, the volume increase;
Press VOL- button, the volume decrease.
Muting the Sound
If you want to mute the sound, press ✕ button on the remote. To resume the sound, press this button again or you can also press VOL+ or VOL- to resume the sound.
Setting Sound mode
This unit can receive both stereo and bilingual broadcasts Transmitted in either NICAM or A2 broadcast system.
| Color sys | AUTO | |
| Sound sys | BG | |
| Sound mode | AUTO |
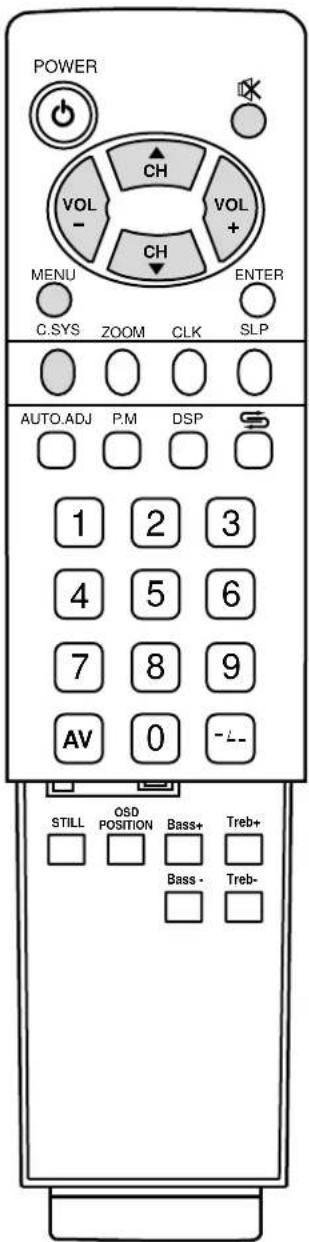
Press C.SYS button on the remote to call up the menu as shown on the above, press CH▲/▼ to select Sound mode item, then making use of VOL+/- to select a desired sound mode. See the following chart for a possible choice.
* When receiving broadcasts transmitted in NICAM system:
* When receiving broadcasts transmitted in A2 system:
| Broadcast mode | Choice |
| FM MONO MONO | |
| FM STEREO FORCE MONO | ←FM STEREO* (default) |
| FM BILINGUAL FM A (default) | RM-B |
| Broadcast mode | Choice |
| FM/AM MONO | MONO |
| FM/AM MONO & NICAM MONO | FORCE MONO ↔ NICAM MONO*(default) |
| FM/AM MONO & NICAM STEREO | FORCE MONO ↔ NICAM STEREO*(default) |
| FM/AM MONO & NICAM BILINGUAL | FORCE MONO ↔NICAM A*(default) ↔NICAM B |
Note: "Default" means the choice is a default one. If you do not select other choice, the TV will be in default sound mode. Please according to your local area's broadcasting condition, select your desired sound mode. Sound mode function is an optional function. It is only available in certain version.
System setting

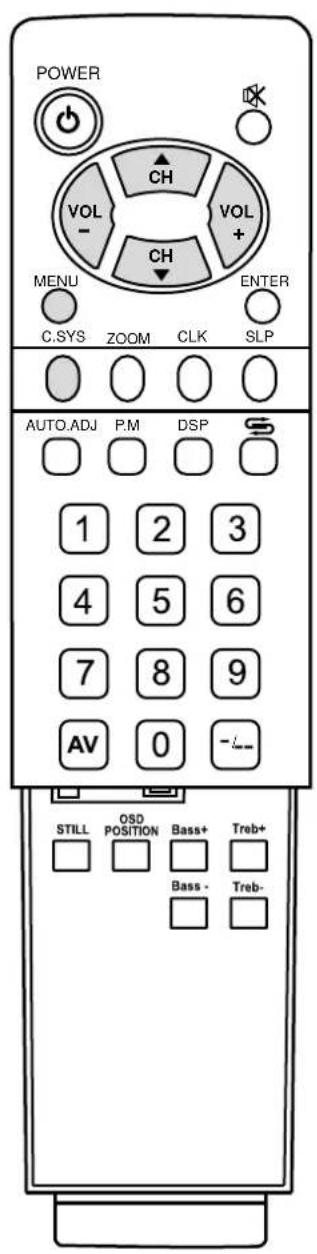
To enter into SETUP menu
- Press MENU button repeatedly to display SETUP menu.
- Press CH ▲/▼ button to select item.
- Press VOL+ or VOL- button to adjust the selected item.
Colour system
From the SETUP menu, press CH ▲/▼ to select Colour sys item. Press VOL- or VOL+ button to select a proper colour system according to your area or you can select AUTO.
Sound system
From the SETUP menu, press CH ▲/▼ to select Sound sys item. Press VOL- or VOL+ button to select a correct sound system.
Notes:
- You can quickly access colour and sound system by using C.SYS button on the remote.
- In some model, the Colour system and Sound system have been preset and cannot be adjusted.
Setting OSD Language
From the SETUP menu, press CH ▲/▼ to select Language item. Press VOL- or VOL+ button to select OSD language.


Setting OSD position
From the SETUP menu, press CH ▲/▼ to select OSD position item. Press VOL- or VOL+ button to select an OSD position in your preference.
Notes:
You can quickly select OSD position by using OSD position button on the remote.
Setting OSD Background
From the SETUP menu, press CH ▲/▼ to select OSD Background item. Press VOL- or VOL+ button to select Opaque or Translucent.

Setting ZOOM mode
This unit allows you to adjust screen aspect ratio in your preference. You can quickly select screen ratio by using ZOOM button on the remote. Press ZOOM button to select a proper screen aspect ratio between Anamorphic, 4:3 and Panorama in TV, AV, S-Video and YCbCr mode. Press ZOOM button to select a proper screen aspect ratio between Fill all and Normal in PC and YPbPr mode.
Timer
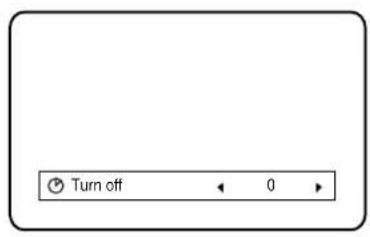
Use SLP button
Press SLP button repeatedly to set sleep time between: 0, 10, 20, 30, 60, 90, 120, 180, 240 minutes. If you select 0 minute, it means the sleep timer function is turned off.
Use CLK button
Press CLK button, the Time menu appears. Use CH▲/▼ to select hour or minute (the selected item is displayed in white), use VOL+/- to set the time.

Press CLK button twice, the Turn off menu appears. Use VOL+/- to set the OFF time.

Press CLK button three times to close the menu.

Adjustments in YPbPr mode
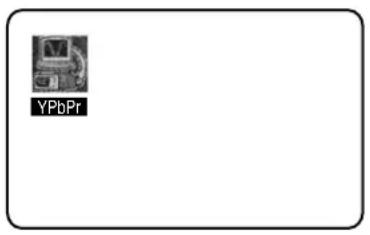
To enter into YPbPr mode
Repeatedly press AV button on the remote control or SOURCE button on the set's panel until the screen display YPbPr, which indicates that the set is in YPbPr mode. Connect the YPbPr terminals to Set Top Box and make sure there is a signal input.
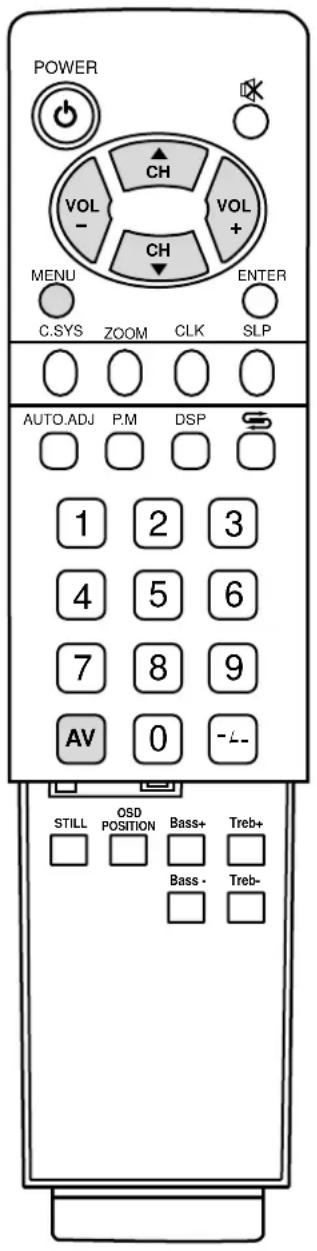
Adjusting picture
In YPbPr mode when there is correct input signal, press MENU button and PICTURE SETTING menu appears, Use CH ▲/▼ to select item and VOL+/- to adjust.
| Item | VOL- | VOL+ |
| Bright | darker | lighter |
| Contrast | weaker | stronger |
| Saturation | paler | deeper |
| Sharpness | softer | sharper |
PICTURE SETTING

Adjusting Colour temperature
You can select different Colour temperature to obtain correct white. Press MENU button, use CH▲/▼ to select Color Temp item, press the VOL+/- to select between User, 9300K, 7300K, 6500K.
The USER_R, USER_G and USER_B can not accessed and adjusted unless you set Color Temp to "User".
PICTURE SETTING

Adjusting horizontal/vertical position
Press MENU button twice and the PICTURE POSITION menu appears. Use CH▲/▼ to select item and VOL+/- to adjust.
When a nonstandard signal input to the set and the picture may not be in the screen centre. Now you can adjust its horizontal and vertical position to display correctly.
PICTURE POSITION

Adjustments in PC mode


To enter into PC mode
Repeatedly press AV button on the remote control or SOURCE button on the set's panel until the screen display PC, which indicates that the set is in PC mode.
PC signal format
Please connect VGA input and be sure that there is VGA input signal. The signal format should be one of the follows:
640 x 480 @60Hz
800 x 600 @60Hz
1024 x 768 @60Hz
1280 x 768 @60Hz
We recommend you to use 1024 x 768 @60Hz (4:3) or 1280 x 768 @ 60 Hz (16:9) so that the set can obtain the best picture.
Use AUTO.ADJ button
When PC signal format changes or when you switch to PC mode by AV button, the set corrects picture automatically including frequency and phase to obtain the best display. During the process of auto correction, all buttons on the remote control and set's panel do not work until this process is finished.
When the set displays some signal formats that are nonstandard and can not adjust by itself to the best displaying status, now you can press AUTO.ADJ button to correct the displaying again.

When there is correct input signal, press MENU button and PICTURE SETTING menu appears. Use CH ▲/▼ to select item and VOL+/- to adjust
Adjusting brightness and contrast
You can adjust bright and contrast in PC mode and this adjustment does not effect the brightness and contrast in TV and AV mode.

Adjusting phase and frequency
If you can not obtain the best display after auto correction for many times. Now you can adjust phase and frequency to obtain the best display.

Adjusting Colour temperature
You can select different Colour temperature to obtain correct white. Press MENU button, use CH ▲/▼ to select Color Temp item, press the VOL+/- to select between User, 9300K, 7300K, 6500K.
The USER_R, USER_G and USER_B can not accessed and adjusted unless you set Color Temp to "User".

Trouble shooting
Before calling service personnel, please check the following chart for a possible cause to the trouble you are experiencing.
| Symptoms | Check the following items |
| Power is not turned on. | □ Be sure the power cord is plugged in. |
| Poor colour, poor tint. | □ Contrast, colour, tint are not correctly adjusted. |
| Spots appear on the screen. | □ Possible interferences of automobiles, motorcycle, trolley bus, neon lamps, etc. |
| Stripes appear on the screen. | □ Possible interference of electronic interference from another TV set, a computer, an electronics game machine, a broadcast station, etc. |
| Double images or "ghosts". | □ This may be caused by reflections from nearby mountains or buildings. □ Check the antenna direction. |
| Snowy picture. | □ It is possible that the aerial "lead-in" is damaged or has come off. □ Check the antenna direction. |
| TV cabinet creaks. | □ Even if the picture or the sound is normal, changes in the room temperature sometimes make the TV cabinet expand or contract, making a noise. This does not indicate a malfunction. |
| Remote control does not work. | □ The batteries may be worn out. □ The batteries may be installed with their polarity reversed. |
| Control buttons do not work | □ Unplug the power cord, wait for some seconds. Then re-plug the power cord and turn on the unit again. |
LCD Display panel information
Important Information Regarding Use of Video Games, Computers, Captions or Other Fixed Image Displays.
The extended use of fixed image program material can cause a permanent "shadow image" on the LCD panel.
This background image is viewable on normal programs in the form of a stationary fixed image. This type of irreversible
LCD panel deterioration can be limited by observing the following steps:
A. Reduce the brightness/contrast setting to a minimum viewing level.
B. Do not display the fixed image for extended periods of time.
C. Turn the power off when not in actual use.
Note:
The marking or retained image on the LCD panel resulting from fixed image use is not an operating defect and as such is not covered by Warranty. This product is not designed to display fixed image patterns for extended periods of time.
Power Supply for AC adaptor: 110-240V 50/60Hz
Power Consumption: 160W
Dimensions (mm): 932 (W) × 553 (H) × 245 (D)
Weight (kg): 16.3
SCREEN: 76cm
TV system & channel range.
SYSTEM VHF UHF CATV
PAL-B/G 2-12 21-69 X\~Z+2, S1\~S41
Colour system: PAL BG, NTSC Playback
Sound output: 5W x 2
Accessories One remote controller;
One AC adaptor
Design and specifications are subject to change without notice.
PALSONIC CORPORATION PTY LTD
1 JOYNTON AVENUE
WATERLOO NSW 2017 AUSTRALIA
TEL: (02) 9313 7111
FAX: (02) 9313 7555
www.palsonic.com.au
PALSONIC CUSTOMER SERVICE
TELEPHONE
AUSTRALIA: 1300 657 888
604-L32B13-07A
Ver. 1.0
- Important Safety Cautions
- Identification of controls
- Identification of controls (continued)
- Notes:
- Effective remote rangeBattery installation
- Installation
- Antenna installation/Adaptor connection
- Elevation adjustment
- Menu Introduction
- Turning On/Off
- Turning On
- Turning Off
- Selecting input signal
- To enter into CHANNEL SETTING menu
- Auto Search
- Manual Search
- Fine Tuning
- Channel Preset (continued)
- Channel Skipping
- Channel Edit
- Use 0\~9 digit buttons and -/-- button
- Using CH ▲/▼ button
- Use previous channel button
- Picture Adjustment
- Adjusting picture
- Using STILL button
- Using AUTO.ADJ button
- Adjusting Sound
- Adjusting Volume
- Muting the Sound
- Setting Sound mode
- System setting
- To enter into SETUP menu
- Colour system
- Sound system
- Setting OSD Language
- Setting OSD position
- Setting OSD Background
- Setting ZOOM mode
- Timer
- Use SLP button
- Use CLK button
- Adjustments in YPbPr mode
- To enter into YPbPr mode
- Adjusting Colour temperature
- Adjusting horizontal/vertical position
- Adjustments in PC mode
- To enter into PC mode
- PC signal format
- Use AUTO.ADJ button
- Adjusting brightness and contrast
- Adjusting phase and frequency
- Trouble shooting
- LCD Display panel information
- Note:
Brand : Palsonic
Model : TFTV765
Category : Television