
FPCEILPTBLP - Wall panel support StarTech.com - Free user manual and instructions
Find the device manual for free FPCEILPTBLP StarTech.com in PDF.

| Product Type | Ceiling Mount for Flat-Screen TV |
| Brand | StarTech.com |
| Model | FPCEILPTBLP |
| VESA Mounting Patterns | 200x200, 200x300, 200x400, 300x200, 300x300, 400x200, 400x300, 400x400, 600x200, 600x300, 600x400 |
| Maximum Weight Capacity | 50 kg (110 lb) |
| Tilt Range | +0° to -25° |
| Swivel Range | +180° to -180° |
| Screen Size Compatibility | 32 in to 75 in (813 mm to 1905 mm) |
| Ceiling Compatibility | Flat or sloped ceilings |
| Pole Sections | Three adjustable poles (ceiling mount, middle, lower) |
| Material | Metal (steel) |
| Package Contents | Ceiling mount and pole, middle pole, lower pole, TV mount, two vertical brackets, one horizontal bracket, M8x55 mm screws (2), M8x60 mm screws (2), nuts (4), wrench, hex key, mounting template, instruction manual, assorted screws (M5, M6, M8), washers, spacers |
| Tools Required | Phillips screwdriver, wrench, hex key (included) |
| Warranty | 5 years |
| Manufacturer | StarTech.com Ltd. |
| Certifications | ISO 9001 Registered |
| Installation Difficulty | Moderate; two people recommended for TV attachment |
| Safety Note | Ceiling must support at least 4x mounted weight; do not exceed 50 kg (110 lb) |
Frequently Asked Questions - FPCEILPTBLP StarTech.com
User questions about FPCEILPTBLP StarTech.com
0 question about this device. Answer the ones you know or ask your own.
Ask a new question about this device
Download the instructions for your Wall panel support in PDF format for free! Find your manual FPCEILPTBLP - StarTech.com and take your electronic device back in hand. On this page are published all the documents necessary for the use of your device. FPCEILPTBLP by StarTech.com.
USER MANUAL FPCEILPTBLP StarTech.com
Flat-Screen TV Ceiling Mount - Long Pole - Full Motion
FPCEILPTBLP

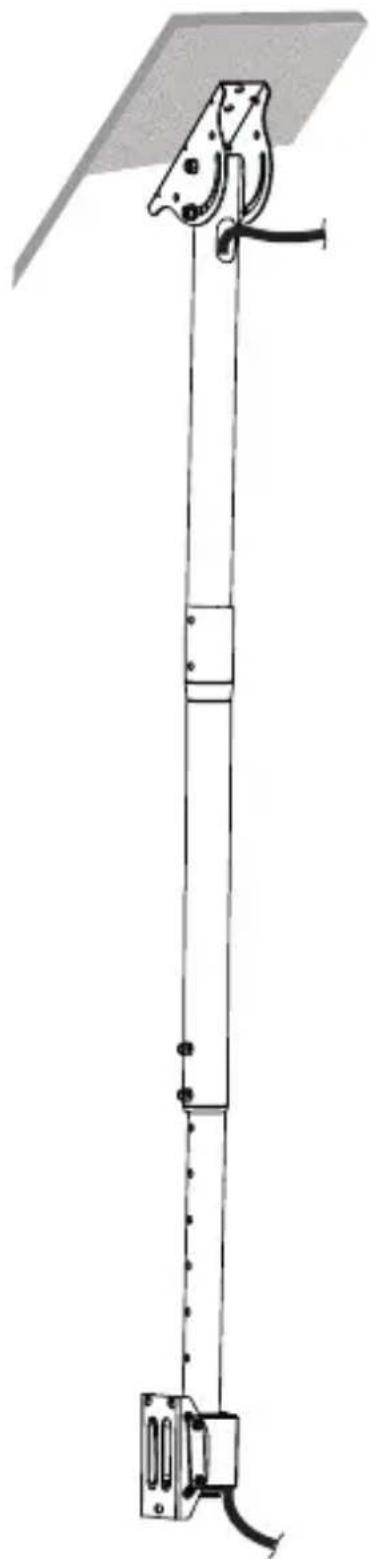
natural_image
Pure vertical metal structure with two side supports and a top cylindrical element (no text or symbols)*actual product may vary from photos
For the latest information, technical specifications, and support for this product, please visit www.StarTech.com/FPCEILPTBLP.
Use of Trademarks, Registered Trademarks, and other Protected Names and Symbols
PHILLIPS ^® is a registered trademark of Phillips Screw Company in the United States or other countries.
This manual may make reference to trademarks, registered trademarks, and other protected names and/or symbols of third-party companies not related in any way to StarTech.com. Where they occur these references are for illustrative purposes only and do not represent an endorsement of a product or service by StarTech.com, or an endorsement of the product(s) to which this manual applies by the third-party company in question. Regardless of any direct acknowledgement elsewhere in the body of this document, StarTech.com hereby acknowledges that all trademarks, registered trademarks, service marks, and other protected names and/or symbols contained in this manual and related documents are the property of their respective holders.
Warning statements
Make sure to assemble this product according to the instructions. Failure to do so might result in personal injury or property damage.
Make sure that the weight of the monitor doesn't exceed the weight capacity of this product. If you exceed the weight capacity, you might experience personal injury or damage to the equipment. This product can support the following weight: Up to 50 kg (110 lb.).
Never operate this product if parts are missing or damaged.
Ceiling structures vary, and it's important to make sure that the type of ceiling structure and mounting hardware that you're using will properly support the mounted equipment. Failure to do so may result in personal injury and/or equipment damage. The ceiling structure should be capable of supporting at least four times the weight of the mounted equipment.
The mounting hardware included with this product might not be adequate for some ceiling structures. If you lack the necessary expertise to attach this product to the ceiling structure that you're using, contact a construction professional to install the ceiling mount or to provide specific mounting instructions for your ceiling structure.
Warnhinweise
Product dimensions....2
Technical specifications .... 3
Package contents....4
Requirements 8
Installation 8
Attach the ceiling mount and pole to the ceiling 8
Attach the middle pole to the ceiling mount and pole 10
Attach the horizontal bracket....14
Prepare the vertical brackets....15
Mount a TV with a flush mounting surface 16
Mount a TV with a recessed mounting surface....17
Attach the TV to the horizontal bracket.... 19
Technical support....22
Warranty information....22
Introduction Product diagram

Product dimensions
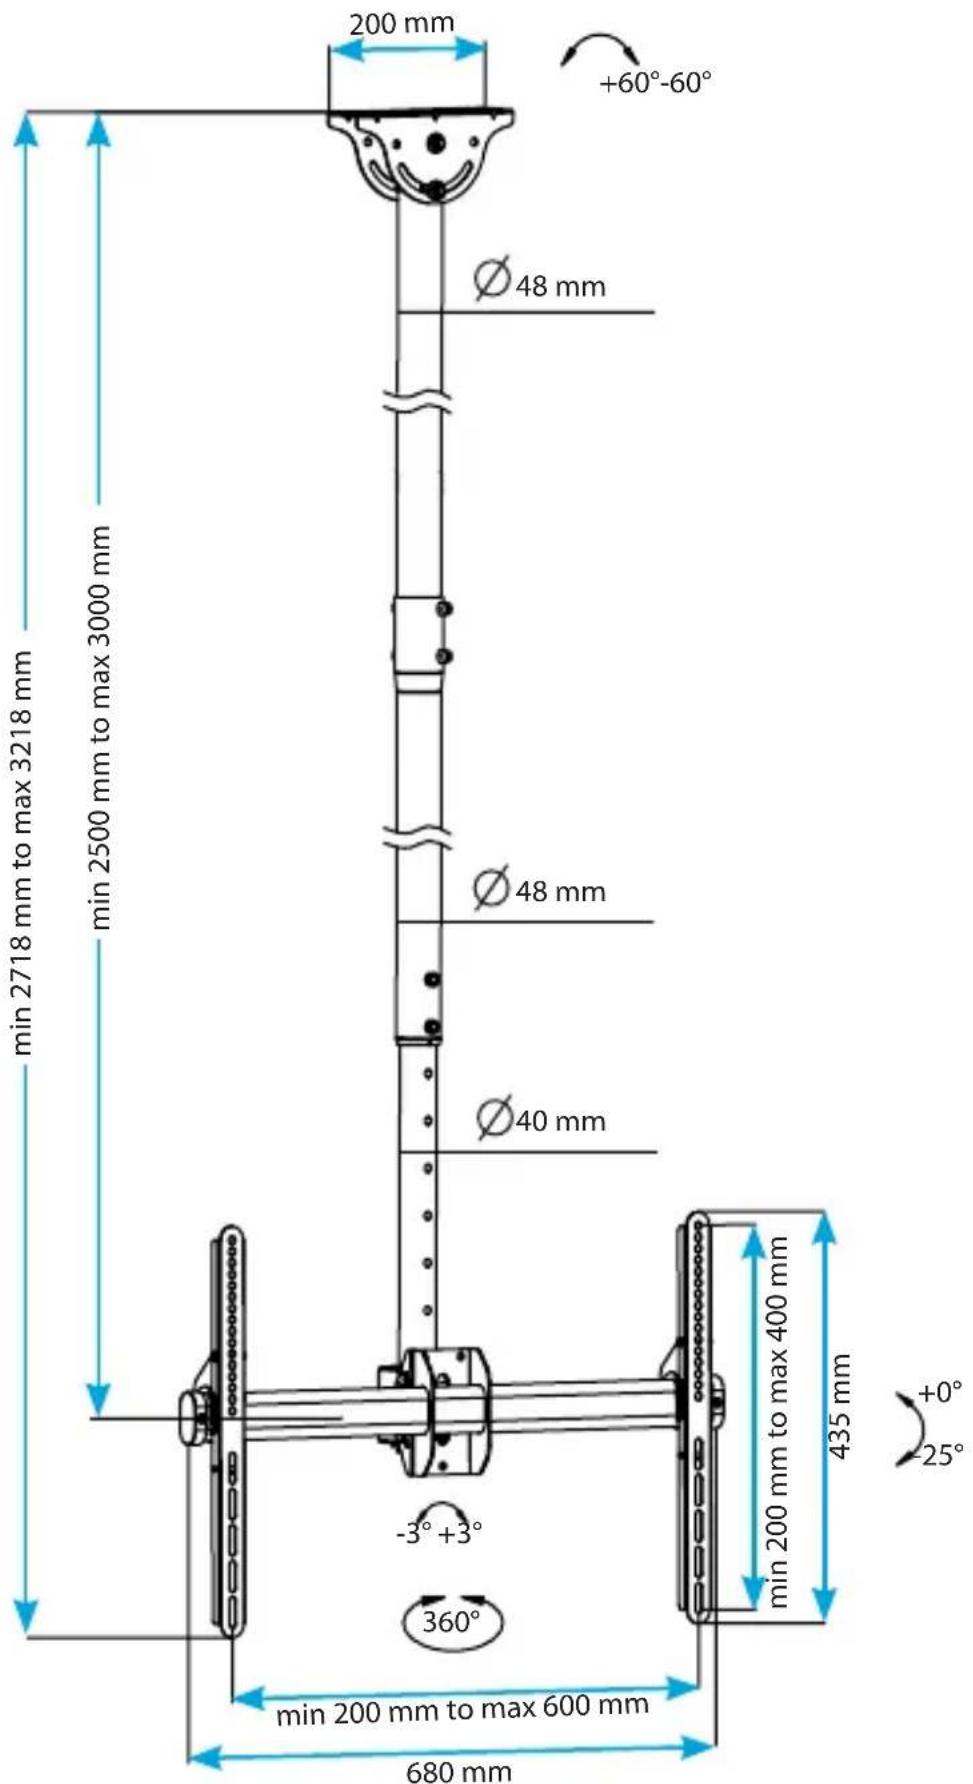
Technical specifications
Type of measurement Measurement
VESA mounting hole pattern | 200x200, 200x300, 200x400300x200, 300x300400x200, 400x300, 400x400600x200, 600x300, 600x400 |
Rated load | 50 kg (110 lb.) |
Tilt | +0° to -25° |
Screen size | Between 813 mm and 1905 mm(32 in. and 75 in.) |
Swivel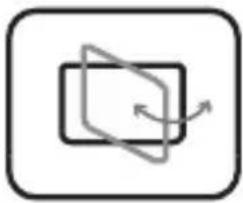 | +180° to -180° |
Package contents
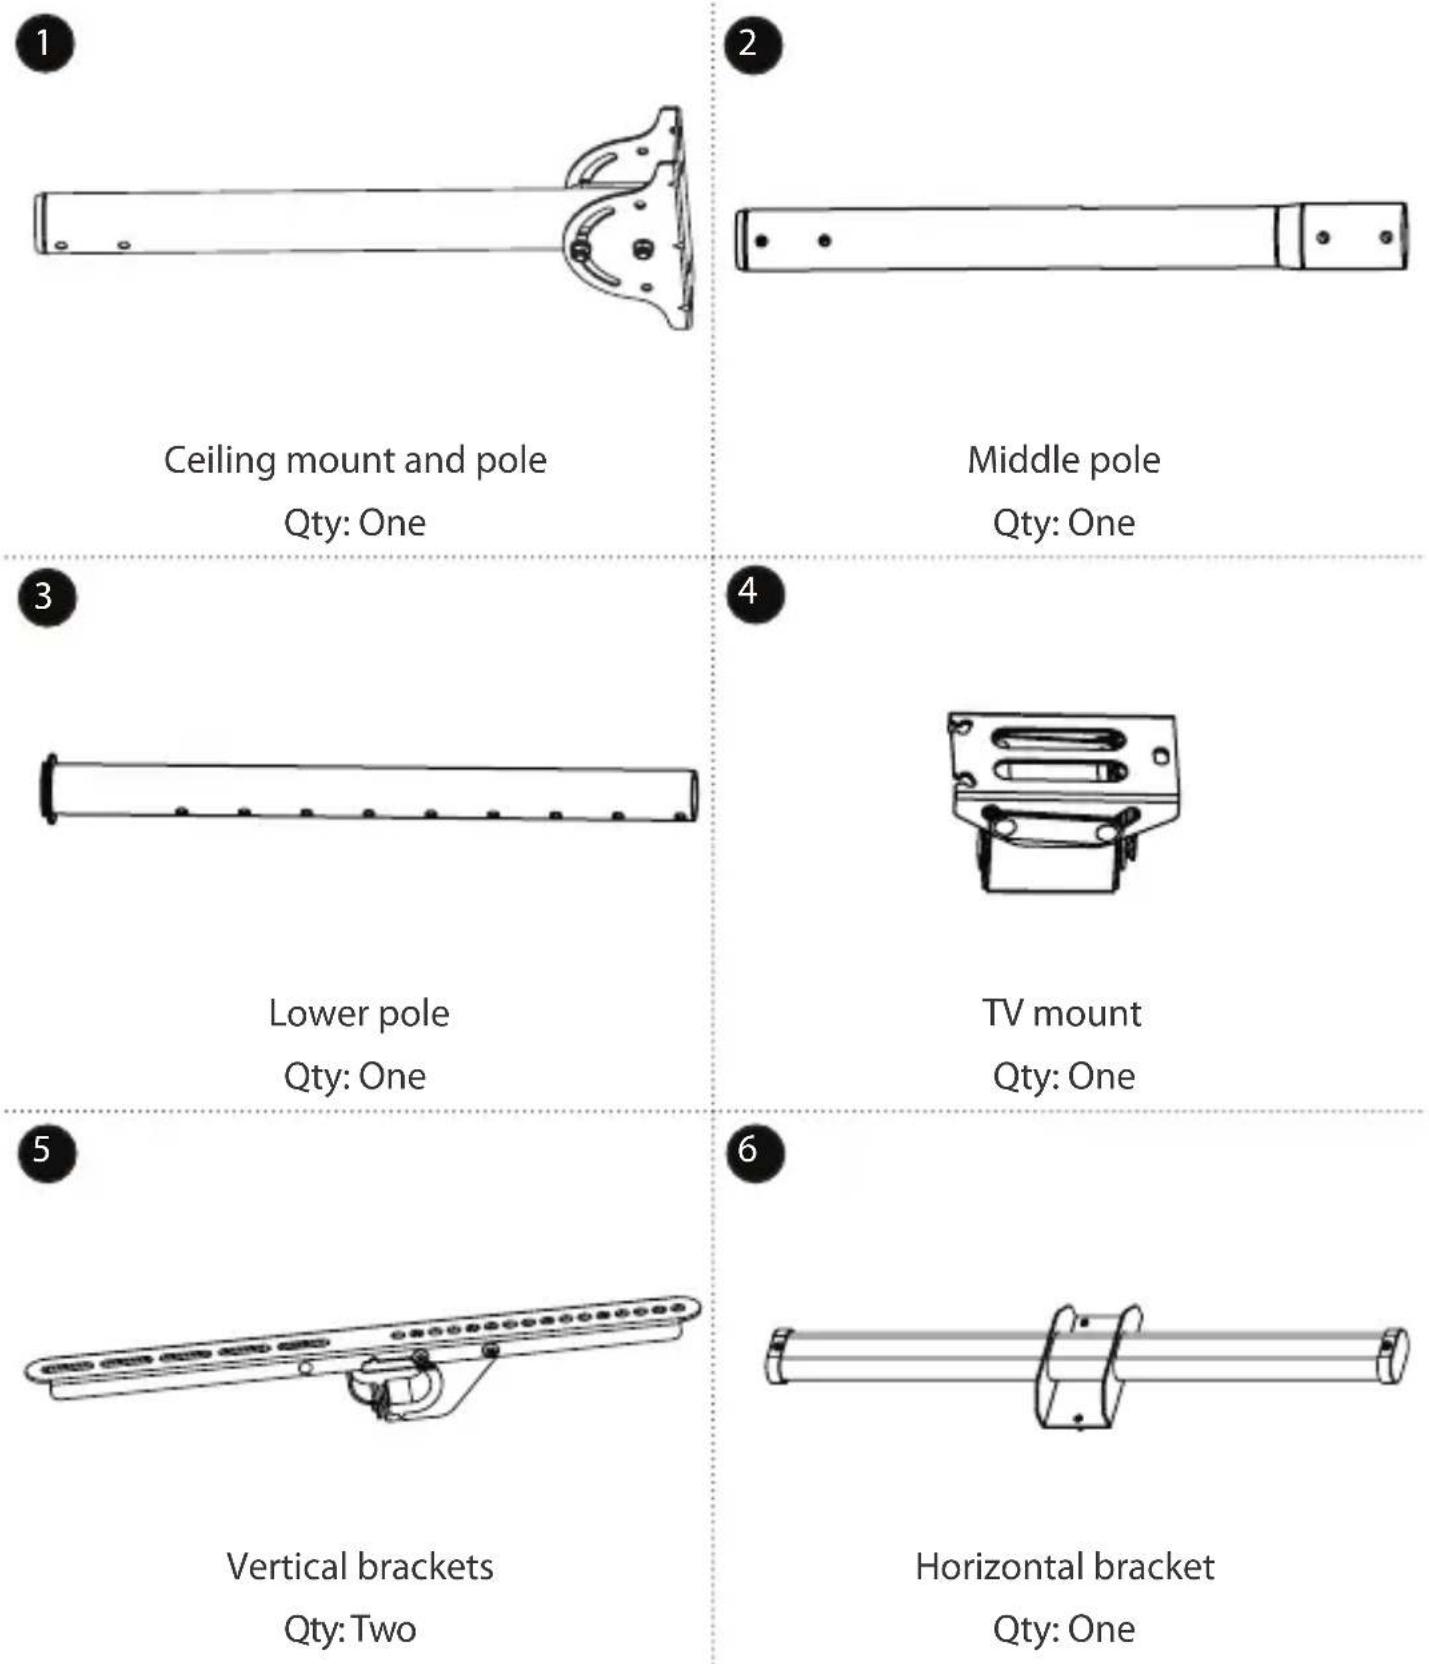
Ceiling mount and pole Qty: One
Middle pole Qty: One
Lower pole Qty: One
TV mount Qty: One
Vertical brackets Qty: Two
Horizontal bracket Qty: One
M8x55 mm screws
Qty: Two
M8x60 mm screws
Qty: Two
Nuts Qty: Four
Wrench Qty: One
Hex key Qty: One
Mounting template Qty: One
other
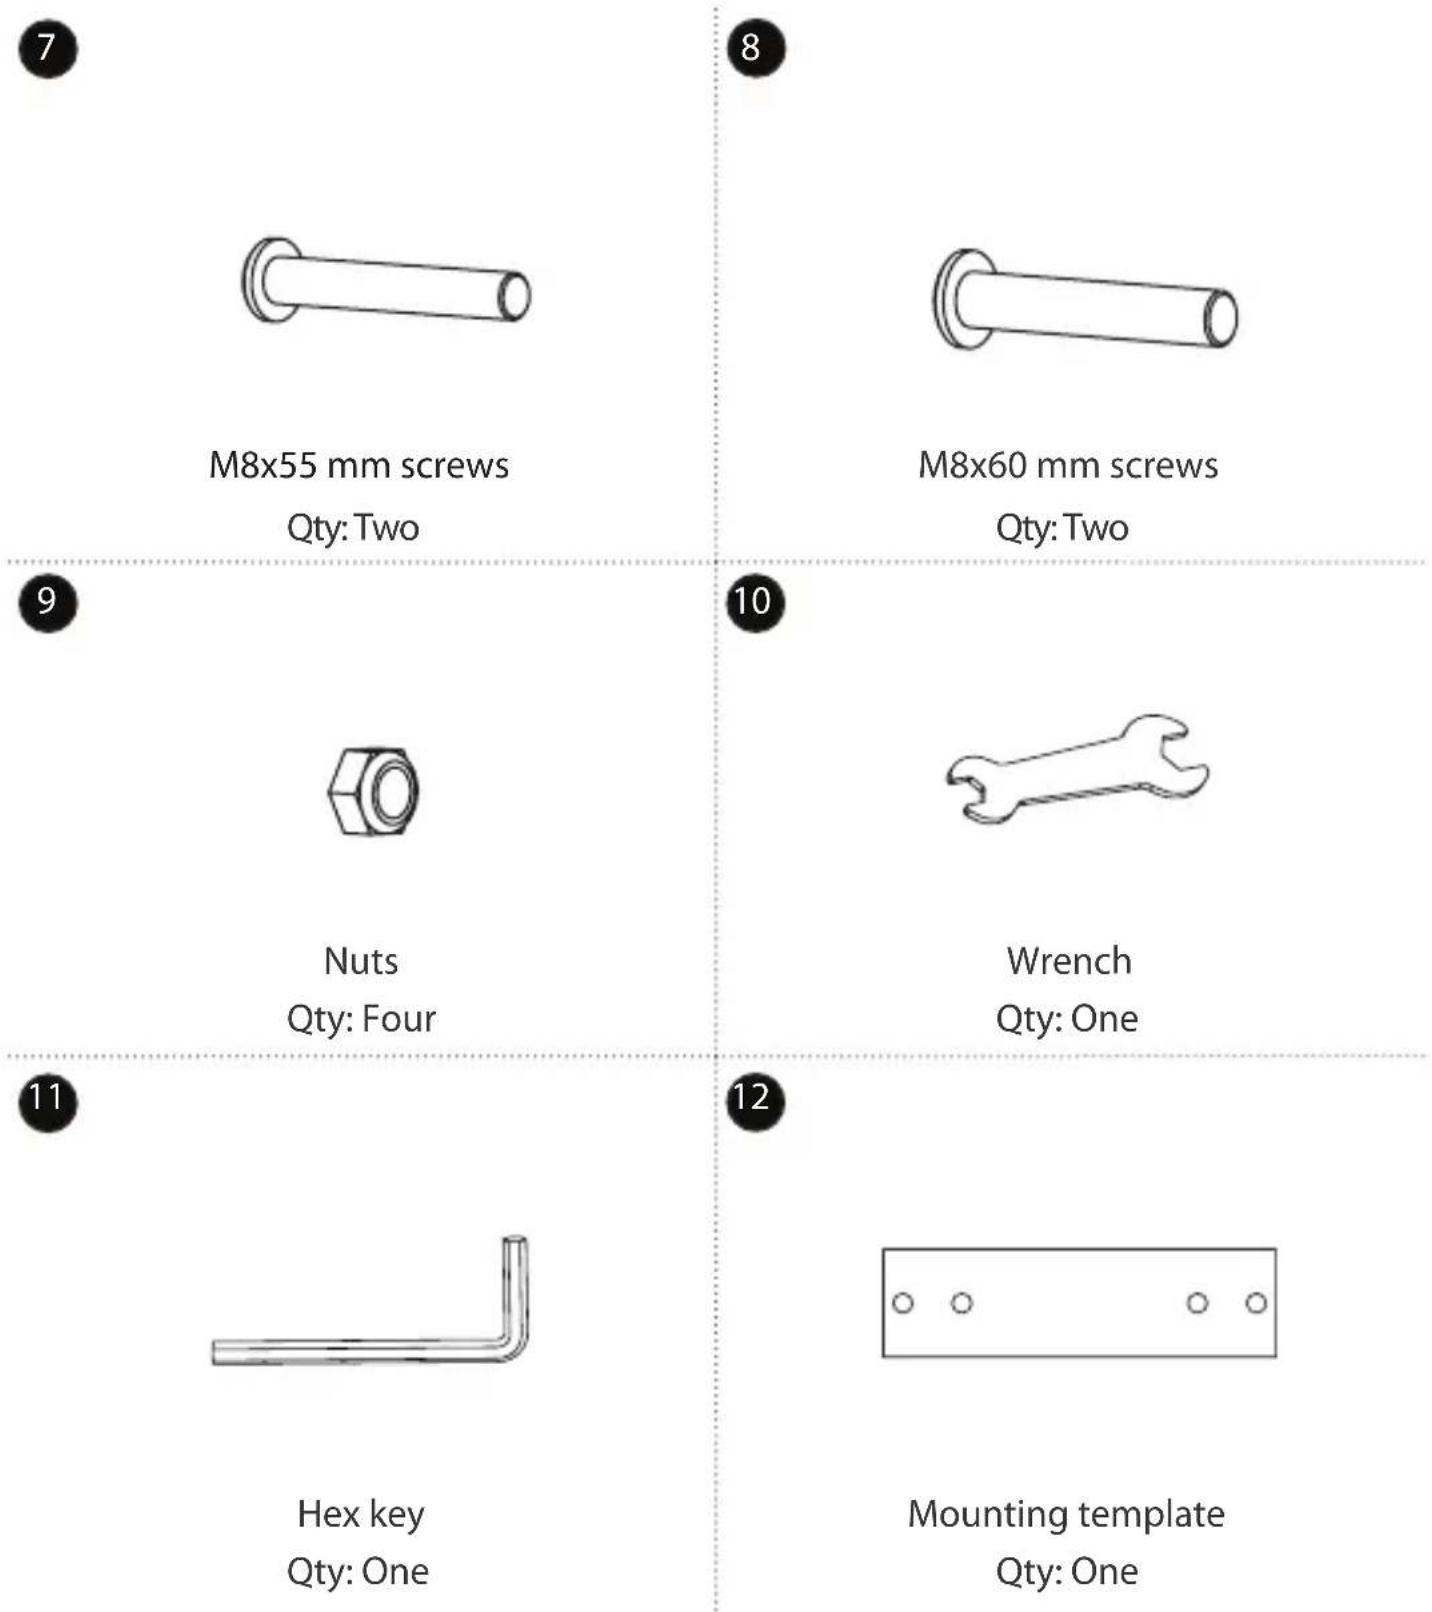
| Type | Qty | Notes | | :--- | :--- | :--- | | Top Left | 13 | M5x14 mm screws | | Top Right | 13 | M6x14 mm screws | | Bottom Left | 15 | M6x30 mm screws | | Bottom Right | 15 | M8x30 mm screws | | Bottom Right | 17 | M8x50 mm screws | | Bottom Right (Rectangular washers) | 17 | Rectangular washers | Qty: Four| 19 |  |  |
| Small spacers Qty: Eight | Large spacers Qty: Eight | |
| 21 |  | 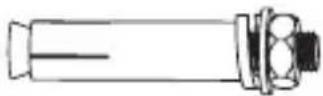 |
| Screws Qty: Four | Concrete anchors Qty: Four | |
| 23 |  |  |
| Circular washers Qty: Four | Instruction manual Qty: One |
Requirements
- A display or TV that is compatible with one of the VESA mounting hole patterns that FPCEILPTBLP supports
• A Phillips screwdriver
Requirements are subject to change. For the latest requirements, please visit www.StarTech.com/FPCEILPTBLP.
Installation
Warning! Make sure that the weight of the TV does not exceed the weight capacity of this product. If you exceed the weight capacity, you might experience personal injury or damage to the product. This product can support the following weight: Up to 50 kg (110 lb.).
Attach the ceiling mount and pole to the ceiling
Warning! Ceiling structures vary, and it is important to make sure that the type of structure and mounting hardware that you are using will properly support the mounted equipment. Failure to do so may result in personal injury and/or equipment damage. The ceiling should be capable of supporting at least four times the weight of the mounted equipment.
Warning! The mounting hardware included with this product might not be adequate for some ceiling structures. If you lack the necessary expertise to attach this product to the ceiling that you are using, contact a construction professional to install the FPCEILPTBLP or to provide specific mounting instructions for your ceiling.
The FPCEILPTBLP can be mounted to a flat or a sloped ceiling.
- Use a pencil and the provided mounting template to mark the location on the ceiling where you want to attach the ceiling mount and pole. (figure 1)
figure 1

-
Follow the appropriate steps for the type of ceiling that you're attaching the mount to and attach the ceiling mount and pole to the ceiling.
-
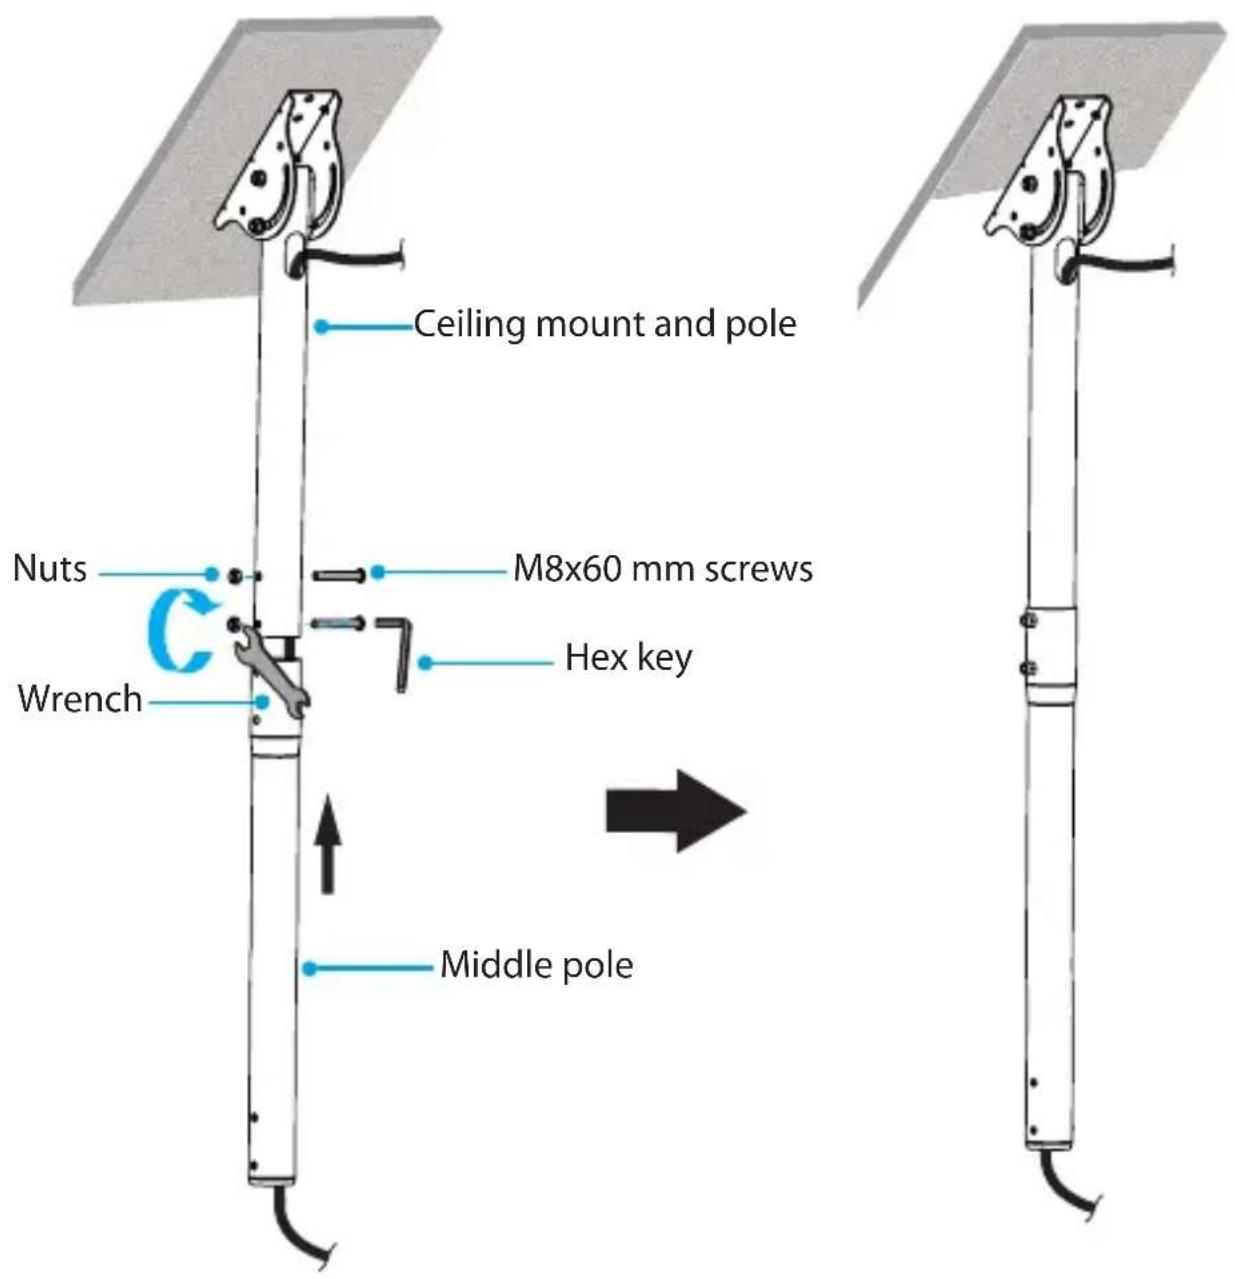
To adjust the vertical position of the pole, use the wrench and the hex key to adjust the nut at the side of the mounting base. (figure 2)
figure 2

Attach the middle pole to the ceiling mount and pole
- Place one end of the TV cable through the top hole in the ceiling mount and pole.
- Run the cable through the ceiling mount and pole, the middle pole, and out the bottom. (figure 3)
figure 3

-
Line up the holes on the middle pole with the holes on the ceiling mount and pole.
-
Insert the two M8x60 mm screws through the holes in the middle pole and the ceiling mount and pole.
-
Attach two nuts to the screws, and use the wrench and the hex key to tighten the nuts in place. (figure 4)
figure 4
- Slide the display mount down the lower pole. (figure 5)
figure 5

- Run the cable through the lower pole and out the bottom. (figure 6)
figure 6

-
Line up the holes on the lower pole with the holes on the middle pole, and insert the two M8x55 mm screws through the poles.
-
Attach two nuts to the screws, and use the wrench and the hex key to tighten the nuts in place. (figure 7)
figure 7

natural_image
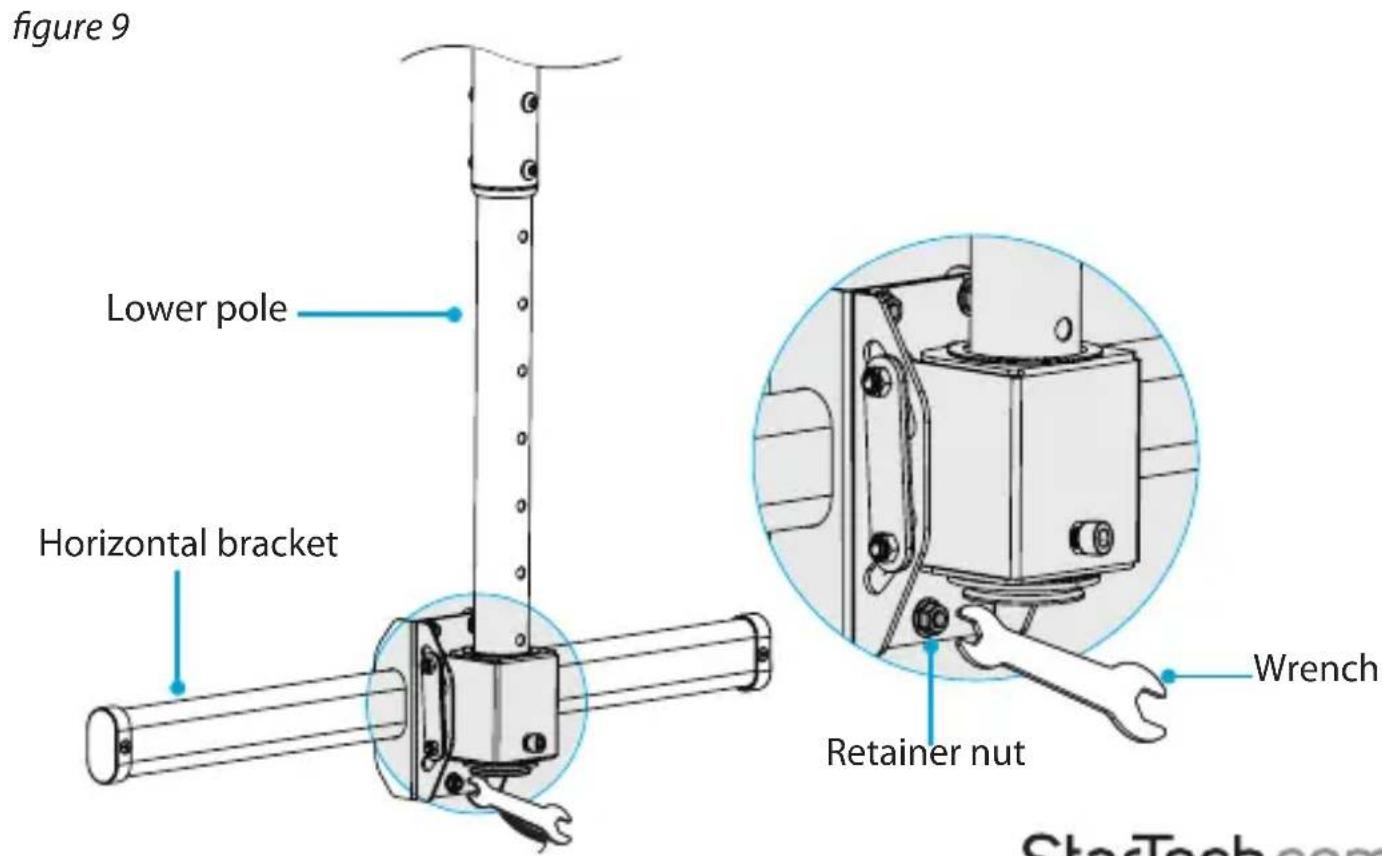
Technical line drawing of a vertical mechanical device with attached bracket and base mount (no text or symbols)Attach the horizontal bracket
- Use a wrench to remove the retainer nut from the back of the horizontal bracket. (figure 8)
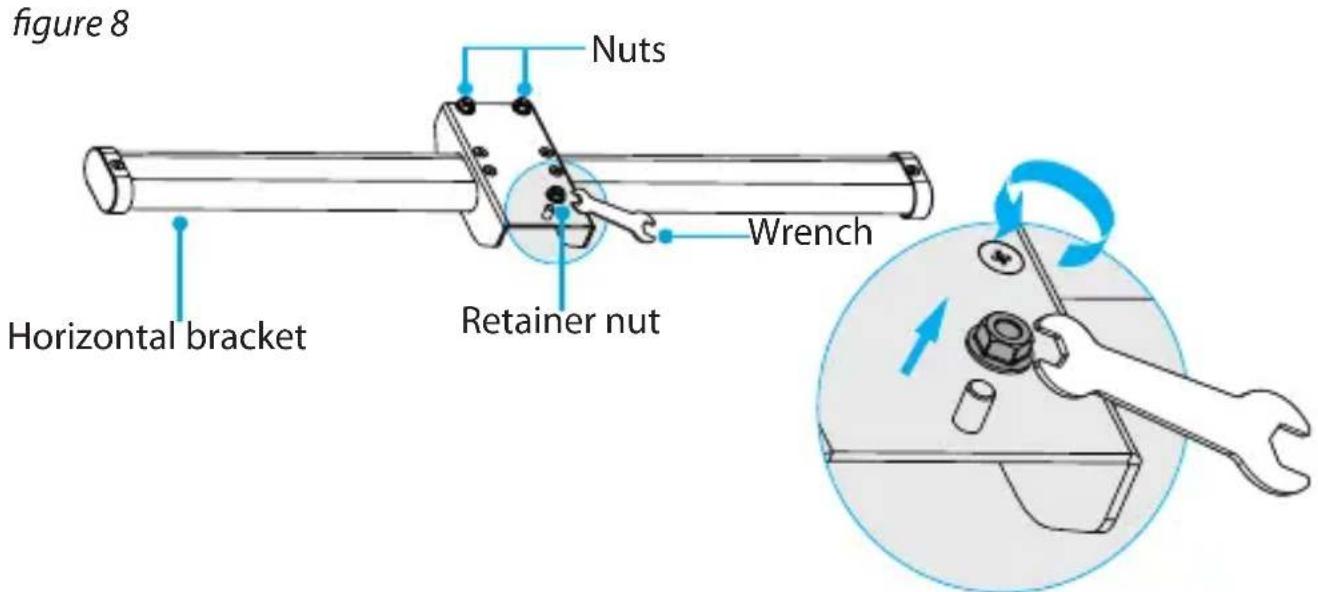
- Loosen the two nuts at the back of the horizontal bracket.
- Attach the horizontal bracket onto the TV mount at the end of the lower pole.
- Reattach the retainer nut that you removed in step 1 and use a wrench to tighten the nut in place. (figure 9)
- Tighten the two nuts that you loosened in step 2.
Prepare the vertical brackets
-
Use a screwdriver to remove the screw from the mounting hardware on each of the two vertical brackets.
-
Set the screws aside; you will need to use them when you hang the TV.
-
Flip down the smaller piece of the mounting hardware. (figure 10)
figure 10

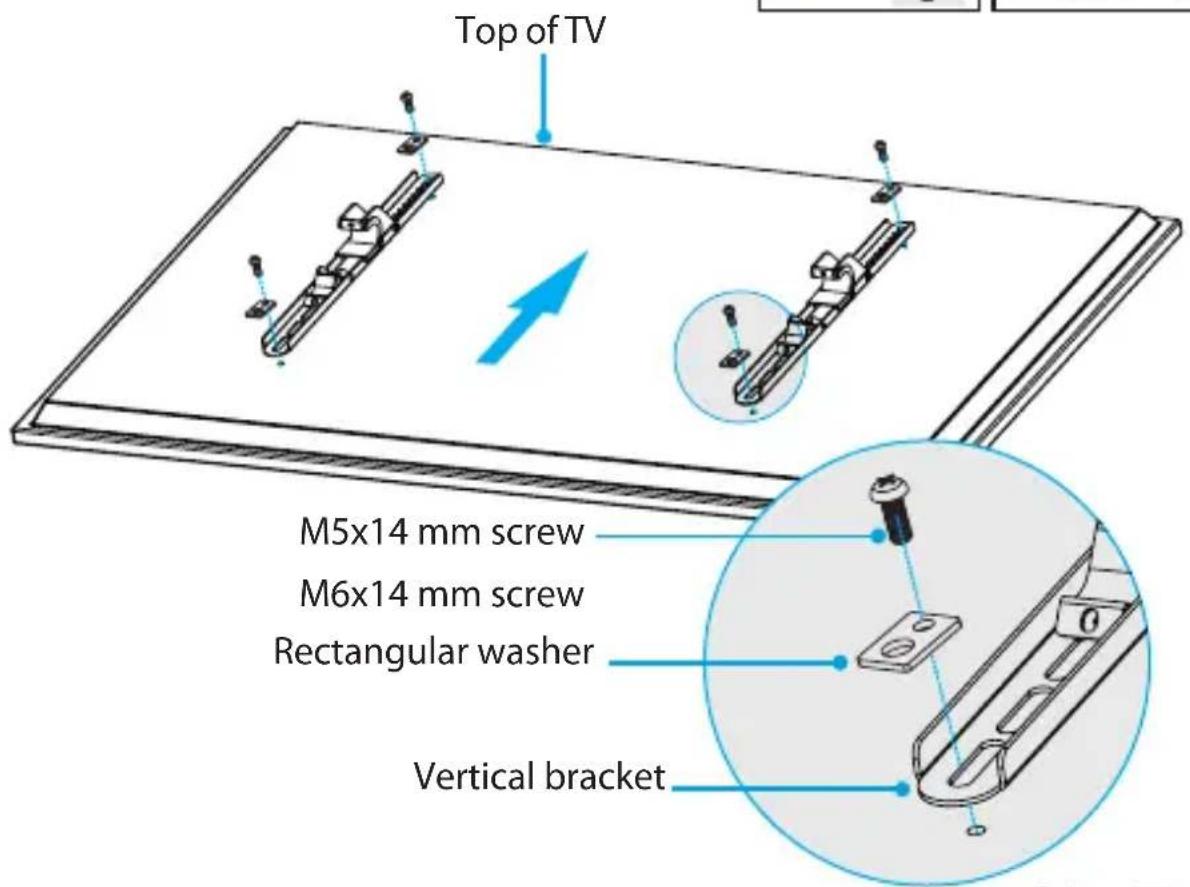
Mount a TV with a flush mounting surface
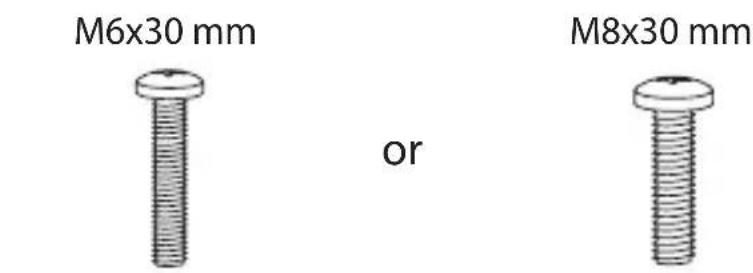
To accommodate different TV designs, the FPCEILPTBLP comes with five sets of screws of different lengths and diameters, and two sizes of spacers.
- To select the combination of mounting hardware that you need to use to attach the vertical brackets to the TV, complete the following:
• Determine the depth of the mounting holes on the TV.
• Determine the diameter of the mounting holes on the TV.
Note: If you're using a TV with a flush mounting surface, you don't need to use any of the provided spacers.
- Line up the vertical brackets with the mounting holes on the back of the TV.
- Place the rectangular washers over the mounting holes in the vertical brackets.
- Insert the M5x14 mm screws or the M6x14 mm screws through the washers, vertical brackets, and into the back of the monitor. (figure 11)
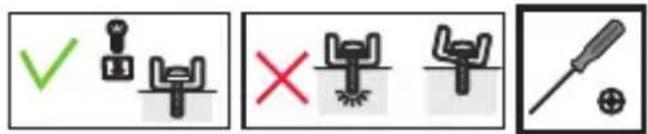
- Use a Phillips screwdriver to tighten the screws.
Warning! Do not over-tighten the screws. If you encounter resistance while you're tightening the screws, stop tightening. Failure to do so could result in damage to the monitor.
figure 11

Mount a TV with a recessed mounting surface
To accommodate different TV designs, the FPCEILPTBLP comes with five sets of screws of different lengths and diameters, and two sizes of spacers.
- To select the combination of mounting hardware that you need to use to attach the vertical brackets to the TV, complete the following:
• Determine the depth of the mounting holes on the TV.
• Determine the diameter of the mounting holes on the TV.
- Consult the images below to see the different hardware combinations available, and select the one that works best with your TV.
combined with
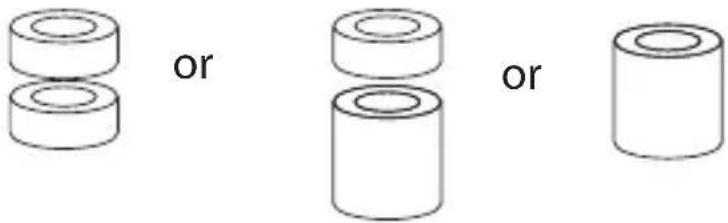
M8x50 mm

combined with
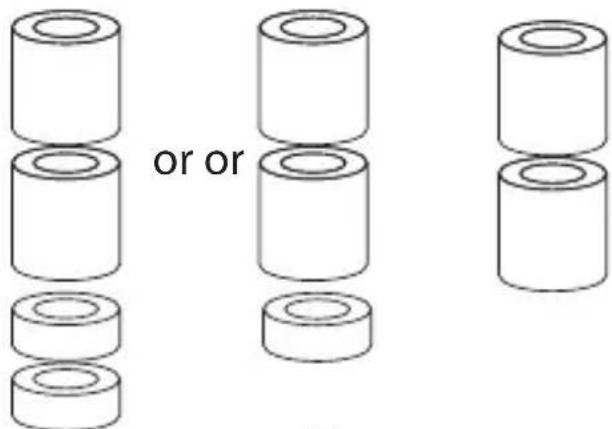
- Line up the vertical brackets with the mounting holes on the back of the TV.
- Place the rectangular washers over the vertical brackets.
- Insert the M6x30 mm screws, M8x30 mm screws, or M8x50 screws through the washers, vertical brackets, spacers, and into the back of the monitor.
- Use a Phillips screwdriver to tighten the screws. (figure 12)
Warning! Do not over-tighten the screws. If you encounter resistance while you're tightening the screws, stop tightening. Failure to do so could result in damage to the monitor.
figure 12

Attach the TV to the horizontal bracket
Warning! Make sure that the weight of the TV doesn't exceed the weight capacity of this product. If you exceed the weight capacity, you might experience personal injury or damage to the product. This product can support the following weight: Up to 50 kg (110 lb.)
Warning! Attaching the monitors is a two-person job. Do not attempt to complete this task by yourself.
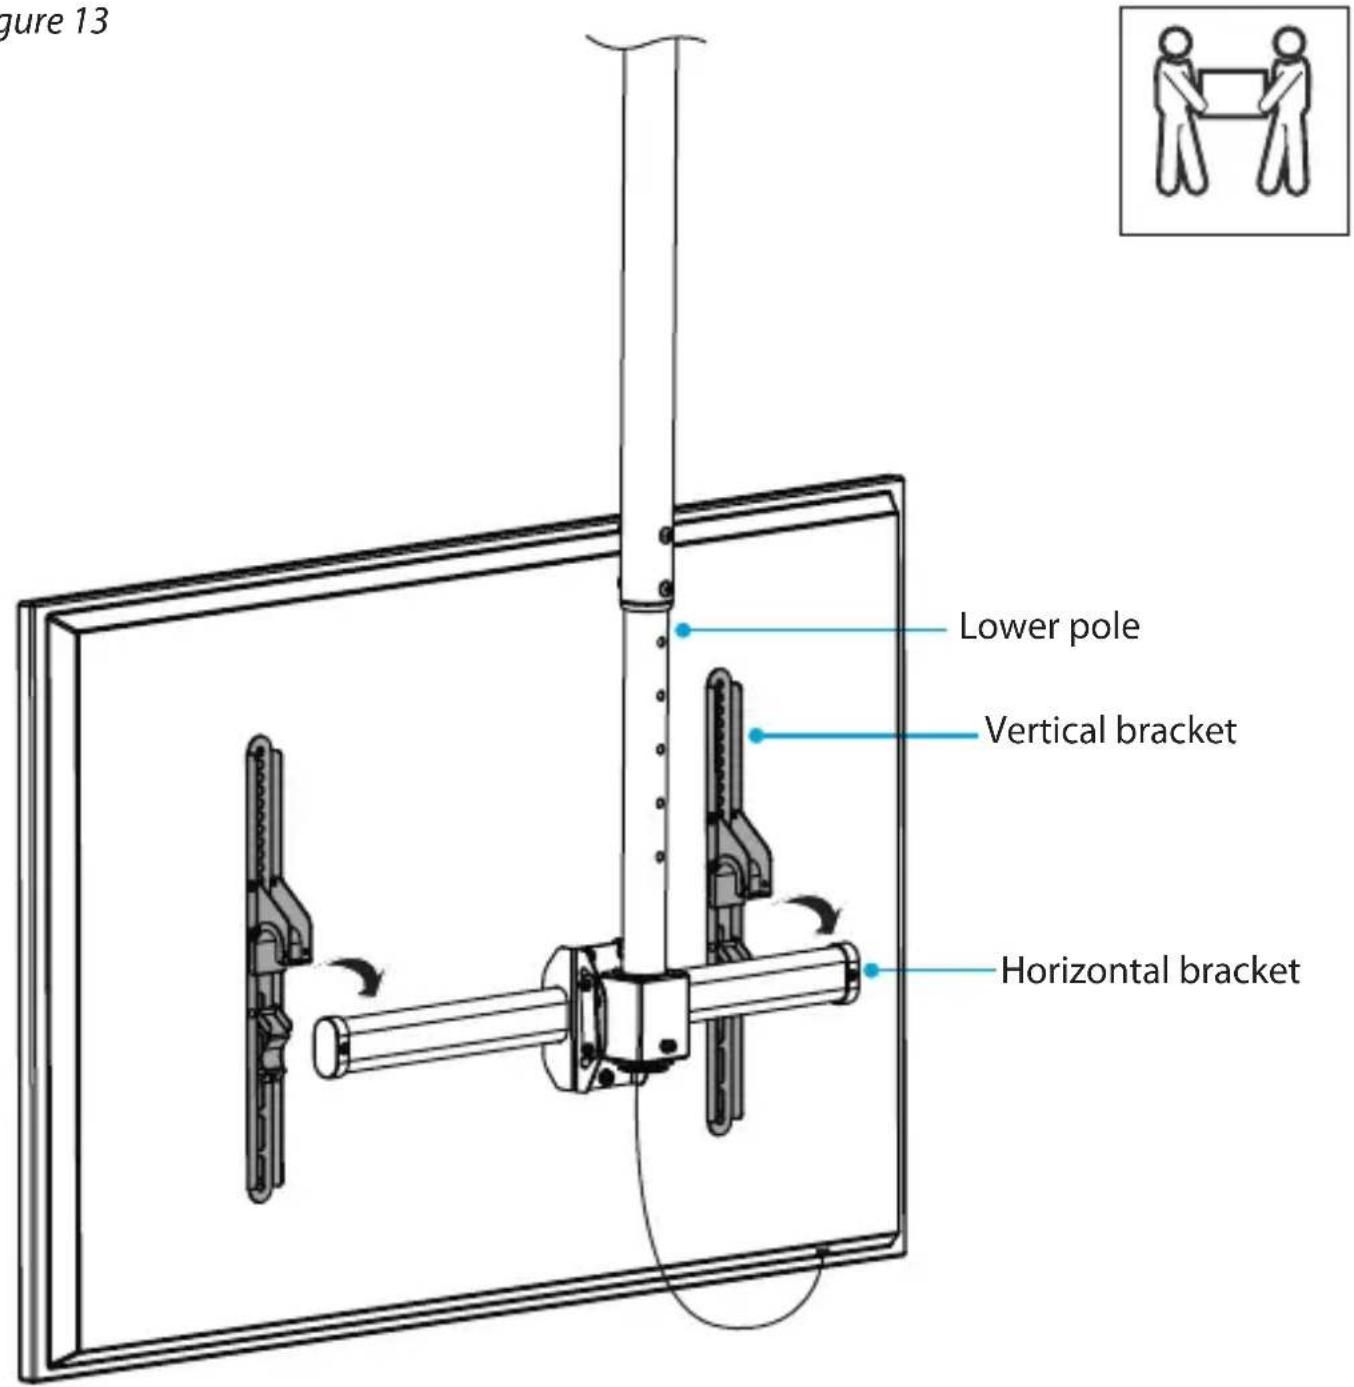
- Carefully lift up the TV and hook the mounting hardware on the vertical brackets onto the horizontal bracket attached to the lower pole. (figure 13)
figure 13
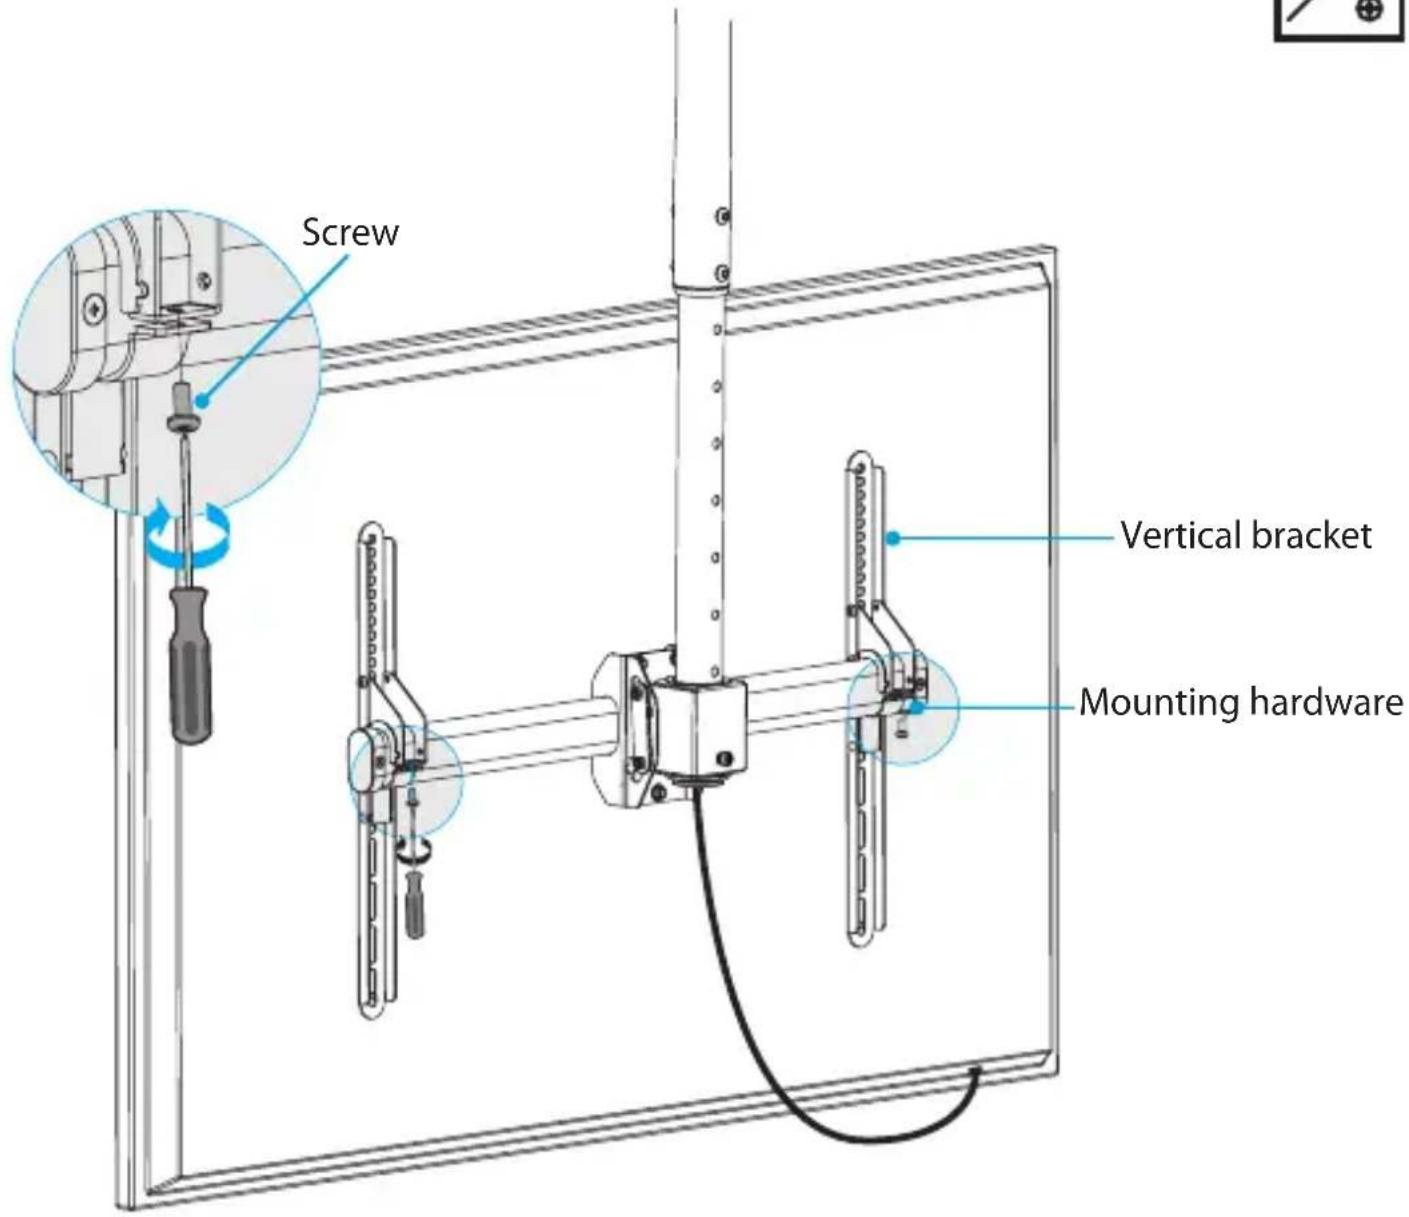
- Flip up the mounting hardware and reinsert the screws that you removed from the mounting hardware on each of the vertical brackets.
(figure 14)
- Use a Phillips screwdriver to tighten the screws in place.
figure 14
- Make any necessary adjustments to the angle of the TV. (figure 15)
figure 15

Adjusting the TVs
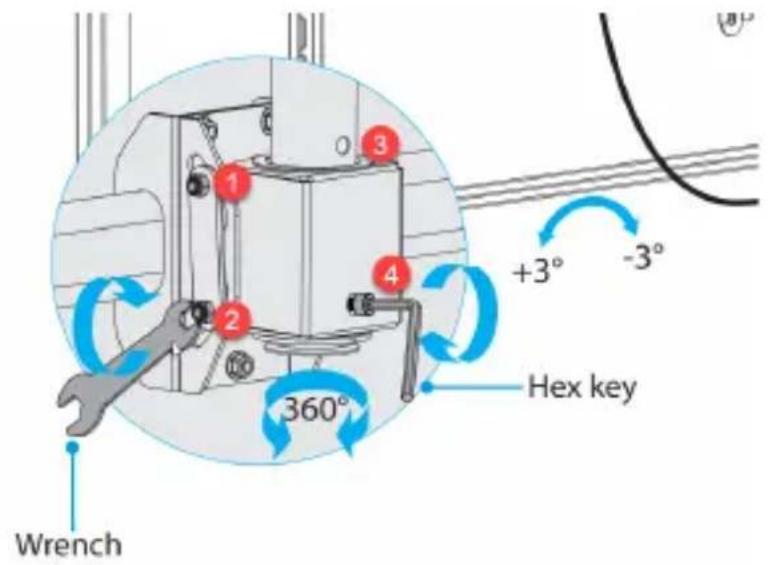
Adjusting the rotation
- Using a Wrench, loosen but do not remove the three Nuts as indicated in the image below
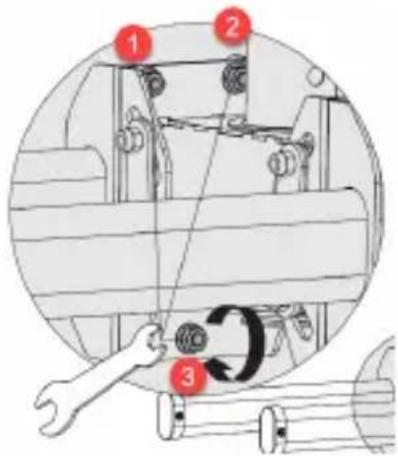
Using a Wrench to loosen the Nuts
- Rotate the TV to the position that you want it in
- Re-tigten the loosen Nuts to fix the new display position
Adjusting the Swivel
- Using a Hex Key loosen but do not remove the Retainer Bolt on the back of the Horizontal Bracket.
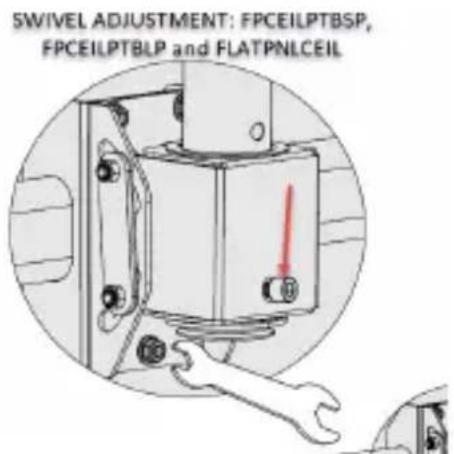
Using a Hex Key to Loosen the Retainer Bolt
- Adjust the TV to the position that you want it in
- Re-tighten the loosen the Retainer Bolt to fix the new display position.
Adjusting the TVs
Adjusting the tilt
- Using a Wrench, loosen but do not remove the four Nuts as indicated in the image below
- Rotate the TV to the position that you want it in
- Re-tigten the loosen Nuts to fix the new display position
Technical support
StarTech.com's lifetime technical support is an integral part of our commitment to provide industry-leading solutions. If you ever need help with your product, visit www.startech.com/support and access our comprehensive selection of online tools, documentation, and downloads.
For the latest drivers/software, please visit www.startech.com/downloads
Warranty information
This product is backed by a five-year warranty.
StarTech.com warrants its products against defects in materials and workmanship for the periods noted, following the initial date of purchase. During this period, the products may be returned for repair, or replacement with equivalent products at our discretion. The warranty covers parts and labor costs only. StarTech.com does not warrant its products from defects or damages arising from misuse, abuse, alteration, or normal wear and tear.
Limitation of liability
In no event shall the liability of StarTech.com Ltd. and StarTech.com USA LLP (or their officers, directors, employees or agents) for any damages (whether direct or indirect, special, punitive, incidental, consequential, or otherwise), loss of profits, loss of business, or any pecuniary loss, arising out of or related to the use of the product exceed the actual price paid for the product. Some states do not allow the exclusion or limitation of incidental or consequential damages. If such laws apply, the limitations or exclusions contained in this statement may not apply to you.
Hard-to-find made easy. At StarTech.com, that isn't a slogan. It's a promise.
StarTech.com is your one-stop source for every connectivity part you need. From the latest technology to legacy products — and all the parts that bridge the old and new — we can help you find the parts that connect your solutions.
We make it easy to locate the parts, and we quickly deliver them wherever they need to go. Just talk to one of our tech advisors or visit our website. You'll be connected to the products you need in no time.
Visit www.startech.com for complete information on all StarTech.com products and to access exclusive resources and time-saving tools.
StarTech.com is an ISO 9001 Registered manufacturer of connectivity and technology parts. StarTech.com was founded in 1985 and has operations in the United States, Canada, the United Kingdom and Taiwan servicing a worldwide market.
Reviews
Share your experiences using StarTech.com products, including product applications and setup, what you love about the products, and areas for improvement.
StarTech.com Ltd.
| 45 ArtisansCrescent | 4490 SouthHamilton Road |
| London, Ontario | Groveport, Ohio |
| N5V 5E9 | 43125 |
| Canada | U.S.A. |
StarTech.com LLP
StarTech.com Ltd.
| Unit B, Pinnacle 15 |
| Gowerton Road Brackmills, |
| Northampton |
| NN4 7BW |
| United Kingdom |
StarTech.com Ltd.
| Siriusdreef 17-27 |
| 2132 WT |
| Hoofddorp |
| The Netherlands |
FR: fr.startech.com
DE: de.startech.com
ES: es.startech.com
NL: nl.startech.com
IT: it.startech.com
JP: jp.startech.com

- Flat-Screen TV Ceiling Mount - Long Pole - Full Motion
- Use of Trademarks, Registered Trademarks, and other Protected Names and Symbols
- Warning statements
- Warnhinweise
- Installation 8
- Technical support....22
- Warranty information....22
- Introduction Product diagram
- Product dimensions
- Technical specifications
- Package contents
- Requirements
- Installation
- Attach the ceiling mount and pole to the ceiling
- Attach the middle pole to the ceiling mount and pole
- Attach the horizontal bracket
- Prepare the vertical brackets
- Mount a TV with a flush mounting surface
- Mount a TV with a recessed mounting surface
- Attach the TV to the horizontal bracket
- Adjusting the TVs
- Adjusting the rotation
- Adjusting the Swivel
- Adjusting the tilt
- Technical support
- Warranty information
- Limitation of liability
- Hard-to-find made easy. At StarTech.com, that isn't a slogan. It's a promise.
- Reviews
Brand : StarTech.com
Model : FPCEILPTBLP
Category : Wall panel support