ZESLCG/CG - Monitor stand Ergotron - Free user manual and instructions
Find the device manual for free ZESLCG/CG Ergotron in PDF.

| Product Type | Monitor Stand |
| Brand | Ergotron |
| Model | ZESLCG/CG |
| Color | Black / Silver |
| Material | Steel, Aluminum, Plastic |
| Weight Capacity | 14–34 lbs (6.4–15.4 kg) |
| VESA Compatible | 75x75mm, 100x100mm |
| Height Adjustment Range | 13.5" (34.3 cm) |
| Tilt Range | -5° to +15° |
| Rotation (Landscape/Portrait) | ±90° (Pivot) |
| Swivel Range | ±90° |
| Extension (Reach) | 11.8" (30 cm) |
| Mounting Type | Desk Clamp or Grommet Mount |
| Desk Thickness Range (Clamp) | 0.5"–2.75" (1.3–7 cm) |
| Desk Thickness Range (Grommet) | 0.5"–2.5" (1.3–6.4 cm) |
| Cable Management | Integrated |
| Dimensions (Base) | 18.5" x 11.6" (47 x 29.5 cm) |
| Net Weight | 7.8 lbs (3.5 kg) |
| Warranty | 10 years |
| Power Supply | None (Mechanical adjustment) |
| Maintenance | Wipe clean with damp cloth |
| Certifications | UL, TUV, GS |
Frequently Asked Questions - ZESLCG/CG Ergotron
User questions about ZESLCG/CG Ergotron
0 question about this device. Answer the ones you know or ask your own.
Ask a new question about this device
Download the instructions for your Monitor stand in PDF format for free! Find your manual ZESLCG/CG - Ergotron and take your electronic device back in hand. On this page are published all the documents necessary for the use of your device. ZESLCG/CG by Ergotron.
USER MANUAL ZESLCG/CG Ergotron
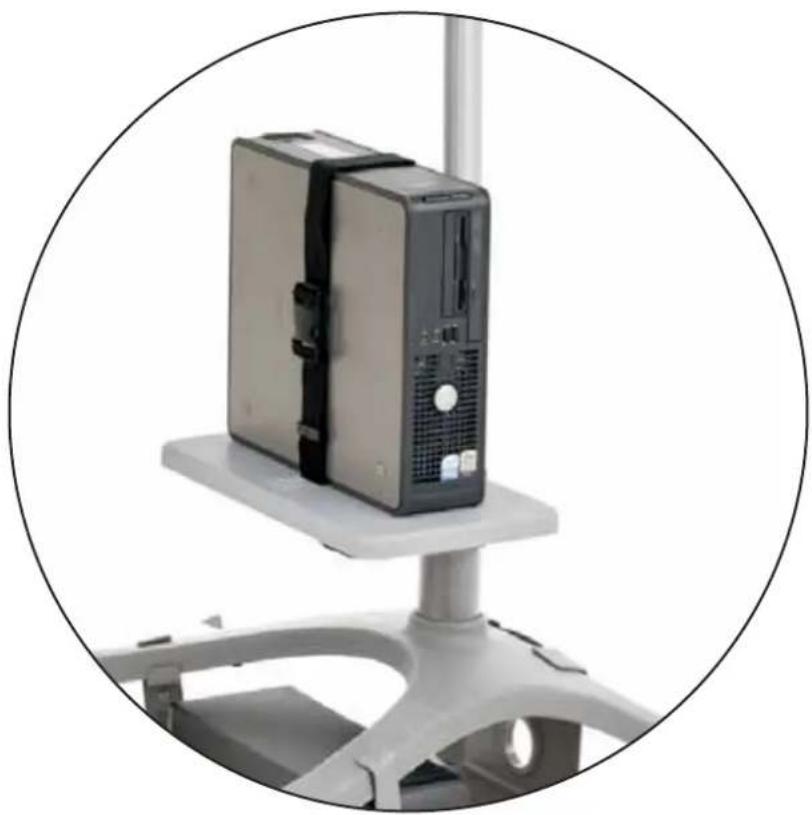
Zido® Shelves and Bin
natural_image
Close-up of a desktop computer tower with a black CPU case mounted on a white platform, enclosed in a circular frame (no text or symbols visible)| Product Part# | |
| Zido Additional Shelf, Lg | ZADLxx |
| Zido Equipment Shelf, Med | ZESMxx |
| Zido Equipment Shelf, Lg | ZESLxx |
| Zido Metal Bin | ZMBxx |
www.ergotron.com
USA 1-800-325-3841
For the latest User Installation Guide please visit: www.ergotron.com
natural_image
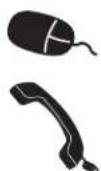
Technical line drawing of a mechanical assembly with exploded and assembled views (no text or symbols)WELCOME
Thank you for purchasing your Zido Shelf or Bin! If you have any questions or if we can help you in any way, please contact us at 800.325.3841.
ASSEMBLY SEQUENCE
Plan out the assembly sequence to make your installation easier.
- Pre-drill the top for accessories (Side Bin, Gel Cup/Probe Holder, Extension Tube).
- Assemble the cart.
- Base Storage Shelf.
- Drawer, Handle.
- Additional Shelves, Equipment Shelves, Metal Bin.
- Cable Bin, Glove Box Holder.
- Side Bin, Gel Cup & Probe Holder, Extension Tube.
- Pole-mount (8in) Handle, Flat Panel Mount.
PARTS LIST
Before beginning assembly of your Zido Shelf or Bin, please review the parts list to verify that your shipment is complete.
The 3-way wrench and 1/8" hex key are provided for assembly of your Equipment Shelf and Metal Bin. The 5/32" hex driver (provided with your Zido cart) is required for this assembly.
Shelves and Metal Bin Quantity Part Number
01 Metal Bin 1 225-2625-00
02 Additional Shelf 1 101-1029-06-50
03 Equipment Shelf 1
Medium 225-2623-00
Large 225-2652-00
04 Inner Shelf Bracket 1 225-2986-00
05 Outer Shelf Bracket 1 225-2626-00
06 Nylok Nuts 8 325-5186-00
07 3/4" Wood Screws (for Wood Shelves) 4 325-5575-00
08 1/2" Button-head Screw 4 325-5193-00
09 Self-threading Screw 3 325-5464-00
10 1/8" Hex Key (not shown) 1 375-5015-00
11 Zido Strap and Buckle Kit f/Equ Shelf 1 ZSTRBK (not shown)
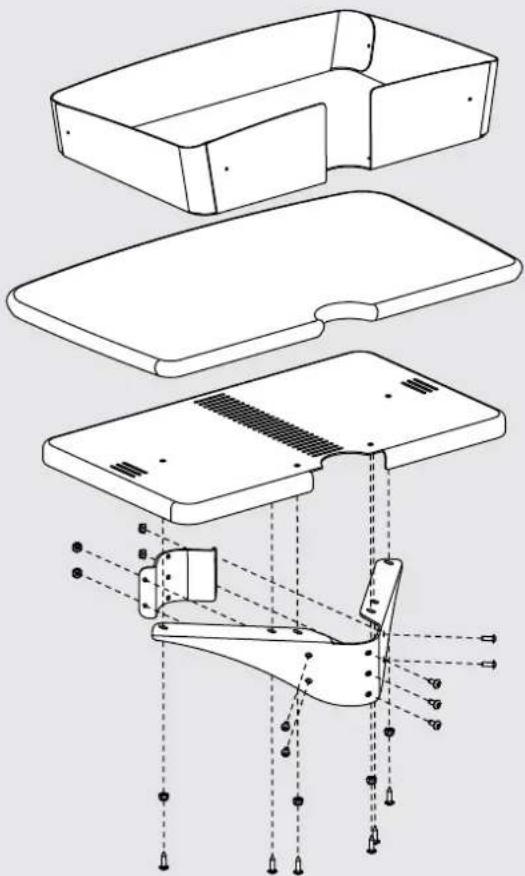
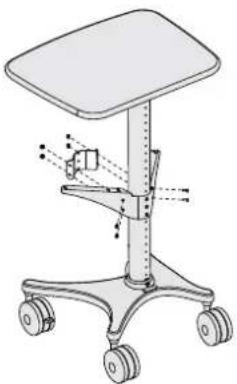
STEP 1
Install the Outer Shelf Bracket
■ Select the location for your shelf or bin. Align the outer shelf bracket so that the top of the bracket is just below the chosen shelf height.
■ Loosely attach the bracket to the Zido tube using three self-threading screws.
Note: These fasteners are creating the threads in the tube, so the first few turns will require some force.

Self-threading Screw
325-5464-00
natural_image
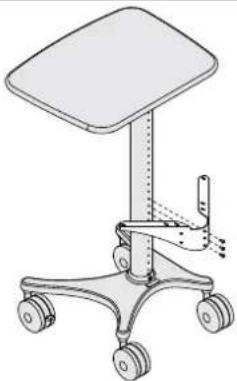
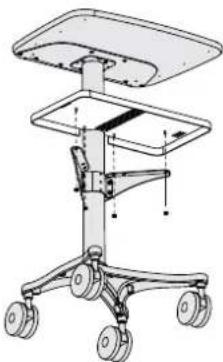
Line drawing of a medical office chair with four wheels and a top shelf (no text or symbols)STEP 2
Install the Inner Shelf Bracket
- Align the inner shelf bracket with the outer shelf bracket so the pair of holes on each end of the inner shelf bracket align with the pair of holes on the outer shelf bracket.
■ Feed one 1/2" Button-head Screw through the inner bracket and through the outer bracket and loosely capture with a Nylock Nut. Repeat for the remaining three screws and nuts.
If you have an Additional Shelf, skip ahead to step 4. If you have an Equipment Shelf or Metal Bin, go to step 3.

1/2" Flat-head Screw 325-5193-00
natural_image
Illustration of a medical or office chair with wheels and a vertical shaft, no text or symbols presentSTEP 3
Install the Equipment Shelf or Metal Bin
■ Place the Shelf or Bin onto the bracket so that the pins seat into the holes on the bracket.
- Secure the Shelf or Bin to the bracket using four nuts. Tighten the three self-threading screws into the bracket. Tighten the inner bracket screws and nuts.
■ If you have an Equipment Shelf, install the Strap and Buckle Kit.
- Use the provided 1/8" Hex Key and your own 3/8" socket, nut driver, or wrench to tighten the fasteners.

Nylock Nuts
325-5186-00
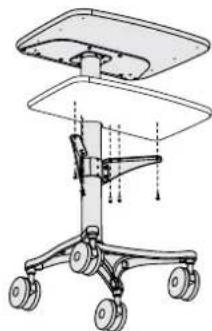
natural_image
Technical line drawing of a mechanical device with wheels and a top platform (no text or symbols)STEP 4
Install the Additional Shelf
■ Place the Shelf onto the bracket so that the holes on the bottom of the shelf align with the holes on the bracket.
- Secure the shelf to the bracket using four 3/4" wood screws. Tighten the three self-threading screws into the bracket. Tighten the inner bracket screws and nuts.
■ Use the provided 1/8" Hex Key and your own 3/8" socket, nut driver, or wrench to tighten the fasteners.

3/4" Button Hd PB Screw
325-5575-00
natural_image
Technical line drawing of a mechanical device with wheels and a top panel (no text or symbols)CONGRATULATIONS! YOUR SHELF AND BIN ASSEMBLY IS COMPLETE!
For Warranty visit: www.ergotron.com/warranty
For Service visit: www.ergotron.com
For local customer care phone numbers visit: http://contact.ergotron.com
Americas Sales and Corporate Headquarters
1181 Trapp Rd.
St. Paul, MN USA
1-800-325-3841
www.ergotron.com
sales@ergotron.com
ERGOTRON®

While Ergotron, Inc. makes every effort to provide accurate and complete information on the installation and use of its products, it will not be held liable for any editorial errors or omissions (including those made in the process of translation from English to another language), or for incidental, special or consequential damages of any nature resulting from furnishing this instruction and performance of equipment in connection with this instruction. Ergotron, Inc. reserves the right to make changes in the product design and/or product documentation without notification to its users. For the most current product information, or to know if this document is available in languages other than those herein, please contact Ergotron. No part of this publication may be reproduced, stored in a retrieval system, or transmitted in any form or by any means, electronic, mechanical, photocopying, recording or otherwise without the prior written consent of Ergotron, Inc., 1181 Trapp Road, Eagan, Minnesota, SS121, USA Patents Pending and Patented U.S. & Foreign. Ergotron is a registered trademark of Ergotron, Inc.