Stealth M 20A - Unknown Plugwise - Free user manual and instructions
Find the device manual for free Stealth M 20A Plugwise in PDF.

User questions about Stealth M 20A Plugwise
0 question about this device. Answer the ones you know or ask your own.
Ask a new question about this device
Download the instructions for your Unknown in PDF format for free! Find your manual Stealth M 20A - Plugwise and take your electronic device back in hand. On this page are published all the documents necessary for the use of your device. Stealth M 20A by Plugwise.
USER MANUAL Stealth M 20A Plugwise
Stealth installation guide
Also applicable to: Stealth+, Stealth M, Stealth M+
natural_image
White and black electronic device housing with three slots (no visible text or symbols)Be aware:
The Stealth is specifically designed to be built in to an appliance/lighting fixture or as a permanently connected device in the electrical installation of a building. Installation should always be executed by a registered installer in compliance with the local electrical code (e.g. BS 7671 or NEC).
Information for the installer
It is required to include an overcurrent protective device (Circuit breaker) before the Stealth, in the EU the maximum rating should be 16A, in North America it should be no more than 20A. Be sure to switch off the circuit before installing the Stealth!
The product should be installed in a closed flame retardant casing with a proper strain-relief mechanism.
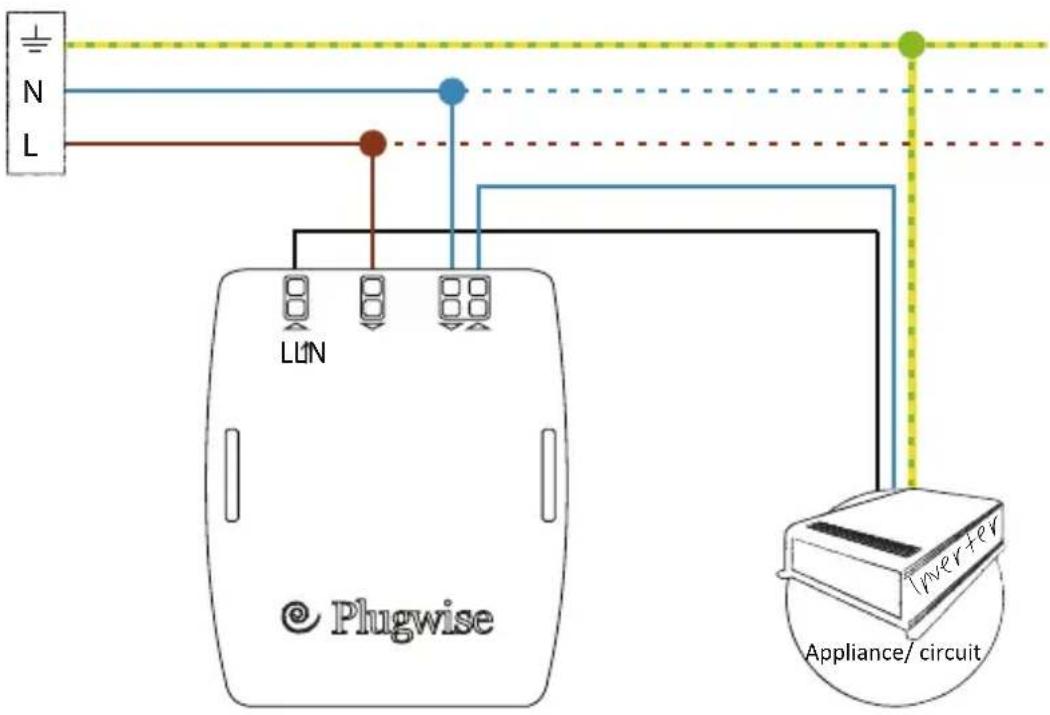
Use the L↑ labelled clamp to connect the phase wire to the appliance and connect the neutral wire to one of the 'N' labelled clamps. Then connect the incoming phase wire to the clamp labelled 'L' and the neutral wire to the free 'N' connection.
For double phase 230V networks the second phase can be connected to the 'N' poles (it will not be switched).
Technical details
| Voltage: 100-240 V~ Frequency: 50 / 60 Hz Total max. current: 16 A | ||
| If a normal Stealth with relay is used, these additional maximum ratings apply:• Inductive load: 4A• Capacitive load: 1AExceeding these ratings will adversely affect the service life of the relay! | ||
| Dimensions:57.1 x 39 x 21 mm | ZigBee Dynamic MESH2.4 GHz | |
| E: helpdesk@plugwise.com | T: +31(0) 252 43 30 70 | W: www.plugwise.com |
All specifications without prejudice.
See www.plugwise.com for detailed information.
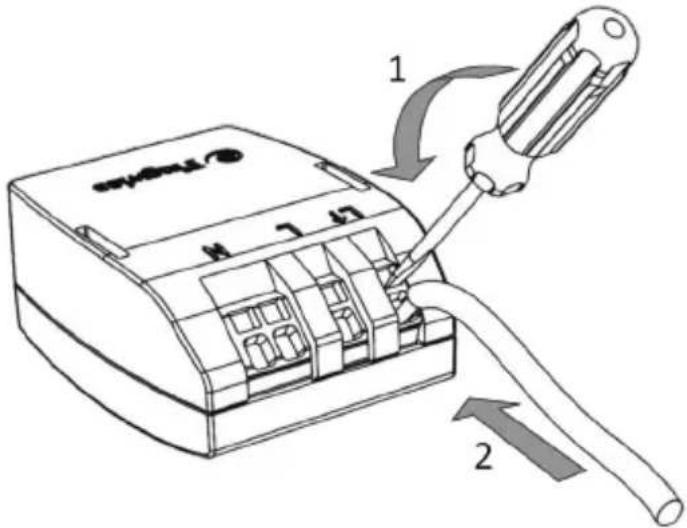
Stealth installation guide
- Insert screwdriver and move in the direction of the arrow (up)
- Insert wire
Be aware:
Connect the L↑ (black line) to the appliance to be measured (in this example the inverter of the solar panel).
Verify the installation
You can verify the installation without the need of WiFi/ LAN:
Make sure you have installed the Stealth and Stretch 2.0.
Remember, the Stretch 2.0 must not be connected to LAN cable!
-
Connect the adapter with the Stretch 2.0 and the wall socket. The Stretch 2.0 will start in WiFi access point modus.
-
Connect your smartphone (installer) with the network of the Stretch via the WiFi access point.
Password: The Stretch ID (see sticker)
- Go to : http://192.168.40.40 via the mobile browser on your smartphone.
The Stretch 2.0 web interface starts loading and continues generating a new appliance for the installed module.
Username: stretch
Password: The Stretch ID (see sticker)
- In case of energy production (solar panel):
You will notice below the image of the Stealth in the green field (and the MAC adress) a negative sign (-) in front of the solar production if the installation has been executed correctly (and if the solar panels are producing). This may take some time. If the installation is connected incorrectly there will be no negative sign (-) in front of the power output.
In case of energy consumption (appliance):
If the installation has been executed correctly there will be no negative sign (-) in front of the power output.