MA010FBM - Fridge Mabe - Free user manual and instructions
Find the device manual for free MA010FBM Mabe in PDF.

User questions about MA010FBM Mabe
0 question about this device. Answer the ones you know or ask your own.
Ask a new question about this device
Download the instructions for your Fridge in PDF format for free! Find your manual MA010FBM - Mabe and take your electronic device back in hand. On this page are published all the documents necessary for the use of your device. MA010FBM by Mabe.
USER MANUAL MA010FBM Mabe
natural_image
Close-up of a white kitchen refrigerator with a handle and label 'CORN RIN' visible (no additional text or symbols)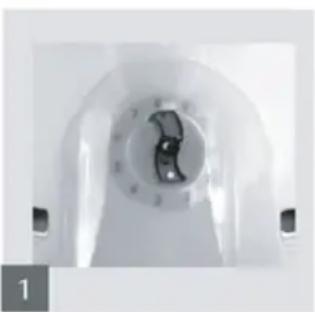
natural_image
Close-up of a medical CT scanner needle inserted into a circular chamber (no visible text or symbols)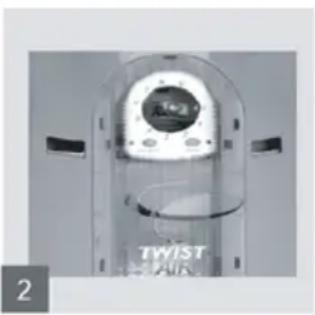
natural_image
Close-up of a transparent cylindrical device with a central circular dial and 'TWIST AIR' label, no readable text or symbols beyond the label.
natural_image
Close-up of a white mechanical component with a curved base and mounting bracket (no visible text or symbols)2
natural_image
Interior view of a refrigerator with three glass bottles on top (no visible text or labels)2
natural_image
Interior view of a multi-tiered storage unit or shelf with visible metal grating and insulation (no text or symbols)4
natural_image
Illustration of two hands placed on a tray with a flat surface (no text or symbols)[Non-Text]
medias parrillas
natural_image
Interior view of a refrigerator with open door and shelves (no visible text or symbols)
natural_image
Close-up of three metallic rectangular panels with curved surfaces, no visible text or symbolsanaquel gaveta
natural_image
Close-up of a transparent cylindrical container with a small object inside, possibly a container or device (no visible text or symbols)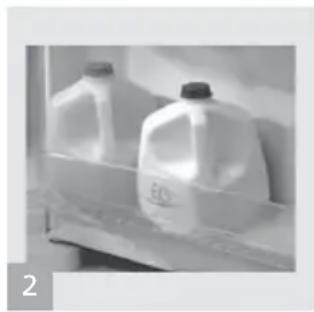
natural_image
Two white plastic bottles with black caps placed on a shelf, no visible text or symbols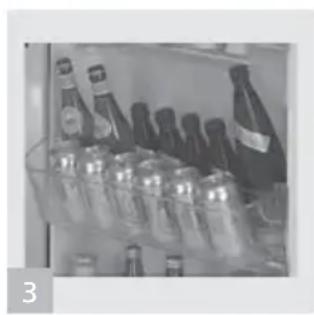
natural_image
Black-and-white photo of a shelf with glass bottles and containers, no visible text or symbols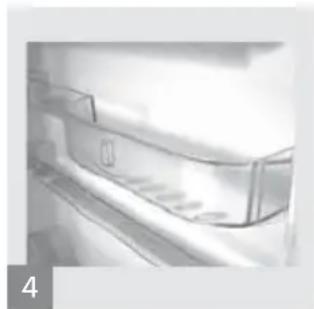
natural_image
Close-up of a refrigerator interior showing glass panels and a door (no visible text or symbols)natural_image
Simple icon showing airplane and suitcase inside a rounded rectangle (no text or symbols)
natural_image
Simple black-and-white icon of a snowflake inside a rounded rectangle (no text or symbols)
natural_image
Simple icon of a rectangular device with concentric circular waves, no text or symbols present.1 seguro
natural_image
Illustration of two hand positions showing a curved object being held, with no text or symbols present.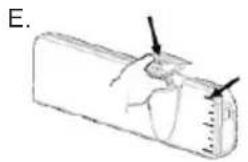
natural_image
Simple icon of a key inside a rounded rectangle with a padlock symbol (no text or numbers)
natural_image
Simple geometric diagram showing a triangle inside a rounded rectangle (no text or symbols)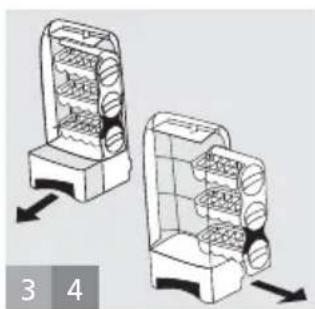
natural_image
Two 3D diagrams of a refrigerator with shelves and legs, showing internal structure and directional arrows (no text or symbols)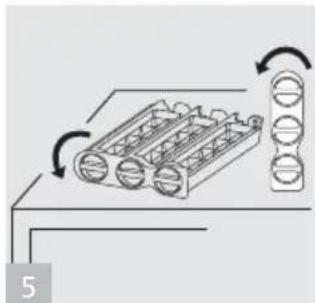
natural_image
Diagram of a mechanical component with rotating parts and directional arrows indicating motion (no text or symbols)natural_image
Isometric line drawing of a mechanical component with internal cavities and a funnel-shaped inset showing flow (no text or symbols)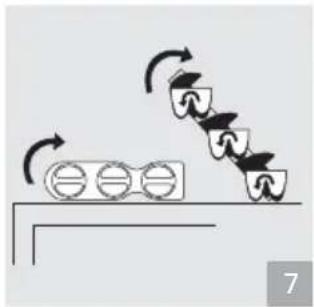
natural_image
Diagram showing a mechanical or electrical component with rotating arrows and three circular components, no text or symbols present.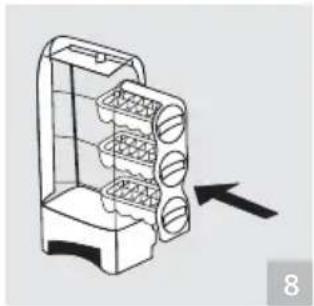
natural_image
Line drawing of a multi-tiered refrigerator with an arrow pointing to the front panel (no text or symbols)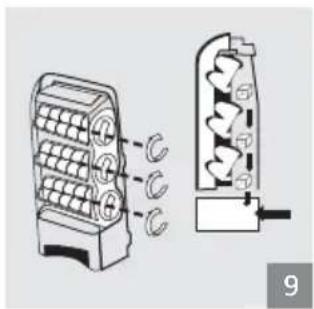
natural_image
Illustration of two mechanical components with rotating parts and a separate view showing internal structure (no text or symbols)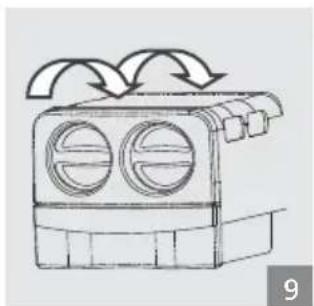
natural_image
Diagram of a device with two circular vent-like components and airflow arrows (no text or symbols)
natural_image
Abstract vertical arrangement of five gray squares with no text or symbolsnatural_image
Close-up of a mechanical component with curved surfaces and a cylindrical top (no visible text or symbols)natural_image
Hand inserting a plug into an electrical outlet (no text or symbols visible)natural_image
Simple line drawing of a device with two circular vents and directional arrows indicating motion (no text or symbols)1
natural_image
Illustration of a light blue delivery truck with a cargo box (no text or symbols)
natural_image
Close-up of a white mechanical device with a cylindrical component and a side panel (no visible text or symbols)1 Twist Air / Maxi Frio cooling system.
2 double deep door.
3 door compartment bin.
4 spill-proof shelves.
5 bottles and cans bin.
6 ultracapacity door bin.
7 humidity control.
8 drawer.
9 fresh food compartment.
10 Twist Air / Maxi Frio cooling tower.
11 freezer.
12 Easy ice.
table of contents
before connecting your refrigerator 28
- general instructions 28
- placement 28
• leveling 28
installing your refrigerator 28
- installation 28
- first connection 30
functioning 30
- fresh food compartment temperature control 31
- freezer temperature control 31
- Twist Air cooling system 31
- drawers 32
• humidity control 32
- shelves 33
• half shelves 33
- removable freezer base 34
• door bins 34
- new internal & external display super luxury models (stainless steel) 34
- water dispenser 37
- Easy Ice 39
caring for your refrigerator 40
cleaning your refrigerator 41
cleaning your Easy Ice 42
general information 43
safety instructions 44
frequent questions 45
serviplus service centers 46
warranty 47
thank you for your preference.
Thank you for buying your Refrigerator from us. We feel sure that you will continue being a valued customer.
This manual was written with a view to your well-being. It contains simple instructions in order for you to obtain the optimum safety, comfort and energy-saving from your refrigerator. Read this guide carefully before installing your refrigerator – the validity of your warranty depends on it.
| Nominal Electric Specifications | |
| Frequency | 60 Hz |
| Voltage | 115 V |
Manufactured in Mexico by:
before connecting your refrigerator
general instructions
Remove the bases, packaging and accessories. Remove the adhesive tape residue with a cloth soaked in water and neutral soap.
Choose the location of the refrigerator. This area should be kept clean and dry to avoid rust.
placement
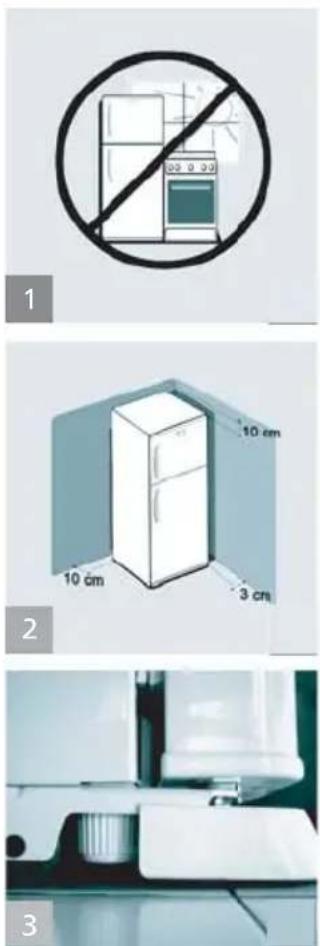
1 Do not install the refrigerator near heat sources like stoves, radiators, or in direct sunlight, as this will cause it to overwork and be less efficient, there by increasing its consumption of electrical energy.
2 Allow the following minimum space to ensure adequate air circulation, especially if the appliance is going to be fixed to the wall: 2 to 3 cm on each side, 10 cm at the back and 5 to 10 cm on top.
Do not lean it against a wall. By complying with this, you will be ensured of the correct positioning of the product, preventing your refrigerator components from directly coming into contact with walls or furniture, thereby avoiding disagreeable noise.
leveling
3 Use the two leveling screws to level the refrigerator. Insert and adjust them so that they rest firmly on the floor.
The front of the refrigerator should rest a little higher than the rear which should lean slightly backwards, thereby facilitating the automatic closing of the doors and preventing temperature loss.
installing your refrigerator
installation
Before inserting the plug into the AC outlet, clean the interior of your refrigerator using a cloth or soft sponge and mild soap, or a solution of bicarbonate of soda and water. Do not use toxic or abrasive products.
minimum requirements of the electrical installation
Characteristics: 127V\~60Hz for residential use. Ideally equipped with a main switch and separate balanced circuits, protected by fuses and/or a circuit breaker of 15 to 20 amperes max.
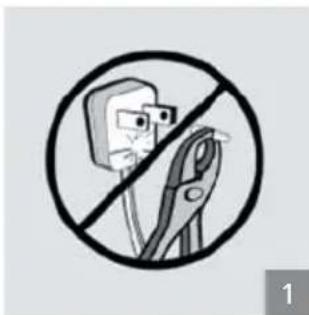
Your refrigerator comes equipped with an AC power cord, apolarized Y-type cable or integrated grounding. Under no circumstances must the grounding be removed to connect an adapter plug or cut and/or replaced by a 2-prong plug.
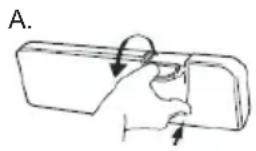
For your safety when installing the refrigerator, refer to figure A.
If your electrical installation is not equipped with this kind of AC outlet, obtain one, and have it installed by a qualified electrician. Any personal accidents and/or material damage caused by the product resulting from failure to do this will be the full responsibility of the client.
Connect your refrigerator to the closest AC outlet.
Use of extension cords; because of potential hazards under certain conditions, we strongly recommend against the use of an extension cord. However, if you still elect to use an extension cord, it is absolutely necessary that it be an UL listed 3-wire grounding type plug and outlet and that the electrical rating of the cord be 15 amperes (minimum) and 120 volts.
Do not connect another electrical appliances to the refrigerator AC outlet while the afore mentioned is in use. By doing this you will avoid power surges and the overheating of your refrigerator.
Never connect another electrical appliances into the same plug that you are using for your refrigerator.
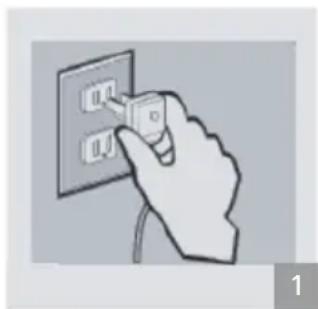
To connect and disconnect your refrigerator, grip the plug firmly, and pull straight from the AC outlet. Never pull the electrical cord.
If you live in an area where there are power surges, exercise the following precautions:
- Do not connect your refrigerator to the AC outlet.
• Install an automatic voltage regulator with a minimum force of 1000 Watts. - Make sure that the regulator can withstand the power surges that occur in your area.
natural_image
Prohibition sign showing a cartoon character crossed out by a diagonal line, no text or symbols present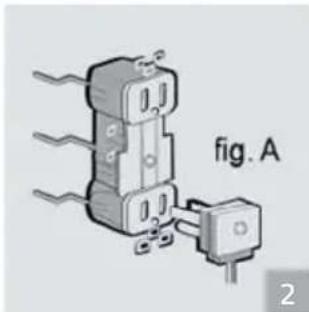
natural_image
Diagram of a wall-mounted electrical socket connected to a terminal block, labeled 'fig. A' (no text or symbols on the diagram itself)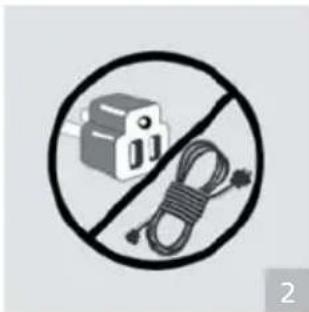
natural_image
Prohibition sign showing a crossed-out electrical plug and cable, no text or symbols present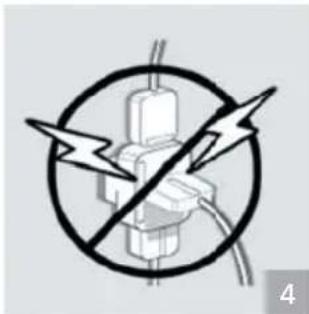
natural_image
Symbolic illustration of a plug with two lightning bolts inside a circle (no text or labels)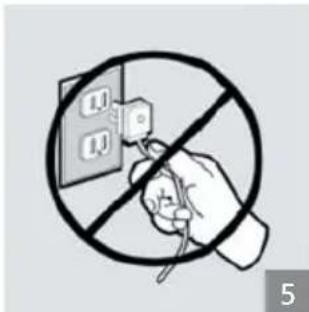
- Ask a qualified electrician to inspect the wall outlet and the electrical circuit, to ensure that the circuit is properly grounded.
- To ground the circuit, follow the grounding regulations and call a qualified electrician.
If the AC power cord is damaged, it must be replaced by an electrician from an Authorized Service Center, in order to avoid any risk of accident.
heating of areas near to the freezer
Your freezer comes equipped with a device which prevents condensation. The heating of some external zones of your refrigerator is normal. This prevents condensation of the drops of water on the exterior of your refrigerator. However, in conditions where there is high atmospheric temperature and humidity, a light film of condensation could form. Dry this with a soft cloth.
first connection
- Once your refrigerator is in place, wait 4 to 6 hours before connecting it so that the compressor oil settle.
- Before connecting the refrigerator, turn the refrigerator temperature control or adjust the temperature level of the display to mid-position (between 4 and 6).
- Connect the plug to the wall AC outlet.
- Allow it to operate empty and with the doors closed for 4 hours before loading with food.
- Avoid opening the door so that it can reach the desired temperature.
- If you want to place your refrigerator in another location, disconnect it before moving.
- Once it is in its new location, repeat the afore mentioned steps.
functioning
Some models have two temperature controls, one for the freezer and one for the fresh food compartment, while other models only have one general control inside the fresh food compartment.
1
fresh food compartment temperature control
To regulate the temperature of the fresh food compartment, turn the knob to the desired position. The refrigerator temperature control is found inside the compartment. It may be necessary to use a coin to turn the control.
| UseTemperature | |
| Minimum | Only few food items stored. Refrigerator's doors seldom opened. Position 1 to 3. |
| Medium | Normal use. Position 4 to 6. |
| Maximum | Many food items stored. Doors frequently opened. Position 7 to 9. |
2
freezer temperature control
The temperature of the freezer compartment is adjusted by selecting the level of freezing on the temperature control found in the interior of this compartment.
| Minimum | Minimum freezing: For when there are few items stored in the freezer or doors are nor frequently opened. |
| Medium | Medium freezing: For normal use. |
| Maximum | Maximum freezing: For when a large amount of food is stored in the freezer or the doors are frequently opened. |
note:
The interior temperature can vary depending on the environmental temperature. In the hot months (summer), the temperature control may need to be adjusted in order to lower the temperature and in the cold months (winter) to raise the temperature.

natural_image
Four-panel technical illustration of a medical or laboratory device, showing front, top, side, and side views with no visible text or symbols.
natural_image
Interior view of a kitchen appliance with shelves and utensils (no visible text or symbols)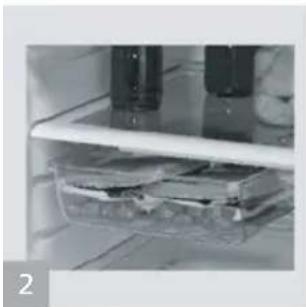
natural_image
Close-up of a refrigerated appliance with internal compartments and a white shelf (no visible text or symbols)
natural_image
Interior view of a food storage cabinet with labeled compartments (no visible text or symbols)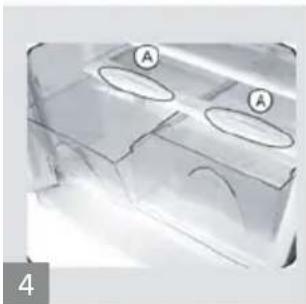
natural_image
Close-up of a transparent plastic surface with two circular indentations labeled 'A' and a curved edge, no readable text or symbols present.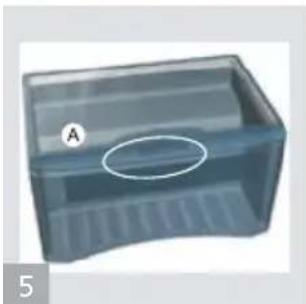
natural_image
3D rendering of a transparent plastic container with a labeled circular feature marked 'A', no text or symbols present."Twist Air" / "Maxi Frio" cooling system
It is not necessary to defrost your refrigerator as it defrosts automatically (No Frost).
The Twist Air / Maxi Frio cooling system guarantees the even circulation of cold air and its distribution to all parts of your refrigerator, thereby maintaining the optimum temperature throughout.
The air disperser in this system acts as a fan. It distributes the cold air in the freezer and the cooling tower. It is very important never obstruct or block the air vents.
The cooling tower, which is situated in the fresh food compartment, has air outlets which ensure that your food is maintained at the correct temperature.
On opening the door of your refrigerator, it is normal for the tempered glass shelves to steam up because of the introduction of moisture.
drawers
Your refrigerator comes equipped with various types of drawers, depending on the model.
The cold meats drawer may be situated on any point along the width of the shelf; it is recommended to place the shelf which supports the drawer on the first level from top to bottom.
The individual vegetable drawer is designed to preserve fresh fruits and vegetables. Make use of the drawer division so as not to mix the fruits and vegetables and to optimize their placement (this only applies in certain models).
The luxury models contain 2 drawers to facilitate the separate storage of fruits and vegetables.
In some models the drawer or drawers have a humidity control.
humidity control
The vegetable drawer maintains a suitable temperature and humidity for the storage of foods, thereby preserving their natural characteristics.
The correct usage of the humidity control ensures the adequate flow of air into the interior of the drawer.
It is recommended to use the humidity control in the smaller compartments to preserve green vegetables and in the larger compartments to preserve fruit.
to remove the drawers:
Remove the drawer until the ceiling, lift slightly to emerge from its riel and pull out.
If you require withdraw the ensemble of drawers and covers, pull as a normal grill.
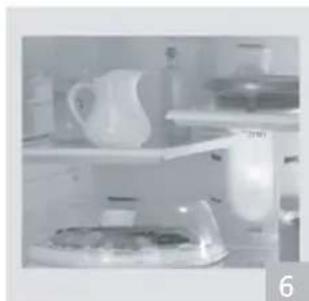
shelves
Some models have spill-proof shelves tempered glasshelves with plastic frames and anti-spill which prevent small liquid spillages in your refrigerator.
Other models have wire shelves. Both kind of shelves are multipositional. The maximum recommended load for the shelf is 25 kg (55Lb).
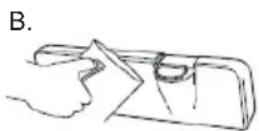
if it is necessary to remove the glass shelves:
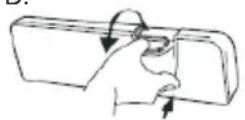
1 Remove all foods and objects placed on them.
2 Place both hands on the front part of the shelf, as demonstrated in the picture.
With your fingertips, gently pull the shelf towards you.
3 Once the rear section of the shelf is lifted, pull it towards you, taking care to grasp it firmly.
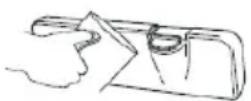
4 To replace the shelf on the desired support, make sure that the support is between the shelf edge and the surface, as shown in the picture, and push it until you feel the catch of the shelf joint.
5 To change the position of other shelves, proceed in the same manner.
6 half shelves
Your refrigerator may be equipped with half shelves. These can be used only on the first three levels of your refrigerator.
When adjusting or removing the shelves, make sure to remove all food items stored in this area and to hold the shelves with both hands.
natural_image
Interior view of a refrigerator with white shelves and a single door (no visible text or symbols)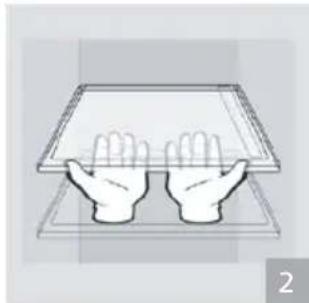
natural_image
Illustration of two hands reaching out of a tray (no text or symbols)
natural_image
Interior view of a kitchen appliance with shelves, a pitcher, and a plate (no visible text or symbols)To adjust the position of your half shelves, lightly lift the front of the shelf and slide it forward until it rests loosely on the support points; when it is approximately half way to these points, shift the shelf to the side.
The placement of the half shelf is similar: introduce it to approximately the mid-point of the refrigerator, rest it against the side of the refrigerator and push backwards until it rests on its support points.
The shelf is not completely horizontal, it is slightly raised in the center so that when heavy objects are placed on it it levels out - this is completely normal. The maximum recommended load for this shelf is 8 kg (17.6 lb).
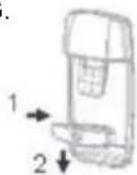
1 removable freezer base
Only certain models come equipped with a removable base.
The freezer base can be removed to facilitate cleaning if liquid spillage occurs.
To remove the base, pull it towards you.
Do not let liquids and objects fall against the interior air vent.
For your refrigerator to run well, ensure that the base is always in its correct position; after cleaning, replace the base by sliding it smoothly into place.
2 door bins
Depending on its model, your refrigerator comes equipped with a double deep door (which is the largest on the market), and some of the following shelves (depending on the model):
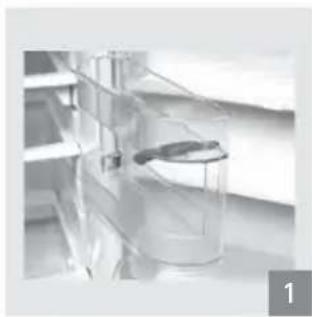
slide-out bins
Some models have slide-out bins which allow greater versatility of internal storage and distribution. To move the slide-out bins, gently slide them into the desired position. Remove any foods which may be stored on them to avoid their falling over during the adjustment.

natural_image
Two grayscale photos showing a refrigerator interior and a storage rack with glassware (no visible text or symbols)door compartment bins
1 Your refrigerator may come equipped with a door compartment bin, which gives you the option of conveniently storing foods like butter, cans and small jars; it is not recommended to store cheeses and meats in this area.
To put the rear shelves into place: gently raise the safety catch on the door compartment bin so that the catch can turn easily; make sure to return it to its original position and check that it is secure.
The maximum load recommended is 2 kg. (4 lb.) Do not allow children to hang on the bin as it will break if overloaded.
Before closing the door of your refrigerator, make sure that the removable compartment bin is in its original position and is secured by the safety catch.
ultracapacity bin
2 A bin with a large storage capacity and great versatility on the inside of the door. Suitable for storing large recipients and 4 liter bottles (one gallon).
bottle and can bin
3 A bin which provides adequate space for the storage of cans on the front part; the rear part is for storing tall bottles. Additionally, it is designed ergonometrically so that products can be easily reached.
two-depth bin
4 A bin suitable for storing small containers like drinking yogurt, juice, small tetrapack cartons, nail varnish, etc. It is ideal for storing small jars which can be knocked over on other shelves.
other accessories:
(this can change from one model to other)
- Ice tray: With this item you can make a double quantity of ice.
- Egg trays: Here is a large quantity of eggs can be stored.
natural_image
Close-up of a laboratory glassware unit with a container and a dark lid, no visible text or symbols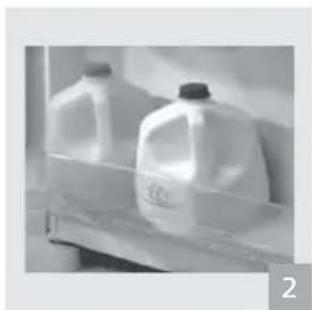
natural_image
Black-and-white photo of two white plastic bottles on a shelf, one black and one white, with no visible text or symbols.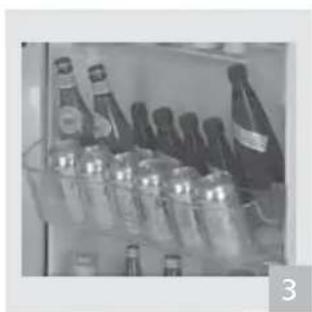
natural_image
Black-and-white photo of a refrigerator shelf with various bottled and canned items (no visible text or labels)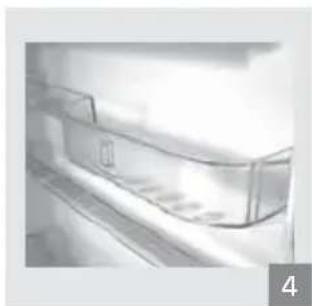
natural_image
Close-up of a kitchen refrigerator with visible door and shelf (no text or symbols)new internal and external display super luxury models (stainless steel)
The super luxury models with exterior display are equipped with the following functions:
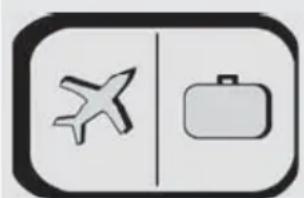
1 vacation function
This function permits you to save energy when you go on vacation (15 days maximum recommended). If vacations exceed 15 days, disconnect your refrigerator, clean it and leave the doors open in order for it to ventilate.
The vacation function is activated by depressing the button and deactivated by once again depressing the button, or, on opening the refrigerator door, an alarm will go off and the upper part of the light will become illuminated, advising you that the vacation function has been set. In addition to the illuminated indicator, you will see the screen digit slowing advancing until the function has been desactivated.
2 turbo
This function accelerates the cooling down time and consequently speeds up the freezing time. The turbo function is activated by depressing the button and is deactivated by depressing it again or on completion of your chosen cycle according to what your specific requirements are. In addition to the illuminated indicator, you will notice the screen function advancing rapidly for one hour. On completion it will return to its normal condition.
note: You cannot activate both functions at the same time.
3 alarm
The alarm goes off when the door of the refrigerator is left open for more than one minute (causing the refrigerator to be less efficient and to consume more energy). It is activated or deactivated by pressing the button. An alarm gives you warning in which case the upper part of the button will become illuminated.
natural_image
Simple icon showing an airplane and a suitcase side by side within a rounded rectangle (no text or symbols)1
natural_image
Simple snowflake icon inside a rounded rectangle (no text or symbols)2
natural_image
Simple icon of a rectangular button with concentric circular waves, no text or symbols present.3
lock
1 This function locks the display so that the programming cannot be changed by anyone else.
To activate or deactivate it, pulse the alarm and vacation buttons simultaneously for 3 seconds. The letter L (Lock) will appear in the center for a few seconds, restoring the temperature.
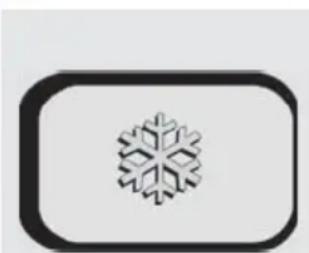
temperature level
2 This function is found on both the internal and the external display.
Pressing this button will make the refrigerator colder. The temperature range is from 1 to 9, with 9 being the coldest.
Note: Your display is capable to detect the presence of a malfunction, which will be indicated by the letter F. If this happens, please call your technical service center. For activate all functions excessive force for pressing buttons is not needed. ALL FUNCTIONS TAKE 2 SECONDS FOR BEEN ACTIVATED.
Water Dispenser
(Applies for some models)
Your fridge has a manual filling water dispenser, that let you obtain cold water on the outside and reduce the energy consumption.
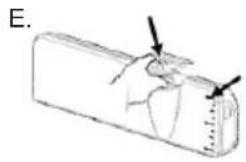
Clean this system before first use and repeat every 30 days without resorting to a cleansing agent or any otheraromatic cleaners. To do so, remove the tank up toward the front and exerting pressure as indicated in the figure A. Rinse with clean water, then pull and replace the tank.
open and fill with water
C.
P lace the tank in its original position by matching the nozzle and pushing towards the back.
To locate the container on its original position, make sure that the mouthpiece below the tank outfits correctly in the hole of the door, this is placing it down and then by pushing the tank backward, so that it will fit with the door doing click. (See figure C)
Avoid fill the container through the top, in order to dismissed any overflow of water. The maximum level of water is indicated to 2.75 lts.
The manufacturer is not responsible for the use of the container with another type of liquid outside the natural water, as they can cause a malfunction in the system.
If the water container is not well placed, there may be a drain or wring and the water will not be discharge by the dispenser of the door.
It is possible that, if the water dispenser ceases to be used regularly, water would have a strange taste in subsequent executions.
Do not remove any water dispenser parts, except the tank, the cover of the tank and the collector grid of drops
After dispatching water, the fallen of some drops is normal, you can minimize this by slowly glass withdraw from the lever or actuator. After dispatching water, the fallen of some drops is normal, you can minimize this by slowly glass withdraw from the lever or actuator. In some cases, due to form a slight condensation, it is also possible that might fall some drops.
FILLINGOFTHEWATERCONTAINER
D.
To supply the water, remove the cover as shown in the image X, spill EXCLUSIVELY PURE DRINKING WATER with a glass or a pitcher until the liquid reaches the measure of 2.75Lts marked on the right end of tank. Place the lid pressure again. (See figure D)
BEWARE: DO NOT SPILL ANY WATER UNTIL THE TANK IS
PLACED CORRECTLY THROUGH THE DOOR (figure E)
WATERDISPENSERUSAGE
Push from the central part and through the back of the dispenser lever with a glass until the water comes out, and keep it pressed until the liquid reaches the desire level. Always dispense by holding the glass.
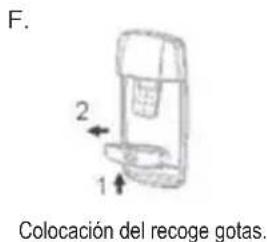
In case of any eventual drop spill, slide the inside dish or drop collector through the top and retire it through the outside, throw the water away and place the dish again sliding it trough the inside and down. (See figure G).
F.
placing the drop container
G.
Easy Ice
Some models have a device designed to make perfect ice, the Easy Ice. This is located in the freezer door, leaving you more space inside for you frozen foods.
note: When you use the Easy Ice it is very important that the freezer shelves are in place.
How to use your Easy Ice?
Taking off
To obtain the ice, pull the drawer towards you.
To refill the molds, remove the cassettes liding it out carefully.
Filling
Once the cassette is out of the freezer, turn the cassette anticlockwise until it is horizontal on a flat surface before filling it.
natural_image
Simple icon of a padlock inside a rounded rectangle, with a key on the left (no text or symbols)
natural_image
Simple geometric shape: a triangle inside a rounded rectangle, no text or symbols present.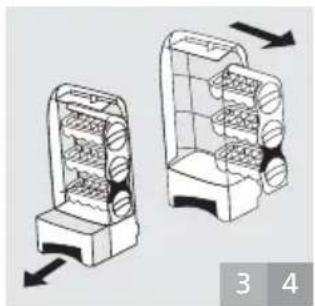
natural_image
Two 3D mechanical components with arrows indicating rotation, no text or symbols present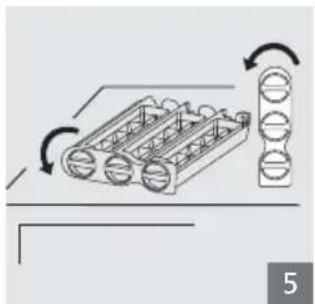
natural_image
Diagram of a mechanical assembly with rotating components and directional arrows (no text or symbols)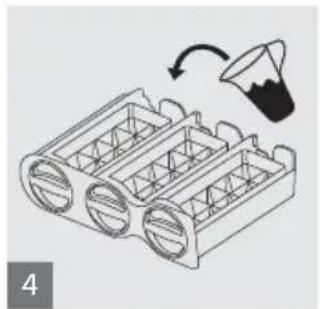
natural_image
Isometric line drawing of a mechanical component with internal channels and a curved arrow indicating rotation (no text or symbols)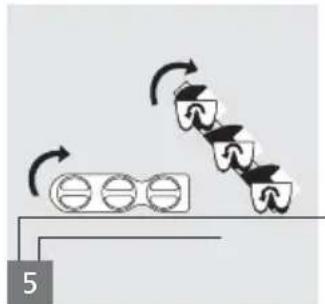
natural_image
Diagram showing a mechanical or electrical component with rotating arrows and three circular components, no text or symbols present.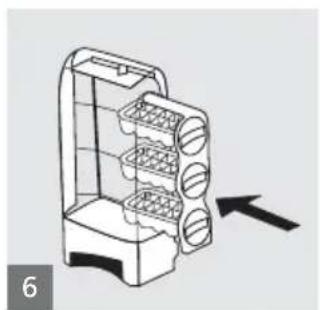
natural_image
Line drawing of a multi-tiered refrigerator with an arrow indicating direction (no text or symbols)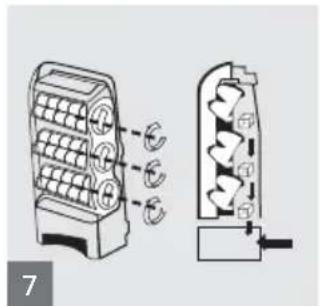
natural_image
Diagram showing two mechanical components with rotating parts and spring-like elements (no text or symbols)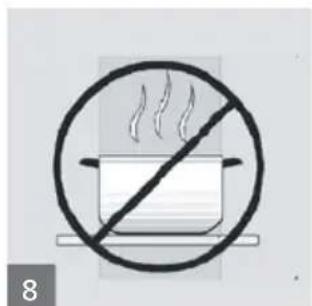
4 The molds have a water level control. If you overfill them the water will spill out.
5 With the knobs facing you, turn the cassette clockwise, the molds will then be in a horizontal position.
6 Finally, put the cassette back into the Ice Factory. Move it on its rails as far as it will go. And wait for the ice tobe made. Be sure to dry excess water from the bottom of the cassette before putting it in your freezer.
Unmolding
7 Turn or twist each knob in the clockwise direction until the ice cubes fall into the drawer below. The drawer can only store the ice from the three molds.
Make sure the ice drawer is empty before unmolding the next batch of ice.
Clean the surface under the drawer at least once a week.
caring for your refrigerator
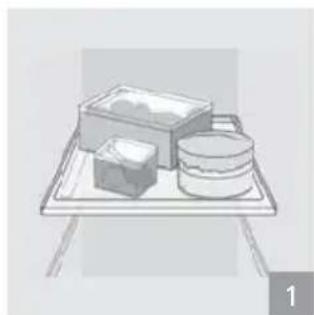
We recommend storing food in containers with lids, wrapped in or stored in airtight materials such as aluminum foil, plastic containers or plastic wrap.
8 Do not store hot foods in the fresh food compartment or freezer. You should wait until they have cooled down to room temperature.
Only open the doors for the necessary time to store or remove food items or drinks. By doing this you will reduce energy consumption and improve the performance of your refrigerator.
It may be difficult to open the door again after having opened and closed it to introduce or remove foods. This is normal due to the vacuum that forms in the interior of the refrigerator caused by the exchange of air at different temperatures. If this happens, wait 10 to 15 seconds before trying again and the doors should open easily.
Always store onions in a plastic bag or a hermetically-sealed container to prevent their odor from penetrating other foods.
Do not store garlic inside your refrigerator as a cold, dark environment promotes its germination.
1 Store foods in small quantities in the freezer as this facilitates quicker and more effective freezing. We recommend placing food that you would like to freeze rapidly or ice cubes on the freezer shelf.
Always take note of the manufacturer's expiry date on frozen products. Once food has been defrosted, it cannot be refrozen.
Liquids increase in volume when frozen. For this reason, do not fill recipients up to the brim with liquids.
Do not store closed glass recipients containing liquids in the freezer. The breakage of glass recipients could badly damage the freezer.
cleaning your refrigerator
2 Always disconnect the refrigerator plug from the outlet before cleaning or before starting a technical revision.
3 Never use toxic products (like ammonia, etc), abrasive products (pastes) or fibers as they can damage the refrigerator. Do not use fibers or sharp or pointed objects which can scratch your refrigerator or the interior shelves.
Use a soft sponge or a cloth which has been soaked in water and a mild soap. Rinse and dry well with a clean, dry cloth. You can also use a solution of one spoon of bicarbonate of soda and two liters of warm water to clean the interior.
To clean the condenser (on the models which have them), use a brush, cloth or sponge to eliminate accumulated dust. Do this at least every six months.
to periodically clean the freezer:
- Disconnect the plug from the wall.
- Remove the freezer base, pulling it towards you.
- During the cleaning, do not let accumulated liquid filter into the interior of the refrigerator as this could damage the unit. Dry well.
- After cleaning, replace the freezer base to ensure the optimum running of your refrigerator.
note: Only certain models come equipped with a removable base.
natural_image
Illustration of a tray with three items: a rectangular box, a cube, and a cylindrical container (no text or symbols)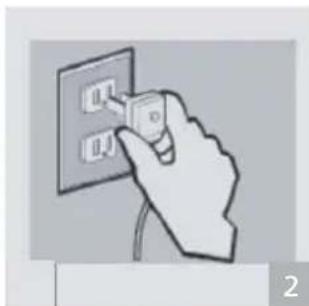
natural_image
Hand inserting a small component into an electrical outlet (no text or symbols visible)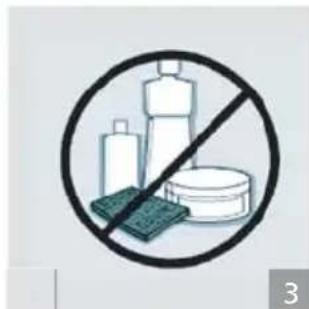
cleaning Easy ice
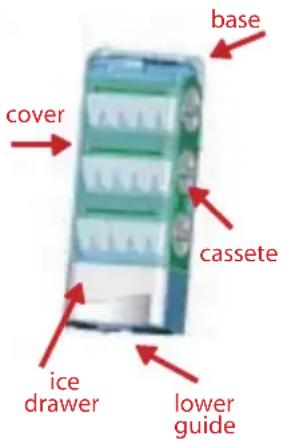
For the easy cleaning of your Easy Ice, we recommend you disassemble it as follows:
1 Remove the shelves from the door, the ice drawer and the cassette.
2 In the freezer door, slide de Easy Ice sideways to the left as far as possible.
3 Remove the upper part of the Easy Ice from its mount, holding the sides in both hands and pulling it towards you away from the door.
4 To disassemble the cassette's components you most push the pin C outwards to free it from the cassette. The knobs will come off on their own. Repeat these steps with the three ice molds.
5 Wash the parts of the Easy Ice using just a soft sponge with water and a mild soap. After that, dry it. It is Important NOT TO USE scouring packs or abrasive products to wash it, especially the ice molds.
to assemble
The cover of the Easy Ice may become detached during cleaning. To put it back, the lower guides of the cover must enter the holes in the base of the mount, then you should line up the lateral guide of the cover with the slide of the mount and press the cover onto the mount until you can hear it has fitted on. The cassette should not be inserted until the cover is in place.
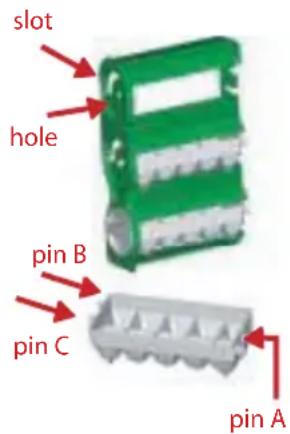
6 To assemble the cassette put pin A into hole O making sure pin B enters slot R. Push the ice mold until pin C is fixed in position. Put on the knob making sure it is firmly fixed to ice mold. Repeat these steps whit the three ice molds.
7 Take the Easy Ice to the door of your freezer. Put the lower guide of the mount into the extreme left side of the rear slot of the freezer door.
8 Push the upper part of the Easy Ice until the mount enters into the back of the door.
9 Slide the Easy Ice to the right, leaving it in its original position.
10 Put the shelves, the cassette and the ice drawer back in place.
general information
trips and absences
1 On prolonged absences, disconnect the plug from the wall outlet. Leave your refrigerator empty and clean. This includes the ice trays.
Leave the door ajar, placing an object behind it to prevent it from closing. This facilitates air circulation and stops bad odors from forming.
For short periods of absence, your refrigerator can stay connected. But be aware that there is always the possibility of power cuts while you are away.
moving
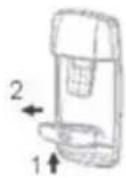
2 If you need to place the refrigerator in a horizontal position in order to transport it, place it only on its left side (when viewing your refrigerator from the front).
Before changing your refrigerator's location, screw the leveling screws in as far as they will go.
problems with the electrical supply
The majority of power cuts are corrected in a few hours. The interior temperature of your refrigerator will not be affected for 4 hours. If the electrical failure persists for more than 6 hours we suggest you to introduce ice bags in both compartments to help to preserve foods.
If your model is equipped with the function Vacations and Turbo, in the case of a power cut these will return to their state of non activation (functions indicator will be switched off). Your refrigerator will not be affected in any way on the resumption of power.
normal operating sounds
Some sounds are normal when your refrigerator is operating. Following is a table describing the different sounds that are characteristic of its functioning:
crunching
Crunching is heard when ice breaks. This is the same noise that is heard when ice trays are removed from the freezer and exposed to room temperature.
natural_image
Hand inserting a plug into an electrical outlet (no text or symbols visible)
natural_image
Illustration of a delivery truck with a front cargo box (no text or symbols)compressor
This is a normal sound caused by the running of the motor. It means the compressor is functioning.
gas expansion
Characteristic of the expansion of gas in the refrigeration system. It is similar to the noise heard when filling a gas cylinder.
defrosting
This sounds like running water. This occurs when the refrigerator is going through the defrosting process.
bubbling water
This occurs in the defrosting cycle and stops heat from entering the unit.
safety instructions
Do not touch the interior walls of the Freezer with wet hands.
Do not allow children to hang from the doors and/or play near the Refrigerator when the door is open as they could get injured or trapped inside.
When you need to change the light bulb, disconnect your refrigerator to avoid any electrical discharge. Also, make sure that the new ligth bulb has the same characteristics, power (Watts) and size.
frequent questions
Before calling our Authorized Service Center, carry out an investigation by consulting the following table.
If after performing these tests you are still in doubt, contact our Service enter and it will be our pleasure to assist you.
| IF MY REFRIGERATOR... | PROBABLE CAUSE WHA | IT SHOULD DO |
| Does not run. | There is no current. | Check the fuses in the electric system.Make sure the plug is tightly pushed into the outlet. |
| Tension is very low (this can be seen by the fluctuations of brilliance of house lights). | Install an automatic voltage regulator | |
| Defective plug. | Connect another electrical appliances to the plug to confirm whether it is necessary to change the plug. | |
| Plug disconnected. Connect the plug. | ||
| Power cord damaged. Call an Authorized Service Center | ||
| Installed in an unsuitable location. | See “Installation” instructions. | |
| Unsuitable leveling of the product. | Adjust the leveling screws. | |
| Abnormal sounds. | Crunching sound. See Normal Operating Sounds under General Information. | |
| Compressor sound. See Normal Operating Sounds under General Information. | ||
| Gas expansion sound. See Normal Operating Sounds under General Information. | ||
| Defrosting sound. See Normal Operating Sounds under General Information. | ||
| Ventilation system sound. See Normal Operating Sounds under General Information. | ||
| Refrigerator does not get cold. | Air does not seem to be circulating efficiently. | Do not obstruct air vents. |
| The doors are opened frequently. | Instruct people to open doors only when necessary. | |
| External condensation. | High humidity in the atmosphere (normal in certain climates and seasons). | Install your refrigerator in a well-ventilated location. |
| External condensation near the magnetic seal. | Magnetic door seal does not adhere properly. | Adjust the leveling screws to gently tilt the refrigerator backwards. |
| The doors are opened frequently. | Instruct people to only open doors when necessary. | |
| Internal condensation. | Foods are not wrapped up, are not in airtight containers or are hot. Liquids may be in recipients without lids which generates excessive moisture. | Wrap up the foods and put lids on recipients containing liquids.Do not store hot foods. |
| Excessive moisture in the foods in the vegetable drawer. | Humidity controls are in wrong position. | Adjust the humidity controls of the drawer to a more open position. |
| Ice crystals form in the freezer | Moisture filtration through the door | Make sure that nothing is preventing the door from closing correctly. If necessary, reorganize the foods in the freezer.If ice manufacture continues, call your Authorized Service Center |
| The internal light bulb does not illuminate. | Light bulb fused. Replace the light bulb. | |
Call free from Mexico:
Internet:
Attention to distributor:
01 800 902 99 00
www.serviplus.com.mx
01 800 509 16 00
Remember that your product is supported by SERVIPLUS, the leading kitchen appliance service company, where you will always receive preferential treatment from professionals who are ready to resolve any problems concerning the malfunctioning of your product.
Before requesting a service warranty:
- Make sure that you have followed the installation, use and care instructions laid out in the manual.
- Have your duly stamped warranty ready, or an invoice, sales receipt or other proof of purchase. This document is indispensable for the validity of the warranty.
- Make a note of the brand, model and serial number of the product and have a pen and paper on hand.
- In the annex to the directory, find the service center closest to you and call them to report the problem you are having with the appliance.
In addition to supporting your product warranty, SERVIPLUS offers you the following services:
• Delivery of appliances not under warranty at extra cost.
• Extension of warranties.
• Preventative maintenance contracts
• Original spare parts sales.
Mexico City Monterrey Guadalajara
01 55 52 27 1000 01 81 83 69 7990 01 33 36 69 3125
| Argentina(5411) 4489 8900 | Costa Rica(506) 260 4307(506) 260 4207 | Guatemala(502) 5811 5990(502) 5810 5266 | El Salvador(503) 294 1444 |
| ColombiaInside Bogotá (571) 423 3177outside Bogotá 01 800 051 6223 | Ecuador1800 737847 | PerúInside Lima (511) 705 36 00No charge - national call 511 0800 706 30 | Venezuela(0501) 737 84 75 |
Service Center
- Acapulco
This warranty covers according to the model an country (see table below) as of the purchase date, against any defect attributable to the materials quality or labor during manufacturing, under the following conditions:
1) For this warranty to be effective, the consumer must apply to any of our SERVIPLUS Service Centers by calling the telephone numbers indicated in the directory which constitute part of this warranty and where parts, spare parts, consumables and accessories can be obtained.
2) Mabe S.A. de C.V. undertakes to repair or replace any part of the product found to be defective, at the home of the client and at no charge to the customer for labor, spare parts or transportation of the product. The SERVIPLUS technicians are trained and have the necessary tools for carrying out the repairs at home, ensuring the correct functioning of the product. MABE guaranteesthe availability of spare parts and supplies on the market for ten years (only applies to Colombia),
3) When our technician from SERVIPLUS arrives to examine the product, the product together with the warranty policy duly stamped by the sales outlet from where it was bought, or an invoice, sales receipt or other proof of purchase should be presented.
4) The repair time shall not exceed 30 days, starting from the receipt of the telephone call at our SERVIPLUS Service Centers.
5) The light bulb is not part of the warranty.
6) The warranty will not be valid in the following cases:
- If the duly signed warranty, an invoice, sales receipt or any other document that proves the date of purchase of the product is not presented.
- If the warranty has expired and is not within the warranty period authorized by the manufacturer.
- If the product has been used for commercial purposes, professional services or any other use that is not wholly domestic.
- If the product has been used outside of normal conditions.
- If the product has not been operated in accordance with its English instruction manual.
- If the product has been modified or repaired by unauthorized technicians or service centers.
- Damages to the paint work and parts constituting its appearance when the product has been exposed to the outdoors.
- Breakage of parts due to mishandling.
- Damages due to power surges caused by short circuits, accidental overloading of the power cord or overloading because of electrical discharge.
- Damages caused by the use of parts that are not original.
- Damage to the product during its transportation, when said transportation is undertaken by the client.
| Modelsx,y,w y z | |||
| COUNTRY COMPANY THAT GUARANTEES | TELEPHONE | ||
| Ecuador | Mabe Ecuador | 1 year | 1.800.73.7847 |
| Colombia | Mabe Colombia | 1 year | 01.800.51.6223 |
| Venezuela | Mabe Venezuela | 2 years | (0501) 737.8475 |
| Perú | Mabe Perú | 1year | 0.800.70.630 |
| El Salvador | Mabe México, S. de R.L. de C.V . | 3 years | (503) 294.1444 |
| Guatemala | Mabe México, S. de R.L. de C.V . | 3 years | (502) 811.5990 |
| Costa Rica | Mabe México, S. de R.L. de C.V . | 3 years | (506) 260.4307 |
| México | Mabe México, S. de R.L. de C.V . | 3 years | 01.800.90.29.900 |
WARNING.
This warranty is only valid in the country of purchase of the product, if the product is moved to an other country by the user or personnel not authorized by the manufacturer it may cancelled.
TO BE FILL IN BY THE SUPPLIER
Product: ____ Model: ____ Date of purchase: ____
Stamp & signature:
Brand: ____ Serial No.: ____ Distributor: ____
Mabe S.A. de C.V