VPC-R1EX - Camera SANYO - Free user manual and instructions
Find the device manual for free VPC-R1EX SANYO in PDF.

User questions about VPC-R1EX SANYO
0 question about this device. Answer the ones you know or ask your own.
Ask a new question about this device
Download the instructions for your Camera in PDF format for free! Find your manual VPC-R1EX - SANYO and take your electronic device back in hand. On this page are published all the documents necessary for the use of your device. VPC-R1EX by SANYO.
USER MANUAL VPC-R1EX SANYO
natural_image
Illustration of a white digital camera with lens and control buttons (no text or symbols)Important note
This manual explains how to safely operate the digital camera.
Any information regarding only one of these products will be labeled as such.
Please read these instructions carefully before using the digital camera. Make sure to read and understand the section "USING YOUR DIGITAL CAMERA SAFELY AND CORRECTLY" from pages 3 to 12. Keep this manual in a safe place for later reference.
Warning
TO PREVENT THE RISK OF FIRE OR ELECTRIC SHOCK, DO NOT EXPOSE THIS APPLIANCE TO RAIN OR MOISTURE
FOR AMERICAN USERS\$
- This equipment has been tested and found to comply with the limits for a Class B digital device, pursuant to Part 15 of the FCC Rules. These limits are designed to provide reasonable protection against harmful interference in a residential installation. This equipment generates, uses and can radiate radio frequency energy and, if not installed and used in accordance with the instructions, may cause harmful interference to radio communications. However, there is no guarantee that interference will not occur in a particular installation. If this equipment does cause harmful interference to radio or television reception, which can be determined by turning the equipment off and on, the user is encouraged to try to correct the interference by one or more of the following measures:
- Reorient or relocate the receiving antenna.
- Increase the separation between the equipment and receiver.
- Connect the equipment into an outlet on a circuit different from that to which the receiver is connected.
- Consult the dealer or an experienced radio/TV technician for help.
- Changes or modifications not expressly approved by the party responsible for compliance could void the user's authority to operate the equipment.

Tested To Comply With FCC Standards
FOR HOME OR OFFICE USE
Declaration of Conformity
Model Number : VPC-R1
Trade Name : SANYO
Responsible party : SANYO FISHER COMPANY
Address: 21605 Plummer Street, Chatsworth, California 91311
Telephone No. : (818) 998-7322
This device complies with Part 15 of the FCC Rules. Operation is subject to the following two conditions:
(1) this device may not cause harmful interference, and
(2) this device must accept any interference received, including interference that may cause undesired operation.
FOR CANADIAN USERS
●This Class B digital apparatus complies with Canadian ICES-003.
BEFORE READING THE MANUAL
Apple, Macintosh and QuickTime are trademark or registered trademarks of Apple Computer, Inc.
Windows is a registered trademark of Microsoft Corporation.
CompactFlash is a trademark of SanDisk Corporation and handed over to CFA (CompactFlash Association).
All other company and product names are registered trademarks or trademarks of their respective owners.
Regarding the data storage media
α This digital camera uses CompactFlash cards for data storage. In this manual, the CompactFlash card is referred to as the “card.”
Caution
It is forbidden to copy this manual, whole or in part, without prior written permission.
α All images and illustrations given in this manual are for explanation purposes and may differ slightly from the actual product. Also, actual specifications are subject to change without prior notice and therefore may differ from the contents of this manual.
œ Sanyo Electric shall not be held responsible for any problems resulting from the use of this digital camera.
α Sanyo Electric declines all responsibility for damages due to improper use of the camera, failure to adhere to the instructions given in this manual, or repairs or changes done by those other than a technician authorized by the manufacturer.
α Sanyo Electric shall not be held responsible for any damage caused by optional devices or consumable items used with the digital camera other than those supplied with the digital camera or those specified by Sanyo Electric.
α Sanyo Electric shall not be held responsible for any losses or loss of revenue resulting from the loss of data caused by the malfunction, or the repairing of a malfunction, of the digital camera.
α The images captured with this camera will differ in quality from pictures taken with a standard film camera.
Symbols used in this manual
HINT More detailed explanations or cautionary notes.
NOTE Extra information about camera features and terminology.
HELP In case of problems, this may help in certain situations.
CAUTION Points requiring special caution.
: Explanation for still images
: Explanation for sequential shots
: Explanation for video clips
You can select different languages for the LCD monitor display (see page 67). Please note, however, that the display examples and the indications in this manual are quoted only from the English version.
CONTENTS
USING YOUR DIGITAL CAMERA SAFELY AND CORRECTLY ..... 3
CHECKING THE INCLUDED ACCESSORIES .... 13
PREPARATION
PART NAMES 14
INSTALLING THE BATTERIES....15
INSTALLING THE CARD....17
3 SHOOTING MODES....23
SHOOTING STILL IMAGES 24
SEQUENTIAL SHOTS....26
VIDEO CLIPS 28
■PLAYBACK
3 PLAYBACK MODES....29
PLAYING BACK STILL IMAGES 31
■SHOOTING APPLICATIONS
SHOOTING SETTINGS SCREEN....35
ADJUSTING THE IMAGE QUALITY 37
TAKING PICTURES WITHOUT USING THE LCD MONITOR
[ ] [ ] .... 40
TAKING CLOSE-UP PICTURES (MACRO PHOTOGRAPHY)
([boxed] [boxed] [boxed])....41
USING THE SELF-TIMER [☐] [☐] [☐] 42
USING THE FLASH [☐]....43
EXPOSURE CORRECTION [☐][☐] [☐] 45
USING THE ZOOM [☐] [☐] [☐].... 47
■PLAYBACK APPLICATIONS
PLAYING IMAGES IN A SLIDE SHOW [☐]....48
MAGNIFYING (ZOOMING IN) THE IMAGE [☐] [☐] [☐] . . . . . . . 49
■OTHER FUNCTIONS
COPYING IMAGES [☐] [☐] 50
PROTECTING/ERASING IMAGE DATA....51
COPYING TO THE CARD 55
USING WITH A COMPUTER 56
PRESERVING THE RECORDED IMAGES .... 57
REQUESTING PRINTING 59
■ SETTINGS & CHECKS
SETTING THE DATE AND TIME 61
CHECKING THE REMAINING NUMBER OF IMAGES AND RECORDING TIME 71
■APPENDICES
TROUBLESHOOTING....72
SPECIFICATIONS....77
ICON INDEX 81
USING YOUR DIGITAL CAMERA SAFELY AND CORRECTLY
CONCERNING THE DIGITAL CAMERA
WARNING
■If the digital camera makes a strange noise, emits a strange odor, or if smoke comes out from it, immediately turn off the power and remove the batteries
- If the digital camera is used under these conditions, it may cause a fire or electric shock. Immediately turn off the digital camera, remove the batteries, and wait to make sure no more smoke comes from the digital camera. Then take it to the dealer for service. Do not try to repair or open the digital camera yourself.

■Do not modify or open the cabinet
●High voltage circuits are inside, and there is a high risk of fire or electric shock if they are touched. Any internal check, setting, or repair should be performed by the dealer.

■Do not use while driving
- Do not capture images, play back images, or watch the LCD monitor while driving a vehicle. Doing so may cause an accident.
- Be careful where you put down the digital camera inside an automobile. During sudden stops or turns it may fall behind the brake pedal and prevent braking.
- When using the digital camera while walking, be very careful of your surroundings and especially the traffic to avoid accidents.

■Be aware of your surroundings when using the digital camera
●Pay close attention to your surroundings when using the digital camera. Failure to do so may lead to an accident or injury.
- Do not use the digital camera inside an airplane or elsewhere where its use may be restricted.

■Do not get the digital camera wet
●This digital camera is not water-resistant. Do not allow it to get wet for it may cause a fire or electric shock.
●Do not use the digital camera in a bathroom.
- If the digital camera gets wet, immediately turn it off and remove the batteries. Then take it to the dealer for repair. Using the digital camera after it has become wet may cause a fire, electric shock, or other accident.

natural_image
Simple line drawing of a showerhead spraying water into a container with no text or symbols■Do not use during a storm
●To avoid the risk of being struck by lightning, do not use the digital camera during a thunderstorm. In particular, if used in an open field, you have an increased chance of being struck by lightning. Quickly seek refuge in a place that will protect you from lightning.

■Do not place on an unstable surface
●The digital camera may fall, resulting in damage to the digital camera or injury.
- If the digital camera has fallen and its body is damaged, turn off the digital camera, remove the batteries, and take it to the dealer for repair. Using the digital camera after its body has been damaged may cause a fire or electric shock.

natural_image
Illustration of stacked books with a smartphone displaying a cartoon face (no text or symbols)■Do not look through the digital camera into the sun
- Do not look through the digital camera at the sun or any other strong source of light. Doing so may seriously injure your eyes.

USING YOUR DIGITAL CAMERA SAFELY AND CORRECTLY
(CONCERNING THE DIGITAL CAMERA)
WARNING
■Do not use the flash close to a person's face
- To prevent possible eye injury, do not use the flash near a person's face (especially young children or babies). If the flash is used close to a person's opened eyes, there is a risk that it may damage that person's eyesight.

■Do not use where there is risk of explosion
- Do not use the digital camera in a location where there is explosive gas, or any other flammable material in the air. Doing so may cause a fire or an explosion.
■Keep the digital camera out of the reach of children
●The following may happen if children play with the digital camera:
• They may wrap the strap around their neck and suffocate.
- They may swallow the batteries or other small parts. In such a case, consult a physician immediately.
- They may damage their eyesight if the flash goes off too close to their eyes.
• They may get hurt by the digital camera.

natural_image
Illustration of a baby reaching toward a computer screen with hands, no text or symbols present■Concerning the Batteries
Concerning the supplied alkaline batteries
- Follow all the warnings indicated below to prevent the batteries from leaking, overheating, exploding, catching fire, or becoming damaged.
- Do not install with the polarities (+) and (-)) reversed.
- Do not heat the batteries or throw them into a fire.
- Do not allow metal objects to touch the terminals. Do not carry loose with necklaces, hairpins, etc.
- Do not transform, open, or modify.
- Do not put in water or any liquid, or get the terminals wet.
- Do not remove or puncture the external wrapping.
- Do not use if there is leaking, swelling, rising temperature, discoloration, or any other abnormal condition.
- Keep out of the reach of children.
- Do not drop, hit, or submit the batteries to strong shocks.
USING YOUR DIGITAL CAMERA SAFELY AND CORRECTLY
(CONCERNING THE DIGITAL CAMERA)
General precautions for the batteries
- Use the alkaline batteries or other specified batteries with this digital camera. Manganese batteries cannot be used, since they have a short battery life and may overheat, causing damage to the digital camera.
- Do not use alkaline batteries together with Ni-Cd batteries, or batteries of different types or different brands at the same time.
- Make sure not to reverse the polarities (+) and (-) when installing the batteries. Install the batteries as described by the indicated polarity.
- Using different types of batteries at the same time may generate heat or cause the batteries to leak, resulting in fire, injury or burns, or damage to the digital camera and other nearby objects.
- Use only specified batteries. Using batteries without protective casings or other inferior products may cause a fire, injury, or burns.
●The batteries may be warm immediately after the digital camera is used. If removing the batteries, turn off the digital camera and allow the batteries to cool down before removing them.
- If a battery is leaking and the electrolyte gets on your skin or clothing, immediately rinse with clean water. If the electrolyte gets into your eyes, you risk losing your eyesight. Immediately
rinse your eyes with clean, running water, and seek medical attention right away.
- Do not drop or hit the batteries, or submit them to strong shocks.
- If the digital camera is not going to be used for a long period of time, remove the batteries and store them in a cool place. (When the batteries are removed for a long period, the time and date settings will be cleared.)
- When disposing of the batteries, make sure to follow all applicable regulations.
- If used at temperatures below 10^ , the service life of the batteries will be shorter than normal (except lithium batteries (CR-V3)).
- When using rechargeable batteries, use them after being fully charged.
●Always read the instruction manuals that may come with the batteries or the battery charger you purchase before use.

natural_image
Illustration of a hand inserting a pencil into a device with a paper inside (no text or symbols)CAUTION
■Cautions when carrying the digital camera
- Do not walk around holding the digital camera by the hand-strap. It may hit other objects and get damaged. When walking around, hold the digital camera in your hand or place it in a pocket.
- Be careful not to drop the digital camera or subject it to strong shocks.
●Make sure direct sunlight does not hit the digital camera lens, since that may damage the internal parts. When not using the digital camera, be sure to always turn off the digital camera and keep the lens cover closed.
■Cautions during use and storage
●This digital camera is a precision instrument. When using or storing the digital camera, make sure to avoid the following locations to privent damage.
- Places in direct sunlight
- Places where humidity and temperature are high
- Places that may get wet
- Places close to an air conditioner or heater
- Inside a car
- Places where there is dust and dirt
- Places where there is a fire burning
- Places where volatile products are stored
- Places subject to vibration


natural_image
Illustration of a sun and a computer monitor with cartoon faces (no text or symbols)| ● Temperature | 0 to 40°C (operation) |
| -20 to 60°C (storage) | |
| ● Humidity 30 to 90% (operation, no condensation) | |
| 10 to 90% (storage, no condensation) | |
USING YOUR DIGITAL CAMERA SAFELY AND CORRECTLY
Concerning the Accessories
CAUTION
■Cautions concerning the use of the AC adaptor
- Use only the separately sold AC adaptor (model VAR-G5EX for the VPC-R1EX, model VAR-G5E for the VPC-R1E and model VAR-G5U for the VPC-R1) with your digital camera. Do not use an AC adaptor other than the one indicted here, designed for specific use with your digital camera.
- If an AC adaptor other than the specified one is used, it may damage the digital camera and cause a fire or electric shock.
- When using an AC adaptor continuously, remove the batteries. Otherwise, batteries may cause excess heat, leakage, injuries, or damage to nearby objects.
- For complete information on how to use the AC adaptor, refer to the instructions accompanying the AC adaptor.
■Cautions concerning the CompactFlash
- Immediately after use, the CompactFlash will be very hot. Before removing the CompactFlash, turn off the digital camera and wait for the temperature to cool down.
- Keep out of the reach of children. Young children may put the media in their mouth and choke or cause some other unexpected injury or accident.
For correct use of your digital camera
■Cautions before capturing important images
●Before capturing important images, make sure that the digital camera is operating properly and in condition to capture the image properly.
- Sanyo Electric shall not be held responsible for any losses that result from images that could not be recorded, are erased, destroyed, or damaged in any way due to a problem with the digital camera, any of its accessories, or its software.
■Cautions concerning copyrights
●The images you capture with your digital camera are for your own private use, any other use may violate the rights of copyrights owners.
■Cautions when cleaning the digital camera
- Do not use benzene or thinner products to clean the digital camera. Doing so may cause deformation, discoloration, or peeling of paint. When using a chemically treated cloth, carefully read its instructions and warnings.
- Do not spray insecticides or volatile sprays on the digital camera. Do not leave rubber or vinyl objects against the digital camera for a long period. They may cause deformation, discoloration, or peeling of paint.
Cleaning procedure
1 Turn off the digital camera and remove the batteries.
2 Remove the dirt with a soft cloth.
3 If the digital camera is extremely dirty, wipe with a soft cloth moistened with a mild detergent diluted with water and wrung dry.
■Cautions concerning the batteries and their terminals
- Periodically clean with a dry cloth the terminals of the batteries (+) and (-)) and the terminals located in the battery compartment of the digital camera.
- Do not touch the battery terminals or the terminals in the battery compartment of the digital camera with your bare hands. Doing so will allow contaminants from your hands to adhere to the terminals and oxidize, increasing the contact resistance. If the contact resistance increases, the usable life of the batteries will diminish.
■Cautions when cleaning the lens
- If the lens gets dirty, use a commercially available air blower or a cleaning cloth for photographic equipment to clean it.
■When not using the digital camera for a long period
- Remove the batteries. However, when the batteries are removed for a long time, the digital camera functions may begin to not work properly. Periodically reinstall the batteries and check the digital camera functions.
- If the batteries are left in the digital camera, a small amount of power is still used even if the digital camera is turned off. If the batteries are left in the digital camera for a long period, they may become completely discharged.
■Cautions concerning condensation
- Using the digital camera with condensation inside it may damage the digital camera.
Be careful of condensation under the following conditions:
- When moving the digital camera suddenly from a cold place to a warm place.
- When the ambient temperature changes drastically, such as when a heater is turned on to quickly heat the room.
- When the digital camera is placed in the path of cool air from an air conditioner.
- When the digital camera is placed in a location of high humidity.
If condensation seems likely to form
- Place the digital camera in a plastic bag and seal it, and then wait until the digital camera has reached the ambient temperature.
■Cautions concerning data storage
-
It is recommended that any important data be copied onto a separate media (such as a hard disk, MO disk, or CD-R disk).
●Data stored in the internal memory of this camera or on the CompactFlash may be lost (or corrupted). Sanyo Electric will not be held responsible for any damage or lost profits arising from the loss of data. -
If the CompactFlash or the camera is used incorrectly.
- If the CompactFlash is not inserted correctly into the digital camera.
- If the CompactFlash or the internal memory is subjected to electrical or mechanical shocks or other forces.
- If the CompactFlash is removed from the digital camera or if the digital camera is turned off during reading or writing operations.
- If the CompactFlash or the internal memory has reached the end of its usable life.
■Cautions when handling the CompactFlash
●The CompactFlash card is a precision device. Do not bend, drop, or subject it to strong forces or shocks.
- Avoid using or storing the CompactFlash card in places with extremely high or low temperatures, subject to direct sunlight, in a completely closed vehicle, near air conditioners or heaters, or in humid or dusty locations.
- Avoid using or storing the CompactFlash card in locations where strong static electrical charges or electrical noise can be easily generated.
- Do not allow the edges of the CompactFlash card to become contaminated with foreign materials. Gently wipe away any contamination with a soft, dry cloth.
- When not using the CompactFlash card, put it back into the protective cover to protect it from damage due to static electricity.
- Do not carry the CompactFlash card inside trouser pockets, since it may become damaged when you sit down or make other movements that may apply force.
- Before using an unused card, make sure to format it using the digital camera (see page 19).
- When buying separately sold or commercially available products, carefully read the instructions and warnings that come with them.
CHECKING THE INCLUDED ACCESSORIES
●Hand-strap ●4 alkaline batteries

●Dedicated USB interface cable

●Software: CD-ROM (Sanyo Software Pack)


USING THE HAND-STRAP
Attach the supplied hand-strap to the digital camera to aid in carrying.
Bend the looped end to slip it through the strap holder.

natural_image
Simple line drawing of a container with a cable extending from it (no text or symbols)Other separately sold devices
●AC adaptor (Model: VAR-G5EX/E/U)
AC adaptor for use with your digital camera
●CompactFlash (Model: KA-DSM-C32G)
32 MB capacity CompactFlash memory card
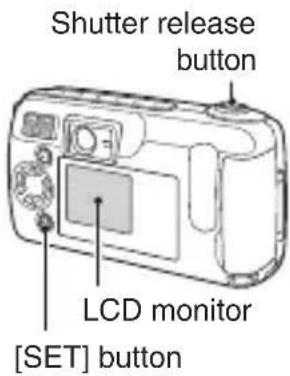
PART NAMES
Front

text_image
Labeled diagram of a digital camera with numbered parts for identification① Shutter release button
② Viewfinder
③ Flash
④ USB terminal
For connecting to a computer with the supplied USB interface cable.
⑤ Self-timer indicator
⑥ Lens
⑦ DC IN terminal (for external DC power input)
For connecting the VAR-G5EX/E/U AC Adapter (sold separately).
⑧ Macro switch
⑨ Lens cover
Rear
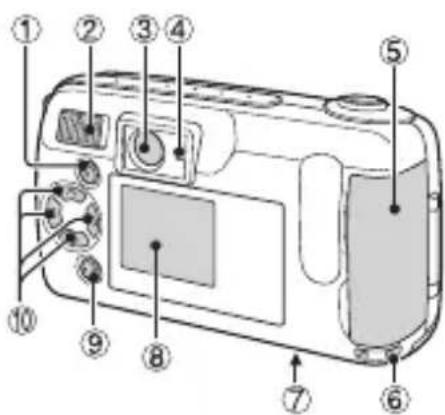
text_image
Diagram of a digital camera with numbered parts for identification and assembly reference.①[MODE] button
② Main switch
③ Viewfinder
④ Standby indicator
⑤ Card slot cover
⑥ Strap holder
⑦ Battery compartment cover
⑧LCD monitor
⑨[SET] button
⑩ Arrow button
●During use, the area around the LCD monitor may become warm. This is normal and does not indicate a malfunction.
- You may see some black and white dots in the LCD monitor. This is normal and does not indicate a malfunction.
INSTALLING THE BATTERIES
Use the four alkaline batteries. To use other batteries, please see "To use other batteries" on page 16, and choose batteries suitable for use with this camera.
1 Set the main switch to [MONITOR OFF] or [☐].
2 Close the lens cover.
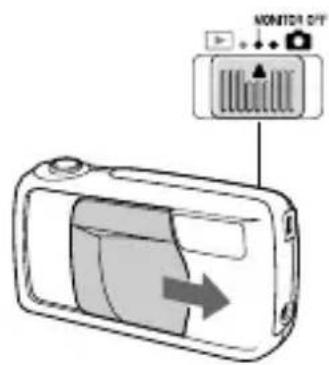
text_image
MONITOR OFF3 Open the battery compartment cover on the bottom of the camera.
- Slide the cover out, then open it.

text_image
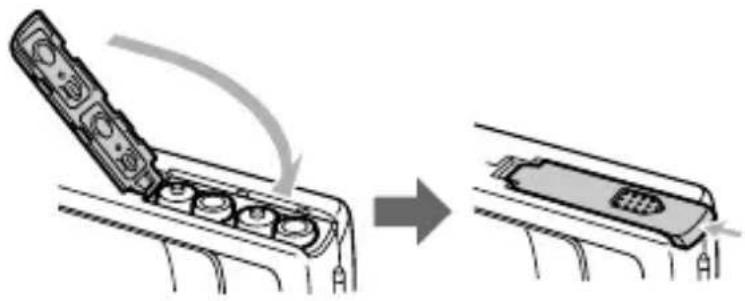
Diagram showing a device with labeled parts and directional arrows, likely illustrating a mechanical or fluid system.4 Insert the batteries.
- Make sure the polarity (+ and −) of the batteries is as indicated.

natural_image
Diagram of a battery holder with four cylindrical cells, showing internal structure (no text or symbols)5 Close the battery compartment cover.
- Slide the cover in the direction of the arrow until a click is heard.
natural_image
Diagram showing a device being inserted into a rack, with an arrow indicating the process (no text or symbols present)CAUTION
Do not use manganese batteries.
- In addition to offering only a short battery life, manganese batteries release heat which may cause damage to the camera.
Do not open battery cover while camera is turned on.
- Do not open the battery cover while the camera is operating. Doing so may cause the loss of memory data. Sanyo cannot take responsibility for any damage arising from such operation.
HINT
To use other batteries
●Types of batteries that can be used in this camera (other than the alkalines):
- AA-size nickel-metal hydride (Ni-MH) batteries (Sanyo HR-3USV: x 4)
- AA-size nickel-cadmium (Ni-Cd) batteries (Sanyo N-3US: x 4)
- Lithium batteries (CR-V3 x 2) Make sure the batteries are pointing in the correct direction when installed.
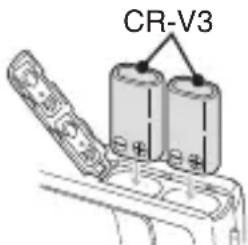
text_image
CR-V3Remove the batteries when not using the camera for a long time.
●A slight amount of battery power is still being used even when the camera is turned off. It is recommended that the batteries be removed from the camera when it is not being used for a long time. However, when the batteries are removed for a long time, the date and time settings may be cleared. When the batteries are reinstalled, please check that the date and time settings are correct (see page 61).
INSTALLING THE CARD
Although the camera can store pictures in its internal memory, the use of a memory card is recommended since only a limited number of pictures can be saved to the internal memory.
●Before you first use a memory card (separately sold KA-DSM-C32G CompactFlash) with the digital camera, it is necessary to format it using this camera. Also, to use a card that was formatted with a computer or another camera, it is necessary to reformat it with this camera.
- In this manual the word "card" is used to refer to the CompactFlash card.
Installing the Card
1 Set the main switch to [MONITOR OFF] or [☐]. Close the lens cover.
- Check that the LCD monitor and standby indicator are off.

text_image
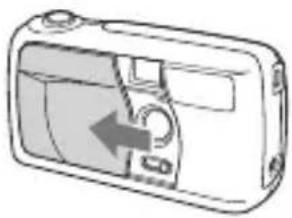
MONSTER OFF2 Open the card slot cover on the side of the camera.
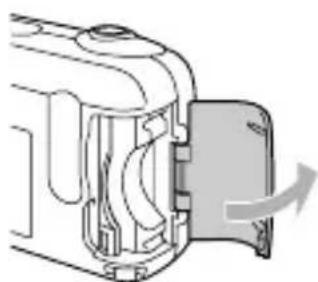
natural_image
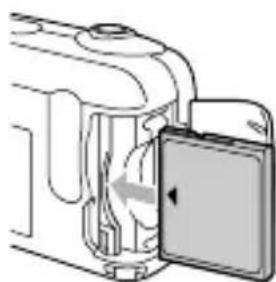
Diagram of a mechanical device showing internal components and a directional arrow (no text or symbols)3 Insert the card.
- Insert the card from the connector end, in the direction shown by the arrow ([◀] mark).
- Insert it fully.
natural_image
Diagram of a mechanical device with a door and internal components, no visible text or symbols■To remove the card...
●Pull the card slowly out with your fingertips.
CAUTION
Do not remove the card when the camera is on.
●Take care not to remove the card when the camera is on, because doing so may cause the data on the card to be lost. Sanyo shall not be held responsible for any data that is damaged or lost in this manner.
HINT
- Inserting a memory card allows picture storage to and playback from that card; the camera's internal memory is used for storage and playback when no card is installed. When the camera is turned on without a card inserted, "☒" is displayed on the LCD monitor.
INSTALLING THE CARD
Reformatting a card
1 After inserting a card, set the main switch to [☐] and open the lens cover.

text_image
HENSOL ST2 Press the [MODE] button to show the following screen.
3 Press [▲] on the arrow button, then press [▶] to select the [☐] icon.

text_image
$A 1280 FINE EXP4 Press the [SET] button.
●The Options screen appears.
5 Press [▼] to select [REFORMAT].
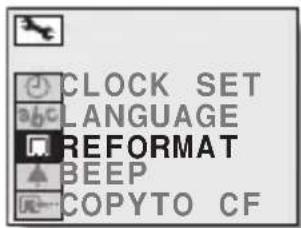
text_image
CLOCK SET LANGUAGE REFORMAT BEEP COPYTO CF6 Press the [SET] button.
●The Reformat screen appears.
7 Press [▲] to select [REFORMAT], and then press the [SET] button.
●Reformatting begins.
●During reformatting, [DO NOT POWER OFF] is displayed.
- When reformatting has completed, the display returns to the Options screen.
![SANYO VPC-R1EX - Press [▲] to select [REFORMAT], and then press the [SET] button. - 1](/content/2026/06/1188067/images/99ed00d2764fe80c951fcc2db76cf27960df80ed5c4b8e06f3dcad0908251fa6.jpg)
text_image
REFORMAT REFORMAT CANCELCAUTION
Do not turn off the digital camera while it is reformatting the card.
- When reformatting begins after step 7, do not turn off the camera.
Reformatting a memory card will erase all data.
●Reformatting a memory card will erase all data which has been stored on that card. Since data which has been protected (see page 51) will also be erased, be sure to save important data to a PC hard disk before performing card reformatting.
HINT
Reformatting with the main switch set to [▶].
- Reformatting is also possible with the main switch set to [▶] in step 1. In this case, it is not necessary to open the lens cover.
To reformat the camera's internal memory
●Perform reformatting after removing the memory card. The reformatting process is the same for internal memory as for memory cards.
To cancel the Reformat operation
- In step 7, select [CANCEL], and press the [SET] button. The display returns to the screen in step 5, and the Reformat operation is canceled.
Turning the power On
The procedures to turn the power on when taking pictures and when playing back images are different.
When taking pictures
1 Set the main switch to [MONITOR OFF] or [☐].
MONITOR OFF: The LCD monitor is not used.
☐: The LCD monitor is used.
2 Open the lens cover.
●The power turns on, and the standby indicator in the viewfinder lights green.
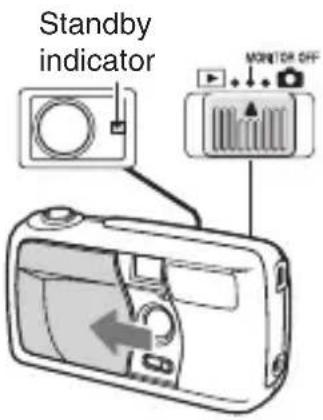
text_image
Standby indicator MONITOR OFFWhen playing back images
1 Set the main switch to [▶].
●The power turns on, and an image appears on the LCD monitor.
Turning the power Off
1 Set the main switch to [MONITOR OFF] or [☐].
2 Close the lens cover.
●The power turns off.
- If the main switch was set to [☐], the standby indicator and the LCD monitor turn off.
Turning the power on when the power save function is active
To save battery power, the power save function automatically turns off the power after a period of no operation (about 1 minute in the shooting mode or about 5 minutes in the playback mode).
To restore power when in the power save mode, perform one of following steps.
- Close and open the lens cover (only in the shooting mode).
- Press the shutter release button once.
- Press the [MODE] button.
When in the playback mode, you can also...
- Move the main switch to another position, then back to [▶].
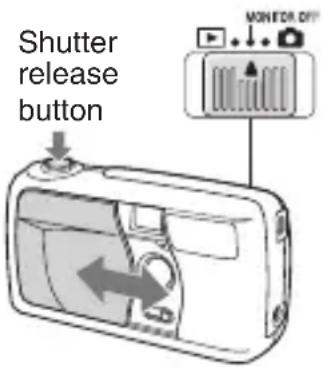
text_image
Shutter release button MONITOR OFFNOTE
To protect your camera's lens...
- Although pictures can be viewed with the lens cover open, closing the cover is recommended to protect the lens.
- When using the AC adaptor (sold separately), the power save function will become active after about 30 minutes of inactivity.
3 SHOOTING MODES
This camera has three different shooting modes to choose from: still image, sequential shot, and video clip. Set the desired shooting mode before taking pictures.
●Still image shooting mode: For taking still pictures.
- Sequential shot shooting mode: For taking several pictures in quick succession.
●Video clip shooting mode: For recording video clips.
1 Open the lens cover, and set the main switch to [☐].
●An image appears on the LCD monitor.
2 Press the [SET] button.
- If the Shooting Settings screen (see page 35) appears, press the [MODE] button to exit it.
●Each time the [SET] button is pressed, the shooting mode changes.
- An icon indicating the set shooting mode is displayed.
![SANYO VPC-R1EX - Press the [SET] button. - 1](/content/2026/06/1188067/images/7cd7129a51df8ad000b14f4d59889382bb507120637e819c03b43758f91c8b9d.jpg)
text_image
■ still image shooting mode ■ sequential shot shooting mode ■ video clip shooting mode• Each time the [SET] button is pressed, the shooting mode changes as follows.
![SANYO VPC-R1EX - Press the [SET] button. - 2](/content/2026/06/1188067/images/b5dd5f3be381aeef2e78c212caf9def0e006575d1c79c81aef7534a968793043.jpg)
![SANYO VPC-R1EX - Press the [SET] button. - 3](/content/2026/06/1188067/images/a6fec53ffa83899adc9f530851bff823fe3f76dd7168e48612e8155a452ec620.jpg)
text_image
MONITOR OFF LCD monitor [SET] button![SANYO VPC-R1EX - Press the [SET] button. - 4](/content/2026/06/1188067/images/fb612007358c540aff055ef0eeceb14b44f1e46af8381163b1ed638b9bdd7f68.jpg)
natural_image
Blank white image with a small rectangular icon in the top-left corner and the number 18 in the top-right corner (no text or symbols on the main area)HINT
- You can also switch the shooting mode from the Shooting Settings screen (see page 35).
SHOOTING STILL IMAGES
1 Set the camera to the still image shooting mode (see page 23).
2 Point the camera at the subject.
Correct hold Incorrect hold

natural_image
Line drawing of a person holding a camera, no text or symbols presentKeep your elbows close to your body.

natural_image
Line drawing of a person holding a camera, no text or symbols presentA finger is blocking the lens.
Your fingers or the strap should not be in front of the lens or the flash.
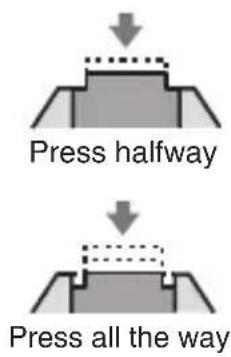
3 Press the shutter release button.
① Center the subject in the viewfinder, press the shutter release button halfway and hold it there.
- Camera settings such as the exposure, are automatically set.
②Press the shutter release button all the way.
- The picture is taken.

text_image
Shutter release buttonLCD monitor

Press halfway

Press all the way
Important points when capturing images
When the next picture cannot be taken...
- When the standby indicator is flashing, the next picture cannot be taken. When the indicator lights, the next picture can be taken.
When the shutter release beep sounds are desired...
- You can change the setting so that the camera makes a beep sound when the shutter release button is pressed (see page 65).
To save battery consumption...
- You can also take pictures without using the LCD monitor (see page 40).
To view a captured image immediately...
- After taking a picture, if you move the main switch to [▶], you can view the image that was just captured on the LCD monitor.
Where are pictures stored?
- Pictures are stored on the memory card if installed and otherwise to the camera's internal memory.
Avoid photographing subjects that are positioned in front of bright light sources.
- Flare (lines or patterns of light) may appear in pictures where the subject is lit from behind.
SEQUENTIAL SHOTS
Two types of sequential shot functions are available. In the standard sequential shot mode, images are taken at 0.5-second intervals. In the AE shift sequential shot mode, three sequential images are taken at different exposures (brightnesses).
Standard sequential shot 0.5:
With the same exposure rate and at 0.5-second intervals, 3 sequential shots are taken.

flowchart
graph LR
    A["Figure"] --> B["Target"]
    B --> C["Figure"]
AE shift sequential shot AE:
The exposure (shutter speed) is automatically changed as three sequential shots are taken.
Dark screen (underexposed) Normal exposure Bright screen (overexposed)

flowchart
graph LR
    A["Plant 1"] --> B["Plant 2"]
    B --> C["Plant 3"]
1 Set the shooting mode to the sequential shot shooting mode (see page 23).
2 Press the [MODE] button.
●The Shooting Settings screen is displayed.
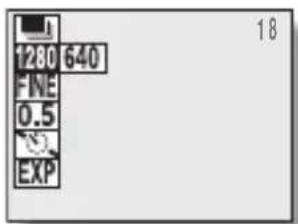
text_image
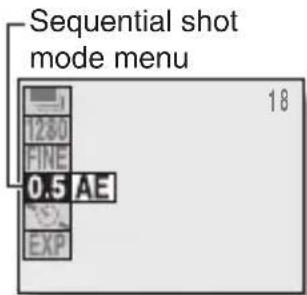
1280 640 FINE 0.5 EXP 183 Select a mode from the sequential shot mode menu, and press the [SET] button.
- Use the [▶] button to change the mode.
0.5: Standard sequential shot
AE: AE shift sequential shot
text_image
Sequential shot mode menu 1280 FINE 0.5 AE EXP 184 Capture the pictures.
① Center the subject in the viewfinder, press the shutter release button halfway and hold it there.
- Camera settings such as the exposure are automatically set.
text_image
Shutter release button LCD monitor [SET] button②Press the shutter release button all the way.
- Shooting starts.
- When three pictures have been taken, sequential shot shooting stops.
• Refer to page 25 for important points to consider when capturing images.
text_image
Press halfway Press all the wayCAUTION
●In the sequential shooting modes, the flash cannot be used.
VIDEO CLIPS
1 Set the shooting mode to the video clip shooting mode (see page 23).
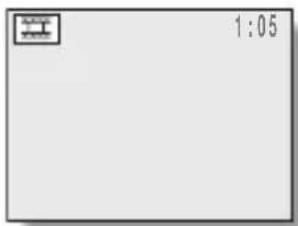
text_image
1:052 Take a video clip.
① Center the subject in the viewfinder, press the shutter release button halfway and hold it there.
- Camera settings such as the exposure are automatically set.

text_image
Shutter release button LCD monitor②Press the shutter release button all the way.
- Shooting starts.
- The [REC] indicator and the remaining shooting time indicator appear on the LCD monitor during recording.
- When the shutter release button is pressed again, video clip shooting stops.
- Refer to page 25 for important points to consider when capturing images.

text_image
Press halfway Press all the wayCAUTION
●Sound recording is not possible with this camera.
3 PLAYBACK MODES
The three playback modes are: still image, sequential shot, and video clip. Set the appropriate playback mode before starting playback.
- Still image playback mode: For viewing still image shots.
- Sequential shot playback mode: For viewing sequential shot images.
- Video clip playback mode: For playing back video clips.
1 Set the main switch to [▶].
●An image appears on the LCD monitor.
2 Press the [MODE] button.
●The Playback Settings screen is displayed.
3 Select the uppermost icon and press [▶] on the arrow button to select the desired playback mode.
4 Press the [SET] button.
- The icon selected in step 3 moves to the left side of the screen, and the playback mode setting is complete.
![SANYO VPC-R1EX - Press the [SET] button. - 1](/content/2026/06/1188067/images/f1c20dbd402a64e03d9e0c635cad9fa72de6de980d7f98aa8c3c5642c5a03ce4.jpg)
text_image
[MODE] button LCD monitor![SANYO VPC-R1EX - Press the [SET] button. - 2](/content/2026/06/1188067/images/bfdc0b6e295e2b6ea1f98b9ab49aeb117d2937e2866d51767d21f709cae8e188.jpg)
text_image
Still image playback mode Sequential shot playback mode Video clip playback mode 18①Playback Mode menu
: Still image icon
: Sequential shot icon
: Video clip icon
: Options icon
②9-image display icon
③Playback zoom icon
④ Image protect icon
⑤Image erase icon
⑥ Print icon
- In sequential shot and video clip playback modes, the copy icon [图标] is shown.
⑦ Data save location (folder number) and file name
⑧ Resolution indicator

text_image
100-0046 1280 FINE 4 2001/06/15⑨Compression rate indicator
⑩ Protect indicator
⑪ Print setting status
⑫ Remaining battery charge indicator
⑬ Date and time picture was taken
■To exit the Playback Settings screen, press the [MODE] button again.
HINT
●Magnified (zoomed in) images that have been saved, as well as copied images are also viewed in still image playback mode.
- Remove the memory card to view pictures stored in the camera's internal memory.
PLAYING BACK STILL IMAGES
Playing back still images one by one
1 Set the playback mode to the still image playback mode (see page 29).
2 Press [◀] or [▶] on the arrow button.
[◀]: To display the previous image.
[▶]: To display the next image.
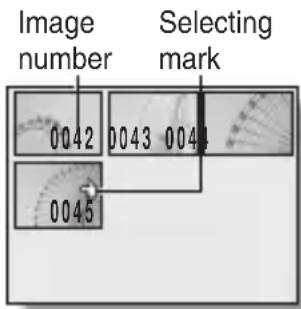
Playing back several images at once (9-image display playback)
1 Set the playback mode to the still image playback mode (see page 29).
2 Press the [MODE] button.
●The Playback Settings screen is displayed.
3 Press the [SET] button.
●The 9-image display appears.
●Each image is displayed with its assigned image number.
4 Use the arrow button to move the [ &=] mark to the desired image, and press the [SET] button.
●The selected image is displayed full-screen.
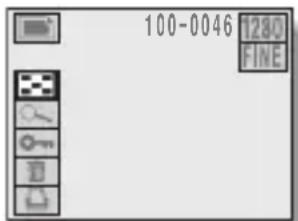
text_image
100-0046 1280 FINE
text_image
Image number Selecting mark 0001 0002 0003 00041 Set the playback mode to the sequential shot playback mode (see page 29).
2 Press [◀] or [▶] on the arrow button.
[◀]: To display the previous image.
[▶]: To display the next image.
3 Press the [MODE] button.
●The Playback Settings screen is displayed.
4 Press the [SET] button.
●The 9-image display appears.
●Each image is displayed with its folder number.
5 Use the arrow button to move the [💡] mark to the desired image, and press the [SET] button.
●The selected image is displayed full-screen.
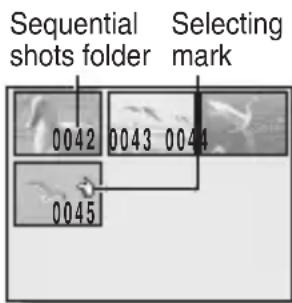
text_image
Sequential shots folder Selecting mark 0042 0043 0044 0045HINT
- To display a different sequential shot, repeat steps 3 to 5.
- In step 2 with the Playback Settings Screen not displayed, press [▲] or [▼] to change to the previous or following sequential shot respectively.
HELP
When the 9-image display is shown in step 1...
● After step 5, perform step 2.
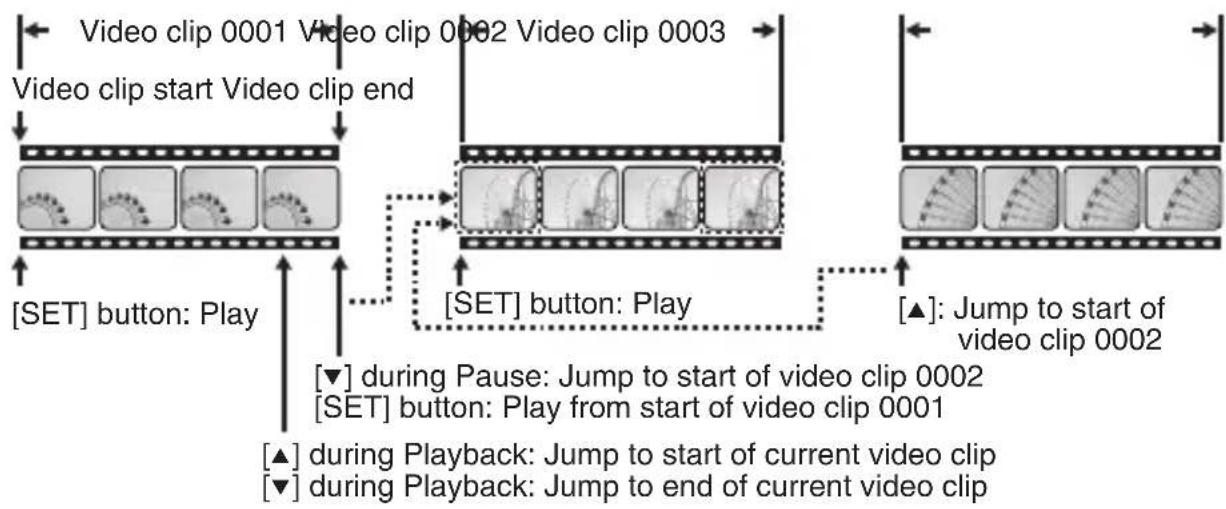
1 Set the playback mode to the video clip playback mode (see page 29).
●The 9-image display appears.
●Each image is displayed with its assigned image number.
2 Use the arrow button to move the [ 👍] mark to the desired video clip.
3 Press the [SET] button.
●The selected image is displayed full-screen.
4 Play back the clip.
●Normal playback
Press the [SET] button.
- Pause
Press the [SET] button while the video clip is being played back. Press the [SET] button again to resume playback.
●Frame-by-frame playback
Forward: While the video clip playback is paused, press [▶].
Reverse: While the video clip playback is paused, press [◀].
●Fast playback
2x fast playback: During normal playback, press [▶].
Return to normal playback: During fast playback, press [▶].
- Jump
Jump to the start of the current video clip: Press [▲].
Jump to the end of the current video clip: Press [▼].
Jump to the start of the next video clip: While the video clip playback is paused, press [▼].
Jump to the start of the previous video clip: While the video clip playback is paused, press [▲].
text_image
Image number Selecting mark 0042 0043 0044 0045
flowchart
graph TD
    A["Video clip 0001"] --> B["Video clip 0002"]
    B --> C["Video clip 0003"]
    C --> D["[SET"] button: Play]
    D --> E["[SET"] button: Play]
    E --> F["[SET"] button: Play]
    F --> G["[SET"] button: Play]
    G --> H["[SET"] button: Play]
    H --> I["[SET"] button: Play]
    I --> J["[SET"] button: Play]
    J --> K["[SET"] button: Play]
    K --> L["[SET"] button: Play]
    L --> M["[SET"] button: Play]
    M --> N["[SET"] button: Play]
    N --> O["[SET"] button: Play]
    O --> P["[SET"] button: Play]
    P --> Q["[SET"] button: Play]
    Q --> R["[SET"] button: Play]
    R --> S["[SET"] button: Play]
    S --> T["[SET"] button: Play]
    T --> U["[SET"] button: Play]
    U --> V["[SET"] button: Play]
    V --> W["[SET"] button: Play]
    W --> X["[SET"] button: Play]
    X --> Y["[SET"] button: Play]
    Y --> Z["[SET"] button: Play]
    Z --> AA["[SET"] button: Play]
    AA --> AB["[SET"] button: Play]
    AB --> AC["[SET"] button: Play]
    AC --> AD["[SET"] button: Play]
    AD --> AE["[SET"] button: Play]
    AE --> AF["[SET"] button: Play]
    AF --> AG["[SET"] button: Play]
    AG --> AH["[SET"] button: Play]
    AH --> AI["[SET"] button: Play]
    AI --> AJ["[SET"] button: Play]
    AJ --> AK["[SET"] button: Play]
    AK --> AL["[SET"] button: Play]
    AL --> AM["[SET"] button: Play]
    AM --> AN["[SET"] button: Play]
    AN --> AO["[SET"] button: Play]
    AO --> AP["[SET"] button: Play]
    AP --> AQ["[SET"] button: Play]
    AQ --> AR["[SET"] button: Play]
    AR --> AS["[SET"] button: Play]
    AS --> AT["[SET"] button: Play]
    AT --> AU["[SET"] button: Play]
    AU --> AV["[SET"] button: Play]
    AV --> AW["[SET"] button: Play]
    AW --> AX["[SET"] button: Play]
    AX --> AY["[SET"] button: Play]
    AY --> AZ["[SET"] button: Play]
    AZ --> BA["[SET"] button: Play]
    BA --> BB["[SET"] button: Play]
    BB --> BC["[SET"] button: Play]
    BC --> BD["[SET"] button: Play]
    BD --> BE["[SET"] button: Play]
    BE --> BF["[SET"] button: Play]
    BF --> BG["[SET"] button: Play]
    BG --> BH["[SET"] button: Play]
    BH --> BI["[SET"] button: Play]
    BI --> BJ["[SET"] button: Play]
    BJ --> BK["[SET"] button: Play]
    BK --> BL["[SET"] button: Play]
    BL --> BM["[SET"] button: Play]
    BM --> BN["[SET"] button: Play]
    BN --> BO["[SET"] button: Play]
    BO --> BP["[SET"] button: Play]
    BP --> BQ["[SET"] button: Play]
    BQ --> BR["[SET"] button: Play]
    BR --> BS["[SET"] button: Play]
    BS --> BT["[SET"] button: Play]
    BT --> BU["[SET"] button: Play]
    BU --> BV["[SET"] button: Play]
    BV --> BW["[SET"] button: Play]
    BW --> BX["[SET"] button: Play]
    BX --> BY["[SET"] button: Play]
    BY --> BZ["[SET"] button: Play]
    BZ --> CA["[SET"] button: Play]
    CA --> CB["[SET"] button: Play]
    CB --> CC["[SET"] button: Play]
    CC --> CD["[SET"] button: Play]
    CD --> CE["[SET"] button: Play]
    CE --> CF["[SET"] button: Play]
    CF --> CG["[SET"] button: Play]
    CG --> CH["[SET"] button: Play]
    CH --> CI["[SET"] button: Play]
    CI --> CJ["[SET"] button: Play]
    CJ --> CK["[SET"] button: Play]
HELP
If the full-screen display appears in step 1...
- Skip to step 4.
Is sound playback possible?
●This digital camera has no sound playback function.
SHOOTING SETTINGS SCREEN
1 Set the shooting mode (see page 23).
2 Press the [MODE] button.
●The Shooting Settings screen appears on the LCD monitor.
●The appearance of the Shooting Settings screen differs depending on the currently active shooting mode.
![SANYO VPC-R1EX - Press the [MODE] button. - 1](/content/2026/06/1188067/images/315b68f9ce0140de1091a5c6eb8010609677848ae615b553d01a77f0ac5ebe61.jpg)
text_image
[MODE] button LCD monitor![SANYO VPC-R1EX - Press the [MODE] button. - 2](/content/2026/06/1188067/images/75a0b87d3c261bf76161f0343d3db692ef426317d623d61d046371571e80cdb9.jpg)
text_image
① Shooting mode menu
: Still image icon
: Sequential shot icon
: Video clip icon
: Options icon
②Flash menu
A: Automatic flash icon
: Forced flash icon
: Flash off icon
☐: Red-eye reduction mode icon
③ Resolution menu
1280: 1280 x 960 pixels icon
640: 640 x 480 pixels icon
320: 320 x 240 pixels icon
160: 160 x 120 pixels icon
④ Compression rate menu
FINE: Low compression icon
NORM: Moderate compression icon
⑤ Sequential shot mode menu
0.5: 0.5-second interval sequential shot icon
AE: AE shift sequential shot icon
⑥Self-timer menu
: Self-timer on icon
: Self-timer off icon
⑦ Exposure correction icon
⑧ Exposure correction bar
⑨Zoom icon
⑩ Zoom bar
① Number of images remaining
In the video clip shooting mode, the remaining available recording time is shown as [minutes: seconds].
⑫ REC indicator (only when in the video clip shooting mode)
⑬ Macro indicator
⑭ Remaining battery charge indicator
■To exit the Shooting Settings screen, press the [MODE] button again.
HINT
To change the shooting mode in the Shooting Settings screen...
① Press [▲] or [▼] on the arrow button to select the shooting mode menu.
② Press [▶] to select the desired shooting mode icon.
③Press the [SET] button.
●The icon selected in the step ② moves furthest to the left and the shooting mode changes.
ADJUSTING THE IMAGE QUALITY
The resolution and compression rate can be changed to adjust the image quality.
Set the image resolution ([boxed] [boxed] [boxed])
At higher resolutions, the image quality is clear and beautiful. But because the data size is also large, the number of pictures that can be taken and the recording time becomes less. Adjust the resolution to match your needs, either for higher picture quality or for quantity.
1 Display the Shooting Settings screen (see page 35).
2 Select the resolution menu.
3 Select the desired resolution from the resolution menu.
- Press [▶] on the arrow button to select the resolution.
1280: 1280 x 960 pixels icon (still image/sequential shot modes only)
640: 640 x 480 pixels icon (still image/sequential shot modes only)
320: 320 x 240 pixels icon (video clip mode only)
160: 160 x 120 pixels icon (video clip mode only)
![SANYO VPC-R1EX - Set the image resolution ([boxed] [boxed] [boxed]) - 1](/content/2026/06/1188067/images/e11a50af4bfa2e3cd2fea21cec112f06a1e67005d41d940417fd658d96c62257.jpg)
text_image
Resolution menu 18 5A 1280 640 FINE EXP4 Press the [SET] button.
●The selected resolution is set.
■To exit the Shooting Settings screen, press the [MODE] button.
HINT
●The resolution setting is retained until you change it.
NOTE
About the resolution and compression rate (see page 39) settings
- The image captured by a digital camera is comprised of a collection of small dots. The resolution refers to the number of these dots; the greater the number, the higher the image quality. However, at high resolutions, the volume of data increases, so the number of images that can be recorded decreases. In a digital camera, the common method to compensate for this is to compress the data. This digital camera uses JPEG compression. When JPEG compression is used and the image is returned to its original size, an extremely small portion of the data is lost. The higher the compression rate, the more of the original image is lost. For this reason, this digital camera allows you a mode by which the image quality has a top priority. This is the FINE (low compression) mode. By understanding the resolution and compression characteristics, you can select the appropriate settings that you require for your pictures.
ADJUSTING THE IMAGE QUALITY
Changing the data size (compression rate)

You can set the compression rate for the captured image data. When you increase the compression rate setting, the data size becomes smaller even for pictures taken at the same resolution; at a lower compression rate, the best image quality is ensured.
1 Display the Shooting Settings screen (see page 35).
2 Select the compression rate menu.
3 Select the desired compression rate from the compression rate menu.
- Press [▶] on the arrow button to select the rate.
FINE: Image data is stored at low compression (high quality).
NORM: Image data is stored at moderate compression (normal quality)
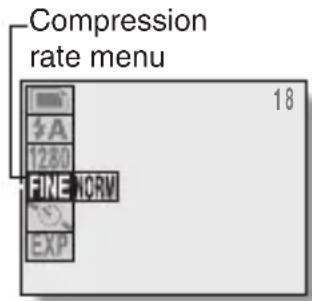
text_image
Compression rate menu 18 A 1280 FINE NORM EXP4 Press the [SET] button.
●The selected compression rate is set.
■To exit the Shooting Settings screen, press the [MODE] button.
HINT
●The compression rate setting is retained until you change it.
TAKING PICTURES WITHOUT USING THE LCD MONITOR [ ] [ ] [ ]
You can turn off the LCD monitor and take pictures using the viewfinder. Turning off the LCD monitor saves battery power.
1 Open the lens cover and set the main switch to [MONITOR OFF].
2 Point the camera at the subject.
3 Compose the image.
- Look through the viewfinder and aim the camera so that the light-measuring area is in the center of the subject.
![SANYO VPC-R1EX - TAKING PICTURES WITHOUT USING THE LCD MONITOR [ ] [ ] [ ] - 1](/content/2026/06/1188067/images/2323919c1dc350b66c25e4fbeab3e97e6f77738aace04e739f181c77d7f01ed9.jpg)
text_image
MONITOR OFFShutter release button
4 Press the shutter release button.
Still image shooting mode
→ see page 24, step 3.
Sequential shot shooting mode
→ see page 27, step 4.
Video clip shooting mode
→ see page 28, step 2.
TAKING CLOSE-UP PICTURES (MACRO PHOTOGRAPHY) ([ ] [ ] [ ]])
Use the macro photography focus to take pictures at close range (20 to 50 cm).
1 Set the main switch to [☐].
2 Open the lens cover.
3 Set the macro switch to [💡].
- The macro indicator [icon] appears on the LCD monitor.
![SANYO VPC-R1EX - TAKING CLOSE-UP PICTURES (MACRO PHOTOGRAPHY) ([ ] [ ] [ ]]) - 1](/content/2026/06/1188067/images/576f1d58ca4add7a3594e2c5e0295fad06d535979ed81a774b496f802fa09c3f.jpg)
natural_image
Diagram of a device with an arrow indicating left-side motion, no text or symbols presentMacro switch
4 Compose the picture, and press the shutter release button.
- If the main switch is set to [MONITOR OFF], you can take pictures without using the LCD monitor (see page 40).
■To return to normal photography, set the macro switch to its original position.
CAUTION
- Due to the distance between the viewfinder and the lens, as the camera gets closer to the subject, the image that is actually recorded becomes lower and more to the left in the viewfinder area. Therefore, it is recommended that when taking close-range pictures you compose the picture by viewing it on the LCD monitor.
USING THE SELF-TIMER [ ] [ ] [ ]
1 Display the Shooting Settings screen (see page 35).
2 Select the self-timer menu.
3 Select [💡] from the self-timer menu.
- Press [▶] on the arrow button to select the self-timer mode.
☐: Self-timer on (the self-timer will be used)
: Self-timer off (the self-timer will not be used)
4 Press the [SET] button.
●The desired self-timer mode is set.
●To exit the Shooting Settings screen, press the [MODE] button.
5 Take the picture.
- When the shutter release button is pressed, the self-timer indicator lights for about 7 seconds, after which it flashes for about 3 seconds, and then the picture is taken.
![SANYO VPC-R1EX - USING THE SELF-TIMER [ ] [ ] [ ] - 1](/content/2026/06/1188067/images/6470e42576a5b5ce0894dd5803561cffa50f720edf18849d199a346348d18feb.jpg)
text_image
Self-timer menu 18Shutter release button Self-timer indicator
![SANYO VPC-R1EX - USING THE SELF-TIMER [ ] [ ] [ ] - 2](/content/2026/06/1188067/images/d918b7fa534c954f8761245c5f3ed71c9e3c8ea0184486a139d2a9904fe7730c.jpg)
text_image
IndicatorHINT
To stop the self-timer...
- Press the shutter release button while the self-timer indicator is lit. To restart it, press the shutter release button again.
To cancel the self-timer mode...
- Select [icon] in step 3, and press the [SET] button.
USING THE FLASH [ ]
The flash is used not only in dark conditions, but also when the subject is in the shade or is lit from the back. The four flash modes (automatic flash, forced flash, flash off, and red-eye reduction) allow you to select the mode appropriate for the surrounding conditions. The flash can be used only in the still image shooting mode. Note that the effective flash range is 0.5 to 2.1 m for normal photography, and 0.2 to 0.5 m for macro photography.
1 Display the Shooting Settings screen for the still image shooting mode (see page 35).
2 Select the flash menu.
3 Select the desired flash mode from the flash menu.
- Press [▶] on the arrow button to select the flash mode.
A: (automatic flash) The camera will detect the brightness of the subject and use the flash or not as required.
☑: (forced flash) The flash operates with every picture taken, regardless of the surrounding conditions. Use this setting when the subject is in the shade, under backlight conditions, under fluorescent lighting conditions, etc.
![SANYO VPC-R1EX - USING THE FLASH [ ] - 1](/content/2026/06/1188067/images/add9111f75de86a97a945b2126ef8a18d7fed0f9a9ffa3a2d7fbb40a3ae57b30.jpg)
text_image
Flash menu A 1280 FINE EXP 18☑: (flash off) The flash will not operate even under dark conditions. Use this setting when taking a picture in a location where flash photography is prohibited, or when shooting a night landscape scene.
☐: (red-eye reduction) When using the flash, the digital camera will operate in a way that reduces the red reflection (“red-eye”) in the subject’s eyes.
4 Press the [SET] button.
●The selected flash mode is set.
●To exit the Shooting Settings screen, press the [MODE] button.
5 Press the shutter release button.
- If the main switch is set to [MONITOR OFF], you can take pictures without using the LCD monitor (see page 40).
HINT
●The flash mode setting is retained until you change it.
●The flash does not operate for sequential shot or video clip photography.
HELP
If the shutter button does not work...
●While the flash is charging, the standby indicator in the viewfinder flashes. During this time, a picture cannot be taken even if the shutter release button is pressed. Release the shutter release button and wait until the standby indicator lights to take the next picture.
EXPOSURE CORRECTION [ ] [ ] [ ]
You can change the brightness (exposure) of the image when you take the picture.
1 Display the Shooting Settings screen (see page 35).
2 Select the exposure correction icon [EXP].
●The exposure correction bar appears.
3 Press [◀] or [▶] on the arrow button to adjust the exposure.
- Pressing [◀] or [▶] moves the pointer on the exposure correction bar to the left or right, changing the exposure.
●To exit the Shooting Settings screen, press the [MODE] button.
![SANYO VPC-R1EX - EXPOSURE CORRECTION [ ] [ ] [ ] - 1](/content/2026/06/1188067/images/bdeeb11cdd3b9337a6fd5cc73f22d45950e83c1f3480bc587d8a5c0e6a016127.jpg)
text_image
18 A 1280 FINE EXP Exposure correction bar Make darker → Make brighter Pointer4 Take the picture.
HINT
- The exposure correction is canceled when the main switch is set to [▶] or [MONITOR OFF], when the camera is turned off, or when the pointer is moved to the center position.
- Moving the pointer away from the center position will change the exposure.
Shortcut for setting the exposure correction
- Any time the Shooting Settings screen is not shown and you press [▶] or [▲] on the arrow button, the exposure correction icon appears, allowing you to change the setting. (If the setting is not available, the icon will not appear.)
USING THE ZOOM [ ] [ ] [ ]
The subject can be enlarged (zoomed in) when you take a picture.
1 Display the Shooting Settings screen (see page 35).
2 Select the zoom icon [###].
●The zoom bar appears.
3 Press [◀] or [▶] on the arrow button to adjust the zoom rate.
●To exit the Shooting Settings screen, press the [MODE] button.
4 Take the picture.
![SANYO VPC-R1EX - USING THE ZOOM [ ] [ ] [ ] - 1](/content/2026/06/1188067/images/fdde937585845f0228ff81b855269473dbe976f9ddc50b94f099de283e8daf12.jpg)
text_image
18 W T Zoom bar Make smaller → Make larger PointerHINT
- The zoom is canceled when the main switch is set to [▶] or [MONITOR OFF], when the camera is turned off, or when the pointer is moved furthest to the left.
●The image quality will deteriorate slightly when the zoom is used.
Shortcut for setting the zoom
- Any time the Shooting Settings screen is not shown and you press [◀] or [▼] on the arrow button, the zoom icon appears, allowing you to change the setting.
NOTE
- When the resolution is set to 1280, the zoom icon will not appear.
PLAYING IMAGES IN A SLIDE SHOW [ ]
Images can be played back in slide show fashion.
1 Select the still image playback mode (see page 29).
- If the Playback Settings screen appears, press the [MODE] button to exit it.
2 Press and hold [▲] or [▼] on the arrow button until the [SLIDE SHOW] indicator appears.
●Images are played in succession at 4-second intervals.
[▲]: Images are displayed in reverse order. [▼]: Images are displayed in the normal order.
![SANYO VPC-R1EX - Press and hold [▲] or [▼] on the arrow button until the [SLIDE SHOW] indicator appears. - 1](/content/2026/06/1188067/images/40b15ac06e44de7a46e2bc83b89cbdb94c286da6da3c33157b16c377c284c934.jpg)
text_image
SLIDE SHOW3 To stop the slide show ...
- Press the [MODE], [SET] or arrow button. [STOP] appears and the slide show ends.

text_image
STOPMAGNIFYING (ZOOMING IN) THE IMAGE

text_image
[ ] [ ] [ ]The recorded images can be magnified when they are played back. In addition to still images and sequential shots, video clip images can be magnified when in the pause mode.
1 Display the image you wish to magnify.
2 Display the Playback Settings screen (see page 29).
3 Select the playback zoom icon [☐].
4 Press the [SET] button.
●The image is magnified and the central portion of the original image is displayed.
- The playback zoom indicator [icon] appears on the LCD screen.
- Press the [SET] button to magnify the image further.
- You can press the arrow button to view different portions of the magnified image.
- When the image is displayed at maximum magnification, if you press the [SET] button again, the image returns to its original size.
- You can press the shutter release button to save the magnified portion of the displayed imaged as a separate still image.

text_image
100-0046 1280 FINEHINT
●The maximum degree of magnification depends on the resolution of the image.
NOTE
●A video clip cannot be played back when it is magnified.
COPYING IMAGES [ ] [ ]
You can select an image from a sequential shot or video clip, copy it, and save it as a still image.
1 Play back a sequential shot or video clip, and display the desired image.
2 Display the Playback Settings screen (see page 29).
3 Select the copy icon [☐].
4 Press the [SET] button.
●The Copy screen appears.
[YES]: Saves the displayed image as a still image.
[EXIT]: Cancels the copy procedure, and returns the display to the Playback Settings screen.
![SANYO VPC-R1EX - COPYING IMAGES [ ] [ ] - 1](/content/2026/06/1188067/images/8024cfa3aade7beff170b69911fc4e8b90bda070aefc623a255cd09b81e31556.jpg)
text_image
100-0005 320 NORM![SANYO VPC-R1EX - COPYING IMAGES [ ] [ ] - 2](/content/2026/06/1188067/images/c0885a86511a4fbb7e11a735a076ca22b05d4b5d862e7bc1d5a3ca6e904aba71.jpg)
text_image
COPY? YES EXIT5 Press the [SET] button.
●[PROCESSING] appears, and the display returns to the copy screen.
●The image is copied and saved.
HINT
●After the image is copied, the original image remains unchanged.
PROTECTING/ERASING IMAGE DATA
Images that you no longer want to keep can be erased from the card. In addition, you can protect stored image data from accidental erasure with the protect function.
- To protect and delete data stored in the camera's internal memory, do not insert a memory card.
Image data protect
Still images and sequential shots are protected one frame at a time, and video clips are protected one clip at a time.
1 Display the image that you want to protect from accidental erasure.
2 Display the Playback Settings screen (see page 29).
3 Select the protect icon [☐].
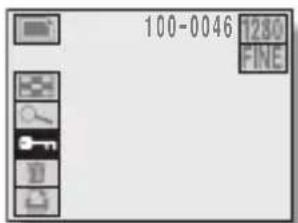
text_image
100-0046 1280 FINE4 Press the [SET] button.
●The [LOCK?] indicator appears.
[YES]: The image data is locked and cannot be erased.
[EXIT]: The protect setting is not changed, and the display returns to the Playback Settings screen.
- If the image data has already been locked, [UNLOCK?] appears.
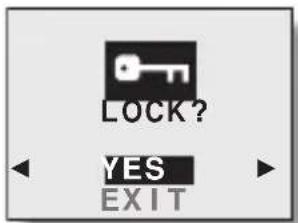
text_image
LOCK? YES EXIT5 Select [YES], and press the [SET] button.
●The image data is locked.
- Images that are protected appear with the protect indicator [boxed].
![SANYO VPC-R1EX - Select [YES], and press the [SET] button. - 1](/content/2026/06/1188067/images/320e1235a9a2d58278bdc742fae7d6fe763235717adf019d79d6c061e4e8aae9.jpg)
text_image
UNLOCK? YES EXITCAUTION
- Even if images are protected, they will be erased if reformatting is performed (see page 19).
HINT
To continue setting the protect mode for other image data...
- After step 5, press [◀] or [▶] to display the desired image, and repeat step 4.
To cancel the protect mode for an image...
- Display the image you wish to unlock, and perform steps 2 to 5. The protect indicator disappears, and the image is unlocked.
PROTECTING/ERASING IMAGE DATA
Erase unneeded data
Images and video clips can be erased one frame at a time, or groups can be erased one group at a time.
1 Display the data that you want to erase.
2 Display the Playback Settings screen (see page 29).
3 Select the erase icon [☐].

text_image
100-0046 1280 FINE4 Press the [SET] button.
●The Erase Mode Selection screen appears.
[ONE ERASE]: Erases one still image at a time.

text_image
ERASE ONE ERASE GROUP ERASE EXIT[GROUP ERASE]: Erases all the still images.
[EXIT]: Returns to the Playback Settings screen.
[ONE ERASE]: Erases one still image at a time.
[GROUP ERASE]: Erases the entire folder for the sequential shot display (the data for the other sequential shots remains).
[EXIT]: Returns to the Playback Settings screen.
[ONE ERASE]: Erases all the images in the displayed video clip.
[GROUP ERASE]: Erases all the video clips.
[EXIT]: Returns to the Playback Settings screen.
5 Press [▲] or [▼] on the arrow button to select the desired erase mode, and press the [SET] button.
●The Erase Confirmation screen appears.
[YES]: The selected data will be erased.
[EXIT]: The selected data is not erased, and the display returns to the Erase Mode Selection screen.
![SANYO VPC-R1EX - Press [▲] or [▼] on the arrow button to select the desired erase mode, and press the [SET] button. - 1](/content/2026/06/1188067/images/735cedbdc70c0cc1dca2dee36dcb7e9056473a4bd35319e181092d2652194b18.jpg)
text_image
ERASE ONE? YES EXIT6 Select [YES], and press the [SET] button.
●[ERASING] appears while the data is being erased.
●The Erase Confirmation screen appears once more. Select [YES], and press the [SET] button to erase the data.
- When all the data has been erased, [NO IMAGE] appears on the screen.
![SANYO VPC-R1EX - Select [YES], and press the [SET] button. - 1](/content/2026/06/1188067/images/09738b7ede5828ff671ef97df16f843116a980782cf2f9eca14b157600718638.jpg)
text_image
NO IMAGE 0 3 1HINT
To continue erasing other image data...
- After step 5, press [◀] or [▶] on the arrow button to display the desired image, and repeat step 6.
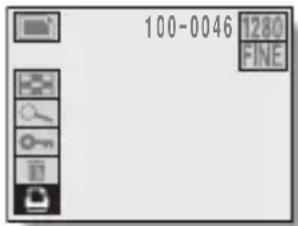
COPYING TO THE CARD
You can copy internal memory data to the card.
1 Insert a card and display the Shooting Settings screen.
●The following steps can also be performed from the Playback Settings screen (see page 29).
2 Select [☐] from the shooting mode menu.
3 Press the [SET] button.
●The Options screen appears.
4 Select [COPY TO CF], and press the [SET] button.
●The Card Copy screen appears. [COPY]: Data will be copied to the card. [EXIT]: The data will not be copied.
Shooting mode menu
![SANYO VPC-R1EX - Select [COPY TO CF], and press the [SET] button. - 1](/content/2026/06/1188067/images/7597a23ea41bea349d2bd156997fac8193e8053d832449ce8d880b3d73425e58.jpg)
text_image
5A 1280 FINE EXP 18![SANYO VPC-R1EX - Select [COPY TO CF], and press the [SET] button. - 2](/content/2026/06/1188067/images/7e26c49aa36920aab176172897d8aabaea39450993e622e034e1978e10621739.jpg)
text_image
CLOCK SET LANGUAGE REFORMAT BEEP COPYTO CF![SANYO VPC-R1EX - Select [COPY TO CF], and press the [SET] button. - 3](/content/2026/06/1188067/images/bee2894e753c5c61295f4287a661011cf8c106e7e00c9db91b70ffcca4fb11ca.jpg)
text_image
COPY TO CF COPY EXIT5 Select [COPY], and press the [SET] button.
- Copying begins.
- When copying has completed, the display returns to the Options screen.
USING WITH A COMPUTER
Install the software on the included CD-ROM (Sanyo Software Pack) before connecting the camera to a computer. The camera can be accessed as an external drive when connected to a computer. See the Sanyo Software Pack instruction manual for more information about software installation.
1 Turn off your digital camera (see page 21).
2 Connect the camera plug of the dedicated USB interface cable to the camera, and the computer plug to the computer.

flowchart
graph LR
    A["Device with USB cable"] <--> B["USB connector"]
    B --> C["Computer with USB port"]
3 Open the camera lens cover.
natural_image
Line drawing of a digital camera with an open lid and scroll wheel (no text or symbols)HINT
- When the digital camera is connected to a computer, no image is shown on the camera's LCD monitor.
PRESERVING THE RECORDED IMAGES
Saving images
The captured pictures can be saved by downloading to your computer's hard disk, or by printing through a lab service.
- To save images to a computer, please see the instruction manual of the Sanyo Software Pack (included CD-ROM).
●To use a lab service, please contact a digital print service for digital cameras or access an Internet print service.
Data formats
The format of data saved on the card or into the internal memory, as well as the method of determining file names, are explained below.
●Still image data
Data format: JPEG
File name structure: File name starts with SANY, with extension .jpg.
Ex.: SANYxxxx.jpg
xxxx represents the sequential number assigned to the recorded image.
- Sequential shot image data
Data format: JPEG
File name structure: File name starts with SEQT, with extension .jpg.
Ex.: SEQTxxyy.jpg
xx represents the sequential shot folder number (2 digits)
yy represents the sequential number assigned to the recorded image (2 digits)
- Video clip data
Data format: QuickTime Movie
File name structure: File name starts with VCLP, with extension .mov.
Ex.: VCLPxxxx.mov
xxxx represents the sequential number assigned to the recorded image.
Directory configuration of recorded data

flowchart
graph TD
    A["ROOT"] --> B["MISC (DPOF file location)"]
    A --> C["DCIM"]
    A --> D["SYSTEM (Card information data storage location)"]
    D --> E["100SANDS*"]
    E --> F["SANY0001.jpg"]
    E --> G["SANY0002.jpg"]
    E --> H["SANY0003.jpg"]
    E --> I["SANY0004.jpg"]
    D --> J["101SANDS"]
    J --> K["SANY1001.jpg"]
    J --> L["SANY1002.jpg"]
    J --> M["SANY1999.jpg"]
    D --> N["102SANDS"]
    N --> O["SANY2001.jpg"]
    N --> P["SANY2002.jpg"]
    E --> Q["SANY0998.jpg"]
    E --> R["SANY0999.jpg"]
    E --> S["SEQT0001"]
    S --> T["SEQT0101.jpg"]
    S --> U["SEQT0102.jpg"]
    S --> V["SEQT0103.jpg"]
    S --> W["VCLP"]
    W --> X["VCLP0001.mov"]
    W --> Y["VCLP0002.mov"]
    W --> Z["File name"]
CAUTION
Do not modify card data using your computer
●Images recorded with the digital camera are assigned file names and saved in specific folders based on the system explained above. For this reason, if you use a commercial card adapter or the like to modify the file names directly from your computer, the digital camera may not be able to play back the images or may otherwise not work properly.
NOTE
About video clip data recorded with the digital camera
- Video clips can be played back with QuickTime Ver. 3.0 or higher, from Apple Computer, Inc. QuickTime 5.0 for Windows/Macintosh is available on the included CD-ROM (Sanyo Software Pack).
REQUESTING PRINTING
You can have photographs made of the still images using a printer or taking them to a shop that provides digital print services.
To have images from sequential shots and video clips printed, the images must first be copied and saved as still images (see page 50). Also, to print images that are stored in the internal memory, first copy the images to a card (see page 55) and follow the steps below.
1 Insert a card and display the still image you wish to have printed (see page 31).
2 Display the Playback Settings screen (see page 29).
3 Select the print icon [☐].
text_image
100-0046 1280 FINE4 Press the [SET] button.
●The Print Setting screen appears.
[STD PRINT]: To print one image on one sheet.
[ALL CLEAR]: To clear the print settings.
[EXIT]: To return to the Playback Settings screen.
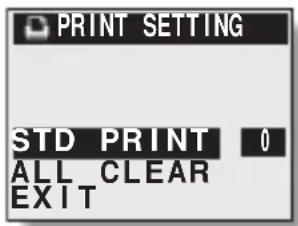
text_image
PRINT SETTING STD PRINT 0 ALL_CLEAR EXIT5 Select [STD PRINT], and press the [SET] button.
●The Copies Printout screen appears.
- Press [◀] or [▶] to continue settings for other images.
![SANYO VPC-R1EX - Select [STD PRINT], and press the [SET] button. - 1](/content/2026/06/1188067/images/9f0e1fb3d25a5dd37127d27212cce462b966763256eed2448029ccf10a8dbfff.jpg)
text_image
STD PRINT6 Press [▲] or [▼] on the arrow button to specify the number of prints.
●The number of prints can be set from 0 to 10.
7 Press the [SET] button.
●This completes the setting for the number of prints.
●The display returns to the Print Setting screen.
- To continue setting the number of prints for the other image data, repeat steps 5 to 7.
HINT
To clear the print settings...
- In step 4 select [ALL CLEAR], and press the [SET] button. A confirmation screen appears. Select [YES], press the [SET] button, and the print settings will be cleared.
NOTE
- This digital camera conforms to DPOF standards, so if the card is taken to a shop that handles the DPOF standard, you can specify—using your digital camera—the number of prints and whether to include the date on the prints.
●The quality of the prints will differ depending on the print service and the printing equipment. - For more information about printing images, please consult a shop providing digital print services.
About the DPOF standard
●DPOF is one of the print order standards. The print specifications can be set using the digital camera, and very efficient prints can be produced. It also enables the use of DPOF-compatible printers.
SETTING THE DATE AND TIME
The clock in the digital camera records the date and time that a picture is taken and can display it during playback. To display the date and time when playing back images, the date and time settings must be completed before the pictures are taken.
Example: To set the clock to 7:30 p.m., August 28, 2002
1 Display the Shooting Settings screen.
●The following steps can also be performed from the Playback Settings screen (see page 29).
2 Select [图标] from the shooting mode menu.
Shooting mode menu
![SANYO VPC-R1EX - Select [图标] from the shooting mode menu. - 1](/content/2026/06/1188067/images/14612df65874389ce01168f81b1246611d8ba843c58e0e5cdf48540ae1038b20.jpg)
text_image
$A 1280 FINE EXP3 Press the [SET] button.
●The Options screen appears.
![SANYO VPC-R1EX - Press the [SET] button. - 1](/content/2026/06/1188067/images/4b425cff421aeddbdc14ffffe94a0f2eb737622146da99fcd7bbe4695b524af8.jpg)
text_image
CLOCK SET LANGUAGE REFORMAT BEEP COPYTO CF4 Select [CLOCK SET], and press the [SET] button.
●The Clock Set screen appears.
●The current date and time settings are shown.
![SANYO VPC-R1EX - Select [CLOCK SET], and press the [SET] button. - 1](/content/2026/06/1188067/images/2356de8e3657cffceeb51c105c9b5e88a78bcfbaf36d85da2c6b716f20c03be6.jpg)
text_image
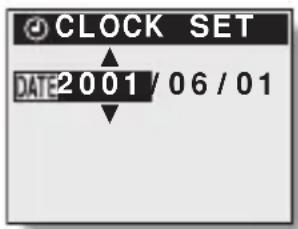
CLOCK SET DATE 2001/06/01 TIME 00:00 DISP ON Y/M/D EXIT5 Set the date.
- The date is set in YEAR → MONTH → DAY order.
① Press the [SET] button.
- The year indication changes to orange.
[▲]: The number decreases.
[▼]: The number increases.
[SET] button or [◀] [▶]: Moves to the next item.
② After the date has been set, press the [SET] button.
text_image
CLOCK SET DATE2001/06/01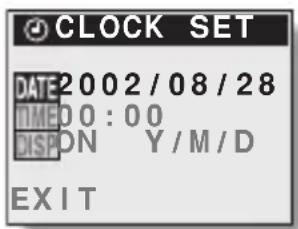
text_image
CLOCK SET DATE 2002/08/28 TIME 00:00 DISP ON Y/M/D EXIT6 Set the time.
●The time is set in HOUR → MINUTE order.
① Press [▼] on the arrow button to select the [TIME] indication.
②Press the [SET] button.
- The hour indication changes to orange.
[▲]: The number decreases.
[▼]: The number increases.
[SET] button or [▶]: Moves to the next item.
③ After the minute has been set, press the [SET] button.
- The display returns to the screen in step 1.

text_image
CLOCK SET DATE 2002/08/28 TIME 00:00 DISP ON Y/M/D EXIT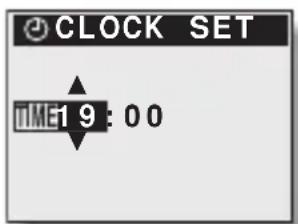
text_image
CLOCK SET TIME1 9:00
text_image
CLOCK SET DATE 2002/08/28 TIME 19:30 DISP ON Y/M/D EXIT7 Set the date display.
① Press [▼] to select [DISP].
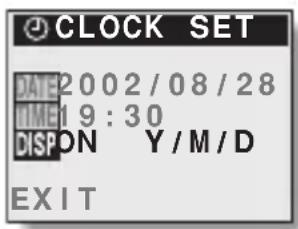
text_image
CLOCK SET DATE 2002/08/28 TIME 19:30 DISP ON Y/M/D EXIT②Press the [SET] button.
- The current indication changes to orange.
③Press [▼].
- Each time [▼] is pressed, the display changes in the following order:
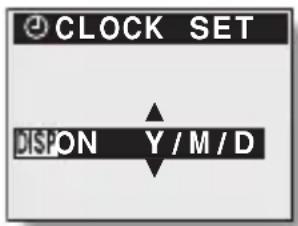
text_image
CLOCK SET DISPON Y / M / D
- Each time [▲] is pressed, the display changes in the reverse order.
- If "OFF" is selected, the date is not shown during playback.
④ After selecting the date display, press the [SET] button.
- The display returns to the screen in step 1.
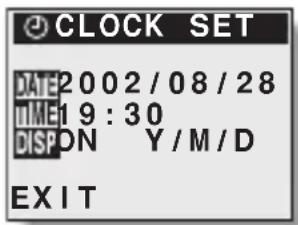
text_image
CLOCK SET DATE 2002/08/28 TIME 19:30 DISP ON Y/M/D EXIT8 Select [EXIT], and press the [SET] button.
●The date and time settings are completed, and the display returns to the screen in step 3.
HINT
If the date and time are not set...
- June 1, 2001, 00:00 (midnight) becomes the set time, and during playback the displayed time will show as “2001/06/01 00:00”.
To correct the date and time setting
① On the screen in step 4, press [▼] on the arrow button to select the line you wish to correct.
② Press [▶] to select the indication you wish to correct.
③ Press [▲] or [▼] on the arrow button to correct the indication.
④ Press the [SET] button.
Check the clock after changing the batteries.
- When you replace the batteries, the internal clock setting is usually backed up for up to 15 minutes. However, depending on how long the batteries have been used, in some cases the date and time setting may be cleared. For this reason, after changing the batteries and before taking pictures, it is recommended that you check that the clock setting is correct (steps 1 through 4).
You can set whether or not the operation confirmation sound (beep) is heard when the shutter release, [SET], [MODE], or other button is pressed.
1 Display the Shooting Settings screen.
●The following steps can also be performed from the Playback Settings screen (see page 29).
2 Select [☐] from the shooting mode menu.
3 Press the [SET] button.
●The Options screen appears.
Shooting mode menu
![SANYO VPC-R1EX - Press the [SET] button. - 1](/content/2026/06/1188067/images/f561593f62e197407bac4a8b8a152824c419a0745ae0dd51ab457587fff44e93.jpg)
text_image
5A 1280 FINE EXP 18![SANYO VPC-R1EX - Press the [SET] button. - 2](/content/2026/06/1188067/images/49b0f26590ccd158a1be638d52dfcc3850c8496ad4fa1d02cee456c3c984641e.jpg)
text_image
CLOCK SET LANGUAGE REFORMAT BEEP COPYTO CF4 Select [BEEP], and press the [SET] button.
●The Beep Sound Setting screen appears.
[ALL]: A beep is heard when any button is pressed.
[SHUTTER]: A beep is heard only when the shutter release button is pressed.
[OFF]: The beep sound is turned off.
![SANYO VPC-R1EX - Select [BEEP], and press the [SET] button. - 1](/content/2026/06/1188067/images/499471d917edc2703ebc9b188648d6b25684e57309fe90a5637414b21143a1b3.jpg)
text_image
BEEP ALL SHUTTER OFF5 Select the beep sound setting, and press the [SET] button.
●The beep sound is set, and the display returns to the Options screen.
HINT
- The beep sound setting is retained even if the main switch is set to [▶] or [MONITOR OFF], or if the power is turned off.
●The beep sound volume cannot be adjusted.
CHANGING THE DISPLAY LANGUAGE
You can select from the following languages for the LCD monitor display:
Japanese, English (initial setting), French, German, Spanish
1 Display the Shooting Settings screen.
●The following steps can also be performed from the Playback Settings screen (see page 29).
2 Select [图标] from the shooting mode menu.
Shooting mode menu
![SANYO VPC-R1EX - Select [图标] from the shooting mode menu. - 1](/content/2026/06/1188067/images/6e5671e2ce81d344180d6416a3d276951ca4ebf2306b0c2e2f766653568ffe31.jpg)
text_image
A 1280 FINE EXP3 Press the [SET] button.
●The Options screen appears.
![SANYO VPC-R1EX - Press the [SET] button. - 1](/content/2026/06/1188067/images/4ddee445e25c9cd21eccf560a51c35395965fc32a1cb42dc5f9e5379af974c01.jpg)
text_image
CLOCK SET LANGUAGE REFORMAT BEEP COPYTO CF4 Select [LANGUAGE], and press the [SET] button.
●The Language Setting screen appears.
- Select from Japanese, English, French, German, and Spanish.
![SANYO VPC-R1EX - Select [LANGUAGE], and press the [SET] button. - 1](/content/2026/06/1188067/images/d98ccba46c8dbe765e4fe5f26a7503861afe84c0e9fcd3a89efb34b4d51a632d.jpg)
text_image
abcLANGUAGE 日本語 ENGLISH FRANÇAIS DEUTSCH ESPAÑOL5 Select the language, and press the [SET] button.
●The display language is set, and the display returns to the Options screen.
HINT
- The display language setting is retained even if the main switch is set to [▶] or [MONITOR OFF], or if the power is turned off.
CHECKING THE REMAINING BATTERY CHARGE
The remaining battery charge can be confirmed on the LCD monitor, and it is recommended that you check it before taking pictures. For information on the battery operation time, please see “Battery Operation” on page 79.
1 Set the main switch to [▶] or [☐].
- If the main switch is set to [☐], open the lens cover.
![SANYO VPC-R1EX - Set the main switch to [▶] or [☐]. - 1](/content/2026/06/1188067/images/9657da24c56265080a72a2a8f3f4692973cd98a5f4b9bc68d8e4a84c915c1b14.jpg)
text_image
MONITOR OFF2 Select any shooting or playback mode other than [☐].
●The remaining battery charge is indicated in the lower-right corner of the LCD monitor.
| Battery indication Remaining charge | |
| No indication From full to about 1/4 full | |
![SANYO VPC-R1EX - Select any shooting or playback mode other than [☐]. - 1](/content/2026/06/1188067/images/372f044558446dcfa82d43170c78243376667cf71eeef2639b3b9afc368d7801.jpg) | From about 1/2 full to less than 1/4 full |
![SANYO VPC-R1EX - Select any shooting or playback mode other than [☐]. - 2](/content/2026/06/1188067/images/abee01f82c29bc8d6b484974b15b4c166714189c99e90fe6cc9b7ac3408283d7.jpg) | Replace the batteries. It will soon be impossible to take pictures. (When this status is reached, the indication will be displayed continually on the LCD monitor.) |
HELP
If the LCD monitor suddenly turns off...
- When taking pictures using the LCD monitor and the battery charge becomes low, the LCD monitor may turn off briefly. This is to suppress battery power consumption when the flash is recharging. When the flash has recharged, the LCD monitor will turn on again.
HINT
- Depending on the characteristics of the batteries, the [☐] indication may appear prematurely when the temperature is low. The indication may also change depending on the surrounding temperature and other conditions, so therefore should be thought of as a general indication of the remaining battery charge.
●The remaining battery indication is displayed as above only when alkaline batteries (supplied) are used. The indication is not correctly displayed when Ni-Cd or other batteries are used.
●Battery life may differ even among batteries of the same type.
●Battery consumption differs depending on the shooting conditions (how many times the flash is used, whether or not the LCD monitor is used) and surrounding conditions (low temperatures below 10^ C), and the number of pictures that can be taken changes significantly.
NOTE
- It is recommended that spare batteries be kept on hand when traveling, at weddings, etc., and in cold weather conditions when battery consumption is high. In cold outdoor environments (when skiing, for example) the batteries can be kept warm by keeping them in your pocket.
CHECKING THE REMAINING NUMBER OF IMAGES AND RECORDING TIME
For information about the card's and internal memory's capacity, please see "Possible No. of Images/possible Shooting Time" on page 80.
- To check the number of pictures or time remaining in the camera's internal memory, do not insert a memory card.
1 Set the main switch to [☐].
2 Open the lens cover.
- Select any shooting mode other than [2c].
●The remaining number of images appears in the upper right of the LCD monitor (for the still image and sequential shot shooting modes).
●The remaining video recording time appears in the upper right of the LCD monitor (for the video clip shooting mode).
●The remaining number of images and video clips differs depending on the resolution and compression rate settings. - When the indication for the remaining number of images or video clips becomes 0, no more images can be recorded. To record more images, either replace the card with another one, or save the recorded card data (see page 57) and then erase the card (see page 53).
●Even when the indication for the remaining number of images or video clips becomes 0, in some cases further recording may be possible if you change the shooting mode, lower the resolution (see page 37), and/or increase the compression rate (see page 39).
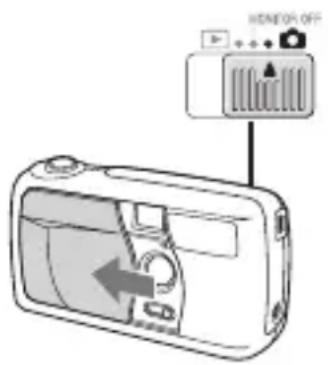
text_image
HENDER-OFF