W100 - Watch Lorus - Free user manual and instructions
Find the device manual for free W100 Lorus in PDF.

| Product Type | Quartz analog watch |
| Brand | Lorus |
| Model | W100 |
| Case Material | Stainless steel |
| Case Diameter | 40 mm |
| Case Thickness | 10 mm |
| Strap Material | Leather or stainless steel bracelet |
| Strap Width | 20 mm |
| Weight | Approx. 80 g |
| Power Source | Battery (SR626SW or equivalent) |
| Battery Life | Approx. 2 years |
| Movement Type | Japanese quartz movement |
| Water Resistance | 50 meters (5 ATM) |
| Dial Type | Analog with hour, minute, second hands |
| Date Display | Yes, at 3 o'clock position |
| Crown Type | Pull-out crown for time/date setting |
| Crystal Material | Mineral glass |
| Buckle Type | Standard buckle or deployment clasp |
| Maintenance | Wipe with soft cloth; avoid contact with chemicals |
| Battery Replacement | Recommended by professional watchmaker |
| Safety Warnings | Keep away from strong magnets and extreme temperatures |
| Spare Parts Availability | Contact Lorus authorized service centers |
| Country of Origin | Japan |
| Warranty | 2 years limited warranty |
Frequently Asked Questions - W100 Lorus
User questions about W100 Lorus
0 question about this device. Answer the ones you know or ask your own.
Ask a new question about this device
Download the instructions for your Watch in PDF format for free! Find your manual W100 - Lorus and take your electronic device back in hand. On this page are published all the documents necessary for the use of your device. W100 by Lorus.
USER MANUAL W100 Lorus
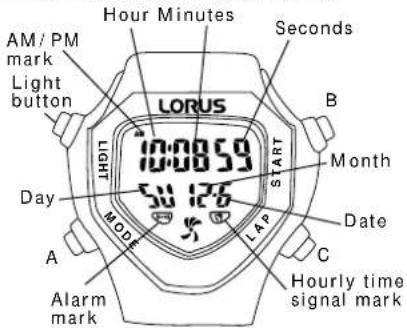
- Time/calendar display: Hour, minutes, seconds, month, date and day of the week.
- Fully automatic calendar: Calendar adjusts automatically for odd and even months including February of leap years from the year 1998 to the end of 2048.
• Time indication: Changeover between 12- and 24-hour indications is possible. - Stopwatch: Measures up to 10 hours with 1/100 second readout.
- Lap time measurement: When the fastest lap time is measured, a beep sounds and the display is illuminated.
- Auto start function: The stopwatch can be set to start automatically at a desired time.
- Countdown timer:
- Preset timer: Five different lengths of time (3, 10, 15, 30 and 45 minutes) have been preset for the timer.
- Adjustable timer: Up to 23 hours and 59 minutes can be set in minute increments.
- Daily alarm: The alarm can be set to ring on a 24-hour basis.
• Hourly time signal: Can be set to ring every hour on the hour. - Dual time: Time of a different time zone can be set and displayed.
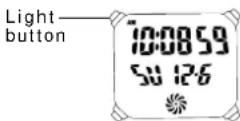
- Illuminating light: The light illuminates the display in the dark.
■ BUTTONS AND DISPLAYS
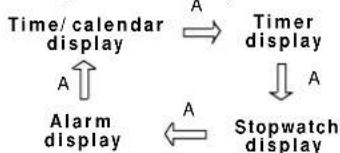
The selection of the display can be made in the following order with each press of button "A".
flowchart
graph TD
    A["Time/calendar display"] -->|A| B["Timer display"]
    B -->|A| C["Stopwatch display"]
    C -->|A| A
    A --> D["Alarm display"]
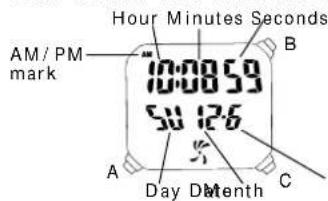
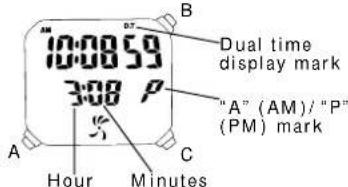
With each press of button "B" in the time/ calendar display, the display changes over between the time/ calendar and dual time alternately.
Time/calendar display
Dual time display
■ HOW TO SET THE TIME/CALENDAR
- Press button "A" to show the time/calendar display.
- Press button "A" for 2 seconds to show the time/calendar setting display. The second digits start flashing.
- Selection of the digits to be adjusted (flashing) is made in the following order by pressing button "B".
$$ \begin{array}{c}\text {Seconds} \rightarrow \text {Minutes} \rightarrow \text {Hour} \rightarrow \text {Year}\\left.\begin{array}{l}\text {12 / 24 - hour} \leftarrow \text {Date Month}\\text {indication}\end{array}\right.\end{array} $$
- Press button "C" to set the flashing digits. One digit is advanced with each press of button "C". Digits except seconds and 12/24-hour indication move quickly by keeping button "C" pressed.
- After all the adjustments are completed, press button "A" to return to the time/calendar display.
Seconds setting
When the seconds digits are flashing, press button "C" in accordance with a time signal. The seconds are reset to "00" and start immediately. When the seconds count any number from "30" to "59" and button "C" is pressed, one minute is added and the seconds are immediately reset to "00".
Notes:
- When setting the hour digits in the 12-hour indication, check that AM/PM is properly set. In the 24-hour indication, there is no indication.
- Once the year, month and date have been set, the day of the week is set automatically.
- If the watch is left untouched in the time/calendar setting display with the digits flashing, it will automatically return to the time/calendar display in 2 minutes.
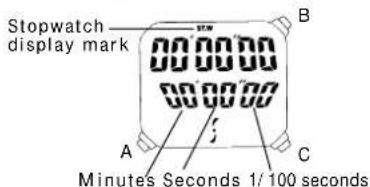
■HOW TO USE THE STOPWATCH
• The stopwatch can measure up to 10 hours in 1/100 seconds.
Even if the stopwatch display is changed to another while the measurement is in progress, it continues counting properly. After the stopwatch is used, however, be sure to reset it as the battery energy is consumed enormously to shorten the battery life.
Stopwatch Operation
Press button "A" to show the stopwatch display.
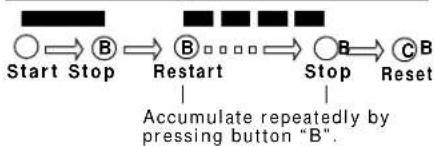
Accumulated elapsed time measurement
flowchart
graph LR
    A["Start Stop"] --> B["Restart"]
    B --> C["Stop"]
    C --> D["Reset"]
    D --> E["Accumulate repeatedly by pressing button "B"'"]
Lap time measurement
- "Lap time" refers to an elapsed time required to cover a given section of the whole distance.
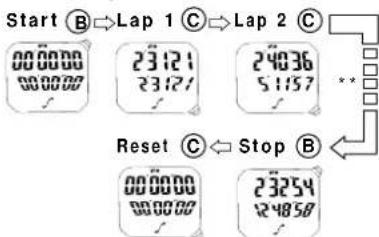
** Can repeat by pressing button "C".
Note: When a lap time measured is the fastest among the lap times previously measured, a beep rings and the display is illuminated.
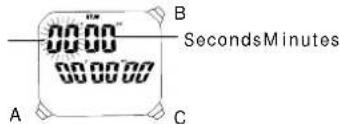
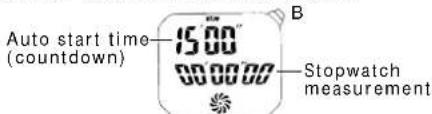
Auto Start Function
- By setting the amount of time before measurement is started, the stopwatch starts automatically at a desired time.
- Up to 15 minutes and 59 seconds can be set in seconds.
Note: The auto start function and timer cannot be used simultaneously.
1) Auto start time setting
-
After stopping the stopwatch or resetting it, press button "A" for 2 seconds to show the auto start time setting display. The minute digits start flashing.
-
Press button "B" to select the digits to be adjusted (flashing).
$$ \text { Minutes } \rightarrow \text { Seconds } $$
-
Press button "C" to set the flashing digits. One digit is advanced with each press of the button. The digits move quickly by keeping the button pressed.
-
After all the adjustments are completed, press button "A" to show the auto start display. The auto start time you have set remains displayed in the upper row.
Note: If the watch is left untouched in the auto start time setting display with the digits flashing, it will automatically return to the auto start display in 2 minutes.
2) How to use the auto start function
- Press button "B" in the auto start display. The countdown of the set time will be started. With each press of the button, the countdown is started and stopped alternately. The stopwatch starts measuring when the set time is up.
At 3, 2 and 1 minutes, 30, 20, 10, 3, 2 and 1 seconds before the stopwatch measurement is started, a beep sounds and the light illuminates.
- After the stopwatch is started, operate the buttons as explained in "Stopwatch Operation".
■ HOW TO SET THE ALARM

-
Press button "A" to show the alarm display.
-
Press button "A" for 2 seconds to show the alarm setting display. The hour digits (and "A"/"P" mark if the time is set in the 12-hour indication) start flashing.
-
Press button "B" to select the digits to be adjusted (flashing).

-
Press button "C" to set the digits. One digit is advanced with each press of the button. The digits move quickly by keeping the button pressed.
-
After all the adjustments are completed, press button "A" to return to the alarm display.
Notes:
-
When the time function is displayed in the 24-hour indication, the alarm is also displayed in the 24-hour indication.
-
When setting the hour digits in the 12-hour indication, check that "A" (AM)/"P" (PM) mark is correctly set. In the 24-hour indication, there is no indication.
-
If the watch is left untouched in the alarm setting display with the digits flashing, it will automatically return to the alarm display in 2 minutes.
Engagement/disengagement of the alarm and hourly time signal
- With each press of button "B" in the alarm display, the engagement and disengagement of the alarm and hourly time signal are made as follows.
$$ \text { Alarm mark } \quad \text { Hourly time signal mark } $$
| 1 | Hourly time signal engaged | |
| 2 | Both engaged | |
| 3 | Alam engaged | |
| 4 | Neither engaged |
- At the designated time, the alarm rings and the display is illuminated for 20 seconds and stops. To stop them manually, press button "A", "B" or "C".
- The alarm can be tested by keeping button "C" pressed in the alarm display.
■HOW TO SET THE DUAL TIME
Time of a different time zone can be set and displayed together with the time you have set in "HOW TO SET THE TIME/CALENDAR".
-
Press button "A" to show the time/calendar display.
-
Press button "B" to show the dual time display. With each press of the button, the display changes over between the time/calendar and dual time alternately.
-
Press button "A" for 2 seconds to show the dual time setting display.
-
To set the digits, refer to "HOW TO SET THE TIME/CALENDAR".
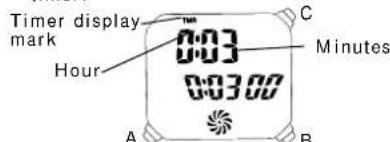
■ HOW TO USE THE COUNTDOWN TIMER
- Two types of timers (adjustable timer and preset timer) are available.
1. How to Use the Preset Timer
- Five different lengths of time (3, 10, 15, 30 and 45 minutes) have been preset for the timer.
Selection of the preset time
-
Press button "A" to show the timer display.
-
Press button "C" to select the desired preset time. Selection of the preset time is made in the following order by pressing button "C".
$$ \begin{array}{c c c}&\rightarrow&\rightarrow 1 5 \text { min.30 min.45 min. }\&&\downarrow\\uparrow&&\\text { Adjustable }&\leftarrow&\leftarrow 1 0 \text { min.3 min. }\\text { timer }&&\end{array} $$
Preset timer operation
Press the button in the following order.

Restart and stop of the timer can be repeated by pressing button "B".
* When the set time is up, a warning sound beeps and the display is illuminated for 10 seconds. To stop them manually, press button "A", "B" or "C".
* At 3, 2 and 1 minutes, 30, 20, 10, 3, 2 and 1 seconds before the set time is up, a beep sounds and the light illuminates.
2. How to Use the Adjustable Timer
- Adjustable timer can be set up to 23 hours and 59 minutes in minutes.
Adjustable timer setting
- Press button "A" to show the timer display.
- Press button "C" to select the adjustable timer. Selection of the adjustable timer and preset timers are made in the following order by pressing button "C".

- Press button "A" for 2 seconds to show the adjustable timer setting display. The hour digits start flashing.
- Selection of the digits to be adjusted (flashing) is made in the following order by pressing button "B".
Hour Minutes

- Press button "C" to set the digits. One digit is advanced with each press of the button. The digits move quickly by keeping the button pressed.
- After all the adjustments are completed, press button "A" to return to the timer display.
Note: If the watch is left untouched in the adjustable timer setting display with the digits flashing, it will automatically return to the timer display in 2 minutes.
Adjustable timer operation
Refer to "Preset timer operation" above.
■ LUMIBRITE WATCH
(dial, hands, buttons, case, bezel, strap, etc.)


☆ If your watch is a LORUS LUMIBRITE watch, it has following features.
LORUS LUMIBRITE watches absorb and store light energy from natural and artificial light sources and emit light in the dark. They are made of environmentally friendly material, and therefore, are harmless to human beings and the environment.
- With a full charge, LORUS LUMIBRITE watches glow in the dark hours longer than conventional luminous watches of this type. If exposed to a light of more than 500 lux (i.e., the brightness of a typical office) for approximately 10 minutes, or direct sunlight for 2 minutes, they will glow for hours.
- Since LORUS LUMIBRITE watches emit the light they store, the brightness will decrease gradually over time. The length of time they will glow may also differ slightly depending on such factors as the brightness of and distance from the light source used to charge the watch.
■ILLUMINATING LIGHT
When the light button is pressed and released in the time/calendar, stopwatch, alarm, dual time or timer display, the light illuminates the display in red, green and both colors for 5 seconds for easy viewing in the dark.
■ ViViDiGi
ViViDiGi is a new type of liquid crystal panel that makes possible various colors and high contrast.
• Excellent light reflection and transmission make the display bright and clear.
- Various color options are available.
- Either the whole panel or the displayed data only can be illuminated.
* Features vary in different models.
ViViDiGi
■ BATTERY CHANGE
The miniature lithium battery PANASONIC CR2025, which powers your watch should last approximately 2.5 years. However, because it is inserted at the factory, the actual life of the battery once in your possession may be less than the specified period. Be sure to replace the battery to prevent any possible malfunction as soon as it runs down. To replace the battery, we recommend taking the watch to a local watch repair shop.
Note: If the alarm is used for more than 20 seconds a day and/or the illuminating light for more than 5 seconds a day, the battery life may be less than the specified period.
■ CARE OF YOUR LORUS WATCH
• BATTERY

CAUTION
Do not expose the old battery to fire or recharge it. Keep it at a place beyond the reach of children. If a child swallows it, consult a doctor immediately.
• WATER RESISTANT
| Condition of use Indica- tion on the dial/ case back | Accidental contact with water, such as splashes and rain | Swimm- ing and taking a shower | Skin diving | Scuba diving |
| No Indication | NO NO | NO NO | ||
| WATER RESISTANT | YES NO | NO NO | ||
| WATER RESISTANT (50 M/ 5 BAR)* | YES YES | NO NO | ||
| WATER RESISTANT ( 100M/ 10BAR or ) above | YES | YES | YES NO |
* If your watch is 200 M/20 BAR, 100 M/10 BAR or 50 M/5 BAR water resistant, it is so indicated on the dial/case back.
- Do not operate the buttons when the watch is wet.
- If the watch is exposed to salt water, rinse it in fresh water and then wipe it thoroughly dry.
Caution:
Leather straps are not water resistant except so indicated, even if the watch head is water resistant.
• ALLERGIC REACTION
Because the case and band touch the skin directly, it is important to clean them regularly. If not, shirt sleeves may be stained and those with delicate skin may develop a rash. Please wear the watch with some play to avoid any possible allergic reaction. If you develop a rash on your wrist, stop wearing and consult a physician.
• MAGNETISM
Your watch will not be affected by magnetism generated by household electric appliances.
• SHOCKS AND VIBRATIONS
Your watch may be worn for normal sports activities, but be careful not to drop it or hit it on hard surfaces.
• TEMPERATURE
Your watch is preadjusted so that constant accuracy may be insured at normal temperature.
■ SERVICE
When your LORUS watch requires repair or servicing, please see the enclosed WARRANTY/GUARANTEE.
Printed in Hong Kong