HP-FPFCBTADAP - Remote control toy Hobbico - Free user manual and instructions
Find the device manual for free HP-FPFCBTADAP Hobbico in PDF.

User questions about HP-FPFCBTADAP Hobbico
0 question about this device. Answer the ones you know or ask your own.
Ask a new question about this device
Download the instructions for your Remote control toy in PDF format for free! Find your manual HP-FPFCBTADAP - Hobbico and take your electronic device back in hand. On this page are published all the documents necessary for the use of your device. HP-FPFCBTADAP by Hobbico.
USER MANUAL HP-FPFCBTADAP Hobbico
www.Hyperion-world.com
HYPERION
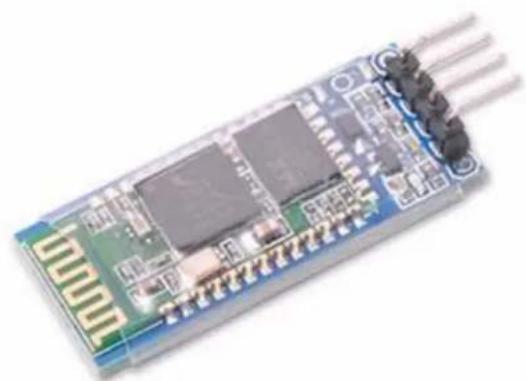
natural_image
Close-up of a green circuit board with integrated circuits and three black connectors (no visible text or symbols)
natural_image
Coiled black cable with four connector terminals, no visible text or symbolsCopyright Hyperion 2016
NAZE & CC3D BLUETOOTH ADAPTER SETUP
These instructions will walk you through how to use a serial Bluetooth module, such as Hyperion | HP-FPFCBTADAP, with Open Pilot hardware to establish a telemetry connection. There are two ways to connect the module; either directly to the flight controller, or to an OPLink ground module. Connecting to the flight controller makes it possible to configure and calibrate the flight controller near a PC or a smartphone, but as a Bluetooth connection does not travel long distances, the link is usually lost during flight. OPLink solves this problem, and communicates telemetry data from the vehicle to ground. Then Bluetooth connection can be used to connect a PC or a smartphone to the OPLink ground module. This is especially useful when using OPLink for vehicle control + telemetry.
www.Hyperion-world.com
No matter which hardware configuration you choose, the Bluetooth module's configuration procedure is basically the same. HC-05 and HC-06 Bluetooth modules are factory configured to 9600 baud rate, 8 data bit, 1 stop bit and no parity serial connection. The baud rate must be increased to 38400 to match with that of the OPLink. Alternatively, 57600 baud can be used if you are connecting the Bluetooth module directly to the flight controller, or if you use 57600 baud with OPLink.
Configuring the Bluetooth module
Hardware connections
To change the baud rate of the Bluetooth module, you must connect to the module with a serial link. You can either use an FTDI USB to serial adapter, or your OpenPilot flight controller to connect to the Bluetooth module. Both establish the same goal. If you have an FTDI adapter it is recommended to use that, because it does not require any configuration steps like the flight controller does for Virtual COM port ComBridge operation.
HW method 1: Using an FTDI adapter
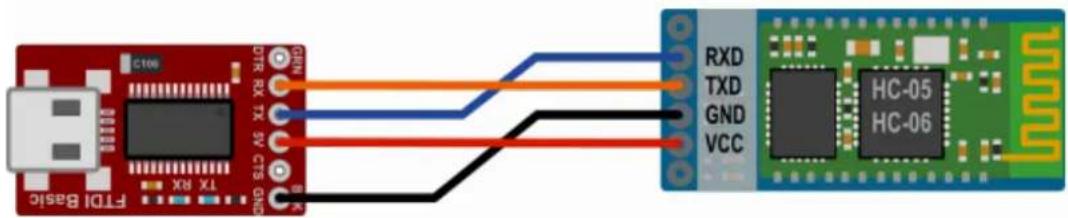
Most R/C hobbyists are familiar with FTDI USB to serial adapters. This is probably the easiest method to connect to the Bluetooth module. An FTDI module can easily be found on eBay.
- Connect the wires according to the diagram.
- Connect USB cable to the FTDI adapter.
- Install any necessary FTDI drivers on your PC, or wait for your operating system to install them.
- COM port becomes available automatically, and can be seen in the Windows Device Manager. Proceed to the next step below: Software steps.
Bluetooth Adapter Setup for Naze32 boards
www.Hyperion-world.com
HW method 2: Using the flight controller Virtual COM port
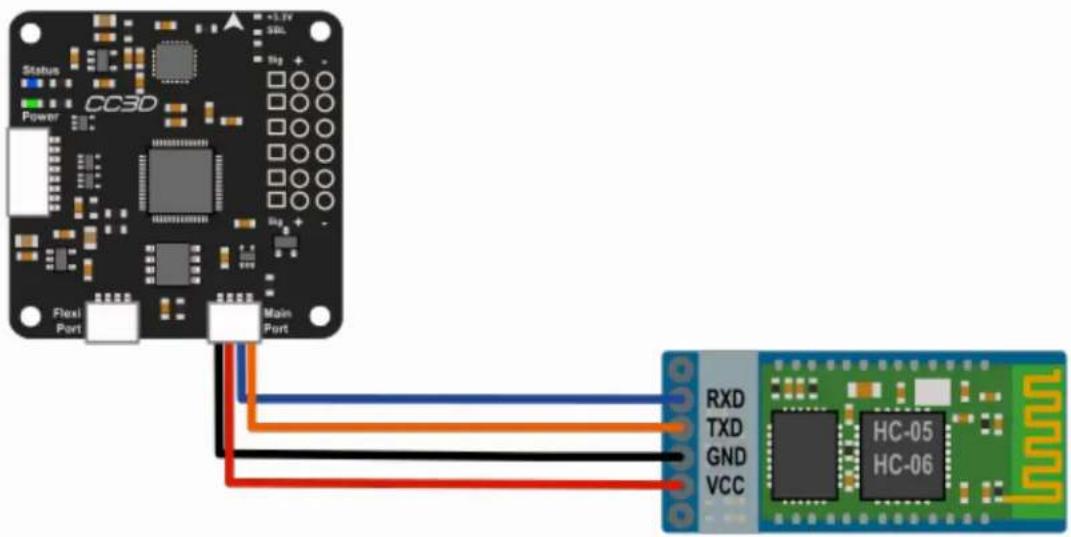
OpenPilot flight controllers can work as a USB-to-serial adapter with a feature called Virtual COM port (VCP). The configuration for VCP ComBridge is fairly straightforward. The VCP ComBridge feature works with all OpenPilot flight controllers.
- Connect the wires according to the diagram.
- Connect USB cable to the flight controller.
- Set the following settings:
• USB VCP Function ComBridge
• Main Port ComBridge
- Speed 9600
-
Click Save, and wait a few seconds for the changes to apply.
-
Reboot the flight controller, and the Virtual COM port should appear in the Windows Device Manager.

- Proceed to the next step below: Software steps.
Bluetooth Adapter Setup for Naze32 boards
www.Hyperion-world.com
Note
To power up the Bluetooth chip for configuration, the flight controller has to be powered up externally, with a flight battery and UBEC, for example.
Software steps
In this section, the Bluetooth module will be configured to correct the baud rate. You can also customize the Bluetooth unit's name. The Bluetooth module expects to be called AT commands in the COM port, which you can either write in a command line, or automatically send with a Windows tool that former Open Pilot developer PT_Dreamer wrote. Connect your Bluetooth module to your PC with either the FTDI or VCP ComBridge. VCP ComBridge usage requires external power to the flight controller.
If you have not decided on the baud rate you want to use for the Bluetooth module, now is the time. Recommended settings are 38400 for usage with OPLink and 57600 for usage directly with your flight controller. Remember the setting, it is a good idea to use a marker pen and write it on the Bluetooth module.
Configuration method 1: Windows configuration software
- Download Bluetooth configuration software from the link below.
- Extract the files and launch the configuration program by clicking on the .exe file.
- Select COM port and baud 9600, and click Connect.
- Select the appropriate Speed (baud rate; i.e., 38400 or 57600), Name and Pin code.
- Click Write values.
- Configuration is done.
- Undo the USB VCP Com Bridge changes if you used a flight controller for the connection.
Configuration software download from below link.
http://opwiki.readthedocs.io/en/latest/_downloads/BT_Cong_Qt4.zip
Bluetooth Adapter Setup for Naze32 boards
www.Hyperion-world.com
Configuration method 2: Command line
While the configuration software above is by far the easiest method on a Windows system, Mac and Linux users will have to use command line to configure the Bluetooth module. There are many terminal applications you can choose from. One option for Windows and Linux is PuTTY, and for Mac CoolTerm. No matter which terminal application you use, connect to the COM port that the FTDI or VCP Com Bridge is in with 9600 baud rate, 8 data bit, 1 stop bit & no parity serial connection.
When serial connection is open in the terminal application, proceed with the following steps, all CAPS:
- Send "AT", the module should answer OK.
- Send "AT+NAMEOpenPilot", this sets the module's name to "OpenPilot".
- Send "AT+BAUD6" for 38400 baud rate OR "AT+BAUD7" for 57600 baud rate.
- Close the terminal application.
- Configuration is done.
- Undo the USB VCP Com Bridge changes if you used a flight controller for the connection.
Connecting the Bluetooth module to Open Pilot devices
Connecting directly to the flight controller
Bluetooth Adapter Setup for Naze32 boards
www.Hyperion-world.com
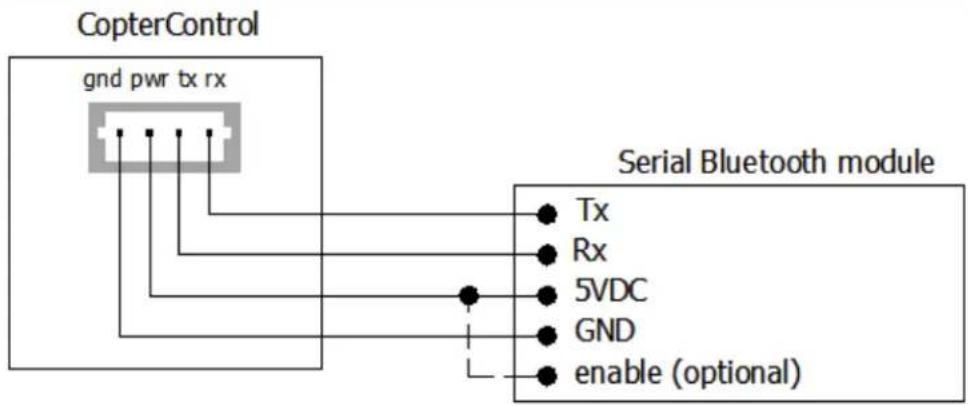
For direct connection from the flight controller to the Bluetooth module, the wiring is exactly the same as USB VCP Com Bridge wiring. The flight controller has to be configured to output telemetry data at the correct baud rate.
Follow below steps:
- Connect the wiring according to the diagram above.
- Connect the USB to your flight controller.
- Navigate to the Hardware tab on the Configuration page in the Open Pilot GCS.
- Select Telemetry in the port where your Bluetooth module is connected (usually Main Port).
- Select 57600 (or another speed that your Bluetooth module is configured to) as Speed.
- Click Save and wait a few seconds for changes to apply.
- Disconnect from the flight controller. You are now ready to test the link.
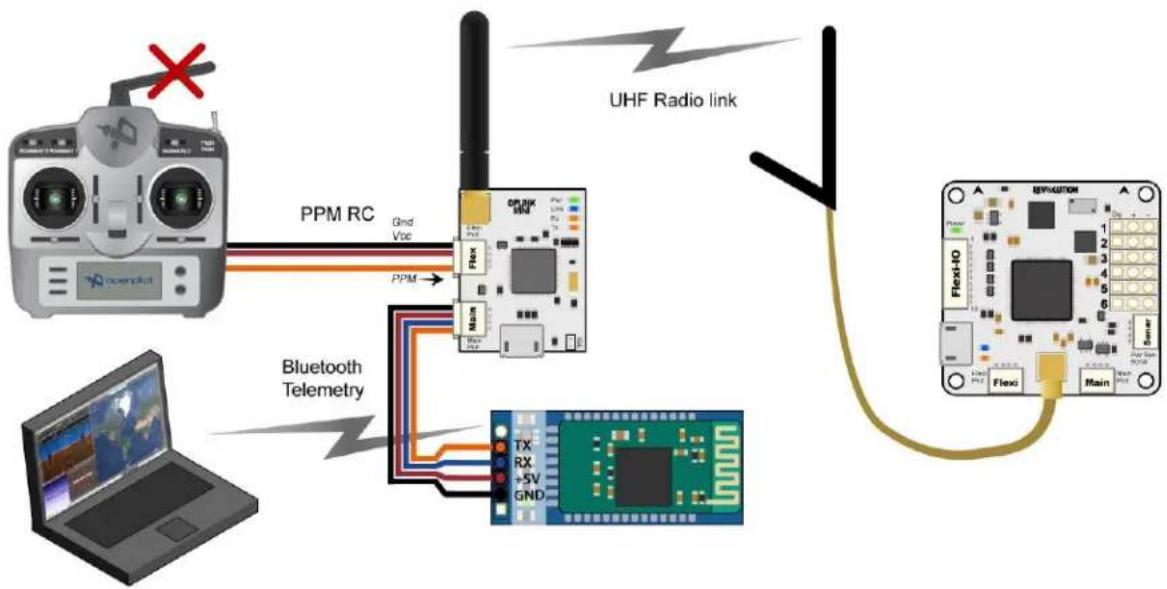
Connecting to OPLink ground module
flowchart
graph TD
    A["Remote Control System"] -->|PPM RC| B["Bluetooth Telemetry"]
    B --> C["UHF Radio Link"]
    C --> D["Electronic Circuit Board"]
    D --> E["Main"]
    style A fill:#f9f,stroke:#333
    style B fill:#ccf,stroke:#333
    style C fill:#cfc,stroke:#333
    style D fill:#fcc,stroke:#333
www.Hyperion-world.com
For completely wireless telemetry with OPLink and Bluetooth module, the wiring has to be connected according to the diagram above. OPLink vehicle control is not necessary for Bluetooth operation, but that is the most common use scenario. Completely wireless telemetry also works with CC/CC3D/Atom, as long as the flight side OPLink wiring has been configured using the OPLM CC - CC3D - Atom Hardware Setup instructions, and you have a successful bind. When you have done the wiring, proceed with the following steps. The baud rate of the Bluetooth module has to be the same as the OPLink radio baud rate. Remember to power up the OPLink via Flexi or Main port, because powering it from USB port redirects Telemetry temporarily to USB.
- Connect your ground OPLink module to your PC with USB.
- Navigate to the OPLink tab on the Configuration page in the Open Pilot GCS.
- Select Telemetry in Main Port of the ground OPLink module.
- Click Save, and wait a few seconds for the changes to apply.
- Disconnect from the OPLink ground module. You are now ready to test the link.
Connecting to the flight controller via Bluetooth telemetry
Your Bluetooth telemetry link should now be ready to test.
Important
Power up all the related devices such as the flight controller and possible OPLink modules using external power and not USB. This is important, because if any Open Pilot device is connected via USB, other Telemetry connections will be temporarily disabled until the USB is unplugged.
- Connect to the Bluetooth module using your computer's Bluetooth utilities. Use a new Pin if you changed it, or the usual default of 1234.
- Launch the Open Pilot GCS and select a serial COM port from the connections drop-down menu in the bottom bar. Then click Connect. You might have to try multiple ports to find the right one. This is the COM
www.Hyperion-world.com
port that your PC's internal Bluetooth chip automatically creates when connection to your Bluetooth module is established.
- Success! In the example screenshot above, the GCS is talking to an Open Pilot Revolution via OPLink <-> Bluetooth connection that is available on Serial COM13 port. The COM port number will most likely be different for you.
Connecting
The Open Pilot GCS will not automatically connect to Bluetooth devices. The connection has to be opened manually by selecting a COM port, and clicking Connect.
For more information, you can check the below site.
https://www.openpilot.org/products/openpilot-coptercontrol-platform/
http://opwiki.readthedocs.io/en/latest/user_manual/cc3d/cc3d.