B904.1 - Oven BAUMATIC - Free user manual and instructions
Find the device manual for free B904.1 BAUMATIC in PDF.

| Type | Built-in electric oven |
| Energy source | Electricity |
| Installation | Built-in |
| Capacity | 60 L |
| Energy efficiency class | Class A (typical) |
| Temperature range | 50 °C to 250 °C |
| Cooking functions | Fan-forced, grill, conventional, defrost, bottom heat |
| Control type | Manual knobs and dials |
| Display | Digital timer |
| Interior lighting | Yes, 25 W halogen |
| Door type | Drop-down, triple-glazed |
| Cleaning | Enamel interior, easy-clean |
| Safety features | Child lock, automatic shut-off, cool touch door |
| Width | 595 mm |
| Height | 590 mm |
| Depth | 550 mm |
| Weight | 32 kg |
| Power consumption | 2.7 kW |
| Oven cavity material | Stainless steel / enamel |
| Number of shelves | 2 |
| Warranty | 2 years |
Frequently Asked Questions - B904.1 BAUMATIC
User questions about B904.1 BAUMATIC
0 question about this device. Answer the ones you know or ask your own.
Ask a new question about this device
Download the instructions for your Oven in PDF format for free! Find your manual B904.1 - BAUMATIC and take your electronic device back in hand. On this page are published all the documents necessary for the use of your device. B904.1 by BAUMATIC.
USER MANUAL B904.1 BAUMATIC
60 cm Built in electric
double oven
Instruction manual

natural_image
Simple line drawing of a fish with no text or symbolsModels covered by this manual:
AS15.1AL-B
B902.1BL-B
B902.1W-B
B904.1SS-B
B905.1SS-B
B905.2SS-B
BR904SS
USER AND INSTALLATION INSTRUCTIONS
For future reference please record the following information which can be found on the Rating Plate and the date of purchase which can be found in the invoice:
Model Number ....
Serial Number ....
Date of Purchase ....
Supplier
CONTENTS
General Information Pages 3-4
Warning and Safety Instructions Pages 5-7
Installation Instructions Pages 8-11
Timer Instructions Pages 12-13
Before the first use Page 14
Operating Instructions Pages 15-17
Cooking Guide Page 18
Cleaning and Maintenance Pages 19-20
Fault Finding Page 21
Technical Data Page 22
Conditions of Guarantee Pages 23-24
GENERAL INFORMATION
Please read this booklet thoroughly before you use this appliance. It is important that you understand all the control functions before commencing to cook with your Baumatic appliance.
Please remember the advice and warnings shown on page 5 which is headed ‘IMPORTANT – Warning and Safety Instructions’.
This appliance is designed for domestic household use and can be built into a standard kitchen cabinet or housing unit.
NOTE: The adjacent furniture or the housing and all materials used in the installation must be able to withstand a minimum temperature rise of 85^ C above ambient during periods of use.
Certain types of vinyl or laminate kitchen furniture are particularly prone to heat damage or discolouration at temperatures below the above guidelines.
Installing the appliance in contravention of this temperature limit or the placing of adjacent cabinet materials closer than 4mm to the appliance, will be at the liability of the owner.
For use in Leisure Accommodation Vehicles, notice must be taken of the appropriate statement in the Installation Instructions.
The use for any other purpose or in any other environment without the express agreement of Baumatic Ltd, would invalidate any warranty or liability claim.
Your new appliance is guaranteed against electrical or mechanical defects subject to certain exclusions noted in Baumatic Ltd Conditions of Guarantee.
The foregoing does not affect your statutory rights.
Any repairs or servicing must be carried out exclusively by a qualified technician.
Never expose the oven to atmospheric agents.
The Warranty applies to Great Britain and Northern Ireland only. In the event that you require any After Sales Service or advice, please contact the Baumatic Service Department on telephone number – 0118 933 6911.
Before using this appliance ensure that any protective packaging or coatings have been removed. To aid the protection of the environment, please sort the packing materials into different types and dispose of them in accordance with the local waste disposal laws.
Keep children away from the packing materials and do not let them play with it.
Any further information on waste disposal can be obtained from your local Environmental Agency office.
When first used, an odour may be emitted by any residual protective finish or moisture, which will cease after a short period of time.
This Appliance has been Constructed and Distributed in compliance with the essential requirements of the following EEC DIRECTIVES and EUROPEAN NORMS:
CE Marking - 93/68 Low Voltage - 73/23 EMC - 89/336 Safety Standards - EN 60 335-1, EN 60 335 - 2 - 6.
As Baumatic have a policy of continued product improvement, the right is reserved to adjust and make any modifications deemed necessary without notification.
IMPORTANT NOTE – WARNING AND SAFETY INSTRUCTIONS
Warning: this appliance must be earthed.
This appliance complies with all current European safety legislation, however Baumatic do wish to emphasise that compliance does not remove the fact that the appliance surfaces will become hot during use and retain heat after operation.
Baumatic therefore strongly advise that babies, young children and unable people are prevented from being near or touching the appliance at any time.
If it is necessary for younger family members to be in the kitchen, please ensure that they are kept under close supervision at all times.
We also advise that great care is taken during use and cleaning operations.
Do not place heavy objects on or lean on the oven door when open as this can cause damage to the hinges.
Do not leave heated oil or fat unattended as there is a risk of fire.
Do not pour water directly into the inside of a hot oven: the enamel coating could be damaged.
Do not place pans or baking trays on the bottom of oven cavities or line any part of the oven cavity with aluminium foil.
Do not allow electrical fittings or cables to be in contact with hot areas of the appliance.
Do not use the appliance for space heating or to dry clothes.
Do not use a steam cleaner with this appliance.
Do not install the appliance next to curtains or soft furnishings.
Do not attempt to lift or move cooking appliances by pulling on any door or handle as this can cause damage.
Always use oven gloves when moving food in or out of the oven cavity.
Before any cleaning operation inside the oven, wait until it has cooled down.
NOTE: This appliance must be correctly installed by a suitably qualified person, strictly in accordance with the manufacturer's instructions.
For electrical installations, NICEIC registration is recommended.
Baumatic Ltd declines any responsibility for injury or damage to persons or property as a result of improper use or installation of this appliance.
Please note that this appliance carries the CE mark for normal domestic use and is not suitable for the marine environment.
Heat, steam and moisture will be created during use, take care to avoid injury and ensure that the room is adequately ventilated. If prolonged use occurs, additional ventilation may be required – please consult your Qualified Installer if you are in any doubt about the amount required.
This appliance must be connected to an a.c. single phase 230V - 50Hz electricity supply.
The cooling fan is in place to assist in the overall cooling of the appliance, and reduce the cool down period after use.
The fan operation will continue to run for a short period after the end of the cooking operation.
This appliance is marked according to the European directive 2002/96/EC on Waste electrical and Electronic Equipment (WEEE). By ensuring this product is disposed of correctly, you will help prevent potential negative consequences for the environment and human health, which could otherwise be caused by inappropriate waste handling of this product.
The symbol

on the product, or on the documents accompanying the product, indicates that this appliance may not be treated as household waste. Instead it shall be handed over to the applicable collection point for the recycling of electrical and electronic equipment.
Disposal must be carried out in accordance with local environmental regulations for waste disposal.
For more detailed information about treatment, recovery and recycling of this product, please contact your local city office, your household waste disposal service or the shop where you purchased the product.
INSTALLATION INSTRUCTIONS
This appliance must be correctly installed by a suitable qualified person strictly in accordance with the manufacturer's instructions.
The manufacturer's declines any responsibility for injury or damage to persons or property as a result of improper installation of this appliance.
The housing, adjacent furniture and all materials used in installation must be able to withstand a minimum temperature of 85^ C plus ambient during periods of operation. In addition, adjacent furniture cabinet doors must be at least 4 mm from the appliance at all points. Certain types of vinyl or laminate kitchen furniture cabinetry are particularly prone to heat damage and discoloration. Any delamination or discolouration of materials which occurs below 85^ C plus ambient or where materials are less than 4 mm from the appliance will be the liability of the owner.
This appliance is designed for building-in to a standard 600 mm wide oven housing.
The housing into which the appliance is installed must incorporate a full depth shell positioned 50 mm below the support shelf for the appliance.
For building-in to a tall housing, the installation dimensions are as follows on the next page.
Important:
When placing the oven in the housing, do not use the oven door as a lever for lifting the oven as damage may result.
Lift the oven using the purpose designed metal handles on the sides and slide it into the housing unit.
Align the oven centrally in the housing unit before securing it.
Once the oven has been positioned in the housing it should be secured in place at the four corners of the oven door frame using suitable screws.
INSTALLATION

text_image
50 500 560 min. 85-90 560 ÷ 580 562 ÷ 565 833 876 525 548 596 22 545 885ELECTRICAL REQUIREMENTS
WARNING: THIS APPLIANCE MUST BE EARTHED
Electrical installation must comply with all relevant local and national regulations. Make sure that the voltage supply is the same as the rating given on the data plate positioned on the lower part of the front of the oven.
This appliance must be connected to an a.c. single phase 230 V - 50Hz electricity supply.
Fit an all-pole On/Off switch between the appliance and the power supply with minimum contact separation of 3 mm. The switch must be of easy access once the appliance is in place for maintenance and service purposes.
This appliance is supplied without a connection cable. A suitable cable which complies with all local and national regulations must be used, and to be in accordance with the details shown on page 22.
The connection clamp for the cable is at the rear of the appliance. Unscrew and remove the cover, then insert the cable by way of the cable clip and connect according to the drawing on next page. The earth wire of the power supply cable must be longer than the positive and negative conductors. Tighten the cable clip screws and close the cover.
Maintenance and servicing work must only be carried out after the power supply has been disconnected, either by switching off at the wall socket or disconnecting at the main fuse box.

text_image
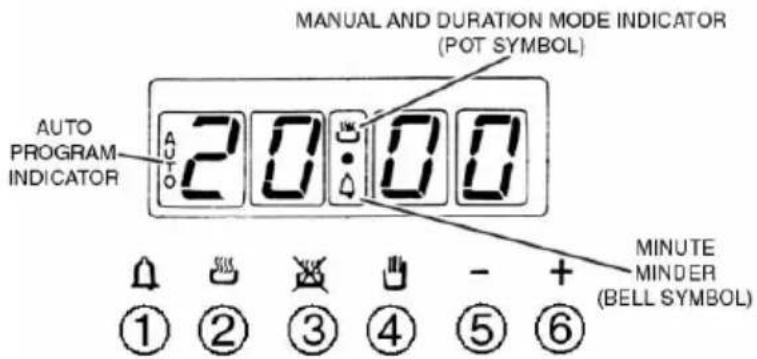
Ensure all links are present and all contact scrws are tight including empty ones N=Terminal 1 2 3 are linked together N=Terminal 4 5 are linked together E=Terminal 6 is earth Only for 220 240 VccUSING THE 6 BUTTON ELECTRONIC TIMER
Description of button functions:
- Minute Minder
- Cooking on auto-function (duration)
- End of cooking time (end time)
- Manual operation
- Reducing numbers in all programs
- Increasing numbers in all programs
(please note the buttons have been numbered for illustration only)
text_image
MANUAL AND DURATION MODE INDICATOR (POT SYMBOL) AUTO PROGRAM INDICATOR 20:00 MINUTE MINDER (BELL SYMBOL) ① ② ③ ④ ⑤ ⑥The timer only operates when the appliance is connected to the electricity supply.
1) TIME OF DAY AND MANUAL MODE
To set the time of day, press and release the ‘manual’ button (any previously entered setting will be cancelled).
By pressing buttons + or – (numbers 5 or 6 in the illustration) the time setting can be adjusted. When the required time has been selected, release all buttons. There is a 5-second acceptance delay during which no button should be touched.
The ‘pot’ symbol will be illuminated indicating Manual cooking mode is available. To revert the oven to manual mode at any chosen time, simply press and release the ‘manual’ button (4). This will cancel any previously entered programs.
Set the oven to the required temperature and briefly press the 'duration' button (2).
Set the required cooking duration time using the + or - buttons. The 'pot' symbol will remain illuminated and 'AUTO' will appear in the display. The timer will revert to time mode after 5 seconds.
At the end of the selected duration time, the oven will switch OFF and an audible signal will be emitted, 'AUTO' will flash and the 'pot' symbol will be extinguished.
To cancel the alarm mode audible signal, briefly press the 'manual' button (4). As the oven is now set for manual operation, ensure the oven controls are in the OFF position.
3) COOK END MODE:
For the cooking end mode, set the oven to the desired temperature and briefly press the 'end time' button (3).
Set the required cooking end time using the + or - buttons. 'AUTO' will appear in the display.
The time will revert to time mode after 5 seconds.
When the time of day equals the cooking end time, the oven will switch OFF and an audible signal will be emitted.
Cancelling the alarm is as above, ensure the oven controls are in the OFF position.
4) FULLY AUTOMATIC COOKING MODE:
Set the oven to the desired temperature and briefly press ‘duration’ button (2).
Set the required cooking duration time with the + or - buttons and 'AUTO' will appear in the display.
Press and release the ‘end time’ button (3) and set the required cooking end time with the + or - buttons.
The oven will turn ON with the ‘pot’ symbol illuminated at the chosen time and OFF at the end time selected. When the ‘end’ time is reached, an audible signal will be emitted, ‘AUTO’ flashes and the pot symbol is extinguished.
Cancelling the alarm mode is as above.
5) MINUTE MINDER MODE:
Briefly press the 'Minute Minder' button (1).
Set the required time by pressing the + or - buttons. The 'bell' symbol will appear in the display.
The timer will revert to time mode after 5 seconds.
When the set time has elapsed, an audible signal is emitted, to cancel the alarm mode briefly press the ‘timer’ (1) or ‘manual’ (4) button.
The Minute Minder does not control any of the oven functions.
NOTES:
- If a setting error is made, this will be indicated by an audible signal and ‘AUTO’ will flash. Cancelling the setting by pressing the ‘manual’ (4) button, then reprogramming can rectify this.
- The audible signal that is emitted at the end of a program will continue for seven minutes unless cancelled by pressing the ‘manual’ (4) button. At the end of the seven minutes, the ‘AUTO’ symbol will continue to flash until cancelled.
- The audible signal has three pitch settings, low, medium and high. To adjust the pitch, ensure the timer is in manual mode, then press and hold the – button to hear the selected pitch. Releasing the button, then pressing again and holding will select another pitch. Repeat the above procedure until the required pitch is heard.
BEFORE THE FIRST USE
Remove any packaging and the accessories from the oven.
Wipe the oven interior using hot water and mild detergent. Rinse carefully using damp cloth. Wash the oven shelves and accessories in a dishwasher or using hot water and a mild detergent, and dry thoroughly.
Slide the oven shelves and the oven pan onto the runners, close the door and heat the oven to maximum temperature for 30 minutes to eliminate any residues from the manufacturing process.
Note: an odour and some smoke may be emitted during this process. It is quite normal.
Before switching the oven on, check that there are no unprocted live parts accessible to touch.
IMPORTANT NOTICE
Switch off oven at the wall socket or disconnect at the main fuse box before cleaning.
OPERATING INSTRUCTIONS
Conventional oven (Top oven)

Interior light

Lower heating element
This particular function is ideal for warming meals or for slow cooking.
Convection mode
This traditional cooking mode is achieved by selecting the desired cooking temperature within the given 50^ C to 230^ C. The amber light will automatically switch off once the desired temperature is achieved. It is advisable to preheat the oven for a few minutes before use.

Double grill mode
To cook meat (smoked bacon, steaks, sausages, etc.) and for making toast. Preheat the oven for 5 min. with the door closed. For best results, leave the oven door open when grilling. Arrange food on the wire shelf. When cooking meat, to avoid spatters of fat and smoke, pour a little water into the drip tray. Turn the food during grilling.
WARNING
Using aluminium foil to cover the grill pan, or putting items wrapped in foil under the grill creates a FIRE HAZARD, and the high reflectivity can damage the grill element.
CAUTION: ACCESSIBLE PARTS MAY BE HOT WHEN GRILL IS USED.
YOUNG CHILDREN SHOULD BE KEPT AWAY.

Oven light
The oven light remains on whilst the oven is in use.

Defrost mode
The fan runs without heat to reduce the defrost time for frozen food.

Fan oven cooking
Select the desired temperature between 50^ C and 230^ C. The fan main function is to circulate the heated air through the oven cavity and achieve even heat distribution.
The correct temperature is achieved a little faster than convection cooking and more economically. This allows different dishes to be cooked on different levels at the same time, but some turning of food may be necessary at times. The interior light will automatically be selected when the oven is set.
Semi forced air convection with grill (only AS15.1AL-B, B905.1SS-B and B905.2SS-B)
The thermostat has to be set at the desired temperature between 50^ C and 230^ C. The fan and the grill element allow a fast and deep cooking for particular food.
It is recommended that the oven be pre-heated for a few minutes.
Double grill mode
(only AS15.1AL-B, B905.1SS-B and B905.2SS-B)
To cook meat (smoked bacon, steaks, sausages, etc.) and for making toast. Preheat the oven for 5 min. with the door closed. For best results, leave the oven door open when grilling. Arrange food on the wire shelf. When cooking meat, to avoid spatters of fat and smoke, pour a little water into the drip tray.
Turn the food during grilling.

Grill mode
This is for grilling smaller items of food.
Keep the oven door closed.
Convection mode with fan
(only AS15.1AL-B, B905.1SS-B and B905.2SS-B)
Select the desired tempareture between 50^ C and 230^ C, keeping the door closed.
Cooking mode suited to bake bread, pizzas and lasagne. It is recommended that the oven be pre-heated.

Convection mode
(only AS15.1AL-B, B905.1SS-B and B905.2SS-B)
This traditional cooking mode is achieved by selecting the desired cooking temperature within the given 50^ C and 230^ C. It is suggested to preheat the oven for a few minutes before use.

Semi forced air convection with lower element (only AS15.1AL-B, B905.1SS-B and B905.2SS-B)
The thermostat has to be set to the desired temperature between 50^ C and 230^ C.
Recommended use: for warming or very slow cooking of food.
COOKING GUIDE
TOP OVEN
| FOOD Function Preheating | Level (from the bottom) | Temperature (°C) | Cooking time min. | |||
| Chicken |  | yes | 1 | 200 | 55 - 65 | |
| Steak and kidney pie |  | yes 1 180 | 110 - 120 | |||
| Victoria sandwich cake | [GKKZ] | yes 2 180 | 25 - 35 | |||
| Semi-rich fruit cake | [8DS3] | yes 2 140 | 170 - 200 | |||
COOKING TABLE FOR GRILL FUNCTION
| FOOD | Function | Preheating | Level (from the bottom) | Cooking time min. |
| Toast |  | yes | 3 | 1 - 3 |
| Pork chops |  | yes | 3 | 30 - 35 |
| Spits |  | yes | 2 | 35 - 40 |
| Bacon rasher | [ISTXT] | yes | 2 | 15 - 20 |
| Sausages | [VH26] | yes | 3 | 25 - 35 |
LOWER OVEN
| FOOD Function Preheating | Level (from the bottom) | Temperature (°C) | Cooking time min. | ||
| Apple plate |  | no | 2 | 180 35 - 45 | |
| Small cakes |  | no | 1 + 3 | 175 35 - 40 | |
| Scones |  | yes | 1 + 3 | 200 10 - 15 | |
| Roast beef + potatoes + fruit pie |  | no | 1 | 190 | 60 - 70 |
| 3 | 35 - 40 | ||||
| Yorkshire pudding (12 buns) | [5SZ8] | no | 2 | 200 25 - 30 | |
N.B.: Cooking times are indicative.
CLEANING AND MAINTENANCE
Important: do not use water pressure cleaners or steam cleaners.
Exterior of the oven
Clean with a damp cloth. If it is very dirty, add a few drops of washing up detergent to the water. Wipe with a dry cloth. Do not use corrosive or abrasive detergents, which dull the surface. In the event that one of these products comes into contact with the oven, immediately clean it using a damp cloth. Slight differences in colour on the front of the appliance are determined by the different materials used, such as glass, plastic and metal.
Accessories
Soak the accessories in water with washing up detergent immediately after use. Food residues can be easily removed using a brush or sponge.
Oven cavity
Do not use abrasive cleaners or pan scourers. Use special oven cleaners and follow the manufacturer's instructions. After every use, wait for the oven to cool then clean it to prevent the build-up of baked-on food residues.
With long cooking times or when cooking on different levels, especially food with a high water content (pizzas, stuffed vegetables, etc.), condensation may form on the inside of the doors and the seal. When the ovens are cool, dry the inside of the doors with a cloth or sponge.
Clean the glass of the doors with a suitable liquid detergent.
Replacing the bulbs
Warning: Disconnect the appliance from the power supply. To remove the side runner frame, push it simultaneously down and towards the centre of the oven (A-fig.1). Then lift the side runner frame upwards to release it from the cavity wall (B-fig.1).
Lower cavity: remove the protective glass cover by turning it anti-clockwise. Unscrew the faulty bulb and discard safely, replace it with the new bulb and refit the cover (fig.2). To refit the side runner frame, follow the steps above in reverse order.
Upper cavity: remove the glass cover using a screw-driver (fig.3). Change the bulb and refit the glass cover by pressing it slightly.
To refit the side runner frame, follow the steps above in reverse order.

text_image
PULL PUSH Fig. 1
natural_image
Diagram of a device with a magnified inset showing internal components (no text or symbols)Fig. 2

natural_image
Diagram of a wall-mounted electrical socket with a screwdriver inserted, showing internal components and directional arrows (no text or symbols)Fig. 3
Removing the oven doors (for cleaning)
To facilitate cleaning, the oven door can be removed as follows:
hinges F are provided with two movable bolts G. When bolt G is raised, the hinge is released from its housing. Having done this, the door must be lifted upwards and removed, sliding it outwards; hold the sides of the door near the hinges when performing these operations. To refit the door, insert the hinges into their seats and open the door fully. Remember to rotate the two movable bolts G used to hook the two hinges before closing the door (fig.4).
WARNING: take care not to dislodge the hinge lock system when removing the door as the hinge mechanism has a strong spring system! Do not immerse the door in water at any time.
Care must be taken when cleaning between the door glasses and inside the inner frame as some of the edges may be sharp due to the manufacturing process.

text_image
G FFig. 4
WHAT TO DO IN THE EVENT OF A FAULT
This appliance must only be repaired by a qualified technician appointed by the manufacturer.
Unauthorised repairs could be dangerous and would invalidate any warranty.
The oven does not work at all
Check that the electricity supply is connected and switched on.
Has the fuse blown? If so, replace with correct type.
Is the timer set on automatic operation? (see pages 12,13)
The oven does not heat up
Has a temperature been set using the temperature selector knob?
Is the timer set on automatic operation? (see pages 12,13)
The oven heats up but the light bulb does not come on
The light bulb is faulty and needs replacing (see page 19).
NOTE: THE LIGHT BULB IS NOT COVERED BY THE MANUFACTURER'S WARRANTY.
If the above solutions do not rectify your fault please contact Baumatic After Sales Service on 0118 933 6911.
TECHNICAL DATA
This fitting conforms with laws regarding radio interference.
ELEMENT RATING
LOWER OVEN:
FAN MOTOR 0,020 kW
CIRCULAR HEATING 2,3 kW
LOWER HEATING (only AS15.1AL-B, B905.1SS-B, B905.2SS-B) 1,3 kW
UPPER HEATING (only AS15.1AL-B, B905.1SS-B, B905.2SS-B) 0,9 kW
GRILL HEATING 2,0 kW
UPPER OVEN:
LOWER HEATING 1,3 kW
UPPER HEATING 0,6 kW
GRILL HEATING 1,4 kW
2 OVEN LIGHTS 0,025 kW
2 COOLING MOTORS 0,020 kW
ELECTRICAL SUPPLY: 230 V - 50 Hz
MAXIMUM LOAD:
B902.1BL-B, B902.1W-B, B904.1SS-B, BR904SS: 4410 W
AS15.1AL-B, B905.1SS-B, B905.2SS-B: 4920 W
CABLE CROSS SECTION:
3x2.5 mm ^2 minimum, H05 RNF, H05 RR-F insulated twin and earth cable.
OVERALL DIMENSIONS: HEIGHT 876 mm
WIDTH 596 mm
DEPTH 545 mm
Baumatic Ltd. Conditions of guarantee
Dear Customer,
Your new Baumatic appliance comes complete with a free 12 month guarantee covering both parts and labour costs resulting from defective materials or workmanship.
Baumatic also gives you the opportunity to automatically extend the guarantee period for a further 12 months at no extra cost, giving an initial guarantee period of 24 months. The extended guarantee period applies to England, Scotland, Wales and Northern Ireland only.
To qualify for your full 24 months guarantee you must register your appliance within 28 days of purchase to be covered under this guarantee. This can be done online via: www.baumatic.co.uk or through returning the guarantee card which can be found in each new Baumatic appliance.
* In addition, your appliance is covered by a 5 year parts warranty. Baumatic Ltd will provide free of charge the parts required to repair the appliance, only if they are fitted by a Baumatic engineer, for any defect that arises due to faulty materials or workmanship within a period of 5 years from the original purchase date.
* An additional 1 to 3 year insurance scheme for labour is available should you wish to extend the warranty period.
Should any person other than an authorised representative of Baumatic Ltd interfere with the appliance, the policy is negated and Baumatic Ltd will be under no further liability.
The guarantee covers the appliance for normal domestic use only, unless otherwise stated.
Any claims made under the terms of the guarantee must be supported by the original invoice/bill of sale issued at the time of purchase.
This guarantee is transferable only with the written consent of Baumatic Ltd.
If the appliance fails and is considered either not repairable or uneconomical to repair between 12 months (2 years if registered) and five years, a free of charge replacement will not be offered.
The guarantee for any replacement will only be for the remainder of the guarantee on the original product purchased.
The guarantee does not cover:
- Sinks and taps
- Failure to comply with the manufacturers instructions for use.
- The replacement of cosmetic components of accessories
- Accidental damage or wilful abuse.
- Subsequent loss or damage owing to the failure of the appliance or electrical supply
- Incorrect installation
- Losses caused by Acts of God, civil war, failure to obtain spare parts, strikes or lockouts
- Filters, fuses, light bulbs, external hoses, damage to bodywork, paintwork, plastic items, covers, baskets, trays, shelves, burner bases, burner caps, decals, corrosion, rubber seals.
In the course of the work carried out it may be necessary to remove the appliance from it operating position. Whilst all reasonable care will be taken, Baumatic Ltd cannot accept responsibility for damage sustained to any property whatsoever in this process.
This guarantee is in addition to and does not diminish your statutory or legal rights.
Contacting Baumatic Ltd
| Sales | Service | Spares | Technical/Advice | |
| TEL: 0118 933 6900 | TEL: 0118 933 6911 | TEL: 0118 933 6922 | 0118 933 6933 | |
| FAX: 0118 931 0035 | FAX: 0118 986 9124 | FAX: 0118 933 6942 | 0118 933 6942 | |
For ROI (Republic of Ireland), please contact one of the numbers below:
TEL: 01-6266798 FAX: 01-6266634
Thanks you for buying Baumatic.
* Applies to UK, Scotland, Wales & Northern Ireland only (Republic of Ireland has 1 year labour & 1 year parts warranty only)
Baumatic®
You will be mine ...
Headquarters
Baumatic Ltd.
Baumatic Buildings,
6 Bennet Road,
Reading,
Berkshire
RG2 0QX, United Kingdom
Sales Telephone
+44 118 933 6900
Sales Fax
+44 118 931 0035
Service Telephone
+44 118 933 6911
Service Fax
+44 118 986 9124
Spares Telephone
+44 118 933 6922
Technical / Advice Telephone
+44 118 933 6933
E-mail:
sales@baumatic.co.uk
technical@baumatic.co.uk
Http (Internet site):
www.baumatic.com
Environmental note
This appliance is marked according to the European directive 2002/96/EC on Waste electrical and Electronic Equipment (WEEE). By ensuring this product is disposed of correctly, you will help prevent potential negative consequences for the environment and human health, which could otherwise be caused by inappropriate waste handling of this product.
The symbol

on the product, or on the documents accompanying the product, indicates that this appliance may not be treated as household waste. Instead it shall be handed over to the applicable collection point for the recycling of electrical and electronic equipment.
Disposal must be carried out in accordance with local environmental regulations for waste disposal.
For more detailed information about treatment, recovery and recycling of this product, please contact your local city office, your household waste disposal service or the shop where you purchased the product.

natural_image
Symbol of a trash bin crossed with two crossed lines, no text or numbers present- The packaging materials that Baumatic uses are environmentally friendly and can be recycled.
- Please discard all packaging material with due regard for the environment.

text_image
Baumatic®www.baumatic.com