MP09CESWW - Air-conditioner HONEYWELL - Free user manual and instructions
Find the device manual for free MP09CESWW HONEYWELL in PDF.

| Product Type | Portable Air Conditioner |
| Model Number | MP09CESWW (also compatible with MP09CES, MP09CESBB, MP10 Series) |
| Cooling Capacity | 9,000 BTU/h (estimated) |
| Modes | Cool, Dehumidify, Fan |
| Fan Speeds | High, Medium, Low |
| Thermostat Range | 61°F – 89°F (16°C – 32°C) |
| Timer | 1 – 24 hours (auto on/off) |
| Remote Control | Yes (requires 2 x AAA batteries) |
| Air Filter | Washable – clean every 2 weeks |
| Exhaust Hose Length | 30 – 120 cm (12 – 47 inches) |
| Power Supply | 115V / 60Hz (USA/Canada) |
| Safety Features | LCDI plug, overload protection, auto shut-off when water tank full |
| Auto Evaporation | Yes (condensate automatically evaporated in cooling mode) |
| Drainage Options | Manual drain (lower plug) or continuous drain (upper plug, for dehumidifier mode) |
| Casters | Yes (4 swivel casters for easy mobility) |
| Installation Kit Included | Window bracket, window bracket panel adapter, plastic pins (2), hose connector, plastic hose |
Frequently Asked Questions - MP09CESWW HONEYWELL
User questions about MP09CESWW HONEYWELL
0 question about this device. Answer the ones you know or ask your own.
Ask a new question about this device
Download the instructions for your Air-conditioner in PDF format for free! Find your manual MP09CESWW - HONEYWELL and take your electronic device back in hand. On this page are published all the documents necessary for the use of your device. MP09CESWW by HONEYWELL.
USER MANUAL MP09CESWW HONEYWELL
Portable Air Conditioner
User Manual
Read and save these instructions before use

natural_image
Line drawing of a portable air conditioner unit with ventilation grilles and control panel (no text or symbols)Email: info@jmatek.com
Web: www.jmatek.com
Model :
MP09 Series: MP09CES, MP09CESBB, MP09CESWW
MP10 Series: MP10CES, MP10CESBB, MP10CESWW
Congratulations on your purchase of this versatile Honeywell Portable Air Conditioner.
USER TIPS
Honeywell Portable Air Conditioners are ideal for spot cooling. The compressor, condenser and evaporator are housed in a compact unit. The air is filtered, dehumidified and cooled while a flexible air outlet hose sends heat outside. The air conditioner includes a window venting kit.
No permanent installation is needed. The unit is easy to move from room to room and offers a truly flexible air conditioning solution.
Auto Evaporation System - The unit automatically evaporates the condensate through the air outlet hose. There is no need to empty the drainage tank except in very high humidity conditions. Read and follow the instructions carefully.
USER TIPS
To ensure optimal efficiency of the product, keep doors and windows closed when it is used as an air conditioner or dehumidifier. If the product is being used with the fan function only, an open window could improve air circulation.

natural_image
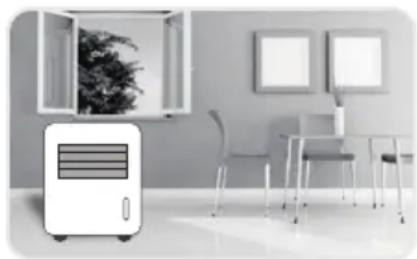
Interior scene with a white air purifier and a window view, no visible text or symbolsCooling and Dehumidifying Operation Fan Operation
natural_image
Interior scene with modern dining area featuring a portable air purifier and chairs, no visible text or symbolsImportant:
Before installing the unit, place it UPRIGHT for 20 minutes before use to allow the refrigerant to stabilize.
Manually adjust the air vent located at the top of the unit to adjust the direction of air flow.
- Follow installation instructions to set up the unit.
- Plug the unit into a properly grounded circuit.
READ AND SAVE THESE INSTRUCTIONS
Improper handling can cause serious damage to the appliance.
WARNING:
- DO NOT operate the unit with a damaged plug or loose wall outlet. If the power cord is damaged, it must be replaced by the manufacturer or an authorized service agent.
• DO NOT cover the air intake and exhaust when in use. - This appliance is not intended for use by children. Children should be supervised and should not play on or around the appliance.
- DO NOT place objects on or sit on the unit.
• Always turn off and unplug the unit when cleaning or servicing. - If service is needed contact an authorized service agent.
- Unplug the unit when stored or not in use.
- DO NOT run the power cord under carpeting and rugs.
- Use caution to prevent tripping on cord.
- DO NOT use in areas where gasoline, paint or other flammable goods are stored.
- Basic safety precautions should always be followed when using electrical appliances.
- This appliance has been manufactured for use in domestic environments and should not be used for other purposes.
PARTS DESCRIPTION
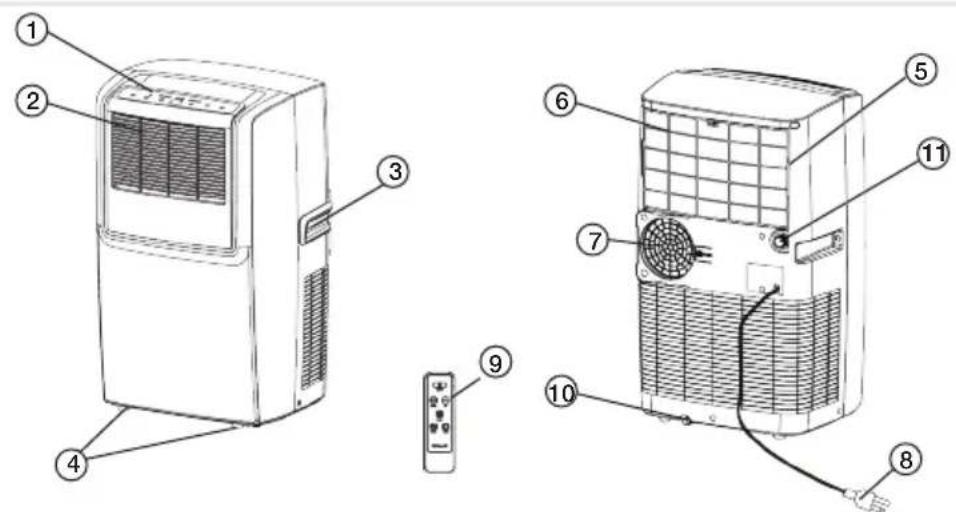
1) Control Panel (Incl. Signal Receptor)
2) Air Outlet
3) Handle
4) Casters
5) Air Filter
6) Back Grill
7) Exhaust Hose Connector
8) Power Supply Cord
9) Remote Control
10) Lower Drain Plug (Air Conditioning Mode)
11) Upper Drain Plug (De-humidifier Mode)
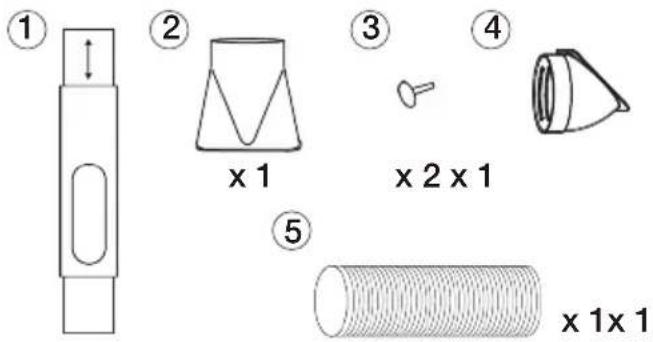
Installation Kit:
- Window Bracket Kit.... 1 Set
- Window Bracket Panel Adapter...... 1 Piece
- Plastic Pin..... 2 Pieces
- Hose Connector.... 1 Piece
- Plastic Hose.... 1 Piece
Installation Steps:
- Install the plastic hose with window bracket adapter and hose connector on both sides. Ensure proper fit on both ends.

- Adjust the window bracket as per width or height of your window and insert the plastic pins to fix at the desired position. There is a hole where the Plastic Hose will be inserted later. Make sure this hole is not blocked.
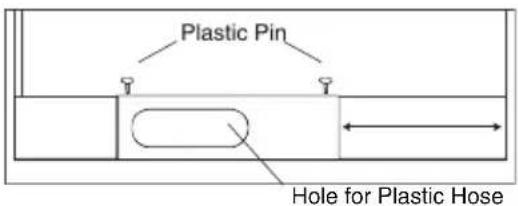
Note:
Do not install the window bracket to your window. This step is required only to adjust it to the size of your window. The bracket should be removed from the window after the size is adjusted.
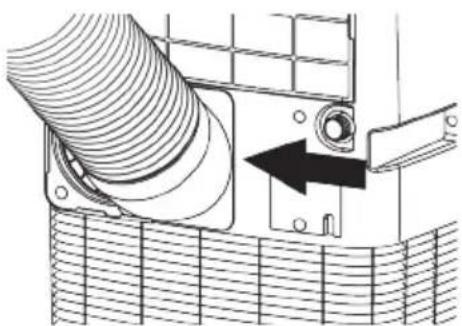
- Connect the eplastic loss to the loss connector on back of the unit. Slide-in the hose from right to left until it is locked in place.
natural_image
Technical diagram of a mechanical component with a coiled spring and directional arrow (no text or symbols)- Connect the window bracket to the opposite end of the plastic hose. Ensure that all connections are tight and installed properly.
natural_image
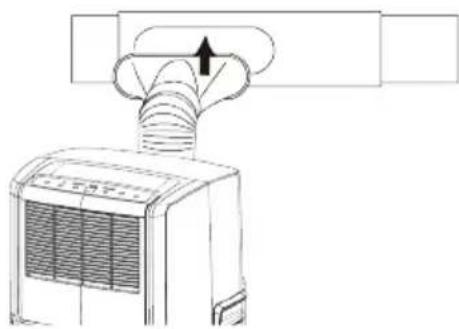
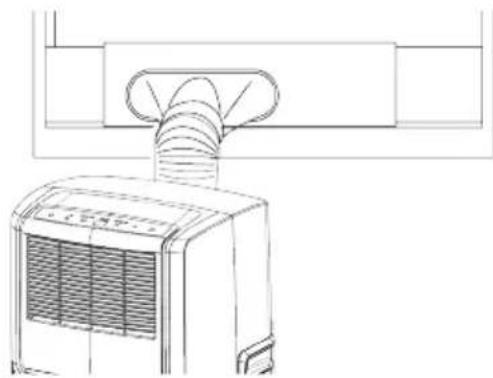
Line drawing of a car air conditioner unit with airflow direction arrow (no text or symbols)- Connect the window bracket to the window.
natural_image
Line drawing of a portable air conditioner unit with cooling fins and ventilation duct (no text or symbols)- The Portable Air Conditioner is now ready to use.
NOTE:
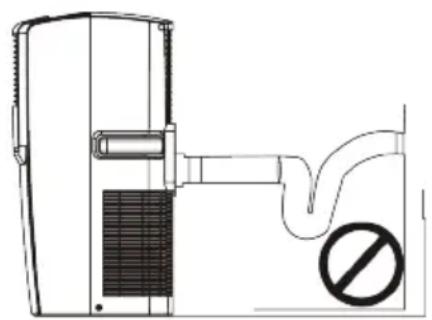
- The supplied exhaust hose can be extended from 30 cm to 120 cm / 12 inches to 47 inches.
- Do not bend (to the extent shown below) the exhaust hose. A bent hose will block exhaust air and cause the unit to malfunction or shut-off.
natural_image
Technical line drawing of a toilet with no visible text or symbols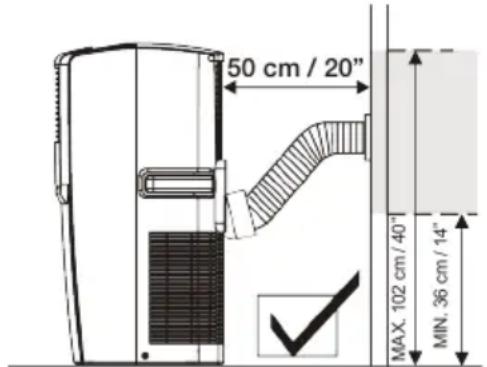
RECOMMENDEDNOT RECOMMENDED
- The length of the exhaust hose is determined by the product specifications. Do not replace or lengthen it as this could cause the unit to malfunction.
- Make sure the back of the unit is at least 50 cm / 20 inches away from. Do not place the unit in front of curtains or drapes as this could obstruct the airflow.
USE & OPERATION
CONTROL PANEL
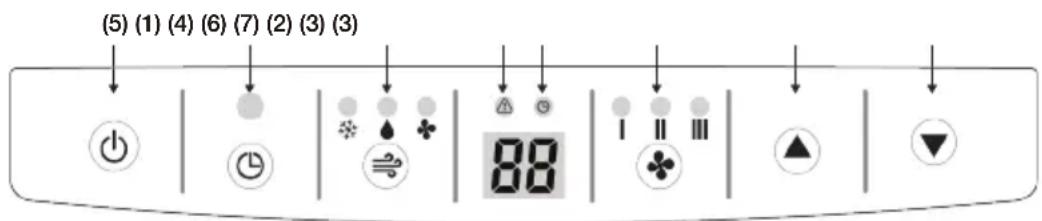
(1) Timer Control
(4) Mode Control
(7) Timer Light
(2) Fan Speed Control
(5) Power Control
(3) Timer / Temperature Set Controls
(6) Warning Light (when flashing)
POWER CONTROL
The Power Control turns the unit on and off.
MODE CONTROL
3 settings: Cool, Dehumidify, Fan.
A light will indicate which setting is currently being used.
- Cooling Mode
The unit works as an air conditioner. Adjust fan speed and air temperature to suit your desired comfort level. Temperature setting range is 16^ C- 32^ C ( 61^ F- 89^ F).
FUNCTION BUTTONS (CONTINUED)
- Dehumidifying Mode
Air is dehumidified as it passes through the unit, without being in full cooling mode. If room temperature is higher than 25^ C ( 77^ F) fan speed can be adjusted; otherwise fan speed is preset to LOW.
Note: If the unit will be used mainly as a dehumidifier, do not connect the exhaust hose and let the warm air return in the room. Continuous drainage is then necessary and more efficient (refer to Continuous Draining). - Fan Mode
For air circulation without air conditioner cooling.
FAN SPEED CONTROL
3 settings: High, Medium and Low.
TIMER CONTROL
While the unit is turned on, press the timer button then press the ▼ or ▲ to select the number of hours you would like the unit to continue to run. The unit will turn off automatically.
AUTO TURN OFF:
While unit is running, press the press the ▼ or ▲ button to select the number of hours you want the unit to run in air conditioning mode.
AUTO TURN ON:
When unit is in a standby mode (plugged in with power light on), then press the ▼ or ▲ button to select the number of hours until you want the unit to automatically start running.
TEMPERATURE / TIMER SET CONTROLS
• Used for adjusting the timer and thermostat.
- The default display is room temperature.
- In cooling mode, when ▼ or ▲ button is pressed, the set temperature is displayed and may be adjusted. After 10 seconds the display will revert back to room temperature. Temperature is only adjustable in cool mode. The time is adjustable between 1\~24 hours.
Note: By pressing both ▼/ ▲ set buttons at the same time, the display will toggle between Celsius and Fahrenheit.
WARNING LIGHT
Condensed water may accumulate in the unit. If the internal tank becomes full, the Power Control light will flash and the unit will not operate until the unit has been drained (refer Water Condensation Drainage).
After switching the air conditioner off, you must wait 3 minutes before switching it back on again.
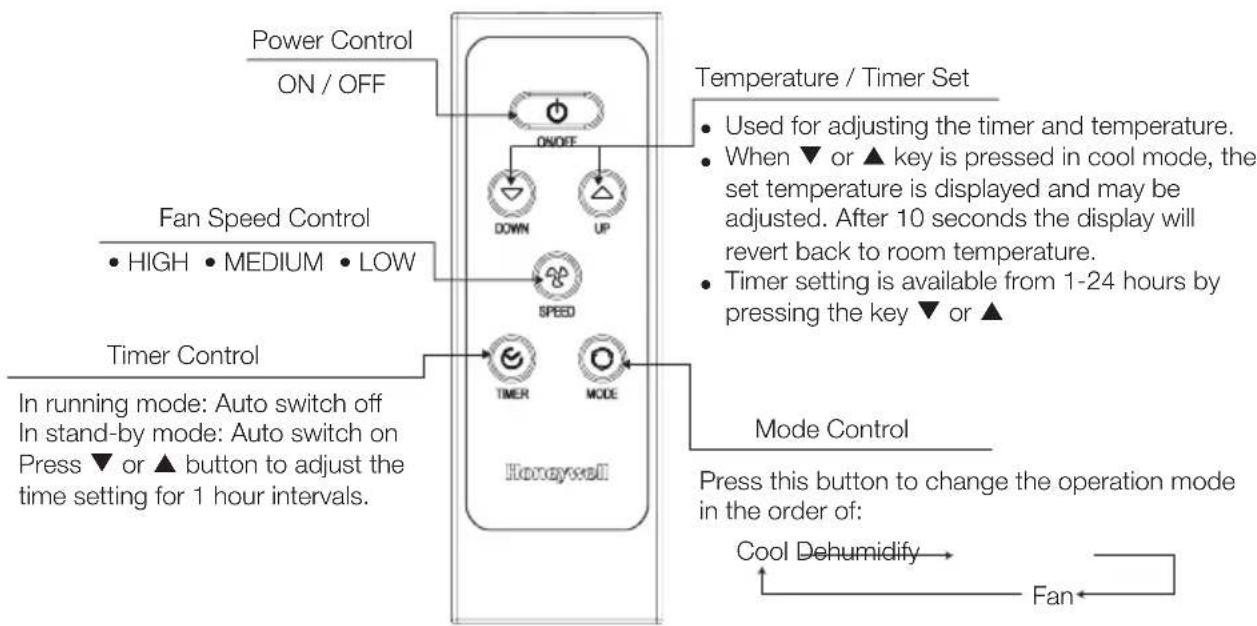
REMOTE CONTROL
The functions work the same as the portable air conditioner's Control Panel. All key functions can be accessed from the remote control.
flowchart
graph TD
    A["Power Control ON/OFF"] --> B["ON/OFF"]
    B --> C["DOWN UP"]
    C --> D["SPEED"]
    D --> E["TIMER MODE"]
    E --> F["Honeywell"]
    G["Fan Speed Control HIGH MEDIUM LOW"] --> B
    H["Timer Control"] --> I["In running mode: Auto switch off In stand-by mode: Auto switch on Press ▼ or ▲ button to adjust the time setting for 1 hour intervals."]
    J["Mode Control"] --> K["Press this button to change the operation mode in the order of: Cool Dehumidify Fan"]
    L["Temperature / Timer Set"] --> M["Used for adjusting the timer and temperature. When ▼ or ▲ key is pressed in cool mode, the set temperature is displayed and may be adjusted. After 10 seconds the display will revert back to room temperature. Timer setting is available from 1-24 hours by pressing the key ▼ or ▲"]
Note:
- Battery Installation: Remove the cover on the back of the remote control and insert two AAA batteries with + and - pointing in the proper direction according to the polarity markings.

Caution:
- Use only two AAA or IEC R03 1.5V batteries.
- Remove the batteries if the remote control is not in use for a month or longer.
- All batteries should be replaced at the same time, do not mix with old batteries.
• Properly dispose of used batteries.
Appliance Maintenance:
- Turn off the appliance before disconnecting the power supply.
- Always clean the appliance with a soft dry cloth.
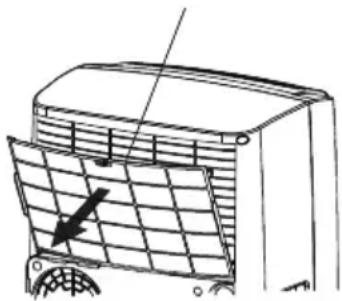
Air Filter Maintenance:
The air filter should be cleaned every two weeks. Clean it as follows:
- Turn off the appliance and remove the air filter.
- Rinse it in lukewarm water. After cleaning, dry in a shaded and cool place, then reinstall.
Air filterAir filter
natural_image
Line drawing of a mechanical component with a grid-patterned panel and an arrow indicating direction (no text or symbols)CLEANING & MAINTENANCE (CONTINUED)
End of Season Storage & Maintenance:
If the appliance will not be used for a long time:
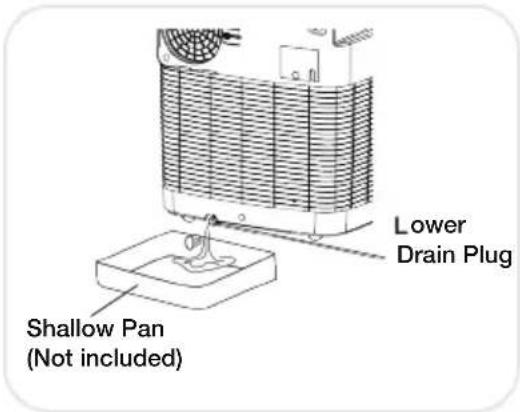
- Be sure to drain the left-over water condensation. Remove the lower drain plug and use a shallow pan to collect the water (make sure to replace the drain plug when finished).
- To dry excess moisture, run the unit in Fan only mode for 30 minutes before storing.
- Turn off and unplug the air conditioner from the power supply.
- Remove the air filter and clean with water. Dry the air filter and then reinstall onto the unit.
-
Disconnecting the Window Installation Kit:
-
Remove the Plastic Hose from the unit by pressing the release button located on the right side of the Hose and then sliding the Hose to the right side.
- Remove the Window Bracket, Window Bracket Panel Adapter and Hose Connector.
- It is recommended to store the Window Kit parts in a bag together with the Remote Control and placing them together with the air conditioner unit.
-
If needed, you can clean the Window Kit with a damp cloth and water before storing. Make sure all parts of the Window Kit are dry before storage.
-
Cover the air conditioner with a cloth/ plastic bag before storage, to protect from dust and scratches collecting on the surface of the unit.
- It is recommended to coil the power cord and store it away from the floor to ensure the cord is protected from bents and creases.
WATER CONDENSATION DRAINAGE
When there is excess water condensation inside the unit, the air conditioner stops running and shows a warning light. This warning light indicates that the water condensation needs to be drained using the following procedures:
Manual Draining for AC & Dehumidifier Mode
Water may need to be drained in high humidity areas.
- Unplug the unit from power source.
- Place a shallow pan under the lower drain plug. See diagram.
- Remove the lower drain plug.
- Water will drain out and collect in the shallow pan.
- After the water is drained, replace the lower drain plug firmly.
- You can now turn on the unit.
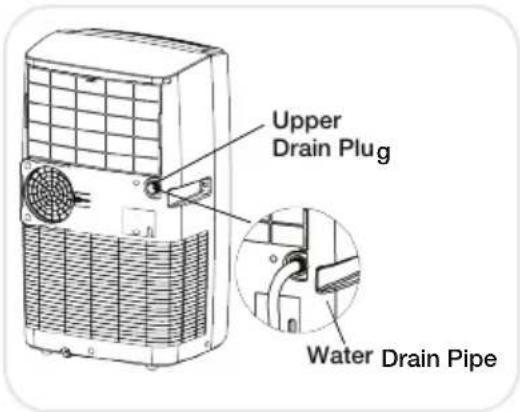
Continuous Draining for Dehumidifier Mode
While using the unit in dehumidifier mode, continuous drainage is recommended.
- Unplug the unit from the power source.
- Remove the upper drain plug. While doing this operation some residual water may spill so please have a pan to collect the water.
- Connect the drain connector to a 34 " hose (not included). See diagram.
- The water can be continuously drained through the hose into a floor drain or sink.
- You can now turn on the unit.
The following troubleshooting guide addresses the most common problems. If problems persist, call customer service. Unplug and disconnect the appliance from the power source before attempting to troubleshoot.
PROBLEM POSSIBLE CAUSE SOLUTION
| The air conditioning unit does not start | No electricity.Batteries in the remote control need to be replaced.The power cord is not properly plugged in.The safety LCDI plug has tripped. (USA / Canada only) | Check for power.Change remote control batteries.Remove and reconnect the power cord.Reset the safety LCDI plug, if problem persists contact our customer support. (USA / Canada only) |
| Runs a short while only | The thermostat temperature setting is too close to room temperature.Air outlet is blocked.There are tight bends in the air exhaust hose. | Lower the set temperature.Make sure the exhaust hose is properly connected.Connect exhaust hose as per instructions on page 4. |
| Runs but no cooling A door or window is open.The air filter is dirty.The exhaust hose is detached.Temperature setting is too high.Air outlet or intake is blocked. | The air filter is dirty.The exhaust hose is detached.Temperature setting is too high.Air outlet or intake is blocked. | Make sure the window or door is closed.Clean the air filter.Reinstall exhaust hose properly (refer to Installation section).Reduce temperature setting on control panel.Remove blockage. |
| Will not run and water full indicator light is ON | Exhaust water (redent at water inside the tank. | Condensation Drainage). |